
C++ 内存管理与自定义容器 SimpleVector实现
·
目录
在 C++ 编程中,内存管理是核心知识点之一。标准库通过allocator提供了灵活的内存分配机制,而容器(如vector)则封装了内存管理细节。本文将通过实现一个简化版的allocator和vector,深入解析 C++ 内存管理的底层原理
一、内存管理基础:从原始内存到对象
C++ 中,内存管理涉及两个关键步骤:
- 内存分配 / 释放:通过
operator new[]/operator delete[]操作原始内存块 - 对象构造 / 析构:通过placement new在已分配内存上构造对象,显式调用析构函数销毁对象
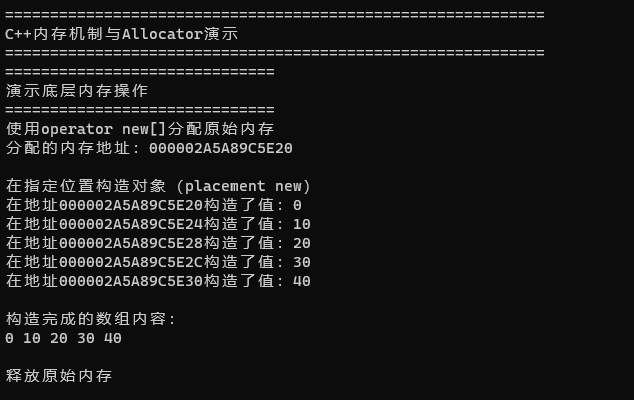
下面通过代码示例展示底层内存操作:
// 演示底层内存操作:分配原始内存->构造对象->销毁对象->释放内存
void demonstrateMemoryOperation() {
    cout << string(30, '=') << endl;
    cout << "演示底层内存操作" << endl;
    cout << string(30, '=') << endl;

    // 1. 分配原始内存(仅分配空间,不构造对象)
    cout << "使用operator new[]分配原始内存" << endl;
    void* raw_memory = operator new[](sizeof(int) * 5);  // 分配5个int的内存
    cout << "分配的内存地址:" << raw_memory << endl;

    // 2. 在指定内存位置构造对象(placement new)
    cout << "\n在指定位置构造对象(placement new)" << endl;
    int* int_array = static_cast<int*>(raw_memory);
    for (int i = 0; i < 5; i++) {
        // 在已分配的内存上构造int对象(不分配新内存)
        new(int_array + i) int(i * 10);  // placement new语法
        cout << "在地址" << (int_array + i) << "构造了值:" << i * 10 << endl;
    }

    // 3. 使用构造好的对象
    cout << "\n构造完成的数组内容:" << endl;
    for (int i = 0; i < 5; i++) {
        cout << int_array[i] << " ";
    }
    cout << endl;

    // 4. 释放内存(对于基础类型可直接释放,复杂类型需先析构)
    cout << "\n释放原始内存" << endl;
    operator delete[](int_array);  // 释放内存块
}
关键知识点:
operator new[]仅分配内存,不调用构造函数- placement new语法:
new(地址) 类型(参数),在指定地址构造对象 - 基础类型可直接释放内存,自定义类型需先显式调用析构函数
二、自定义 Allocator:内存分配器
标准库std::allocator封装了内存管理逻辑,我们可以实现一个简化版来理解其原理:
// 自定义内存分配器:封装内存分配/释放和对象构造/析构
template<typename T>
class SimpleAllocator {
public:
    // 类型定义(遵循标准allocator接口规范)
    typedef T value_type;         // 分配的对象类型
    typedef T* pointer;           // 指向对象的指针
    typedef const T* const_pointer; // 指向常量对象的指针
    typedef T& reference;         // 对象的引用
    typedef const T& const_reference; // 常量对象的引用
    typedef size_t size_type;     // 大小类型
    typedef ptrdiff_t difference_type; // 指针差值类型

    // 1. 分配内存(仅分配,不构造对象)
    pointer allocate(size_type n) {
        cout << "分配" << n << "个" << typeid(T).name() << "类型的内存" << endl;
        // 分配n个T类型大小的内存块
        return static_cast<pointer>(operator new[](n * sizeof(T)));
    }

    // 2. 构造对象(在已分配内存上)
    void construct(pointer p, const_reference val) {
        cout << "在地址" << p << "构造对象" << endl;
        new(p) T(val);  // placement new:拷贝构造对象
    }

    // 3. 释放内存(仅释放,不析构对象)
    void deallocate(pointer p, size_type n) {
        cout << "释放" << n << "个对象的内存" << endl;
        operator delete[](p);  // 释放内存块
    }

    // 4. 析构对象(仅析构,不释放内存)
    void destroy(pointer p) {
        cout << "在地址" << p << "析构对象" << endl;
        p->~T();  // 显式调用析构函数
    }
};
Allocator 设计要点:
- 分离内存分配(
allocate)和对象构造(construct) - 分离对象析构(
destroy)和内存释放(deallocate) - 遵循标准接口规范,便于与容器结合使用
三、自定义 Vector:SimpleVector 实现
基于上面的SimpleAllocator,我们实现一个简化版的vector,重点关注动态扩容机制:
// 自定义动态数组:基于SimpleAllocator实现
template<typename T>
class SimpleVector {
private:
    T* element;       // 指向数组起始位置
    T* first_free;    // 指向最后一个已构造对象的下一个位置
    T* end;           // 指向数组内存末尾(容量边界)
    SimpleAllocator<T> alloc;  // 内存分配器

    // 动态扩容核心函数
    void reAllocate() {
        cout << "\n---------开始扩容---------" << endl;
        size_t old_size = size();  // 当前元素数量
        // 计算新容量:空容器初始化为1,否则翻倍
        size_t new_capacity = old_size == 0 ? 1 : old_size * 2;
        cout << "当前大小: " << old_size << ",新容量: " << new_capacity << endl;

        // 1. 分配新内存
        T* new_element = alloc.allocate(new_capacity);

        // 2. 拷贝构造元素到新内存
        T* dest = new_element;  // 新内存的目标位置
        for (T* src = element; src != first_free; ++src, ++dest) {
            alloc.construct(dest, *src);  // 拷贝构造
        }

        // 3. 析构旧内存中的元素
        for (T* p = first_free; p != element; ) {
            alloc.destroy(--p);  // 从后往前析构
        }

        // 4. 释放旧内存
        if (element != nullptr) {
            alloc.deallocate(element, end - element);
        }

        // 5. 更新指针
        element = new_element;
        first_free = element + old_size;  // 保持元素数量不变
        end = element + new_capacity;     // 容量更新为新值

        cout << "---------扩容完成---------" << endl;
    }

public:
    // 构造函数:初始化空容器
    SimpleVector() : element(nullptr), first_free(nullptr), end(nullptr) {
        cout << "SimpleVector初始化完成(空容器)" << endl;
    }

    // 析构函数:释放所有资源
    ~SimpleVector() {
        // 1. 析构所有元素
        for (T* p = first_free; p != element; ) {
            alloc.destroy(--p);
        }
        // 2. 释放内存
        if (element != nullptr) {
            alloc.deallocate(element, end - element);
        }
    }

    // 向容器尾部添加元素
    void push_back(const T& t) {  // 原代码笔误pubsh_back->push_back
        cout << "\n添加元素: " << t << endl;
        // 若容量不足则扩容
        if (first_free == end) {
            reAllocate();
        }
        // 构造新元素并移动指针
        alloc.construct(first_free, t);
        ++first_free;
        cout << "添加完成。当前大小: " << size()
             << ",容量: " << capacity() << endl;
    }

    // 获取当前元素数量
    size_t size() const {
        return first_free - element;
    }

    // 获取当前容量(可容纳的最大元素数)
    size_t capacity() const {
        return end - element;
    }

    // 重载[]运算符:访问元素
    T& operator[](size_t index) {
        return element[index];
    }
    const T& operator[](size_t index) const {
        return element[index];
    }

    // 打印容器内容
    void print() const {
        cout << "容器内容: [";
        for (const T* p = element; p != first_free; ++p) {
            if (p != element) cout << ",";
            cout << *p;
        }
        cout << "]" << endl;
        cout << "大小: " << size() << "; 容量: " << capacity() << endl;
    }
};
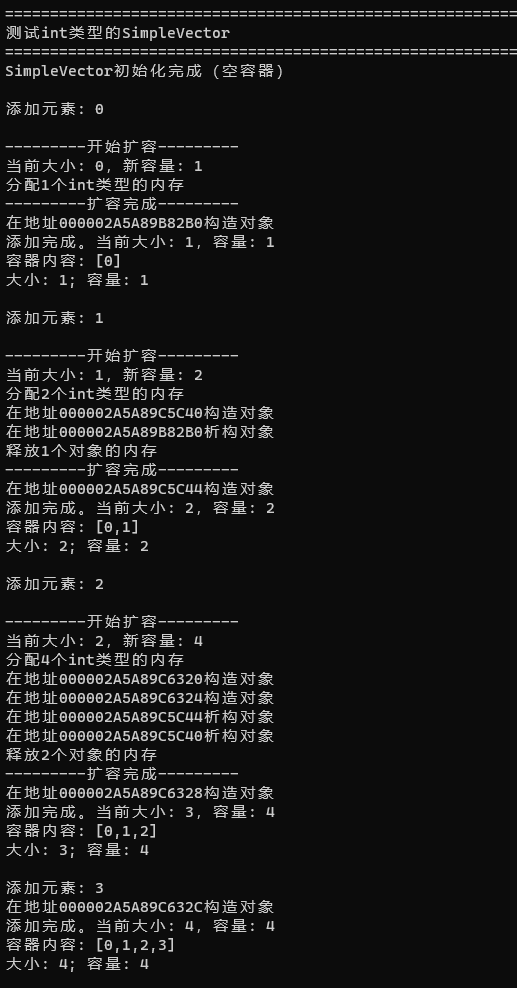
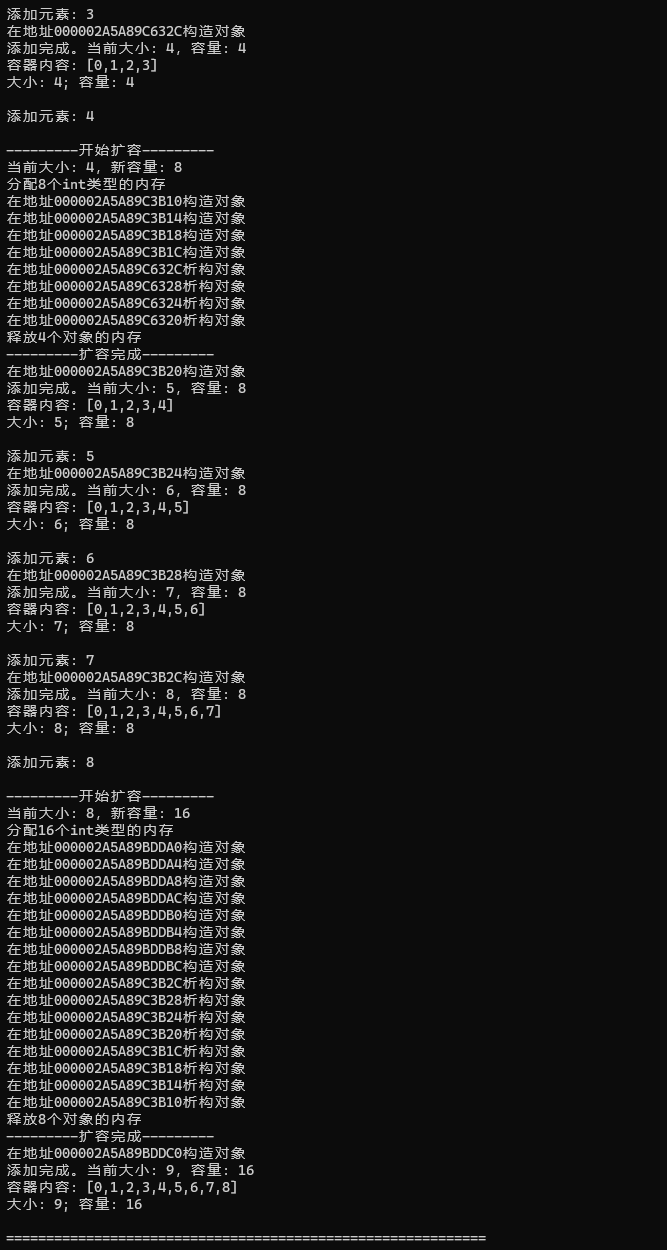
SimpleVector 核心机制:
-
三指针管理:
element(起始)、first_free(已用边界)、end(容量边界) -
动态扩容
容量不足时翻倍(
reAllocate函数),步骤为:- 分配更大内存块
- 拷贝构造元素到新内存
- 析构旧内存元素
- 释放旧内存并更新指针
-
资源管理:析构函数确保所有元素被析构且内存被释放
四、测试与验证
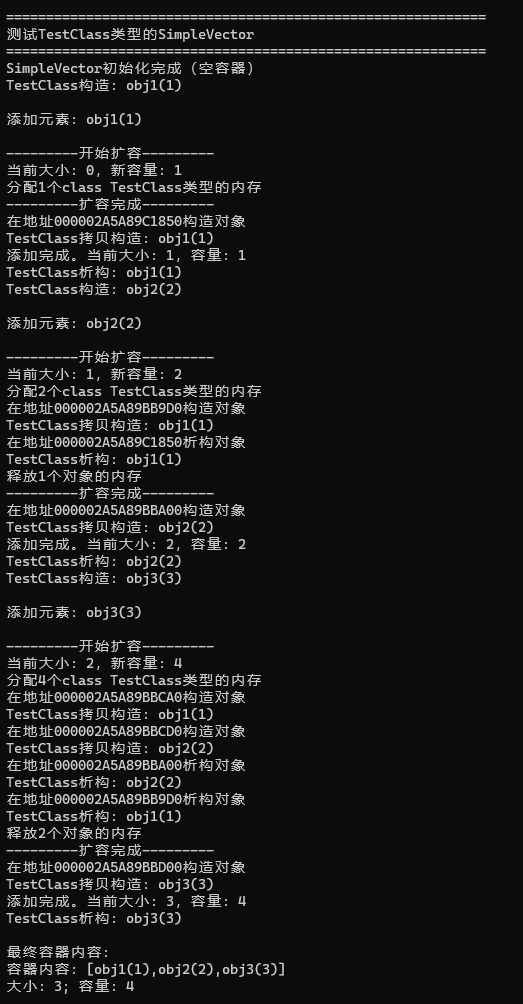
为验证实现的正确性,我们使用基础类型(int)和自定义类型(TestClass)进行测试:
// 测试用自定义类:用于验证对象的构造/析构行为
class TestClass {
private:
    int value;
    string name;

public:
    // 构造函数
    TestClass(int v, const string& n) : value(v), name(n) {
        cout << "TestClass构造: " << name << "(" << value << ")" << endl;
    }

    // 拷贝构造函数
    TestClass(const TestClass& other) : value(other.value), name(other.name) {
        cout << "TestClass拷贝构造: " << name << "(" << value << ")" << endl;
    }

    // 析构函数
    ~TestClass() {
        cout << "TestClass析构: " << name << "(" << value << ")" << endl;
    }

    // 重载输出运算符:便于打印
    friend ostream& operator<<(ostream& os, const TestClass& obj) {
        os << obj.name << "(" << obj.value << ")";
        return os;
    }
};

// 主函数:测试所有功能
int main() {
    cout << string(60, '=') << endl;
    cout << "C++内存机制与Allocator演示" << endl;
    cout << string(60, '=') << endl;

    // 1. 演示底层内存操作
    demonstrateMemoryOperation();

    // 2. 测试int类型的SimpleVector
    cout << "\n" << string(60, '=') << endl;
    cout << "测试int类型的SimpleVector" << endl;
    cout << string(60, '=') << endl;
    SimpleVector<int> int_vec;
    for (int i = 0; i <= 8; i++) {  // 插入9个元素,触发多次扩容
        int_vec.push_back(i);
        int_vec.print();
    }

    // 3. 测试自定义类型的SimpleVector
    cout << "\n" << string(60, '=') << endl;
    cout << "测试TestClass类型的SimpleVector" << endl;
    cout << string(60, '=') << endl;
    SimpleVector<TestClass> class_vec;
    class_vec.push_back(TestClass(1, "obj1"));  // 临时对象->拷贝构造
    class_vec.push_back(TestClass(2, "obj2"));
    class_vec.push_back(TestClass(3, "obj3"));

    cout << "\n最终容器内容:" << endl;
    class_vec.print();

    cout << "\n" << string(60, '=') << endl;
    cout << "程序结束,开始析构..." << endl;
    cout << string(60, '=') << endl;
    return 0;
}
五、总结
通过实现SimpleAllocator和SimpleVector,深入理解了 C++ 内存管理的核心思想:
- 分离内存与对象:内存分配≠对象构造,内存释放≠对象析构
- 容器扩容机制:通过重新分配内存、拷贝元素、释放旧内存实现动态增长
- 资源安全:确保所有构造的对象都被正确析构,避免内存泄漏
标准库的std::allocator和std::vector在此基础上做了更多优化(如移动语义、内存池等),但核心原理一致。掌握这些底层机制,能帮助更好地理解 C++ 容器的行为,写出更高效、更安全的代码。
完整代码
#include<iostream>
using namespace std;
#include<memory>
#include<new>
#include<algorithm>
#include<string>

// 自定义内存分配器:封装内存分配/释放和对象构造/析构
template<typename T>
class SimpleAllocator {
public:
    // 类型定义(遵循标准allocator接口规范)
    typedef T value_type;         // 分配的对象类型
    typedef T* pointer;           // 指向对象的指针
    typedef const T* const_pointer; // 指向常量对象的指针
    typedef T& reference;         // 对象的引用
    typedef const T& const_reference; // 常量对象的引用
    typedef size_t size_type;     // 大小类型
    typedef ptrdiff_t difference_type; // 指针差值类型

    // 1. 分配内存(仅分配,不构造对象)
    pointer allocate(size_type n) {
        cout << "分配" << n << "个" << typeid(T).name() << "类型的内存" << endl;
        // 分配n个T类型大小的内存块
        return static_cast<pointer>(operator new[](n * sizeof(T)));
    }

    // 2. 构造对象(在已分配内存上)
    void construct(pointer p, const_reference val) {
        cout << "在地址" << p << "构造对象" << endl;
        new(p) T(val);  // placement new:拷贝构造对象
    }

    // 3. 释放内存(仅释放,不析构对象)
    void deallocate(pointer p, size_type n) {
        cout << "释放" << n << "个对象的内存" << endl;
        operator delete[](p);  // 释放内存块
    }

    // 4. 析构对象(仅析构,不释放内存)
    void destroy(pointer p) {  // 注意:原代码笔误destory->destroy
        cout << "在地址" << p << "析构对象" << endl;
        p->~T();  // 显式调用析构函数
    }
};

// 自定义动态数组:基于SimpleAllocator实现
template<typename T>
class SimpleVector {
private:
    T* element;       // 指向数组起始位置
    T* first_free;    // 指向最后一个已构造对象的下一个位置
    T* end;           // 指向数组内存末尾(容量边界)
    SimpleAllocator<T> alloc;  // 内存分配器

    // 动态扩容核心函数
    void reAllocate() {
        cout << "\n---------开始扩容---------" << endl;
        size_t old_size = size();  // 当前元素数量
        // 计算新容量:空容器初始化为1,否则翻倍
        size_t new_capacity = old_size == 0 ? 1 : old_size * 2;
        cout << "当前大小: " << old_size << ",新容量: " << new_capacity << endl;

        // 1. 分配新内存
        T* new_element = alloc.allocate(new_capacity);

        // 2. 拷贝构造元素到新内存
        T* dest = new_element;  // 新内存的目标位置
        for (T* src = element; src != first_free; ++src, ++dest) {
            alloc.construct(dest, *src);  // 拷贝构造
        }

        // 3. 析构旧内存中的元素
        for (T* p = first_free; p != element; ) {
            alloc.destroy(--p);  // 从后往前析构
        }

        // 4. 释放旧内存
        if (element != nullptr) {
            alloc.deallocate(element, end - element);
        }

        // 5. 更新指针
        element = new_element;
        first_free = element + old_size;  // 保持元素数量不变
        end = element + new_capacity;     // 容量更新为新值

        cout << "---------扩容完成---------" << endl;
    }

public:
    // 构造函数:初始化空容器
    SimpleVector() : element(nullptr), first_free(nullptr), end(nullptr) {
        cout << "SimpleVector初始化完成(空容器)" << endl;
    }

    // 析构函数:释放所有资源
    ~SimpleVector() {
        // 1. 析构所有元素
        for (T* p = first_free; p != element; ) {
            alloc.destroy(--p);
        }
        // 2. 释放内存
        if (element != nullptr) {
            alloc.deallocate(element, end - element);
        }
    }

    // 向容器尾部添加元素
    void push_back(const T& t) {  // 原代码笔误pubsh_back->push_back
        cout << "\n添加元素: " << t << endl;
        // 若容量不足则扩容
        if (first_free == end) {
            reAllocate();
        }
        // 构造新元素并移动指针
        alloc.construct(first_free, t);
        ++first_free;
        cout << "添加完成。当前大小: " << size()
            << ",容量: " << capacity() << endl;
    }

    // 获取当前元素数量
    size_t size() const {
        return first_free - element;
    }

    // 获取当前容量(可容纳的最大元素数)
    size_t capacity() const {
        return end - element;
    }

    // 重载[]运算符:访问元素
    T& operator[](size_t index) {
        return element[index];
    }
    const T& operator[](size_t index) const {
        return element[index];
    }

    // 打印容器内容
    void print() const {
        cout << "容器内容: [";
        for (const T* p = element; p != first_free; ++p) {
            if (p != element) cout << ",";
            cout << *p;
        }
        cout << "]" << endl;
        cout << "大小: " << size() << "; 容量: " << capacity() << endl;
    }
};

// 演示底层内存操作:分配原始内存->构造对象->销毁对象->释放内存
void demonstrateMemoryOperation() {
    cout << string(30, '=') << endl;
    cout << "演示底层内存操作" << endl;
    cout << string(30, '=') << endl;

    // 1. 分配原始内存(仅分配空间,不构造对象)
    cout << "使用operator new[]分配原始内存" << endl;
    void* raw_memory = operator new[](sizeof(int) * 5);  // 分配5个int的内存
    cout << "分配的内存地址:" << raw_memory << endl;

    // 2. 在指定内存位置构造对象(placement new)
    cout << "\n在指定位置构造对象(placement new)" << endl;
    int* int_array = static_cast<int*>(raw_memory);
    for (int i = 0; i < 5; i++) {
        // 在已分配的内存上构造int对象(不分配新内存)
        new(int_array + i) int(i * 10);  // placement new语法
        cout << "在地址" << (int_array + i) << "构造了值:" << i * 10 << endl;
    }

    // 3. 使用构造好的对象
    cout << "\n构造完成的数组内容:" << endl;
    for (int i = 0; i < 5; i++) {
        cout << int_array[i] << " ";
    }
    cout << endl;

    // 4. 释放内存(对于基础类型可直接释放,复杂类型需先析构)
    cout << "\n释放原始内存" << endl;
    operator delete[](int_array);  // 释放内存块
}

// 测试用自定义类:用于验证对象的构造/析构行为
class TestClass {
private:
    int value;
    string name;

public:
    // 构造函数
    TestClass(int v, const string& n) : value(v), name(n) {
        cout << "TestClass构造: " << name << "(" << value << ")" << endl;
    }

    // 拷贝构造函数
    TestClass(const TestClass& other) : value(other.value), name(other.name) {
        cout << "TestClass拷贝构造: " << name << "(" << value << ")" << endl;
    }

    // 析构函数
    ~TestClass() {
        cout << "TestClass析构: " << name << "(" << value << ")" << endl;
    }

    // 重载输出运算符:便于打印
    friend ostream& operator<<(ostream& os, const TestClass& obj) {
        os << obj.name << "(" << obj.value << ")";
        return os;
    }
};

// 主函数:测试所有功能
int main() {
    cout << string(60, '=') << endl;
    cout << "C++内存机制与Allocator演示" << endl;
    cout << string(60, '=') << endl;

    // 1. 演示底层内存操作
    demonstrateMemoryOperation();

    // 2. 测试int类型的SimpleVector
    cout << "\n" << string(60, '=') << endl;
    cout << "测试int类型的SimpleVector" << endl;
    cout << string(60, '=') << endl;
    SimpleVector<int> int_vec;
    for (int i = 0; i <= 8; i++) {  // 插入9个元素,触发多次扩容
        int_vec.push_back(i);
        int_vec.print();
    }

    // 3. 测试自定义类型的SimpleVector
    cout << "\n" << string(60, '=') << endl;
    cout << "测试TestClass类型的SimpleVector" << endl;
    cout << string(60, '=') << endl;
    SimpleVector<TestClass> class_vec;
    class_vec.push_back(TestClass(1, "obj1"));  // 临时对象->拷贝构造
    class_vec.push_back(TestClass(2, "obj2"));
    class_vec.push_back(TestClass(3, "obj3"));

    cout << "\n最终容器内容:" << endl;
    class_vec.print();

    cout << "\n" << string(60, '=') << endl;
    cout << "程序结束,开始析构..." << endl;
    cout << string(60, '=') << endl;
    return 0;
}
实验结果
1. 演示底层内存操作
2. 测试int类型的SimpleVector
3. 测试自定义类型的SimpleVector
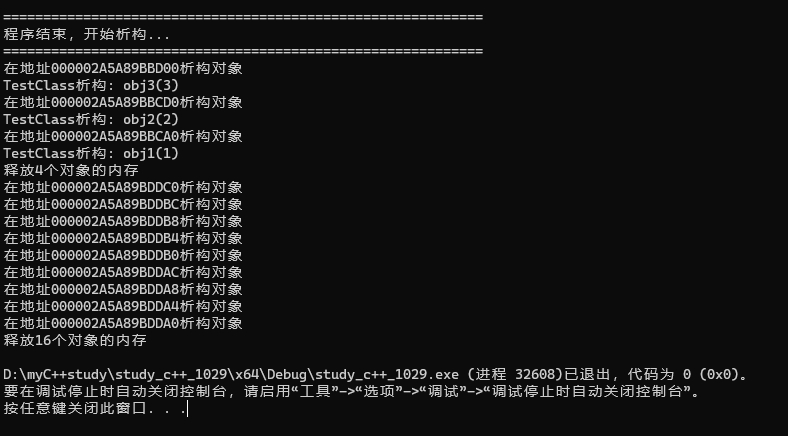
4. 析构
更多推荐
 26
26 0
0- 0


 已为社区贡献1条内容

所有评论(0)