
微信小程序+大模型实现图片描述修改、P图、PS
·

欢迎到【图片-你说我来改自动化小助手】微信搜索小程序体验。
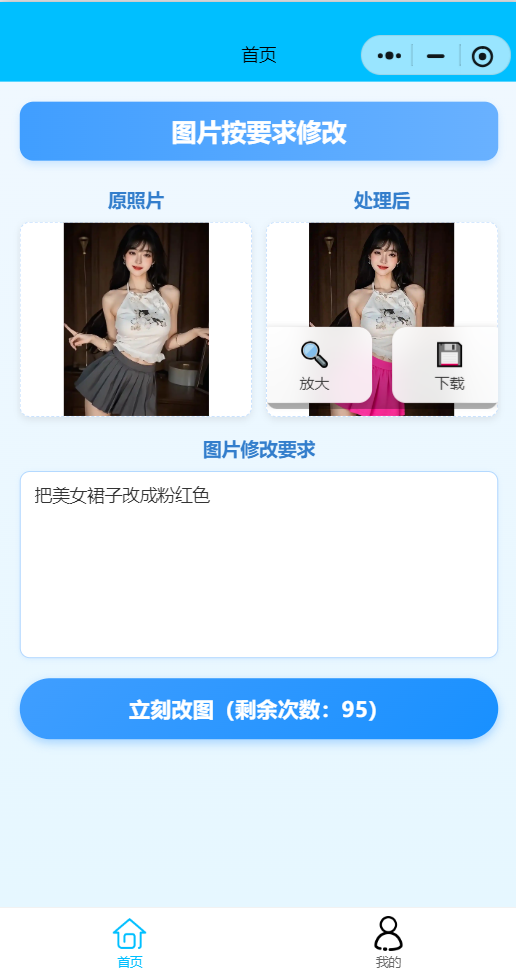
基于UniApp的AI图片处理应用开发实践
本文将详细介绍如何使用UniApp框架开发一个功能完整的AI图片处理应用,涵盖图片上传、AI处理、预览下载等核心功能。
前言
在移动应用开发中,图片处理功能已成为许多应用的标配。随着AI技术的发展,智能图片处理需求日益增长。本文将分享如何使用UniApp开发一个支持AI图片修改的应用,包括技术实现细节和代码解析。
项目概述
功能特性
-
图片上传与预览
-
AI智能图片处理
-
图片对比展示
-
处理结果下载保存
-
用户权限与次数管理
技术栈
-
前端:UniApp + Vue.js
-
样式:CSS3 + 渐变效果
-
网络请求:uni.uploadFile + 封装HTTP请求
-
图片处理:后端AI服务
核心代码解析
1. 页面结构与数据定义
<template>
	<view class="container">
		<!-- 标题区域 -->
		<view class="header">
			<text class="title">图片按要求修改</text>
		</view>

		<!-- 图片对比展示区域 -->
		<view class="image-comparison">
			<!-- 原图区域 -->
			<view class="image-section">
				<text class="section-title">原照片</text>
				<view class="image-wrapper" @tap="chooseImage">
					<image v-if="originalImage" :src="originalImage" mode="aspectFit" class="preview-image"></image>
					<view v-else class="placeholder">
						<text class="placeholder-text">请上传图片</text>
					</view>
				</view>
			</view>

			<!-- 处理后图片区域 -->
			<view class="image-section">
				<text class="section-title">处理后</text>
				<view class="image-wrapper">
					<image v-if="processedImage" :src="processedImage" mode="aspectFit" class="preview-image"
						@tap="previewProcessedImage"></image>
					<view v-else class="placeholder">
						<text class="placeholder-text">处理后效果</text>
					</view>

					<!-- 操作按钮 -->
					<view v-if="processedImage" class="image-actions">
						<view class="action-btn" @tap="previewProcessedImage">
							<text class="action-icon">🔍</text>
							<text class="action-text">放大</text>
						</view>
						<view class="action-btn" @tap="downloadProcessedImage">
							<text class="action-icon">💾</text>
							<text class="action-text">下载</text>
						</view>
					</view>
				</view>
			</view>
		</view>

		<!-- 其他UI组件 -->
	</view>
</template>

<script>
	export default {
		data() {
			return {
				user: uni.getStorageSync("user") || null,
				originalImage: '',
				processedImage: '',
				imageDescription: '',
				uploadedImageUrl: '', // 上传后的URL地址
				baseUrl: 'https://wdfgdzx.top', // 服务器地址
			}
		}
	}
</script>
2. 图片选择与上传
图片选择使用UniApp的uni.chooseImageAPI,上传使用uni.uploadFile:
chooseImage() {
	const that = this;
	uni.chooseImage({
		count: 1,
		sizeType: ['compressed'], // 压缩图片
		sourceType: ['album'], // 从相册选择
		success: function(res) {
			that.originalImage = res.tempFilePaths[0];
			that.processedImage = '';
			// 上传图片到服务器
			that.uploadImage(res.tempFilePaths[0]);
		},
		fail: function(err) {
			console.log("图片选择错误信息:" + JSON.stringify(err))
			uni.showToast({
				title: '选择图片失败',
				icon: 'none'
			});
		}
	});
},

uploadImage(filePath) {
	uni.showLoading({
		title: '上传中...'
	});

	const baseUrl = this.baseUrl;
	const uploadUrl = `${baseUrl}/document/upload`;

	uni.uploadFile({
		url: uploadUrl,
		filePath: filePath,
		name: 'multipartFile', // 后端接收参数名
		formData: this.user,
		header: {
			'Authorization': 'Bearer ' + this.user.token,
		},
		success: (res) => {
			uni.hideLoading();
			if (res.statusCode === 200) {
				uni.showToast({
					icon: "success",
					title: "上传成功"
				});
				this.uploadedImageUrl = res.data;
			} else {
				// 错误处理
			}
		},
		fail: (err) => {
			// 失败处理
		}
	});
}
3. AI图片处理
调用后端AI服务进行图片处理:
generateImage() {
	// 前置验证
	if (!this.originalImage) {
		uni.showToast({ title: '请先上传图片', icon: 'none' });
		return;
	}
	if (!this.user.token) {
		uni.showToast({ title: '请先登录', icon: 'none' });
		return;
	}
	if (this.user.balance <= 0) {
		uni.showToast({ title: '余额不足!到我的-联系客服充值', icon: 'none' });
		return;
	}

	uni.showLoading({ title: 'AI修改中...' });

	// 准备请求数据
	this.user.originImageUrl = this.uploadedImageUrl;
	this.user.prompt = this.imageDescription;

	// 调用AI处理接口
	this.$http.post("/user/modify_photo", this.user).then(res => {
		if (res.code == 200) {
			uni.showToast({ title: '生成成功', icon: 'success' });
			this.processedImage = res.object.dealImageUrl;

			// 更新用户余额
			this.updateUserBalance();
		} else {
			uni.showToast({ title: res.message, icon: 'error' });
		}
	}).catch(err => {
		uni.showToast({ title: '网络错误,请重试', icon: 'none' });
		console.error('上传失败:', err);
	});
}
4. 图片预览与下载
// 图片预览
previewProcessedImage() {
	if (!this.processedImage) {
		uni.showToast({ title: '暂无处理后的图片', icon: 'none' });
		return;
	}

	uni.previewImage({
		urls: [this.processedImage],
		current: 0,
		indicator: 'default',
		loop: false,
		success: () => {
			console.log('图片预览成功');
		},
		fail: (err) => {
			console.error('图片预览失败:', err);
		}
	});
},

// 图片下载
async downloadProcessedImage() {
	if (!this.processedImage) return;

	this.isDownloading = true;

	try {
		uni.showLoading({ title: '下载中...', mask: true });

		// 下载到临时路径
		const result = await uni.downloadFile({
			url: this.processedImage,
			timeout: 15000
		});

		if (result.statusCode === 200) {
			// 保存到相册
			await uni.saveImageToPhotosAlbum({
				filePath: result.tempFilePath
			});

			uni.showToast({ title: '下载成功', icon: 'success' });
		} else {
			throw new Error('下载失败');
		}
	} catch (error) {
		// 错误处理,包括权限处理
		if (error.errMsg && error.errMsg.includes('auth deny')) {
			uni.showModal({
				title: '权限提示',
				content: '需要相册权限才能保存图片,是否前往设置开启权限?',
				confirmText: '前往设置',
				success: (res) => {
					if (res.confirm) uni.openSetting();
				}
			});
		} else {
			uni.showToast({ title: '下载失败,请重试', icon: 'none' });
		}
	} finally {
		this.isDownloading = false;
		uni.hideLoading();
	}
}
5. 样式设计亮点
/* 渐变背景与现代化设计 */
.container {
	padding: 30rpx;
	background: linear-gradient(180deg, #f0f8ff 0%, #e6f7ff 100%);
	height: 100vh;
	overflow: hidden;
	box-sizing: border-box;
}

/* 毛玻璃效果操作按钮 */
.action-btn {
	display: flex;
	flex-direction: column;
	align-items: center;
	padding: 15rpx 25rpx;
	background: rgba(255, 255, 255, 0.9);
	border-radius: 20rpx;
	backdrop-filter: blur(10px); /* 毛玻璃效果 */
	box-shadow: 0 4rpx 12rpx rgba(0, 0, 0, 0.15);
	transition: all 0.3s ease;
}

/* 动态按钮效果 */
.generate-btn::after {
	content: '';
	position: absolute;
	top: 0;
	left: -100%;
	width: 100%;
	height: 100%;
	background: linear-gradient(90deg, transparent, rgba(255, 255, 255, 0.3), transparent);
	transition: left 0.5s;
}

.generate-btn:active::after {
	left: 100%;
}
开发注意事项
1. 图片上传优化
-
使用压缩模式减少上传体积
-
添加加载状态提升用户体验
-
完善的错误处理机制
2. 用户体验考虑
-
操作反馈及时(Toast提示)
-
防止重复点击(loading状态)
-
网络异常处理
3. 权限管理
-
登录状态检查
-
使用次数控制
-
相册权限申请
4. 性能优化
-
图片按需加载
-
请求合理超时设置
-
内存泄漏预防
总结
通过本文的介绍,我们完成了一个功能完整的UniApp图片处理应用。关键点包括:
-
模块化设计:清晰的组件结构和数据流
-
用户体验:流畅的操作反馈和视觉设计
-
错误处理:完善的异常情况处理机制
-
性能优化:合理的资源管理和请求控制
这种架构可以扩展到其他类型的图片处理应用,为开发者提供了很好的参考模板。在实际项目中,还可以根据需求添加更多功能,如批量处理、历史记录、多种AI滤镜等。
更多推荐

 26
26 0
0- 0


 已为社区贡献10条内容

所有评论(0)