
AI大模型应用开发-工具调用(Function Calling)
为了助于大家学习理解,本文会通过旅游规划应用案例演示工具调用的实际应用开发:
工具调用(入门)
什么是工具调用呢?工具调用是Tool Calling也叫Function Calling,让AI大模型借用外部工具来完成它自己做不到的事情
工具调用的工作原理:整个过程是由我们应用程序来控制的,AI拿到用户的问题,发现回答不了,这时候它需要使用工具来回答用户的问题,后端程序判断出AI需要哪个工具,然后我们让AI使用这个工具。其实就是说AI只是决定什么时候用工具,需要传递什么参数,真正执行工具的是我们的程序。
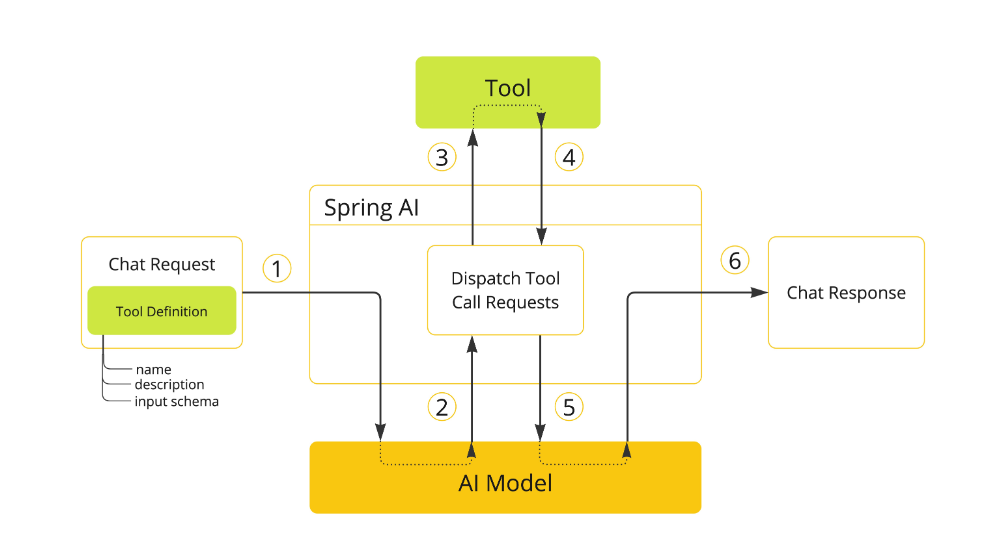
那为什么不直接把工具丢给AI,而要通过后端来执行判断把工具给AI?关键是安全性,如果就把工具丢给AI让AI自己决定,那肯定是不行的,要是AI想用就用,想干嘛就干嘛,那还得了,而且这样也给AI服务器本身增加压力。所以呢所有操作必须由我们程序控制执行,不让AI接触到你的API和系统资源。
工具调用的流程:
1、工具定义:我们程序告诉AI你可以使用哪些工具,并描述工具的功能和所需参数
2、工具选择:AI根据用户问题判断要使用哪个工具,并准备好相应参数
3、返回意图:AI给程序返回“我想要使用这个工具...,参数是...”
4、工具执行:程序接收到请求,执行相应的工具操作
5、结果返回:程序将工具执行的结果返回给AI
6、继续对话:AI根据根据返回的结果,生成最终回答给用户
要实现这些我们当然可以自主开发,不过还是更推荐使用Spring AI、LangChain等开发框架
Spring AI工具开发:
1、定义工具:在Spring AI中主要有两种模式:1、(推荐)基于Methods方法 2、Functions函数式编程。第二种了解即可咱只要用第一种基于Methods方法来定义工具就可以,因为它更容易编写、理解、支持的参数和返回类型更多。
Methods模式:通过@Tool注解定义工具,通过tools方法绑定工具,使用@ToolParam注解提供额外的描述信息
Functions模式:通过@Bean注解定义工具,通过functions方法绑定工具
2、使用工具:Spring AI提供了多种灵活的方式将工具提供给ChatClient,让AI能在需要时调用工具。1、按需使用 2、全局使用 3、更底层使用方式 4、动态解析
主流工具开发:如果在github社区没有找到能满足我们需求的工具,就要自己开发一个工具,那就让我们来开始开发吧!
文件操作工具
---首先在dogaiagent根目录下新建一个tools包,在tmp目录下新建一个file目录。那为什么要在tmp下建一个file呢?这是因为文件操作提供了两大功能-->往我们电脑保存文件和读取文件,那就会涉及到一定风险,如果AI脑抽了不断往我们电脑保存垃圾文件,那就完蛋了,所以我们要规定跟AI操作文件有关的限制在tmp临时目录下的file中。
那我们继续,在dogaiagent下再新建一个constant包,再在包下新建一个FileConstant接口,来放文件操作要用的一些常量,代码如下:
public interface FileConstant {
    /**
    * 文件保存目录
    */
    String FILE_SAVE_DIR = System.getProperty("user.dir") + "/tmp";
}
在tools包下新建一个FileOperationTool类,来写文件操作工具(读写功能),代码如下:
/**
* 文件操作工具类,提供文件读写功能
*/
public class FileOperationTool {
    private final String FILE_DIR = FileConstant.FILE_SAVE_DIR + "/file";
    @Tool(description = "Read content from a file")
    public String readFile(@ToolParam(description = "Name of the file to read") String fileName) {
        String filePath = FILE_DIR + "/" + fileName;
        try {
            return FileUtil.readUtf8String(filePath);
        } catch (Exception e) {
            return "Error reading file: " + e.getMessage();
        }
    }
    @Tool(description = "Write content to a file")
    public String writeFile(
        @ToolParam(description = "Name of the file to write") String fileName,
        @ToolParam(description = "Content to write to the file") String content) {
        String filePath = FILE_DIR + "/" + fileName;
        try {
            // 创建目录
            FileUtil.mkdir(FILE_DIR);
            FileUtil.writeUtf8String(content, filePath);
            return "File written successfully to: " + filePath;
        } catch (Exception e) {
            return "Error writing to file: " + e.getMessage();
        }
    }
}
然后编写对应单元测试,代码如下:
@SpringBootTest
class FileOperationToolTest {
    @Test
    void readFile() {
        FileOperationTool fileOperationTool = new FileOperationTool();
        String fileName = "旅游规划.txt";
        String result = fileOperationTool.readFile(fileName);
        Assertions.assertNotNull(result);
    }
    @Test
    void writeFile() {
        FileOperationTool fileOperationTool = new FileOperationTool();
        String fileName = "旅游规划.txt";
        String content = "TheChosenOne---欢迎来到GitHub";
        String result = fileOperationTool.writeFile(fileName, content);
        Assertions.assertNotNull(result);
    }
}
注意:测试时要先写再读,也就是先运行writeFile()再运行readFile()。
联网搜索工具
---使用专业的网页搜索API,如Search API,实现从多个网站搜索内容,不过要计费,但是呢新用户免费送100次请求,那让我们来开发一个联网搜索工具吧。
在tools包下新建一个WebSearchTool类,然后呢很简单,找到Search API的baidu将这里面文档复制给AI让AI给我们生成Java代码,然后将代码复制粘贴到WebSearchTool类中,代码如下:
/**
* Web 搜索工具类,提供百度搜索功能
*/
public class WebSearchTool {
    // SearchAPI 的搜索接口地址
    private static final String SEARCH_API_URL = "https://www.searchapi.io/api/v1/search";
    private final String apiKey;
    public WebSearchTool(String apiKey) {
        this.apiKey = apiKey;
    }
    @Tool(description = "Search for information from Baidu Search Engine")
    public String searchWeb(
        @ToolParam(description = "Search query keyword") String query) {
        Map<String, Object> paramMap = new HashMap<>();
        paramMap.put("q", query);
        paramMap.put("api_key", apiKey);
        paramMap.put("engine", "baidu");
        try {
            String response = HttpUtil.get(SEARCH_API_URL, paramMap);
            // 取出返回结果的前 5 条
            JSONObject jsonObject = JSONUtil.parseObj(response);
            // 提取 organic_results 部分
            JSONArray organicResults = jsonObject.getJSONArray("organic_results");
            List<Object> objects = organicResults.subList(0, 5);
            // 拼接搜索结果为字符串
            String result = objects.stream().map(obj -> {
                JSONObject tmpJSONObject = (JSONObject) obj;
                return tmpJSONObject.toString();
            }).collect(Collectors.joining(","));
            return result;
        } catch (Exception e) {
            return "Error searching Baidu: " + e.getMessage();
        }
    }
}
然后在application.yml和application-local.yml中配置API Key:
# searchApi
search-api:
api-key: 你的 API Key
然后编写对应的单元测试,代码如下:
@SpringBootTest
class WebSearchToolTest {
    @Value("${search-api.api-key}")
    private String searchApiKey;
    @Test
    void searchWeb() {
        WebSearchTool webSearchTool = new WebSearchTool(searchApiKey);
        String query = "如何学习Java+AI";
        String result = webSearchTool.searchWeb(query);
        Assertions.assertNotNull(result);
    }
}
注意:如果测试出来的result为error,不用担心,因为AI是有可能失败的,多Debug测试几次会成功的。
网页抓取工具
---网页抓取工具的作用是根据网址解析到网页的内容,使用jsoup库来实现网页内容抓取和解析,让我们来开发吧!
首先引入jsoup的依赖:
<dependency>
  <groupId>org.jsoup</groupId>
  <artifactId>jsoup</artifactId>
  <version>1.21.2</version>
</dependency>
在tools包下新建一个WebScrapingTool类,实现网页抓取工具代码如下:
/**
* Web 抓取工具类,提供网页抓取功能
*/
public class WebScrapingTool {
    @Tool(description = "Scrape the content of a web page")
    public String scrapeWebPage(@ToolParam(description = "URL of the web page to scrape")
                                String url) {
        try {
            Document doc = Jsoup.connect(url).get();
            return doc.html();
        } catch (IOException e) {
            return "Error scraping web page: " + e.getMessage();
        }
    }
}
然后生成对应单元测试,代码如下:
class WebScrapingToolTest {
    @Test
    void scrapeWebPage() {
        WebScrapingTool webScrapingTool = new WebScrapingTool();
        String url = "https://www.baidu.com/";
        String result = webScrapingTool.scrapeWebPage(url);
        Assertions.assertNotNull(result);
    }
}
注意:Debug测试的result可能抓取不了网页,这是因为网页是异步的,没有加载时间所以看不到抓取的信息,可以使用Sublime Text粘贴进去看。
终端操作工具
---指在终端执行命令,比如执行python命令来运行脚本
在tools包下新建一个TerminalOperationTool类,AI生成就好了,不用自己写,实现终端操作工具代码如下(注意:这个的代码Windows和其他系统不一样),其他系统代码如下:
public class TerminalOperationTool {
    @Tool(description = "Execute a command in the terminal")
    public String executeTerminalCommand(@ToolParam(description = "Command to execute in the terminal") String command) {
        StringBuilder output = new StringBuilder();
        try {
            Process process = Runtime.getRuntime().exec(command);
            try (BufferedReader reader = new BufferedReader(new InputStreamReader(process.getInputStream()))) {
                String line;
                while ((line = reader.readLine()) != null) {
                    output.append(line).append("\n");
                }
            }
            int exitCode = process.waitFor();
            if (exitCode != 0) {
                output.append("Command execution failed with exit code: ").append(exitCode);
            }
        } catch (IOException | InterruptedException e) {
            output.append("Error executing command: ").append(e.getMessage());
        }
        return output.toString();
    }
}
Windows的代码如下:
public class TerminalOperationTool {
    @Tool(description = "Execute a command in the terminal")
    public String executeTerminalCommand(@ToolParam(description = "Command to execute in the terminal") String command) {
        StringBuilder output = new StringBuilder();
        try {
            ProcessBuilder builder = new ProcessBuilder("cmd.exe", "/c", command);
            //            Process process = Runtime.getRuntime().exec(command);
            Process process = builder.start();
            try (BufferedReader reader = new BufferedReader(new InputStreamReader(process.getInputStream()))) {
                String line;
                while ((line = reader.readLine()) != null) {
                    output.append(line).append("\n");
                }
            }
            int exitCode = process.waitFor();
            if (exitCode != 0) {
                output.append("Command execution failed with exit code: ").append(exitCode);            }
        } catch (IOException | InterruptedException e) {
            output.append("Error executing command: ").append(e.getMessage());
        }
        return output.toString();
    }
}
然后生成对应单元测试,代码如下:
@SpringBootTest
class TerminalOperationToolTest {
    @Test
    void executeTerminalCommand() {
        TerminalOperationTool tool = new TerminalOperationTool();
        String command = "dir";
        String result = tool.executeTerminalCommand(command);
        Assertions.assertNotNull(result);
    }
}
资源下载工具
---使用Hutool的HttpUtil.downloadFile方法实现资源下载
在tools包下新建一个ResourceDownloadTool类,实现代码如下:
public class ResourceDownloadTool {
    @Tool(description = "Download a resource from a given URL")
    public String downloadResource(@ToolParam(description = "URL of the resource to download") String url, @ToolParam(description = "Name of the file to save the downloaded resource") String fileName) {
        String fileDir = FileConstant.FILE_SAVE_DIR + "/download";
        String filePath = fileDir + "/" + fileName;
        try {
            // 创建目录
            FileUtil.mkdir(fileDir);
            // 使用 Hutool 的 downloadFile 方法下载资源
            HttpUtil.downloadFile(url, new File(filePath));
            return "Resource downloaded successfully to: " + filePath;
        } catch (Exception e) {
            return "Error downloading resource: " + e.getMessage();
        }
    }
}
然后生成对应单元测试,测试成功会在download目录下生成logo.png,测试代码如下:
@SpringBootTest
class ResourceDownloadToolTest {
    @Test
    void downloadResource() {
        ResourceDownloadTool tool = new ResourceDownloadTool();
        String url = "https://www.baidu.com/img/bd_logo1.png";
        String fileName = "logo.png";
        String result = tool.downloadResource(url, fileName);
        assertNotNull(result);
    }
}
PDF生成工具
---作用是根据文件名和内容生成PDF文档并且保存,使用itext库实现PDF生成工具,不过itext对中文字体不太友好,需要我们额外配置中文字体,要做好建议自行下载需要的字体使用,我们这边直接就使用itext内置的中文字体
首先引入依赖:
<dependency>
  <groupId>com.itextpdf</groupId>
  <artifactId>itext-core</artifactId>
  <version>9.1.0</version>
  <type>pom</type>
</dependency>
<dependency>
  <groupId>com.itextpdf</groupId>
  <artifactId>font-asian</artifactId>
  <version>9.1.0</version>
  <scope>test</scope>
</dependency>
在tools包下新建一个PDFGenerationTool类,实现以下代码:
public class PDFGenerationTool {
    @Tool(description = "Generate a PDF file with given content")
    public String generatePDF(
        @ToolParam(description = "Name of the file to save the generated PDF") String fileName,            @ToolParam(description = "Content to be included in the PDF") String content) {
        String fileDir = FileConstant.FILE_SAVE_DIR + "/pdf";
        String filePath = fileDir + "/" + fileName;
        try {
            // 创建目录
            FileUtil.mkdir(fileDir);
            // 创建 PdfWriter 和 PdfDocument 对象
            try (PdfWriter writer = new PdfWriter(filePath);
                 PdfDocument pdf = new PdfDocument(writer);
                 Document document = new Document(pdf)) {
                // 自定义字体(需要人工下载字体文件到特定目录)
                //                String fontPath = Paths.get("src/main/resources/static/fonts/simsun.ttf")
                //                        .toAbsolutePath().toString();
                //                PdfFont font = PdfFontFactory.createFont(fontPath,
                //                        PdfFontFactory.EmbeddingStrategy.PREFER_EMBEDDED);                // 使用内置中文字体
                PdfFont font = PdfFontFactory.createFont("STSongStd-Light", "UniGB-UCS2-H");                document.setFont(font);
                // 创建段落
                Paragraph paragraph = new Paragraph(content);
                // 添加段落并关闭文档
                document.add(paragraph);
            }
            return "PDF generated successfully to: " + filePath;
        } catch (IOException e) {
            return "Error generating PDF: " + e.getMessage();
        }
    }
}
然后生成对应单元测试进行测试一下,代码如下:
@SpringBootTest
class PDFGenerationToolTest {
    @Test
    void generatePDF() {
        PDFGenerationTool tool = new PDFGenerationTool();
        String fileName = "百度.pdf";
        String content = "百度网址 https://www.baidu.com/";
        String result = tool.generatePDF(fileName, content);
        assertNotNull(result);
    }
}
开发了这么多工具,为了方便我们统一管理和绑定所有工具,可以给AI一次性提供所有工具,让AI决定什么时候使用,我们需要创建一个集中工具注册类。
在tools包下新建一个ToolRegistration类,编写以下代码:
/**
* 集中的工具注册
*/
@Configuration
public class ToolRegistration {
    @Value("${search-api.api-key}")
    private String searchApiKey;
    @Bean
    public ToolCallback[] allTools() {
        FileOperationTool fileOperationTool = new FileOperationTool();
        WebSearchTool webSearchTool = new WebSearchTool(searchApiKey);
        WebScrapingTool webScrapingTool = new WebScrapingTool();
        ResourceDownloadTool resourceDownloadTool = new ResourceDownloadTool();
        TerminalOperationTool terminalOperationTool = new TerminalOperationTool();
        PDFGenerationTool pdfGenerationTool = new PDFGenerationTool();
        return ToolCallbacks.from(
            fileOperationTool,
            webSearchTool,
            webScrapingTool,
            resourceDownloadTool,
            terminalOperationTool,
            pdfGenerationTool
        );
    }
}
注意:@Value引的是import org.springframework.beans.factory.annotation.Value;
补充:它暗含了好几种设计模式:
-
-
- 工厂模式:allTools() 方法作为一个工厂方法,负责创建和配置多个工具实例,然后将它们包装成统一的数组返回。这符合工厂模式的核心思想 - 集中创建对象并隐藏创建细节。
- 依赖注入模式:通过
@Value注解注入配置值,以及将创建好的工具通过 Spring 容器注入到需要它们的组件中。 - 注册模式:该类作为一个中央注册点,集中管理和注册所有可用的工具,使它们能够被系统其他部分统一访问。
- 适配器模式的应用:ToolCallbacks.from 方法可以看作是一种适配器,它将各种不同的工具类转换为统一的 ToolCallback 数组,使系统能够以一致的方式处理它们。
-
有了这个注册类,如果需要添加或移除工具,只需修改这一个类即可,更利于维护。
然后我们来给我们的项目使用这些工具,在TravelApp中,编写以下代码:
//旅游规划大师调用工具能力
@Resource
private ToolCallback[] allTools;
public String doChatWithTools(String message, String chatId) {
    ChatResponse response = chatClient
    .prompt()
    .user(message)
    .advisors(spec -> spec.param(CHAT_MEMORY_CONVERSATION_ID_KEY, chatId)
              .param(CHAT_MEMORY_RETRIEVE_SIZE_KEY, 10))
    // 开启日志,便于观察效果
    .advisors(new MyLoggerAdvisor())
    .tools(allTools)
    .call()
    .chatResponse();
    String content = response.getResult().getOutput().getText();
    log.info("content: {}", content);
    return content;
}
生成对应的单元测试,代码如下:
@Test
void doChatWithTools() {
    // 测试联网搜索问题的答案
    testMessage("国庆打算和女朋友在福建约会,推荐几个治愈的小众打卡地?");
    // 测试网页抓取:旅游规划案例分析
    testMessage("最近学习压力太大了,怎么通过旅游来放松");
    // 测试资源下载:图片下载
    testMessage("下载一张厦门鼓浪屿的图片");
    // 测试终端操作:执行代码
    testMessage("执行 Python3 脚本来生成数据分析报告");
    // 测试文件操作:保存用户档案
    testMessage("保存我的旅游规划档案为文件");
    // 测试 PDF 生成
    testMessage("生成一份‘国庆旅游计划清单’PDF,包含餐厅预订、活动流程和景点打卡");
}
private void testMessage(String message) {
String chatId = UUID.randomUUID().toString();
String answer = travelApp.doChatWithTools(message, chatId);
Assertions.assertNotNull(answer);
}
给工具类的代码打断点,在 Debug 模式下观察工具的调 用过程和结果。不过,这边报错了,是因为itext的字体原因无法处理,那我们把注释的自定义字体给它开启,把内置的字体关掉,就可以了。
工具调用(进阶知识,了解即可)
- 工具底层数据结构:Spring AI工具调用的核心在ToolCallback接口,它是所有工具实现的基础。
- 工具上下文:实际开发应用中,工具执行可能需要额外的上下文信息,Spring AI通过ToolContext提供这一功能。
- 立即返回:工具执行的结果不需要再经过AI模型处理,而是希望直接返回给用户,Spring AI通过returnDirect属性支持这一功能。
- 工具底层执行原理:Spring AI提供了两种工具执行模式1、框架控制的工具执行 2、用户控制的工具执行,它们都与ToolCallingManager这个管理AI调用全过程的核心组件有关。
- 工具解析
- 可观测性
更多推荐


 48
48 0
0- 0



 已为社区贡献4条内容

所有评论(0)