
手把手掌握Spring注解开发:IoC容器配置与AOP切面实战
一、Spring IoC注解式开发
1.1 回顾注解
注解的存在主要是为了简化XML的配置。Spring6倡导全注解开发。
@Target(value = {ElementType.TYPE})
@Retention(value = RetentionPolicy.RUNTIME)
public @interface Component {
 String value();
}
上面是⾃定义了⼀个注解:Component。上⾯修饰的注解包括:Target注解和Retention注解,这两个注解被称为元注解。
- Target注解⽤来设置Component注解可以出现的位置,以上代表表Component注解只能⽤在类和接⼝上。
- Retention注解⽤来设置Component注解的保持性策略,以上代表Component注解可以被反射机制读取。
- String value(); 是Component注解中的⼀个属性。该属性类型String,属性名是value。
使用该注解:
// @注解类型名(属性名=属性值, 属性名=属性值, 属性名=属性值......)
@Component(value = "userBean")
public class User {
}
1.2 声明Bean的注解
负责声明Bean的注解,常⻅的包括四个:
- @Component
- @Controller
- @Service
- @Repository
@Controller、@Service、@Repository这三个注解都是@Component注解的别名。这四个注解的功能⼀样。建议表现层使用Controller,业务层使用Service,持久层使用Repository。
可以在类上直接添加注解,将类交给spring管理:
@Component(value = "userBean")
public class User{
}
1.3 Spring注解的使用
我们需要在spring.xml文件中添加xmlns:context="http://www.springframework.org/schema/context",并在配置⽂件中指定要扫描的包<context:component-scan base-package="com.powernode.spring6.bean"/>,最后在Bean类上使⽤注解:
@Component(value = "userBean")
public class User {
}
如果注解的属性名是value,那么value是可以省略的@Component("vipBean")。如果把value属性彻底去掉,spring会给Bean⾃动取名。并且默认名字的规律是:Bean类名⾸字⺟⼩写即可。也就是说,User的bean的名字为:user。
如果有多个包需要使用注解,可以在配置文件中指定多个包,用逗号隔开
<context:component-scan base-package="com.powernode.spring6.bean,com.po wernode.spring6.bean2"/>。
或者指定多个包的共同父包。
1.4 选择性实例化Bean
如果某个包下有很多Bean,被Component、Controller、Service、Repository注解分别标注,我们现在需要让部分注解实例化,可以在配置文件中这样配置:
<context:component-scan base-package="com.powernode.spring6.bean3" use-default-filters="false">
 	<context:include-filter type="annotation" expression="org.springframework.stereotype.Controller"/>
</context:component-scan>
其中use-default-filters=“true” 表示:使⽤spring默认的规则,以上四个注解都可实例化;use-default-filters=“false” 表示:不再spring默认实例化规则,都不再实例化。
<context:include-filter type="annotation" expression="org.springframework.stereotype.Controller"/> 表示只有Controller进⾏实例化。
注:也可以将use-default-filters设置为true(不写就是true),并且采⽤exclude-filter⽅式排出哪些注解标的Bean不参与实例化:
<context:exclude-filter type=“annotation” expression=“org.springframework.stereotype.Repository”/>
1.5 负责注入的注解
@Component @Controller @Service @Repository 这四个注解是⽤来声明Bean的,下面是给Bean属性赋值需要⽤到的注解:
@Value
当属性的类型是简单类型时,可以使⽤@Value注解进⾏注⼊。
@Value注解可以出现在属性上、setter⽅法上、以及构造⽅法的形参上。
public class User {
 	@Value(value = "zhangsan")
 	private String name;
 	@Value("20")
 	private int age;

	@Value("李四")
 	public void setName(String name) {
 		this.name = name;
 	}
 	@Value("30")
 	public void setAge(int age) {
 		this.age = age;
 	}

	public User(@Value("隔壁⽼王") String name, @Value("33") int age) {
 		this.name = name;
 		this.age = age;
 	}
}
@Autowired与@Qualifier
当属性的类型是⾮简单类型时,可以使⽤@Autowired注解进⾏注⼊。
@Autowired注解就可以出现在属性上、方法上、构造方法上、形参上、注解上。该注解有⼀个required属性,默认值是true,表示在注⼊的时候要求被注⼊的Bean必须是存在的,如果不存在则报错。如果required属性设置为false,表示注⼊的Bean存在或者不存在都没关系,不存在的话,也不报错。
例:在持久层中的UserDao类
@Repository //纳⼊bean管理
public class UserDaoForMySQL implements UserDao{
	@Override
 	public void insert() {
 	System.out.println("正在向mysql数据库插⼊User数据");
 	}
}
业务层UserService
@Service // 纳⼊bean管理
public class UserService {

 	@Autowired // 在属性上注⼊
 	private UserDao userDao;

 	// 没有提供构造⽅法和setter⽅法。
 	public void save(){
		 userDao.insert();
 	}
}
spring.xml文件中
<?xml version="1.0" encoding="UTF-8"?>
<beans xmlns="http://www.springframework.org/schema/beans"
 	xmlns:xsi="http://www.w3.org/2001/XMLSchema-instance"
 	xmlns:context="http://www.springframework.org/schema/context"
 	xsi:schemaLocation="http://www.springframework.org/schema/beans http://www.springframework.org/schema/beans/spring-beans.xsd
 						http://www.springframework.org/schema/context http://www.springframework.org/schema/context/spring-context.xsd">

 	<context:component-scan base-package="com.powernode.spring6.dao,com.powernode.spring6.service"/>
</beans>
上述为在属性上添加@Autowired,且没有添加setter方法和构造方法。我们还可以分别在setter方法、构造方法、构造⽅法的形参上添加注解来看看:
// 在sertter方法上
@Autowired
public void setUserDao(UserDao userDao) {
 		this.userDao = userDao;
}

// 在构造方法上
@Autowired
public UserService(UserDao userDao) {
 	this.userDao = userDao;
}

// 在构造⽅法的形参上,当有参数的构造⽅法只有⼀个时,@Autowired注解可以省略。
public UserService(@Autowired UserDao userDao) {
 	this.userDao = userDao;
}
当类中有多个构造⽅法,@Autowired肯定是不能省略的。如类中有参构造无参构造同时存在
@Autowired注解默认根据类型注⼊。如果要根据名称注⼊的话,需要配合@Qualifier注解⼀起使⽤。如果以上程序中,UserDao接⼝还有另外⼀个实现类,可以看看以下例子:
@Autowired
@Qualifier("userDaoForOracle") // 这个是bean的名字。
public void setUserDao(UserDao userDao) {
 	this.userDao = userDao;
}
@Resource
@Resource注解也可以完成⾮简单类型注⼊。那它和@Autowired注解有什么区别?
- @Resource注解是JDK扩展包中的,也就是说属于JDK的⼀部分。所以该注解是标准注解,更加具有通⽤性。
- @Resource注解默认根据名称装配byName,未指定name时,使⽤属性名作为name。通过name找不到的话会⾃动启动通过类型byType装配。
- @Resource注解⽤在属性上、setter⽅法上、类上。
例:在持久层中
@Repository("userDao")
public class UserDaoForOracle implements UserDao{
 	@Override
 	public void insert() {
 		System.out.println("正在向Oracle数据库插⼊User数据");
 	}
}
在业务层中:
@Service
public class UserService {
 	@Resource(name = "userDao")
 	private UserDao userDao;
 	public void save(){
 		userDao.insert();
 	}
}
此为@Resource注解使⽤时没有指定name的时候且采用setter方法注入时,方法名去掉set之后,将首字母变小后写作为name:
@Resource
public void setUserDao(UserDao userDao) {
	this.userDao = userDao;
}
默认byName注⼊,没有指定name时把属性名(userDao)当做name,根据name找不到时,才会byType注⼊。byType注⼊时,某种类型的Bean只能有⼀个。
1.6 全注解式开发
所谓的全注解开发就是不再使⽤spring配置⽂件了。写⼀个配置类来代替spring.xml配置⽂件。
@Configuration
@ComponentScan({"com.powernode.spring6.dao", "com.powernode.spring6.service"})
public class Spring6Configuration {
}
- @Configuration 是 Spring 的核心配置注解,用于标记一个类作为配置类,替代传统的 XML 配置文件。它通过 @Bean 注解的方法显式定义 Spring 容器管理的 Bean,支持完整的依赖注入和 Bean 生命周期管理。
- @ComponentScan 用于启用 Spring 的组件扫描机制,自动发现并注册被 @Component、@Service、@Repository、@Controller 等注解标记的类为 Spring Bean。它通过指定扫描的基础包路径和过滤规则,实现了基于注解的自动装配,减少了显式配置。
二、面向切面编程AOP
AOP(Aspect Oriented Programming):⾯向切⾯编程,⾯向⽅⾯编程。Spring的AOP使⽤的动态代理是:JDK动态代理 + CGLIB动态代理技术。Spring在这两种动态代理中灵活切换,如果是代理接⼝,会默认使⽤JDK动态代理,如果要代理某个类,这个类没有实现接⼝,就会切换使⽤CGLIB。当然,你也可以强制通过⼀些配置让Spring只使⽤CGLIB。
2.1 AOP介绍
⼀般⼀个系统当中都会有⼀些系统服务,例如:⽇志、事务管理、安全等。这些系统服务被称为:交叉业务。这些业务在多个业务流程中反复出现,这个交叉业务代码没有得到复⽤。使⽤AOP可以很轻松的解决。
⽤⼀句话总结AOP:将与核⼼业务⽆关的代码独⽴的抽取出来,形成⼀个独⽴的组件,然后以横向交叉的⽅式应⽤到业务流程当中的过程被称为AOP。
AOP的优点:
- 代码复⽤性增强。
- 代码易维护。
- 使开发者更关注业务逻辑。
2.2 AOP的七大术语
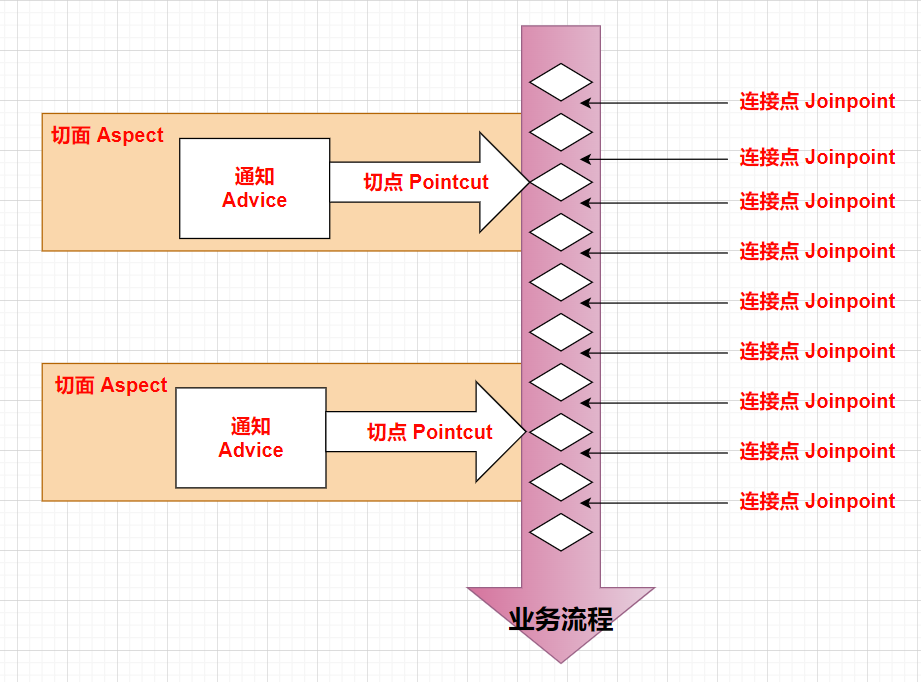
- 连接点 Joinpoint:在程序的整个执⾏流程中,可以织⼊切⾯的位置。⽅法的执⾏前后,异常抛出之后等位置。
- 切点 Pointcut:在程序执⾏流程中,选择哪些方法要织入切面。(⼀个切点对应多个连接点,可能有多个适合的)
- 通知 Advice:通知⼜叫增强,就是具体你要织⼊的代码。包括:前置通知、后置通知、环绕通知、异常通知、最终通知。
- 切⾯ Aspect:切点 + 通知就是切⾯。
- 织⼊ Weaving:把通知应⽤到⽬标对象上的过程。
- 代理对象 Proxy:⼀个⽬标对象被织⼊通知后产⽣的新对象。
- ⽬标对象 Target:被织⼊通知的对象。
2.3 切点表达式
切点表达式⽤来定义通知(Advice)往哪些⽅法上切⼊。切⼊点表达式语法格式:
execution([访问控制权限修饰符] 返回值类型 [全限定类名]⽅法名(形式参数列表) [异常])
访问控制权限修饰符(可选项):
- 没写,就是4个权限都包括。(public、protected、不写、private)
- 写public就表示只包括公开的⽅法。
返回值类型(必填项):
- * 表示返回值类型任意。
全限定类名(可选项):
- 两个点“…”代表当前包以及⼦包下的所有类
- 省略时表示所有的类。
⽅法名(必填项):
- *表示所有⽅法
- set * 表示所有的set⽅法
形式参数列表(必填项):
- () 表示没有参数的⽅法
- (…) 参数类型和个数随意的⽅法
- (*) 只有⼀个参数的⽅法
- (*, String) 第⼀个参数类型随意,第⼆个参数是String的
异常(可选项):
- 省略时表示任意异常类型
例:
// service包下所有的类中以delete开始的所有⽅法
execution(public * com.powernode.mall.service.*.delete*(..))

// mall包下所有的类的所有的⽅法
execution(* com.powernode.mall..*(..))

//所有类的所有⽅法
execution(* *(..))
2.4 使用Spring的AOP
Spring对AOP的实现包括以下3种⽅式:
- 第⼀种⽅式:Spring框架结合AspectJ框架实现的AOP,基于注解⽅式
- 第⼆种⽅式:Spring框架结合AspectJ框架实现的AOP,基于XML⽅式。
- 第三种⽅式:Spring框架⾃⼰实现的AOP,基于XML配置⽅式。
实际开发中,都是Spring+AspectJ来实现AOP。所以我们重点学习第⼀种和第⼆种⽅式。首先添加依赖和修改配置:
<!--spring context依赖-->
<dependency>
 	<groupId>org.springframework</groupId>
 	<artifactId>spring-context</artifactId>
 	<version>6.0.0-M2</version>
</dependency>
<!--spring aop依赖-->
<dependency>
 	<groupId>org.springframework</groupId>
 	<artifactId>spring-aop</artifactId>
 	<version>6.0.0-M2</version>
</dependency>
<!--spring aspects依赖-->
<dependency>
 	<groupId>org.springframework</groupId>
 	<artifactId>spring-aspects</artifactId>
 	<version>6.0.0-M2</version>
</dependency>
// Spring配置⽂件中添加context命名空间和aop命名空间
xmlns:context="http://www.springframework.org/schema/context"
xmlns:aop="http://www.springframework.org/schema/aop"
http://www.springframework.org/schema/aop http://www.springframework.org/schema/aop/spring-aop.xsd
2.4.1 基于AspectJ的AOP注解式开发
实现步骤
第⼀步:定义⽬标类以及⽬标⽅法并纳⼊spring bean管理
// ⽬标类
@Component
public class OrderService {
 	// ⽬标⽅法
 	public void generate(){
 		System.out.println("订单已⽣成!");
 	}
}
第⼆步:定义切⾯类并纳⼊spring bean管理
// 切⾯类
@Aspect
@Component
public class MyAspect {
	// 切点表达式,注解@Before表示前置通知。
 	@Before("execution(* com.powernode.spring6.service.OrderService.*(..))")
 	// 这就是需要增强的代码(通知)
 	public void advice(){
 		System.out.println("我是⼀个通知");
 	}
}
第三步:在spring配置⽂件中启⽤⾃动代理
<?xml version="1.0" encoding="UTF-8"?>
<beans xmlns="http://www.springframework.org/schema/beans"
 	   xmlns:xsi="http://www.w3.org/2001/XMLSchema-instance"
 	   xmlns:context="http://www.springframework.org/schema/context"
 	   xmlns:aop="http://www.springframework.org/schema/aop"
 	   xsi:schemaLocation="http://www.springframework.org/schema/beans http://www.springframework.org/schema/beans/spring-beans.xsd
 						http://www.springframework.org/schema/context http://www.springframework.org/schema/context/spring-context.xsd
 						http://www.springframework.org/schema/aop http://www.springframework.org/schema/aop/spring-aop.xsd">
 	<!--开启组件扫描-->
 	<context:component-scan base-package="com.powernode.spring6.service"/>
 	<!--开启⾃动代理-->
 	<aop:aspectj-autoproxy proxy-target-class="true"/>
</beans>
<aop:aspectj-autoproxy proxy-target-class="true"/> 开启⾃动代理之后,凡事带有@Aspect注解的bean都会⽣成代理对象。
proxy-target-class="true" 表示采⽤cglib动态代理。
proxy-target-class="false" 表示采⽤jdk动态代理。默认值是false。即使写成false,当没有接⼝的时候,也会⾃动选择cglib⽣成代理类。
通知类型
通知类型包括:
- 前置通知:@Before ⽬标⽅法执⾏之前的通知
- 后置通知:@AfterReturning ⽬标⽅法执⾏之后的通知
- 环绕通知:@Around ⽬标⽅法之前添加通知,同时⽬标⽅法执⾏之后添加通知。
- 异常通知:@AfterThrowing 发⽣异常之后执⾏的通知
- 最终通知:@After 放在finally语句块中的通知
// 切⾯类
@Component
@Aspect
public class MyAspect {
 	@Around("execution(* com.powernode.spring6.service.OrderService.*(..))")
 	public void aroundAdvice(ProceedingJoinPoint proceedingJoinPoint) throws Throwable {
 		System.out.println("环绕通知开始");
 		// 执⾏⽬标⽅法。
 		proceedingJoinPoint.proceed();
 		System.out.println("环绕通知结束");
 }

 	@Before("execution(* com.powernode.spring6.service.OrderService.*(..))")
 	public void beforeAdvice(){
 		System.out.println("前置通知");
 	}

 	@AfterReturning("execution(* com.powernode.spring6.service.OrderService.*(..))")
 	public void afterReturningAdvice(){
 		System.out.println("后置通知");
 	}

 	@AfterThrowing("execution(* com.powernode.spring6.service.OrderService.*(..))")
 	public void afterThrowingAdvice(){
 		System.out.println("异常通知");
 	}

 	@After("execution(* com.powernode.spring6.service.OrderService.*(..))")
 	public void afterAdvice(){
 		System.out.println("最终通知");
 	}
}
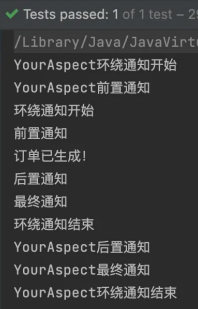
他们的执行顺序:环绕通知开始、前置通知、目标方法、后置通知、最终通知、环绕通知结束。出现异常之后,后置通知和环绕通知的结束部分不会执⾏。
切面的先后顺序
我们知道,业务流程当中不⼀定只有⼀个切⾯,可能有的切⾯控制事务,有的记录⽇志,如果多个切⾯的话,可以使⽤@Order注解来标识切⾯类,为@Order注解的value指定⼀个整数型的数字,数字越⼩,优先级越⾼。
@Aspect
@Component
@Order(1) //设置优先级
public class YourAspect {
}
优先使用切点表达式
切点表达式重复写了多次,不利于复用和维护将切点表达式单独的定义出来,在需要的位置引⼊即可。如下:
// 切⾯类
@Component
@Aspect
@Order(2)
public class MyAspect {

	@Pointcut("execution(* com.powernode.spring6.service.OrderService.*(..))")
	public void pointcut(){}

	@Around("pointcut()")
	public void aroundAdvice(ProceedingJoinPoint proceedingJoinPoint) throwsThrowable {
 		System.out.println("环绕通知开始");
 		// 执⾏⽬标⽅法。
 		proceedingJoinPoint.proceed();
 		System.out.println("环绕通知结束");
	}

 	@Before("pointcut()")
 	public void beforeAdvice(){
 		System.out.println("前置通知");
 	}
}
全注解式开发AOP
就是编写⼀个类,在这个类上⾯使⽤⼤量注解来代替spring的配置⽂件,spring配置⽂件消失了,如下:
@Configuration
@ComponentScan("com.powernode.spring6.service")
@EnableAspectJAutoProxy(proxyTargetClass = true)
public class Spring6Configuration {
}
@EnableAspectJAutoProxy 用于启用 Spring 对 AspectJ 注解风格 AOP 的支持。当proxyTargetClass = false(默认)时,使用 JDK 动态代理(基于接口);当proxyTargetClass = true时,使用 CGLIB 动态代理(基于继承)。
2.4.3 基于XML配置⽅式的AOP(了解)
第⼀步:编写⽬标类`
// ⽬标类
public class VipService {
 	public void add(){
 		System.out.println("保存vip信息。");
 	}
}
第⼆步:编写切⾯类,并且编写通知
// 负责计时的切⾯类
public class TimerAspect {

 	public void time(ProceedingJoinPoint proceedingJoinPoint) throws Throwable {
 		long begin = System.currentTimeMillis();
 		//执⾏⽬标
 		proceedingJoinPoint.proceed();
 		long end = System.currentTimeMillis();
 		System.out.println("耗时"+(end - begin)+"毫秒");
 	}
}
第三步:编写spring配置⽂件
<?xml version="1.0" encoding="UTF-8"?>
<beans xmlns="http://www.springframework.org/schema/beans"
 		xmlns:xsi="http://www.w3.org/2001/XMLSchema-instance"
 		xmlns:context="http://www.springframework.org/schema/context"
 		xmlns:aop="http://www.springframework.org/schema/aop"
 		xsi:schemaLocation="http://www.springframework.org/schema/beans http://www.springframework.org/schema/beans/spring-beans.xsd
 						http://www.springframework.org/schema/context http://www.springframework.org/schema/context/spring-context.xsd
 						http://www.springframework.org/schema/aop http://www.springframework.org/schema/aop/spring-aop.xsd">

 	<!--纳⼊spring bean管理-->
 	<bean id="vipService" class="com.powernode.spring6.service.VipService"/>
 	<bean id="timerAspect" class="com.powernode.spring6.service.TimerAspect"/>
 	<!--aop配置-->
 	<aop:config>
 		<!--切点表达式-->
 		<aop:pointcut id="p" expression="execution(* com.powernode.spring6.service.VipService.*(..))"/>
 		<!--切⾯-->
 		<aop:aspect ref="timerAspect">
 			<!--切⾯=通知 + 切点-->
 			<aop:around method="time" pointcut-ref="p"/>
 		</aop:aspect>
 	</aop:config>
</beans>
2.5 事务处理案例
这个控制事务的代码就是和业务逻辑没有关系的“交叉业务”。可以把控制事务的代码作为环绕通知,切⼊到⽬标类的⽅法当中。接下来我们做⼀下这件事,有两个业务类,如下:
@Component
// 业务类
public class AccountService {
 	// 转账业务⽅法
 	public void transfer(){
 		System.out.println("正在进⾏银⾏账户转账");
 	}
 	// 取款业务⽅法
 	public void withdraw(){
 		System.out.println("正在进⾏取款操作");
 	}
}
@Component
// 业务类
public class OrderService {
 	// ⽣成订单
 	public void generate(){
		System.out.println("正在⽣成订单");
 	}
 	// 取消订单
 	public void cancel(){
 		System.out.println("正在取消订单");
 	}
}
接下来我们给以上两个业务类的4个⽅法添加事务控制代码,使⽤AOP来完成:
@Aspect
@Component
// 事务切⾯类
public class TransactionAspect {

 	@Around("execution(* com.powernode.spring6.biz..*(..))")
 	public void aroundAdvice(ProceedingJoinPoint proceedingJoinPoint){
 		try {
 			System.out.println("开启事务");
 			// 执⾏⽬标
			proceedingJoinPoint.proceed();
 			System.out.println("提交事务");
 		} catch (Throwable e) {
 			System.out.println("回滚事务");
 		}
 	}
}
2.6 安全日志案例
我们需要在系统中进⾏修改操作、删除操作、新增操作,这些危险操作都要被记录下来,其中业务类和业务⽅法:
@Component
//⽤户业务
public class UserService {
 	public void getUser(){
 		System.out.println("获取⽤户信息");
 	}
 	public void saveUser(){
 		System.out.println("保存⽤户");
 	}
 	public void deleteUser(){
 		System.out.println("删除⽤户");
 	}
 	public void modifyUser(){
 		System.out.println("修改⽤户");
 	}
}
// 商品业务类
@Component
public class ProductService {
 	public void getProduct(){
 		System.out.println("获取商品信息");
 	}
 	public void saveProduct(){
 		System.out.println("保存商品");
 	}
 	public void deleteProduct(){
 		System.out.println("删除商品");
 	}
 	public void modifyProduct(){
 		System.out.println("修改商品");
 	}
}
接下来我们使⽤aop来解决上⾯的需求:编写⼀个负责安全的切⾯类:
@Component
@Aspect
public class SecurityAspect {
 @Pointcut("execution(* com.powernode.spring6.biz..save*(..))")
 public void savePointcut(){}
 @Pointcut("execution(* com.powernode.spring6.biz..delete*(..))")
 public void deletePointcut(){}
 @Pointcut("execution(* com.powernode.spring6.biz..modify*(..))")
 public void modifyPointcut(){}

 @Before("savePointcut() || deletePointcut() || modifyPointcut()")
 public void beforeAdivce(JoinPoint joinpoint){
 System.out.println("XXX操作员正在操作"+joinpoint.getSignature().getN
ame()+"⽅法");
 }
}
最后感谢动力节点提供的优质学习资源,让我们在技术道路上能够站在巨人的肩膀上继续前行。本资料仅为学习过程的副产品,希望能帮助到更多同样在努力学习的开发者。
更多推荐

 42
42 0
0- 0


 已为社区贡献1条内容

所有评论(0)