
万字精讲,保姆级流程!Docker容器化环境下企业级Harbor私有镜像仓库搭建
Docker容器化环境下企业级Harbor私有镜像仓库搭建与运维实践
项目实践介绍:
随着 Docker 容器化技术在企业生产环境的规模化落地,容器镜像作为应用交付的核心载体,其管理效率与安全性成为容器架构稳定运行的关键。企业直接使用公共 Docker Registry 存在显著痛点:外网访问速度受限、镜像缺乏安全管控、核心业务镜像私密性无法保障,且镜像版本混乱、缺乏可视化管理能力,难以适配 Kubernetes 集群的镜像分发需求。
Harbor 作为企业级私有容器镜像仓库,具备镜像私有存储、精细化权限管控、HTTPS 安全访问、可视化管理等核心能力,可有效解决公共仓库的弊端。本实验基于生产级标准搭建 Harbor 私有仓库,旨在替代 Docker Registry 完成企业级镜像全生命周期管理,覆盖环境初始化、证书配置、服务部署、镜像运维等全流程,验证私有仓库在容器化架构中的实用性与稳定性,为企业容器平台落地提供镜像管理支撑。
1、环境准备:
克隆一台虚拟机(harbor),CPU 至少 2 核,Memory 至少 4G,磁盘 100G。
1.1修改主机名,修改ip地址
修改ip地址为 192.168.110.150
[root@localhost ~]# hostnamectl set-hostname harbor && bash
[root@harbor ~]#
1.2配置主机映射
[root@harbor ~]# cat /etc/hosts
127.0.0.1   localhost localhost.localdomain localhost4 localhost4.localdomain4
::1         localhost localhost.localdomain localhost6 localhost6.localdomain6
192.168.110.150 hb.reg.com harbor
192.168.110.155 k8s-master01 m1
192.168.110.156 k8s-node01 n1
1.3安装docker
由于我们在构建虚拟机模板机时已经安装好 Docker 服务了,因此这一步就可以省略。我们只需要修改 /etc/docker/daemon.json 文件即可。
1.3.1修改加速器文件
[root@harbor ~]# vim /etc/docker/daemon.json
文件内容如下:
{
        "default-ipc-mode": "shareable",
        "data-root": "/data/docker",
        "exec-opts": ["native.cgroupdriver=systemd"],
        "log-driver": "json-file",
        "log-opts": {
                "max-size": "100m",
                "max-file": "50"
        },
        "insecure-registries": ["https://hb.reg.com"],
        "registry-mirrors": [
                "https://docker.1ms.run",
                "https://func.ink",
                "https://proxy.1panel.live",
                "https://docker-0.unsee.tech",
                "https://docker.zhai.cm",
                "https://a.ussh.net",
                "https://docker.melikeme.cn",
                "https://docker.hlmirror.com",
                "https://docker.xiaogenban1993.com",
                "https://docker.1panel.top",
                "https://docker.kejilion.pro",
                "https://dockerpull.cn",
                "https://docker.xuanyuan.me",
                "https://docker.anye.in",
                "https://hub.fast360.xyz"
        ]
}
在文件中添加了 insecure-registries 配置来指定我们自己的私有仓库访问地址。
1.3.2重启服务生效
[root@harbor ~]# systemctl daemon-reload
[root@harbor ~]# systemctl restart docker
1.4搭建Docker-Compose环境
1.4.1下载docker-compose或者上传离线下载好的 docker-compose-linux-x86_64 文件到服务器中。
[root@harbor ~]# wget https://github.com/docker/compose/releases/download/v5.0.2/docker-compose-linux-x86_64
本项目采用文件上传方法至/root目录中
[root@harbor ~]# ls
docker-compose-5.0.2-linux-x86_64
1.4.2安装docker-compose并进行验证
[root@harbor ~]# mv docker-compose-5.0.2-linux-x86_64 /usr/bin/docker-compose
[root@harbor ~]# chmod +x /usr/bin/docker-compose
[root@harbor ~]# ll /usr/bin/docker-compose
-rwxr-xr-x. 1 root root 31327024 Feb  3 11:34 /usr/bin/docker-compose
验证安装
[root@harbor ~]# docker-compose -v
Docker Compose version v5.0.2
1.5搭建harbor环境
1.5.1硬件和软件要求:
1、硬件要求
| 资源 | 最小配置 | 推荐配置 |
|---|---|---|
| CPU | 2 CPU | 4 CPU |
| Mem | 4 GB | 8 GB |
| Disk | 40 GB | 160 GB |
2、软件要求
| 软件 | 版本 | 说明 |
|---|---|---|
| Docker Engine | Version > 20.10 | 用于运行Harbor环境 |
| Docker Compose | Docker compose > 2.3 | 用于管理Harbor服务 |
| OpenSSL | Latest (optional) | 用于生成Harbor访问的私钥和证书 |
检查本机软件环境:
[root@harbor ~]# docker --version
Docker version 29.1.5, build 0e6fee6

[root@harbor ~]# docker-compose -v
Docker Compose version v5.0.2

[root@harbor harbor]# openssl -v
OpenSSL 3.2.2 4 Jun 2024 (Library: OpenSSL 3.2.2 4 Jun 2024)
3.网络要求
需要在防火墙和 Selinux 中放行 80 和 443 端口。
[root@harbor ~]# systemctl is-active firewalld
inactive
[root@harbor ~]# getenforce
Permissive
4.准备harbor
下载harbor安装包,或者将下载好的安装包上传到服务器中
[root@harbor ~]# wget https://github.com/goharbor/harbor/releases/download/v2.14.2/harbor-offline-installer-v2.14.2.tgz
或者
[root@harbor ~]# ls
harbor-offline-installer-v2.14.2.tgz
解压harbor安装包
# 解压文件
[root@harbor ~]# tar -zxf harbor-offline-installer-v2.14.2.tgz -C /data/
# 进入解压目录
[root@harbor ~]# cd /data
# 查看目录文件
[root@harbor data]# ls
docker  harbor
# 进入harbor目录
[root@harbor data]# cd harbor/
# 查看目录文件
[root@harbor harbor]# ls
common.sh  harbor.v2.14.2.tar.gz  harbor.yml.tmpl  install.sh  LICENSE  prepare
2、证书配置
官方文档:https://goharbor.io/docs/2.14.0/install-config/configure-https/
2.1生成CA证书
# 创建证书存放目录
[root@harbor harbor]# mkdir ssl
[root@harbor harbor]# cd ssl
[root@harbor ssl]# pwd
/data/harbor/ssl

# 生成CA证书私钥文件
[root@harbor ssl]# openssl genrsa -out ca.key 4096
[root@harbor ssl]# ls
ca.key

# 根据生成的CA证书私钥文件来生成证书文件
[root@harbor ssl]# openssl req -x509 -new -nodes -sha512 -days 3650 \
 -subj "/C=CN/ST=CQ/L=CQ/O=Banan/OU=Chengke/CN=Houdelou" \
 -key ca.key \
 -out ca.crt

# 查看生成的文件
[root@harbor ssl]# ls
ca.crt  ca.key
2.2生成服务证书
对于证书来说,通常包含 .crt 和 .key 两个文件
1.生成服务私钥
[root@harbor ssl]# openssl genrsa -out hb.reg.com.key 4096
[root@harbor ssl]# ls
ca.crt  ca.key  hb.reg.com.key
2.根据私钥生成服务证书请求
[root@harbor ssl]# openssl req -sha512 -new \
    -subj "/C=CN/ST=CQ/L=CQ/O=Banan/OU=Chengke/CN=hb.reg.com" \
    -key hb.reg.com.key \
    -out hb.reg.com.csr
[root@harbor ssl]# ls
ca.crt  ca.key  hb.reg.com.csr  hb.reg.com.key
3.生成一个x509 v3扩展文件
[root@harbor ssl]# cat > v3.ext <<-EOF
authorityKeyIdentifier=keyid,issuer
basicConstraints=CA:FALSE
keyUsage = digitalSignature, nonRepudiation, keyEncipherment, dataEncipherment
extendedKeyUsage = serverAuth
subjectAltName = @alt_names

[alt_names]
DNS.1=hb.reg.com
DNS.2=hb.reg
DNS.3=harbor
EOF

[root@harbor ssl]# ls
ca.crt  ca.key  hb.reg.com.csr  hb.reg.com.key  v3.ext
4.使用该v3.ext文件为您的Harbor主机生成证书
[root@harbor ssl]# openssl x509 -req -sha512 -days 3650 \
    -extfile v3.ext \
    -CA ca.crt -CAkey ca.key -CAcreateserial \
    -in hb.reg.com.csr \
    -out hb.reg.com.crt
Certificate request self-signature ok
subject=C=CN, ST=CQ, L=CQ, O=Banan, OU=Chengke, CN=hb.reg.com

[root@harbor ssl]# ls
ca.crt  ca.key  ca.srl  hb.reg.com.crt  hb.reg.com.csr  hb.reg.com.key  v3.ext
2.3仓库配置证书
生成 ca.crt、hb.reg.com.crt 和 hb.reg.com.key 密钥文件后,您必须将它们提供给Harbor和Docker,并重新配置Harbor以使用它们。
1、将服务器证书和密钥复制到 Harbor 主机上的 certficates 文件夹中
[root@harbor ssl]# mkdir /data/cert
[root@harbor ssl]# cp hb.reg.com.crt /data/cert/
[root@harbor ssl]# cp hb.reg.com.key /data/cert/
2、转换 hb.reg.com.crt 为 hb.reg.com.cert,供 Docker 使用
[root@harbor ssl]# cd /data/cert/
[root@harbor cert]# ls
hb.reg.com.crt  hb.reg.com.key

# 转换证书供docker使用
[root@harbor cert]# openssl x509 -inform PEM -in hb.reg.com.crt -out hb.reg.com.cert
[root@harbor cert]# ls
hb.reg.com.cert  hb.reg.com.crt  hb.reg.com.key
3、将服务器证书,私钥文件和 CA 文件复制到 Harbor 主机上的 Docker 证书文件夹中。必须首先创建适当的文件夹
# 创建需要的目录结构
[root@harbor cert]# mkdir -p /etc/docker/certs.d/hb.reg.com:443

# 复制文件
[root@harbor cert]# cp hb.reg.com.cert /etc/docker/certs.d/hb.reg.com:443
[root@harbor cert]# cp hb.reg.com.key /etc/docker/certs.d/hb.reg.com:443
[root@harbor cert]# cp /data/harbor/ssl/ca.crt /etc/docker/certs.d/hb.reg.com:443

# 查看最终结构
[root@harbor cert]# tree /etc/docker/certs.d/
/etc/docker/certs.d/
└── hb.reg.com:443
    ├── ca.crt
    ├── hb.reg.com.cert
    └── hb.reg.com.key

1 directory, 3 files
4、启动docker服务
[root@harbor cert]# systemctl restart docker
3、部署配置Harbor
3.1配置Harbor
如果尚未部署Harbor,请参阅配置Harbor YML文件,了解如何通过在harbor.yml中指定主机名和https属性来配置Harbor以使用证书。
如果已经使用HTTP部署了Harbor,并希望将其重新配置为使用HTTPS,请执行以下步骤。
1、从配置文件模板中复制出配置文件
[root@harbor cert]# cd /data/harbor/
[root@harbor harbor]# ls
common.sh  harbor.v2.14.2.tar.gz  harbor.yml.tmpl  install.sh  LICENSE  prepare  ssl
[root@harbor harbor]# cp -p harbor.yml.tmpl harbor.yml
[root@harbor harbor]# ls
common.sh  harbor.v2.14.2.tar.gz  harbor.yml  harbor.yml.tmpl  install.sh  LICENSE  prepare  ssl
2、修改配置文件
[root@harbor harbor]# vim harbor.yml
修改内容如下:
# DO NOT use localhost or 127.0.0.1, because Harbor needs to be accessed by external clients.
hostname: hb.reg.com

# http related config
http:
  # port for http, default is 80. If https enabled, this port will redirect to https port
  port: 80

# https related config
https:
  # https port for harbor, default is 443
  port: 443
  # The path of cert and key files for nginx
  certificate: /data/cert/hb.reg.com.crt
  private_key: /data/cert/hb.reg.com.key
.....
# Remember Change the admin password from UI after launching Harbor.
harbor_admin_password: Harbor12345
......
# The default data volume
data_volume: /opt/data
.......
3、创建数据卷目录
[root@harbor harbor]# mkdir -p /opt/data
[root@harbor harbor]# ls /opt
containerd  data
3.2加载harbor镜像
1、导入镜像文件
[root@harbor harbor]# docker load -i harbor.v2.14.2.tar.gz
Loaded image: goharbor/prepare:v2.14.2
Loaded image: goharbor/trivy-adapter-photon:v2.14.2
Loaded image: goharbor/harbor-core:v2.14.2
Loaded image: goharbor/harbor-db:v2.14.2
Loaded image: goharbor/harbor-jobservice:v2.14.2
Loaded image: goharbor/harbor-registryctl:v2.14.2
Loaded image: goharbor/nginx-photon:v2.14.2
Loaded image: goharbor/harbor-portal:v2.14.2
Loaded image: goharbor/redis-photon:v2.14.2
Loaded image: goharbor/registry-photon:v2.14.2
Loaded image: goharbor/harbor-log:v2.14.2
Loaded image: goharbor/harbor-exporter:v2.14.2
2、查看镜像
[root@harbor harbor]# docker images
IMAGE                                   ID             DISK USAGE   CONTENT SIZE   EXTRA
goharbor/harbor-core:v2.14.2            def2f48ebb3a        413MB          205MB
goharbor/harbor-db:v2.14.2              3417b2d261fe        593MB          293MB
goharbor/harbor-exporter:v2.14.2        ae87109e4c79        269MB          133MB
goharbor/harbor-jobservice:v2.14.2      2ad0c5a5810c        362MB          180MB
goharbor/harbor-log:v2.14.2             32448bb26446        379MB          188MB
goharbor/harbor-portal:v2.14.2          32fb3a3f57cd        370MB          183MB
goharbor/harbor-registryctl:v2.14.2     cfa0b205c9fd        334MB          167MB
goharbor/nginx-photon:v2.14.2           09aadc2e99b0        353MB          175MB
goharbor/prepare:v2.14.2                a4380f5d2bab        413MB          203MB
goharbor/redis-photon:v2.14.2           ac49d496e188        383MB          190MB
goharbor/registry-photon:v2.14.2        a4cf93bc522b        177MB         88.4MB
goharbor/trivy-adapter-photon:v2.14.2   4201757303dd        807MB          403MB
3.3检查安装环境
[root@harbor harbor]# pwd
/data/harbor
[root@harbor harbor]# ls
common.sh  harbor.v2.14.2.tar.gz  harbor.yml  harbor.yml.tmpl  install.sh  LICENSE  prepare  ssl

[root@harbor harbor]# ./prepare
prepare base dir is set to /data/harbor
Generated configuration file: /config/portal/nginx.conf
Generated configuration file: /config/log/logrotate.conf
Generated configuration file: /config/log/rsyslog_docker.conf
Generated configuration file: /config/nginx/nginx.conf
Generated configuration file: /config/core/env
Generated configuration file: /config/core/app.conf
Generated configuration file: /config/registry/config.yml
Generated configuration file: /config/registryctl/env
Generated configuration file: /config/registryctl/config.yml
Generated configuration file: /config/db/env
Generated configuration file: /config/jobservice/env
Generated configuration file: /config/jobservice/config.yml
copy /data/secret/tls/harbor_internal_ca.crt to shared trust ca dir as name harbor_internal_ca.crt ...
ca file /hostfs/data/secret/tls/harbor_internal_ca.crt is not exist
copy  to shared trust ca dir as name storage_ca_bundle.crt ...
copy None to shared trust ca dir as name redis_tls_ca.crt ...
Generated and saved secret to file: /data/secret/keys/secretkey
Successfully called func: create_root_cert
Generated configuration file: /compose_location/docker-compose.yml
Clean up the input dir
执行完后,在目录中会生成 docker-compose.yml 文件
[root@harbor harbor]# ls
common     docker-compose.yml     harbor.yml       install.sh  prepare
common.sh  harbor.v2.14.2.tar.gz  harbor.yml.tmpl  LICENSE     ssl
3.4部署Harbor
[root@harbor harbor]# ls
common     docker-compose.yml     harbor.yml       install.sh  prepare
common.sh  harbor.v2.14.2.tar.gz  harbor.yml.tmpl  LICENSE     ssl
[root@harbor harbor]# pwd
/data/harbor
[root@harbor harbor]# ./install.sh
[Step 0]: checking if docker is installed ...
Note: docker version: 29.1.5
[Step 1]: checking docker-compose is installed ...
Note: Docker Compose version v5.0.2
[Step 2]: loading Harbor images ...
Loaded image: goharbor/prepare:v2.14.2
Loaded image: goharbor/trivy-adapter-photon:v2.14.2

...

Loaded image: goharbor/harbor-exporter:v2.14.2
[Step 3]: preparing environment ...
[Step 4]: preparing harbor configs ...
prepare base dir is set to /data/harbor
Clearing the configuration file: /config/portal/nginx.conf

...

Generated configuration file: /compose_location/docker-compose.yml
Clean up the input dir
Note: stopping existing Harbor instance ...
[Step 5]: starting Harbor ...
[+] up 10/10
 ✔ Network harbor_harbor       Created                                              0.0s
 ✔ Container harbor-log        Created                                              0.1s

...

✔ Container harbor-jobservice Created                                              0.0s
✔ ----Harbor has been installed and started successfully.----
3.5查看运行容器
[root@harbor harbor]# docker ps
CONTAINER ID   IMAGE                                 COMMAND                  CREATED         STATUS                   PORTS                                                                                NAMES
07fdb44e471b   goharbor/harbor-jobservice:v2.14.2    "/harbor/entrypoint.…"   3 minutes ago   Up 3 minutes (healthy)                                                                                        harbor-jobservice

...

redis
2091d7505c94   goharbor/harbor-log:v2.14.2           "/bin/sh -c /usr/loc…"   3 minutes ago   Up 3 minutes (healthy)   127.0.0.1:1514->10514/tcp                                                            harbor-log
也可以使用 docker-compose ps 命令来查看。
4、配置启动服务
4.1停止Harbor
由于现在启动 Harbor 的操作必须是在 docker-compose.yml 文件所在目录下执行,非常不方便。所以我们先使用 docker-compose 命令来关闭 Harbor 服务。
[root@harbor harbor]# docker-compose down
[+] down 10/10
 ✔ Container registryctl       Removed                                                                0.3ss
 ✔ Container harbor-jobservice Removed

 ...

  10.2s
 ✔ Network harbor_harbor       Removed                                                                0.1s
如果要启动的话使用 docker-compose up -d 命令:
[root@harbor harbor]# docker-compose up -d
[+] up 10/10
✔ Network harbor_harbor       Created                                                                 0.0s
✔ Container harbor-log        Created

...

✔ Container harbor-jobservice Created                                                                 0.0s
4.2 编写服务文件
1、编写文件
为了方便在任意地方都可以启动服务而不是在 harbor 安装目录下,我们需要在 /usr/lib/systemd/system/ 目录下新建 harbor.service 服务启动文件。
[root@harbor harbor]# vim /usr/lib/systemd/system/harbor.service
文件内容如下:
[Unit]
Documentation=https://goharbor.io/docs/
Description=Harbor
After=docker.service systemd-networkd.service systemd-resolved.service
Requires=docker.service

[Service]
Type=simple
ExecStart=/usr/bin/docker-compose --file /data/harbor/docker-compose.yml up
ExecStop=/usr/bin/docker-compose --file /data/harbor/docker-compose.yml down
Restart=on-failure
RestartSec=5

[Install]
WantedBy=multi-user.target
2、加载配置
[root@harbor harbor]# systemctl daemon-reload
4.3验证启动服务
验证停止服务,启动服务,并查看状态;
[root@harbor harbor]# systemctl stop harbor

[root@harbor harbor]# systemctl start harbor

[root@harbor ssl]# systemctl status harbor
● harbor.service - Harbor
     Loaded: loaded (/usr/lib/systemd/system/harbor.service; disabled; preset: disabled)
     Active: active (running) since Tue 2026-02-03 16:45:10 CST; 44s ago

...

[03/Feb/2026:08:45:42 +0>
Feb 03 16:45:42 harbor docker-compose[20910]: nginx              | 127.0.0.1 - "GET / HTTP/1.1" 308 171 "->
加入开机启动
[root@harbor ssl]# systemctl enable --now harbor
Created symlink /etc/systemd/system/multi-user.target.wants/harbor.service → /usr/lib/systemd/system/harbor.service.
5.定制本地仓库
5.1 配置映射
为了使用域名来访问,我们需要在 windows 中C:\Windows\System32\drivers\etc\hosts文件配置 IP 和域名的映射。
192.168.110.150 hb.reg.com
5.2访问仓库
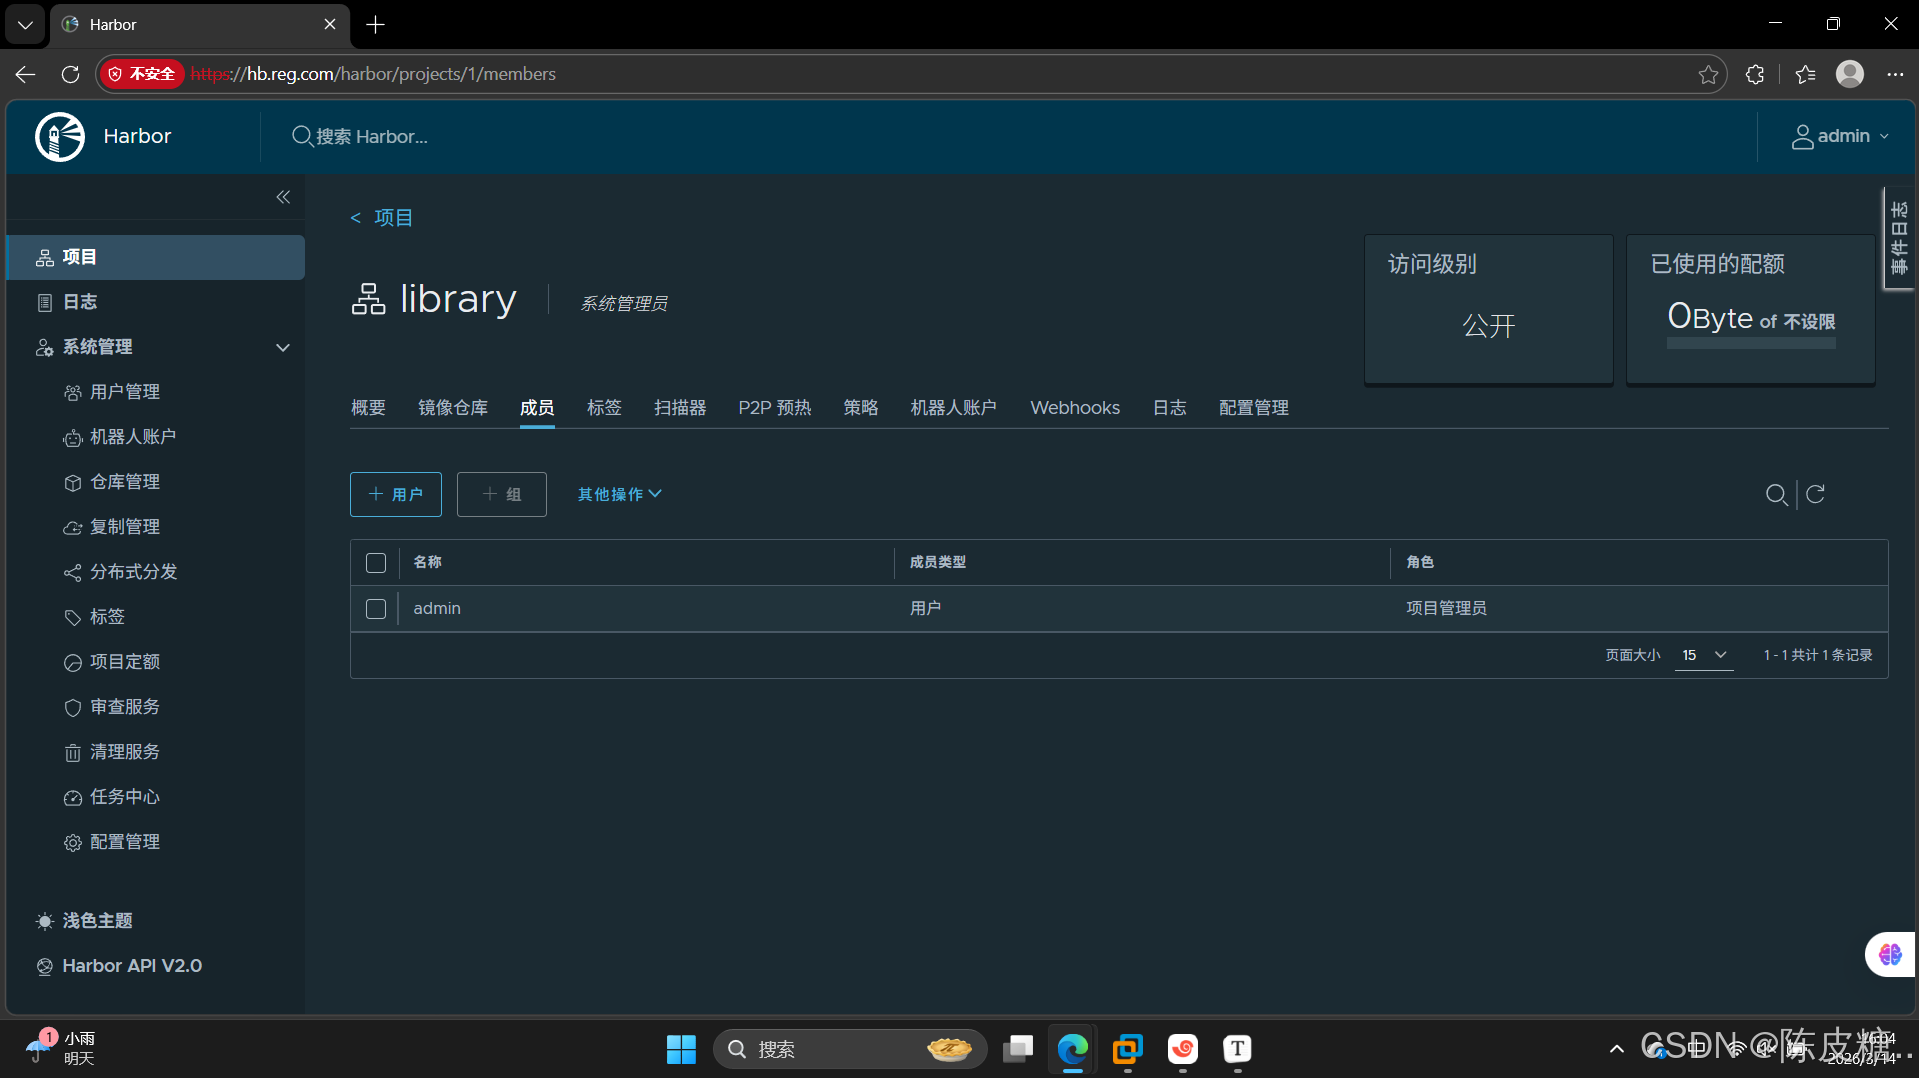
在浏览器中输入 https://hb.reg.com 来访问。会提示证书不安全,我们点击高级,然后再点击 “继续前往hb.reg.com(不安全)”,就会进入到仓库的登录页面。
在这个页面中的用户名输入 admin,密码输入 Harbor12345,然后点击登录就可以进入到管理界面。
5.3配置本地仓库
5.3.1环境准备
1.克隆一台虚拟机,例如本设备为192.168.110.151,然后安装好 docker 环境。
2.修改/etc/docker/daemon.json文件
[root@localhost ~]# vim /etc/docker/daemon.json
文件内容如下:
{
        "default-ipc-mode": "shareable",
        "data-root": "/data/docker",
        "exec-opts": ["native.cgroupdriver=systemd"],
        "log-driver": "json-file",
        "log-opts": {
                "max-size": "100m",
                "max-file": "50"
        },
        "dns": [
                "223.5.5.5",
                "8.8.8.8"
        ],
        "insecure-registries" : ["https://hb.reg.com"],
        "registry-mirrors": [
                "https://docker.1ms.run",
                "https://func.ink",
                "https://proxy.1panel.live",
                "https://docker-0.unsee.tech",
                "https://docker.zhai.cm",
                "https://a.ussh.net",
                "https://docker.melikeme.cn",
                "https://docker.hlmirror.com",
                "https://docker.xiaogenban1993.com",
                "https://docker.1panel.top",
                "https://docker.kejilion.pro",
                "https://dockerpull.cn",
                "https://docker.xuanyuan.me",
                "https://docker.anye.in",
                "https://hub.fast360.xyz"
        ]
}
3.重启docker引擎
[root@localhost ~]# systemctl restart docker
[root@localhost ~]# docker info
Client: Docker Engine - Community
 Version:    29.1.5
 ........

Server:
 Containers: 5
  Running: 1
  Paused: 0
  Stopped: 4
 Images: 8
 .......
 Insecure Registries:
  hb.reg.com
  ::1/128
  127.0.0.0/8
 Registry Mirrors:
  https://docker.1ms.run/
........
4.修改/etc/hosts文件,在这个文件中添加映射
[root@localhost ~]# vim /etc/hosts
文件内容如下:
127.0.0.1   localhost localhost.localdomain localhost4 localhost4.localdomain4
::1         localhost localhost.localdomain localhost6 localhost6.localdomain6
192.168.110.150  hb.reg.com
验证映射:
[root@localhost ~]# ping -c 3 hb.reg.com
PING hb.reg.com (192.168.110.150) 56(84) bytes of data.
64 bytes from hb.reg.com (192.168.110.150): icmp_seq=1 ttl=64 time=0.117 ms
64 bytes from hb.reg.com (192.168.110.150): icmp_seq=2 ttl=64 time=0.077 ms
64 bytes from hb.reg.com (192.168.110.150): icmp_seq=3 ttl=64 time=0.208 ms

--- hb.reg.com ping statistics ---
3 packets transmitted, 3 received, 0% packet loss, time 2038ms
rtt min/avg/max/mdev = 0.077/0.134/0.208/0.054 ms
5.4推送镜像到仓库
查看本地镜像:
[root@localhost ~]# docker images
IMAGE                                                         ID             DISK USAGE   CONTENT SIZE   EXTRA
mysql:8.4@sha256:c4678fed620278d29a6ef031b6aba9a31b1bc8f48e46bd56e9706943db2bc0c1
                                                           c4678fed6202       1.09GB          249MB
redis:8.2                                                  c4316c436734        201MB         54.9MB
redis:8.4                                                  2ed5383f191b        200MB         54.5MB
swarm:latest                                               2de8883e2933       16.6MB         3.85MB
5.4.1镜像重命名
接下来我们将 mysql:8.4、redis:8.2 以及 swarm:latest这三个镜像推送到 harbor 仓库
给要推送的镜像重命名标签
[root@localhost ~]# docker tag mysql:8.4 hb.reg.com/k8s/mysql:8.4
[root@localhost ~]# docker tag redis:8.2 hb.reg.com/k8s/redis:8.2
[root@localhost ~]# docker tag swarm:latest hb.reg.com/k8s/swarm:1.0
[root@localhost ~]# docker images
IMAGE                        ID             DISK USAGE   CONTENT SIZE   EXTRA
hb.reg.com/k8s/mysql:8.4                                   c4678fed6202       1.09GB          249MB
hb.reg.com/k8s/redis:8.2                                   c4316c436734        201MB         54.9MB
hb.reg.com/k8s/swarm:1.0                                   2de8883e2933       16.6MB         3.85MB
5.4.2推送镜像到仓库
[root@localhost~]# docker push hb.reg.com/k8s/swarm:1.0
The push refers to repository [hb.reg.com/k8s/swarm]
91a4ade4b5cf: Unavailable
07f31eb954bf: Unavailable
85286fcd22bc: Unavailable
4f4fb700ef54: Unavailable
d1f164b67fa7: Unavailable
541d5943b9e8: Unavailable
c02d17997ce3: Unavailable
failed to authorize: failed to fetch anonymous token: Get "https://hb.reg.com/service/token?scope=repository%3Ak8s%2Fredis%3Apull&scope=repository%3Ak8s%2Fredis%3Apull%2Cpush&service=harbor-registry": tls: failed to verify certificate: x509: certificate signed by unknown authority
❌注意:可以发现,我们使用 docker push 命令来推送镜像到仓库时报了如上的错误,提示没有认证。即需要先登录。
5.4.3登录仓库
root@localhost ~]# docker login hb.reg.com
Username: admin
Password:

WARNING! Your credentials are stored unencrypted in '/root/.docker/config.json'.
Configure a credential helper to remove this warning. See
https://docs.docker.com/go/credential-store/

Login Succeeded
查看这个认证文件:
[root@localhost ~]# cat /root/.docker/config.json
{
	"auths": {
		"hb.reg.com": {
			"auth": "YWRtaW46SGFyYm9yMTIzNDU="
		}
	}
}
5.4.4重新推送镜像到仓库
[root@localhost ~]# docker push hb.reg.com/library/swarm:1.0
The push refers to repository [hb.reg.com/library/swarm]
998d5e4721ac: Unavailable
119d43eec815: Unavailable
ae9b786964d0: Unavailable
8d96ce5090ec: Unavailable
a5163318194d: Unavailable
7621fff433f2: Unavailable
6697c8ec7c25: Unavailable
failed to authorize: failed to fetch oauth token: Post "https://hb.reg.com/service/token": tls: failed to verify certificate: x509: certificate signed by unknown authority
发现还是报错,解决办法:
1、将ca.crt文件复制到系统认证目录下
cp ca.crt /etc/pki/ca-trust/source/anchors/hb-ca.crt
2、执行如下命令更新为信认证书
update-ca-trust
3、重启服务
systemctl daemon-reload
systemctl restart docker
4、然后再推送
[root@worker2 ~]# docker push hb.reg.com/k8s/swarm:1.0
The push refers to repository [hb.reg.com/k8s/swarm]
083aff163606: Waiting
2064f1a73c6b: Waiting
38e5683d7755: Waiting
unknown: unexpected status from HEAD request to https://hb.reg.com/v2/k8s/swarm/blobs/sha256:083aff16360665b6a2e34da65173bfa2b005b7cb77327239984b4f3f3a2d0b0e: 401 Unauthorized
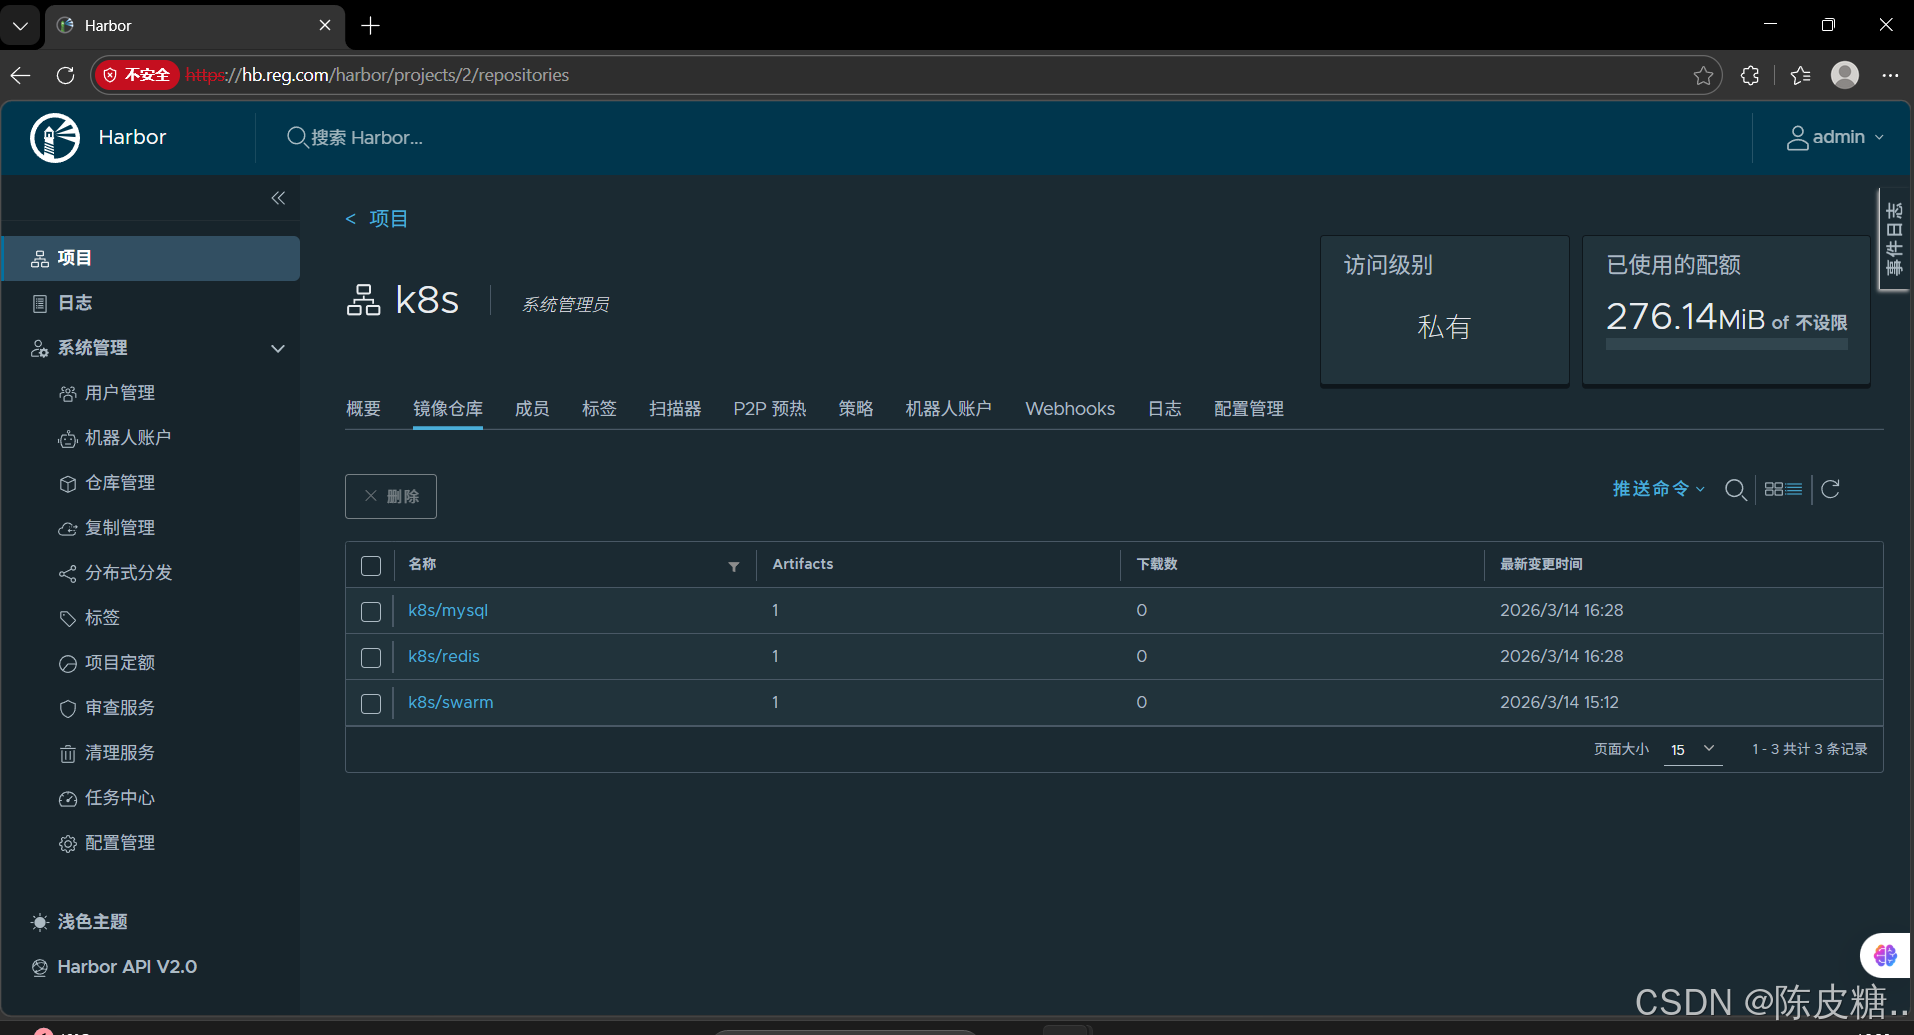
发现报错401,于是官网查找资料,最终确认是harbor库里为创建k8s项目,网页登入harbor,创建k8s项目,重新推送,最终成功。
5、最终解决
[root@worker2 ~]# docker push hb.reg.com/k8s/swarm:1.0
The push refers to repository [hb.reg.com/k8s/swarm]
2064f1a73c6b: Pushed
38e5683d7755: Pushed
083aff163606: Pushed
1.0: digest: sha256:2de8883e2933840ed7ee7360ea1eed314bf8aeac37c0692b9ca651630fde3b7f size: 319

[root@worker2 ~]# docker push hb.reg.com/k8s/redis:8.2
The push refers to repository [hb.reg.com/k8s/redis]
d1f164b67fa7: Pushed
c02d17997ce3: Pushed
07f31eb954bf: Pushed
541d5943b9e8: Pushed
91a4ade4b5cf: Pushed
85286fcd22bc: Pushed
4f4fb700ef54: Pushed
8.2: digest: sha256:f2883f89dd08e397c7fc67366f90a6286f93b6392e3e3f0563b8c564f5c0c28f size: 2288
i Info → Not all multiplatform-content is present and only the available single-platform image was pushed        sha256:c4316c4367348fcad30734d594a1f17153922f788a3f919592076e8340f7320d -> sha256:f2883f89dd08e397c7fc67366f90a6286f93b6392e3e3f0563b8c564f5c0c28f

[root@worker2 ~]# docker push hb.reg.com/k8s/mysql:8.4
The push refers to repository [hb.reg.com/k8s/mysql]
c21bb7e51cd3: Pushed
02b10d19996b: Pushed
6b179870ed4f: Pushed
f80a30003c2e: Pushed
e6aee23ed853: Pushed
2ee1cd90e640: Pushed
18fb6d2428e1: Pushed
f8e3da22b30f: Pushed
e54eefb1b1ac: Pushed
00f157e82a70: Pushed
8.4: digest: sha256:7b67e5d38694e2a7d452fe58b8f0a9dd7133c5a5ec15511bf707344522e52cd7 size: 2856
i Info → Not all multiplatform-content is present and only the available single-platform image was pushed       sha256:c4678fed620278d29a6ef031b6aba9a31b1bc8f48e46bd56e9706943db2bc0c1 -> sha256:7b67e5d38694e2a7d452fe58b8f0a9dd7133c5a5ec15511bf707344522e52cd7
[root@worker2 ~]#
5.5拉取镜像测试
[root@worker2 ~]# docker pull hb.reg.com/k8s/redis:8.2
8.2: Pulling from k8s/redis
Digest: sha256:f2883f89dd08e397c7fc67366f90a6286f93b6392e3e3f0563b8c564f5c0c28f
Status: Downloaded newer image for hb.reg.com/k8s/redis:8.2
hb.reg.com/k8s/redis:8.2
[root@worker2 ~]#
发现拉取成功,成功搭建好本地私有harbor仓库。
实践项目总结:
本次实验围绕 “生产级 Harbor 私有仓库搭建与运维” 核心目标,完成从环境准备到镜像全生命周期管理的全流程实践,核心成果与关键问题解决如下:
(一)核心实施成果
- 标准化环境搭建:基于 RedHat 系统完成 2 核 4G 规格虚拟机的资源规划,配置主机名 / IP / 主机映射(192.168.110.150 hb.reg.com),优化 Docker daemon.json 配置(添加国内镜像加速器、配置 insecure-registries),部署 Docker Compose v5.0.2,构建满足 Harbor 运行的标准化基础环境。
- HTTPS 证书体系配置:通过 OpenSSL 生成 CA 根证书、Harbor 服务证书(hb.reg.com),完成证书在 Harbor 服务端与 Docker 客户端的双向部署,解决 HTTPS 访问的证书信任问题,保障仓库访问的安全性与合规性。
- Harbor 服务部署与运维优化:解压并配置 Harbor v2.14.2 离线安装包,修改 harbor.yml 指定 HTTPS 端口、证书路径等核心参数,通过 prepare 脚本与 install.sh 完成部署;编写 systemd 服务文件(harbor.service),实现 Harbor 服务的系统级启停、开机自启,摆脱目录依赖,提升运维效率。
- 镜像全流程管理验证:在客户端节点完成 Docker 与 Harbor 的对接配置(hosts 映射、证书信任),解决镜像推送过程中的证书验证(x509)、权限认证(401 Unauthorized)等问题;成功将 mysql:8.4、redis:8.2、swarm:1.0 等镜像推送至 Harbor 的 k8s 项目仓库,并完成拉取验证,实现镜像 “推送 - 存储 - 拉取” 闭环管理。
(二)关键问题解决
- 证书信任问题:推送镜像时出现 “x509: certificate signed by unknown authority” 错误,通过将 CA 证书复制到系统信任目录(/etc/pki/ca-trust/source/anchors/)并执行
update-ca-trust更新信任库,重启 Docker 后解决。 - 权限认证问题:登录成功但推送报 401 错误,排查发现 Harbor 未创建 k8s 项目,通过网页端创建 k8s 私有项目并为 admin 账号分配项目管理员权限,重新推送后成功。
- 运维效率问题:初始部署后启停 Harbor 需依赖 docker-compose.yml 目录,通过编写 systemd 服务文件,实现任意目录下通过
systemctl命令启停服务,适配生产环境运维习惯。
项目实践的收获与展望
(一)技术实践收获
- 掌握企业级镜像仓库核心技术:完整掌握 Harbor 从环境准备、证书配置、服务部署到镜像管理的全流程,深入理解 Docker 与 Harbor 的对接原理、HTTPS 证书认证机制,弥补公共仓库使用的技术短板。
- 提升问题定位与解决能力:在实践中解决证书信任、权限认证、服务运维等典型问题,强化 Linux 系统配置、容器运维、故障排查的实战能力,适配企业生产环境的问题处理场景。
(二)生产应用收获
- 解决企业镜像管理痛点:搭建的 Harbor 私有仓库替代公共 Docker Registry,解决镜像存储分散、版本混乱、缺乏权限管控的问题;内网部署大幅提升镜像推送 / 拉取速度,降低外网带宽依赖,保障容器应用部署效率。
- 保障镜像安全与合规:通过 HTTPS 证书认证、精细化项目权限管控,实现企业核心镜像的私密存储与安全访问,满足等保合规对镜像资产的安全要求;适配 Kubernetes 集群的镜像拉取需求,为容器编排平台提供稳定的镜像来源。
(三)职业能力收获
- 强化容器化技术体系:构建 “Docker 环境配置 - 私有仓库搭建 - 镜像生命周期管理” 的完整技术链路,提升容器化架构的全栈运维能力,适配企业对容器技术人才的核心要求。
- 适配生产级运维场景:按企业生产标准完成 Harbor 的部署与运维优化(如 systemd 服务配置、证书合规配置),积累可直接落地的容器镜像管理实践经验,提升职场核心竞争力。
综上,本次实验不仅完成了生产级 Harbor 私有仓库的搭建与验证,更形成了一套可复用的企业级镜像仓库运维方案,既解决了容器化架构中镜像管理的核心问题,也为后续 Kubernetes 集群运维、容器安全管控等进阶实践奠定了坚实基础。
更多推荐

 12
12 0
0- 0


 已为社区贡献6条内容

所有评论(0)