
尚硅谷微服务SpringCloud总结集成思维导图:七个小时速通版(快速复习入门)
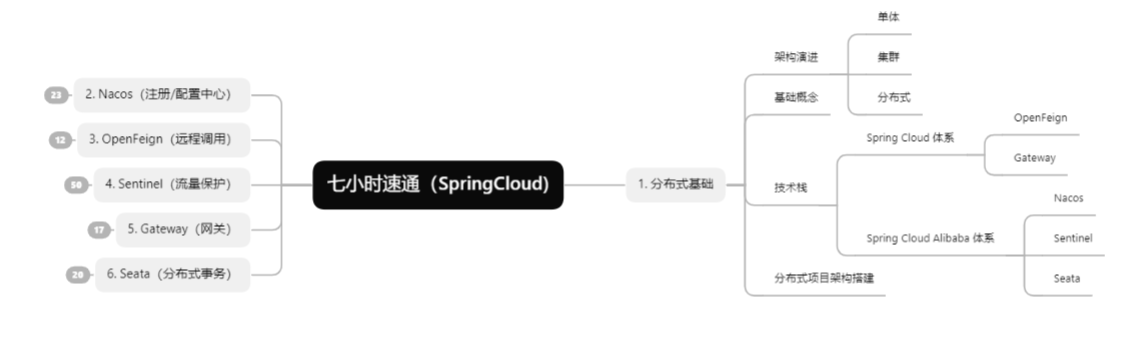
·
Spring Cloud 微服务全栈学习笔记(2025版)
从分布式基础 → Nacos → OpenFeign → Sentinel → Gateway → Seata
一套完整的 Spring Cloud Alibaba 微服务体系学习路线。
集成知识图谱:
非常适合快速入门复习:请查看知识图谱。
幕布知识图谱分享路径:https://share.mubu.com/doc/3SYoibiRbEn
都看到这了,给杰克李点个赞支持一下呗
你的‘赞’,是给与杰克李最大的动力鸭
有问题,可以评论区大家一起讨论
后续会在此更新,相关问题及解决方案
1. 分布式基础
1.1 架构演进
单体架构
-
所有模块部署在同一个项目中
-
开发简单
-
部署方便
-
后期维护困难
-
扩展性差
集群架构
-
多台服务器部署相同服务
-
提高并发能力
-
提高系统可用性
分布式架构
-
将系统拆分为多个独立微服务
-
每个服务独立部署
-
服务之间远程调用
1.2 基础概念
微服务
-
按业务拆分
-
独立部署
-
独立数据库
-
独立扩展
远程调用
-
服务与服务之间通信
-
HTTP / RPC
负载均衡
-
请求分摊到多个服务实例
-
提高并发能力
1.3 技术栈
Spring Cloud 体系
-
OpenFeign
-
Gateway
Spring Cloud Alibaba 体系
-
Nacos
-
Sentinel
-
Seata
1.4 分布式项目架构搭建
推荐模块:
service-order
service-product
service-user
service-gateway
common-api
common-utils
集成知识图谱:
幕布分享路径:https://share.mubu.com/doc/3SYoibiRbEn
知识图谱:
Nacos(注册中心 / 配置中心)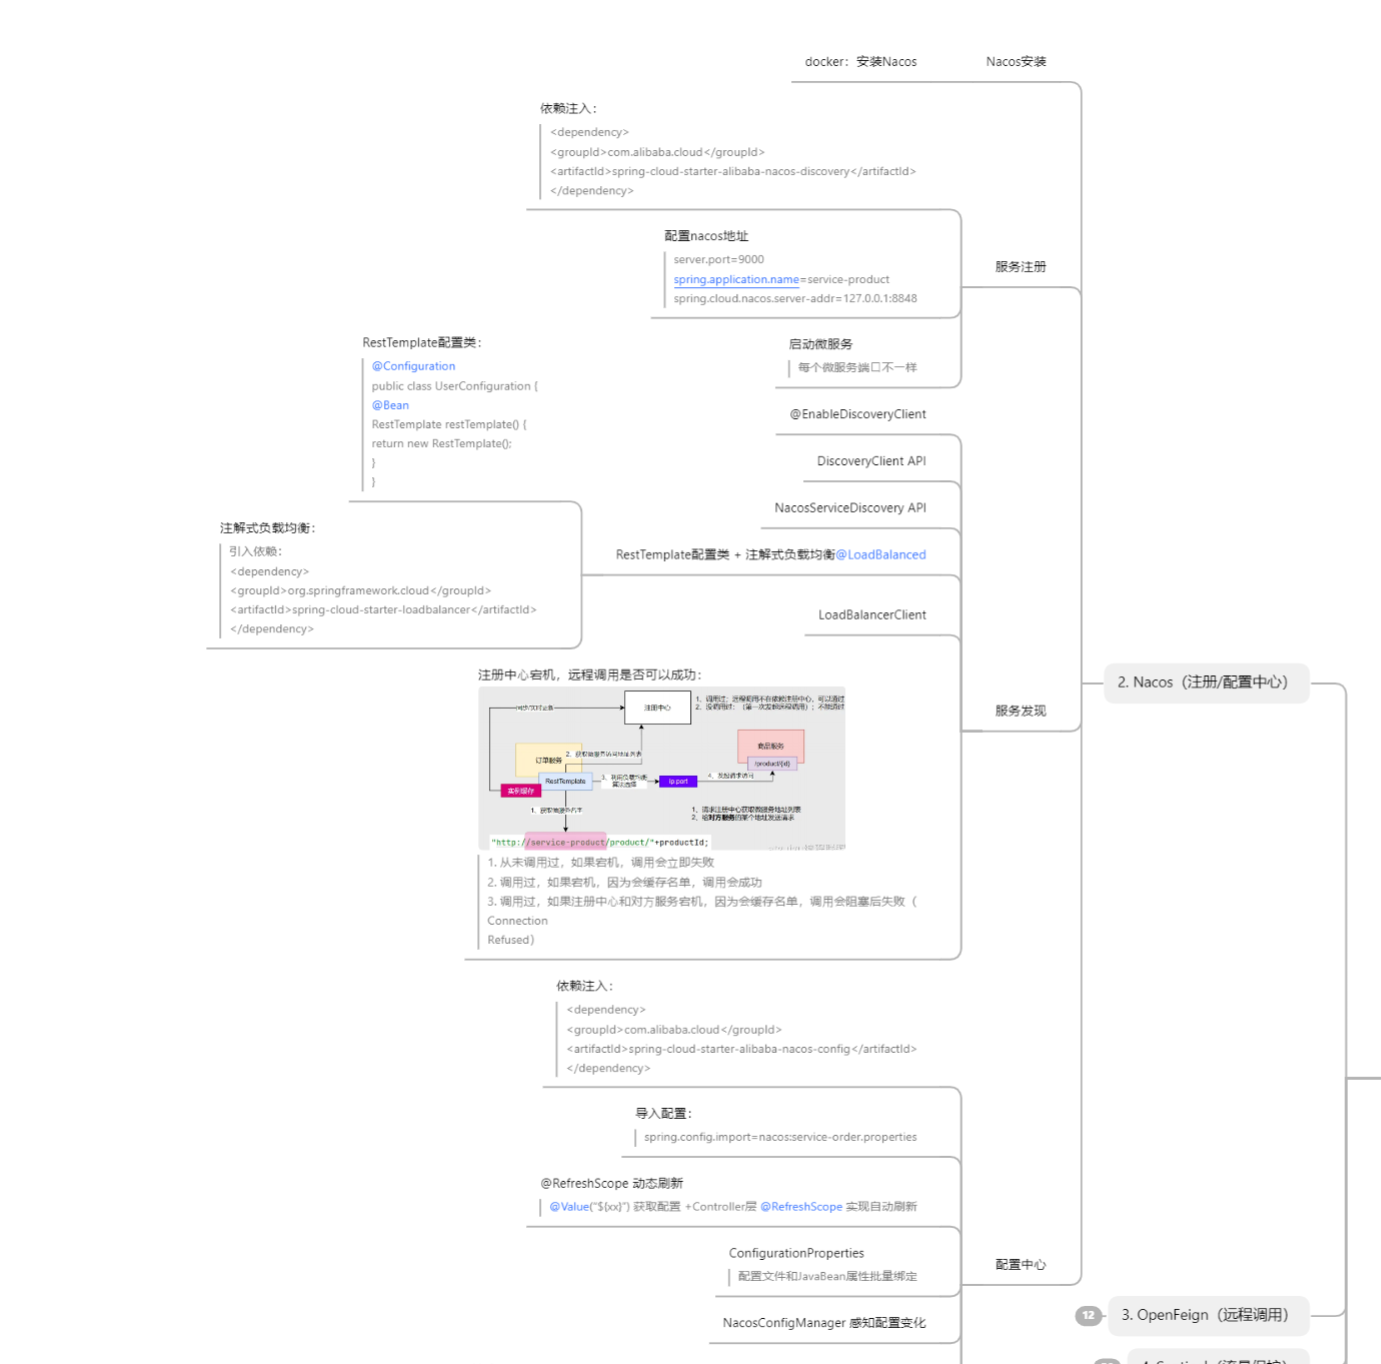
OpenFeign(远程调用)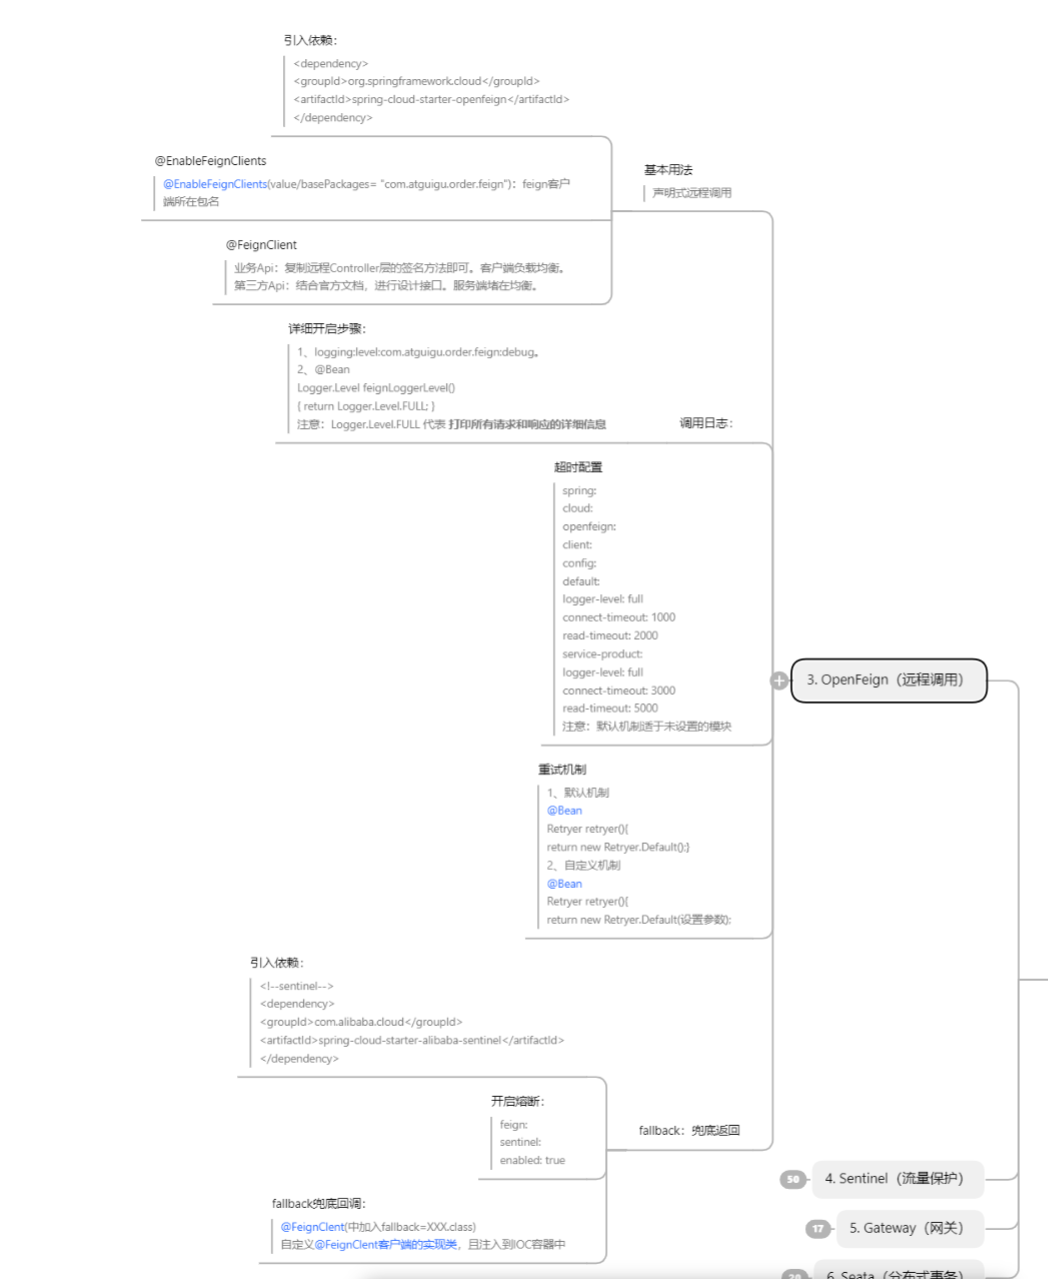
sentinel(流量保护)
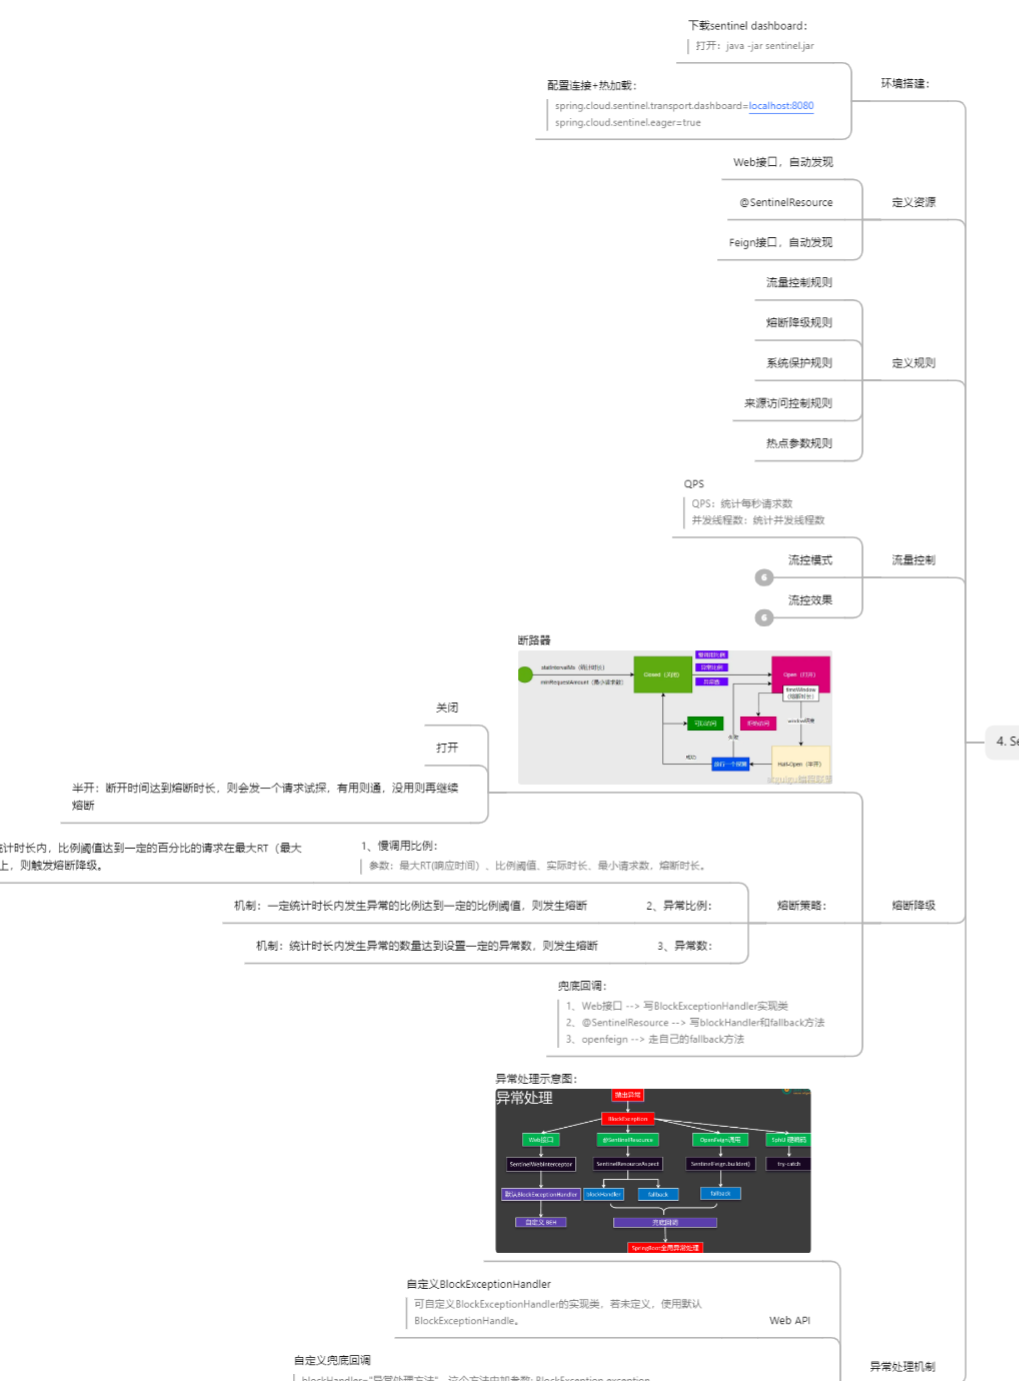
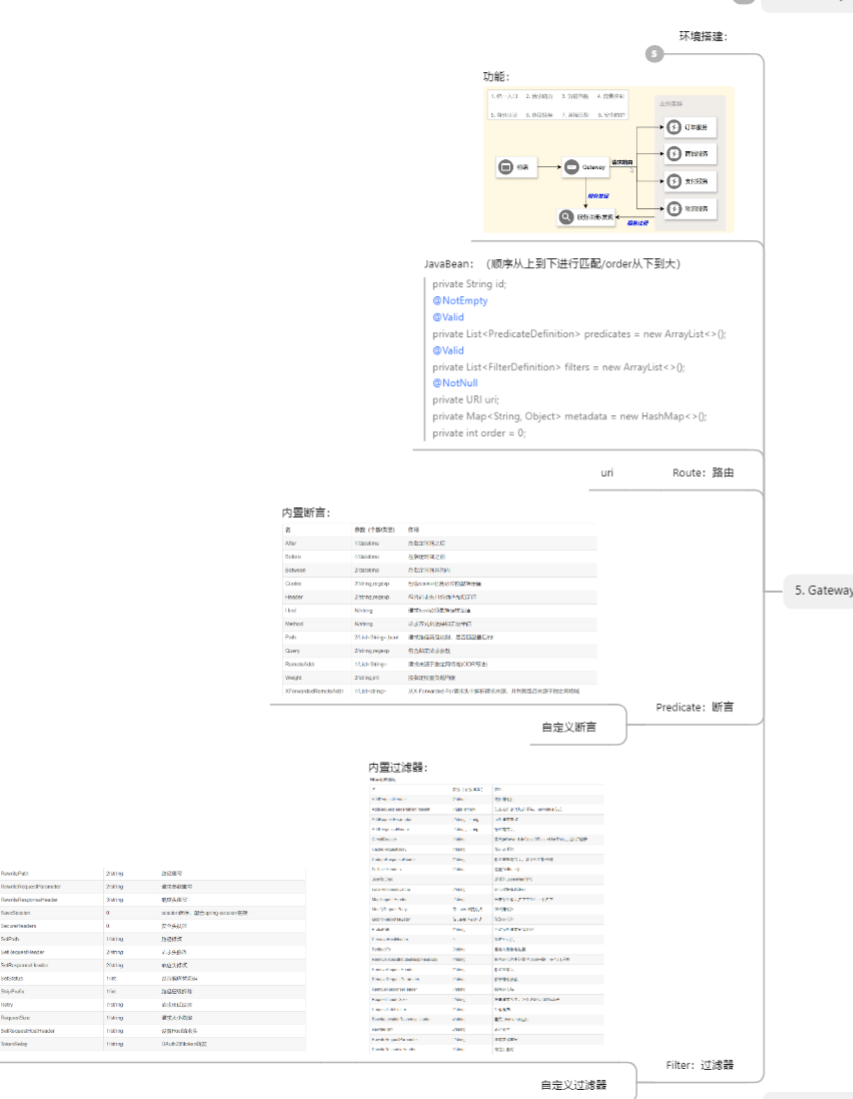
Gateway网关:
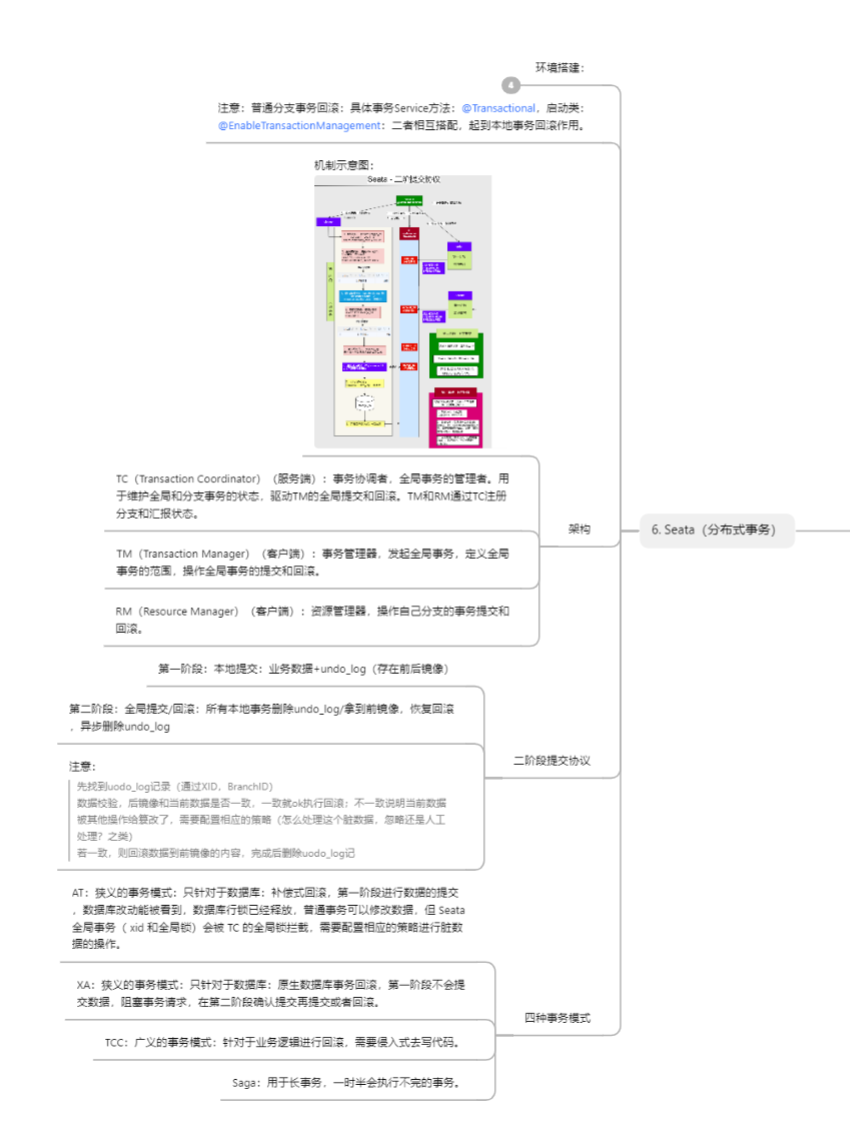
Seata(分布式事务)
2. Nacos(注册中心 / 配置中心)
2.1 Nacos 安装
Docker 安装 Nacos
docker run --name nacos \
-e MODE=standalone \
-p 8848:8848 \
-d nacos/nacos-server
默认访问:
http://localhost:8848/nacos
2.2 服务注册
引入依赖
<dependency>
    <groupId>com.alibaba.cloud</groupId>
    <artifactId>spring-cloud-starter-alibaba-nacos-discovery</artifactId>
</dependency>
配置 Nacos 地址
server.port=9000

spring.application.name=service-product

spring.cloud.nacos.server-addr=127.0.0.1:8848
启动微服务
每个微服务端口不能重复
2.3 服务发现
开启服务发现
@EnableDiscoveryClient
DiscoveryClient API
@Autowired
private DiscoveryClient discoveryClient;
RestTemplate + 负载均衡
RestTemplate 配置类
@Configuration
public class UserConfiguration {

    @Bean
    public RestTemplate restTemplate() {
        return new RestTemplate();
    }
}
注解式负载均衡
引入依赖
<dependency>
    <groupId>org.springframework.cloud</groupId>
    <artifactId>spring-cloud-starter-loadbalancer</artifactId>
</dependency>
使用 @LoadBalanced
@Bean
@LoadBalanced
public RestTemplate restTemplate() {
    return new RestTemplate();
}
LoadBalancerClient
@Autowired
private LoadBalancerClient loadBalancerClient;
注册中心宕机问题
- 注册中⼼宕机,远程调⽤是否可以成功:
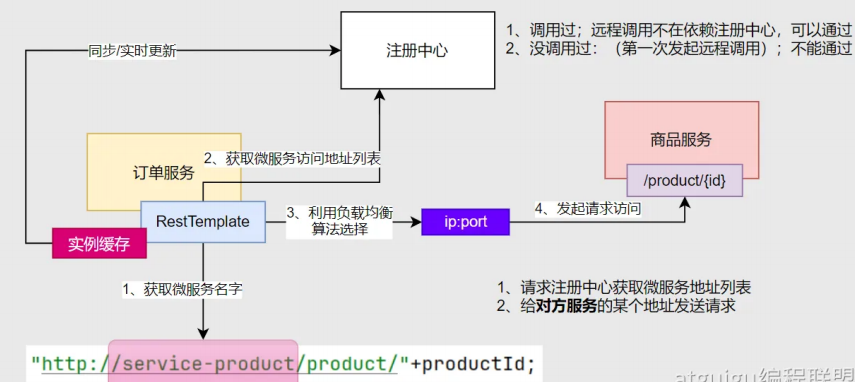
1. 从未调用过:
   注册中心宕机后,调用立即失败

2. 调用过:
   因为本地缓存服务列表,调用仍然成功

3. 注册中心 + 服务都宕机:
   会阻塞后失败(Connection Refused)
2.4 配置中心
引入依赖
<dependency>
    <groupId>com.alibaba.cloud</groupId>
    <artifactId>spring-cloud-starter-alibaba-nacos-config</artifactId>
</dependency>
导入配置
spring.config.import=nacos:service-order.properties
动态刷新配置
@RefreshScope
@Value("${xx}")
private String name;
ConfigurationProperties
@ConfigurationProperties(prefix = "user")
作用:
配置文件与 JavaBean 属性批量绑定
NacosConfigManager
@Autowired
private NacosConfigManager nacosConfigManager;
作用:
监听配置变化
配置隔离机制
| 配置项 | 作用 |
|---|---|
| namespace | 多环境隔离 |
| group | 微服务分组 |
| dataId | 不同配置文件 |
| profile | 激活环境 |
注意事项
后加载配置覆盖先加载配置

本地配置可能被 Nacos 配置覆盖
3. OpenFeign(远程调用)
3.1 基本用法
引入依赖
<dependency>
    <groupId>org.springframework.cloud</groupId>
    <artifactId>spring-cloud-starter-openfeign</artifactId>
</dependency>
开启 Feign
@EnableFeignClients(
    basePackages = "com.atguigu.order.feign"
)
Feign 客户端
@FeignClient("service-product")
public interface ProductFeignClient {

    @GetMapping("/product/{id}")
    Product getById(@PathVariable Long id);
}
特点
1. 声明式远程调用
2. 自带负载均衡
3. 接口化开发
3.2 调用日志
开启日志
logging:
  level:
    com.atguigu.order.feign: debug
配置 Logger.Level
@Bean
public Logger.Level feignLoggerLevel() {
    return Logger.Level.FULL;
}
FULL 级别
打印请求头、响应头、参数等全部信息
3.3 超时配置
spring:
  cloud:
    openfeign:
      client:
        config:

          default:
            logger-level: full
            connect-timeout: 1000
            read-timeout: 2000

          service-product:
            logger-level: full
            connect-timeout: 3000
            read-timeout: 5000
注意
default 对未单独配置的服务生效
3.4 重试机制
默认重试
@Bean
Retryer retryer() {
    return new Retryer.Default();
}
自定义重试
@Bean
Retryer retryer() {
    return new Retryer.Default(
        100,
        1000,
        3
    );
}
3.5 Fallback 兜底
引入 Sentinel 依赖
<dependency>
    <groupId>com.alibaba.cloud</groupId>
    <artifactId>spring-cloud-starter-alibaba-sentinel</artifactId>
</dependency>
开启 Feign 熔断
feign:
  sentinel:
    enabled: true
配置 fallback
@FeignClient(
    value = "service-product",
    fallback = ProductFeignFallback.class
)
public interface ProductFeignClient {
}
fallback 实现类
@Component
public class ProductFeignFallback
        implements ProductFeignClient {

    @Override
    public Product getById(Long id) {

        Product product = new Product();

        product.setName("兜底数据");

        return product;
    }
}
4. Sentinel(流量保护)
4.1 环境搭建
启动 Sentinel Dashboard
java -jar sentinel.jar
配置 Dashboard 地址
spring.cloud.sentinel.transport.dashboard=localhost:8080

spring.cloud.sentinel.eager=true
4.2 定义资源
Web 接口
自动识别
@SentinelResource
@SentinelResource("order-resource")
Feign 接口
自动识别
4.3 定义规则
五大规则
-
流量控制规则
-
熔断降级规则
-
系统保护规则
-
来源访问控制规则
-
热点参数规则
4.4 流量控制
QPS 与线程数
QPS
每秒请求数量
并发线程数
统计并发线程数量
流控模式
直接模式
资源自身超过阈值则限流
关联模式
资源B超过阈值时,限流资源A
典型场景:
写操作过多时,保护读操作
链路模式
spring:
  cloud:
    sentinel:
      web-context-unify: false
作用:
不同入口链路单独统计
流控效果
快速失败
直接拒绝请求
Warm Up 预热
系统慢慢提升到峰值流量
匀速排队
请求排队匀速执行
4.5 熔断降级
断路器状态
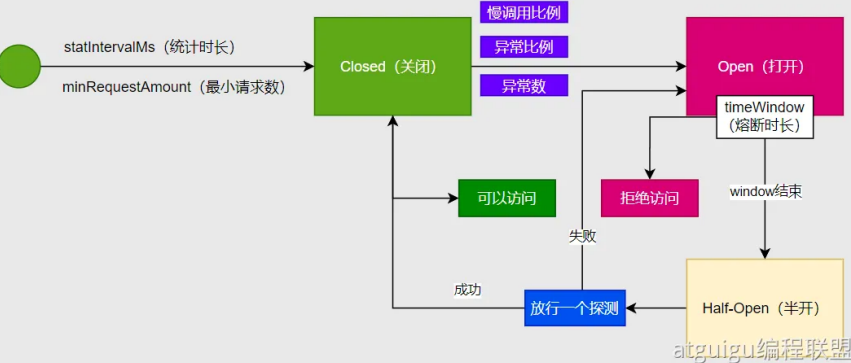
关闭
正常请求
打开
熔断状态
半开
尝试恢复服务
熔断策略
慢调用比例
响应时间过长比例达到阈值
异常比例
异常请求比例达到阈值
异常数
异常次数达到阈值
兜底回调
Web 接口
实现 BlockExceptionHandler
@SentinelResource
@SentinelResource(
    value = "test",
    blockHandler = "blockHandler",
    fallback = "fallback"
)
OpenFeign
使用 fallback 回调
4.6 异常处理机制
Web API
- 异常处理示意图:
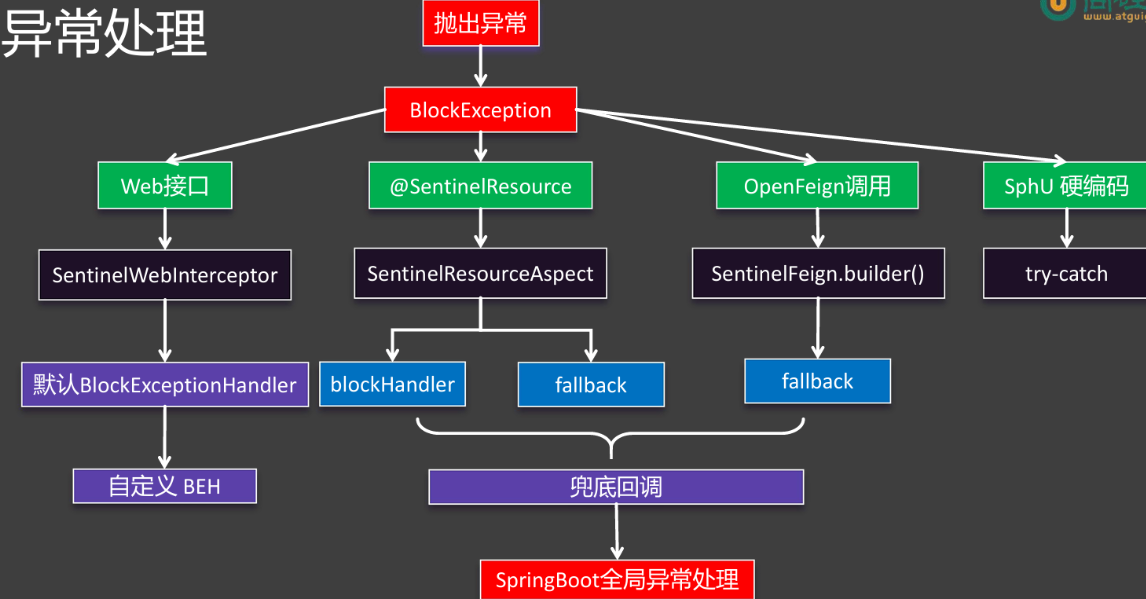
自定义 BlockExceptionHandler
@Component
public class MyBlockExceptionHandler
        implements BlockExceptionHandler {
}
@SentinelResource
blockHandler
public String blockHandler(
        BlockException exception) {
    return "限流";
}
fallback
public String fallback(
        Throwable exception) {
    return "异常";
}
OpenFeign
使用 fallback 统一兜底
5. Gateway(网关)
5.1 环境搭建
- 功能:
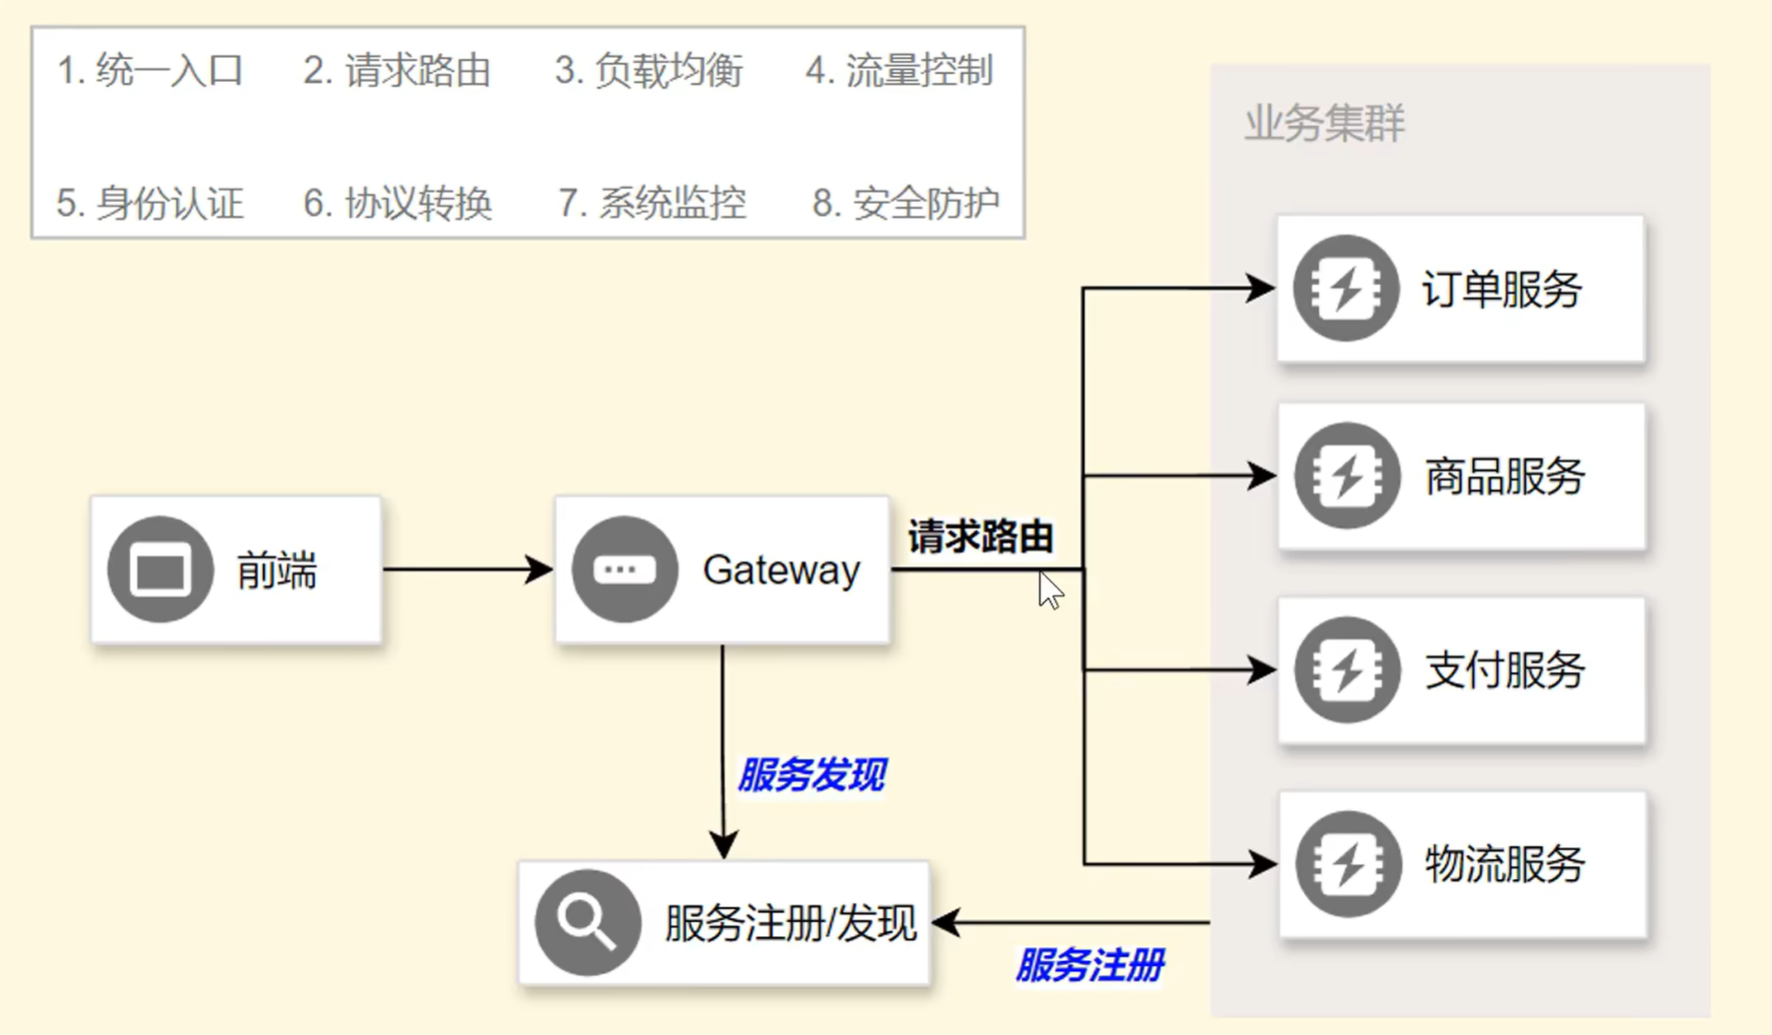
创建 Gateway 微服务
service-gateway
引入依赖
<dependency>
    <groupId>org.springframework.cloud</groupId>
    <artifactId>spring-cloud-starter-gateway</artifactId>
</dependency>

<dependency>
    <groupId>com.alibaba.cloud</groupId>
    <artifactId>spring-cloud-starter-alibaba-nacos-discovery</artifactId>
</dependency>
配置路由
- JavaBean:(顺序从上到下进行匹配/order从下到大)
private String id;
@NotEmpty
@Valid
private List<PredicateDefinition> predicates = new ArrayList<>();
@Valid
private List<FilterDefinition> filters = new ArrayList<>();
@NotNull
private URI uri;
private Map<String, Object> metadata = new HashMap<>();
private int order = 0;
spring:
  cloud:
    gateway:
      routes:

        - id: order
          uri: lb://service-order
          predicates:
            - Path=/api/order/**

        - id: product
          uri: lb://service-product
          predicates:
            - Path=/api/product/**
5.2 核心功能
Route(路由)
请求转发规则
Predicate(断言)
内置断言
- 内置断言:
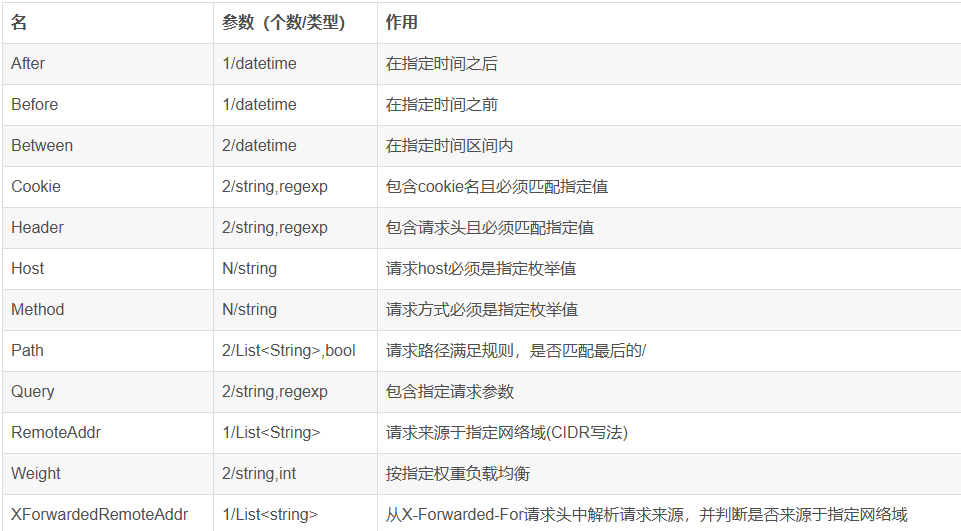
-
Path
-
Method
-
Header
-
Host
自定义断言
自定义匹配规则
Filter(过滤器)
内置过滤器
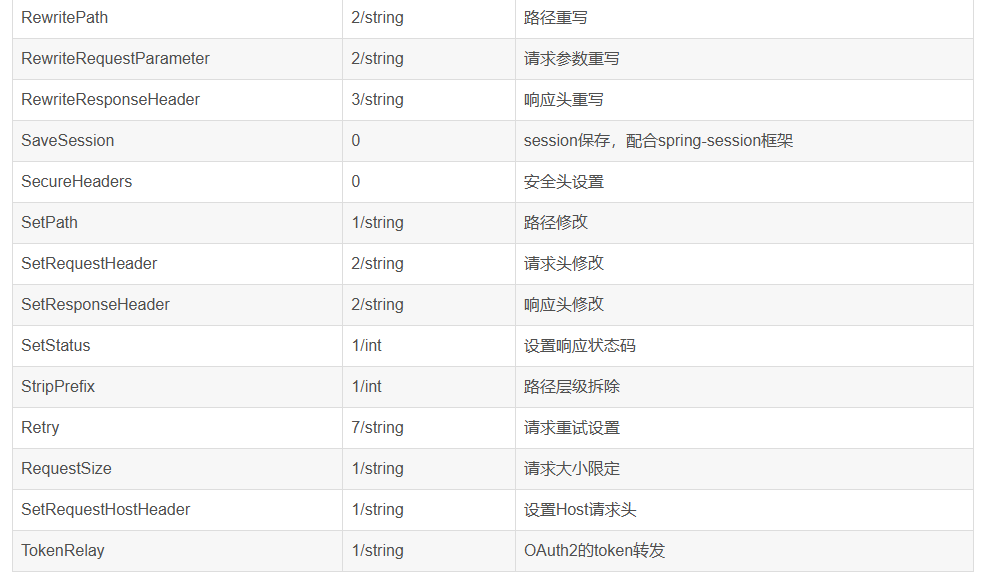
- 内置过滤器:
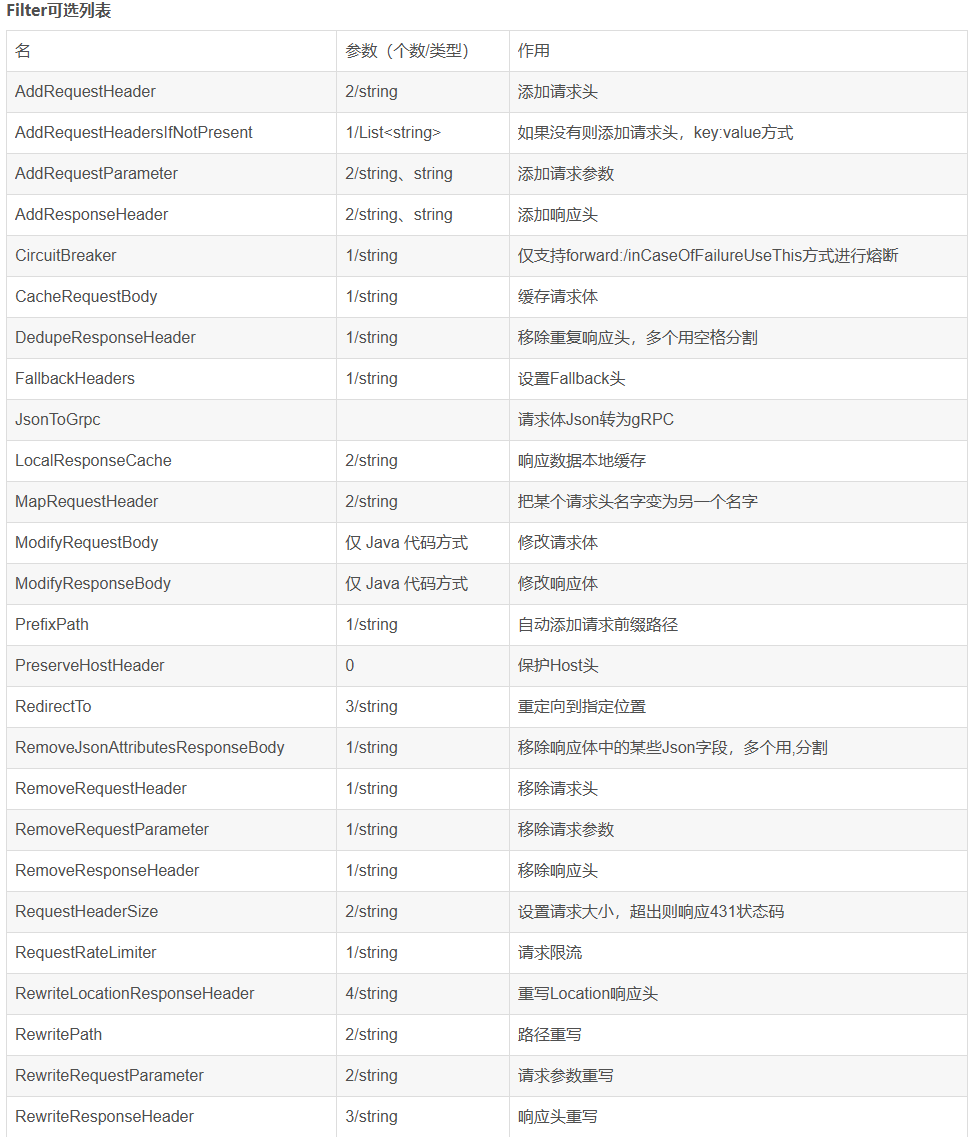
-
-
StripPrefix
-
AddRequestHeader
-
AddResponseHeader
自定义过滤器
@Component
public class AuthFilter
        implements GlobalFilter {
}
Route JavaBean
private String id;

@NotEmpty
@Valid
private List<PredicateDefinition> predicates
        = new ArrayList<>();

@Valid
private List<FilterDefinition> filters
        = new ArrayList<>();

@NotNull
private URI uri;

private Map<String, Object> metadata
        = new HashMap<>();

private int order = 0;
6. Seata(分布式事务)
6.1 环境搭建
启动 Seata
/bin/seata-server.bat
引入依赖
<dependency>
    <groupId>com.alibaba.cloud</groupId>
    <artifactId>spring-cloud-starter-alibaba-seata</artifactId>
</dependency>
file.conf 配置
每个微服务都需要 file.conf

通常复制 service 模块配置即可
开启事务
分支事务
@Transactional
全局事务
@GlobalTransactional
注意
只需在主入口添加全局事务注解
普通事务回滚
Service 层
@Transactional
启动类
@EnableTransactionManagement
6.2 Seata 架构
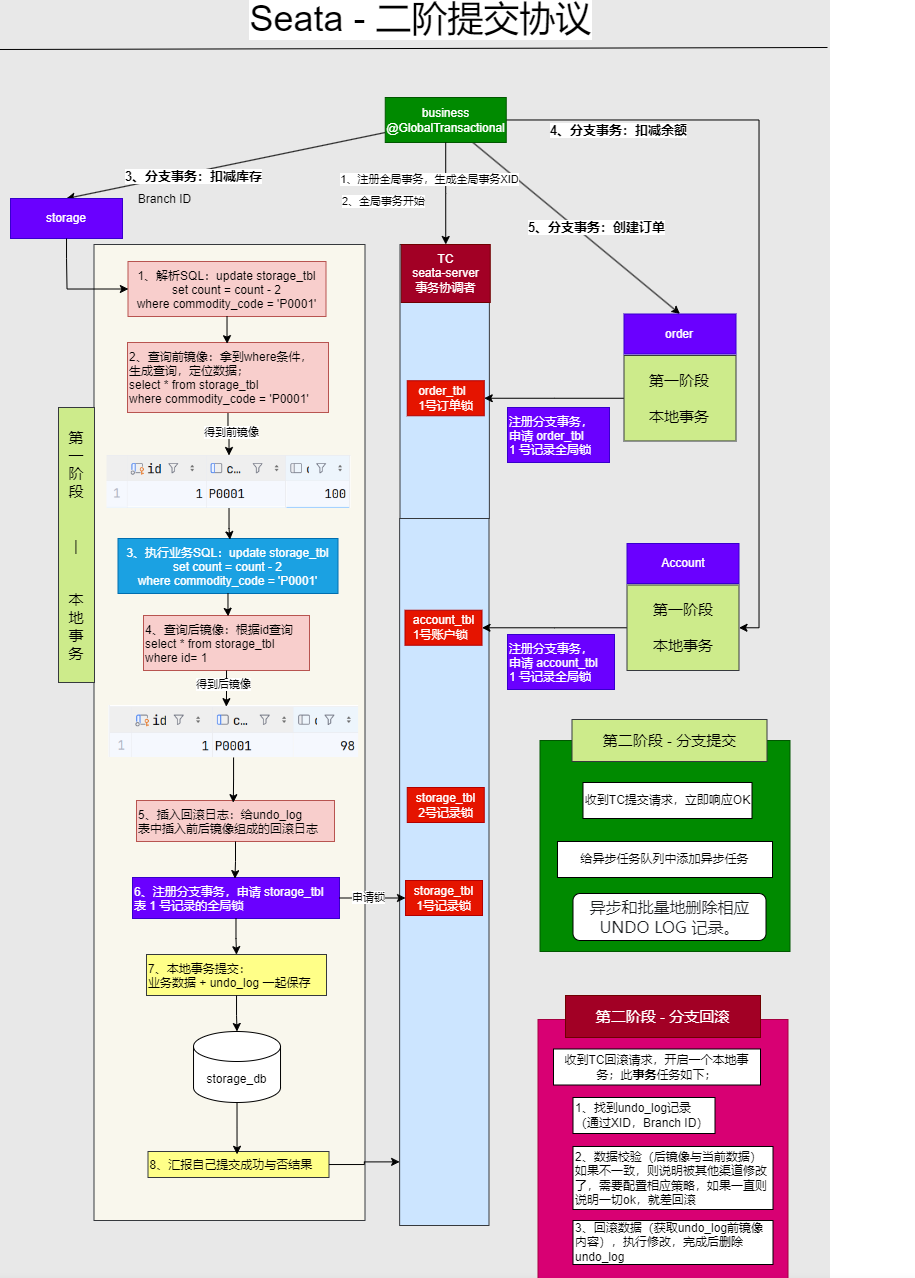
- 机制示意图:
TC(Transaction Coordinator)
事务协调者(服务端)

负责:
1. 管理全局事务
2. 驱动提交回滚
TM(Transaction Manager)
事务管理器(客户端)

负责:
1. 开启全局事务
2. 提交 / 回滚事务
RM(Resource Manager)
资源管理器(客户端)

负责:
1. 管理分支事务
2. 提交 / 回滚本地事务
6.3 二阶段提交协议
第一阶段
本地事务提交
业务数据 + undo_log 一起提交
undo_log
记录数据前镜像和后镜像
第二阶段
全局提交
删除 undo_log
全局回滚
根据前镜像恢复数据
回滚流程
1. 根据 XID + BranchID 找到 undo_log

2. 校验后镜像与当前数据是否一致

3. 一致:
   执行数据恢复

4. 不一致:
   说明脏数据被修改
   根据策略处理
6.4 四种事务模式
AT 模式
补偿式事务

第一阶段直接提交本地事务
通过 undo_log 回滚
特点:
1. 数据可见
2. 行锁释放
3. Seata 全局锁仍存在
XA 模式
数据库原生 XA 协议
特点:
1. 第一阶段不提交
2. 阻塞事务
3. 一致性更强
TCC 模式
Try
Confirm
Cancel
特点:
需要业务代码侵入
Saga 模式
适用于长事务
例如:
订单审批
跨系统流程
长时间任务
🎯 总结
Spring Cloud Alibaba 核心体系:
| 组件 | 作用 |
|---|---|
| Nacos | 注册中心 + 配置中心 |
| OpenFeign | 服务远程调用 |
| Sentinel | 限流熔断 |
| Gateway | 网关路由 |
| Seata | 分布式事务 |
🚀 推荐学习顺序
分布式基础
    ↓
Nacos
    ↓
OpenFeign
    ↓
Sentinel
    ↓
Gateway
    ↓
Seata
🌟 最终目标
掌握:
1. 微服务拆分
2. 服务注册发现
3. 远程调用
4. 限流熔断
5. 网关路由
6. 分布式事务
7. 微服务高可用架构
更多推荐

 16
16 0
0- 0


 已为社区贡献2条内容

所有评论(0)