
有其它语言基础快速转python
一.变量的创建
1.1创建的形式
变量创建方式:变量名 = 变量值
Python 变量无需预先指定类型或显式声明存在,直接赋值即可自动创建并使用。每个变量在使用前都必须赋值,变量赋值以后该变量才会被创建。
1.2多个变量的创建
# 多个变量的创建
var1 = var2 = var3 = 10  # 多个变量的值相同
var4, var5, var6 = 10, 20, 30  # 多个变量的值不同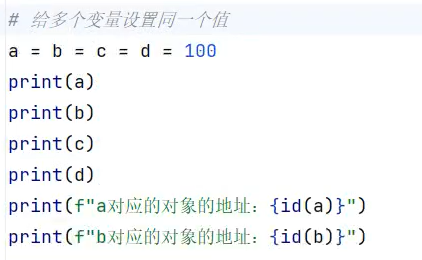

1.3python中的变量本质是对变量的引用或者指针,而非数据的容器
a = [1, 2, 3]
b = a       # b 和 a 引用同一个列表
b.append(4)
print(a)    # 输出 [1, 2, 3, 4]
1.4约定:大写代表常量
在程序中定义后就不再修改的值为常量,Python中没有内置的常量类型。一般约定使用全大写变量名来表示常量。
PI = 3.1415926
E = 2.718282
二.python中常见的数据类型
2.1 基本数据类型
2.1.1 数值
整数(int)
浮点数(float)
计算精度问题
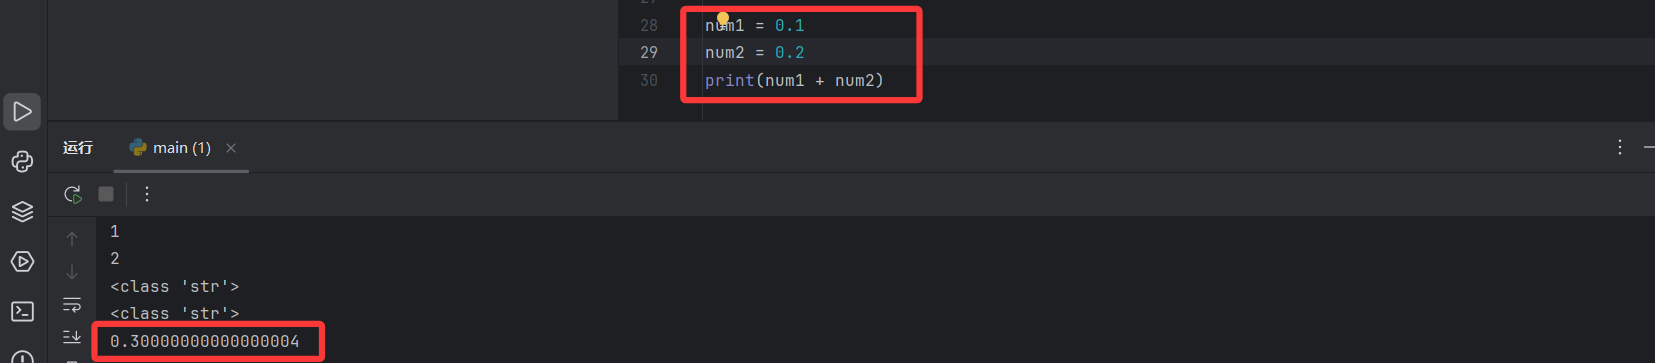
解决精度问题 -- 类比Java中的BigDecimal
# Python 精确计算(对应 Java BigDecimal)
from decimal import Decimal

a = Decimal("0.1")
b = Decimal("0.2")
print(a + b)  # 输出 0.3  完全正确,无精度丢失
复数(complex)
complex1 = 1 + 2j
print(type(complex1))

布尔(bool)
注意:布尔类型是整数类型的父类
flag = False
print(flag + 1)

flag = True
print(flag + 1)
同样,你可以用True==1 或者 False==0来检测。
bytes -- Java的byte[ ]
字节数组。
2.2 字符串(str)
可以使用单引号 '...' 或双引号 "..." 创建。
也可以使用三个引号表示多行字符串。三引号允许一个字符串跨多行.一个典型的用例是,当你需要一块HTML或者SQL时,使用三个引号就很简单。
2.2.1字符串的特点
-
字符串是不可变的、有序的。
-
字符串使用单引号、双引号或三重引号定义。
-
字符串中每个值都有对应的位置值,称为索引或下标,索引从起始从0开始向后逐个递增,并且末尾从-1开始逐个向前递减。
-
可以使用转义符
str1 = "hello world\n"
str2 = "welcome to python"
print(str1 + str2)
### 结果###
hello world
welcome to python
2.2.2允许反向随机访问以及随机访问子串
str1 = "hello world"
print(str1[0])
print(str1[-1])
print(str1[4:-3]) # 前闭(包含)后开(不包含)左闭右开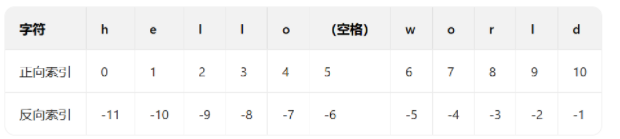
2.2.3允许乘法
str1 = "hello world"
print(str1 * 2)  # hello worldhello world
#或者
str2 = "hello world"*2
print(str2)
###结果###
hello worldhello world
hello worldhello world
2.2.4成员是否为字符串中元素
str = 'ciallo'
print('lo' in str)  # True
###结果###
True
2.2.5str类型常用方法
1)split方法
str = 'ciallo world'
print(str.split())
print(type(str.split()))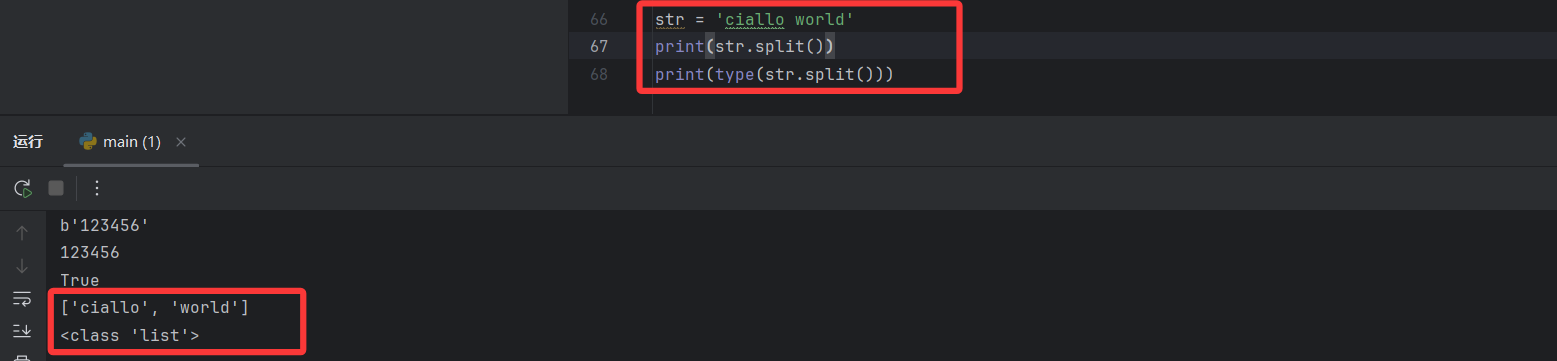
2)replace方法
str.replace(旧字符串, 新字符串, 替换次数)- old:必须 → 要被替换的旧内容
- new:必须 → 替换成的新内容
- count:可选 → 最多替换几次(不写默认全部替换)
3)join方法
list = ['1','2','3','4','5']
print(','.join(list))
#1,2,3,4,5
4) find方法
str = 'ciallo world ,suzumie'
print(str.find('suzu',0,20))
#14
5)index方法
str = 'ciallo world ,suzumie'
print(str.find('suzu',0,20)) #14
print(str.find('suzu')) #14
index和find方法的区别:
1>index没找到会报异常,find没找到会返回-1
# 2.未找到子串时
# find() 返回 -1
print(s.find("Python"))  # 输出: -1
# index() 抛出异常:
2>index方法可以去找列表,元组等,而find仅限于str
# 3.index() 的扩展用法
# index() 还可用于 列表(list) 和 元组(tuple),而 find() 仅限字符串:
# 列表中使用 index()
lst = [10, 20, 30]
print(lst.index(20))  # 输出: 1

# 元组中使用 index()
tup = (1, 2, 3)
print(tup.index(3)) # 输出: 2| 方法 | 适用类型 | 找到子串时 | 未找到子串时 | 错误处理 |
|---|---|---|---|---|
find() | 字符串(str) | 返回子串的起始索引(≥0) | 返回 -1 | 不报错 |
index() | 字符串、列表、元组 | 返回子串的起始索引(≥0) | 抛出 ValueError | 报错 |
6)max方法
l = [1, 2, 3, 4, 5]
print(l.index(2)) # 1
print(max(l)) # 5
7)min方法
l = [1, 2, 3, 4, 5]
print(l.index(2)) # 1
print(min(l)) # 1
8)其它常用方法
| 函数 | 说明 |
|---|---|
| str.replace(old,new[,max]) | 把将字符串中的old替换成new,如果指定max,则替换不超过max次 |
| str.split(x) | 按x分隔字符串,默认按任何空白字符串分隔并在结果中丢弃空字符串。可指定最大分隔次数 |
| str.rsplit(x) | 与split()类似,从右边开始分隔 |
| x.join(seq) | 以x作为分隔符,将序列中所有的字符串合并为一个新的字符串 |
| str.strip([x]) | 截掉字符串两边的空格或指定字符 |
| str.lstrip([x]) | 截掉字符串左边的空格或指定字符 |
| str.rstrip([x]) | 截掉字符串右边的空格或指定字符 |
| str.removeprefix() | 截掉字符串指定前缀 |
| str.removesuffix() | 截掉字符串指定后缀 |
| str.upper() | 将所有字符转为大写 |
| str.lower() | 将所有字符转为小写 |
| str.swapcase() | 反转字符串中字母大小写 |
| str.capitalize() | 将字符串第一个字母变为大写,其他字母变为小写 |
| str.title() | 将字符串每个单词首字母大写 |
| str.casefold() | 返回适合无大小写比较的字符串版本 |
| len(str) | 返回字符串长度 |
| max(str) | 返回字符串中最大值 |
| min(str) | 返回字符串中最小值 |
| str.find(x,start) | 返回字符串中第一个x的索引值,不存在则返回-1,可指定字符串开始结束范围 |
| str.rfind(x,start) | 与find()类似,从右边开始查找 |
| str.index(x,start) | 返回字符串中第一个x的索引值,不存在则报错,可指定字符串开始结束范围 |
| str.rindex(x,start) | 与index()类似,从右边开始查找 |
| str.count(x,start) | 返回字符串中x的个数,可指定字符串开始结束范围 |
| str.startswith(x,start) | 检查字符串是否以x开头,可指定字符串开始结束范围 |
| str.endswith(x,start) | 检查字符串是否以x结尾,可指定字符串开始结束范围 |
| str.isspace() | 检查字符串是否非空且只包含空白 |
2.2容器数据类型
2.2.1、列表(list)→ 对标 Java ArrayList
有序、可重复、可修改,增删改查非常方便。
[1,2,3]
2.2.2、元组(tuple)→ 对标 Java 不可变 List
有序、可重复、不可修改,一旦创建不能改,比 list 安全。
(10,11,12)
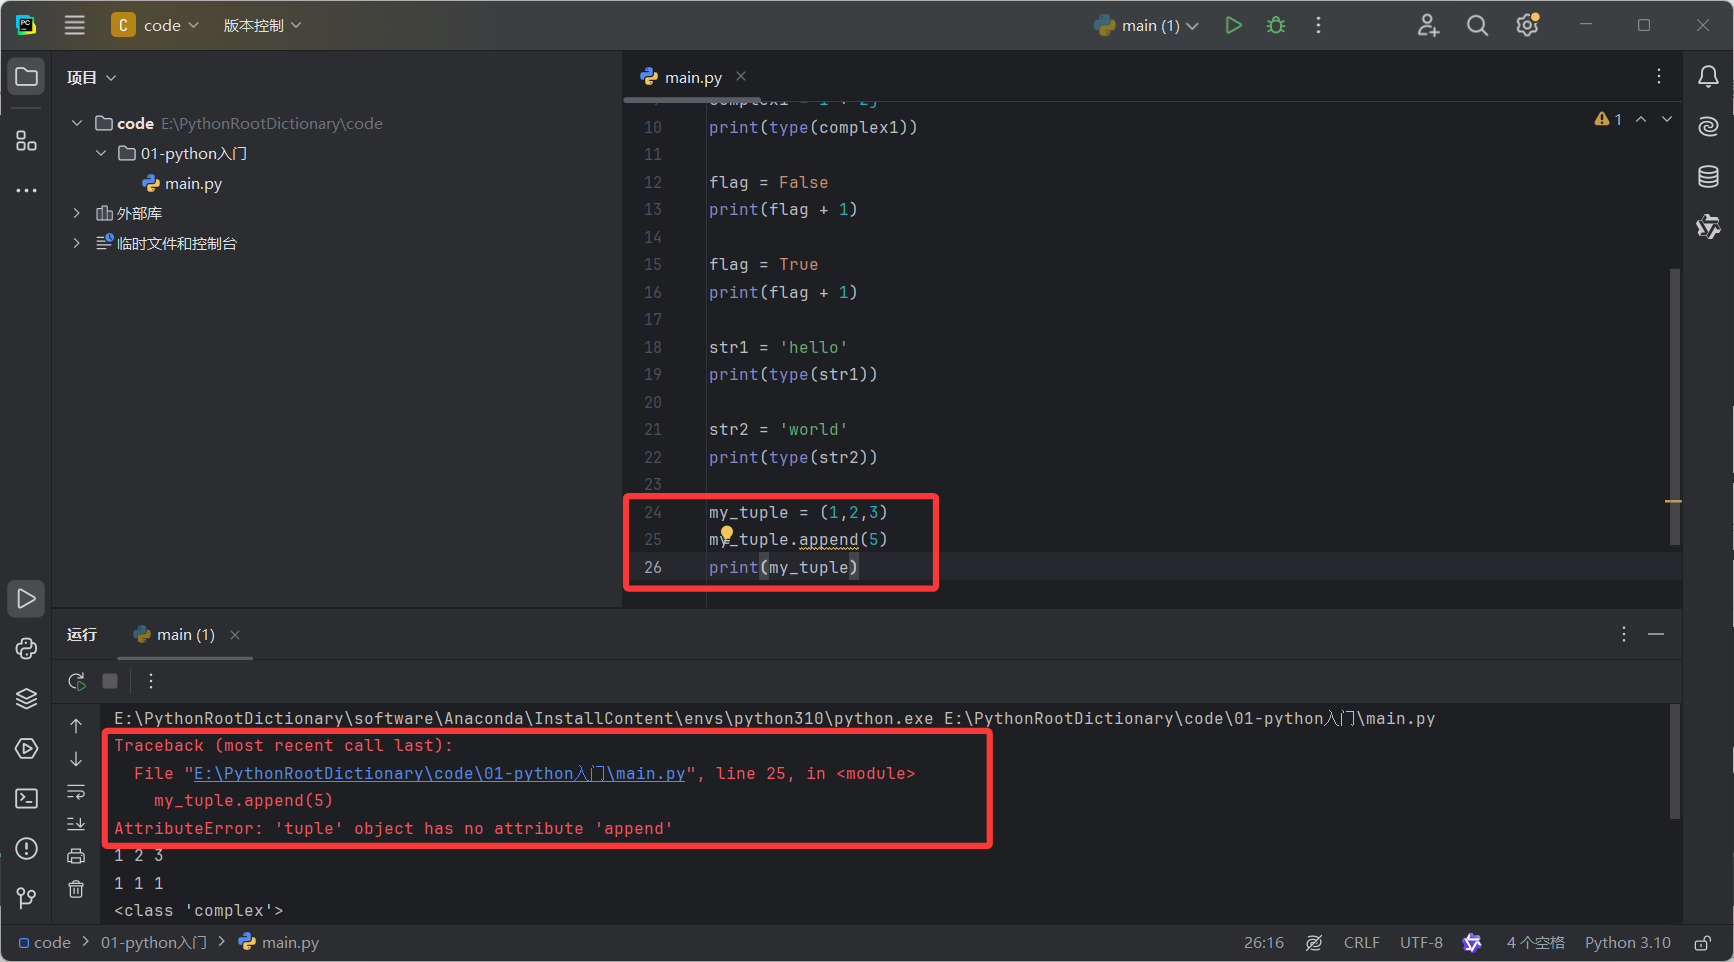
2.2.3、集合(set)→ 对标 Java HashSet
无序、无重复、自动去重
{1,3,5}
2.2.4、字典(dist)→ 对标 Java HashMap
2.3 算逻运算符
2.3.1整数运算符
| 运算符 | 说明 | 实例 |
|---|---|---|
| + | 加 | a + b |
| - | 减、或取负 | a - b、-a |
| * | 乘 | a * b |
| / | 除 | a / b |
| // | 整除,除后向下取整 | a // b |
| % | 模,返回除法的余数 | a % b |
| ** | 幂 | a ** b |
2.3.2赋值运算符
| 运算符 | 说明 | 实例 |
|---|---|---|
| = | 赋值 | a = 1 |
| += | 加法赋值 | a += 2,等同于a = a + 2 |
| -= | 减法赋值 | a -= 2,等同于a = a - 2 |
| *= | 乘法赋值 | a *= 2,等同于a = a * 2 |
| /= | 除法赋值 | a /= 2,等同于a = a / 2 |
| //= | 整除赋值 | a //= 2,等同于a = a // 2 |
| %= | 模赋值 | a %= 2,等同于a = a % 2 |
| **= | 幂赋值 | a = 2,等同于a = a 2 |
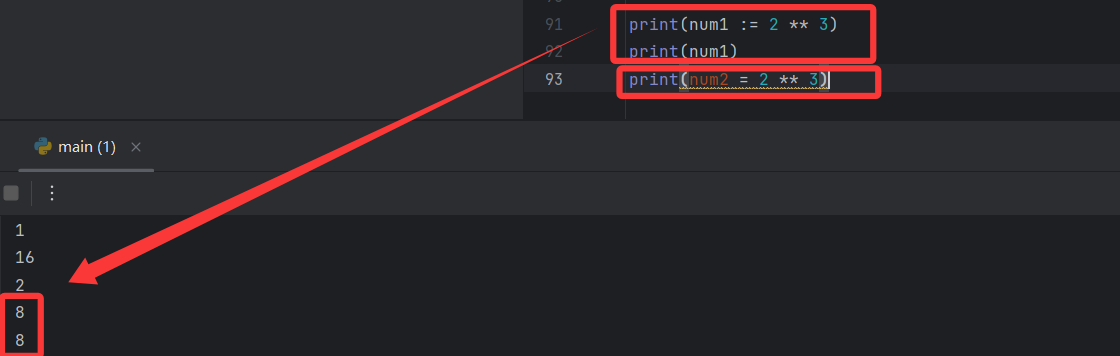
| := | 海象运算符,在表达式中同时进行赋值和返回运算结果。Python3.8 版本新增 | num1 = 20 print((num2 := 3**2) > num1) print(num2) |
2.3.3 比较运算符
| 运算符 | 说明 | 实例 |
|---|---|---|
| == | 相等,比较两者的值 | a == b |
| != | 不相等 | a != b |
| > | 大于 | a > b |
| < | 小于 | a < b |
| >= | 大于等于 | a >= b |
| <= | 小于等于 | a <= b |
2.3.4逻辑运算符
| 运算符 | 说明 |
|---|---|
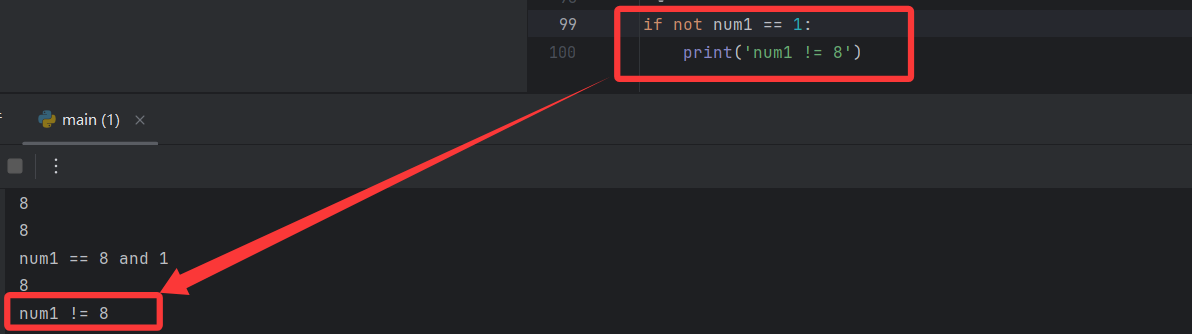
| and | 先计算左侧表达式,再根据左侧结果决定是否计算右侧表达式 如果左侧表达式的布尔值为假(Falsy),则直接返回左侧的值,不再计算右 侧。 如果左侧表达式的布尔值为真(Truthy),则返回右侧表达式的值(无论右侧是真还是假)。 |
| or | 先计算左侧表达式,再根据左侧结果决定是否计算右侧表达式。 如果左侧表达式的布尔值为真(Truthy),则直接返回左侧的值,不再计算右侧(短路)。 如果左侧表达式的布尔值为假(Falsy),则返回右侧表达式的值(无论右侧是真还是假)。 |
| not | 非,not x,若x为True返回False,若x为False返回True |
2.3.5成员运算符
| 运算符 | 说明 | 实例 |
|---|---|---|
| in | 在指定的序列中找到值返回 True,否则返回 False | a in ['a', 'b', 'c'] |
| not in | 在指定的序列中没有找到值返回 True,否则返回 False | a not in ['a', 'b', 'c'] |
if not num1 in [1,2,3]:
    print('num1 not in [1,2,3]')
2.4 条件判断语句
2.4.1 if elif else
if 条件1:

  # 语句1 # 条件1满足时执行

elif 条件2: #条件1不满足时检查条件2

  # 语句2   # 条件2满足时执行

elif 条件3: #条件1条件2都不满足时检查条件3

  # 语句3 # 条件2满足时执行

else:  # else如不需要可以省略 #所有条件都不满足执行

  # 语句4
2.4.2 match case
case 里的专用语法:在 case 后面写多个值,用 | 分隔,表示 “任意一个匹配”,这里不是位运算,而是或的意思。
case _: = 其他所有 case 都不匹配时执行,相当于 else /default
1)匹配数值
match x:
    case a:
        # 语句1
    case b:
        # 语句2
    case _:
        # 语句3
match month := 1:
case 1 | 3 | 5 | 7 | 8 | 10 | 12:
print(f"{month}月有31天")
case 4 | 6 | 9 | 11:
print(f"{month}月有30天")
case 2:
print(f"{month}月可能有28天")
case _:
print(f"{month}月有?天")2)匹配数据类型
Python match...case 的专用写法:匹配【int 类型】的数据!
# 匹配数据类型
value = 3.14
match value:
    case int():
        print("整数")
    case float():
        print("浮点数")  # 输出: 浮点数
3)匹配字典类型
# 匹配字典类型
data = {"name": "Alice", "age": 30}
match data:
    case {"name": str(name), "age": int(age)}:  # 类型+解构(匹配结构 + 提取变量”)
        print(f"{name}, {age}岁")  # 输出: Alice, 30岁
    case _:
        print("未知格式")
2.4.3三元运算符
表达式1
if 判断条件:
else 表达式2
num1 = 2
num2 = 3
if num1 > num2:
max_num = num1
else:
max_num = num2
print(max_num)
# 使用三元运算符
num1 = 2
num2 = 3
max_num = num1 if num1 > num2 else num2
print(max_num)2.5 强制转换
| 函数 | 作用 | 例子 |
|---|---|---|
| int(x) | 转整数 | int("18") → 18 |
| float(x) | 转浮点数 | float("3.14") → 3.14 |
| str(x) | 转字符串 | str(123) → "123" |
| bool(x) | 转布尔 | bool(0) → False |
| list(x) | 转列表 | list((1,2,3)) → [1,2,3] |
| tuple(x) | 转元组 | tuple([1,2]) → (1,2) |
2.6 enumerate函数
# enumerate函数
list_fruit = ['apple', 'banana', 'orange']
for index,value in enumerate(list_fruit):
    print(f"下标:{index},水果名{value}")

# 下标:0,水果名apple
# 下标:1,水果名banana
# 下标:2,水果名orange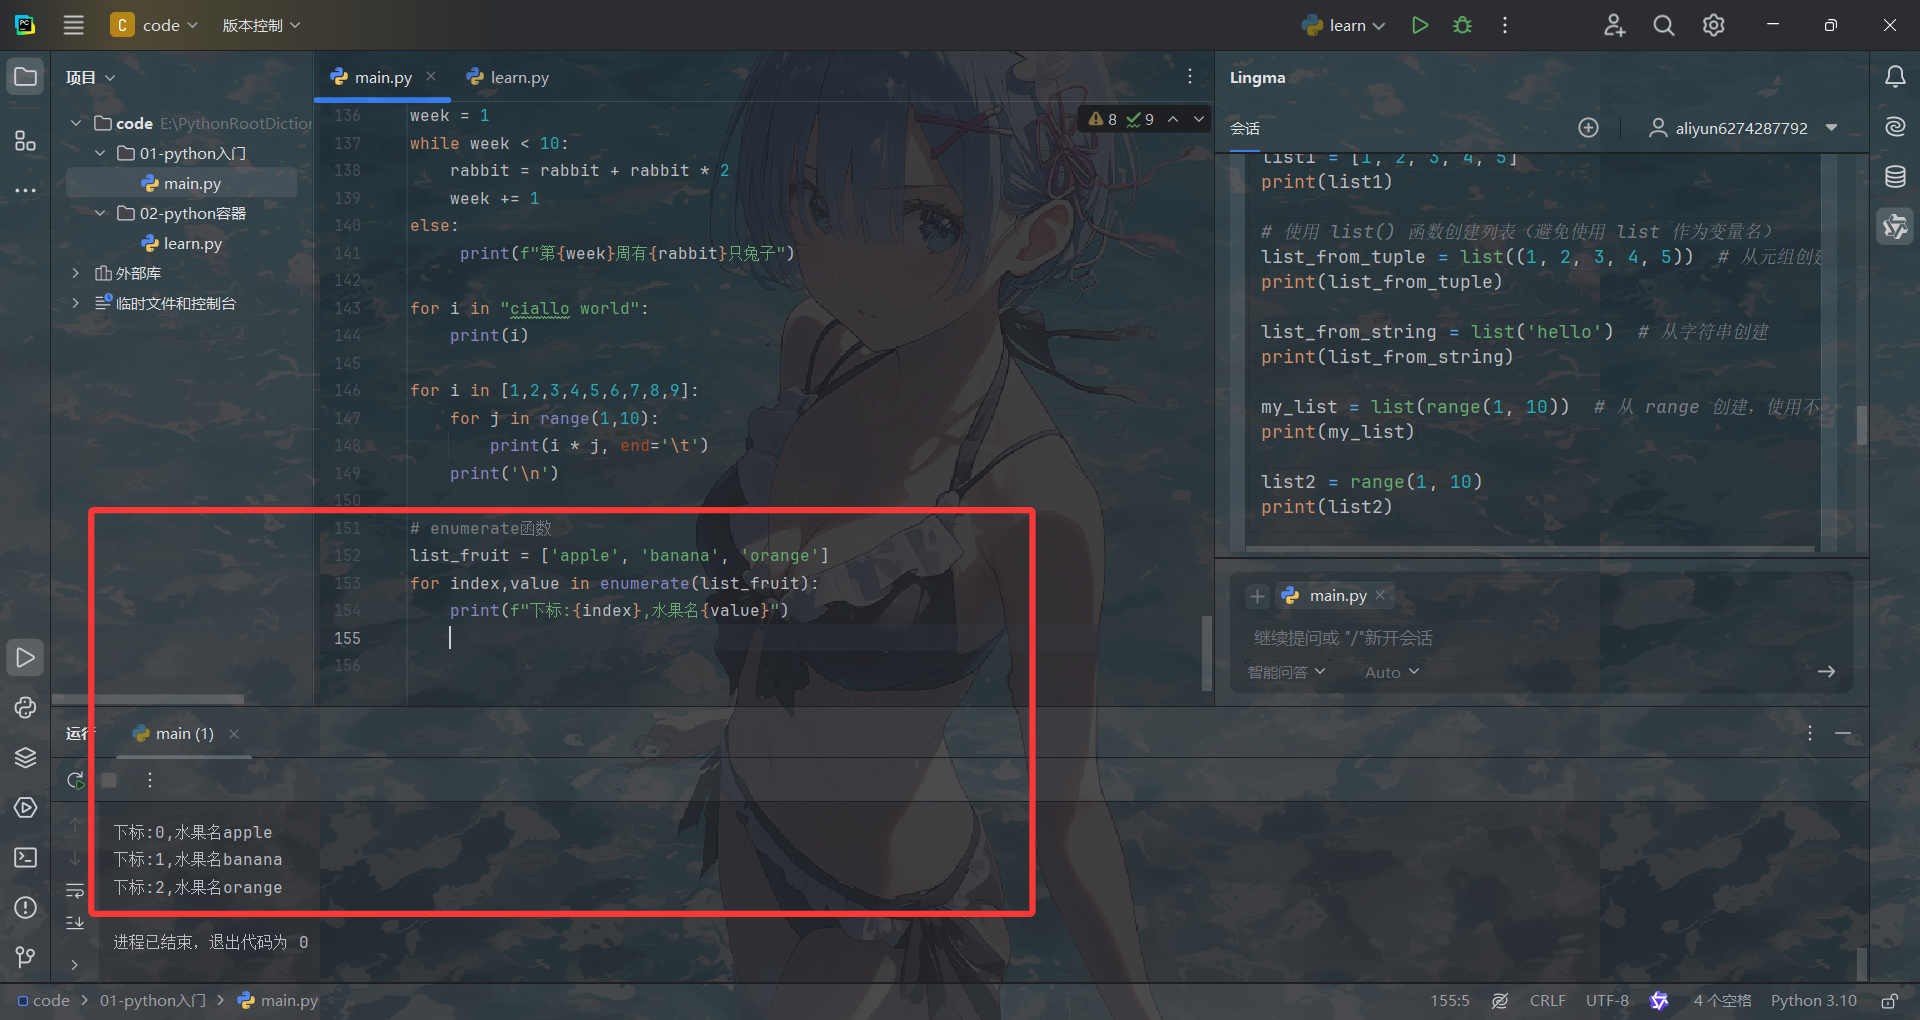
三.python容器
3.1列表list
3.1.1特点
-
有序列表:列表中的元素保持插入顺序
-
可变类型:创建后可以修改(增删改元素后对象地址不会改变)
-
可包含任意类型:同一个列表可以包含数字、字符串、其他列表等不同类型
-
允许重复元素:同一个值可以出现多次
3.1.2创建列表
-
直接创建列表
-
通过 list() 函数创建列表
# 创建列表的两种方式
# 通过range()创建
list_from_range = list(range(1, 10))
print(list_from_range)

# 通过元组创建
list_from_tuple = list((1, 2, 2, 3, 4))
print(list_from_tuple)

# 通过str创建
list_from_str = list('ciallo world')
print(list_from_str)


# 直接创建list
list_direct = [1, 2, 3, 4, 5]
print(list_direct)
3.1.3列表的遍历
# 通过索引遍历
print(list_from_str[0:-1])

print(list_from_range[::])

for i in list_from_str[0:-1]:
    print(i)

for i in range(len(list_from_str)):
    print(list_from_str[i])
3.1.4enumerate函数获取列表的索引和元素
#enumerate函数
for index,value in enumerate(list_from_str):
    print(f"下标:{index},字符名{value}")

# 下标:0,字符名c
# 下标:1,字符名i
# 下标:2,字符名a
# 下标:3,字符名l
# 下标:4,字符名l
# 下标:5,字符名o
# 下标:6,字符名
# 下标:7,字符名w
# 下标:8,字符名o
# 下标:9,字符名r
# 下标:10,字符名l
# 下标:11,字符名d
3.1.5列表的函数
| 函数 | 说明 |
|---|---|
| list.insert(index,x) | 在指定位置插入x |
| list.append(x) | 在列表末尾追加x |
| list1.extend(list2) | 在列表1的末尾追加列表2的数据 |
| del list[index] | 删除指定位置的数据或切片 |
| list.remove(x) | 删除第一次出现的x |
| list.pop([index]) | 删除指定位置的数据,默认为末尾数据 |
| list.clear() | 清空列表中元素 |
| list[index] = x | 修改指定位置的数据 |
| list1[start:end] = list2 | 修改列表切片的数据 |
| sorted(list[,reverse=True]) | 返回排序后的新列表,可选降序 |
| list.sort([reverse=True]) | 对列表就地排序,可选降序 |
| list.reverse() | 反转列表中的元素 |
| list.index(x[,start,[,end]]) | 返回x在列表中首次出现的位置,可指定起始和结束范围 |
| list.count(x) | 返回x的数量 |
| len(list) | 返回列表元素个数 |
| max(list) | 返回列表中最大值 |
| min(list) | 返回列表中最小值 |
| sum(list) | 返回列表中所有元素和 |
| list.copy() | 拷贝列表 |
| list(x) | 将序列转换为列表 |
1)反转原列表
list_from_range.reverse()
print(list_from_range)
2)保留原列表,但是获得一个新的反转的列表
print(list(reversed(list_from_range)))
print(list_from_range)

reverse = list_from_range[::-1]
print(reverse)
print(list_from_range[::])
3)用sorted进行排序并反转
print(sorted(list_unsorted, reverse=True))4)排序
list_unsorted = [5, 3, 1, 2, 4]
list_from_sort = sorted(list_unsorted)
print(list_from_sort)
3.2元组Tuple
3.2.1特点
-
使用语法:元组使用 () 定义,元素之间使用 , 分隔,单元素元组需要逗号
(只要元素之间有逗号,()可以省略)。
-
有序集合:元组中的元素保存插入顺序。
-
不可变类型:不能对元组中的不可变对象进行修改操作(增删改元素)
-
可包含任意类型:元组中元素可以是不同的类型。
-
允许重复元素:同一个值可以出现多次。
3.2.2元组的创建
-
直接创建元组
-
通过 tuple() 函数创建元组
3.2.3元组的创建
# 创建原组
# 直接创建元组
tuple_direct = (1, 2, 3, 4, 5)

# 通过range()创建
tuple_from_range = tuple(range(1, 10))
print(tuple_from_range)

# 通过list创建
tuple_from_list = tuple([1, 2, 3, 4, 5,6])
print(tuple_from_list)
3.2.4元组的访问
# 访问多个下标的元素
print(tuple_from_range[0:3])
print(tuple_from_range[-4:-1])
print(tuple_from_range.index(3,0,len(tuple_from_range)))
3.2.5原则的运算
1)元组的相加
# 元组相加
tuple_part1 = tuple(range(1,5))
print(tuple_part1)
tuple_part2 = tuple(range(5,10))
print(tuple_part2)
print(tuple_part1 + tuple_part2)
2)元组相乘
# 元组相乘
print(tuple_part1 * 3)
3)检测元组是否含义某成员
# 元组的成员检测
print(1 in tuple_part1)
4)元组的长度
# 元组的长度
print(len(tuple_part1))
5)求元组的最大,最小值
# 元组的最大,最小的值
print((f"The max value of tuple_part1 is {max(tuple_part1)}"))
print((f"The min value of tuple_part1 is {min(tuple_part1)}"))
6)元组的求和
# 元组的求和
print(sum(tuple_part1))
7)元组的比较
# 元组的比较

# 元组比较 = 从左到右,逐个位置比元素
# 比的是:元素的大小 / 字典序
# 只要比出大小,立刻停止,后面不看!
tuple_test_compare1 = (1,2,3,4,5,6,7)
tuple_test_compare2 = (1,2,3,3,5,6,7)
tuple_test_compare3 = (1,2,3,5,5,6,7)
8)元组的排序
tuple_unsorted = (5,3,1,2,4,9,6,1)
print(sorted(tuple_unsorted,reverse = True))
3.2.6元组的遍历
# 元组的遍历
for i in tuple_from_range:
    print(i)

print("====================")
for i in range(len(tuple_from_range)):
    print(tuple_from_range[i])

print("====================")
for i in tuple_from_range[::]:
    print(i)

print("====================")
for i in tuple_from_range[::-1]:
    print(i)

print("====================")
print(tuple_from_range[::])
print(tuple_from_range[::-1]) # 反向输出元组
3.2.7enumerate函数
# enumerate函数
for index,value in enumerate(tuple_from_range):
    print(f"下标:{index},字符名{value}")
3.3集合Set
3.3.1特点
-
使用语法:集合Set使用{}定义,元素之间使用,分割
-
无序集合:集合中的元素不以任何特定顺序存储,所以集合没有索引,也不能通过索引或切片方式访问集合元素
-
可变类型:可以对集合中的元素进行修改操作(增删改元素)
-
可以包含任意类型:集合中元素可以是不同类型
-
不允许重复元素:同一个值只能出现一次
-
支持集合运算:集合可以进行数学上的集合操作,如并集、交集和差集。
3.3.2 集合的创建
-
直接创建集合
-
通过 set() 函数创建集合
3.3.3 集合不支持切片和随机访问
# 访问集合
# 访问单个元素
 print(set_from_range[-2]) # 报错: set类不支持随机访问
 print(set_from_range[::]) # 报错: set类不支持切片访问
3.3.4集合的并差交集
# 集合的运算
# 集合的交集
set_part1 = {1, 2, 3, 4, 5}
set_part2 = {4, 5, 6, 7, 8}
print(set_of_intersection := set_part1 & set_part2)
print(set_of_intersection )

# 集合的并集
print("================")
print(set_of_union := set_part1 | set_part2)
print(set_part1.intersection(set_part2))
# 集合的差集
print(set_of_difference := set_part1 - set_part2)
3.3.5集合的增删元素
# 向集合中添加元素
set_of_union.add(9) # 添加一个元素
set_of_union.update([10, 11, 12]) # 添加多个元素
print(set_of_union)

# 从集合中删除元素
set_of_union.remove(9) # 删除一个元素
set_of_union.discard(10) # 删除一个元素
set_of_union.pop() # 删除头部的一个元素
# set_of_union.clear() # 删除所有元素
set_of_union.difference_update([8,11, 12]) # 删除一系列元素
print(set_of_union)
3.3.6检测集合是否存在某些元素
# 检验集合是否存在某些元素
print(1 in set_of_union)
print(3 in set_of_union)
3.3.7获取集合的元素
# 获取集合的长度
print(len(set_of_union))
3.3.8获取集合的最大,最小元素和求和
# 集合中的元素的最大值,最小值,求和
print(max(set_of_union))
print(min(set_of_union))
print(sum(set_of_union))
3.3.9 集合的排序
# 集合的排序
print(sorted(set_of_union, reverse=True))
print(sorted(set_of_union))
3.3.10 集合的比较
# 集合的比较
set_compare1 = {1, 2, 4, 5, 8}
set_compare2 = {1 ,2, 4, 5, 7}
set_compare3 = {1 ,2, 3, 6, 7}

print(set_compare1 > set_compare2)
print(set_compare1 > set_compare3)
print(set_compare2 > set_compare3)
3.3.11集合的遍历
# 集合的遍历
# 通过for循环遍历
print("==============")
for i in set_of_union:
    print(i)

# 通过enumerate函数遍历
print("==============")
for index,value in enumerate(set_of_union):
    print(f"下标:{index},元素名{value}")

# 转为list再遍历
print("==============")
for i in list(set_of_union):
    print(i)
3.4 字典dict
3.4.1字典的特点
-
使用语法:字典使用 {} 定义,键(key)和值(value)使用 : 连接,每个键值对之间使用 , 分隔。如{key1 : value1, key2 : value2}
-
有序性:python3.7+版本,保证字典会记住键值对的插入顺序,但是字典没有索引,不能使用索引或切片访问,可以通过键访问对应的值。
-
可变类型:可以对字典中的元素(键值对)进行修改操作(增删改元素)
-
键值类型:值可以取任何数据类型,但键必须是不可变的,如字符串、数字、元组等。不能使用列表、集合或字典作为可变类型做为键。
-
键值重复性:字典中的键必须是唯一的,如果重复赋值,后面的值会覆盖前面的,value可以重复。
3.4.2字典的创建
-
直接创建字典
-
通过 dict() 函数创建字典
# 字典的创建
# 字典的直接创建
dict_direct = {"name": "张三", "age": 18, "sex": "男"}
print(dict_direct)

# 通过dict创建
dict_from_dict = dict(name="张四", age=19, sex="男")
print(dict_from_dict)
3.4.3 访问字典
# 字典的基本操作
# 访问字典
# 使用Key访问
print("字典的基本操作")
print("使用key访问")
print(dict_direct["name"])
print(dict_direct["age"])
print(dict_direct["sex"])

# 使用get访问
print("使用get访问")
print(dict_direct.get("name"))
print(dict_direct.get("age"))
print(dict_direct.get("sex"))
3.4.4字典的增删
# 字典运算
# 向字典添加元素
print("向字典添加元素") # 添加一个元素
dict_direct["address"] = "北京"
print(dict_direct)

dict_direct.update({"phone": "12345678901", "email": "12345678901@163.com"})# 添加多个元素
print(dict_direct)

# 删除字典元素
print("删除字典元素")
dict_direct.pop("phone")
print(f"删除后的dict_direct = {dict_direct}")
3.4.5字典成员的检测
# 字典key成员检测
print("字典key成员检测")
print("name" in dict_direct)
print("ciallo" in dict_direct)
3.4.6获取字典的长度
# 获取字典的长度
print("获取字典的长度")
print(len(dict_direct))
3.4.7查找字典的最大,最小值
# 字典中的最大,最小值的查找
print("字典中的最大,最小值的查找")
dict_score = {
    "张三": 100,
    "张四": 90,
    "张五": 80,
    "张六": 70,
    "张七": 60,
    "张八": 50,
    "张九": 40,
    "张十": 30,
    "张十一": 20,
    "张十二": 10,
    "张十三": 0
}

print(f"dict_score = {dict_score}")
# 查找字典的最大值
print(values := dict_score.values()) # 获取字典的值
print(type(dict_score.values())) # 获取字典的值这个函数的返回类型
print(max(dict_score.values()))
# 获取字典中的最小值
print(min(dict_score.values()))
3.4.8字典的排序
# 字典的排序
print("字典的排序")
print(f"原来的dict_score = {dict_score}")
print(sorted(dict_score.items(), key=lambda x: x[1], reverse=False)) # 反向排序,不会修改原字典
print(sorted(dict_score.items(), key=lambda x: x[1], reverse=True)) # 正向排序,不会修改原字典
3.4.9字典的默认值处理
# 字典的默认值处理
print("字典的默认值处理")
dict_default = {"name": "张三", "age": 18, "sex": "男"}
print(dict_default.get("phone", "没有这个key"))
print(dict_default.get("email", "没有这个key"))
3.4.10 字典的合并
# 字典的合并
print("字典的合并")
dict_merge_part1 = {"name": "张三", "age": 18, "sex": "男"}
dict_merge_part2 = {"phone": "12345678901", "email": "12345678901@163.com"}
dict_merge = {**dict_merge_part1, **dict_merge_part2} # 合并字典
print(dict_merge)
3.4.11 字典的遍历(包含enumerate函数)
# 遍历字典
print("遍历字典")
# 通过for循环遍历
print("====================")
for key, value in dict_merge.items():
    print(f"key = {key}, value = {value}")

# 通过keys()方法遍历
print("====================")
print(type(dict_merge.keys()))
print(dict_merge.keys())
print(tuple(dict_merge.keys()))
for key in dict_merge.keys():
    print(f"key = {key}")

# 通过values()方法遍历
print("====================")
print(type(dict_merge.values()))
print(dict_merge.values())
print(tuple(dict_merge.values()))
for value in dict_merge.values():
    print(f"value = {value}")

# 错误写法
# for key,value in dict_merge.keys(),dict_merge.values():
#     print(f"key = {key}, value = {value}")

# 通过enumerate函数遍历
print("====================")
for index,value in enumerate(dict_merge.items()):
    print(f"下标:{index},元素名{value}")

# 转换为列表后遍历
print("====================")
print(f"原来的items为dict_merge.items() = {dict_merge.items()}")
print(type(list(dict_merge.items())))
print(list(dict_merge.items()))

for i in list(dict_merge.items()):
    print(i)
3.4.12 .items()函数 → 拿所有 键值对(key+value)
print(student.items())
# dict_items([('name', 'ciallo'), ('age', 18), ('sex', '男')])- 类型:dict_items
- 每一项都是 元组 (key, value)
- 最常用:遍历字典
3.4.13 .keys()函数 → 拿所有 键(key)
作用:获取字典里所有的 key
print(student.keys())
# dict_keys(['name', 'age', 'sex'])- 类型:dict_keys(视图对象)
- 不是列表、不是元组
- 可以遍历、可以转 list/tuple
3.4.14 .values()函数 → 拿所有 值(value)
作用:获取字典里所有的 value
print(student.values())
# dict_values(['ciallo', 18, '男'])
四.函数
4.1 传入不可变/可变对象类型参数
4.1.1 传入不可以对象类型参数
不可变类型:
也即值传递,如整数、浮点数、字符串、元组等。比如如def fun(a):,传递的只是a的值,没有传递a对象的地址。比如在fun(a)内部修改a的值,只是修改另一个复制的对象的值,不会影响 a 本身对象的值。
# 题目 1
# 定义一个函数,接收一个整数参数。在函数内部把这个参数改成 100。在外面定义一个变量 a = 10,调用函数后打印 a。
def change_Int(a):
    a = 100
    return a

a = 10
print(change_Int(a))

# 题目 2
# 定义一个函数,接收一个列表参数。在函数内部给列表添加一个元素 99。外面定义列表 lst = [1,2,3],调用后打印原列表。
def apend_int(list):
    list.append(99)
    return list

list1 = list(range(1,4))
print(apend_int(list1))

# 题目 3
# 定义一个函数,接收一个列表参数。在函数内部直接把参数赋值成一个新列表 [10,20,30]。外面定义 lst = [1,2,3],调用后打印原列表。
def update_list(list):
    list = [10,20,30]
    return list

list2 = list(range(1,4))
print(update_list(list2))

# 题目 4
# 定义一个函数,接收一个字符串参数。函数内部执行 s += "python"。外面定义 s = "hello",调用后打印原字符串。
def print_str(str):
    str += " python"
    return str

str = "ciallo"
print(print_str(str))

# 题目 5
# 定义一个函数,接收一个元组参数。函数内部执行 t += (4,5)。外面定义 t = (1,2,3),调用后打印原元组。
def add_tuple(tuple):
    tuple += (4,5)
    return tuple

tuple = (1,2,3)
print(add_tuple(tuple))
4.1.2 传入可变对象参数类型
可变类型:
也即引用(地址)传递,如列表,集合、字典等。如def fun(la):,则是将 la对象地址传过去,修改后fun外部的la也会受影响。
# 题目 6
# 定义一个函数,接收一个字典参数。函数内部给字典添加一个键值对 'score': 100。外面定义 d = {'name': '张三'},调用后打印原字典。
def append_dict(dict):
    dict['score'] = 100


d = {'name': '张三'}
append_dict(d)
print(d)
4.2参数
4.2.1 默认值参数
定义函数时,可以给每个形参指定默认值,接着在调用函数时,可以选择是否给提供了实参值,如果提供了,则使用提供的实参值,否则使用形参的默认值,给形参指定默认值后,可在函数调用中省略相应的实参。使用默认值可简化函数调用。
def print_info(name,age = 20) :
    print("姓名:",name)
    print("年龄:",age)

print_info("zhangsan")

print_info("lisi",30)
4.2.2 关键字参数
函数调用使用关键字参数和定义方法形参名进行匹配,并且不要求函数调用时关键字参数的顺序与定义函数的参数名一致。
def print_info(name,age) :
    print("姓名:",name)
    print("年龄:",age)

# Python解释器可以通过age和name这样的关键字去和形参进行匹配
print_info(name = "zhangsan",age = 18)
print_info(age = 18,name = "zhangsan")
4.2.3不定长参数
函数定义的时候,参数的个数是不确定的。
一种是参数带一个星号 *的可变长参数
def print_info(num,*vartuple):
    print(num)
    print(vartuple)

printInfo(70,60,50)

print("-" * 20)
# 如果不定长的参数后面还有参数,必须通过关键字参数传参
def print_info(num1,*vartuple,num) :
    print(num)
    print(num1)
    print(vartuple)

print_info(10,20,num = 40)

print("-" * 20)
# 如果没有给不定长的参数传参,那么得到的是空元组
print_info(70,num = 60)
*args : 只能接收同类型的多个值
def func(*args):**args : 可以接收任意类型、任意个数的位置参数
def func(**kwargs):4.2.4 题目
# 题目 1(基础)
# 定义一个函数 add,接收:
# 一个普通参数 base
# 一个不定长参数 *nums
# 函数功能:把 base 加上所有 nums 里的数字,返回总和。
def add(base,*num):
    sum = 0;
    for i in num:
        sum += i
    return sum + base

print(add(1,2,3,4,5))


# 定义函数 show:
# 参数:msg, *words
# 功能:
# 先打印 msg
# 再打印 words(看它是不是空元组)
def show(msg,*words):
    print(f"{msg},{words}")

show("hello")
show("hi", "Python", "Java", "Go")

# 题目 3(综合小练习)
# 写一个函数 calc,参数:a, *nums, b
# 实现:计算 a + 所有nums的和 - b,并输出结果。
def calc(a,*nums,b):
    sum = 0;
    for i in nums:
        sum += i
    return a + sum - b

print(calc(1,2,3,4,5,b=1))
4.3匿名函数
Python使用 lambda 来定义匿名函数,所谓匿名,指其不用 def 的标准形式定义函数。
语法:
lambda 参数列表: 表达式4.3.1 sorted()
有三名学生的姓名和年龄,按年龄排序。
student_list = [{"name": "zhang3", "age": 36}, {"name": "li4", "age": 14}, {"name": "wang5", "age": 27}]
print(sorted(student_list, key=lambda student: student["age"]))
4.3.2 map()
map() 的主要作用是将给定的函数批量应用到可迭代对象的每个元素上,实现数据转换
list_1 = [1, 2, 3, 4, 5]
print(list(map(lambda ele:ele * ele,list_1)))
4.3.3 filter()
filter 的主要作用是将给定的函数批量应用到可迭代对象的每个元素上,实现数据过滤。
list_2 = list(range(1,10))
print(list(filter(lambda ele:ele % 2 == 0,list_2)))
4.3.4练习题
# 题目 1:sorted 按年龄从小到大排序
# 有如下学生列表,请用 sorted + lambda 按年龄升序排列:
students = [
    {"name": "Alice", "age": 22},
    {"name": "Bob", "age": 19},
    {"name": "Charlie", "age": 25}
]

print(list(sorted(students,key = lambda stu:stu["age"])))

# 题目 2:sorted 按分数从高到低排序
# 按分数 score 降序排列(reverse=True):
scores = [
    {"name": "张三", "score": 88},
    {"name": "李四", "score": 92},
    {"name": "王五", "score": 76}
]

print(list(sorted(scores,key = lambda score:score["score"],reverse=True)))

# 题目 3:map 每个数 ×2
# 列表 nums = [1,2,3,4,5]用 map + lambda 把每个数字变成原来的 2 倍,转列表输出。
nums = [1,2,3,4,5]
print(list(map(lambda num:num * 2,nums)))

# 题目 4:map 字符串变长度
# 列表 words = ["apple", "banana", "cat"]用 map + lambda 得到每个字符串的长度,转列表。
words = ["apple", "banana", "cat"]
print(list(map(lambda word:len(word),words)))

# 题目 5:filter 筛选大于 10 的数
# 列表 nums = [5, 12, 8, 20, 3, 15]用 filter + lambda 只留下大于 10 的数字。
nums_filter = [5, 12, 8, 20, 3, 15]
print(list(filter(lambda num : num > 10,nums_filter)))

# 题目 6:filter 筛选偶数
# 列表 nums = [1,2,3,4,5,6,7,8,9,10]用 filter + lambda 只留下偶数,并从大到小排序。
nums_filter_new = [1,2,3,4,5,6,7,8,9,10]
print(list(sorted(list((filter(lambda num:num % 2 == 0,nums_filter_new))),reverse=True)))

# 题目 1*:先过滤,再映射
# 列表:nums = [10,8,3,4,5,7,6,2,9,1]
# 要求:
# 先用 filter 选出偶数
# 再用 map 把每个偶数平方
# 最后转列表从大到小输出
nums_range10 = [10,8,3,4,5,7,6,2,9,1]
print(sorted(map(lambda num : num ** 2,list(filter(lambda num:num % 2 == 0,nums_range10))),reverse=True))

# 题目 2*:多条件排序(先按分数,再按年龄)
# 学生列表:
# 要求:
# 按 score 从高到低排序
# 如果分数相同,按 age 从小到大排序
# 提示:key=lambda x: (-x["score"], x["age"])
students_new = [
    {"name": "A", "score": 90, "age": 20},
    {"name": "B", "score": 80, "age": 19},
    {"name": "C", "score": 90, "age": 18},
    {"name": "D", "score": 85, "age": 21}
]

for ele in list(sorted(students_new,key = lambda x: (x["score"], x["age"]),reverse=True)):
    print(ele)
五.变量的作用域
5.1global关键字
global是Python中用于声明全局变量的关键字,它允许在函数内部修改和访问在全局作用域(模块级别)定义的变量。
x # 1.全局变量是不可变类型
var1 = 100
def immutable_a():
    global var1
    var1 = 200
    print("var1:", var1)
print(var1)  # 100
immutable_a()  # var1: 200
print(var1)  # 200
其实底层就是明确告诉 Python 要修改的是全局变量(修改原来对象),而不是创建局部变量(创建新对象)。
5.2 nonlocal关键字
nonlocal 也用作内部作用域修改外部作用域的变量的场景,不过此时外部作用域不是全局作用域而是嵌套作用域。
def function_outer():
    var1 = 1
    print(var1)
    def function_inner():
        nonlocal var1
        var1 = 200
    function_inner()
    print(var1)
function_outer()  # var1: 1 -> 200
5.3 练习题
# 题目 1:基础 global(修改全局整数)
# 定义一个全局变量 count = 0写一个函数 add()在函数内部用 global 把 count 加 1调用函数 3 次,最后打印 count,看结果是不是 3
def add():
    global count
    count += 1

count = 0
add()
add()
add()
print(count)  # 输出:3


# 题目 2:global 练习(修改全局字符串)
# 定义全局变量 name = "小明"写函数 change_name()在函数里用 global 把 name 改成 "小红"调用函数后打印全局变量 name
def change_name(source_name):
    global name
    name = "小红"

name = "小明"
change_name(name)
print(name)

# 题目 3:nonlocal 嵌套函数(必考)
# 写一个外层函数 outer()里面定义变量 num = 10再写一个内层函数 inner()内层函数用 nonlocal 声明 num,并把它改成 20最后外层函数返回内层函数
def outer():
    num = 10
    def innner():
        nonlocal num
        num = 20
        return num
    return innner()

# 调用 outer()函数并把返回值赋给 inner_func()
num = outer()
print(num)

# 题目 4:综合题(global + nonlocal 一起用)
# 定义全局变量 total = 0
# 写外层函数,里面有变量 score = 60
# 写内层函数:
# 用 nonlocal 修改 score 为 100
# 用 global 修改 total 为 1000
# 调用外层 → 内层
# 最后打印 global 的 total 和外层的 score
total = 0

def outer():
    score = 60
    def inner():
        nonlocal score
        score = 78
        global total
        total = 91
        print(f"score = {score},total = {total}")
        return (score,total)
    return inner()

tuple_of_result = outer()
print(tuple_of_result)
六.文件操作
6.1文件的分类
6.1.1纯文本文件
有统一的编码,可以被看做存储在磁盘上的长字符串。
纯文本文件编码格式常见的有ASCII、ISO-8859-1、GB2312、GBK、UTF-8、UTF-16等。
6.1.2 二进制文件
没有统一的字符编码,直接由0与1组成。
如图片文件(jpg、png),视频文件(avi)等。
七.OOP -- 类比Java认识python OOP
7.0 代码结构对比
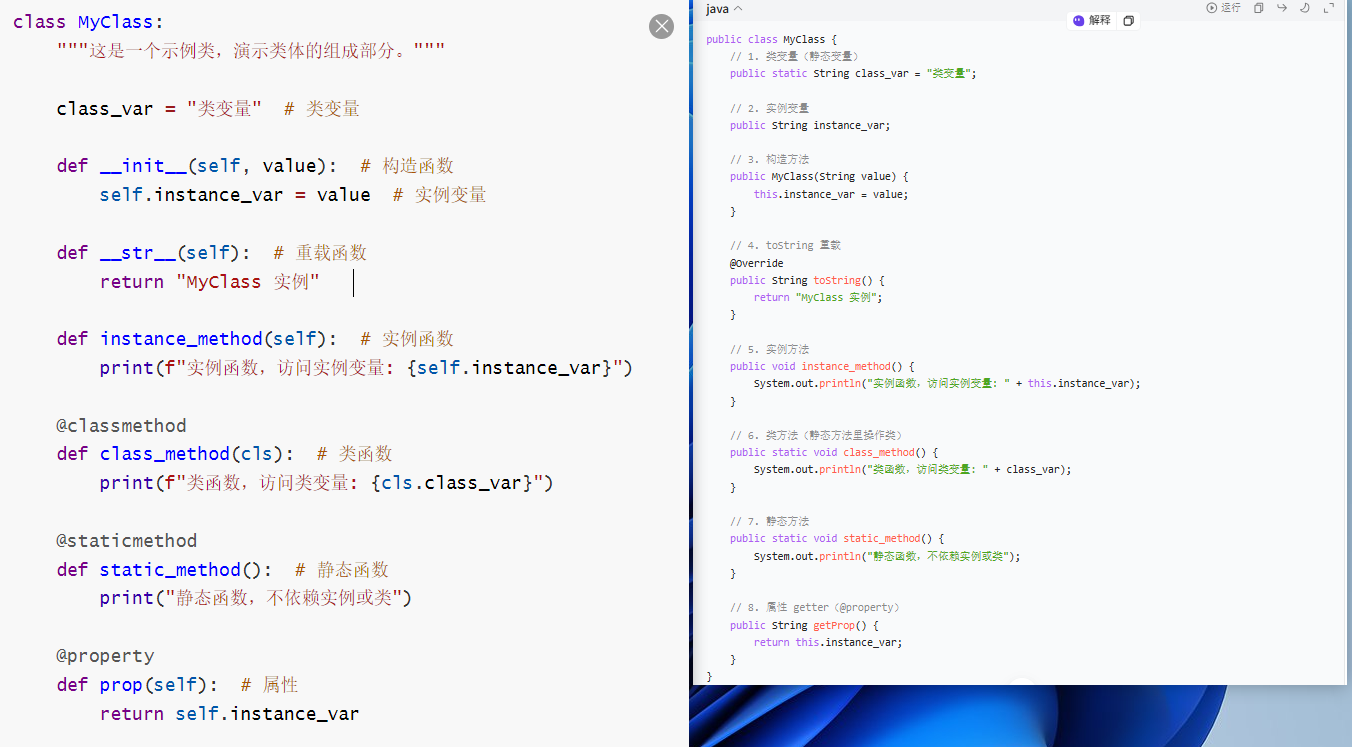
7.1类的成员
7.1.1 类变量和类属性
1)类变量 -- java中的静态变量
python中的:
class_var = "类变量" # 类变量java中的:
// 1. 类变量(静态变量)
    public static String class_var = "类变量";
2)类属性 -- getter()方法
python中的:
@property
    def prop(self):  # 属性
        return self.instance_var
java中的:
// 8. 属性 getter(@property)
    public String getProp() {
        return this.instance_var;
    }
7.1.2 实例变量
1)python中的: -- 隐式地定义,需要的时候在构造器中构造
def __init__(self, value):  # 构造函数
        self.instance_var = value  # 实例变量
2)java中的
// 2. 实例变量
public String instance_var;
7.1.3 构造方法
python中的:
def __str__(self):  # 重载函数
        return "MyClass 实例"
java中的:
// 3. 构造方法
    public MyClass(String value) {
        this.instance_var = value;
    }
7.1.4实例方法
python中的:
def instance_method(self):  # 实例函数
        print(f"实例函数,访问实例变量: {self.instance_var}")
java中的:
    // 5. 实例方法
    public void instance_method() {
        System.out.println("实例函数,访问实例变量: " + this.instance_var);
    }
7.1.5 类方法
python中的: -- @Classmethod
@classmethod
    def class_method(cls):  # 类函数
        print(f"类函数,访问类变量: {cls.class_var}")
java中的:
// 6. 类方法(静态方法里操作类)
    public static void class_method() {
        System.out.println("类函数,访问类变量: " + class_var);
    }
7.1.6 静态函数
python中的:
@staticmethod
    def static_method():  # 静态函数
        print("静态函数,不依赖实例或类")
java中的:
    // 7. 静态方法
    public static void static_method() {
        System.out.println("静态函数,不依赖实例或类");
    }
7.1.7 重载方法
python中的:
def __str__(self):  # 重载函数
        return "MyClass 实例"
java中的:
     // 4. toString 重载
    @Override
    public String toString() {
        return "MyClass 实例";
    }
7.1.8 Student类练习
from types import ClassMethodDescriptorType


class Student:
    # 类变量
    school = "第一中学"   # 类比于 public static String school = "第一中学";

    # 构造函数
    def __init__(self,name,age,score):
        self.name = name
        self.age = age
        self.score = score

    # 重载方法
    def __str__(self):
        # return "学生:".join(self.name) + "年龄:".join(str(self.age)) + "分数:".join(str(self.score))
        return f"学生:{self.name},年龄:{self.age},分数:{self.score}"

    # 类方法
    @classmethod
    def change_school(cls,school):
        cls.school = school

    # 实例方法
    def show_info(cls):
        cls.__str__()

    # 静态方法
    @staticmethod
    def is_pass(score):
        return score >= 60

    @property
    def level(self):
        match self.score:
            case score if score >= 90:
                return "优秀"
            case score if score >= 80:
                return "良好"
            case score if score >= 70:
                return "及格"
            case _:
                return "不及格"


s1 = Student("小明", 16, 85)
s2 = Student("小红", 17, 59)

print(s1)
print(s2)

s1.show_info()

Student.change_school("实验中学")
print("学校:", Student.school)

print(Student.is_pass(s1.score))
print(Student.is_pass(s2.score))

print(s1.level)
print(s2.level)
7.2 类的操作
7.2.1 成员变量的操作
类名.成员名7.2.2 构造函数 -- __init__(self,*args)函数
在@property中,不存在public,protected,private嘛,因为只是做校验,用self都可以访问到 。但是在__init__()中会体现public,protected,private来决定继承。
特点:
-
init() 函数的调用时机在实例通过 new()被创建之后
-
一般用于初始化一些数据
-
当类定义了 init() 函数后,在类实例化的时候会自动调用 init() 函数
-
也可以向 init() 函数中传参。
-
init()函数必须至少指定一个参数self
-
无返回值(隐式返回
None) -
可以调用类的其他函数(实例函数、静态函数、类函数、特殊函数)
-
可以访问类变量
-
可以动态添加属性
场景:
-
需要初始化实例属性时(如
self.name = name)。 -
需要在实例化时执行一些逻辑(如连接数据库)。
7.2.3重载函数前后必须写__
在 Python 里,所谓的 “重载方法”(魔术方法 / 双下划线方法),必须写成 __xxx__ 这种格式,少一个下划线都不行。
def __str__(self):   ✅ 正确
def _str_(self):     ❌ 错误
def str(self):       ❌ 不是重载
7.2.4 self和cls的区别
self = 当前对象
cls = 当前类
self
代表由这个类创建出来的具体对象
- 每个对象都有自己的
self - 管的是:实例变量、实例方法
cls
代表类本身
- 整个类只有一个
- 管的是:类变量、类方法
7.3 静态函数
7.3.1 特点
-
使用
@staticmethod装饰器定义,不需要self或cls参数。 -
与类和实例无关,只是放在类中的普通函数。
-
可以通过 类名直接调用 或 实例调用(但无自动参数传递)。
-
不能直接访问类属性或实例属性(除非通过类名或实例参数传入)。【这是归self,cls管的】
-
适合实现与类相关但不依赖类或实例状态的工具函数
class StringUtils:
    @staticmethod
    def is_palindrome(s):
        return s == s[::-1]  # 判断字符串是否回文

# 通过类调用
print(StringUtils.is_palindrome("madam"))  # 输出: True

# 通过实例调用(不推荐,无意义)
utils = StringUtils()
print(utils.is_palindrome("hello"))  # 输出: False
7.3.2 静态函数访问类属性(需显式通过类名)
class Config:
    LOG_LEVEL = "INFO"  # 类属性

    @staticmethod
    def show_log_level():
        print(Config.LOG_LEVEL)  # 必须通过类名访问

Config.show_log_level()  # 输出: INFO
7.3.3 静态函数调用其他静态函数(通过类名来访问)
class MathOps:
    @staticmethod
    def square(x):
        return x * x

    @staticmethod
    def cube(x):
        return MathOps.square(x) * x  # 调用其他静态函数

print(MathOps.cube(3))  # 输出: 27
7.4 特殊函数
函数名中有两个前缀下划线和两个后缀下划线的函数为特殊函数,也叫魔法函数。上文提到的 init() 就是一个特殊函数。这些函数会在进行特定的操作时自动被调用。
几个常见的特殊函数:
1)new()
对象实例化时第一个调用的函数。真正创建对象的方法,第一个被调用。
- 作用:开辟内存,创建实例,返回 self
- 是个静态方法(不用写装饰器)
- 必须返回一个实例,否则
__init__不会执行
class Person:
    def __new__(cls, *args, **kwargs):
        print("1. 先执行 __new__,创建对象")
        return super().__new__(cls)  # 真正造对象

    def __init__(self, name):
        print("2. 再执行 __init__,初始化对象")
        self.name = name

p = Person("小明")

# 1. 先执行 __new__,创建对象
# 2. 再执行 __init__,初始化对象
__new__ 负责生小孩
__init__ 负责给小孩穿衣服、起名字
2)init()
类的初始化函数。
3)del()
对象的销毁器,定义了当对象被垃圾回收时的行为。使用 del xxx 时不会主动调用 del() ,除非此时引用计数==0。
4)str()
定义了对类的实例调用 str() 时的行为。
5)repr()
定义对类的实例调用 repr() 时的行为。 str() 和 repr() 最主要的差别在于目标用户。 repr() 的作用是产生机器可读的输出(大部分情况下,其输出可以作为有效的Python代码),而 str() 则产生人类可读的输出。
6)__getattribute__()
概念
__getattribute__ 是 Python 类里的 “属性拦截器”只要你访问对象的任何属性,不管存在不存在,都会先自动走一遍这个方法。
item就是你要访问的属性名字符串- 必须用
super().__getattribute__(item)才能真正拿到属性
class Student:
    def __init__(self, name):
        self.name = name

    # 只要访问属性,就会触发这个方法
    def __getattribute__(self, item):
        print(f"正在访问属性:{item}")

        # 必须这样才能真正获取到值
        return super().__getattribute__(item)


s = Student("小明")

# 访问 name 属性
print(s.name)
例子:
class Student:
    def __init__(self, name):
        self.name = name

    # 只要访问属性,就会触发这个方法
    def __getattribute__(self, item):
        print(f"正在访问属性:{item}")

        # 必须这样才能真正获取到值
        return super().__getattribute__(item)


s = Student("小明")

# 访问 name 属性
print(s.name)

# 正在访问属性:name
# 小明
作用
场景 1:记录所有属性访问(日志)
def __getattribute__(self, item):
    print(f"日志:访问了 {item}")
    return super().__getattribute__(item)
场景 2:访问不存在的属性时不报错
def __getattribute__(self, item):
    try:
        return super().__getattribute__(item)
    except AttributeError:
        return f"属性 {item} 不存在"
场景 3:统一控制某些属性
比如不让别人访问私有属性:
def __getattribute__(self, item):
    if item == "password":
        raise PermissionError("禁止访问密码")
    return super().__getattribute__(item)
超级重要的坑(必看)
千万不要在 __getattribute__ 里直接写 self.xxx
会死循环!!!
错误写法:
def __getattribute__(self, item):
    return self.item  # 又会触发 __getattribute__,无限递归
正确写法:
def __getattribute__(self, item):
    return super().__getattribute__(item)
7.5 动态给对象添加属性
7.5.0 Student类
class Student:
    # 类变量
    school = "第一中学"   # 类比于 public static String school = "第一中学";

    # 构造函数
    def __init__(self,name,age,score):
        self.name = name
        self.age = age
        self.score = score

    # 重载方法
    def __str__(self):
        # return "学生:".join(self.name) + "年龄:".join(str(self.age)) + "分数:".join(str(self.score))
        return f"学生:{self.name},年龄:{self.age},分数:{self.score}"

    # 实例方法
    def show_info(self):
        self.__str__()

    # 类方法
    @classmethod
    def change_school(cls,school):
        cls.school = school

    # 静态方法
    @staticmethod
    def is_pass(score):
        return score >= 60

    @property
    def level(self):
        match self.score:
            case score if score >= 90:
                return "优秀"
            case score if score >= 80:
                return "良好"
            case score if score >= 70:
                return "及格"
            case _:
                return "不及格"
7.5.1 直接添加实例属性
# 方式 1:直接给实例添加属性(最常用)
stu = Student("小明", 16, 85)
stu.gender = "男"
print(f"{stu},{stu.gender}")

# 方式 2;使用setattr() 函数
stu2 = Student("小王", 18, 60)
setattr(stu2, "gender", "女")
setattr(stu2, "phone", 18888888888)
print(f"{stu2},{getattr(stu2, 'gender')},{getattr(stu2, 'phone')}")
7.5.2 使用setattr()函数
# 方式 1:直接给实例添加属性(最常用)
stu = Student("小明", 16, 85)
stu.gender = "男"
print(f"{stu},{stu.gender}")

# 方式 2;使用setattr() 函数
stu2 = Student("小王", 18, 60)
setattr(stu2, "gender", "女")
setattr(stu2, "phone", 18888888888)
print(f"{stu2},{getattr(stu2, 'gender')},{getattr(stu2, 'phone')}")
7.6 动态给类添加属性 -- 类级别的属性
# 动态给类添加属性
Student.address = "北京"
print(Student.address)
7.7 动态给实例添加函数
7.7.1 动态添加普通函数
# 动态给实例添加普通方法
stu3 = Student("小王", 18, 60)
def dynamic_add_normal_method():
    print("动态添加的普通方法")
stu3.dynamic_add_method = dynamic_add_normal_method
stu3.dynamic_add_method()
7.7.2 动态给类添加属性
# 动态给类添加属性
Student.address = "北京"
print(Student.address)
7.7.3 动态给类添加普通方法
# 动态给实例添加普通方法
stu3 = Student("小王", 18, 60)
def dynamic_add_normal_method():
    print("动态添加的普通方法")
stu3.dynamic_add_method = dynamic_add_normal_method
stu3.dynamic_add_method()
7.7.4 动态给类添加实例方法
# 动态添加实例方法
stu4 = Student("小八", 3, 66)
def dynamic_add_instance_method(self):
    print("动态添加的实例方法")
stu4.dynamic_add_instance_method = types.MethodType(dynamic_add_instance_method, stu4)
stu4.dynamic_add_instance_method()
7.7.5 动态给类添加类方法
# 动态给类添加类方法(重点)
def new_class_method(cls):
    """这是一个动态添加的类方法"""
    return f"这是 {cls.__name__} 的新类方法,学校是:{cls.school}"

Student.new_class_method = classmethod(new_class_method)
八.封装,继承,多态
8.1封装
8.1.1 概念
Python 的封装是面向对象编程(OOP)的核心特性之一,它通过隐藏对象内部实现细节,仅暴露必要的接口来操作数据。
8.1.2 访问权限
参数最好不要写_开头的,但是属性按照访问权限以_开头
在@property中,不存在public,protected,private嘛,因为只是做校验,用self都可以访问到 。但是在__init__()中会体现public,protected,private来决定继承
| 类型 | 命名规则 | 访问范围 | 示例 |
|---|---|---|---|
| 公有(Public) | 普通命名(无前缀) | 任意位置可访问 | self.name |
| 保护(Protected) | 单下划线 _ 开头 | 约定为“仅内部或子类 使用”(实际仍可访问,通过import可以访问) | self._age |
| 私有(Private) | 双下划线 __ 开头 | 仅类内部可访问(通过名称修饰) | self.__secret |
8.1.3 getter,setter方法(@property)
在@property中,不存在public,protected,private嘛,因为只是做校验,用self都可以访问到 。但是在__init__()中会体现public,protected,private来决定继承
class Person:
    def __init__(self, age):
        self._age = age  # 保护属性

    @property
    def age(self):
        return self._age

    @age.setter
    def age(self, value):
        if value < 0:
            raise ValueError("年龄不能为负数!")
        self._age = value
第二个标签 @age.setter 是第一个 @property 自动 “生” 出来的!
当你用 @property 装饰了 age 方法后
Python 会自动给这个方法创建一个属性:.setter
也就是说:
age现在不是普通函数了age变成了一个 property 对象- 这个对象自带 3 个东西:
age.getterage.setterage.deleter (当你执行del user.age时,会自动调用这个方法。它就是删除 / 重置属性的拦截器。)
 # deleter ← 就是这个
    @age.deleter
    def age(self):
        print("执行了 del age")
        self._age = None  # 重置为None,或直接删除
8.2继承
8.2.1 单继承
class 类名(父类):
    类体
class Person:
def __init__(self, name, age):
self.name = name
self.age = age
print("初始化父类")
def __str__(self):
return f"姓名:{self.name},年龄:{self.age}"
class Student(Person):
occupation = "学生"
school = "第一中学"
def __init__(self, name, age, class_num):
super().__init__(name, age)
self.class_num = class_num
print("初始化子类")
def __str__(self):
return super().__str__() + f",班级:{self.class_num}"
@property
def occupation(self):
return Student.occupation
@property
def school(self):
return Student.school
@classmethod
def change_school(cls, school):
cls.school = school
stu1 = Student("小明", 16, "1")
print(stu1)
print(f"职业:{stu1.occupation}")
print(f"学校:{stu1.school}")
# 测试修改类属性
Student.change_school("实验中学")
print(f"修改后的学校:{stu1.school}")
8.2.2 多继承
class 类名(父类1, 父类2, ...):

  类体
print("==============================================================")
# 基础用户类
class BaseUser:
def __init__(self, username, age):
self.username = username
self._age = age
def __str__(self):
return f"用户名:{self.username},年龄:{self._age}"
def login(self):
print(f"用户{self.username}登录")
# 学生身份类
class StudentRole:
school = "第一中学"
def study(self):
print(f"{self.username}正在学习")
@classmethod
def change_school(cls, school):
cls.school = school
# 会员身份类
class MemberRole:
level = "普通会员"
def buy_course(self):
print(f"{self.username}购买了课程")
@classmethod
def upgrade_level(cls, level):
cls.level = level
class StudentMember(BaseUser, StudentRole, MemberRole):
def __init__(self,username, age,class_num):
super().__init__(username, age)
self.class_num = class_num
def __str__(self):
return super().__str__() + f",班级:{self.class_num},学校:{self.school},会员等级:{self.level}"
# 创建对象
sm = StudentMember("小明", 16, "高三1班")
# 调用三个父类的方法
sm.login()
sm.study()
sm.buy_course()
# 修改类属性
StudentMember.change_school("实验中学")
StudentMember.upgrade_level("高级会员")
# 打印完整信息
print(sm)8.2.3 函数重写
在子类中定义与父类函数重名的函数,调用时会调用子类中重写的函数。
class Father:
    def eat(self):
        print("father:吃吃吃")

class Son(Father):
    def eat(self):
        print("son:嘻嘻嘻吃吃吃")

son = Son()
son.eat()

father = Father()
father.eat()
8.3多态
8.3.1 概念
多态 指的是**同一操作作用于不同的对象,可以有不同的解释,产生不同的执行结果**。简单说就是"一个接口,多种实现"。
多态特点:
-
鸭子类型(Duck Typing):Python的多态基于"如果它走起来像鸭子,叫起来像鸭子,那么它就是鸭子"的理念,不依赖于继承关系。
-
动态绑定:在运行时确定对象的类型并调用相应的函数。
8.3.2 鸭子类型实现多态
换句话说,不关心对象的类型,只关心对象是否具有某个函数或属性。如果对象有这个函数,它就可以被调用,而不管它具体是什么类。
class Dog:
    def speak(self):
        print("汪汪汪")

class Cat:
    def speak(self):
        print("喵喵喵")

class Animal:
    def speak(self):
        print("动物叫")

def animal_speak(animal):
    animal.speak()

animal_speak(Dog())
animal_speak(Cat())
animal_speak(Animal())

# 汪汪汪
# 喵喵喵
# 动物叫
九.异常和错误
9.1 try except
try:
    可能发生异常的代码
except:
    异常处理的代码

# 或者
try:
    可能发生异常的代码
except 异常类型1 as 变量名1:
    异常处理的代码
except(异常类型2, 异常类型3) as 变量名2:
异常处理的代码
except:
异常处理的代码
说明:
-
如果没有发生异常,程序会忽略except中的代码,继续向下执行。
-
如果发生了异常,会忽略try中剩余代码,根据异常类型匹配到相应的 except 并执行其中的代码。
-
如果发生了异常,且异常类型无法和指定except匹配,异常将向外传递。
-
一个except可以同时处理多个异常,将这些异常放在一个元组中。
-
最后一个 except 可以忽略异常类型,它将被作为通配符使用。
try:
    result = 3 / 0
    print("发生异常了")
except ZeroDivisionError as e:
    print(e)
except (RuntimeError, TypeError, NameError) as e:
    print(e)
except:
    print("Unexpected error")
print("End")
9.2 else
如果你希望在try块中有些操作执行成功后,再执行其它代码,那就可以把代码放到else语句块中。
try:

  可能发生异常的代码

except 异常类型1 as 变量名1:

  异常处理的代码

except 异常类型2 as 变量名2:

  异常处理的代码

else:

  没有异常时执行的代码
9.3 finally
-
可选,但是如果选,只能放在最后
-
无论是否发生异常都会执行的代码
-
通常用于执行一些必须要进行的清理操作,例如关闭文件、释放资源(如网络连接、数据库连接、锁等)
try:
    可能发生异常的代码
except 异常类型1 as 变量名1:
    异常处理的代码
except 异常类型2 as 变量名2:
       异常处理的代码
else:
    没有异常时执行的代码
finally:
    无论是否发生异常都会执行的代码
9.4 raise
raise 异常类型("异常描述")def int_add(x, y):
if isinstance(x, int) and isinstance(y, int):
return x + y
else:
raise TypeError("参数类型错误")
print(int_add(1, 2)) # 3
print(int_add("1", "2")) # TypeError: 参数类型错误9.5 assert断言
assert用于判断一个表达式,在表达式条件为False的时候触发异常,常用于调试程序。
# [, error_message] 表示 error_message 是可选的,实际使用时不需要写方括号
assert 表达式 [,异常描述]
# [, error_message] 表示 error_message 是可选的,实际使用时不需要写方括号-
如果
expression的值为True,程序继续正常执行 -
如果
expression的值为False,则抛出AssertionError异常-
如果没有提供
error_message,抛出默认的AssertionError -
如果提供了
error_message,它会作为异常信息显示
-
# 1.基本用法
x = 5
assert x == 5  # 不会触发异常
assert x == 3  # 触发AssertionError
# 2.带错误信息的断言
x = 10
assert x % 2 == 0, "x必须是偶数"
assert x > 20, f"x的值{x}必须大于20"  # 触发AssertionError: x的值10必须大于20
# 3.在函数中使用
def divide(a, b):
    assert b != 0, "除数不能为0"
    return a / b

print(divide(10, 2))  # 正常执行
print(divide(10, 0)) # 触发AssertionError: 除数不能为0-
9.6不要用于数据验证:assert主要用于调试和开发阶段,可能会被Python的优化模式忽略
-
错误处理:生产环境中应该使用
try/except来处理预期可能发生的错误 -
性能影响:大量使用assert可能会影响程序性能
9.6 异常的传递
当存在 try 嵌套或函数嵌套时,若内层出现了异常且在内层无法处理,会将异常一层一层向外传递,直到异常被处理或程序报错。
try:
    try:
        try:
            print(1 / 0)
        except NameError as e:
            print("第三层", e)
    except TypeError as e:
        print("第二层", e)
except Exception as e:
    print("第一层", type(e), e)
# 第一层 <class 'ZeroDivisionError'> division by zero
9.7 with关键字 -- Java中的try with resource
9.7.1 概念
Python中的with语句用于异常处理,封装了try except finally编码范式,提供了一种简洁的方式来确保资源的正确获取和释放,同时处理可能发生的异常,提高了易用性。使代码更清晰、更具可读性。
with expression as variable:-
expression: 必须返回一个上下文管理器对象
-
variable:用于接收
expression返回的上下文管理器对象或它的__enter__()函数的返回值
9.7.2 工作原理
with语句背后的工作机制涉及两个特殊函数:
-
__enter__()- 进入上下文时调用,返回值会赋给as后的变量 -
__exit__()- 退出上下文时调用,负责清理工作
9.7.3 执行流程
-
计算
expression,获取上下文管理器对象 -
调用上下文管理器的
__enter__()函数 -
如果有
as子句,将__enter__()的返回值赋给变量 -
执行
with代码块中的语句 -
无论代码块是否发生异常,都会调用
__exit__()函数-
如果代码块正常执行完毕,
__exit__()的三个参数都为None -
如果发生异常,
__exit__()会接收到异常类型、值和追踪信息
-
9.8 异常基类
| 异常 | 说明 |
|---|---|
| BaseException | 所有内置异常的基类。它不应该被用户自定义类直接继承(这种情况请使用[Exception])。 |
| Exception | 所有内置的非系统退出类异常都派生自此类。所有用户自定义异常也应当派生自此类。 |
| ArithmeticError | 此基类用于派生针对各种算术类错误而引发的内置异常:[OverflowError], [ZeroDivisionError], [FloatingPointError])。 |
| BufferError | 当与[缓冲区]相关的操作无法执行时将被引发。 |
| LookupError | 此基类用于派生当映射或序列所使用的键或索引无效时引发的异常:IndexError。这可以通过 [codecs.lookup()]来直接引发。 |
9.9 具体异常
| 异常 | 说明 |
|---|---|
| AssertionError | 当 [assert] 语句失败时将被引发。 |
| AttributeError | 当属性引用或赋值失败时将被引发。 |
| IndexError | 当序列抽取超出范围时将被引发。 |
| KeyError | 当在现有键集合中找不到指定的映射(字典)键时将被引发。 |
| KeyboardInterrupt | 当用户按下中断键 (通常为 Control-C 或 Delete) 时将被引发。 |
| MemoryError | 当一个操作耗尽内存但情况仍可(通过删除一些对象)进行挽救时将被引发。 |
| NameError | 当某个局部或全局名称未找到时将被引发。 |
| OSError | 此异常在一个系统函数返回系统相关的错误时将被引发,此类错误包括 I/O 操作失败例如 文件未找到 或 磁盘已满 等。 |
| SyntaxError | 当解析器遇到语法错误时引发。 |
| TypeError | 当一个操作或函数被应用于类型不适当的对象时将被引发。 |
十.模块与包
10.1 全局导入import
import 模块名 [as 别名]# 导入模块
import my_add
# 使用模块
print(my_add.add(1, 2))
print(my_add.num)10.2 局部导入from import
from 模块名 import 成员名1[as 别名], 成员名2[as 别名],…-
只能使用其导入的成员,未导入的成员不能使用。
-
如果多个模块中存在重名成员,后一次导入会覆盖前一次导入。
# 1.使用导入的成员
from my_add import add
print(add(1, 2)) # 只能使用导入的成员add
print(num) # NameError: name 'num' is not defined

# 2.重名变量,后一次导入会覆盖前一次导入
# 2.1 创建新的模块my_multi.py
num =200
_str1="abc"
def multi(a, b):
    """求两个数的积"""
    return a * b

# 2.2 导入模块
from my_add import add, num
from my_multi import num

print(add(1, 2))
print(num)  # my_multi的num

# 3.通过别名区分不同模块的变量
# 导入模块
# 导入模块
from my_add import num as a1
from my_multi import num as m1
# 使用模块
print(a1)  # my_add的num 100
print(m1)  # my_multi的num 200
10.3 局部导入 from import *
from 模块名 import *导入模块中所有不以单下划线开头的成员,直接通过成员名的方式访问。
from my_add import *

# 使用模块
print(add(1, 2)) # 3
print(num) # 100
print(_str1) # NameError: name '_str1' is not defined
10.4 导入模块搜索顺序
当导入一个模块时,会按照以下顺序进行查找:
(1)当前目录。
(2)PYTHONPATH环境变量中的目录。
(3)包含标准 Python 模块以及这些模块所依赖的任何 extension module 的目录。
10.5 访问性控制__all__
-
控制
from module import *导入的内容 -
当使用
from module import *时,只有__all__列表中指定的名称会被导入
# test_my_module.py
__all__ = ['public_func', 'PUBLIC_VAR']  # 明确指定公开接口

def public_func():
    return "This is public"

def _private_func():
    return "This is private"

PUBLIC_VAR = 42
_PRIVATE_VAR = 99

import  test_my_module

print(test_my_module.public_func())  # 可以访问
print(test_my_module.PUBLIC_VAR)     # 可以访问

print(test_my_module._private_func())  # NameError: name '_private_func' is not defined
print(test_my_module._PRIVATE_VAR) # NameError: name '_PRIVATE_VAR' is not defined注意:Python中以下划线(_)开头的成员会被视为私有,使用from module import *时默认不会导入这些成员。但__all__的存在有更重要的用途。
下划线进行访问控制和__all__的区别
| 特性 | 下划线命名约定 | __all__ |
|---|---|---|
| 约束范围 | 仅影响import * | 明确声明公开API,精确控制API表面,防止意外暴露 |
| 可访问性 | 仍可显式导入 | 可完全隐藏非列表成员 |
| 灵活性 | 固定规则 | 可自定义 |
-
下划线命名的局限性:
-
只能防止
import *导入私有成员 -
用户仍可通过显式导入访问
_private_func和__really_private_func -
如果忘记加下划线(如
utility_func),会被意外导出
-
-
__all__的严格控制:-
即使成员没有下划线前缀(如
utility_func),只要不在__all__中,import *就不会导出。单独导入模块中不在all以及私有的都可以。 -
提供了真正的API边界控制
-
10.6__init__
__init__.py是Python包的标识文件,它决定了包的初始化行为和公开接口。以下是常见的编写内容:
10.6.1 包初始化代码
# 包级别的初始化代码 注意被首次导入时自动执行
print(f"初始化 {__name__} 包")
10.6.2 定义__all__
# 明确公开接口
__all__ = ['module1', 'module2', 'main_func']   #  import  *导入模块
10.6.3 导入模块与子模块
from .module1 import Class1, function1   # 从当前包的 module1 导入
from .subpackage import Class2
10.6.4 包版本与元信息
__version__ = '1.0.0'
__author__ = 'Your Name'
__license__ = 'MIT'
10.6.5 包级别函数/变量
# 包级别工具函数
def package_util():
    return "包级别的工具函数"

# 包级别配置
DEFAULT_CONFIG = {'option': 'value'}
10.6.6 导入时验证
# 检查依赖
try:
    import numpy
except ImportError:
    raise ImportError("此包需要numpy,请先安装: pip install numpy")
10.7 __name__
在 Python 中,name 是一个特殊的内置变量
-
当一个Python文件被直接运行时,该文件的name属性值为"main"。
-
当一个Python文件作为模块被导入时,name属性会被设置为该模块的名称(即文件名,不包含 .py 后缀)。
使用 name == “main” 避免测试代码被执行
num = 100
num1 = 200
def add(a, b):
    """求两个数的和"""
    return a + b
def sub(a, b):
    """求两个数的差"""
    return a - b
if __name__ == "__main__":
    print(add(10,20))
10.8 dir
dir() 是一个内置函数,主要用于列出对象的属性和方法,或者列出当前作用域中定义的名称,并以一个字符串列表的形式返回。
1、当你不传递任何参数调用 dir() 时,它会列出当前作用域中定义的名称,包括变量、函数、类等
def my_function():
    pass
variable = 10
print(dir())
#['__annotations__', '__builtins__', '__cached__', '__doc__', '__file__', '__loader__', '__name__', '__package__', '__spec__', 'my_function', 'variable']
2、 当你将一个对象作为 dir() 的参数时,它会返回该对象的属性和方法列表。
class MyClass:
    def __init__(self):
        self.x = 1
        self.y = 2

    def method1(self):
        pass
obj = MyClass()
print(dir(obj))

#['__class__', '__delattr__', '__dict__', '__dir__', '__doc__', '__eq__', '__format__', '__ge__', '__getattribute__', '__getstate__', '__gt__', '__hash__', '__init__', '__init_subclass__', '__le__', '__lt__', '__module__', '__ne__', '__new__', '__reduce__', '__reduce_ex__', '__repr__', '__setattr__', '__sizeof__', '__str__', '__subclasshook__', '__weakref__', 'method1', 'x', 'y']
3、当你将一个模块作为 dir() 的参数时,它会返回该模块中定义的名称列表,包括函数、类、变量等
['__doc__', '__loader__', '__name__', '__package__', '__spec__', 'acos', 'acosh', 'asin', 'asinh', 'atan', 'atan2', 'atanh', 'cbrt', 'ceil', 'comb', 'copysign', 'cos', 'cosh', 'degrees', 'dist', 'e', 'erf', 'erfc', 'exp', 'exp2', 'expm1', 'fabs', 'factorial', 'floor', 'fmod', 'frexp', 'fsum', 'gamma', 'gcd', 'hypot', 'inf', 'isclose', 'isfinite', 'isinf', 'isnan', 'isqrt', 'lcm', 'ldexp', 'lgamma', 'log', 'log10', 'log1p', 'log2', 'modf', 'nan', 'nextafter', 'perm', 'pi', 'pow', 'prod', 'radians', 'remainder', 'sin', 'sinh', 'sqrt', 'sumprod', 'tan', 'tanh', 'tau', 'trunc', 'ulp']更多推荐

 7
7 0
0- 0


 已为社区贡献3条内容

所有评论(0)