
C++笔记2
文章目录
内存管理
内存管理是C++的重要内容,C++程序员在实际开发中需要重点关注的问题之一。也是C++这门语言独特的优势(优秀的内存管理能够得到高性能的程序),而像Python、Java这些脚本语言是无法操纵内存的
C++内存区域
- 栈区(Stack):自动管理内存,存储局部变量和函数调用信息。内存分配和释放速度快,但空间有限
- 堆区(Heap):手动管理内存,用于动态分配内存。内存分配和释放由程序员控制,灵活但易出错(如内存泄漏、悬挂指针)
- 全局/静态区(Data/BSS Segment):存储全局变量和静态变量
- 代码区(Code Segment):存放函数体的二进制代码,由OS进行管理
了解栈和堆的区别,以及如何有效地在堆上分配和管理内存,是编写高效且安全的 C++ 程序的基础
C++内存管理
因为我不搞嵌入式,所以这里我们先略过C风格的内存管理(下边有用malloc的例子),来看C++的:
#include <iostream>

int main() {
    int* arr = new int[5]; // 分配5个整数
    for (int i = 0; i < 5; ++i) {
        arr[i] = i * 10;
    }
    for (int i = 0; i < 5; ++i) {
        std::cout << "arr[" << i << "] = " << arr[i] << std::endl;
    }
    delete[] arr; // 释放数组内存,释放单个对象时不用加[]
    return 0;
}
输出:
arr[0] = 0
arr[1] = 10
arr[2] = 20
arr[3] = 30
arr[4] = 40
高级内存管理
realloc内存重分配
//原型
#include <cstdlib>
//第一个参数指向原来的内存块,第二个参数为新开辟的内存大小(单位:B)
//注:size_t ==unsigned __int64
void* realloc(void* ptr, size_t new_size);
例子:
#include <iostream>
#include <cstdlib>
#include <cstring> // 包含 memcpy

int main() {
    // 初始分配 3 个整数
    int* arr = (int*)malloc(3 * sizeof(int));
    if (arr == nullptr) {
        std::cerr << "Initial malloc failed" << std::endl;
        return 1;
    }

    // 初始化数组
    for (int i = 0; i < 3; ++i) {
        arr[i] = i + 1;
    }

    std::cout << "Initial array: ";
    for (int i = 0; i < 3; ++i) {
        std::cout << arr[i] << " ";
    }
    std::cout << std::endl;

    // 重新分配为 5 个整数
    int* temp = (int*)realloc(arr, 5 * sizeof(int));
    if (temp == nullptr) {
        std::cerr << "Realloc failed" << std::endl;
        free(arr); // 释放原内存
        return 1;
    }
    arr = temp;

    // 初始化新元素
    for (int i = 3; i < 5; ++i) {
        arr[i] = (i + 1) * 10;
    }

    std::cout << "Reallocated array: ";
    for (int i = 0; i < 5; ++i) {
        std::cout << arr[i] << " ";
    }
    std::cout << std::endl;

    // 释放内存
    free(arr);
    return 0;
}
输出:
Initial array: 1 2 3
Reallocated array: 1 2 3 40 50
实现简单内存池
在此之前,我们需要知道:在c++里使用new和delete有以下几个开销,而内存池就是为了解决这个问题:
- 性能开销:
- 每次 new 和 delete 最终都会调用操作系统的 API(如 brk, mmap 等)
- 系统调用需要在用户态和内核态之间切换,这个过程比较耗时(如果你忘了系统调用,可以复习一下王道考研 操作系统 系统调用)
- 内存池的解决方式:通过一次或少量几次系统调用申请一大块内存,后续的所有分配和释放都在用户态完成,效率极高
- 内存碎片(如果你忘了内存碎片,可以回顾这个视频:王道考研 操作系统 内存连续分配管理方式)
- 外部碎片:频繁地、不规则地申请和释放不同大小的内存块,会导致系统中存在大量小的、不连续的内存空隙。这些空隙加起来可能很大,但无法分配给一个大对象使用
- 内部碎片:操作系统分配内存有对齐要求,比如你申请 6 字节,系统可能给你 8 或 16 字节,多余的部分就浪费了(如果你忘了大小端对齐,可以看看这篇文章内存对齐问题)
- 内存池的解决方式:对于固定大小的内存池(例如,专为某个类设计),所有块大小一致,完全没有外部碎片,内部碎片也固定且可控。对于可变大小的内存池,有专门的算法来减少碎片(如伙伴系统)
- 预测性与稳定性
- 在实时系统或高性能服务器中,一次 new 的耗时是不确定的,可能会因为触发垃圾回收或系统调度而变长,这被称为“延迟抖动”
- 内存池的解决方式:分配和释放的时间是 predictable(可预测的)和 constant(常数时间的),因为逻辑非常简单,通常只是操作一下链表指针
接下来实现一简易的内存池,创建一个类MemoryPool
//此为头文件
#pragma once
#include<iostream>
#include<stack>
#include<cstdlib>

class MemoryPool
{
public:
	MemoryPool(size_t objectSize, size_t poolSize);
	~MemoryPool();
	void* allocate();
	void deallocate(void* ptr);
private:
	size_t objSize;
	size_t totalSize;
	char* pool;//首地址
	std::stack<void*> freeList;//用栈来模拟
};

class Student
{
public:
    std::string name;
    int age;
    Student():name(""),age(0);
    Student(std::string NAME,int AGE):name(NAME),age(AGE)
};
cpp内:
#include "MemoryPool.h"

MemoryPool::MemoryPool(size_t objectSize, size_t poolSize)
	: objSize(objectSize), totalSize(poolSize), pool((char*)malloc(objectSize* poolSize)) {
	if (pool == nullptr) {
		throw std::bad_alloc();
	}
	//初始化freeList
	for (size_t i = 0; i < poolSize; ++i) {
		freeList.push(pool + i * objSize);
	}
}
MemoryPool::~MemoryPool()
{
	std::cout << "~MemoryPool" << std::endl;
	free(pool);
}

void* MemoryPool::allocate()
{
	if(freeList.empty()) {
		std::cerr << "Memory pool exhausted!" << std::endl;
		return nullptr;
		//throw std::bad_alloc();// 或者抛出异常
	}
	void* ptr = freeList.top();
	freeList.pop();
	return ptr;
}

void MemoryPool::deallocate(void* ptr)
{
	freeList.push(ptr);
}
main函数内:
try{
	MemoryPool pool(sizeof(Student), 3);
	void* mem1 = pool.allocate();
	void* mem2 = pool.allocate();
	void* mem3 = pool.allocate();
	void* mem4 = pool.allocate();//由于只开辟了3个空间,会抛出异常

	//C++11特性:在内存池中构造对象,可以在new后面传入内存空间
	auto obj1 = new (mem1) Student("Alice", 20);//将mem1初始化为Student格式的一个数据
	auto obj2 = new (mem2) Student("Bob", 22);
	auto obj3 = new (mem3) Student("Chase", 42);
	cout << "obj1 name: " << obj1->name << ", age: " << obj1->age << endl;
	cout << "obj2 name: " << obj2->name << ", age: " << obj2->age << endl;
	cout << "obj3 name: " << obj3->name << ", age: " << obj3->age << endl;
	cout << "obj4 name: " << obj4->name << ", age: " << obj4->age << endl;

	//显式调用析构函数
	obj1->~Student();
	obj2->~Student();
	obj3->~Student();
	pool.deallocate(mem1);
	pool.deallocate(mem2);
	pool.deallocate(mem3);
	//抛出异常前调用析构函数和释放内存
}catch (const bad_alloc& e) {
	cout << "Memory allocation failed: " << e.what() << endl;
	return -1;

}
输出:
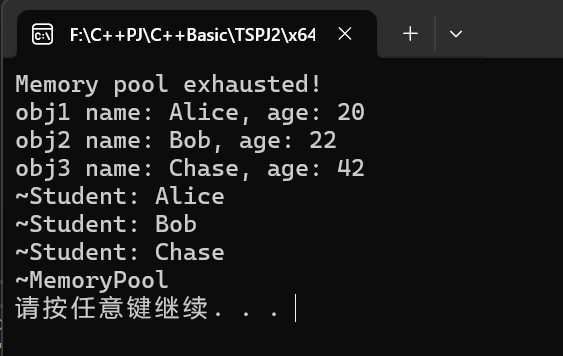
原本在分配第四个空间时就会抛出异常且不会执行后面的代码,但try catch保证了在抛出异常前调用析构函数和释放内存
以上代码体现了RAII(resource acquision is initiallization)思想,这是C++编程的一种惯用手法:通过对象的生命周期管理资源,确保资源在对象构造时获取,析构时释放,避免泄漏
智能指针
C++引入智能指针是为了自动化管理内存,减少使用new和delete带来的复杂性与错误。智能指针相比于原生指针的优势在于以下几点
- 自动销毁:在智能指针生命周期结束时自动释放资源
- 引用计数:共享智能指针能够跟踪引用数量,确保资源在最后一个引用结束时释放
- 避免内存泄漏:通过 RAII 机制自动管理资源生命周期
- 类型安全:提供更严格的类型检查,减少错误
下面是C++提供的三种智能指针的用法
std::shared_ptr
定义
shared_ptr 是一种共享所有权的智能指针,允许多个shared_ptr实例共享对同一个对象的所有权。通过引用计数机制,管理资源的生命周期
主要特性:
- 共享所有权:多个
shared_ptr可以指向同一对象 - 引用计数:记录由多少
shared_ptr实例指向同一对象 - 自动释放:引用计数为0时自动释放资源
shared_ptr依赖一控制块(Control Block),主要包含:
- 强引用计数(
use_count):表示有多少shared_ptr指向对象 - 弱引用计数(
weak_count):表示有多少weak_ptr指向对象(不增加强引用计数)
构造函数与赋值
- 默认构造函数:创建一个空的
shared_ptr。 - 指针构造函数:接受一个裸指针,拥有其所有权。
- 拷贝构造函数:增加引用计数,共享对象所有权。
- 移动构造函数:转移所有权,源
shared_ptr变为空。 - 拷贝赋值操作符:释放当前资源,增加引用计数,指向新对象。
- 移动赋值操作符:释放当前资源,转移所有权,源
shared_ptr变为空
案例
auto stu = new Student();
shared_ptr<Student> sp1(stu);
//C++14make_shared写法
auto s_stu1=make_shared<Student>("Alice", 20);//创建一个Student对象并返回一个shared_ptr
shared_ptr<Student> s_stu2 = s_stu1;
cout << "s_stu1 use_count: " << s_stu1.use_count() << endl; //use_count为2
cout << "s_stu2 use_count: " << s_stu2.use_count() << endl; //use_count为2

shared_ptr<Student> s_stu3;
s_stu3 = s_stu1;
cout << s_stu3.use_count() << endl; //use_count为3
cout << s_stu1.use_count() << endl; //use_count为3
s_stu3.reset();//s_stu3不再指向Student对象,use_count-1
cout << s_stu1.use_count() << endl; //use_count为2
cout << s_stu3.use_count() << endl; //use_count为0
std::unique_ptr
定义
这是一种独占所有权的智能指针,任何时刻只能有一个unique_ptr 实例拥有对某个对象的所有权。不能被拷贝,只能被移动
主要特性:
- 独占所有权:确保资源在一个所有者下
- 轻量级:没有引用计数,开销小
- 自动释放:在指针销毁时自动释放资源
构造函数与赋值
- 默认构造函数:创建一个空
unique_ptr - 指针构造函数:接受一个裸指针,拥有其所有权
- 移动构造函数:将一个
unique_ptr的所有权转移到另一个unique_ptr - 移动赋值操作符:将一个
unique_ptr的所有权转移到另一个unique_ptr
由于unique_ptr不能被拷贝(源码里把拷贝构造给禁用了),必须通过移动语义转移所有权。这保证了资源的独占性
案例
#include <iostream>
#include <memory>
using namespace std;
class Student
{
public:
    string name;
    int age;
    Student():name(""),age(0);
    Student(string NAME,int AGE):name(NAME),age(AGE)
    ~Student()
    {
        cout<<"~Student(): "<<name<<endl;
    }
};

int main()
{
    unique_ptr<Student>ptr1(new Student("a", 1));
    cout<<ptr1->name<<endl;
    unique_ptr<Student>ptr2 = move(ptr1);//ptr1被置空
    cout<<ptr2->name<<endl;
    auto ptr3=make_unique<Student>("b", 22);//C++14用法
    cout<<ptr3->name<<endl;
    ptr3.reset(new Student("c", 32));//重置指针
    cout << ptr3->name << endl;
    unique_ptr<Student>ptr4(ptr3.release());//ptr3释放对c学生的所有权,由ptr4来接管
    cout << ptr4->name << endl;
    return 0;
}
输出:
a
a
b
~Student(): b
c
c
需要注意,reset是释放原本指向的对象(会调用析构),指向新的对象。而release只是释放所有权(将指针置空)并返回unique_ptr的内置指针,并不会删除对象(不会调用析构),后续需要手动delete
std::weak_ptr
定义
weak_ptr是一种不拥有对象所有权的智能指针,用于观察但不影响对象的生命周期。主要用于解决shared_ptr之间的循环引用问题
主要特性:
- 非拥有所有权:不增加引用计数。
- 可从
shared_ptr生成:通过weak_ptr可以访问shared_ptr管理的对象。 - 避免循环引用:适用于双向关联或观察者模式
循环引用问题:在存在双向关联(如父子关系)时,使用多个shared_ptr可能导致循环引用,导致内存泄漏。此时,可以使用weak_ptr来打破循环
案例
//首先定义两个类,另它们互相包含对方的智能指针
#include<iostream>
#include<memory>
#include<string>

class B;
class A
{
public:
	shared_ptr<B>ptrB;
	A()
	{
		cout << "A" << endl;
	}
	~A()
	{
		cout << "~A()" << endl;
	}
};

class B
{
public:
	shared_ptr<A>ptrA;//改为weak_ptr
	B()
	{
		cout << "B" << endl;
	}
	~B()
	{
		cout << "~B()" << endl;
	}
};
int main()
{
    shared_ptr<A> a=make_shared<A>();//I语句
    shared_ptr<B> b =make_shared<B>();//II语句
    a->ptrB = b; //III语句 A持有B的shared_ptr
    b->ptrA = a; //IV语句 B持有A的shared_ptr
    //离开作用域后A与B的生命周期并未结束
    //循环引用,B并没有调用析构,导致内存泄漏,要将B的shared_ptr改为weak_ptr
    return 0;
}
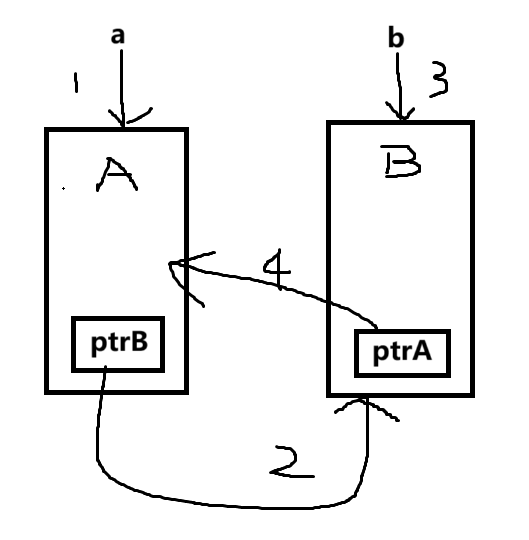
在I和II语句时,只有1和3两条引用,执行III和IV语句后产生了2和4引用。离开作用域后a与b被回收(即1、3引用断开),但2、4引用依然存在且每一个引用计数都不为0,这就导致了其指向的对象无法被析构
另外注意:weak_ptr不能直接访问对象,需要用lock()转换为shared_ptr
    std::shared_ptr<int> sp = std::make_shared<int>(42);
    std::weak_ptr<int> wp = sp;

    if (auto locked = wp.lock())// 尝试获取 shared_ptr
        std::cout << "Value: " << *locked << std::endl;
   else
        std::cout << "Object no longer exists." << std::endl;
自定义删除器
查看源码可知删除器其实是一种回调函数,可用于自定义资源的释放方式
//实现仿函数
struct CustomizedDeleter
{
	void operator()(FILE* fp) const//重载()
	{
		if (fp)
		{
			fclose(fp);
			cout << "File closed successfully." << endl;
		}
		else
		{
			cout << "File pointer is null." << endl;
		}
	}
};

int main()
{
	shared_ptr<FILE> fileptr(nullptr, CustomizedDeleter());//指定删除方式
	if (fileptr)
    {
	    cout << "open successfully" << endl;
	    fprintf(fileptr.get(), "Hello, World!\n");
    }
	else
		cout << "Failed to open file." << endl;
	//当然自定义删除器也支持lambda表达式
   auto fileDeleter = [](FILE* fp)
   {
        if (fp)
        {
            std::cout << "Closing file via lambda." << std::endl;
            fclose(fp);
        }
   };
   std::unique_ptr<FILE, decltype(fileDeleter)>
   filePtr(fopen("example.txt", "w"),fileDeleter);//decltype用于推导删除器类型
   if (filePtr)
   {
       std::cout << "File opened successfully." << std::endl;
	   fprintf(filePtr.get(), "Hello, Lambda!\n");
   }
}
注:查看unique_ptr源码可知它的模板指定了两个参数,所以传入两个参数时必须指定它们的类型
在当前目录下能够看到成功创建两个文本文件且能正常往里写入
参考
更多推荐

 8
8 0
0- 0


 已为社区贡献2条内容

所有评论(0)