
【17】喜欢折腾系列:带你玩转debian13编译安装php7.4
操作前建议把手机上的termux清除数据或者卸载termux重新安装
打开手机终端模拟器Termux,手动添加国内源
termux-change-repo
一、安装linux(debian13)系统(可能需要vpn加速)
1)安装proot-distro
pkg update && pkg upgrade -y && pkg install -y proot-distro
期间出现停顿,一律输入 y 回车即可。
2)安装debian13
proot-distro install debian:13
3)登录debian13
proot-distro login debian
二、编译前准备(只要网络不掉线和有足够的耐心,能九成以上的编译安装成功率)
1)更新系统安装gcc,make和perl等编译必须的工具链
apt update && apt install build-essential checkinstall curl wget -y
2)安装必备核心依赖库
apt install -y libxml2-dev \
libsqlite3-dev \
libonig-dev \
zlib1g-dev \
libzip-dev \
libgd-dev \
libjpeg-dev \
libpng-dev \
libfreetype6-dev \
libc6-dev \
libssl-dev \
libcurl4-openssl-dev
3)debian13安装libfreetype依赖库时,一般都会缺失freetype-config核心文件
①尝试查看有无freetype-config文件
find /usr -name "freetype-config" 2>/dev/null
②不显示出路径说明没有这个文件,需手动创建freetype-config文件
tee /root/freetype-config <<EOF
#!/bin/sh
exec pkg-config freetype2 "\$@"
EOF
chmod +x freetype-config && mv freetype-config /usr/bin
如下图: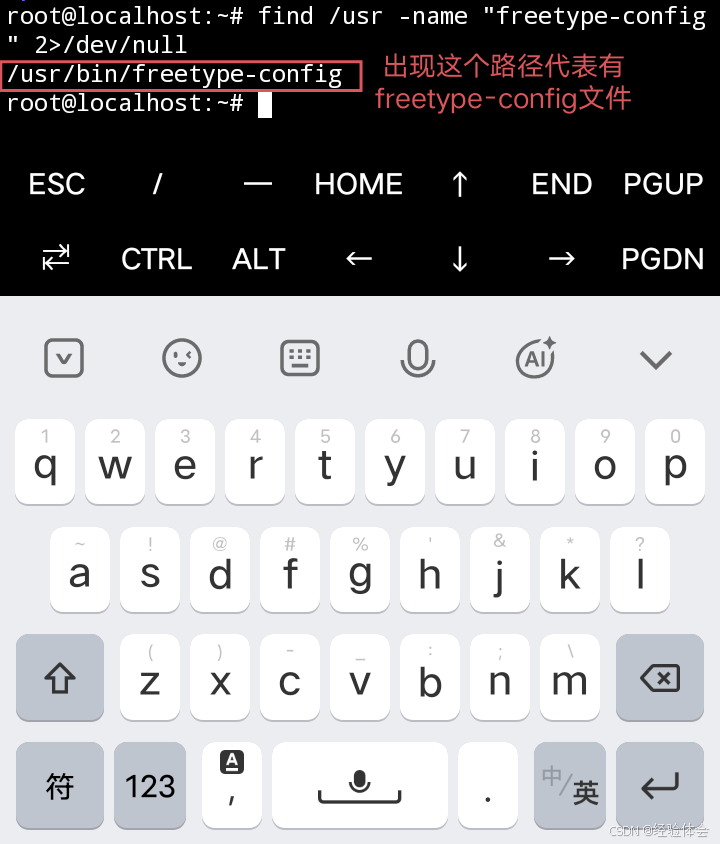
4)由于debian13很难降级gcc编译工具,在无gcc降级的情况下,debian13几乎无法编译安装php7.4以下的旧版本,因此只能从成功率比较高的php7.4开始入手学编译,编译安装php7.4依赖于openssl-1.1.1
①下载openssl1.1.1k并解压
wget https://github.com/openssl/openssl/releases/download/OpenSSL_1_1_1k/openssl-1.1.1k.tar.gz && tar xvf openssl-1.1.1k.tar.gz && rm openssl-1.1.1k.tar.gz && cd openssl-1.1.1k
②生成配置脚本Makefile,后续配合make和make install完成编译安装。
./config --prefix=/usr/local/ssl1.1 --openssldir=/usr/local/ssl1.1 shared zlib -Wl,-rpath=/usr/local/ssl1.1/lib
③编译(需要些时间,请耐心等待跑完)
make -j$(( $(nproc) - 1 ))
④安装(需要些时间,请耐心等待跑完)
make install
安装之后会在/usr/local目录看到生成的ssl1.1
ls /usr/local && cd
如下图: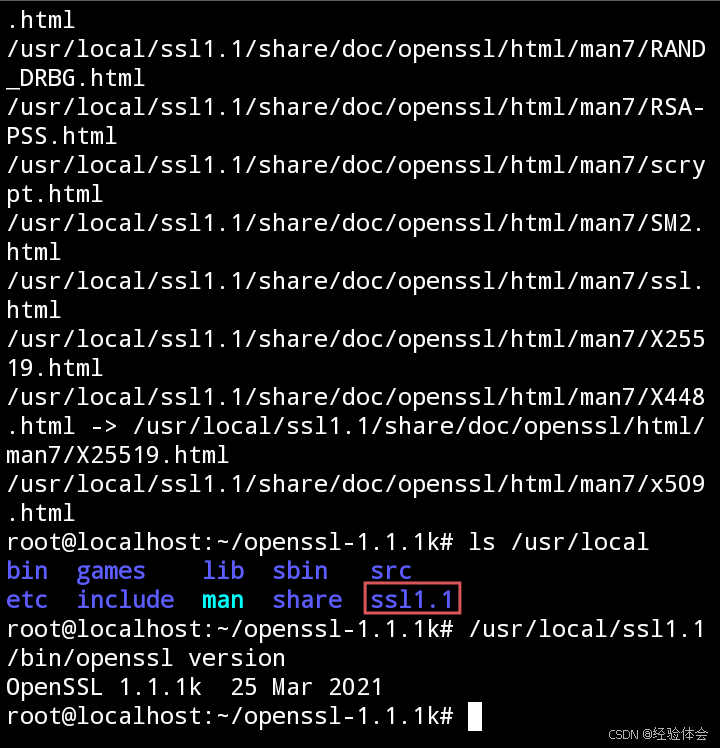
⑤验证版本号
/usr/local/ssl1.1/bin/openssl version && cd
⑥编译安装php7.4时记得把./configure下的--with-openssl参数修改成:--with-openssl=/usr/local/ssl1.1,或者把路径添加在环境变量里
如果编译失败就清理旧的构建残留,重新编译,避免之前错误产物的干扰:
make clean && make distclean
三、编译安装php
1)进入php官网https://www.php.net/releases/查找各种php的最后一个版本下载链接
建议把源码下载到本地,再把源码上传到各大网盘收藏,防止官网哪一天会失联
2)下载php7.4并解压
wget https://www.php.net/distributions/php-7.4.33.tar.gz && tar xvf php-7.4.33.tar.gz && rm php-7.4.33.tar.gz && cd php-7.4.33
①生成php7.4专用的配置脚本Makefile(需要些时间,请耐心等待跑完)
./configure \
--prefix=/usr/local/php7.4 \
--with-config-file-path=/usr/local/php7.4/etc \
PKG_CONFIG_PATH=/usr/local/ssl1.1/lib/pkgconfig \
--enable-fpm \
--with-fpm-user=www-data \
--with-fpm-group=www-data \
--with-pdo-mysql \
--with-mysqli \
--enable-mbstring \
--with-zip \
--with-zlib \
--enable-gd \
--with-jpeg \
--with-freetype \
--with-iconv \
--with-openssl \
--with-curl
跑到最后如下图才算配置成功:
②编译(需要些时间,请耐心等待跑完)
make -j$(( $(nproc) - 1 ))
③安装 (需要些时间,请耐心等待跑完)
make install
如果编译失败就清理旧的构建残留重新编译,避免之前错误产物的干扰:
make clean && make distclean
④安装完成验证版本号
/usr/local/php7.4/bin/php -v
⑤把从源码编译出来的php.ini复制到已经安装好的php7.4指定配置文件路径
cp php.ini-development /usr/local/php7.4/etc/php.ini
⑥创建php-fpm配置文件:
cd /usr/local/php7.4/etc && cp php-fpm.conf.default php-fpm.conf && cd php-fpm.d && cp www.conf.default www.conf && cd
⑦启动
/usr/local/php7.4/sbin/php-fpm
四、nginx对接php-fpm
1)安装nginx
apt install -y nginx
①删除default
rm /etc/nginx/sites-available/default
②重新创建default
nano /etc/nginx/sites-available/default
复制下面的内容粘贴进去:
server {
    listen 8080;
    server_name localhost;
    # 网站根目录要正确
    root /var/www/html;
    index index.php index.htm;

# 伪静态。找不到文件文件夹时交给index.php处理
    location / {
        try_files $uri $uri/ /index.php?$args;
    }

    # 解析PHP-FPM
    location ~ \.php$ {
        include snippets/fastcgi-php.conf;
        fastcgi_pass 127.0.0.1:9000; # 凡是对接编译安装的php都用9000端口通信
    }
}
③Ctrl+O回车保存,Ctrl+X退出
④启动nginx
nginx
⑤写入info.php到网站根目录
echo '<?php phpinfo(); ?>' > /var/www/html/info.php
⑥浏览器访问:
http://127.0.0.1:8080/info.php
2)各种网站源码的nginx配置模板
①基础nginx配置模板(常用于搭建wordpress等非ThinkPHP框架的网站源码)
server {
    listen 8080;
    server_name localhost;
    # 网站根目录要正确
    root /var/www/html;
    index index.php index.html;

    # 非ThinkPHP框架基础伪静态
    location / {
        try_files $uri $uri/ /index.php?$args;
    }

    # 解析PHP-FPM
    location ~ \.php$ {
        include snippets/fastcgi-php.conf;
        fastcgi_pass 127.0.0.1:9000; # 凡是对接编译安装的php都用9000端口通信
    }
}
②苹果cms影视网站nginx专用配置模板(需要php5.6-7.4)
server {
    listen 8080;
    server_name localhost;
    # 网站根目录要正确
    root /var/www/html;
    index index.php index.html;

    # 苹果cms伪静态
    location / {
        if (!-e $request_filename) {
            rewrite ^/index.php(.*)$ /index.php?s=$1 last;
            rewrite ^/api.php(.*)$ /api.php?s=$1 last;
            rewrite ^/admin.php(.*)$ /admin.php?s=$1 last;
            rewrite ^(.*)$ /index.php?s=$1 last;
            break;
        }
    }

    # 解析PHP-FPM
    location ~ \.php$ {
        include snippets/fastcgi-php.conf;
        fastcgi_pass 127.0.0.1:9000; # 凡是对接编译安装的php都用9000端口通信
    }
}
③v免签二开版nginx专用配置模板(需要php5.6-7.4)
server {
    listen 8080;
    server_name localhost;
    # 网站根目录要正确
    root /var/www/html/public;
    index index.php index.html;

    # ThinkPHP框架伪静态
    location / {
        if (!-e $request_filename) {
            rewrite ^(.*)$ /index.php?s=$1 last;
            break;
        }
    }

    # 解析PHP-FPM
    location ~ \.php$ {
        include snippets/fastcgi-php.conf;
        fastcgi_pass 127.0.0.1:9000; # 凡是对接编译安装的php都用9000端口通信
    }
}
搭建v免签二开版时从外部导入.sql数据库文件方法:
确保已经登录了数据,创建一个名为vmq专用于v免签的数据库,先执行USE vmq;切换到该数据库,再执行下面的语法导入:
source /var/www/html/pay.sql;
执行show tables;语法查询当前vmq数据库下所导入的列表内容
如果源码不在/var/www/html默认路径,执行命令导入.sql文件时,要注意修改命令中的正确路径
如果源码下载到手机本地,先执行USE vmq;切换到该数据库,再打开源码中的pay.sql文件,把里面的语法内容全部复制,然后回到该数据库粘贴即可导入
④v免签开源版nginx专用配置模板(需要php5.6-7.4)
server {
    listen 8080;
    server_name localhost;
    # 网站根目录要正确
    root /var/www/html/public;
    index index.html;

    # ThinkPHP框架伪静态
    location / {
        if (!-e $request_filename) {
            rewrite ^(.*)$ /index.php?s=$1 last;
            break;
        }
    }

    # 解析PHP-FPM
    location ~ \.php$ {
        include snippets/fastcgi-php.conf;
        fastcgi_pass 127.0.0.1:9000; # 凡是对接编译安装的php都用9000端口通信
    }
}
搭建v免签开源版时从外部导入.sql数据库文件方法:
确保已经登录了数据,创建一个名为vmq专用于v免签的数据库,先执行USE vmq;切换到该数据库,再执行下面的语法导入:
source /var/www/html/vmq.sql;
执行show tables;语法查询当前vmq数据库下所导入的列表内容
如果源码不在/var/www/html默认路径,执行命令导入.sql文件时,要注意修改命令中的正确路径
如果源码下载到手机本地,先执行USE vmq;切换到该数据库,再打开源码中的vmq.sql文件,把里面的语法内容全部复制,然后回到该数据库粘贴即可导入
更多推荐
 17
17 0
0- 0


 已为社区贡献12条内容

所有评论(0)