
基于注解方式的声明式事务管理(黑马程序员Java EE企业级应用开发教程(Spring+Spring MVC+MyBatis)(第3版)学习笔记)
·
基于注解方式的声明式事务管理介绍
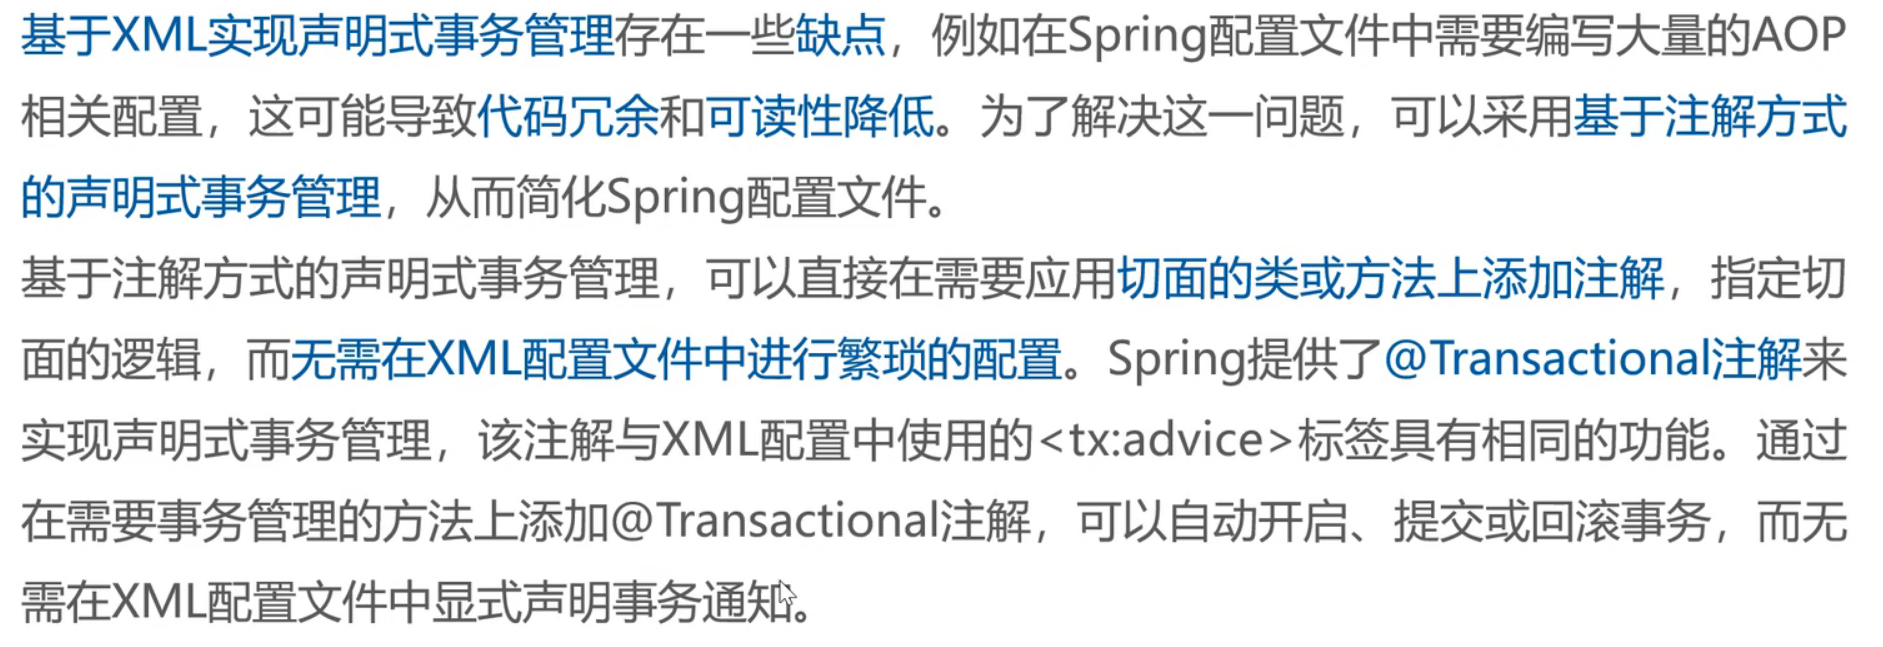
简单来说就是使用配置文件来完成相关配置步骤繁琐,代码冗余(基于XML相关知识可以查看我的上一篇文章),可读性降低等等缺点,为了 解决这些问题可以使用注解的方法来简化操作
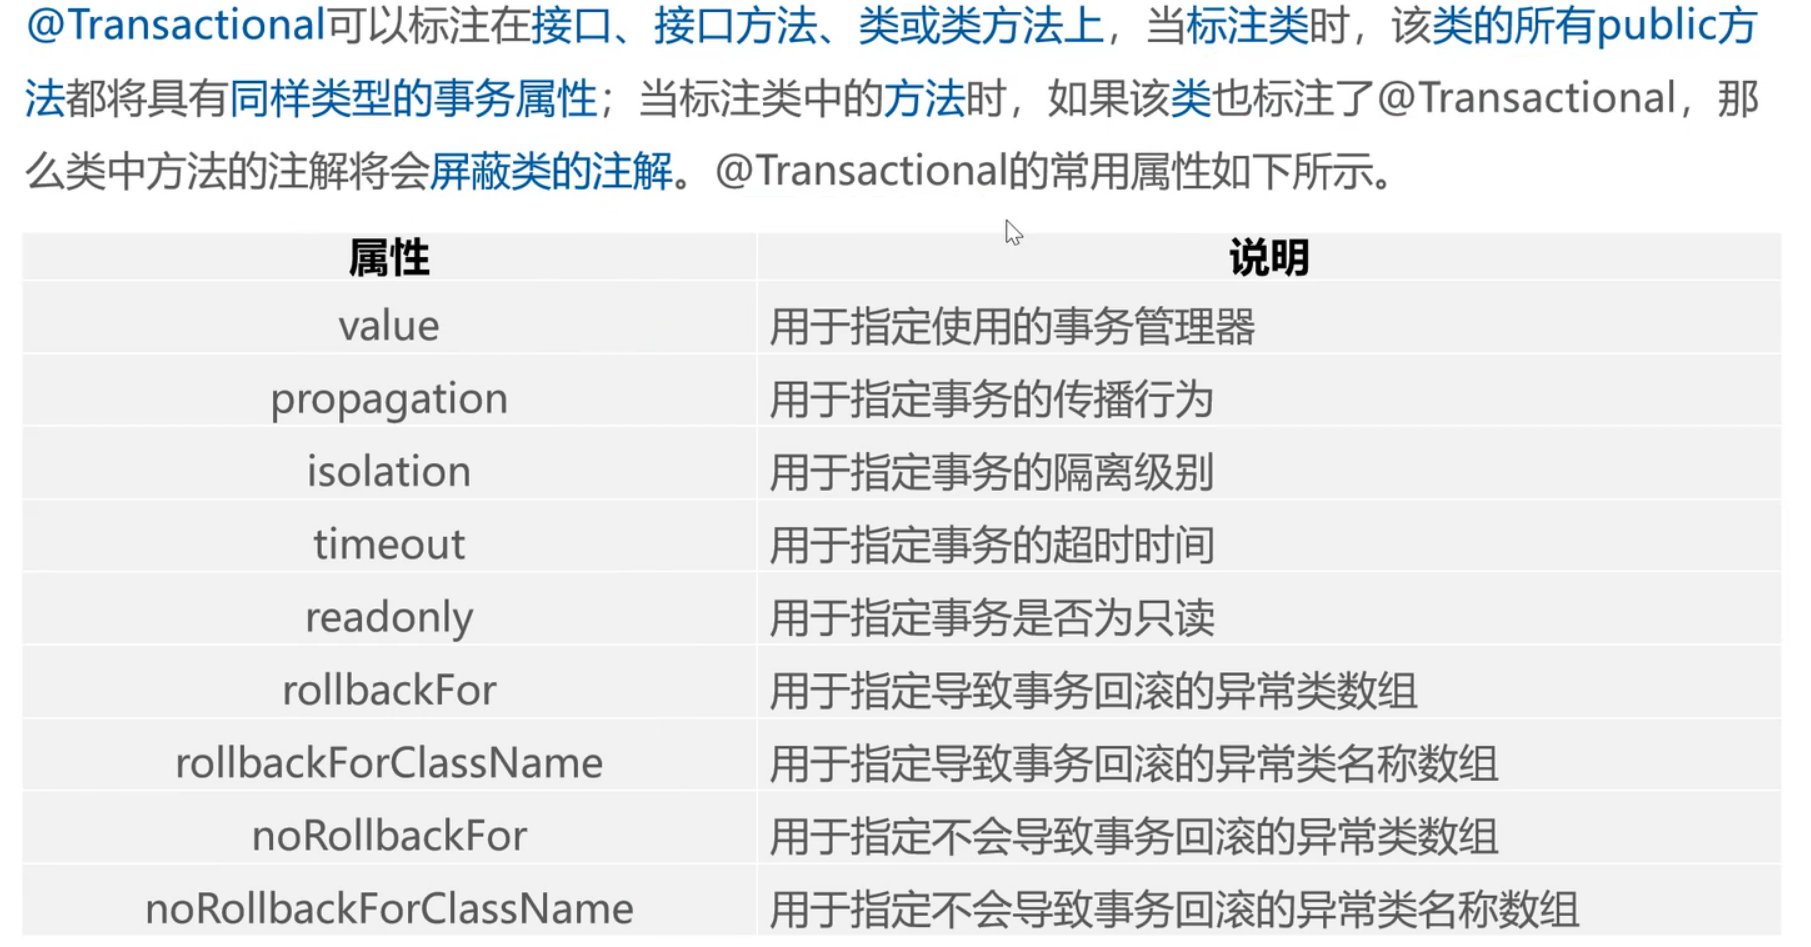
@Transactional注解的相关属性
实例代码
这次代码将基于上一篇文章的基础进行修改,代码会附在文章之后
1.创建配置文件applicationContext-annotation.xml
<?xml version="1.0" encoding="UTF-8"?>
<beans xmlns="http://www.springframework.org/schema/beans"
xmlns:xsi="http://www.w3.org/2001/XMLSchema-instance"
xmlns:context="http://www.springframework.org/schema/context" xmlns:tx="http://www.springframework.org/schema/tx"
xsi:schemaLocation="http://www.springframework.org/schema/beans http://www.springframework.org/schema/beans/spring-beans.xsd http://www.springframework.org/schema/context https://www.springframework.org/schema/context/spring-context.xsd http://www.springframework.org/schema/tx http://www.springframework.org/schema/tx/spring-tx.xsd">
<!--包扫描-->
<context:component-scan base-package="com.noxuwdy"/>
<!--配置数据源-->
<bean id="dataSource" class="org.springframework.jdbc.datasource.DriverManagerDataSource">
<property name="password" value="123456"/>
<property name="username" value="root"/>
<property name="url" value="jdbc:mysql://localhost:3306/spring"/>
<property name="driverClassName" value="com.mysql.cj.jdbc.Driver"/>
</bean>
<!--配置事务管理器 关联数据源-->
<bean id="transactionManager" class="org.springframework.jdbc.datasource.DataSourceTransactionManager">
<property name="dataSource" ref="dataSource"/>
</bean>
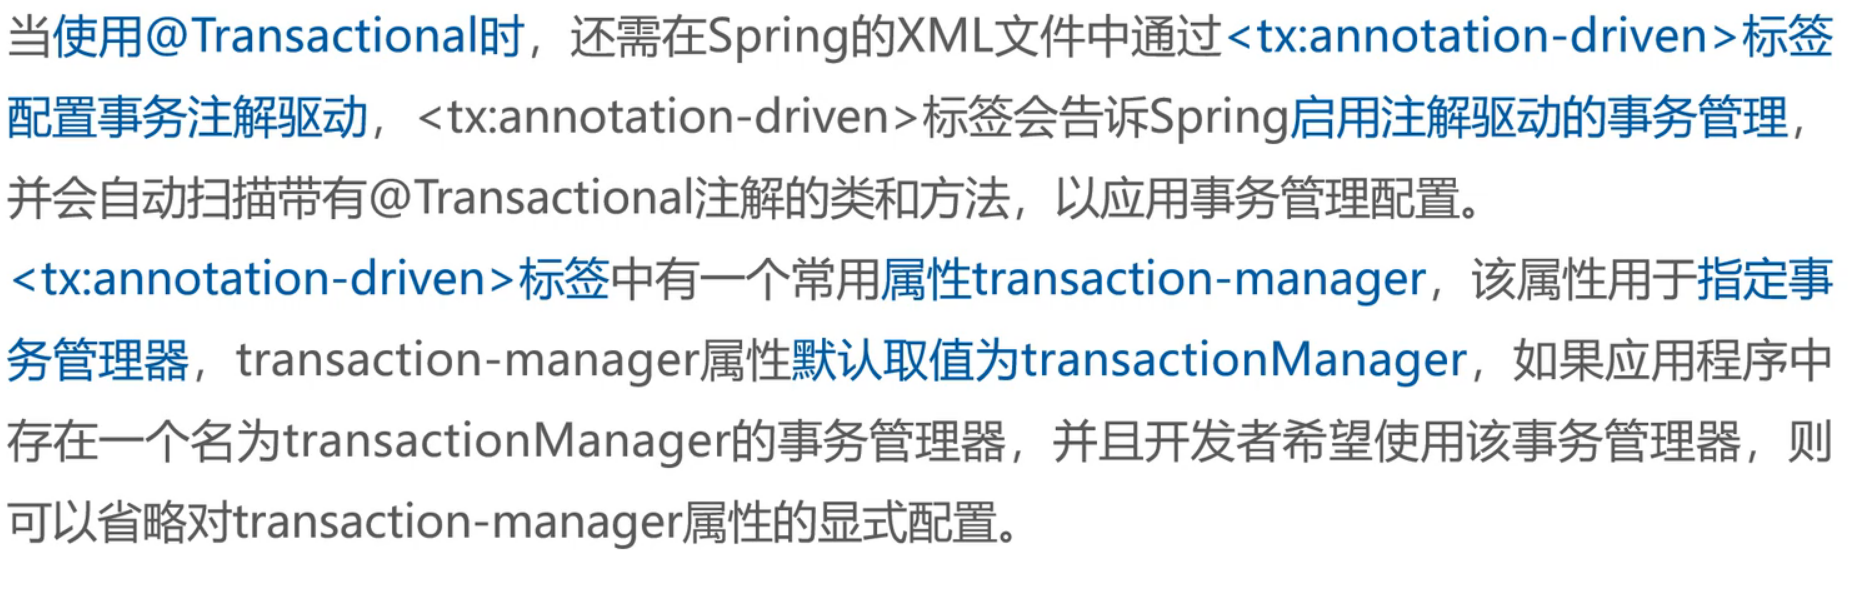
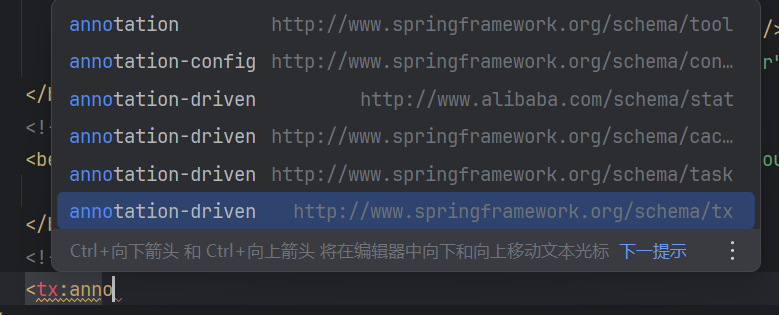
<!--配置事务注解驱动-->
<tx:annotation-driven/>
</beans>注意这里配置事务注解驱动时候要选对,要在"tx"中的annotation-driven
我们可以对比一下使用基于XML的配置文件
<?xml version="1.0" encoding="UTF-8"?>
<beans xmlns:xsi="http://www.w3.org/2001/XMLSchema-instance"
       xmlns:context="http://www.springframework.org/schema/context"
       xmlns:tx="http://www.springframework.org/schema/tx" xmlns:aop="http://www.springframework.org/schema/aop"
       xmlns="http://www.springframework.org/schema/beans"
       xsi:schemaLocation="http://www.springframework.org/schema/beans
       http://www.springframework.org/schema/beans/spring-beans.xsd
        http://www.springframework.org/schema/context
         https://www.springframework.org/schema/context/spring-context.xsd
         http://www.springframework.org/schema/tx
         http://www.springframework.org/schema/tx/spring-tx.xsd
         http://www.springframework.org/schema/aop
          https://www.springframework.org/schema/aop/spring-aop.xsd">
<!--包扫描-->
    <context:component-scan base-package="com.noxuwdy"/>
<!--数据源配置-->
    <bean id="dataSource" class="org.springframework.jdbc.datasource.DriverManagerDataSource">
        <!--数据库驱动-->
        <property name="driverClassName" value="com.mysql.cj.jdbc.Driver"/>
        <property name="url" value="jdbc:mysql://localhost:3306/spring"/>
        <property name="username" value="root"/>
        <property name="password" value="123456"/>

    </bean>
    <!--配置事务管理器 关联数据源-->
    <bean id="transactionManager" class="org.springframework.jdbc.datasource.DataSourceTransactionManager">
        <property name="dataSource" ref="dataSource"/>
    </bean>
<!--配置通知,对事务进行增强(通知)-->
    <!--这里的tx引入的包是tx结尾不是catch-->
    <tx:advice id="txAdvice" transaction-manager="transactionManager">
        <!--配置事务参数-->
        <tx:attributes>
 <!--name 表示管理的方法  * 表示都管   propagation表示传播行为 isolation 表示隔离级别  read-only 表示只读-->
            <tx:method name="*" propagation="REQUIRED" isolation="DEFAULT" read-only="false"/>
        </tx:attributes>


    </tx:advice>
    <!--AOP配置切入点和切面-->
    <aop:config>
        <aop:pointcut id="txPointCut" expression="execution(* com.noxuwdy.dao.*.*(..))"/>
        <aop:advisor advice-ref="txAdvice" pointcut-ref="txPointCut"/>
    </aop:config>

</beans>
很明显就可以看出来注解方式要简洁很多
2.创建dao层接口(详情见上一篇文章)
package com.noxuwdy.dao;

import com.noxuwdy.pojo.Account;

import java.util.List;
import java.util.Map;

public interface AccountDao {
    //添加单个账户信息
    public void addAccount(Account account);
    //根据ID查找用户信息
    public Account queryAccount(int id);
    //批量添加用户]
    public void addAccountList(List<Account> list);
    //查询所有账户
    public List<Account> queryAccountList();
    //根据id查询账户信息,将信息封装到Map中
    public Map<String,Object> queryAccountMap(int id);
    //修改账户信息
    public void updateAccount(Account account);
    //删除用户
    public void deleteAccount(int id);
    //实现转账业务
    public void transfer(String outUser ,String inUser,Double money);
}
3.创建dao的实现类并添加注解
package com.noxuwdy.dao;

import com.noxuwdy.pojo.Account;
import org.springframework.beans.factory.annotation.Autowired;
import org.springframework.jdbc.core.BeanPropertyRowMapper;
import org.springframework.jdbc.core.JdbcTemplate;
import org.springframework.stereotype.Repository;
import org.springframework.transaction.annotation.Isolation;
import org.springframework.transaction.annotation.Propagation;
import org.springframework.transaction.annotation.Transactional;

import java.util.ArrayList;
import java.util.List;
import java.util.Map;

@Repository//交给Spring管理 持久层文件标记
public class AccountDaoImpl implements AccountDao{
    //添加用户信息
    @Autowired
    private JdbcTemplate jdbcTemplate;
    @Override
    public void addAccount(Account account) {
    String sql = "insert into account(username,balance) values(?,?)";
    Object[] obj =new Object[]{account.getUsername(),account.getBalance()};
    jdbcTemplate.update(sql,obj);

    }

    @Override
    public Account queryAccount(int id) {
        String sql = "select id ,username,balance from account where id=?";
        Account account = jdbcTemplate.queryForObject(sql, new BeanPropertyRowMapper<>(Account.class), id);
        return account;

    }

    @Override
    public void addAccountList(List<Account> list) {
        String sql = "insert into account(username,balance) values(?,?)";
        List<Object[]> objs =new ArrayList<>();
        for (Account account : list) {
            objs.add(new Object[]{
                    account.getUsername(),
                    account.getBalance()
            });
        }

        //批量完成添加操作
        jdbcTemplate.batchUpdate(sql,objs);
    }

    @Override
    public List<Account> queryAccountList() {
    String sql = "select * from account";
        List<Account> query = jdbcTemplate.query(sql, new BeanPropertyRowMapper<>(Account.class));

        return query ;
    }

    @Override
    public Map<String, Object> queryAccountMap(int id) {
        String sql = "select * from account where id=?";
        Map<String, Object> map = jdbcTemplate.queryForMap(sql, id);
        return map;
    }

    @Override
    public void updateAccount(Account account) {
        String sql = "update account set username=?,balance=? where id=?";
        Object[] obj =new Object[]{account.getUsername(),account.getBalance(),account.getId()};
        jdbcTemplate.update(sql,obj);
    }

    @Override
    public void deleteAccount(int id) {
        String sql = "delete from account where id=?";
        Object[] obj =new Object[]{id};
        jdbcTemplate.update(sql,obj);
    }


    /**
     * 实现转账业务
     * @param outUser 汇款人
     * @param inUser 收款人
     * @param money 转账数额
     */
    @Override
    @Transactional(propagation = Propagation.REQUIRED,isolation = Isolation.DEFAULT,readOnly = false)
    public void transfer(String outUser, String inUser, Double money) {
        //汇款时 汇款账户余额= 现有金额-转账金额
        jdbcTemplate.update("update account set balance=balance-? where username=?",money,outUser);

        //模拟系统运行时出现突发状态(转账一半出现问题)
        int i= 1/0;
        //首款时 收款账户余额 = 现有余额+转账金额
        jdbcTemplate.update("update account set balance=balance+? where username=?",money,inUser);
    }

    //

}
这里只对transfer(转账)方法进行了注解
4.创建测试类
import com.noxuwdy.dao.AccountDao;
import org.junit.jupiter.api.Test;
import org.springframework.beans.factory.annotation.Autowired;
import org.springframework.test.context.junit.jupiter.SpringJUnitConfig;

@SpringJUnitConfig(locations = "classpath:applicationContext-annotation.xml")
public class TransactionTest {
    @Autowired
    private AccountDao accountDao;
@Test
    public void testTransfer() {
    accountDao.transfer("Noxuswdy","wenjing",100.0);
}
}
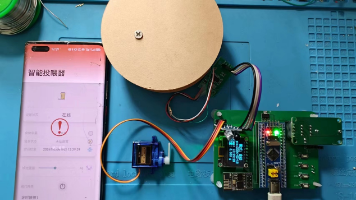
5.进行测试
我们在接口实现类中模拟了出现意外情况终止的代码
所以如果我们代码执行前和执行后数据没有发生变化则进行了事务回滚证明我们的代码没问题
测试前
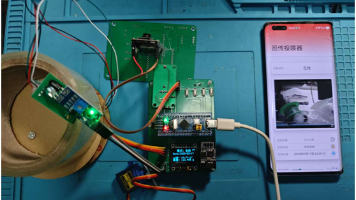
测试后
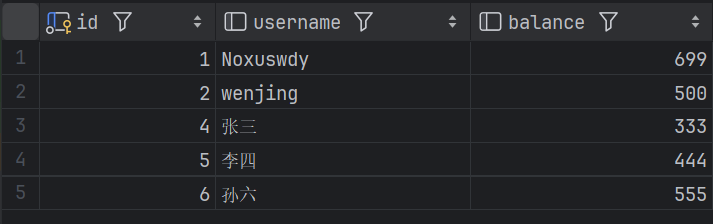

可以看到控制台出现了我们预留的模拟错误测试前后也没有变化
至此证明代码没有问题
总结
基于注解方式的声明式事务管理方法,相比XML配置更加简洁高效。通过@Transactional注解实现事务控制,重点演示了转账业务的事务处理。文章详细展示了配置文件的简化过程(applicationContext-annotation.xml)、DAO层实现类的注解使用(特别是transfer方法的@Transactional配置),以及测试验证过程。测试中通过模拟异常验证了事务回滚功能,证明注解方式能有效管理事务。这种方法避免了XML配置的繁琐,提高了代码可读性和开发效率。
更多推荐
 8
8 0
0- 0


 已为社区贡献2条内容

所有评论(0)