
AI Agent 学习手记:从基础 Agent Loop 到 Pi Agent 框架设计
·
AI Agent 学习手记:从 Agent Loop 机制到 Pi Coding Agent 架构解析
写在前面:昨天我深度拆解了大语言模型(LLM)从“单轮 Prompt 对话”走向“自主 Agent”的底层机制,并对比阅读了 Pi Coding Agent (
pi.dev) 的官方文档。
过去我们常用 LangChain 或 AutoGPT 这种高度封装的框架,但很容易掉进“黑盒难以调试”的坑里。真正理解 Agent 的关键,在于掌握 Agent Loop(智能体循环) 的递归本质,以及像 Pi 这样强调 轻量 Harness、显式 Trace 与高扩展性 的现代化 Agent 架构设计。
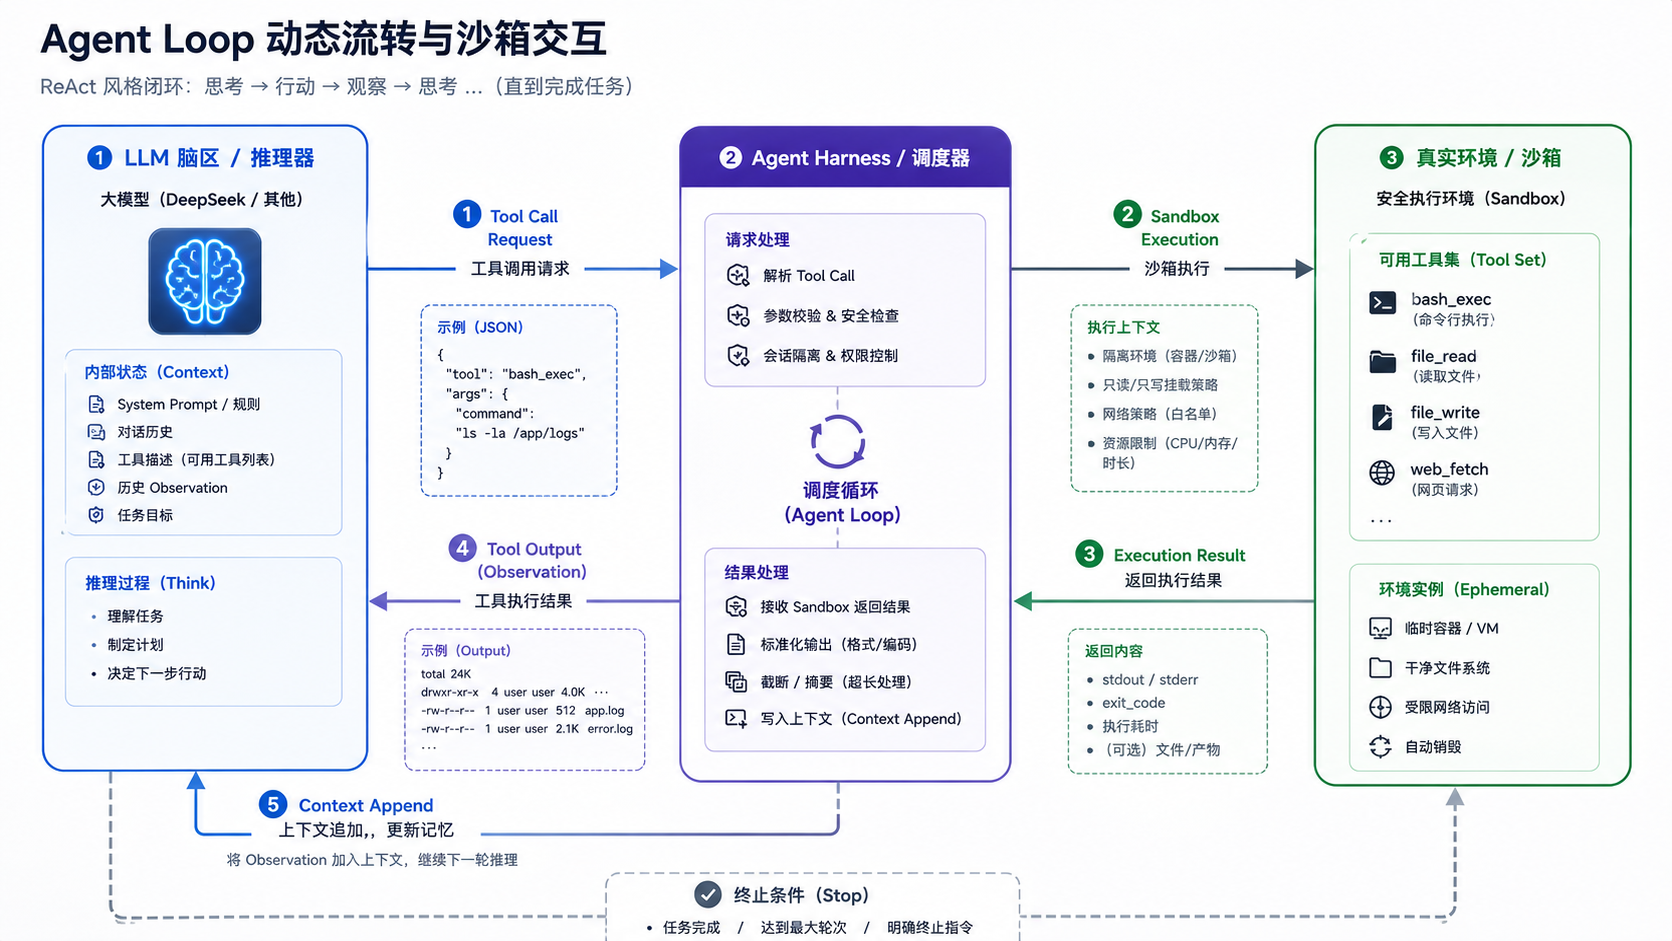
01. Agent Loop 的本质:ReAct 状态机循环
LLM 本质上只是预测下一个 Token 的概率模型。要让它具备自主解决复杂任务(如定位 Bug、修改代码、运行测试)的能力,必须引入 Agent Loop。
1.1 核心循环结构
Agent Loop 是一个典型的 Thought -> Action -> Observation 递归闭环:
        ┌─────────────────────────────────────────┐
        │                                         │
        ▼                                         │
┌──────────────┐      ┌──────────────┐     ┌──────────────┐
│   Thought    │ ───► │    Action    │ ───►│ Observation  │
│  (LLM 推理)  │      │  (工具调用)  │     │ (环境/API返回)│
└──────────────┘      └──────────────┘     └──────────────┘
        │
        └───────► [任务完成 / 触发 Stop] ───► Finish
- Thought(思考):LLM 结合 Prompt 和历史上下文,推理下一步行动。
- Action(行动):模型输出结构化的工具调用请求(如
execute_bash、read_file)。 - Observation(观察):宿主环境(Harness)执行该工具,将真实输出(如终端日志、命令返回值)作为新的
role: tool上下文追加回对话中。 - Loop(循环):模型基于更新后的上下文重新评估,直到达成目标退出循环。
02. Agent Loop 核心代码骨架
为了搞清底层的上下文追加逻辑,我用 Python 实现了一个最简的 Agent Loop 执行器:
def run_agent_loop(user_prompt: str, system_prompt: str, tools: list, max_steps: int = 10):
    messages = [
        {"role": "system", "content": system_prompt},
        {"role": "user", "content": user_prompt}
    ]

    step = 0
    while step < max_steps:
        step += 1
        print(f"\n--- [Step {step}] ---")

        # 1. 调用模型获取思考与行动
        response = llm_client.chat(messages=messages, tools=tools)

        # 2. 若没有工具调用,说明已得出最终答案,退出循环
        if not response.tool_calls:
            return response.content

        # 3. 截断并执行工具调用 (Action)
        for tool_call in response.tool_calls:
            tool_name = tool_call.function.name
            tool_args = tool_call.function.arguments

            # 真实环境中执行并获取 Observation
            observation = execute_tool_in_sandbox(tool_name, tool_args)

            # 4. 追加轨迹到 Context 历史中
            messages.append(response.message)
            messages.append({
                "role": "tool",
                "tool_call_id": tool_call.id,
                "content": str(observation)
            })

    raise TimeoutError("Agent Loop 达到最大步数上限!")
03. 拆解 Pi Coding Agent (pi.dev) 的架构设计
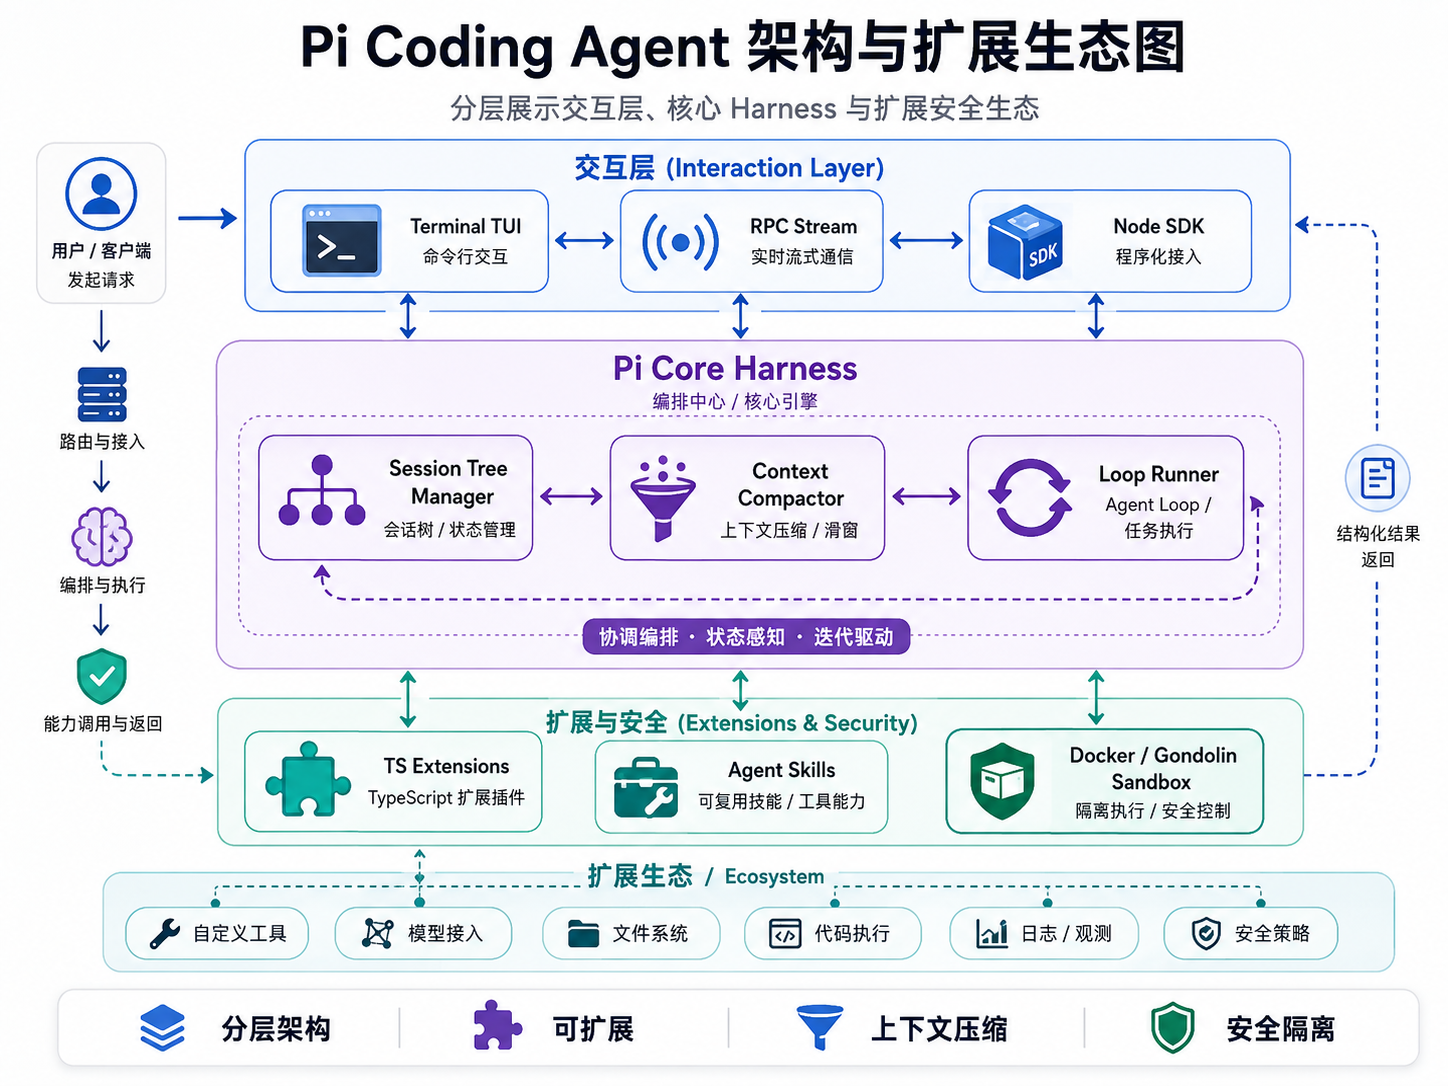
根据官方文档,Pi (Pi Coding Agent) 被定义为一个 “Minimal Terminal Coding Harness(极简终端代码 Agent 框架)”。它拒绝过度封装,倡导 “Core 极简,靠 TypeScript Extensions 与 Skills 扩展”。
3.1 Pi 的四大架构支柱
                  ┌─────────────────────────────────────┐
                  │          Pi Coding Agent            │
                  └──────────────────┬──────────────────┘
                                     │
      ┌────────────────┬─────────────┴────────────┬────────────────┐
      ▼                ▼                          ▼                ▼
┌───────────┐    ┌───────────┐              ┌───────────┐    ┌───────────┐
│ Session   │    │ Program    │              │ Custom    │    │ Security  │
│  Tree     │    │  Usage    │              │ Extensions│    │ Sandbox   │
│ JSONL日志  │    │ TUI/RPC/  │              │ TS Tools  │    │ Docker/   │
│ 树状分支   │    │ EventStream│              │ Agent技能 │    │ Gondolin  │
└───────────┘    └───────────┘              └───────────┘    └───────────┘
- Session 树状持久化与上下文压缩(Compaction):
- Pi 将所有 Tool Call、Thinking 与结果持久化为结构化的 JSONL Session 树。
- 支持分支切换(Branching)与上下文自动压缩(Compaction),解决长对话爆栈问题。
- 多模式程序化接入(Programmatic Usage):
- 除了终端 TUI 模式,Pi 原生支持 RPC Mode(基于 stdin/stdout 的 JSONL 通信) 与 SDK 嵌入,方便集成为 CI/CD 或 IDE 插件。
- TypeScript 驱动的 Extensions 与 Skills:
- 开发者可通过轻量 TypeScript 模块扩充自定义 Tool、Slash Command 与事件 Hook,也可以发布为 Pi Packages 复用。
- 容器与安全隔离(Containerization & Security):
- 在终端执行 Bash 命令存在安全隐患,Pi 原生支持配合 Gondolin、Docker 或 OpenShell 进行沙箱隔离。
04. 实战踩坑与 Agent 调优策略
昨晚在实际测试 Agent 自动修复单元测试的场景时,总结了 3 个非常关键的工程调优点:
1. 避免死循环(Infinite Loop Detection)
- 问题:Agent 遇到相同报错时,容易重复发送完全一致的 Tool Call 参数。
- 对策:在 Loop 中校验历史记录,一旦连续两轮生成相同请求,在 System Prompt 强行追加 Warning 指令引导更换思路。
2. Observation 截断与防爆栈
- 问题:Agent 执行
cat large.log返回数万行文本,瞬间吃满上下文。 - 对策:在写回
messages前进行流式截断(如只保留最近 2000 字符及尾部 Error),保持上下文精干。
3. 工具描述(Tool Spec)必须语义精准
- 问题:模型传错参数。
- 对策:JSON Schema 中的
description比代码实现本身更关键,必须附带边缘条件与格式示例。
05. 总结
- Agent Loop 是智能体的灵魂,其本质是基于上下文的递归状态机。
- Pi Coding Agent 展现了现代终端 Agent 的极佳范式:小 Core、强 Session 树、显式 JSONL 轨迹、沙箱安全与 TypeScript 极简扩展。

小龙虾开发者社区是 CSDN 旗下专注 OpenClaw 生态的官方阵地,聚焦技能开发、插件实践与部署教程,为开发者提供可直接落地的方案、工具与交流平台,助力高效构建与落地 AI 应用
更多推荐


 7
7 0
0- 0


 已为社区贡献5条内容

所有评论(0)