
OpenClaw 龙虾全自动源码安装,适合本地和云端
本教程提供一键全自动安装脚本,适用于 Ubuntu 系统(本地或云端),覆盖基础依赖安装、Node.js 环境搭建、OpenClaw 源码拉取与构建、模型配置、网关启动及页面测试全流程。建议在 Docker 容器中运行以确保安全,Docker 安装可参考另一份教程。详细教程来源于“龙虾实验室”社区(longxialab.cn)。龙虾实验室包含大量入门教程和龙虾应用资源,是个很不错的龙虾资源聚合平台。
1 获取全自动安装程序
脚本内容如下所示,
修改3个参数:
大模型地址:“baseUrl”: “http://xxxxx/v1”,
大模型秘钥:“apiKey”: “xxxxx”,
大模型名称:“id”: “qwen-plus”,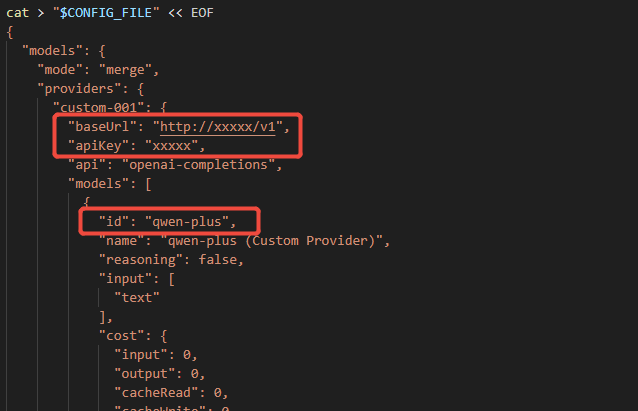
修改完成后,保存为 install.sh
#!/bin/bash
# OpenClaw(龙虾)本地安装脚本
# 适用于 Ubuntu 系统(主机或 Docker 内)

set -e

HOME_DIR=$(eval echo ~)
echo "当前用户 HOME 目录: $HOME_DIR"

echo "=== [1/5] 安装基础依赖 ==="
apt update
apt-get install -y curl ssh vim gcc cmake build-essential git sudo

echo "=== [2/5] 安装 Node.js LTS ==="
curl -fsSL https://deb.nodesource.com/setup_lts.x | sudo -E bash -
sudo apt-get install -y nodejs
node -v
npm -v
npm install -g pnpm
pnpm -v

echo "=== [3/5] 下载 OpenClaw 源码 ==="
mkdir -p "$HOME_DIR/project"
cd "$HOME_DIR/project"
if [ ! -d "openclaw" ]; then
  git clone https://gitee.com/fgai/openclaw.git \
    || git clone https://ghfast.top/https://github.com/openclaw/openclaw.git \
    || https://github.com/openclaw/openclaw.git
fi
cd "$HOME_DIR/project/openclaw"

echo "=== [4/5] 安装依赖并构建 ==="
pnpm install
pnpm ui:build
pnpm build

echo "=== [5/5] 全局链接 OpenClaw ==="
cd "$HOME_DIR/project/openclaw"
pnpm setup
PNPM_GLOBAL_BIN=$(pnpm bin -g)
export PNPM_HOME="$HOME_DIR/.local/share/pnpm"
export PATH="$PNPM_HOME:$PNPM_GLOBAL_BIN:$PATH"
echo "PNPM_HOME 已设置: $PNPM_HOME"
bash -c "source ~/.bashrc; echo 'bashrc 加载完成'"
cd "$HOME_DIR/project/openclaw"
pnpm link --global


echo "=== 配置 openclaw.json ==="
CONFIG_DIR="$HOME_DIR/.openclaw"
CONFIG_FILE="$CONFIG_DIR/openclaw.json"
mkdir -p "$CONFIG_DIR"

# 备份已有配置
if [ -f "$CONFIG_FILE" ]; then
  cp "$CONFIG_FILE" "${CONFIG_FILE}.bak.$(date +%Y%m%d_%H%M%S)"
  echo "已备份原配置:${CONFIG_FILE}.bak.*"
fi

cat > "$CONFIG_FILE" << EOF
{
  "models": {
    "mode": "merge",
    "providers": {
      "custom-001": {
        "baseUrl": "http://xxxxx/v1",
        "apiKey": "xxxxx",
        "api": "openai-completions",
        "models": [
          {
            "id": "qwen-plus",
            "name": "qwen-plus (Custom Provider)",
            "reasoning": false,
            "input": [
              "text"
            ],
            "cost": {
              "input": 0,
              "output": 0,
              "cacheRead": 0,
              "cacheWrite": 0
            }
          }
        ]
      }
    }
  },
  "agents": {
    "defaults": {
      "model": {
        "primary": "custom-001/qwen-plus"
      },
      "models": {
        "custom-001/qwen-plus": {}
      },
      "workspace": "$HOME_DIR/.openclaw/workspace"
    }
  },
  "tools": {
    "profile": "coding",
    "web": {
      "search": {
        "enabled": true,
        "provider": "gemini",
        "gemini": {
          "apiKey": "sk-xxxxxxxxxx"
        }
      }
    }
  },
  "commands": {
    "native": "auto",
    "nativeSkills": "auto",
    "restart": true,
    "ownerDisplay": "raw"
  },
  "session": {
    "dmScope": "per-channel-peer"
  },
  "hooks": {
    "internal": {
      "enabled": true,
      "entries": {
        "boot-md": {
          "enabled": true
        },
        "bootstrap-extra-files": {
          "enabled": true
        },
        "command-logger": {
          "enabled": true
        },
        "session-memory": {
          "enabled": true
        }
      }
    }
  },
  "gateway": {
    "port": 18789,
    "mode": "local",
    "bind": "loopback",
    "auth": {
      "mode": "token",
      "token": ""
    },
    "tailscale": {
      "mode": "off",
      "resetOnExit": false
    },
    "nodes": {
      "denyCommands": [
        "camera.snap",
        "camera.clip",
        "screen.record",
        "contacts.add",
        "calendar.add",
        "reminders.add",
        "sms.send"
      ]
    }
  },
  "skills": {
    "install": {
      "nodeManager": "npm"
    },
    "entries": {
      "goplaces": {
        "apiKey": "sk-xxxxxxxxxxxxxx"
      },
      "nano-banana-pro": {
        "apiKey": "sk-xxxxxxxxxxxxxxxxxxxxx"
      },
      "notion": {
        "apiKey": "sk-xxxxxxxxxxxxxxxxxxxx"
      },
      "openai-image-gen": {
        "apiKey": "sk-xxxxxxxxxxxxxxxxxxxxx"
      },
      "openai-whisper-api": {
        "apiKey": "sk-xxxxxxxxxxxxxxxxxxxx"
      },
      "sag": {
        "apiKey": "sk-xxxxxxxxxxxxxxxxxxxxx"
      }
    }
  }
}
EOF

echo "=== 安装插件 ==="
openclaw plugins install @wecom/wecom-openclaw-plugin@1.0.6


echo ""
echo "=== 安装完成 ==="
echo "配置文件已写入:$CONFIG_FILE"

bash -c "source ~/.bashrc; echo 'bashrc 加载完成'"
2 运行全自动安装程序
运行上面脚本,命令为
chmod +x install.sh && ./install.sh
命令运行结束后,安装成功。
安装成功后,配置文件一般在home目录下的.openclaw/openclaw.json,可以继续修改大模型地址、秘钥和名称等配置信息。
3 启动龙虾(OpenClaw)
如果提示openclaw命令找不到,那么运行 source ~/.bashrc 即可。
# 前台运行,关闭窗口后会退出
openclaw gateway --port 18789 --verbose
#  生产环境中,建议通过 nohup 将 OpenClaw 运行在后台,并将日志输出到指定文件,便于后续排查问题:
nohup openclaw gateway --port 18789 > /tmp/openclaw-gateway.log 2>&1 &
前端启动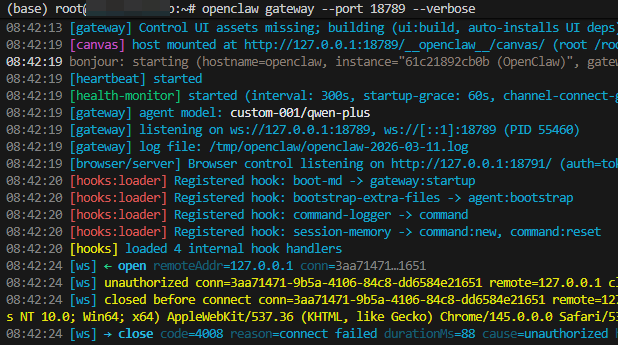
4 页面测试
步骤一:访问前端页面
打开网页浏览器,输入 http://localhost:18789/overview 打开页面。
默认会显示离线状态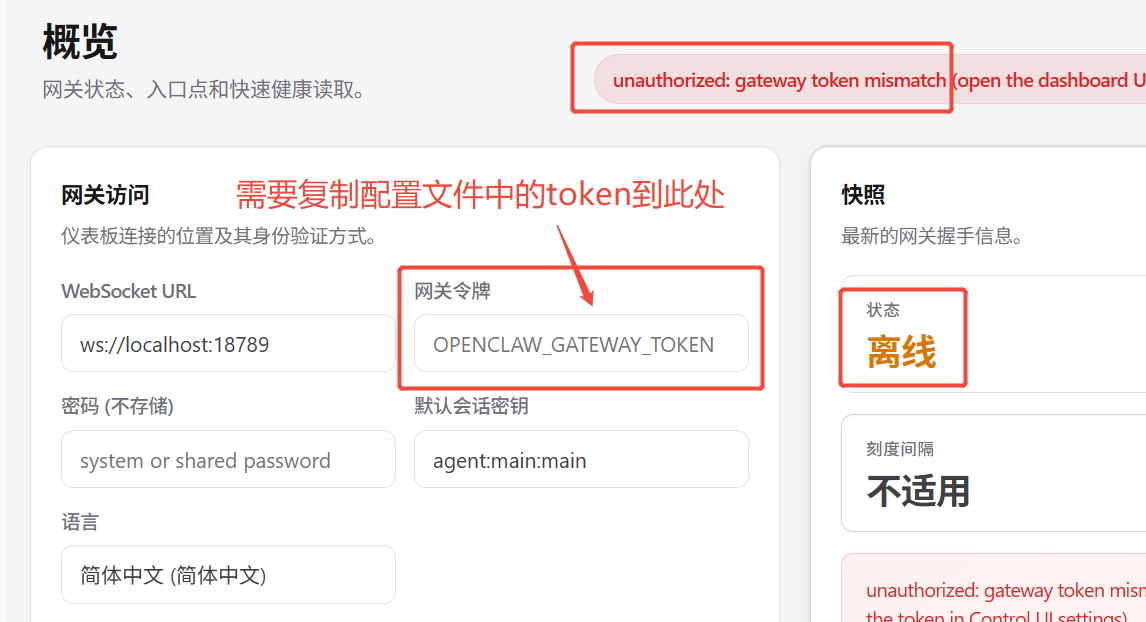
步骤二:获取 token
需要去配置文件(home目录下的.openclaw/openclaw.json)中找到token字段。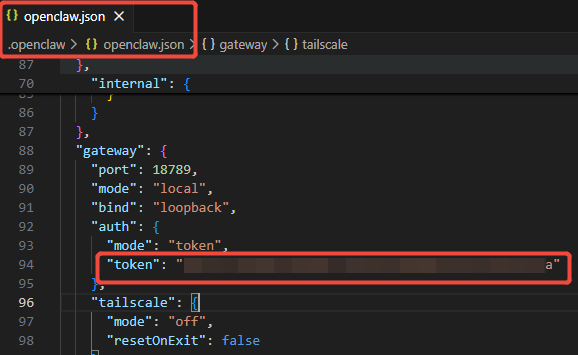
步骤三:输入token
在 http://localhost:18789/overview 页面的处输入token点击连接,状态显示为正常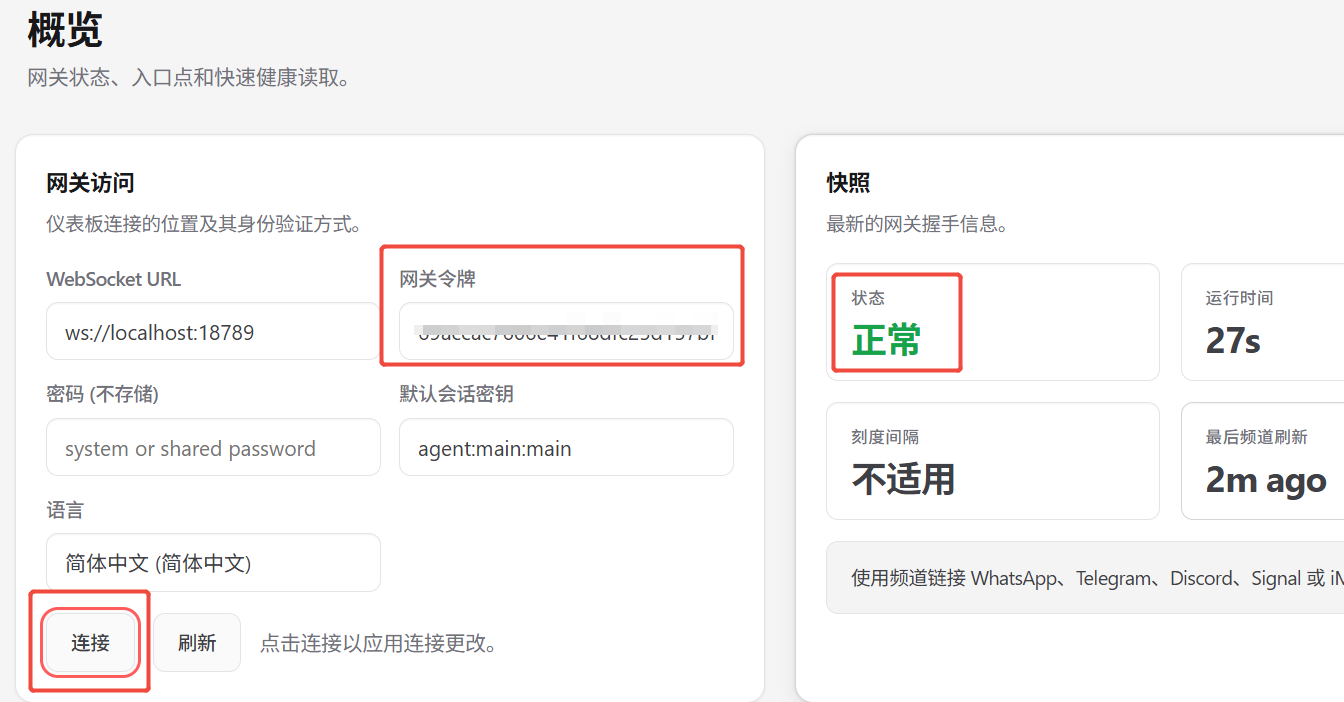
步骤四:聊天测试
在聊天测试页面(http://localhost:18789/chat?session=agent%3Amain%3Amain)进行聊天,如果龙虾没有任何反馈或提示LLM request timed out.,很大概率是模型配置问题。请检查修改配置文件后重新启动龙虾。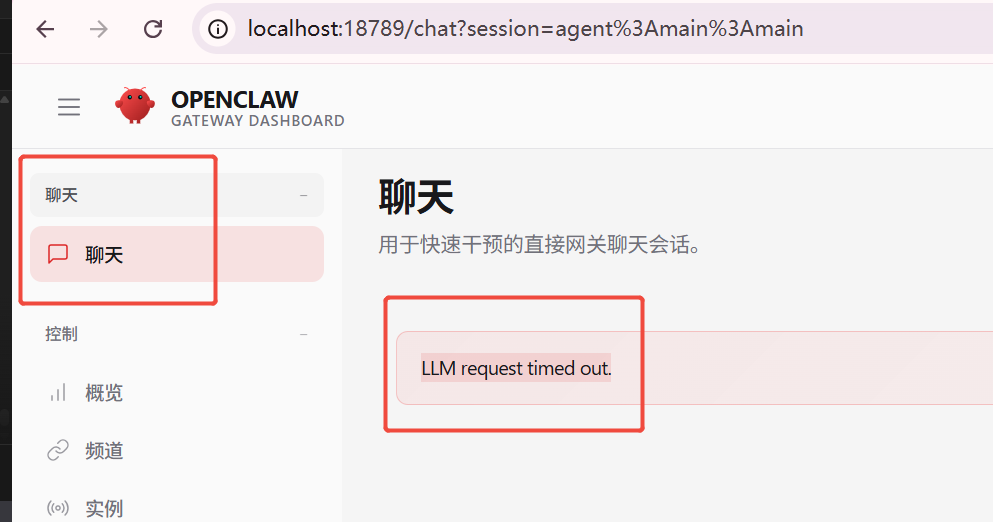
检查修改配置文件后重新启动龙虾。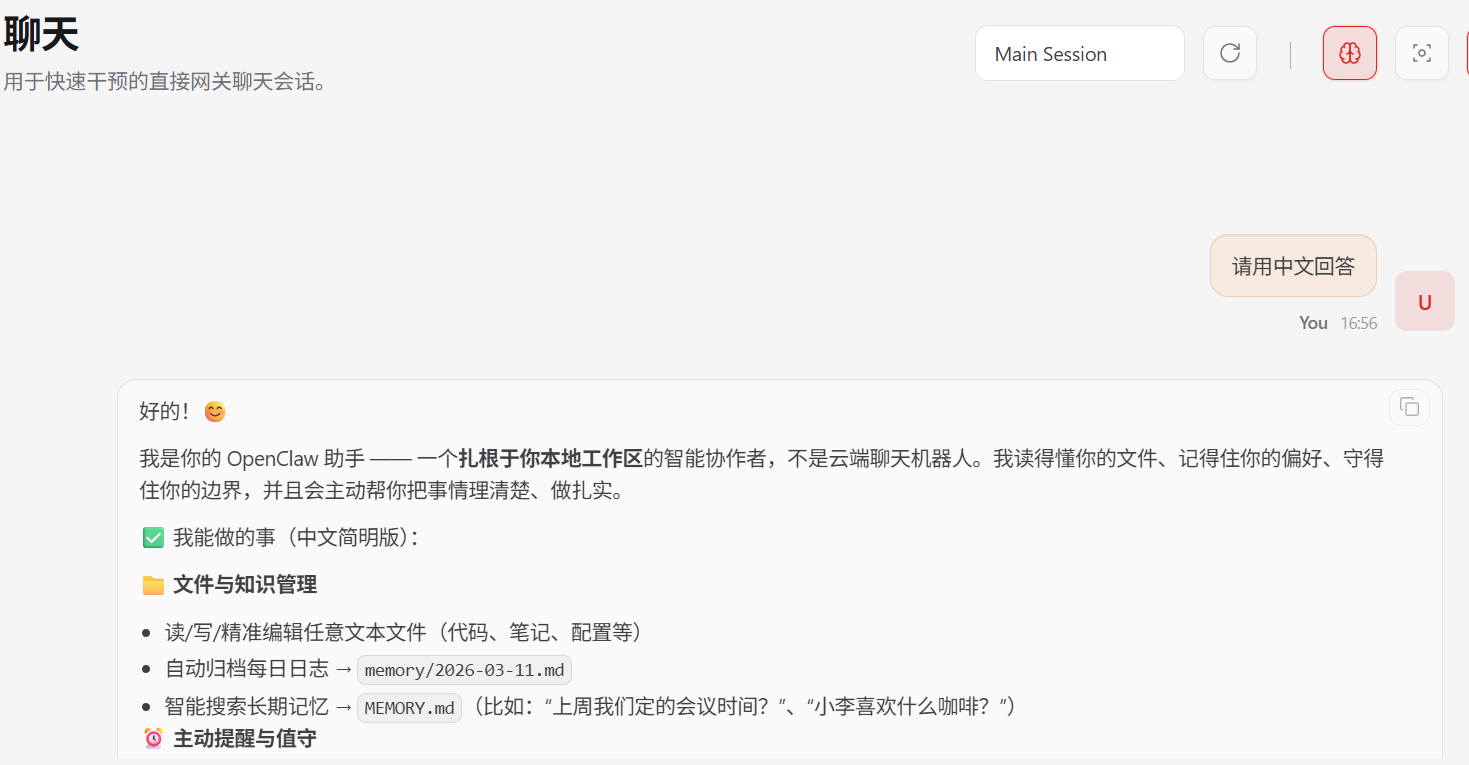

小龙虾开发者社区是 CSDN 旗下专注 OpenClaw 生态的官方阵地,聚焦技能开发、插件实践与部署教程,为开发者提供可直接落地的方案、工具与交流平台,助力高效构建与落地 AI 应用
更多推荐


 8
8 0
0- 0


 已为社区贡献13条内容

所有评论(0)