Laravel 9 Vue JS CRUD App 使用 Vite 示例
_2022 年 7 月 23 日,最初发表于 _laravel tuts.com・9 分钟阅读
使用 Vite 示例的 Laravel 9 Vue JS CRUD 应用程序
今天,我们将学习Laravel 9 Vue JS CRUD App using Vite Example。本教程将通过示例介绍使用 Vite 最新 laravel 更新的 laravel 9 Vue Js CRUD 应用程序。
Vite 是一个现代的前端构建工具,它提供了一个极快的开发环境,并将你的代码打包用于生产。使用 Laravel 构建应用程序时,您通常会使用 Vite 将应用程序的 CSS 和 JavaScript 文件捆绑到生产就绪资产中。
Vue.js 是一个开源的模型-视图-视图模型前端 JavaScript 框架,用于构建用户界面和单页应用程序。它由 Evan You 创建,由他和其他活跃的核心团队成员维护。
Laravel 9 Vue JS CRUD 应用程序使用 Vite 示例的步骤:
-
第 1 步: 安装全新的 Laravel 9 应用程序
-
**第二步:**创建数据库和配置
-
第 3 步: 使用 Breeze 创建 Auth
-
第 4 步: 创建迁移和模型
-
Step 5: 创建路由
-
第六步: 创建控制器
-
**第7步:**创建Vue页面
-
**第8步:**测试
-
**第9步:**结论
另请阅读:Laravel 9 Livewire 多步表单向导教程
第 1 步:安装全新的 Laravel 9 应用程序
首先,我们正在安装一个全新的 laravel 9 应用程序。要安装 laravel 应用程序,请在终端中运行以下命令。
作曲家创建项目 laravel/laravel vue js-crud-vite vue js-crud-vite
注意:“vuejs-crud-vite”是我们的 laravel 应用名称。

Laravel 9 Vue JS CRUD 应用程序使用 Vite 示例
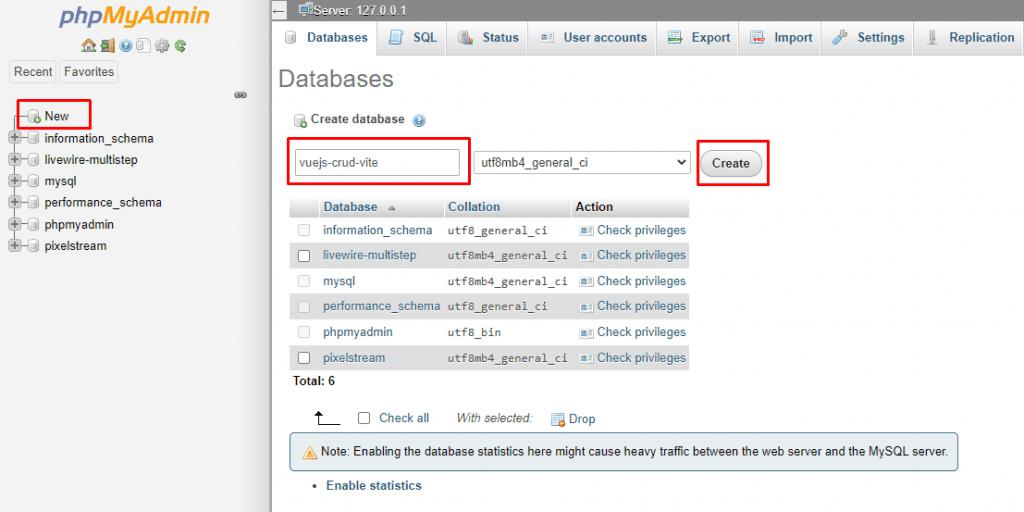
第二步:创建数据库和配置
现在,我们将创建一个数据库。首先打开 phpmyadmin 并创建一个名为“vuejs-crud-vite”的数据库(你可以使用任何你喜欢的东西)。
Laravel 9 Vue JS CRUD 应用程序使用 Vite 示例
现在我们要将数据库详细信息添加到 laravel 应用程序中。打开 .env 文件并输入数据库详细信息。
DB_CONNECTIONu003dmysql
DB_HOSTu003d127.0.0.1
数据库_PORTu003d3306
DB\DATABASEu003dvue js-crud-vite
DB_USERNAMEu003droot
数据库_密码u003d

Laravel 9 Vue JS CRUD 应用程序使用 Vite 示例
第 3 步:使用 Breeze 创建 Auth
现在我们将使用微风创建身份验证。在终端中运行以下命令来安装微风库。
作曲家需要 laravel/breeze --dev
使用以下命令创建身份验证。
php工匠微风:安装vue
安装节点 JS 包。
npm 安装
现在运行 vote 命令并让它继续运行。
npm 运行开发
注意:如果发生错误,则将节点更新到 v16.16.0 并且可以正常工作
现在打开新终端并运行迁移。
php工匠迁移
另请阅读:Laravel 9 Livewire 数据表示例
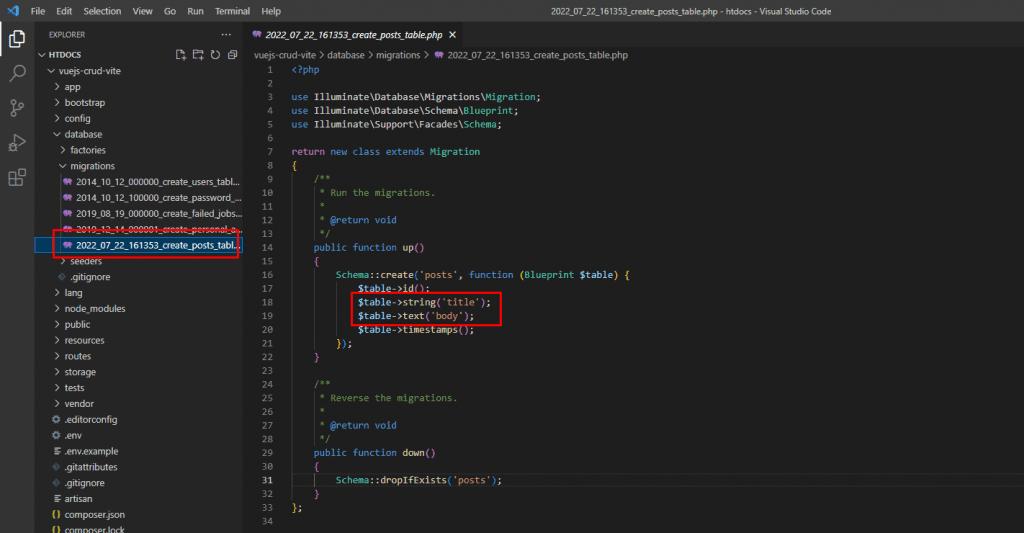
第 4 步:创建迁移和模型
在这里,我们将为 Posts 表创建迁移。要创建帖子迁移,请运行以下命令。
php artisan make:migration create_posts_table
将以下字段添加到帖子迁移文件。
<?phpuse Illuminate\Database\Migrations\Migration;
使用 Illuminate\Database\Schema\Blueprint;
使用 Illuminate\Support\Facades\Schema;返回新类扩展迁移
{
/**
* 运行迁移。
*
* @return 无效
*/
公共函数 up()
{
Schema::create('posts', function (Blueprint $table) {
$table->id();
$table->string('title');
$table->text('body');
$table->timestamps();
});
} /**
* 反转迁移。
*
* @return 无效
*/
公共函数向下()
{
Schema::dropIfExists('posts');
}
};
Laravel 9 Vue JS CRUD 应用程序使用 Vite 示例
再次运行迁移以创建帖子表。
php工匠迁移
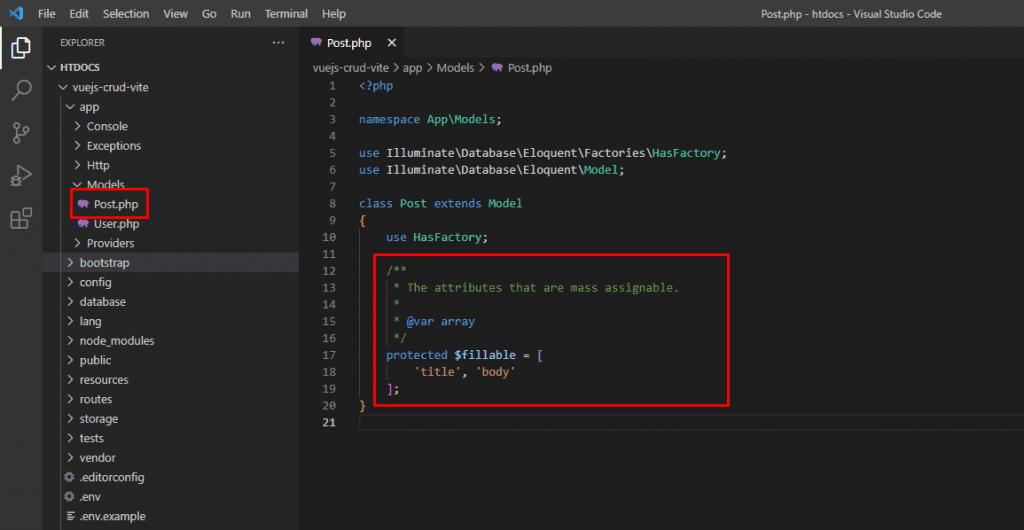
所以现在,我们将创建 Post 模型。要创建 Post 模型,请在终端中运行以下命令。
php artisan make:model Post
并将以下代码添加到 Post.php 模型中。
<?phpnamespace App\Models;使用 Illuminate\Database\Eloquent\Factories\HasFactory;
使用 Illuminate\Database\Eloquent\Model;类 Post 扩展模型
{
使用 HasFactory; /**
* 可批量分配的属性。
*
* @var 数组
*/
受保护的 $fillable u003d [
“标题”、“正文”
];
}
Laravel 9 Vue JS CRUD 应用程序使用 Vite 示例
第五步:创建路由
现在我们将为我们的 CRUD 应用程序创建一个资源路由。将以下路由添加到 routes/web.php
<?phpuse Illuminate\Foundation\Application;
使用 Illuminate\Support\Facades\Route;
使用惯性\惯性;
使用 App\Http\Controllers\PostController;/*
|------------------------------------------------- -------------------------
| 网络路由
|------------------------------------------------- -------------------------
|
| 在这里您可以为您的应用程序注册网络路由。这些
| 路由由组内的 RouteServiceProvider 加载
| 包含“web”中间件组。现在创造一些伟大的东西!
|
*/Route::get('/', function () {
return Inertia::render('Welcome', [
'canLogin' u003d> Route::has('login'),
'canRegister' u003d> Route::has('register'),
'laravelVersion' u003d> 应用程序::版本,
'phpVersion' u003d> PHP_VERSION,
]);
});Route::get('/dashboard', function () {
返回惯性::render('Dashboard');
})->middleware(['auth', 'verified'])->name('dashboard');需要__DIR__.'/auth.php';Route::resource('帖子', PostController::class);

Laravel 9 Vue JS CRUD 应用程序使用 Vite 示例
另请阅读:**在 Laravel 9 中使用 React Js 安装 NextUI **
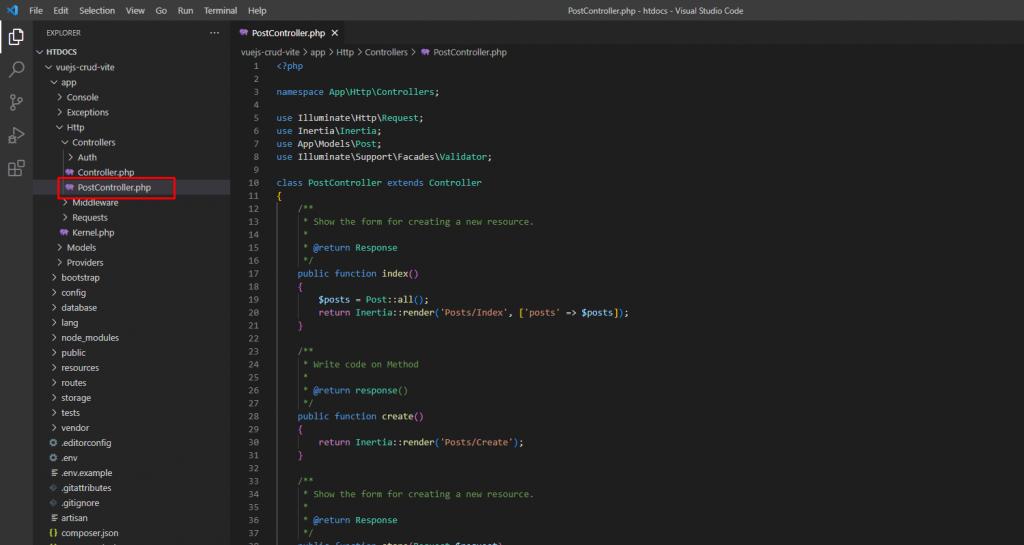
第六步:创建控制器
在这一步中,我们将创建一个 Post Controller。在 app/Http/Controllers 文件夹中创建一个新文件 PostController.php 并在其中添加以下代码。
<?php
命名空间 App\Http\Controllers;
使用 Illuminate\Http\Request;
使用惯性\惯性;
使用 App\Models\Post;
使用 Illuminate\Support\Facades\Validator;
类 PostController 扩展控制器
{
/**
* 显示创建新资源的表单。
*
* @return 响应
*/
公共函数索引()
{
$posts u003d Post::all();
return Inertia::render('Posts/Index', ['posts' u003d> $posts]);
}
/**
* 在方法上写代码
*
* @return 响应()
*/
公共函数创建()
{
return Inertia::render('Posts/Create');
}
/**
* 显示创建新资源的表单。
*
* @return 响应
*/
公共功能存储(请求 $request)
{
验证器::make($request->all(), [
'标题' u003d> ['必填'],
'正文' u003d> ['必需'],
])->验证();
Post::create($request->all());
返回重定向()->路由('posts.index');
}
/**
* 在方法上写代码
*
* @return 响应()
*/
公共功能编辑(发布 $post)
{
return Inertia::render('帖子/编辑', [
'发布' u003d> $发布
]);
}
/**
* 显示创建新资源的表单。
*
* @return 响应
*/
公共函数更新($id,请求 $request)
{
验证器::make($request->all(), [
'标题' u003d> ['必填'],
'正文' u003d> ['必需'],
])->验证();
Post::find($id)->update($request->all());
返回重定向()->路由('posts.index');
}
/**
* 显示创建新资源的表单。
*
* @return 响应
*/
公共函数销毁($id)
{
Post::find($id)->delete();
返回重定向()->路由('posts.index');
}
}
Laravel 9 Vue JS CRUD 应用程序使用 Vite 示例
另请阅读:Laravel 9 安装 Vue JS 示例
第七步:创建 Vue 页面
在这最后一步中,我们将创建一个 Vue Js 页面——Index.vue、Create.vue 和 Edit.vue。
在 resources/js/Pages 内创建一个新文件夹 Posts 并在 Posts 文件夹内创建以下页面。

Laravel 9 Vue JS CRUD 应用程序使用 Vite 示例
资源/js/Pages/Posts/Index.vue
<脚本设置>
从'@/Layouts/Authenticated.vue'导入BreezeAuthenticatedLayout;
从'@inertiajs/inertia-vue3'导入{ Head, Link, useForm };
定义道具({
帖子:数组,
});
常量形式 u003d useForm();
函数销毁(id){
if (confirm("您确定要删除")) {
form.delete(route('posts.destroy', id));
}
}
</脚本>
<模板>
<Head titleu003d"仪表盘" />
<BreezeAuthenticatedLayout>
<模板#header>
<h2 classu003d"font-semibold text-xl text-gray-800leading-tight">
Laravel 9 Vue JS CRUD 应用程序使用 Vite 示例 - LaravelTuts.com
</right>
</模板>
<div classu003d"py-12">
<div classu003d"max-w-7xl mx-auto sm:px-6 lg:px-8">
<div classu003d"bg-white overflow-hidden shadow-sm sm:rounded-lg">
<div classu003d"p-6 bg-whiteborder-bborder-gray-200">
<div classNameu003d"flex items-center justify-between mb-6">
<链接
classNameu003d"px-6 py-2 text-white bg-green-500 rounded-md focus:outline-none"
:hrefu003d"route('posts.create')"
创建帖子
</链接>
</div>
<table classNameu003d"table-fixed w-full">
<头>
<tr classNameu003d"bg-gray-100">
<th classNameu003d"px-4 py-2 w-20">没有。</th>
<th classNameu003d"px-4 py-2">标题</th>
<th classNameu003d"px-4 py-2">正文</th>
<th classNameu003d"px-4 py-2">动作</th>
</tr>
</thead>
<tbody>
<tr v-foru003d"在帖子中发帖">
<td classNameu003d"border px-4 py-2">{{ post.id }}</td>
<td classNameu003d"border px-4 py-2">{{ post.title }}</td>
<td classNameu003d"border px-4 py-2">{{ post.body }}</td>
<td classNameu003d"border px-4 py-2">
<链接
标签索引u003d“1”
classNameu003d"px-4 py-2 text-sm text-white bg-blue-500 rounded"
:hrefu003d"route('posts.edit', post.id)"
编辑
</链接>
<按钮
@clicku003d"销毁(post.id)"
tabIndexu003d"-1"
类型u003d"按钮"
classNameu003d"mx-1 px-4 py-2 text-sm text-white bg-red-500 rounded"
删除
</按钮>
</td>
</tr>
</tbody>
</table>
</div>
</div>
</div>
</div>
</BreezeAuthenticatedLayout>
</模板>
资源/js/Pages/Posts/Create.vue
<脚本设置>
从'@/Layouts/Authenticated.vue'导入BreezeAuthenticatedLayout;
从'@/Components/Label.vue'导入BreezeLabel;
从'@/Components/Input.vue'导入BreezeInput;
从'@/Components/Textarea.vue'导入BreezeTextArea;
从'@inertiajs/inertia-vue3'导入{ Head, Link, useForm };
常量形式 u003d useForm({
标题: '',
身体: ''
});
常量提交 u003d () u003d> {
form.post(route('posts.store'));
};
</脚本>
<模板>
<Head titleu003d"仪表盘" />
<BreezeAuthenticatedLayout>
<模板#header>
<h2 classu003d"font-semibold text-xl text-gray-800leading-tight">
创建帖子
</right>
</模板>
<div classu003d"py-12">
<div classu003d"max-w-7xl mx-auto sm:px-6 lg:px-8">
<div classu003d"bg-white overflow-hidden shadow-sm sm:rounded-lg">
<div classu003d"p-6 bg-whiteborder-bborder-gray-200">
<div classNameu003d"flex items-center justify-between mb-6">
<链接
classNameu003d"px-6 py-2 text-white bg-blue-500 rounded-md focus:outline-none"
:hrefu003d"route('posts.index')"
后退
</链接>
</div>
<form nameu003d"createForm" @submit.preventu003d"submit">
<div classNameu003d"flex flex-col">
<div classNameu003d"mb-4">
<BreezeLabel foru003d"title" valueu003d"Title" />
<微风输入
idu003d"标题"
类型u003d“文本”
classu003d"mt-1 块 w-full"
v-modelu003d"form.title"
自动对焦 />
<span classNameu003d"text-red-600" v-ifu003d"form.errors.title">
{{ form.errors.title }}
</span>
</div>
<div classNameu003d"mb-4">
<Breeze Label foru003d"body" Valveu003d"Body" />
<BreezeTextArea
ID u003d“身体”
classu003d"mt-1 块 w-full"
v-modelu003d"form.body"
自动对焦 />
<span classNameu003d"text-red-600" v-ifu003d"form.errors.body">
{{ form.errors.body }}
</span>
</div>
</div>
<div classNameu003d"mt-4">
<按钮
类型u003d"提交"
classNameu003d"px-6 py-2 font-bold text-white bg-green-500 rounded"
节省
</按钮>
</div>
</form>
</div>
</div>
</div>
</div>
</BreezeAuthenticatedLayout>
</模板>
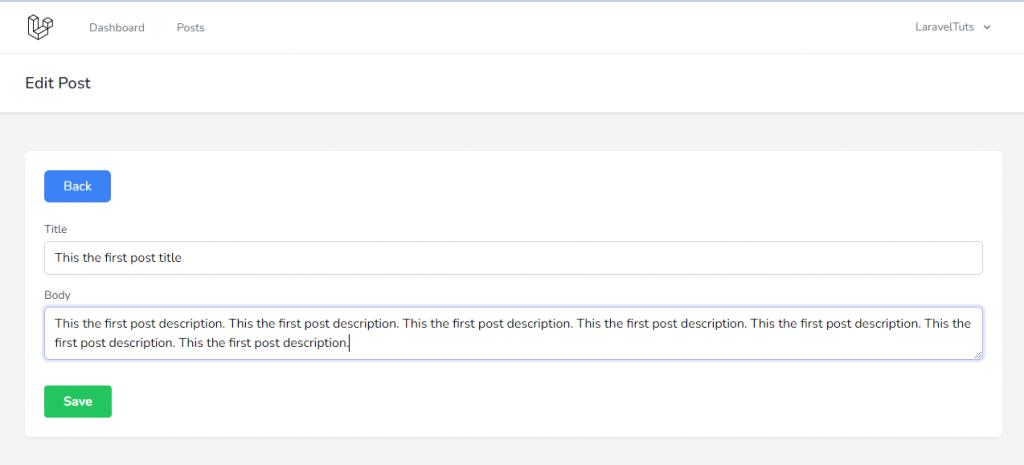
资源/js/Pages/Posts/Edit.vue
<脚本设置>
从'@/Layouts/Authenticated.vue'导入BreezeAuthenticatedLayout;
从'@/Components/Label.vue'导入BreezeLabel;
从'@/Components/Input.vue'导入BreezeInput;
从'@/Components/Textarea.vue'导入BreezeTextArea;
从'@inertiajs/inertia-vue3'导入{ Head, Link, useForm };
常量道具 u003d defineProps({
帖子:对象,
});
常量形式 u003d useForm({
标题:props.post.title,
正文:props.post.body
});
常量提交 u003d () u003d> {
form.put(route('posts.update', props.post.id));
};
</脚本>
<模板>
<Head titleu003d"仪表盘" />
<BreezeAuthenticatedLayout>
<模板#header>
<h2 classu003d"font-semibold text-xl text-gray-800leading-tight">
编辑帖子
</right>
</模板>
<div classu003d"py-12">
<div classu003d"max-w-7xl mx-auto sm:px-6 lg:px-8">
<div classu003d"bg-white overflow-hidden shadow-sm sm:rounded-lg">
<div classu003d"p-6 bg-whiteborder-bborder-gray-200">
<div classNameu003d"flex items-center justify-between mb-6">
<链接
classNameu003d"px-6 py-2 text-white bg-blue-500 rounded-md focus:outline-none"
:hrefu003d"route('posts.index')"
后退
</链接>
</div>
<form nameu003d"createForm" @submit.preventu003d"submit">
<div classNameu003d"flex flex-col">
<div classNameu003d"mb-4">
<BreezeLabel foru003d"title" valueu003d"Title" />
<微风输入
idu003d"标题"
类型u003d“文本”
classu003d"mt-1 块 w-full"
v-modelu003d"form.title"
自动对焦 />
<span classNameu003d"text-red-600" v-ifu003d"form.errors.title">
{{ form.errors.title }}
</span>
</div>
<div classNameu003d"mb-4">
<Breeze Label foru003d"body" Valveu003d"Body" />
<BreezeTextArea
ID u003d“身体”
classu003d"mt-1 块 w-full"
v-modelu003d"form.body"
自动对焦 />
<span classNameu003d"text-red-600" v-ifu003d"form.errors.body">
{{ form.errors.body }}
</span>
</div>
</div>
<div classNameu003d"mt-4">
<按钮
类型u003d"提交"
classNameu003d"px-6 py-2 font-bold text-white bg-green-500 rounded"
节省
</按钮>
</div>
</form>
</div>
</div>
</div>
</div>
</BreezeAuthenticatedLayout>
</模板>
在 resources/js/Pages/Components 中创建一个新文件 Textaarea.vue
资源/js/页面/组件/Textarea.vue
<脚本设置>
从'vue'导入{ onMounted,ref };
defineProps(['modelValue']);
defineEmits(['update:modelValue']);
常量输入 u003d ref(null);
onMounted(() u003d> {
if (input.value.hasAttribute('autofocus')) {
input.value.focus();
}
});
</脚本>
<模板>
<textarea classu003d"border-gray-300 focus:border-indigo-300 focus:ring focus:ring-indigo-200 focus:ring-opacity-50 rounded-md shadow-sm" :valueu003d"modelValue" @inputu003d "$emit('update:modelValue', $event.target.value)" refu003d"input"></textarea>
</模板>
在 resources/js/Layouts 文件夹内的 Authenticated.vue 中添加 Post Navigation。
<!-- 导航链接 -->
<div classu003d"hidden space-x-8 sm:-my-px sm:ml-10 sm:flex"> <BreezeNavLink :hrefu003d"route('dashboard')" :activeu003d"route().current( 'dashboard')">仪表板</BreezeNavLink> <BreezeNavLink :hrefu003d"route('posts.index')" :activeu003d"route().current('posts.index')">帖子</BreezeNavLink>< /div>

Laravel 9 Vue JS CRUD 应用程序使用 Vite 示例
第八步:测试
现在让我们使用 Vite 示例测试我们的 Laravel 9 Vue JS CRUD 应用程序。运行以下命令启动 laravel 服务器。
php工匠服务
还要在新终端中运行 Vite 并保持运行。
npm 运行开发
或建造。
npm 运行构建
现在打开任何 Web 浏览器并输入以下链接来测试应用程序。
http://127.0.0.1:8000/
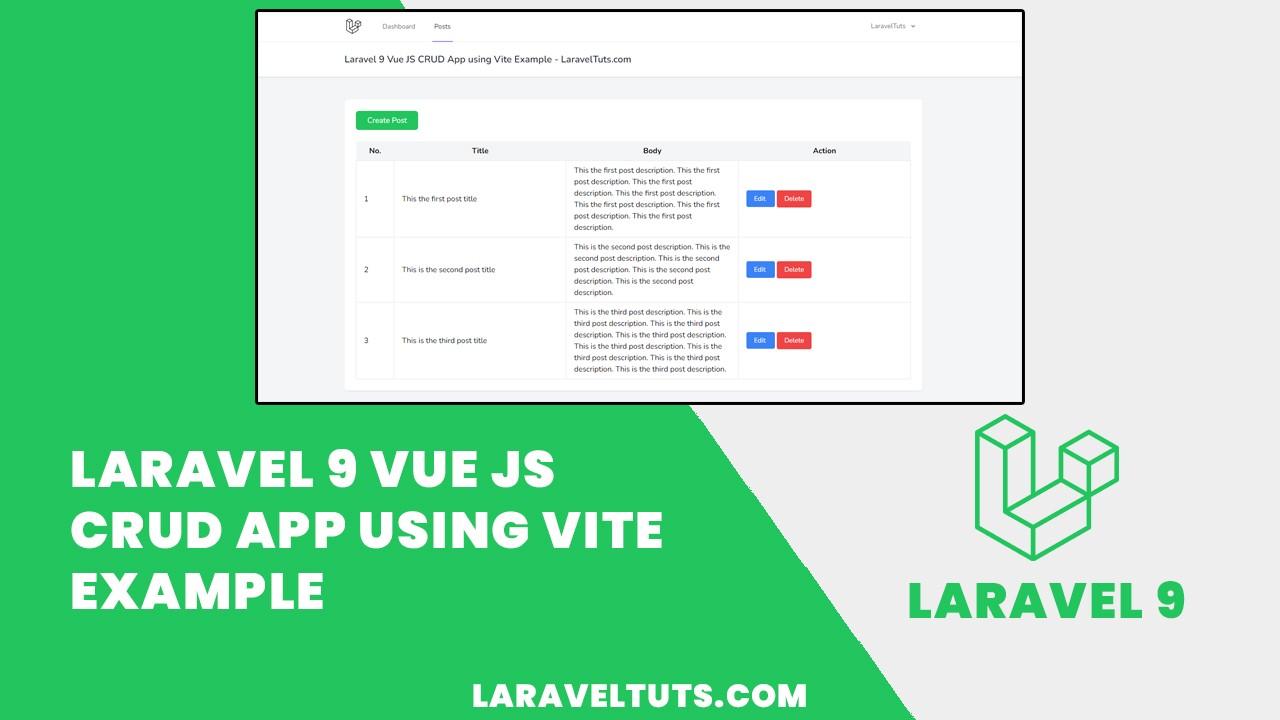
注意:注册一个新用户,然后点击导航中的帖子。
预习:
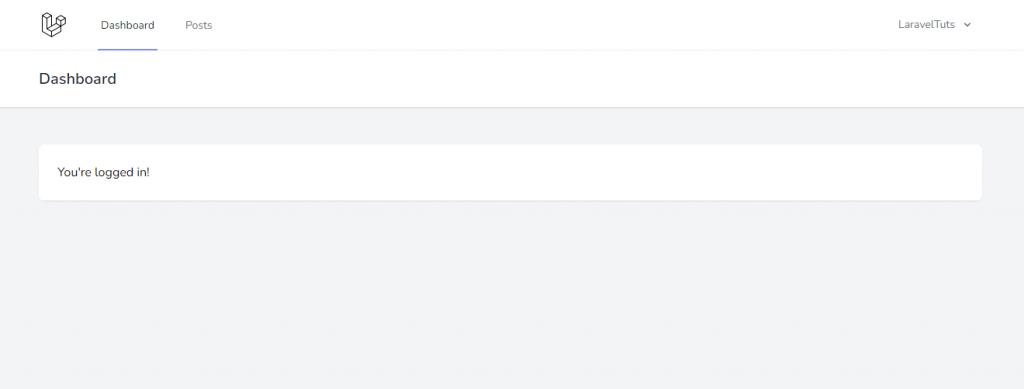

Laravel 9 Vue JS CRUD 应用程序使用 Vite 示例

Laravel 9 Vue JS CRUD 应用程序使用 Vite 示例
Laravel 9 Vue JS CRUD 应用程序使用 Vite 示例
Laravel 9 Vue JS CRUD 应用程序使用 Vite 示例
第九步:结论
今天,我们学习了Laravel 9 Vue JS CRUD App using Vite Example。希望本教程对您学习 Laravel 9 有所帮助。如果您有任何问题,可以在下面的评论部分向我们提问。如果您喜欢本教程,请订阅我们的YouTube 频道并在社交网络Facebook和Instagram上关注我们。
另请阅读:React JS Image Upload using Vite in Laravel 9 Example

Vue社区为您提供最前沿的新闻资讯和知识内容
更多推荐
 0
0 0
0- 0


 已为社区贡献21229条内容

所有评论(0)