

Table Of Contents
- Introduction
- 1.1 Assumptions
- Update User Creation Flow
- 2.1 Setup Cloud Firestore
- 2.2 Create the DB Service
- 2.3 User Model
- 2.4 Update Auth Actions
- User Profile with Vuexfire
- 3.1 Why Vuexfire
- 3.2 Vuexfire Installation
- 3.3 Vuexfire Integration
- Update User Info
- 4.1 Google Cloud Storage Setup
- Unbinding Vuexfire Bindings
- Summary
- Repository
1. Introduction
This article builds atop of the initial article, Initial Service & Structure, and Email Authentication published in the Quasar-Firebase series. In this post, we're going to build something that most applications that handle users have: a user profile. We'll be using Firebase, Firestore, Vuexfire, and Google's Cloud Storage.
- 1.1 Assumptions
Before we get started, a few assumptions are in order. In this post, we're going to be building atop of the email authentication article, specifically, state management. Be sure to go over the insights in that post first, or review if needed. Also, one minor addition is we'll be adding Vuexfire bindings in our actions files. Let's update our illustration for consistency.

*Note: This repo already contains a working Firebase API key. In order to set up your own project, you need to delete the "FIREBASE_CONFIG" attributes within the .quasar.env.json file and replace it with your own key from the first article.
If you already created an account on this Firebase API from the email authentication article you'll need to use a different email to set up a new account, as that account doesn't have a user in the users collection as you'll learn in this article.*
Be sure to clone the repo and have the app to follow along with. Navigate to the respective app and run:
$ npm run dev
A final note, this code is for Vue v2 and Quasar v1.
2. Update User Creation Flow
In our email authentication post, we built a form to allow users to register a new account and also log into the application via their credentials that were supplied during registration. That was a good first step, but now we need to expand the experience so we can build our profile off of additional user information.
Also, now that we're going to be working more in-depth with our user, we're going to split up our layouts. One called Basic.vue, and one called User.vue. The user layout will have the logging out functionality and also controlling the opacity of when a user launches their settings modal.
/src/layouts/Basic.vue
/src/layouts/User.vue
Managing users are possible to some extent through the Firebase authentication record, but we need more fidelity for our user.
Let's use Cloud Firestore as our database and create a new record in a users' collection.
- 2.1 Setup Cloud Firestore
Back in the Firebase console, click on the Database section in the left menu, and then create a Cloud Firestore instance.
Be sure to keep our Firestore instance in Production Mode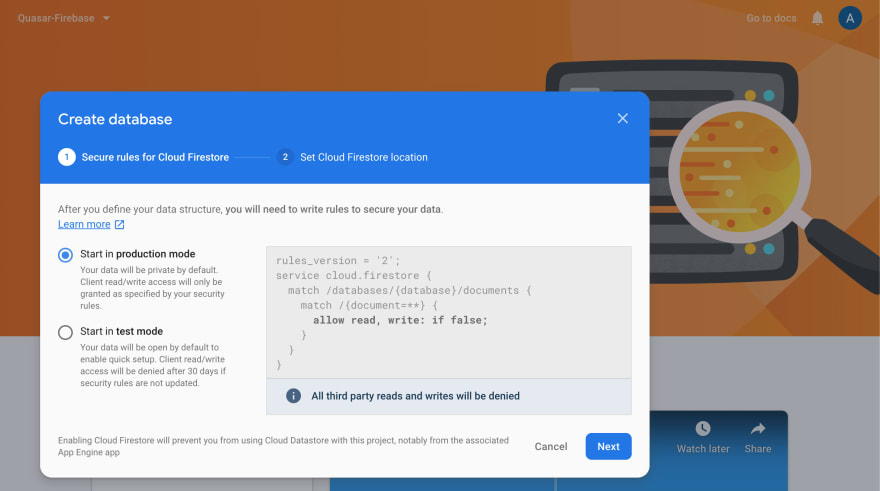
Set the location of your server. You can choose whatever works best for your location.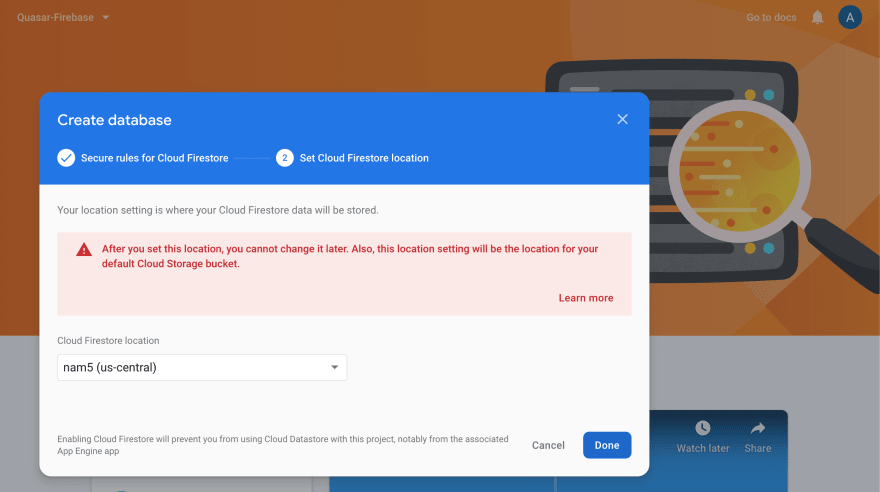
Once you have Firestore set up, it's essential to set some basic security rules for your data. In your Rules tab, enter the following snippet of code:
service cloud.firestore {
  match /databases/{database}/documents {
    match /{document=**} {
      allow read, write: if request.auth.uid != null;
    }
  }
}
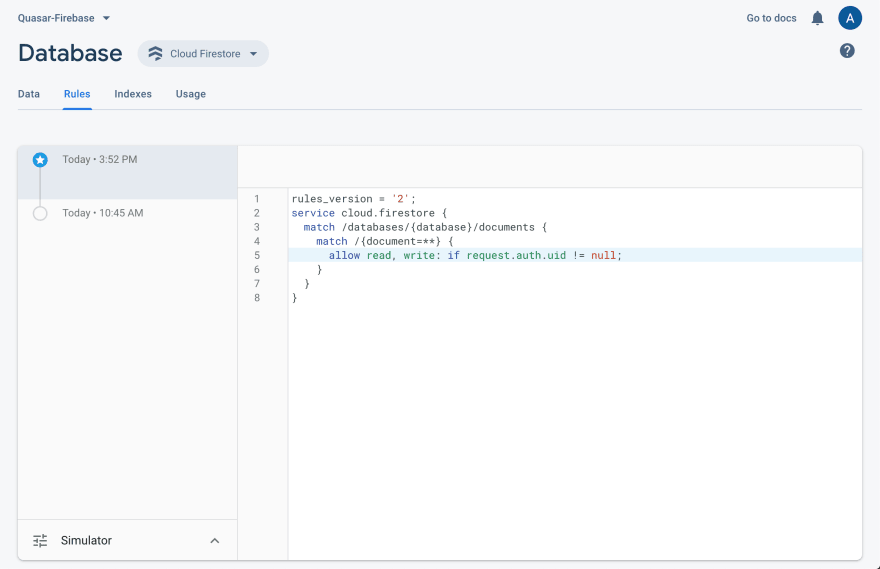
If you don't do this, your call to Firestore to save a User record will fail, and our application will prevent the user from moving forward after successful user registration.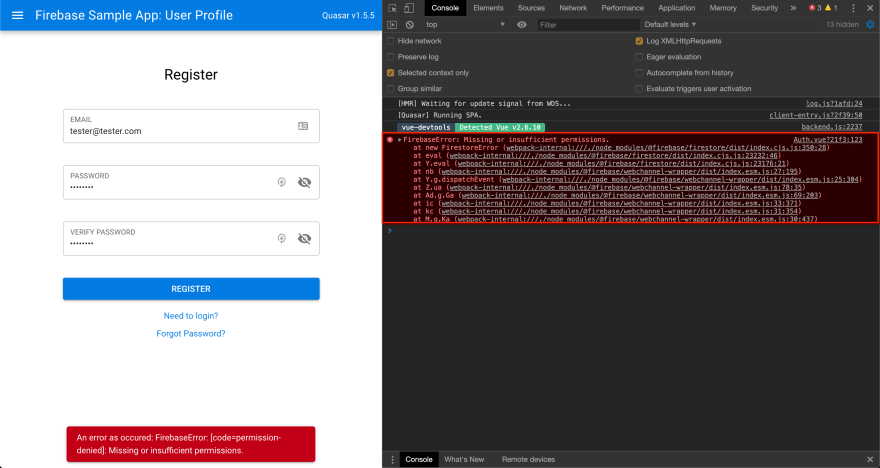
- 2.2 Create the DB Service
Now, a DB service needs to be created. Take a look at the new service:
/src/services/firebase/db.js
Following the pattern from the Email post, this service allows the application to have a reference to Cloud Firestore. Now, add the reference of the db service into our firebaseService object in our index.js file to keep the service under one namespace, firebaseService.
/src/services/firebase/index.js
import * as base from '../services/firebase/base.js'
import * as db from '../services/firebase/db.js'
import * as email from '../services/firebase/email.js'

export default Object.assign({}, base, db, email)
- 2.3 User Model
Next, create a User model.
/src/models/User.js
/** Class representing a User. */
export default class User {
  /**
   * Create a user.
   * @param {String} id - Place holder for a unique Firebase id.
   * @param {String} backgroundPhoto - A generated URL from Google Storage.
   * @param {String} email - A valid email.
   * @param {String} fullName - The user's full name.
   * @param {String} mobile - the user's mobile number.
   * @param {String} profilePhoto - A generated URL from Google Storage.
  */
  id = ''
  backgroundPhoto = ''
  email = ''
  fullName = ''
  mobile = ''
  profilePhoto = ''

  /**
   * @param  {Object} args - User args
   */
  constructor (args) {
    Object.keys(args).forEach((v, i) => {
      this[v] = args[v]
    })

    return {
      ...this
    }
  }
}
Here is a basic user class that consumes the supplied arguments and returns an object to send to Cloud Firestore.
- 2.4 Update Auth Actions
Now that there is a user object, the actions file for creating a user can be updated. Assuming email is the authentication method, let's look at the actions file.
/src/store/auth/actions.js
Similar to the actions file from the last post for doing basic email authentication, a few changes are needed. Import the new User class, add a new method, addUserToUsersCollection, and then update our existing method, createNewUser.
import { firestoreAction } from 'vuexfire'
import User from '../../models/User.js'

export const addUserToUsersCollection = async (state, userRef) => {
  const
    { email } = state,
    user = new User({ email })
  return userRef.set(user)
}

export const createNewUser = async function ({ dispatch, commit }, data) {
  const $fb = this.$fb
  const { email, password } = data
  const fbAuthResponse = await $fb.createUserWithEmail(email, password)
  const id = fbAuthResponse.user.uid
  const userRef = $fb.userRef('users', id)
  return addUserToUsersCollection({ email }, userRef)
}
A quick note before we move on.
-
The
importoffirestoreActionis seen later in our updatedlogoutUseraction. -
Accessing
$fbfromthisis possible because of the use of thefunctionkeyword, and because we assigned the service back in ourserverConnectionfile when we imported*forbase,email, anddb, respectively.
3. User Profile with Vuexfire
Now that we have the user flow updated, we move the user over to the user profile screen upon the successful creation of a new user record in Firestore via our route command via our Auth.vue file.
/src/pages/Auth.vue
onSubmit () {
  const { email, password } = this
  this.$refs.emailAuthenticationForm.validate()
    .then(async success => {
      if (success) {
        this.$q.loading.show({
          message: this.isRegistration
            ? 'Registering your account...'
            : 'Authenticating your account...',
          backgroundColor: 'grey',
          spinner: QSpinnerGears,
          customClass: 'loader'
        })
        try {
          if (this.isRegistration) {
            await this.createNewUser({ email, password })
          } else {
            await this.loginUser({ email, password })
          }
          this.$router.push({ path: '/user/profile' })
        } catch (err) {
          console.error(err)
          this.$q.notify({
            message: `An error as occured: ${err}`,
            color: 'negative'
          })
        } finally {
          this.$q.loading.hide()
        }
      }
    })
}
Here is our profile page.
/src/pages/user/Profile.vue
Before we render the user profile, we want to get the user's data and sync it to our application's store via Vuexfire.
- 3.1 Why Vuexfire
The Vue core team maintains Vuexfire, so a reasonable assumption here is that their approach to syncing your data against Firestore is well-designed. Vuefire, another similar binding available, is another option. However, over time, as your application grows, and the need for its data to be in your application's store for multiple aspects of the app, it's just easier to keep it in Vuex.
Ideally, we want to go from this: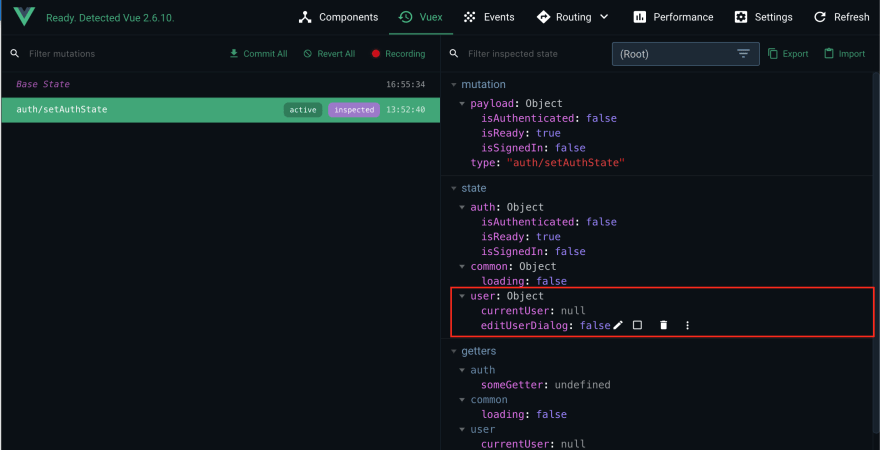
to this, with as little as code possible.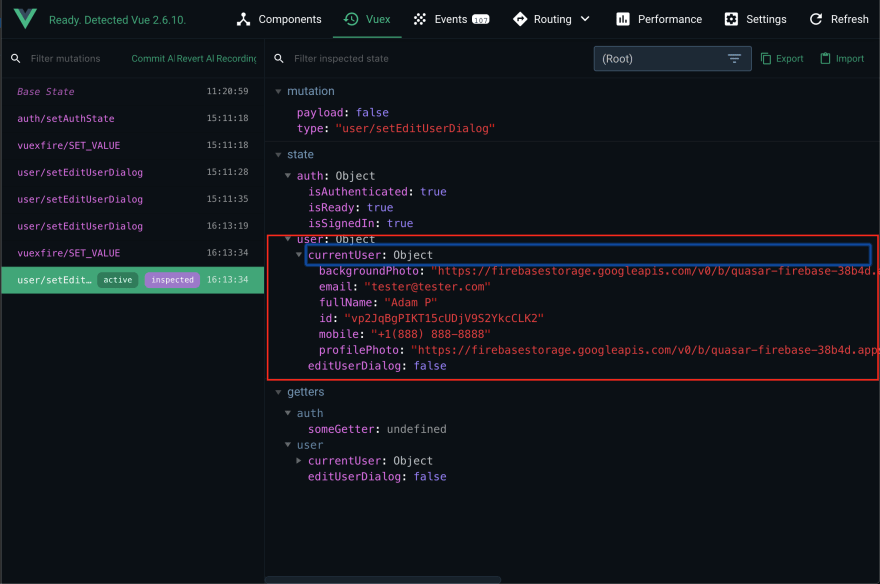
The Firebase SDK does provide an API to keep your local data in sync with any changes happening in the remote database. However, it is more tedious than you can imagine, and it involves many edge cases. Take a look here at the code needed to perform this operation.
- 3.2 Vuexfire Installation
Simply install Vuexfire in your app:
yarn add vuexfire
# or
npm install vuexfire
- 3.3 Vuexfire Integration
Next, integrate the binding package into our store.
/src/store/index.js
import Vue from 'vue'
import Vuex from 'vuex'
import { vuexfireMutations } from 'vuexfire'

import auth from './auth'
import common from './common'
import user from './user'

Vue.use(Vuex)

/*
 * If not building with SSR mode, you can
 * directly export the Store instantiation
 */

export default function (/* { ssrContext } */) {
  const Store = new Vuex.Store({
    modules: {
      auth,
      common,
      user
    },
    mutations: {
      ...vuexfireMutations
    },

    // enable strict mode (adds overhead!)
    // for dev mode only
    strict: process.env.DEV
  })

  return Store
}
Now that we have the binding connected to our store, we will create a method in the store's user module actions file.
/src/store/user/actions.js
export const getCurrentUser = firestoreAction(({ bindFirestoreRef }, id) => {
  return bindFirestoreRef('currentUser', userRef('users', id))
})
Now that we have an access point to get our current user information from our users' collection in Firestore, we'll need to connect this method when Firebase's onAuthStateChanged observer fires when the user becomes authenticated. The key to this is setting our auth state with a uid from Firebase. Then the key can be used anywhere in the app where specific data regarding the user is needed.
Back in our base.js service, look at the handleOnAuthStateChanged method:
/src/services/firebase/base.js
export const handleOnAuthStateChanged = async (store, currentUser) => {
  const initialAuthState = isAuthenticated(store)
  // Save to the store
  store.commit('auth/setAuthState', {
    isAuthenticated: currentUser !== null,
    isReady: true,
    uid: (currentUser ? currentUser.uid : '')
  })
Remember this method is connected to our serverConnection boot file.
/src/boot/serverConnection.js
firebaseService.auth().onAuthStateChanged((currentUser) => {
    firebaseService.handleOnAuthStateChanged(store, currentUser)
  }, (error) => {
    console.error(error)
  })
Once the uid is available via our currentUser from our Firebase auth service, we can attach it to our auth state, and commit the mutation in our handleOnAuthStateChanged method.
/src/store/auth/mutations.js
export function setAuthState (state, data) {
  state.isAuthenticated = data.isAuthenticated
  state.isReady = data.isReady
  state.uid = data.uid
}
From here, a decision needs to be made when to query Firestore for the user's data. Either here in the handleOnAuthStateChanged, or later once the protected route has passed the route guard checks, and then perform the query and notify the user that the app is fetching data. In this instance, we're going to start the query here in the base service for the user's profile data. Because we've added the uid to the auth state, we can still rely on the uid to be available to any protected route before the page renders. This gives any protected view the key needed to query any data related to the user before rending the view, and after Firebase has supplied the uid from its Auth service.
export const handleOnAuthStateChanged = async (store, currentUser) => {
// ...

// Get & bind the current user
  if (store.state.auth.isAuthenticated) {
    await store.dispatch('user/getCurrentUser', currentUser.uid)
  }

// ...
}
Once the dispatch has completed, the application's currentUser is now bound to our Vuex store.
And that's it! Now, all subsequent writes to our user document in Firestore will automatically be kept in sync in our store module with no additional coding.
5. Updating User Info
At this point, you should have an app that looks like the image below.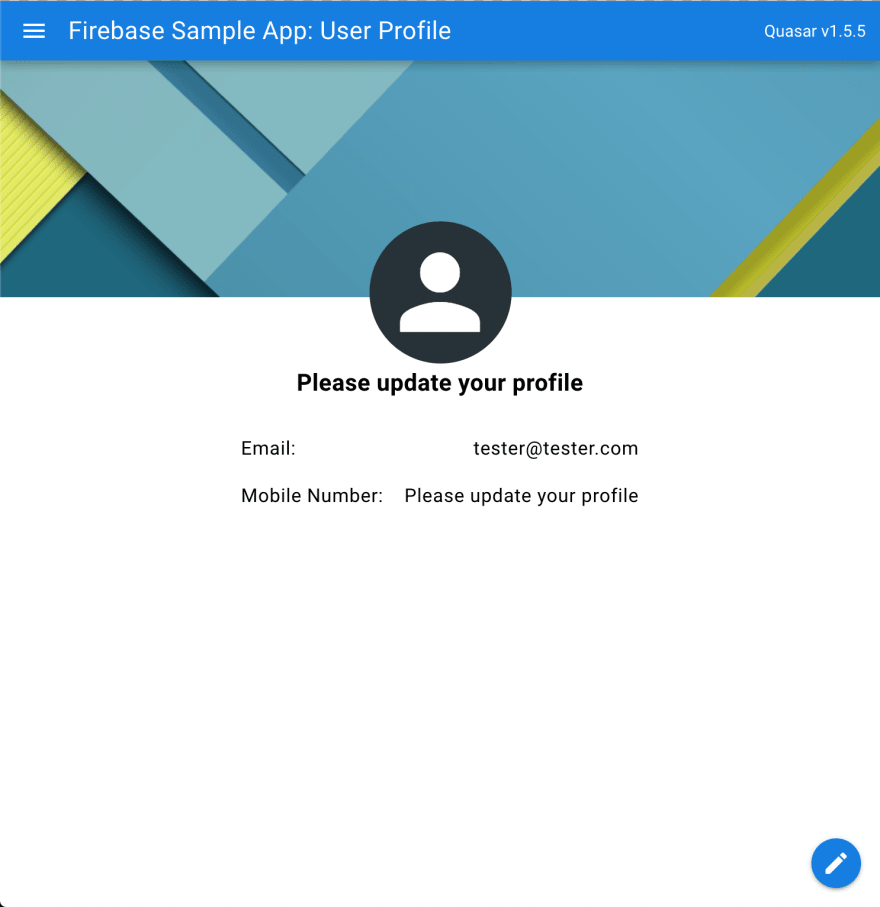
Also, if you open up dev tools you will see a console statement outputting the uid from our state that is available to the protected page before rendering from our created Vue lifecycle method in our User.vue file.

Now that we have our data from Firestore bound and in-sync, we're ready to move on to the final piece of our user profile feature, uploading files, and updating user fields.
- 5.1 Google Cloud Storage Setup
Head back over to the console and click on the storage menu item, and click Get started, and follow the rest of the prompts.


- 5.2 User actions
Now that the current user called from Firestore is loaded into our store's user module, it's time to upload a photo to Cloud Storage. First, take a look at the custom component based off of Quasar's q-uploader, within the UserSettings component.
/src/pages/user/profile/UserSettings.vue
Per the docs, we can create a custom component to support our Cloud Firestore service modeled after the QUploaderBase mixin.
Have a look at our custom component FBQUploader
Because there are some considerations regarding reusability, multiple file uploads, and other considerations, a separate article highlighting FBQUploader component will be available in the future.
In regards to the user profile content like name, phone number, or anything else for that matter, capture the data and post it to Firestore. Here we can see this in the UserSettings component again. First, we capture the data in our saveUserData method on the form submission.
async saveUserData () {
  const { currentUser, email, fullName, mobile } = this

  this.$q.loading.show({
    message: 'Updating your data, please stand by...',
    customClass: 'text-h3, text-bold'
  })

  try {
    await this.updateUserData({
      id: currentUser.id,
      email,
      fullName,
      mobile
    })
  } catch (err) {
    this.$q.notify({
      message: `Looks like a probelm updating your profile: ${err}`,
      color: 'negative'
    })
  } finally {
    this.$q.loading.hide()
    this.setEditUserDialog(false)
  }
}
Set up some visual language notifying the user that we're doing an update via Quasar's Loading plugin, massage the data, then pass it over to the user action, updateUserData.
export const updateUserData = async function ({ state }, payload) {
  return userRef('users', payload.id).update(payload)
}
Again, once the data is successfully stored in the current user document in the users' collection, your store's user module automatically updates via the Vuexfire binding.
6. Unbinding Vuexfire Bindings
Lastly, when the user logs off we need to unbind our Vuexfire bindings.
export const logoutUser = async function ({ commit }, payload) {
  await firestoreAction(({ unbindFirestoreRef }) => { unbindFirestoreRef('users') })
  commit('user/setCurrentUserData', null, { root: true })
  await this.$fb.logoutUser()
}
7. Summary
Hopefully, this gave you some insight into the process of creating a user record in Firestore from the Firebase authentication step. Also, setting up a common use case of a user profile while combining the functionality of uploading files to Google's Cloud Storage, as well as harnessing the power of Vuexfire bindings to simplify the syncing process between your Vuex store modules and Cloud Firestore.
8. Repository
User Profile Repo


 已为社区贡献6083条内容

所有评论(0)