
服务端HTTP压力测试框架locust
locust使用篇locust安装:pip install locustiogithub:https://github.com/locustio/locust官方文档:https://docs.locust.io/en/stable/示例:locust_test.py#coding=utf-8from locust import HttpLocust, TaskSet, taski...
locust使用篇
locust安装:pip install locustio
github:https://github.com/locustio/locust
官方文档:https://docs.locust.io/en/stable/
示例:locust_test.py
#coding=utf-8
from locust import HttpLocust, TaskSet, task
import cv2,random,os,json
class WebsiteTasks(TaskSet):
    @task(1)
    def home(self):
        self.client.get("/")
    @task(1)
    def login(self):
        self.head = {'Content-Type': 'application/json;charset=utf-8',
                     'token': 'planceholder',
                     'User-Agent': 'Mozilla/5.0 (Windows NT 10.0; Win64; x64) AppleWebKit/537.36 (KHTML, like Gecko) Chrome/65.0.3325.181 Safari/537.36',
                     'userId': 'planceholder'
                     }
        self.form_data = {'account': 'admin',
                          'password': 'zs123YL!'}
        with self.client.post("/login", headers=self.head,data=json.dumps(self.form_data)) as response:
            print(response.status_code)
            print(response.content)
class WebsiteUser(HttpLocust):
    task_set = WebsiteTasks
    host = "http://118.89.220.161:8080"
    min_wait = 100
    max_wait = 300
终端中启动:locust -f locust_test.py,然后在浏览器中输入:http://127.0.0.1:8089设置后开始压力测试

locust启动参数说明:
https://www.cnblogs.com/fnng/p/7758368.html
https://www.cnblogs.com/leiziv5/p/7831397.html
深入浅出开源性能测试工具Locust(使用篇):https://debugtalk.com/post/head-first-locust-user-guide/
深入浅出开源性能测试工具Locust(脚本增强):https://debugtalk.com/post/head-first-locust-advanced-script/
服务端性能监控 glances
sudo apt-get install glances
在终端输入:glances

如果有报错,在.bashrc中添加export LC_ALL=C即可
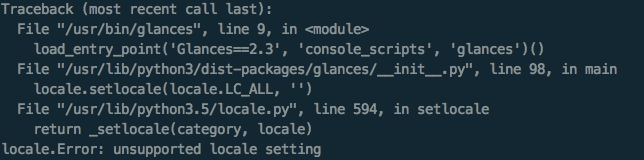
参考:https://linux.cn/article-2782-1.html

瓜分20万奖金 获得内推名额 丰厚实物奖励 易参与易上手
更多推荐

 0
0 0
0- 0


 已为社区贡献3条内容

所有评论(0)