
【Keras-Xception】CIFAR-10
系列连载目录请查看博客 《Paper》 4.1 小节 【Keras】Classification in CIFAR-10 系列连载学习借鉴github:BIGBALLON/cifar-10-cnn知乎专栏:写给妹子的深度学习教程Xception Caffe 代码:https://github.com/soeaver/caffe-model/edit/master/cls/incep...
系列连载目录
- 请查看博客 《Paper》 4.1 小节 【Keras】Classification in CIFAR-10 系列连载
学习借鉴
- github:BIGBALLON/cifar-10-cnn
- 知乎专栏:写给妹子的深度学习教程
- Xception Caffe 代码:https://github.com/soeaver/caffe-model/edit/master/cls/inception/deploy_xception.prototxt
- Xception Keras 代码:https://github.com/keras-team/keras-applications/blob/master/keras_applications/xception.py
参考
代码下载
- 链接:https://pan.baidu.com/s/164uiHjnlmIR6ioZvA5GIAw
提取码:dags
硬件
- GTX 1080 Ti
文章目录
1 理论基础
【Xception】《Xception: Deep Learning with Depthwise Separable Convolutions》(CVPR-2017)
2 Xception 代码实现

extreme inception,1×1 和 3×3 交换位置也无所谓,因为是两者堆叠的形式,先 1×1 再 3×3 为 extreme inception,先 3×3 再 1×1 则为 depth-wise separable convolution,代码实现的形式为 depth-wise separable convolution,对应 keras 中实现为 SeparableConv2D,地址为 https://keras.io/layers/convolutional/#separableconv2d
2.1 xception_1
1)导入库,设置好超参数
import os
os.environ["CUDA_DEVICE_ORDER"]="PCI_BUS_ID"
os.environ["CUDA_VISIBLE_DEVICES"]="0"

import keras
from keras.datasets import cifar10
from keras import backend as K
from keras.layers import Input, Conv2D, Dense, BatchNormalization, Activation
from keras.layers import GlobalAveragePooling2D, MaxPooling2D, add
from keras.models import Model
from keras.layers import SeparableConv2D

from keras import optimizers,regularizers
from keras.preprocessing.image import ImageDataGenerator
from keras.initializers import he_normal
from keras.callbacks import LearningRateScheduler, TensorBoard, ModelCheckpoint

num_classes        = 10
batch_size         = 64         # 64 or 32 or other
epochs             = 300
iterations         = 782
weight_decay=1e-4

log_filepath  = './xception_1'
2)数据预处理并设置 learning schedule
def color_preprocessing(x_train,x_test):
    x_train = x_train.astype('float32')
    x_test = x_test.astype('float32')
    mean = [125.307, 122.95, 113.865]
    std  = [62.9932, 62.0887, 66.7048]
    for i in range(3):
        x_train[:,:,:,i] = (x_train[:,:,:,i] - mean[i]) / std[i]
        x_test[:,:,:,i] = (x_test[:,:,:,i] - mean[i]) / std[i]
    return x_train, x_test

def scheduler(epoch):
    if epoch < 100:
        return 0.01
    if epoch < 200:
        return 0.001
    return 0.0001

# load data
(x_train, y_train), (x_test, y_test) = cifar10.load_data()
y_train = keras.utils.to_categorical(y_train, num_classes)
y_test  = keras.utils.to_categorical(y_test, num_classes)
x_train, x_test = color_preprocessing(x_train, x_test)
3)定义网络结构
- Entry flow

可以发现,module2 与 module3、4 仅差一个输入的时候Relu层,我们封装成如下函数形式,通过 top 参数来控制这种区别,params 参数的 shape 为 (3,),分别对应着,residual 结构的 filters,第一个第二个 SeparableConv 的 filters:
# 36 convolutional layers are structured into 14 modules
def entryflow(x,params,top=False):
    # modules 2-4,13
    # params is (3,)
    # top = true means module 2, don't use relu
    residual = Conv2D(params[0], (1, 1), strides=(2, 2),padding='same')(x)
    residual = BatchNormalization()(residual)
    if top:
        x = Activation('relu')(x)
    x = SeparableConv2D(params[1], (3, 3),padding='same')(x)
    x = BatchNormalization()(x)
    x = Activation('relu')(x)
    x = SeparableConv2D(params[2], (3, 3),padding='same')(x)
    x = BatchNormalization()(x)
    x = MaxPooling2D((3, 3), strides=(2, 2),padding='same')(x)
    x = add([x, residual])
    return x
- Middle flow
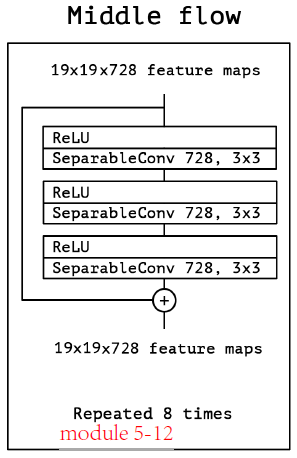
params 为 int,如上图所示 728
def middleflow(x,params):
    # modules 5-12, params is int
    residual = x
    x = Activation('relu')(x)
    x = SeparableConv2D(params, (3, 3),padding='same')(x)
    x = BatchNormalization()(x)
    x = Activation('relu')(x)
    x = SeparableConv2D(params, (3, 3),padding='same')(x)
    x = BatchNormalization()(x)
    x = Activation('relu')(x)
    x = SeparableConv2D(params, (3, 3),padding='same')(x)
    x = BatchNormalization()(x)
    x = add([x, residual])
    return x
- Exit flow

module 13 同module 3,4,用 Entry flow 的结构即可,我们只用封装 module 14 的结构,params 的 shape 为 2
def exitflow(x,params):
    # modules 14 , params is (2,)
    x = SeparableConv2D(params[0], (3, 3),padding='same')(x)
    x = BatchNormalization()(x)
    x = Activation('relu')(x)
    x = SeparableConv2D(params[1], (3, 3),padding='same')(x)
    x = BatchNormalization()(x)
    x = Activation('relu')(x)
    return x
4)搭建网络
用 3)中设计好的模块来搭建网络,整体 architecture 如下:

def xception(img_input,shallow=False, classes=10):
    # modules 1
    x = Conv2D(32,(3, 3),strides=(2, 2),padding='same')(img_input)
    x = BatchNormalization()(x)
    x = Activation('relu')(x)
    x = Conv2D(64, (3, 3),strides=(1,1),padding='same')(x)
    x = BatchNormalization()(x)
    x = Activation('relu')(x)
    # module 2
    x = entryflow(x,(128,128,128),top=True)
    # module 3-4
    x = entryflow(x,(256,256,256))
    x = entryflow(x,(728,728,728))
    # module 5-12
    for _ in range(8):
        x = middleflow(x,728)
    # module 13
    x = entryflow(x,(1024,728,1024))
    # module 14
    x = exitflow(x,(1536,2048))
    # output
    x = GlobalAveragePooling2D()(x)
    x = Dense(classes, activation='softmax')(x)
    return x
5)生成模型
img_input=Input(shape=(32,32,3))
output = xception(img_input)
model=Model(img_input,output)
model.summary()
Total params: 20,909,234
Trainable params: 20,854,706
Non-trainable params: 54,528
6)开始训练
# set optimizer
sgd = optimizers.SGD(lr=.1, momentum=0.9, nesterov=True)
model.compile(loss='categorical_crossentropy', optimizer=sgd, metrics=['accuracy'])

# set callback
tb_cb = TensorBoard(log_dir=log_filepath, histogram_freq=0)
change_lr = LearningRateScheduler(scheduler)
cbks = [change_lr,tb_cb]

# set data augmentation
datagen = ImageDataGenerator(horizontal_flip=True,
                             width_shift_range=0.125,
                             height_shift_range=0.125,
                             fill_mode='constant',cval=0.)
datagen.fit(x_train)

# start training
model.fit_generator(datagen.flow(x_train, y_train,batch_size=batch_size),
                    steps_per_epoch=iterations,
                    epochs=epochs,
                    callbacks=cbks,
                    validation_data=(x_test, y_test))
model.save('xception_1.h5')
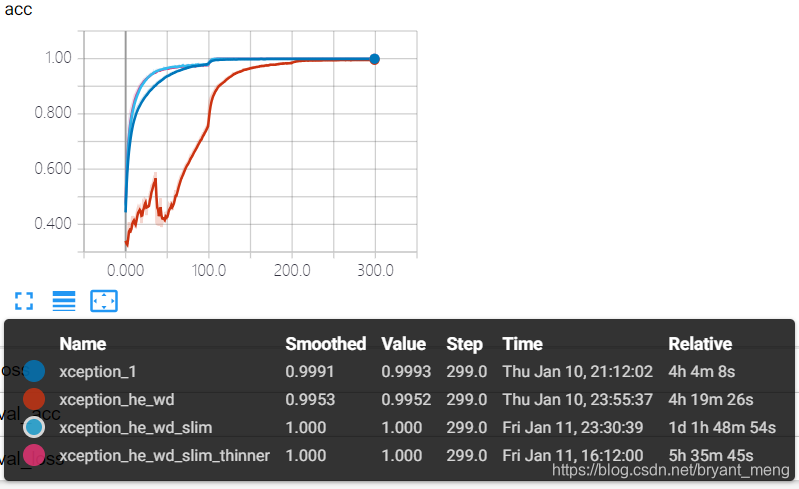
7)结果分析
training accuracy 和 training loss


第一次看见这么小的 loss
test accuracy 和 test loss

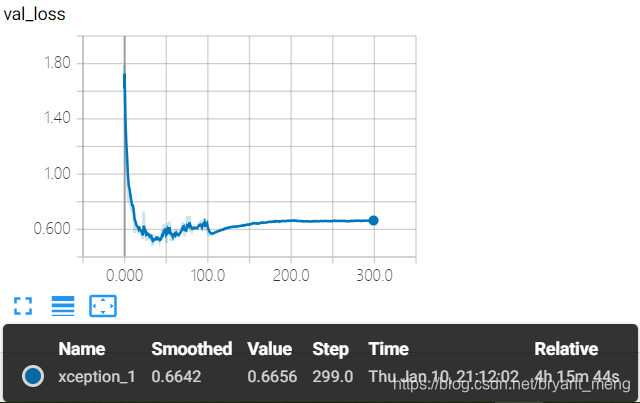
耐克标志出现,过拟合,实话说,精度能达到88%+ 还蛮高的,注意到 module 1-4 down sampling 了4次,原图片的 resolution 已经到了 2×2,靠 padding 才能经受 module 5-12 的洗礼,效果可想而知, module 13 再来一次 down sampling,resolution 到了 1×1,module 14 没有发挥的空间了!我们先解决下过拟合问题!
2.2 xception_he_wd
改变卷积的初始化方案为 he_normal,加入 regularization + weight decay
- 修改所有
SeparableConv2D
x = SeparableConv2D(params[0], (3, 3),padding='same',
                   depthwise_initializer="he_normal",
                   pointwise_initializer="he_normal",
                   depthwise_regularizer=regularizers.l2(weight_decay),
                   pointwise_regularizer=regularizers.l2(weight_decay))(x)
- 修改所有
Conv2D
x = Conv2D(32,(3, 3),strides=(2, 2),padding='same',
          kernel_initializer="he_normal",kernel_regularizer=regularizers.l2(weight_decay))(img_input)
- 修改所有
BatchNormalization
x = BatchNormalization(momentum=0.9, epsilon=1e-5)(x)
其他代码同 xception_1
参数量如下(不变):
Total params: 20,909,234
Trainable params: 20,854,706
Non-trainable params: 54,528
- xception_1
Total params: 20,909,234
结果分析如下:
training accuracy 和 training loss


test accuracy 和 test loss

一首凉凉,放大了 resolution 过低的影响,还是采用 slim 的策略,参考 【Keras-Inception-resnet v1】CIFAR-10、【Keras-Inception-resnet v2】CIFAR-10,我们把 module 2-4 的 stride 为 2 的地方都改为 1,以保持 feature map 的 resolution.
2.3 xception_he_wd_slim
将 module 2,3,4 的 stride 变为1,其它代码同 xception_he_wd
修改如下:
在 entryflow(x,params,top=False,last=False) 中加入 last 形参,因为前面设计的时候,module 13 也是调用的这个函数,我们不改变 module 13 的步长,所以 加一个 last
def entryflow(x,params,top=False,last=False):
    # modules 2-4,13
    # params is (3,)
    # top = true means module 2, don't use relu
    if last:
        stride = (2,2)
    else:
        stride = (1,1)
    residual = Conv2D(params[0], (1, 1), strides=stride,padding='same',
                     kernel_initializer="he_normal",kernel_regularizer=regularizers.l2(weight_decay))(x)
    residual = BatchNormalization(momentum=0.9, epsilon=1e-5)(residual)
    if top:
        x = Activation('relu')(x)
    x = SeparableConv2D(params[1], (3, 3),padding='same',
                       depthwise_initializer="he_normal",
                       pointwise_initializer="he_normal",
                       depthwise_regularizer=regularizers.l2(weight_decay),
                       pointwise_regularizer=regularizers.l2(weight_decay))(x)
    x = BatchNormalization(momentum=0.9, epsilon=1e-5)(x)
    x = Activation('relu')(x)
    x = SeparableConv2D(params[2], (3, 3),padding='same',
                       depthwise_initializer="he_normal",
                       pointwise_initializer="he_normal",
                       depthwise_regularizer=regularizers.l2(weight_decay),
                       pointwise_regularizer=regularizers.l2(weight_decay))(x)
    x = BatchNormalization(momentum=0.9, epsilon=1e-5)(x)
    x = MaxPooling2D((3, 3), strides=stride,padding='same')(x)
    x = add([x, residual])
    return x
然后 module 13 搭建的时候,添加上 last = True
# module 13
x = entryflow(x,(1024,728,1024),last=True)
参数量如下(不变):
Total params: 20,909,234
Trainable params: 20,854,706
Non-trainable params: 54,528
- xception_1
Total params: 20,909,234 - xception_he_wd
Total params: 20,909,234
结果分析如下:
training accuracy 和 training loss


test accuracy 和 test loss


缓解了过拟合,精度也上来了,到了 92% +
2.4 xception_he_wd_slim_thinner
实话说,速度有点感人,我们学习 【Keras-MobileNet v1】CIFAR-10 来个瘦身版,修改如下,module 1 不变,module 2-4 变成一个传统的卷积,channels 减半为 728/2 = 364,module 5-12 数量减半,channels 也减半为 728/2 = 364,module 13、14 形式不变,channles 都减半,具体结构如下:
def xception(img_input,shallow=False, classes=10):
    # modules 1
    x = Conv2D(32,(3, 3),strides=(2, 2),padding='same',
              kernel_initializer="he_normal",kernel_regularizer=regularizers.l2(weight_decay))(img_input)
    x = BatchNormalization(momentum=0.9, epsilon=1e-5)(x)
    x = Activation('relu')(x)
    x = Conv2D(64, (3, 3),strides=(1,1),padding='same',
              kernel_initializer="he_normal",kernel_regularizer=regularizers.l2(weight_decay))(x)
    x = BatchNormalization(momentum=0.9, epsilon=1e-5)(x)
    x = Activation('relu')(x)
    x = Conv2D(364, (3, 3),strides=(1,1),padding='same',
              kernel_initializer="he_normal",kernel_regularizer=regularizers.l2(weight_decay))(x)
    x = BatchNormalization(momentum=0.9, epsilon=1e-5)(x)
    x = Activation('relu')(x)
    # module 5-12
    for _ in range(4):
        x = middleflow(x,364)
    # module 13
    x = entryflow(x,(512,364,512),last=True)
    # module 14
    x = exitflow(x,(768,1024))
    # output
    x = GlobalAveragePooling2D()(x)
    x = Dense(classes, activation='softmax')(x)
    return x
其它代码同 xception_he_wd
参数量如下(大大减少):
Total params: 3,611,466
Trainable params: 3,595,450
Non-trainable params: 16,016
- xception_1
Total params: 20,909,234 - xception_he_wd
Total params: 20,909,234 - xception_he_wd_slim
Total params: 20,909,234
结果分析如下:
training accuracy 和 training loss


test accuracy 和 test loss


3 总结
精度最高的是 xception_he_wd_slim
性价比最高的是 xception_he_wd_slim_thinner(trade-off parameters and accuracy)
模型大小

参数量
- xception_1
Total params: 20,909,234 - xception_he_wd
Total params: 20,909,234 - xception_he_wd_slim
Total params: 20,909,234 - xception_he_wd_slim_thinner
Total params: 3,611,466
3.1 xception vs inception v3 in CIFAR-10

- xception_he_wd_slim
Total params: 20,909,234 - inception_v3_slim:
Total params: 23,229,370
参数量相当,所有 hyper-parameters 设置的一样,xception_he_wd_slim 效果并没有 inception_v3_slim 好(论文中前者好,在 ImageNet 和 JFT数据集上),可能是 xception_he_wd_slim 中 module 2-4 如果设置成 stride = 1,影响效果吧,毕竟每个module 都有 max pooling,而 inception_v3_slim 中的stem 结构由一个传统卷积替换了。参考(【Keras-Inception v3】CIFAR-10)
3.3 inception 全家福


瓜分20万奖金 获得内推名额 丰厚实物奖励 易参与易上手
更多推荐


 4
4 0
0- 0


 已为社区贡献2条内容

所有评论(0)