
OpenCV threshold函数详解
threshold函数作用:去掉噪,例如过滤很小或很大像素值的图像点。threshold函数原型:double threshold( InputArray src, OutputArray dst,double thresh, double maxval, int type );参数说明:src:原图像。dst:结果图像。thresh...
threshold函数作用:
去掉噪,例如过滤很小或很大像素值的图像点。
threshold函数python版原型:
retval, dst = cv.threshold( src, thresh, maxval, type[, dst] ) 参数说明:
src:原图像。
dst:结果图像。
thresh:当前阈值。
maxVal:最大阈值,一般为255.
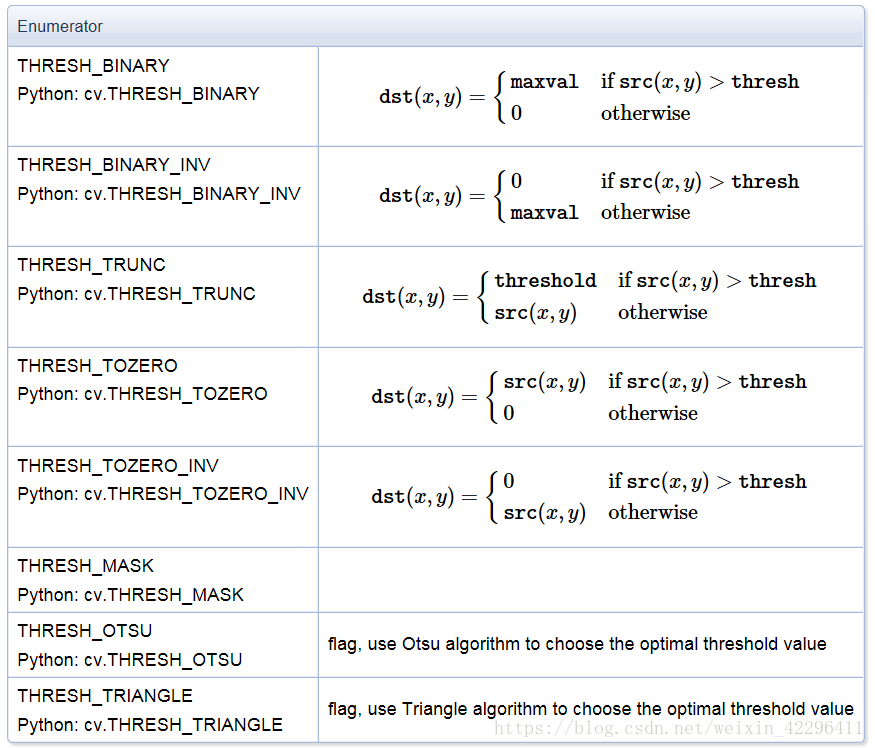
thresholdType:阈值类型,主要有下面几种:
enum ThresholdTypes {
    THRESH_BINARY     = 0,
    THRESH_BINARY_INV = 1,
    THRESH_TRUNC      = 2,
    THRESH_TOZERO     = 3,
    THRESH_TOZERO_INV = 4,
    THRESH_MASK       = 7,
    THRESH_OTSU       = 8,
    THRESH_TRIANGLE   = 16
};| 编号 | 阈值类型枚举 |
注意
|
| 1 | THRESH_BINARY | |
| 2 | THRESH_BINARY_INV | |
| 3 | THRESH_TRUNC | |
| 4 | THRESH_TOZERO | |
| 5 | THRESH_TOZERO_INV | |
| 6 | THRESH_MASK |
不支持
|
| 7 | THRESH_OTSU |
不支持32位
|
| 8 | THRESH_TRIANGLE |
不支持32位
|
具体说明如下:
注意:
THRESH_OTSU和THRESH_TRIANGLE是作为优化算法配合THRESH_BINARY、THRESH_BINARY_INV、THRESH_TRUNC、THRESH_TOZERO以及THRESH_TOZERO_INV来使用的。
当使用了THRESH_OTSU和THRESH_TRIANGLE两个标志时,输入图像必须为单通道。
生成关系:

下面通过代码来验证一下threshold的用法:
import numpy as np
import cv2
#创建一个6x6的BGR三通道图片
img6x6 = np.zeros((6,6,3), dtype=np.uint8)
#Blue通道取值0~99随机值
img6x6[:,:,0] = np.random.randint(0, 100, size=36).reshape(6,6)
#Green通道取值100~199随机值
img6x6[:,:,1] = np.random.randint(100, 200, size=36).reshape(6,6)
#Red通道取值200~255随机值
img6x6[:,:,2] = np.random.randint(200, 256, size=36).reshape(6,6)
print(img6x6)
得到img6x6的BGR三通道数据:
[[[ 62 171 226]
  [ 29 118 212]
  [ 61 151 200]
  [ 43 123 206]
  [ 58 146 232]
  [  2 124 246]]

 [[ 48 101 207]
  [ 32 194 228]
  [ 90 171 241]
  [ 36 152 244]
  [ 64 169 245]
  [ 71 106 202]]

 [[ 27 198 206]
  [ 39 193 213]
  [ 60 128 207]
  [ 53 134 248]
  [ 25 187 229]
  [ 72 116 229]]

 [[ 52 163 201]
  [ 39 189 251]
  [ 63 190 217]
  [ 73 139 212]
  [ 54 166 236]
  [ 43 191 200]]

 [[ 34 119 207]
  [ 36 110 209]
  [ 40 191 229]
  [ 60 100 228]
  [ 62 174 250]
  [ 41 115 209]]

 [[ 35 165 246]
  [ 50 182 218]
  [ 77 110 239]
  [ 44 106 245]
  [ 21 189 252]
  [ 64 144 241]]]128 207]
  [ 53 134 248]
  [ 25 187 229]
  [ 72 116 229]]

 [[ 52 163 201]
  [ 39 189 251]
  [ 63 190 217]
  [ 73 139 212]
  [ 54 166 236]
  [ 43 191 200]]

 [[ 34 119 207]
  [ 36 110 209]
  [ 40 191 229]
  [ 60 100 228]
  [ 62 174 250]
  [ 41 115 209]]

 [[ 35 165 246]
  [ 50 182 218]
  [ 77 110 239]
  [ 44 106 245]
  [ 21 189 252]
  [ 64 144 241]]]
观察结果我们发现img6x6[2][2][1]=128,我们取该值作为thresh值来演示THRESH_BINARY、THRESH_BINARY_INV等的作用。
1) THRESH_BINARY
我们取参数值thresh=128,maxval=255,flag = THRESH_BINARY
cv2.threshold(img6x6, 128, 255, cv2.THRESH_BINARY)根据前面对THRESH_BINARY flag值的解释:

预期得到的结果中,img6x6中>128的值均应变为255,<=128的值均应变为0。
我们实际得到的结果为:
[[[  0 255 255]
  [  0   0 255]
  [  0 255 255]
  [  0   0 255]
  [  0 255 255]
  [  0   0 255]]

 [[  0   0 255]
  [  0 255 255]
  [  0 255 255]
  [  0 255 255]
  [  0 255 255]
  [  0   0 255]]

 [[  0 255 255]
  [  0 255 255]
  [  0   0 255]
  [  0 255 255]
  [  0 255 255]
  [  0   0 255]]

 [[  0 255 255]
  [  0 255 255]
  [  0 255 255]
  [  0 255 255]
  [  0 255 255]
  [  0 255 255]]

 [[  0   0 255]
  [  0   0 255]
  [  0 255 255]
  [  0   0 255]
  [  0 255 255]
  [  0   0 255]]

 [[  0 255 255]
  [  0 255 255]
  [  0   0 255]
  [  0   0 255]
  [  0 255 255]
  [  0 255 255]]]0 255]
  [  0 255 255]
  [  0 255 255]
  [  0   0 255]]

 [[  0 255 255]
  [  0 255 255]
  [  0 255 255]
  [  0 255 255]
  [  0 255 255]
  [  0 255 255]]

 [[  0   0 255]
  [  0   0 255]
  [  0 255 255]
  [  0   0 255]
  [  0 255 255]
  [  0   0 255]]

 [[  0 255 255]
  [  0 255 255]
  [  0   0 255]
  [  0   0 255]
  [  0 255 255]
  [  0 255 255]]]
与预期的结果一致。
2)THRESH_BINARY_INV
THRESH_BINARY_INV的作用与THRESH_BINARY相反,大于thresh的值置0,小于等于thresh的值置maxval:

预期的结果与1)的结果完全相反。
code:
ret,dst=cv2.threshold(img6x6, 128, 255, cv2.THRESH_BINARY_INV)
print(dst)
dst输出:
[[[255   0   0]
  [255 255   0]
  [255   0   0]
  [255 255   0]
  [255   0   0]
  [255 255   0]]

 [[255 255   0]
  [255   0   0]
  [255   0   0]
  [255   0   0]
  [255   0   0]
  [255 255   0]]

 [[255   0   0]
  [255   0   0]
  [255 255   0]
  [255   0   0]
  [255   0   0]
  [255 255   0]]

 [[255   0   0]
  [255   0   0]
  [255   0   0]
  [255   0   0]
  [255   0   0]
  [255   0   0]]

 [[255 255   0]
  [255 255   0]
  [255   0   0]
  [255 255   0]
  [255   0   0]
  [255 255   0]]

 [[255   0   0]
  [255   0   0]
  [255 255   0]
  [255 255   0]
  [255   0   0]
  [255   0   0]]]
255   0]
  [255   0   0]
  [255   0   0]
  [255 255   0]]

 [[255   0   0]
  [255   0   0]
  [255   0   0]
  [255   0   0]
  [255   0   0]
  [255   0   0]]

 [[255 255   0]
  [255 255   0]
  [255   0   0]
  [255 255   0]
  [255   0   0]
  [255 255   0]]

 [[255   0   0]
  [255   0   0]
  [255 255   0]
  [255 255   0]
  [255   0   0]
  [255   0   0]]]
与预期结果完全一致。
3)THRESH_TRUNC
THRESH_TRUNC的作用是对大于thresh的值进行截断,其余值保留原值。

code:
ret,dst=cv2.threshold(img6x6, 128, 255, cv2.THRESH_TRUNC)
print(dst)
dst输出:
[[[ 62 128 128]
  [ 29 118 128]
  [ 61 128 128]
  [ 43 123 128]
  [ 58 128 128]
  [  2 124 128]]

 [[ 48 101 128]
  [ 32 128 128]
  [ 90 128 128]
  [ 36 128 128]
  [ 64 128 128]
  [ 71 106 128]]

 [[ 27 128 128]
  [ 39 128 128]
  [ 60 128 128]
  [ 53 128 128]
  [ 25 128 128]
  [ 72 116 128]]

 [[ 52 128 128]
  [ 39 128 128]
  [ 63 128 128]
  [ 73 128 128]
  [ 54 128 128]
  [ 43 128 128]]

 [[ 34 119 128]
  [ 36 110 128]
  [ 40 128 128]
  [ 60 100 128]
  [ 62 128 128]
  [ 41 115 128]]

 [[ 35 128 128]
  [ 50 128 128]
  [ 77 110 128]
  [ 44 106 128]
  [ 21 128 128]
  [ 64 128 128]]]128 128]
  [ 60 128 128]
  [ 53 128 128]
  [ 25 128 128]
  [ 72 116 128]]

 [[ 52 128 128]
  [ 39 128 128]
  [ 63 128 128]
  [ 73 128 128]
  [ 54 128 128]
  [ 43 128 128]]

 [[ 34 119 128]
  [ 36 110 128]
  [ 40 128 128]
  [ 60 100 128]
  [ 62 128 128]
  [ 41 115 128]]

 [[ 35 128 128]
  [ 50 128 128]
  [ 77 110 128]
  [ 44 106 128]
  [ 21 128 128]
  [ 64 128 128]]]
4) THRESH_TOZERO
THRESH_TOZERO的作用是对大于thresh的值进行保留原值,小于或等于thresh的值置0:

code:
ret, dst=cv2.threshold(img6x6, 128, 255, cv2.THRESH_TOZERO)
print(dst)
dst输出:
[[[  0 171 226]
  [  0   0 212]
  [  0 151 200]
  [  0   0 206]
  [  0 146 232]
  [  0   0 246]]

 [[  0   0 207]
  [  0 194 228]
  [  0 171 241]
  [  0 152 244]
  [  0 169 245]
  [  0   0 202]]

 [[  0 198 206]
  [  0 193 213]
  [  0   0 207]
  [  0 134 248]
  [  0 187 229]
  [  0   0 229]]

 [[  0 163 201]
  [  0 189 251]
  [  0 190 217]
  [  0 139 212]
  [  0 166 236]
  [  0 191 200]]

 [[  0   0 207]
  [  0   0 209]
  [  0 191 229]
  [  0   0 228]
  [  0 174 250]
  [  0   0 209]]

 [[  0 165 246]
  [  0 182 218]
  [  0   0 239]
  [  0   0 245]
  [  0 189 252]
  [  0 144 241]]]
0 207]
  [  0 134 248]
  [  0 187 229]
  [  0   0 229]]

 [[  0 163 201]
  [  0 189 251]
  [  0 190 217]
  [  0 139 212]
  [  0 166 236]
  [  0 191 200]]

 [[  0   0 207]
  [  0   0 209]
  [  0 191 229]
  [  0   0 228]
  [  0 174 250]
  [  0   0 209]]

 [[  0 165 246]
  [  0 182 218]
  [  0   0 239]
  [  0   0 245]
  [  0 189 252]
  [  0 144 241]]]
5) THRESH_TOZERO_INV
THRESH_TOZERO_INV的作用与THRESH_TOZERO的作用完全相反,对大于thresh的值置0,其余值则保留:

code:
ret, dst=cv2.threshold(img6x6, 131, 255, cv2.THRESH_TOZERO_INV)
print(dst)
dst输出:
[[[ 62   0   0]
  [ 29 118   0]
  [ 61   0   0]
  [ 43 123   0]
  [ 58   0   0]
  [  2 124   0]]

 [[ 48 101   0]
  [ 32   0   0]
  [ 90   0   0]
  [ 36   0   0]
  [ 64   0   0]
  [ 71 106   0]]

 [[ 27   0   0]
  [ 39   0   0]
  [ 60 128   0]
  [ 53   0   0]
  [ 25   0   0]
  [ 72 116   0]]

 [[ 52   0   0]
  [ 39   0   0]
  [ 63   0   0]
  [ 73   0   0]
  [ 54   0   0]
  [ 43   0   0]]

 [[ 34 119   0]
  [ 36 110   0]
  [ 40   0   0]
  [ 60 100   0]
  [ 62   0   0]
  [ 41 115   0]]

 [[ 35   0   0]
  [ 50   0   0]
  [ 77 110   0]
  [ 44 106   0]
  [ 21   0   0]
  [ 64   0   0]]]
128   0]
  [ 53   0   0]
  [ 25   0   0]
  [ 72 116   0]]

 [[ 52   0   0]
  [ 39   0   0]
  [ 63   0   0]
  [ 73   0   0]
  [ 54   0   0]
  [ 43   0   0]]

 [[ 34 119   0]
  [ 36 110   0]
  [ 40   0   0]
  [ 60 100   0]
  [ 62   0   0]
  [ 41 115   0]]

 [[ 35   0   0]
  [ 50   0   0]
  [ 77 110   0]
  [ 44 106   0]
  [ 21   0   0]
  [ 64   0   0]]]
6)THRESH_OTSU
THRESH_OTSU是需要搭配THRESH_BINARY、THRESH_BINARY_INV、THRESH_TRUNC、THRESH_TOZERO以及THRESH_TOZERO_INV来使用的。并且输入图像必须是灰度图像。
所以,我们首先需要创建一个灰度图像:
code:
img_gray = cv2.cvtColor(img6x6,cv2.COLOR_BGR2GRAY)
print(img_gray)
得到的img_gray为:
[[175   0   0   0 162   0]
 [  0 186 183 166 180   0]
 [181 181   0 159 181   0]
 [162 190 184   0 174 177]
 [  0   0 185   0 184   0]
 [174 178   0   0 189 164]]
然后在通过THRESH_OTSU标准搭配其他标志位来对输入图像做处理,这里只演示搭配THRESH_BINARY标志的用法,
code:
ret,dst=cv2.threshold(img_gray, 127, 255, cv2.THRESH_TOZERO|cv2.THRESH_OTSU)
print(dst)
dst输出:
[[175   0   0   0 162   0]
 [  0 186 183 166 180   0]
 [181 181   0 159 181   0]
 [162 190 184   0 174 177]
 [  0   0 185   0 184   0]
 [174 178   0   0 189 164]]
对比一下不使用THRESH_OTSU时的输出,
code:
ret,dst=cv2.threshold(img_gray, 166, 255, cv2.THRESH_TOZERO)
print(dst)
dst输出:
[[175   0   0   0   0   0]
 [  0 186 183   0 180   0]
 [181 181   0   0 181   0]
 [  0 190 184   0 174 177]
 [  0   0 185   0 184   0]
 [174 178   0   0 189   0]]0 180   0]
 [181 181   0   0 181   0]
 [  0 190 184   0 174 177]
 [  0   0 185   0 184   0]
 [174 178   0   0 189   0]]
7) THRESH_TRIANGLE
THRESH_TRIANGLE用法与THRESH_OTSU用法一致,这里不做演示。
综合示例
Demo Code
#encoding=utf-8


import sys, cv2, numpy as np
from ui_thresholdDemo import Ui_ThresoldDemo
from PyQt5.QtWidgets import QApplication, QWidget, QFileDialog
from PyQt5.QtGui import QImage, QPixmap


class ThresholdDemo(QWidget, Ui_ThresoldDemo):

    def __init__(self):
        super().__init__()
        self.setupUi(self)
        self.setupSigSlots()
        self.param_threshold = 1
        self.param_maxVal    = 255
        self.param_thresholdType = cv2.THRESH_BINARY
        self.param_ExtendType = 0
        self.checkGray = False

    def setupSigSlots(self):
        self.btnBrowse.clicked.connect(self.slotBtnBrowse)
        self.parmThreshold.valueChanged.connect(self.slotThresholdChanged)
        self.paramMaxVal.valueChanged.connect(self.slotMaxValChanged)
        self.parmThresholdType.currentTextChanged[str].connect(self.slotThresholdTypeChanged)
        self.btnCheckGray.toggled.connect(self.slotCheckGray)
        self.parmThresholdType2.currentTextChanged[str].connect(self.slotThresholdType2Changed)

    def slotBtnBrowse(self):
        try:
            file, _ = QFileDialog.getOpenFileName(self, 'Open Image', 'D:\\tmp\\pics', '*.*', '*.*',)
            if file:
                self.imagePath.setText(file)
                img_init = cv2.imdecode(np.fromfile(file, dtype=np.uint8), -1)
                self.img_threshold = img_init.copy()
                cv2.cvtColor(img_init, cv2.COLOR_BGR2RGB, img_init)
                h,w,c = img_init.shape
                qImg = QImage(img_init, w, h, w*c, QImage.Format_RGB888)
                self.initPicFrame.setPixmap(QPixmap.fromImage(qImg))
                self.updateThresholdImage()
        except Exception as e:
            print(e)

    def updateThresholdImage(self):
        try:
            img = self.img_threshold.copy()
            if self.checkGray:
                img_gray = np.zeros((img.shape[0], img.shape[1]), dtype=np.uint8)
                cv2.cvtColor(img, cv2.COLOR_BGR2GRAY, img_gray)
                ret, img_threshold = cv2.threshold(img_gray, self.param_threshold, self.param_maxVal, self.param_thresholdType|self.param_ExtendType)
                print('thresh:{}, maxval:{}, flags:{}|{}'.format(self.param_threshold, self.param_maxVal, self.param_thresholdType, self.param_ExtendType))
                h,w = img_threshold.shape
                qImg = QImage(img_threshold, w, h, w, QImage.Format_Indexed8)
                self.thresholdPicFrame.setPixmap(QPixmap.fromImage(qImg))
            else:
                ret, img_threshold = cv2.threshold(img, self.param_threshold, self.param_maxVal, self.param_thresholdType)
                #ret: ret equals to self.param_threshold, it canbe ignored
                h,w,c = img_threshold.shape
                cv2.cvtColor(img_threshold, cv2.COLOR_BGR2RGB, img_threshold)
                qImg = QImage(img_threshold, w, h, w*c, QImage.Format_RGB888)
                self.thresholdPicFrame.setPixmap(QPixmap.fromImage(qImg))
        except Exception as e:
            print(e)

    def slotThresholdChanged(self, val):
        self.param_threshold = val
        self.labelThreshold.setText('threshold:{:>3}'.format(val))
        self.updateThresholdImage()

    def slotMaxValChanged(self, val):
        self.param_maxVal    = val
        self.labelMaxVal.setText(' maxValue:{:>3}'.format(val))
        self.updateThresholdImage()

    def slotThresholdTypeChanged(self, type):
        type_dic = {
            'THRESH_BINARY': cv2.THRESH_BINARY,
            'THRESH_BINARY_INV': cv2.THRESH_BINARY_INV,
            'THRESH_TRUNC': cv2.THRESH_TRUNC,
            'THRESH_TOZERO': cv2.THRESH_TOZERO,
            'THRESH_TOZERO_INV': cv2.THRESH_TOZERO_INV,
            #'THRESH_MASK': cv2.THRESH_MASK,
            #'THRESH_OTSU': cv2.THRESH_OTSU,
            #'THRESH_TRIANGLE': cv2.THRESH_TRIANGLE,
            }
        self.param_thresholdType = type_dic[type]
        #print(type,self.param_thresholdType )
        self.updateThresholdImage()

    def slotThresholdType2Changed(self, type):
        try:
            extend_type = {
                "THRESH_OTSU":cv2.THRESH_OTSU,
                "THRESH_TRIANGLE":cv2.THRESH_TRIANGLE
                }
            if type == 'NONE':
                self.param_ExtendType = 0
                self.checkGray = False
                self.btnCheckGray.setEnabled(True)
            else:
                self.param_ExtendType = extend_type[type]
                self.checkGray = True
                self.btnCheckGray.setEnabled(False)

            print('self.param_ExtendType: ', self.param_ExtendType)
            self.updateThresholdImage()
        except Exception as e:
            print(e)


    def slotCheckGray(self, bGray):
        self.checkGray = bGray
        self.updateThresholdImage()


def thresholdDemo():
    img6x6 = np.zeros((6,6,3), dtype=np.uint8)
    img6x6[:,:,0] = np.random.randint(0, 100, size=36).reshape(6,6)
    img6x6[:,:,1] = np.random.randint(100, 200, size=36).reshape(6,6)
    img6x6[:,:,2] = np.random.randint(200, 256, size=36).reshape(6,6)
    cv2.threshold(img6x6, 127, 255, cv2.THRESH_BINARY)


if __name__ == '__main__':
    qApp = QApplication(sys.argv)
    demo = ThresholdDemo()
    demo.show()
    qApp.exec_()
程序运行结果:

完整Code下载,请点这里

旨在为数千万中国开发者提供一个无缝且高效的云端环境,以支持学习、使用和贡献开源项目。
更多推荐


 48
48 0
0- 0


 已为社区贡献1条内容

所有评论(0)