gem5学习7——gem5仿真器启动过程
本文使用X86架构为例介绍GEM5中最简单的SE模式启动过程。GEM5启动的命令为:~/simulators/gem5$ build/X86_MESI_Three_Level_sparse/gem5.opt configs/example/se.py -c test其中gem5.opt为GEM5的主二进制程序,se.py为用Python语言编写的配置文件,test为标准Linux下gc
本文使用X86架构为例介绍GEM5中最简单的SE模式启动过程。GEM5启动的命令为:
~/simulators/gem5$ build/X86_MESI_Three_Level_sparse/gem5.opt configs/example/se.py -c test 其中gem5.opt为GEM5的主二进制程序,se.py为用Python语言编写的配置文件,test为标准Linux下gcc编译的二进制文件。
运行结果如下:
wgh@atlantis:~/simulators/gem5$ build/X86_MESI_Three_Level_sparse/gem5.opt configs/example/se.py -c test
gem5 Simulator System.  http://gem5.org
gem5 is copyrighted software; use the --copyright option for details.

gem5 compiled Jun 22 2014 15:27:09
gem5 started Jun 22 2014 15:27:28
gem5 executing on atlantis
command line: build/X86_MESI_Three_Level_sparse/gem5.opt configs/example/se.py -c test
Global frequency set at 1000000000000 ticks per second
0: system.remote_gdb.listener: listening for remote gdb #0 on port 7000
**** REAL SIMULATION ****
info: Entering event queue @ 0.  Starting simulation...
info: Increasing stack size by one page.
warn: ignoring syscall access(0, 4893217, ...)
Hello, world!
Exiting @ tick 6979500 because target called exit()
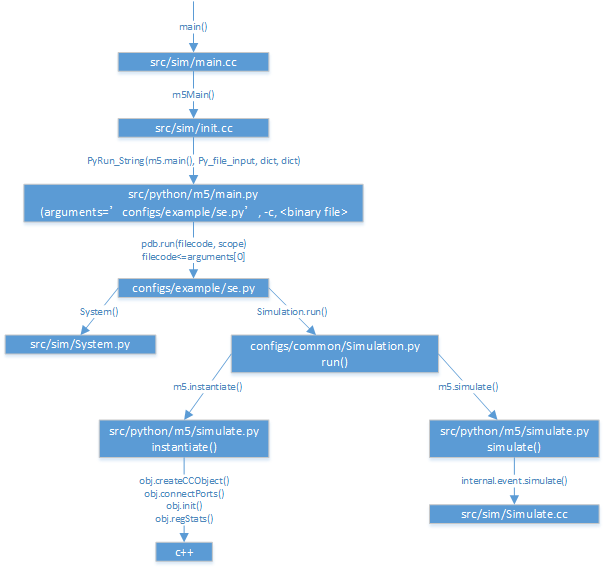
通过GDB调试发现GEM5启动的过程如下图:
其中GEM5启动使用的trigger是标准的C/C++的main函数,main函数主要工作为初始化信号量和初始化Python环境。然后通过调用sim/init.cc中的initM5Python()方法来初始化GEM5使用的模块。在initM5Python()函数主要调用了两个方法:
int
initM5Python()
{
    EmbeddedSwig::initAll();
    return EmbeddedPython::initAll();
}#include "sim/init.hh"
extern "C" {
void init_param_IsaFake();
}
EmbeddedSwig embed_swig_param_IsaFake(init_param_IsaFake); //实例化一个EmbeddedSwig对象,并把初始化函数通过构造函数传给类中的静态变量list//EmbeddedSwig的构造函数
EmbeddedSwig::EmbeddedSwig(void (*init_func)())
: initFunc(init_func)
{
getList().push_back(this);
}EmbeddedPython::initAll()用来整理继承于SimObject的模块并把他们映射到m5.objects命名空间下。这些gem5模块是分布在不同文件夹下的,理论上Python是通过文件的路径来确定Python模块的命名空间(类似Java),但是通过分析来看下gem5是通过什么方法把分布在不同文件下的Python模块map到m5.objects下。
在每个gem5的功能模块下都会有类似,xxxx.py.cc的文件,这个文件就是用来描述这个模块的名字、文件的绝对路径等信息:
EmbeddedPython embedded_m5_objects_AtomicSimpleCPU(
    "m5/objects/AtomicSimpleCPU.py",  //理论上这个文件该在的位置
    "/home/wgh/simulators/gem5/src/cpu/simple/AtomicSimpleCPU.py", //实际在的位置
    "m5.objects.AtomicSimpleCPU",   //模块的名字
    data_m5_objects_AtomicSimpleCPU,  //是一个大数组,I don't know what the fuck it is!
    766,   //上面那个大数组的长度
    1610);  //?
} 初始化完毕,仿真器调用main.cc的m5Main()函数,在m5Main()函数中使用PyRun_String来启动Python模块,PyRun_String()函数为c/c++调用python的接口,其中函数第一个参数为python命令,在这个地方使用了两个命令:import m5和m5.main(),第二个命令是调用python模块的main()函数。在m5.main()函数中使用
    if options.pdb:
	......
         pdb.run(filecode, scope) #调试模式下运行se.py,在gem5.opt的运行参数下加上--pdb参数。pdb调试器类似gdb,
    	.....
    else:
exec filecode in scope #正常运行更多推荐
 已为社区贡献1条内容


所有评论(0)