vmlinux
vmlinux.elf/vmlinux.bin/vmlinux.img区别
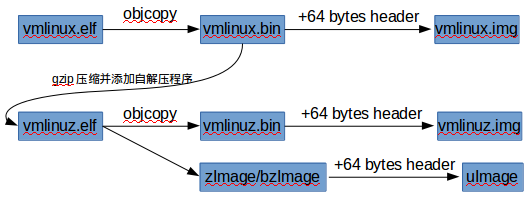
vmlinux.elf是编译出来的最原始的文件,用于kernel-debug,产生System.map符号表,不能用于直接加载,不可作为启动内核。
vmlinux.bin:the same as vmlinux.elf, but in a binary file format
vmlinux.img是vmlinux.bin加上64 bytes的header
vmlinuz.elf是可引导的、压缩的内核,相对于vmlinux.elf,它增加了解压缩和boot的部分。
zImage是vmlinuz.elf经过objcopy的文件,适用于小内核(512 kB以内)
bzImage是vmlinuz.elf经过objcopy的文件,适用于大内核。
bin文件与elf文件区别
bin文件是raw binary文件,这种文件只包含机器码。
执行raw binary很简单,只需要将程序加载到起始地址,就可以执行。
FILE *fp = fopen(“vmlinux.bin”, “rb”);
fread(VMLINUX_START, 1, VMLINUX_SIZE, fp);
((void (*)(void))VMLINUX_START)();
elf文件除了机器码之外,还包含其他额外的信息,如段的加载地址,运行地址,重定位表,符号表等。
执行elf程序则需要一个elf loader
objcopy
通过objcopy将elf文件转换为bin文件
(OBJCOPY) -O binary -R .note -R .comment -S boot.elf boot.bin
使用 -O binary (或–out-target=binary) 输出为原始的二进制文件
使用 -R .note (或–remove-section) 输出文件中不要.note这个section,缩小了文件尺寸
使用 -S (或 –strip-all) 输出文件中不要重定位信息和符号信息,缩小了文件尺寸
objdump
objdump将vmlinux.elf生成vmlinux.txt
mkimage
uboot源码的tools/目录下有mkimage工具,这个工具可以用来制作不压缩或者压缩的多种可启动映象文件,通过mkimage可以将zImage转换为uImage。
mkimage在原来的文件前增加一个64字节长度的头,增加的头结构描述如下:
Image Name占用了32字节,其他信息占用了32字节
/*
* Legacy format image header,
* all data in network byte order (aka natural aka bigendian).
*/
typedef struct image_header {
uint32_t ih_magic; /* Image Header Magic Number */
uint32_t ih_hcrc; /* Image Header CRC Checksum */
uint32_t ih_time; /* Image Creation Timestamp */
uint32_t ih_size; /* Image Data Size */
uint32_t ih_load; /* Data Load Address */
uint32_t ih_ep; /* Entry Point Address */
uint32_t ih_dcrc; /* Image Data CRC Checksum */
uint8_t ih_os; /* Operating System */
uint8_t ih_arch; /* CPU architecture */
uint8_t ih_type; /* Image Type */
uint8_t ih_comp; /* Compression Type */
uint8_t ih_name[IH_NMLEN]; /* Image Name */
} image_header_t;
mkimage用法:
Usage: ./mkimage -l image
-l ==> list image header information
./mkimage [-x] -A arch -O os -T type -C comp -a addr -e ep -n name -d data_file[:data_file...] image
-A ==> set architecture to 'arch'
-O ==> set operating system to 'os'
-T ==> set image type to 'type'
-C ==> set compression type 'comp'
-a ==> set load address to 'addr' (hex)
-e ==> set entry point to 'ep' (hex)
-n ==> set image name to 'name'
-d ==> use image data from 'datafile'
-x ==> set XIP (execute in place)
./mkimage [-D dtc_options] -f fit-image.its fit-image
-A 设定架构类型,可取值参照uboot/common/image.c
-O 设定操作系统类型,可取值参照uboot/common/image.c
-T image类型,可取值参照uboot/common/image.c
-a 指定image在内存中的加载地址
-e 指定image运行的入口点地址
-C 指定压缩方式,压缩方式参考uboot/common/image.c
-d data_file[:data_file...] 制作image的源文件
示例
./mkimage -A arm -O linux -T kernel -C none -a 0x90008000 -e 0x90008000 -n "Android Linux Kernel" -d ./zImage ./uImage
bootm
1、如果我们没用mkimage对内核进行处理的话,那直接把内核下载到0x30008000再运行就行,内核会自解压运行(不过内核运行需要一个tag来传递参数,而这个tag建议是由bootloader提供的,在u-boot下默认是由bootm命令建立的)。
2、如果使用mkimage生成内核镜像文件的话,会在内核的前头加上了64byte的信息,供建立tag之用。bootm命令会首先判断bootm xxxx 这个指定的地址xxxx是否与-a指定的加载地址相同。
(1)如果相同的话那就让其原封不同的放在那,但-e指定的入口地址会推后64byte,以跳过这64byte的头部。
(2)如果不同的话会从这个地址开始提取出这个64byte的头部,对其进行分析,然后把去掉头部的内核复制到-a指定的load地址中去运行之
具体的操作步骤看参考文章中第4个
参考文章

AtomGit 是由开放原子开源基金会联合 CSDN 等生态伙伴共同推出的新一代开源与人工智能协作平台。平台坚持“开放、中立、公益”的理念,把代码托管、模型共享、数据集托管、智能体开发体验和算力服务整合在一起,为开发者提供从开发、训练到部署的一站式体验。
更多推荐


 0
0 0
0- 0


 已为社区贡献13条内容


所有评论(0)