Spring学习之Spring的声明式事务管理详解
声明式事务管理大多数Spring用户选择声明式事务管理的原因是,这个是对应用代码影响最小的选择,因此也最符合 非侵入式 轻量级容器的理念。Spring声明式事务管理可以在任何环境下使用。只需更改配置文件, 它就可以和JDBC、JDO、Hibernate或其他的事务机制一起工作。Spring的声明式事务管理可以被应用到任何类(以及那个类的实例)上。Spring提供了声明式的回滚规则。Sprin
声明式事务管理
大多数Spring用户选择声明式事务管理的原因是,这个是对应用代码影响最小的选择,因此也最符合 非侵入式 轻量级容器的理念。
- Spring声明式事务管理可以在任何环境下使用。只需更改配置文件, 它就可以和JDBC、JDO、Hibernate或其他的事务机制一起工作。
- Spring的声明式事务管理可以被应用到任何类(以及那个类的实例)上。
- Spring提供了声明式的回滚规则。
- Spring允许你通过AOP定制事务行为。(例如,如果需要,你可以在事务回滚中插入定制的行为。 你也可以增加任意的通知,就象事务通知一样。)。
- Spring不提供高端应用服务器提供的跨越远程调用的事务上下文传播。如果你需要这些特性,我们推荐你使用EJB。 然而,不要轻易使用这些特性。因为通常我们并不希望事务跨越远程调用。
理解Spring声明式事务管理的实现
Spring的事务管理是通过AOP代理实现的。 其中的事务通知由元数据(目前基于XML或注解)驱动。
代理对象与事务元数据结合产生了一个AOP代理,它使用一个PlatformTransactionManager 接口配合事务拦截器,在方法调用前后实施事务。
从概念上来说,在事务代理上调用方法的工作过程看起来像这样:

例子
1、首先定义事务性的服务接口:
public interface UserService {

    public abstract void addUser(User user);

    public abstract void deleteUser();

    public abstract void updateUser();

    public abstract List queryUser();

}
2、上面服务的实现类:
public class UserServiceImpl implements UserService {

    private UserDaoImpl userDao;

    @Override
    public void addUser(User user) {
        this.userDao.addUser(user);
    }

    @Override
    public void deleteUser() {
        this.userDao.deleteUser();
    }

    @Override
    public void updateUser() {
        this.userDao.updateUser();
    }

    @Override
    public List queryUser() {
        this.userDao.queryUser();
    }
}
现在假定,UserService的方法(queryUser())必须执行在只读事务上下文中,其他的方法(addUser(User user)、deleteUser()和updateUser())必须执行在可读写事务上下文中。
下面开始配置Spring的配置文件:
<?xml version="1.0" encoding="UTF-8"?>
<beans xmlns="http://www.springframework.org/schema/beans"
    xmlns:xsi="http://www.w3.org/2001/XMLSchema-instance"
    xmlns:tx="http://www.springframework.org/schema/tx"
    xmlns:aop="http://www.springframework.org/schema/aop"
    xsi:schemaLocation="http://www.springframework.org/schema/beans http://www.springframework.org/schema/beans/spring-beans.xsd
        http://www.springframework.org/schema/aop http://www.springframework.org/schema/aop/spring-aop.xsd
        http://www.springframework.org/schema/tx http://www.springframework.org/schema/tx/spring-tx.xsd">

<!-- 声明式事务管理 -->
<!-- 1,引入命名空间:
    xmlns:tx="http://www.springframework.org/schema/tx"
    xsi:schemaLocation=http://www.springframework.org/schema/tx http://www.springframework.org/schema/tx/spring-tx.xsd

    xmlns:aop="http://www.springframework.org/schema/aop"
    xsi:schemaLocation=http://www.springframework.org/schema/aop http://www.springframework.org/schema/aop/spring-aop.xsd
    -->

<!-- 2,配置数据源DataSource -->
<bean id="dataSource" class="com.mchange.v2.c3p0.ComboPooledDataSource" destroy-method="close">
    <property name="driverClass" value="com.mysql.jdbc.Driver"/>
    <property name="jdbcUrl" value="jdbc:mysql://localhost:3306/hb_dfdc"/>
    <property name="user" value="root"/>
    <property name="password" value="root"></property>
</bean>

<!-- 3,配置JdbcTemplate,如果不用spring的jdbc可以省略 -->
<bean id="jdbcTemplate" class="org.springframework.jdbc.core.JdbcTemplate">
    <property name="dataSource" ref="dataSource"/>
</bean>

<!-- 4, 配置DAO层-->
<bean id="userDao" class="com.dfdc.spring.declaratx.dao.impl.UserDaoImpl">
    <property name="jdbcTemplate" ref="jdbcTemplate"/><!--如果不用spring的jdbc可以省略-->
</bean>
<!-- 4.1 配置Service层,即要被事务管理的服务对象 -->
<bean id="userService" class="com.dfdc.spring.declaratx.service.impl.UserServiceImpl">
    <property name="userDao" ref="userDao"/>
</bean>

<!-- 5,配置Spring的事务管理器,即PlatformTransactionManager bean-->
<bean id="txManager" class="org.springframework.jdbc.datasource.DataSourceTransactionManager">
    <property name="dataSource" ref="dataSource"/>
</bean>

<!-- 6, 配置通知-->
<tx:advice id="txAdvice" transaction-manager="txManager">
    <tx:attributes>
        <!-- 所有以query开头的方法是只读的 -->
        <tx:method name="query*" read-only="true"/>
        <!-- 其他方法使用默认的事务设置 -->
        <tx:method name="*"/>
    </tx:attributes>
</tx:advice>

<!-- 7, 启用以上的事务通知-->
<aop:config>
    <!-- 运行被定义在UserServiceImpl类下的任意方法 -->
    <aop:pointcut expression="execution(* com.dfdc.spring.declaratx.service.impl.UserServiceImpl.*(..))" id="aopCut"/>
    <!-- 将切入点与通知编织在一起 -->
    <aop:advisor advice-ref="txAdvice" pointcut-ref="aopCut"/>
</aop:config>

<!-- 其他bean -->


</beans>
我们来分析一下上面的配置。我们要把一个服务对象(’userService’ bean)做成事务性的。
我们想施加的事务语义封装在<tx:advice/>定义中。
“<tx:advice/>“把所有以 ‘query’ 开头的方法看做执行在只读事务上下文中, 其余的方法执行在默认语义的事务上下文中”。
其中的 ‘transaction-manager’ 属性被设置为一个指向 PlatformTransactionManager bean的名字(这里指 ‘transactionManager’), 该bean将会真正管理事务。
提示
事实上,如果 PlatformTransactionManager bean的名字是 ‘transactionManager’ 的话,你的事务通知(
<tx:advice/>)中的 ‘transaction-manager’ 属性可以忽略。否则你则需要像上例那样明确指定。
配置中最后一段是 <aop:config/> 的定义, 它确保由 ‘txAdvice’ bean定义的事务通知在应用中合适的点被执行。
首先我们定义了一个切面,它匹配 UserService 接口定义的所有操作, 我们把该切面叫做 ‘aopCut’。然后我们用一个通知器(advisor)把这个切面与 ‘txAdvice’ 绑定在一起, 表示当 ‘aopCut’ 执行时,’txAdvice’ 定义的通知逻辑将被执行。
<aop:pointcut/> 元素定义是AspectJ的切面表示法。
一个普遍性的需求是让整个服务层成为事务性的。满足该需求的最好方式是让切面表达式匹配服务层的所有操作方法。例如:
<aop:config>
    <aop:pointcut expression="execution(* com.dfdc.spring.declaratx.service.impl.*.*(..))" id="aopCut"/>
    <aop:advisor advice-ref="txAdvice" pointcut-ref="aopCut"/>
</aop:config>
现在,既然我们已经分析了整个配置,你可能会问了,“好吧,但是所有这些配置做了什么?”。
上面的配置将为’userService’ bean创建一个代理对象,这个代理对象被装配了事务通知,所以当它的相应方法被调用时,一个事务将被启动、挂起、被标记为只读,或者其它(根据该方法所配置的事务语义)。我们来看看下面的测试代码,测试一下上面的配置。
ApplicationContext context = new ClassPathXmlApplicationContext("com/dfdc/spring/declaratx/test/context-declaratx.xml");
UserService userService = (UserService) context.getBean("userService");
userService.deleteUser();
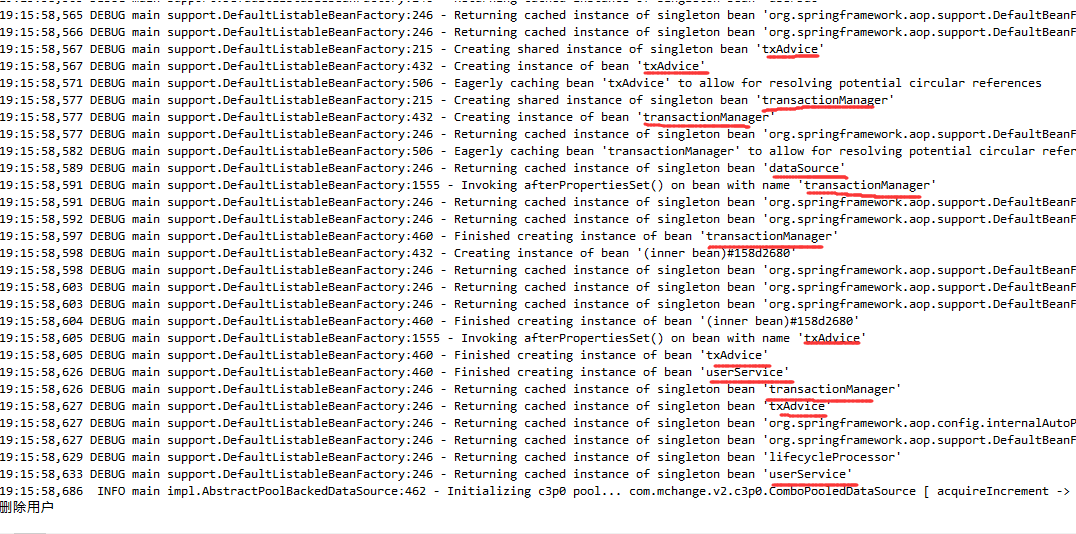
结果:
可以看到spring容器创建了一系列的单例bean,方法deleteUser输入“输出用户”字符串。
设置断点调试:

可以看到userService是由Spring的JDK动态代理生成的代理对象。
总结
Spring声明式事务处理的步骤:
- 搭建环境,引入tx和context命名空间;
- 在spring的配置文件中,先导入dataSource;
- 测试dataSource是否配置正确;(可省略)
- 导入dao和service层的bean
- 测试dao和service是否配置正确(可省略)
- 引入事务管理器
- 配置通知
<tx:advice/> - 启用事务通知
<aop:config/>,将切入点和通知器织入 - 测试service层的类,看是否是代理对象。
转载声明
如需转载请注明出处:
http://blog.csdn.net/u011726984
更多推荐
 已为社区贡献1条内容


所有评论(0)