
使用 Github、Hugo 搭建个人博客
使用 Github、Hugo 搭建个人博客
Hugo 静态网站构建手册:https://jimmysong.io/hugo-handbook/
关键字:开源 博客 框架
1、GitHub Pages
官网:https://pages.github.com/
文档:https://docs.github.com/zh
Github Pages 简介
Websites for you and your projects. (为你的项目提供网站)。GitHub Pages 是通过 GitHub 托管和发布的公共网页。Github Pages 本质上是一个静态网站托管系统,可以使用它为你的每一个仓库制作一个静态网页入口。
- 搭建简单而且免费;
- 支持静态脚本;
- 可以绑定你的域名;
- DIY自由发挥,动手实践一些有意思的东西git,markdown,bootstrap,jekyll;
- 理想写博环境,git+github+markdown+jekyll;
Git、GitHub、GitHub Pages
- Git 是一个开源的分布式版本控制系统。
- GitHub 是托管各种 git 库的站点。
- GitHub Pages 是免费的静态站点。可以免费托管、自带主题、支持自制页面和Jekyll。
GitHub Pages 文档
官网文档(英文):https://docs.github.com/en/pages
官网文档(中文):https://docs.github.com/zh/pages
GitHub Pages 是通过 GitHub 托管和发布的公共网页。 启动和运行的最快方法是使用 Jekyll 主题选择器加载预置主题。 然后修改 GitHub Pages 的内容和样式。
创建 网站
首先需要 github 账号,没有就注册一个。
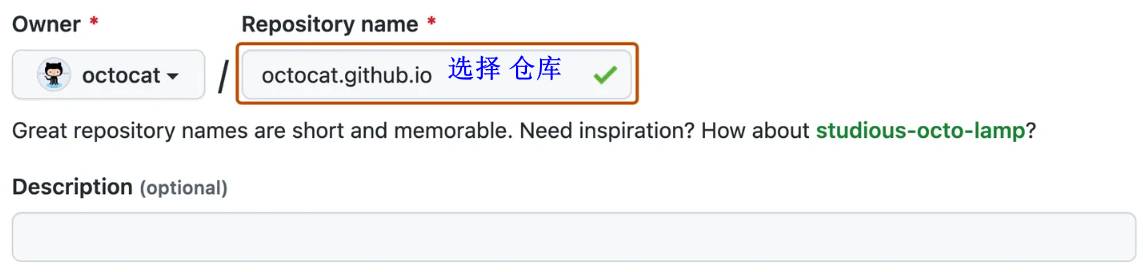
1. 在任何页面的右上角选择 + ,单击 新建仓库。输仓库名。仓库名必须以 .github.io 结尾
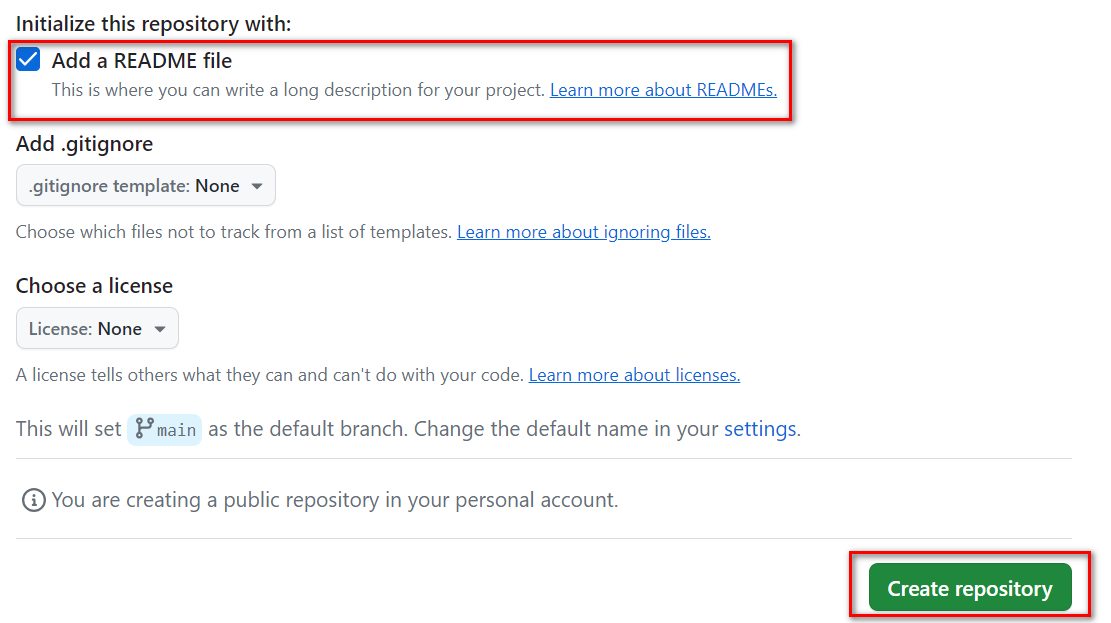
然后勾选 "添加 README.txt"
2. 进入创建的仓库,点击 设置,在 "左边的侧边栏" 的 "代码和自动化" 部分,点击 页面,在 "构建和部署" 下的 "源" 选择 "从分支部署",在 "分支" 下选择发布源 为 None,然后保存。
3. (可选),打开仓库中的 README.md 文件,可以保持默认也可以编辑,这个文件是编写你网站内容的位置。
4. 修改并推送到 GitHub 后,最长可能需要 10 分钟才会发布。
访问发布后的网站。


更改标题和说明。单击仓库的 “代码” 选项卡,添加 _config.yml文件,编辑_config.yml 添加如下内容,编辑完文件后,单击“提交更改”
theme: jekyll-theme-minimal
title: xxx 的 github pages 主页
description: xxx的 github pages 主页

站点添加主题:使用 Jekyll 向 GitHub Pages 站点添加主题 - GitHub 文档
网站的 2种 pages 模式
两种 pages 模式
- 个人或公司站点:User/Organization Pages。
使用自己的用户名,每个用户名下面只能建立一个;主干上内容被用来构建和发布页面 - 项目站点:Project Pages。gh-pages分支用于构建和发布;
如果user/org pages使用了独立域名,那么托管在账户下的所有project pages将使用相同的域名进行重定向,除非project pages使用了自己的独立域名;
如果没有使用独立域名,project pages将通过子路径的形式提供服务http://username.github.com/projectname;
自定义404页面只能在独立域名下使用,否则会使用User Pages 404;
常用命令
$ git clone git@github.com:username/username.github.com.git
//本地如果无远程代码,先做这步,不然就忽略
$ cd .ssh/username.github.com //定位到你blog的目录下
$ git pull origin master
//先同步远程文件,后面的参数会自动连接你远程的文件
$ git status //查看本地自己修改了多少文件
$ git add . //添加远程不存在的git文件
$ git commit * -m "what I want told to someone"
$ git push origin master //更新到远程服务器上
项目 站点:Project Pages
- gh-pages分支用于构建和发布;
- 如果user/org pages使用了独立域名,那么托管在账户下的所有project pages将使用相同的域名进行重定向,除非project pages使用了自己的独立域名;
- 如果没有使用独立域名,project pages将通过子路径的形式提供服务http://username.github.com/projectname;
- 自定义404页面只能在独立域名下使用,否则会使用User Pages 404;
创建项目站点步骤:
$ git clone https://github.com/USERNAME/PROJECT.git PROJECT
$ git checkout --orphan gh-pages
$ git rm -rf .
$ git add .
$ git commit -a -m "First pages commit"
$ git push origin gh-pages
建立主站、二级应用页面
可以通过 User/Organization Pages建立主站,而通过Project Pages挂载二级应用页面。
入门
配置 自定义 域
2、部署 博客
使用 Github Pages 创建并部署网站。
安装 git 工具:https://git-scm.com/downloads
github 桌面版:https://desktop.github.com/
搭建静态页面网站的技术有很多,目前有三种主流技术选型:Hogo是 Go 语言,Hexo是 nodejs,jekyll 是 Ruby。都是静态网站生成器。
Jekyll
官网
Jekyll 是一个简单的博客形态的静态站点生产机器。它有一个模版目录,其中包含原始文本格式的文档,通过一个转换器(如 Markdown)和 Liquid 渲染器转化成一个完整的可发布的静态网站,你可以发布在任何你喜爱的服务器上。Jekyll 也可以运行在 GitHub Page 上,也就是说,你可以使用 GitHub 的服务来搭建你的项目页面、博客或者网站,而且是完全免费的。说白了就是,只要安装Jekyll的规范和结构,不用写html,就可以生成网站。
jekyll 与 github 的关系:GitHub Pages一个由 GitHub 提供的用于托管项目主页或博客的服务,jekyll 是后台所运行的引擎。
GitHub Pages 建立个人网站详细教程:https://zhuanlan.zhihu.com/p/58229299
使用 Jekyll 设置站点
Hugo (雨果)
Hugo 官网描述说是世界上最快的、最受欢迎的开源静态网站生成器。hugo是用Go语言编写的静态网页生成器,只需要一个命令 hugo 就可以在几秒钟内生成一个静态的博客页面。
Website | Installation | Documentation |
官网文档
- Installation 安装
- Getting started 开始
- Content management 内容管理
- Templates 模板
- Functions 功能
- Methods 方法
- Quick reference 快速参考
- Variables 变量
- Hugo Modules Hugo模块
- Hugo Pipes 雨果派普斯
- CLI
快速入门、目录结构、hugo配置
- 如果是 Windows 用户:不要使用 命令提示符,不要使用 "Windows PowerShell"。
- "PowerShell" 和 "Windows PowerShell" 是不同的应用程序。
- 可以使用 "PowerShell" 或 Linux 终端(如 WSL 或 Git Bash)运行 hugo 命令。
在使用 Hugo 静态网站生成器时,你可能会遇到 hugo.toml 和 config.toml 这两个配置文件。
- hugo.toml 是 Hugo 项目的主要配置文件,通常位于 Hugo 项目的根目录下。它包含了许多配置选项,用于指定网站的各种设置,例如语言、页面布局、URL 等。你可以使用文本编辑器打开 hugo.toml 文件,并根据你的需求进行相应的配置。
- config.toml 是 Hugo 的默认配置文件名称,也位于 Hugo 项目的根目录下。它是一个用户自定义的配置文件,用于存储网站的自定义设置。你可以在 config.toml 文件中添加自己的配置选项,以满足特定需求。Hugo 会自动加载并应用 config.toml 中的配置。
- 对于 Hugo 项目,只需要一个有效的配置文件,可以是 hugo.toml 或者 config.toml。如果同时存在这两个文件,Hugo 会优先加载 hugo.toml 文件。如果只有 config.toml 文件存在,则 Hugo 只加载该文件。
- 如果使用config.yml 配置文件需要注意:yml 是缩进敏感
开始使用
基本用法
- Test your installation 测试安装
- Display available commands显示可用命令
- Build your site 构建您的网站
- Draft, future, and expired content草稿、未来和过期内容
- Develop and test your site开发和测试您的网站
- Deploy your site 部署站点
目录结构
配置 Hugo
- Configuration file 配置文件
- Configuration directory 配置目录
- Merge configuration from themes从主题合并配置
- All configuration settings所有配置设置
- Configure build 配置构建
- Configure cache busters 配置缓存破坏程序
- Configure server 配置服务器
- 404 server error page404 服务器错误页面
- Configure title case 配置标题大小写
- Configuration environment variables配置环境变量
- Configure with environment variables使用环境变量进行配置
- Ignore content and data files when rendering渲染时忽略内容和数据文件
- Configure front matter 配置前端
- Configure additional output formats配置其他输出格式
- Configure minify 配置缩小
- Configure file caches 配置文件缓存
- Configure cacheDir 配置 cacheDir
配置 markup
术语表:https://gohugo.io/getting-started/glossary/
关于Hugo的教程和书籍列表
- Hugo In Action Home Page:https://www.manning.com/books/hugo-in-action
- Hugo In Action 主页:https://www.manning.com/books/hugo-in-action
托管和部署
托管和部署 (Hosting and deployment)
- 概述
- 部署 Hugo
- 使用 Rclone 进行部署
- 使用 Rsync 部署
- 托管部署到 21YunBox
- 托管部署到 AWS Amplify
- 托管部署到 Azure 静态 Web Apps
- 托管部署到 Cloudflare Pages
- 托管部署到 Firebase
- 托管部署到 GitHub Pages
- 托管部署到 GitLab Pages
- 托管部署到 KeyCDN
- 托管部署到 Netlify
- 托管部署到 Render
其他托管网站的平台
- Netlify:做的一些 Vue 或者 React 想上线部署之后可以让别人预览,可以通过 Netlify 这个平台实现
- Nanobox:本地开发工具,可以消除环境的复杂性,在部署和生产环境之间,进行自动化环境配置,通过虚拟化使得开发环境更简洁
- AWS Amplify:亚马逊出品的移动应用开发程序管理工具
- Firebase:Google 出品的 BAAS
hugo 主题 库
hugo 官方的主题库,可以搜索、下载喜欢的主题:https://themes.gohugo.io/

使用 Hugo 创建静态网站
Github Pages 是一个静态网站托管系统,可以为每个仓库制作一个静态网页入口。它有两种存在方式:
- 识别 master branch 根目录下的:README.md 或者 index.html
- 识别 master branch 的 /docs 目录下的:README.md 或者 index.html
也就是说:可以把我们的静态网页直接存在 master branch,并在 Github Repository 的 Setting 页中打开 Github Pages 选项,就可以通过一个域名访问到我们的想要的网站了。
将 Hugo 部署为 GitHub Pages 项目或个人/组织站点,并使用 GitHub Actions 自动执行整个过程
- Prerequisites 先决条件
- Types of sites 网站类型
- Procedure 程序
- Customize the workflow 自定义工作流
- Additional resources 其他资源
安装 Hugo
下载:https://github.com/gohugoio/hugo
Hugo 有两个版本:标准版和扩展版。扩展版功能:在处理图像时编码为 WebP 格式,可以使用任一版本解码 WebP 图像;使用嵌入式 LibSass 转译器将 Sass 转译为 CSS,使用 Dart Sass 转译器不需要扩展版。查看 Hugo 是否安装成功:hugo --help

使用 "hugo [command] --help" 查看对应命令的帮助。
用法:
hugo [flags]
hugo [command]可用命令:
completion 为指定的shell生成自动完成脚本
config 打印 site 配置
convert 将内容转换为不同的格式
deploy 将站点部署到云提供商。
env 打印 Hugo 版本和环境信息
gen 几个有用的生成器的集合。
help 帮助
import 从其他站点导入您的站点。
list 列出各种类型的内容
mod 各种Hugo模块帮助
new 为 web 站点创建 网站内容
server 一个高性能的 webserver
version 打印 Hugo 版本和环境信息Flags:
-b, --baseURL string hostname (and path) to the root, e.g. https://spf13.com/
-D, --buildDrafts include content marked as draft(草案、草稿)
-E, --buildExpired include expired content
-F, --buildFuture include content with publishdate in the future
--cacheDir string filesystem path to cache directory
--cleanDestinationDir remove files from destination not found in static directories
--clock string set the clock used by Hugo, e.g. --clock 2021-11-06T22:30:00.00+09:00
--config string config file (default is hugo.yaml|json|toml)
--configDir string config dir (default "config")
-c, --contentDir string filesystem path to content directory
--debug debug output
-d, --destination string filesystem path to write files to
--disableKinds strings disable different kind of pages (home, RSS etc.)
--enableGitInfo add Git revision, date, author, and CODEOWNERS info to the pages
-e, --environment string build environment
--forceSyncStatic copy all files when static is changed.
--gc enable to run some cleanup tasks (remove unused cache files) after the build
-h, --help help for hugo
--ignoreCache ignores the cache directory
--ignoreVendorPaths string ignores any _vendor for module paths matching the given Glob pattern
-l, --layoutDir string filesystem path to layout directory
--logLevel string log level (debug|info|warn|error)
--minify minify any supported output format (HTML, XML etc.)
--noBuildLock don't create .hugo_build.lock file
--noChmod don't sync permission mode of files
--noTimes don't sync modification time of files
--panicOnWarning panic on first WARNING log
--poll string 设置 poll 时间间隔, e.g --poll 700ms, 使用基于轮询的方法来监视文件系统的更改
--printI18nWarnings print missing translations
--printMemoryUsage print memory usage to screen at intervals
--printPathWarnings print warnings on duplicate target paths etc.
--printUnusedTemplates print warnings on unused templates.
--quiet build in quiet mode
--renderToMemory render to memory (only useful for benchmark testing)
-s, --source string filesystem path to read files relative from
--templateMetrics display metrics about template executions
--templateMetricsHints calculate some improvement hints when combined with --templateMetrics
-t, --theme strings themes to use (located in /themes/THEMENAME/)
--themesDir string filesystem path to themes directory
--trace file write trace to file (not useful in general)
-v, --verbose verbose output
-w, --watch watch filesystem for changes and recreate as needed
hugo new site xxx 创建站点
hugo new xxx 创建 站点内容,即 网页内容文件。
创建 网站
hugo new site 命令创建一个新的 Hugo 网站时,如果指定的目录不为空会报错。如果想要在非空目录中创建 Hugo 网站,可以先 hugo new site temp-site 创建一个临时的空目录,再将临时文件夹temp-site 中的内容移动到你想要的目标目录中。


- hugo new site 在指定的目录创建一个站点,新创建的站点有正确的结构,但还没有内容和主题。
- 可以使用 hugo new [contentPath] 创建 站点内容(网页文件)
添加 ananke 主题,并启动
在流行框架的基础上搭建网站其实并不是一个技术活,千差万别的网站体验则主要体现在网站主题的设计上。Hugo 提供丰富多样的主题模板,可以在主题库搜索喜欢的主题进行安装:https://themes.gohugo.io/
示例:安装 https://github.com/theNewDynamic/gohugo-theme-ananke 主题
- 方法 1:作为 Hugo 模块(推荐),需要安装Go。
在项目的根目录初始化hugo模块系统:hugo mod init github.com/<your_user>/<your_project>
添加主题仓库到 config.toml 文件:theme = ["github.com/theNewDynamic/gohugo-theme-ananke"]- 方法 2:作为 git 子模块。在Hugo站点根目录中运行:git submodule add https://github.com/theNewDynamic/gohugo-theme-ananke.git themes/ananke
- 方法 3:直接把主题 clone 到 theme 目录下。示例克隆 jane 主题:git clone https://github.com/xianmin/hugo-theme-jane.git --depth=1 themes/jane
- git clone https://github.com/adityatelange/hugo-PaperMod themes/PaperMod --depth=1
git init
git submodule--helper add https://github.com/adityatelange/hugo-PaperMod.git themes/PaperMod --depth=1
hugo server -D 是用于在 Hugo 静态网站生成器中启动本地服务器的命令。
hugo: 是 Hugo 静态网站生成器的可执行命令。server: 是 Hugo 提供的一个子命令,用于启动本地开发服务器。-D(或--buildDrafts): 是一个可选参数,用于告诉 Hugo 在构建网站时包括草稿(draft)文章。可以在预览网站时渲染未发布的草稿文档。
为了成功运行 hugo server -D 命令,需要先进入 Hugo 项目的根目录,然后再运行该命令。成功运行后将启动一个本地开发服务器,并自动监视你的 Hugo 项目文件夹中的更改。这意味着每当你编辑或添加新的内容时,服务器都会重新加载并显示最新的更改。在浏览器中打开 http://localhost:1313 即可访问 Hugo 生成的网站。
启动:hugo server 后访问效果如下。
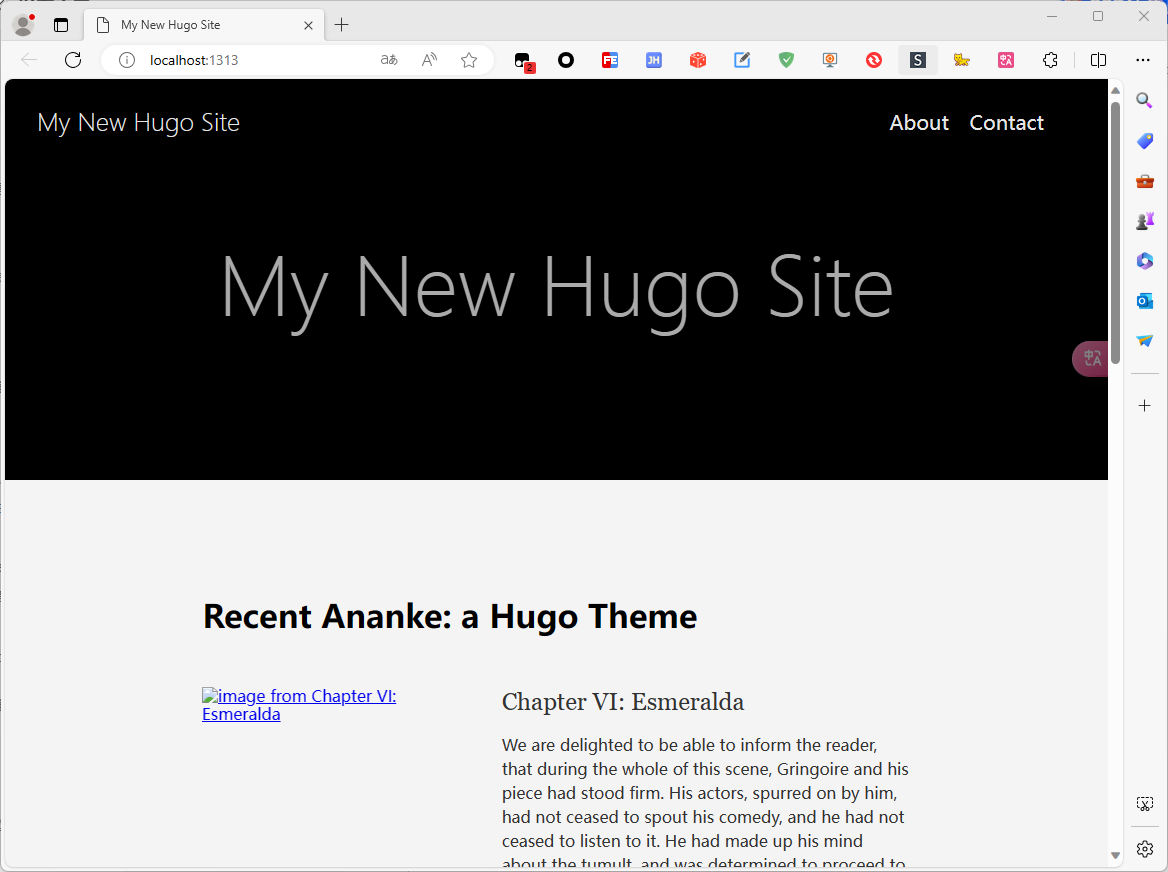
添加 博文,并启动
进入web 站点根目录,执行命令 hugo new post/test.md 或者 hugo new post/2021/test.md 创建博文。创建的文章会自动生成一部分文本。
如果嫌弃手动添加麻烦,目录 themes\ananke\exampleSite 是个样例站点,可以直接把 exampleSite 目录下的 "content目录 和 config.toml文件" 复制到自己创建站点的 根目录下,然后把 config.toml 里面的内容合并到 hugo.toml 里面,然后删除 config.toml

再次启动:hugo server 后访问效果如下

总结步骤:
hugo new site my_hugo_web_src # 创建名为 my_hugo_web_src 的目录,作为根目录
cd my_hugo_web_src
git init ##初始化仓库
git remote add origin https://github.com/caecarxu/caecarxu.github.io.git ##链接远程仓库
git add .
git commit -m "first commit"
git push -u origin master
在此之后更新文章,使用hugo生成新的静态页面,并使用git push进行同步
cd my_hugo_web_src
git add .
git status
git commit -m "add blog post"
git push
提示以下,commit -m 后面的东西是此次提交的备注,通常用来说明提交人的名字
或者
在仓库页面可以获取到 clone 链接 git@github.com:$USER_NAME/xxx.github.io.git
git init -b main
git remote add upstream git@github.com:$USER_NAME/xxx.github.io.gitgit push -f upstream main
这样就部署成功了,等待几分钟后,访问网址:xxx.github.io即可看到自己的博客内容。
将网站部署到 Github Pages
Hugo 提供非常详尽的 GitHub Pages 部署指引。步骤如下:
- 1. 部署到 Github Pages 时,需要把 hugo.toml 文件中 baseURL 修改为自己博客的网址,譬如 baseURL = "https://caecarxu.github.io/"
- 2. 然后执行 hugo 命令生成静态页面文件,执行成功后出现一个 public 文件夹,里面就是网站的静态页面文件
- 3. 进入 public 目录,把目录中所有文件上传到 xxx.github.io 的仓库中。
进入 public 文件夹,使用 git 上传文件
cd public
git init ##初始化仓库
git remote add origin https://github.com/caecarxu/caecarxu.github.io.git ##链接远程仓库
git add .
git commit -m "first commit"
git push -u origin main
在此之后更新文章,使用hugo生成新的静态页面,并使用git push进行同步
cd public
git add .
git status
git commit -m "add blog post"
git push - 4. 每当写完文章,运行
hugo命令,Hugo 将自动生成静态网站到public文件夹中,只需要将该文件夹的内容发布在网络上即可。
部署成功后,网站依然略显简陋,可以通过配置 hugo.toml 中的配置项增加你想要的功能
增加 About 页面
博客默认菜单只有 4 个页面选项:Home, Archives, Tags, Categories,如果想新增 About 页面,仅需以下 2 步:
- 新建 about 文件:hugo new about.md,命令将会创建
contents/about.md文件 - 在 about.md 文件的 Front Matter 中输入以下配置:
---
title: "About"
date: 2021-12-19T13:51:21+08:00
draft: false
menu: "main" # 在 main 新增选项
weight: 50 # About 选项的位置
---
重新部署博客,可以看到新增了 About 选项。
转移目录至侧边栏
添加评论系统
giscus 是一个基于 GitHub Discussions 的评论系统,包含多种主题可供选择。你应该首先跟随 utterances 配置方法了解可选配置项,并根据个人偏好自动生成一份包含个性化配置属性的 HTML 代码:
博客使用 utterances 作为评论系统:https://juejin.cn/post/6844903834712539150
giscus:https://giscus.app/zh-CN
给 hugo 博客添加评论功能:https://segmentfault.com/a/1190000039217582
SEO 优化
写博客不只是为了记录,也是为了更好地去(man)帮(zu)助(xu)别(rong)人(xin),为了让搜索引擎更好地收录你的博客文章,还需要做一些搜索引擎优化(SEO),Even 主题已经提供了丰富的 SEO 优化手段,我们只需设置一些配置项。
- 最好在
archtypes/default.md中增加keywords和description配置,便于搜索引擎索引。
keywords: []
description: "" -
网站目录 增加 robots 文件,便于爬虫爬取网页内容。不过 Even 已经提供了 robots 和相关的网页地图设置,因此这里无需操作。
-
提交博客地址到搜索引擎 Google
-
配置 Google Analytics,将获取到的 Tracking ID 配置到
config.toml中。
googleAnalytics = "" # UA-XXXXXXXX-X
使用 GitHub Action 自动发布文章
这里主要参考 搭建个人blog, 使用 master 分支发布文章,使用一个新的 source 分支进行写作,写作完成后上传 source ,GitHub Action 自动将 source 分支的 publish 文件夹拷贝到 master 分支,从而完成文章的发布。
主要步骤如下:
1. 在 GitHub 上的个人网站仓库
xxx.github.io新建source分支

2. 清除文件夹
xxx.github.io中的内容,并将个人网站quickstart中的所有内容 copy 到xxx.github.io:
git clone --branch=source https://github.com/xxx/xxx.github.io.git
rm -rf woot!*
cp -rf quickstart/* http://xxx.github.io
3. 生成
ACTIONS_DEPLOY_KEY
ssh-keygen -t rsa -b 4096 -C "$(git config user.email)" -f gh-pages -N ""
将生成的私钥文件gh-pages(注意不是公钥gh-pages.pub) 中的内容复制填写到 GitHub 仓库设置中,即在xxx.github.io项目主页中,找到 Repository Settings -> Secrets -> 添加这个私钥的内容并命名为ACTIONS_DEPLOY_KEY。
然后在xxx.github.io项目主页中,找到 Repository Settings -> Deploy Keys -> 添加这个公钥的内容,命名为ACTIONS_DEPLOY_KEY,并勾选 Allow write access。
4. 配置 workflow
创建 workflow 文件
mkdir -p .github/workflows/
touch .github/workflows/main.yml
在main.yaml中撰写 workflow,内容如下:
name: github pages
on:
push:
branches:
- source
jobs:
build-deploy:
runs-on: ubuntu-18.04
steps:
- uses: actions/checkout@master
- name: Checkout submodules
shell: bash
run: |
auth_header="$(git config --local --get http.https://github.com/.extraheader)"
git submodule sync --recursive
git -c "http.extraheader=$auth_header" -c protocol.version=2 submodule update --init --force --recursive --depth=1
- name: Setup Hugo
uses: peaceiris/actions-hugo@v2
with:
hugo-version: 'latest'
extended: true
- name: Build
run: hugo --gc --minify --cleanDestinationDir
- name: Deploy
uses: peaceiris/actions-gh-pages@v3
with:
deploy_key: ${{ secrets.ACTIONS_DEPLOY_KEY }}
publish_dir: ./public
publish_branch: main
注意,如果你的仓库是master分支作为主分支,将publish_branch后面的main修改为master;
5. 将 source 分支发送到远程
发送脚本deploy.sh:
#!/bin/bash
git add .
git commit -m "update article"
git push
推送到远程分支:
sh deploy.sh
推送成功后,可以在项目主页中的 action 里面查看自动部署是否成功,即 https://github.com/xxx/xxx.github.io/actions;
hugo 主题 推荐
最好的搜索方式是在 https://github.com/ 中,搜索关键词:hugo theme
或者使用 搜索引擎,搜索:hugo theme site:github.com
github 搜索 主题
:https://github.com/search?q=hugo+theme&type=repositories
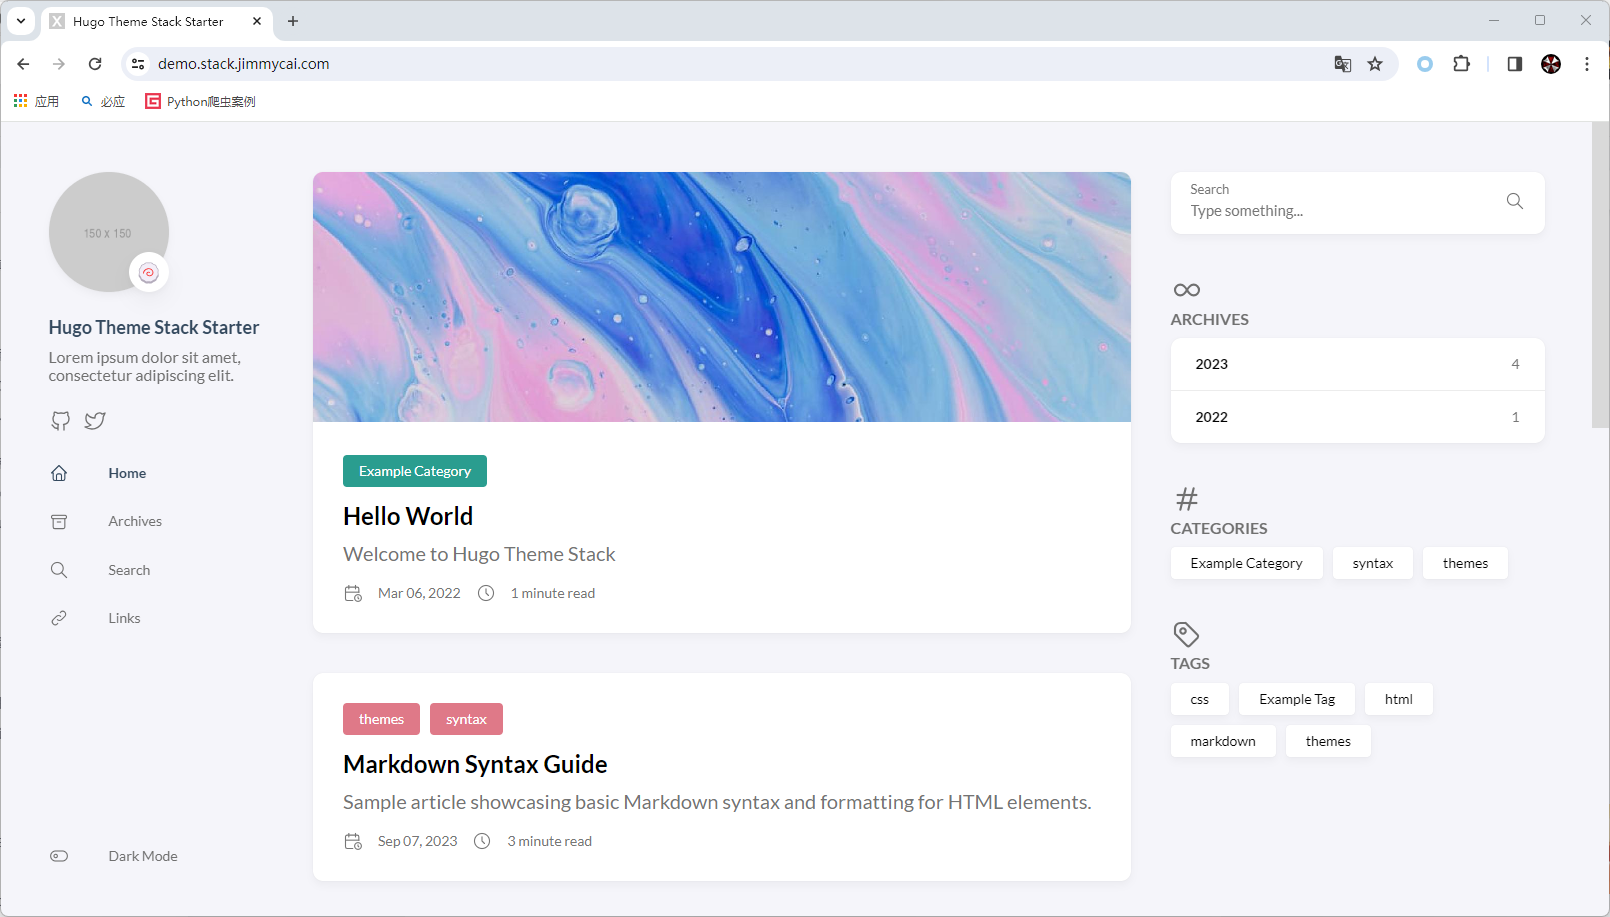
hugo-theme-stack 主题示例:https://demo.stack.jimmycai.com/
手动安装部署:https://stack.jimmycai.com/guide/getting-started
自动化安装部署:https://github.com/CaiJimmy/hugo-theme-stack-starter
Hugo 主题库 搜索
HBS 主题:Bootstrap Theme for Personal Blog and Documentations
:https://themes.gohugo.io/themes/hugo-theme-bootstrap/
Hugo 流行主题 MemE:Github 地址:https://github.com/reuixiy/hugo-theme-meme
Hugo 流行主题 Clarity:Github 地址:https://github.com/chipzoller/hugo-clarity
Hugo 流行主题 Even:Github 地址:https://github.com/olOwOlo/hugo-theme-even
Hugo 流行主题 Octopress:Github 地址:https://github.com/parsiya/Hugo-Octopress
Hugo 流行主题 Tokiwa:Github 地址:https://github.com/heyeshuang/hugo-theme-tokiwa
从Hexo迁移到Hugo-送漂亮的Hugo Theme主题:https://zhuanlan.zhihu.com/p/40997372
知乎:有哪些好看的Hugo主题:https://www.zhihu.com/question/266175192
Hugo NexT 最新主题:https://gitee.com/hugo-next/hugo-theme-next
自动化 部署
:https://blog.taoluyuan.com/posts/github-workflows/
可以通过 Github workflows CI/CD 自动化部署 Github Pages hugo 免费博客
GitHub Actions 介绍
- GitHub 文档:https://docs.github.com/zh/actions/learn-github-actions/understanding-github-actions
- 官方介绍:
GitHub Actions是一种持续集成和持续交付 (CI/CD) 平台,可用于自动执行生成、测试和部署管道。 可以创建工作流程来构建和测试存储库的每个拉取请求,或将合并的拉取请求部署到生产环境
流程及原理介绍
主要介绍使用GitHub Actions 来实现自动化部署博客网站 ,静态网站生成使用的是Hugo,部署使用的是Github pages,并且使用自定义域名。
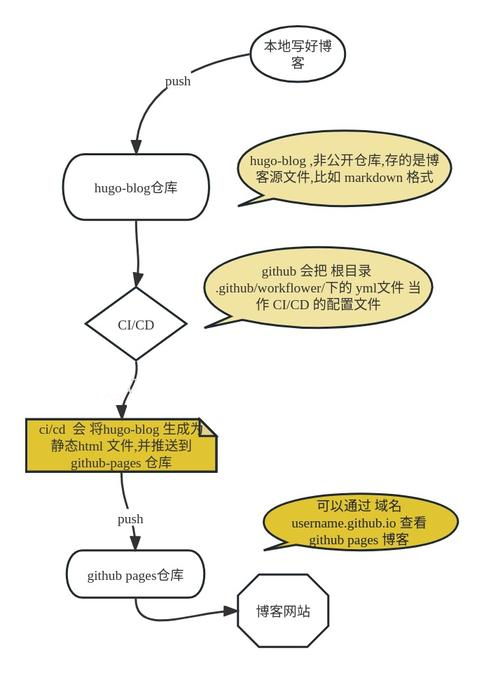
- 本地写hugo-blog 博客,hugo-blog 是一个hugo的博客模板,使用
hugo new site hugo-blog命令创建,可以在里面写markdown文件 - 写好后推送到github hugo-blog 仓库,触发github actions ci/cd,执行hugo命令生成静态网站,并且推送到github-pages 仓库
- github-pages 仓库接收到推送后,会自动部署到github pages,公网可以通过 github pages 域名 访问,也可以通过CNAME配置自定义域名访问
Github Pages 介绍
- Github Pages 是一个静态网站托管服务,可以通过github pages 托管静态网站,并且可以通过自定义域名访问
- 创建github pages 仓库,仓库名必须是
username.github.io格式,username是你的github用户名,仓库名必须是这个,否则无法部署成功 访问地址就是 https://username.github.io - 自定义域名访问,例如
www.abc.com,在域名服务商添加CNAME记录,指向username.github.io, 然后在github pages 仓库设置中添加自定义域名, 这样通过www.abc.com 就能访问github pages - 下面的 Actions 部分会介绍如何自动化部署到github pages,并且配置自定义域名
Hugo 介绍
- Hugo 是一个静态网站生成器,可以通过markdown文件生成静态网站,官网:https://gohugo.io/
- 写好markdown文件后,执行hugo命令,在public目录生成静态网站,然后 将public目录推送到github pages 仓库
- github actions工作流 就是通过hugo命令生成静态网站,并且推送到github pages 仓库
使用 Github Actions 自动化部署
创建 Github Actions。在github 仓库中(hugo-blog)创建.github/workflows目录,并且在目录中创建deploy.yml文件,文件名可以自定义,但是后缀必须是yml,例如deploy.yml,这样就创建了一个github actions,并且会自动执行,下面介绍我的deploy.yml文件
name: deploy

on:
    push:
    workflow_dispatch:
jobs:
    build:
        runs-on: ubuntu-latest
        steps:
            - name: Checkout
              uses: actions/checkout@v2
              with:
                  submodules: true
                  fetch-depth: 0

            - name: Setup Hugo
              uses: peaceiris/actions-hugo@v2
              with:
                  hugo-version: "latest"

            - name: Build Web
              run: hugo

            - name: Deploy Web
              uses: peaceiris/actions-gh-pages@v3
              with:
                  PERSONAL_TOKEN: ${{ secrets.BLOG_TOKEN }}
                  EXTERNAL_REPOSITORY: webws/webws.github.io
                  PUBLISH_BRANCH: master
                  PUBLISH_DIR: ./public
                  commit_message: ${{ github.event.head_commit.message }}
                  cname: ${{ secrets.DOMAIN }}
上面 GitHub Actions配置文件用于自动部署Hugo博客到我的 GitHub Pages。以下是每个步骤的功能和解释:
- 步骤1:Checkout。此步骤使用
actions/checkout插件来检出 GitHub 仓库,具体使用文档地址是 checkoutsubmodules: true参数用于同时检出子模块,fetch-depth: 0用于完整地检出所有历史记录。 - 步骤2:Setup Hugo。此步骤使用
peaceiris/actions-hugo插件来安装最新版本的 Hugo。- name: Setup Hugo uses: peaceiris/actions-hugo@v2 with: hugo-version: "latest" - 步骤3:Build Web。此步骤在运行时调用 Hugo 构建静态网站,并在
public目录中生成静态html 文件- name: Build Web run: hugo - 步骤4:Deploy Web。此步骤使用
peaceiris/actions-gh-pages插件将静态网站部署到 GitHub Pages 上。- name: Deploy Web uses: peaceiris/actions-gh-pages@v3 with: PERSONAL_TOKEN: ${{ secrets.BLOG_TOKEN }} EXTERNAL_REPOSITORY: webws/webws.github.io PUBLISH_BRANCH: master PUBLISH_DIR: ./public commit_message: ${{ github.event.head_commit.message }} cname: ${{ secrets.DOMAIN }}
参数的含义:
PERSONAL_TOKEN: GitHub Personal Access Tokens 用于访问 GitHub 仓库,需要到github Personal access tokens设置添加权限,并将Token存储在仓库的Secrets中供Workflow使用EXTERNAL_REPOSITORY: 部署到的 GitHub Pages 仓库,webws/webws.github.io 是我的github pages 仓库,需要修改为你的github pages 仓库PUBLISH_BRANCH: 要在其上部署站点的分支名称(通常为master)。PUBLISH_DIR: hugo 静态html文件目录。(在此例中,Hugo 输出位于./public目录中)。commit_message: 提交更改时使用的提交消息,从上游分支获取。cname: 自定义域名,CNAME记录,我自己的是 blog.taoluyuan.com,需要修改为你的自定义域名,如果没有,可以删除这个参数,使用默认的github pages域名也访问 webws.github.io
设置 Secrets 变量,对应 yml 文件中的 PERSONAL_TOKEN 和 DOMAIN ,具体设置 在 仓库中(hugo-blog) 的 Settings -> secrets and variables->actions 中,hugo-blog 要换成你自己的仓库名
BLOG_TOKEN: GitHub Personal Access Token。DOMAIN: 你的自定义域名。
触发 Github Actions
- 在github 仓库中(hugo-blog)创建.md文件,并且提交到github,这样就会触发github actions,自动部署到github pages 仓库,并且可以通过自定义域名访问了
- 可以通过 仓库中 Actions 标签查看部署状态
访问 Github Pages
- 通过github pages域名访问, https://webws.github.io,因为我设置了自定义域名,所以这个域名会自动跳转到 https://blog.taoluyuan.com
- 通过自定义域名访问, https://blog.taoluyuan.com
搭建个人主页or博客网站

旨在为数千万中国开发者提供一个无缝且高效的云端环境,以支持学习、使用和贡献开源项目。
更多推荐


 20
20 0
0- 0


 已为社区贡献35条内容

所有评论(0)