
写给工程师的 MacBook 商用级大模型知识库部署方案
本文介绍了如何在自己的 MacBook 上部署一套知识库方案辅助自己的知识管理工作,希望能给每位计划自己搭建大模型知识库应用的工程师一点参考。背景历史的车轮滚滚向前,大模型技术发展日新月异,每天都有新鲜的技术出炉,让人目不暇接,同时具备可玩性和想象空间的各种应用和开源库,仿佛让自己回到了第一次设置 JAVA_HOME 的日子,作为一枚古典工程师,我专门挑了个可能对手上工作有帮助的方向小试一把,尝试

本文介绍了如何在自己的 MacBook 上部署一套知识库方案辅助自己的知识管理工作,希望能给每位计划自己搭建大模型知识库应用的工程师一点参考。

背景
历史的车轮滚滚向前,大模型技术发展日新月异,每天都有新鲜的技术出炉,让人目不暇接,同时具备可玩性和想象空间的各种应用和开源库,仿佛让自己回到了第一次设置 JAVA_HOME 的日子,作为一枚古典工程师,我专门挑了个可能对手上工作有帮助的方向小试一把,尝试在自己的 MacBook 上部署一套知识库方案,看看能不能辅助自己的知识管理工作。
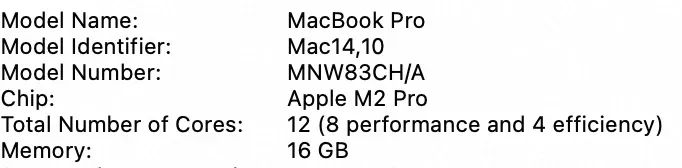
我自己的 Macbook 配置情况如下,可以流畅地运行没问题。经过量化处理的大模型,还是对办公本很友好的。
为什么要在 MacBook 搭建而不是直接采用现成的云服务呢?最核心最重要的是我们手上的文档资料出于安全要求,不能随便上传云服务,也就无法实际验证知识库的实际效用;另外对于工程师来说,自己亲手搭建一个完整的方案、能灵活调整和对接各种不同的模型、评测各种模型不同的表现,也是出于对技术的探索本能使然。
鉴于大模型已经是大模型及其周边概念已经是大家耳熟能详的东西,我这里就不再重复阐述相关的基础概念和理论了,直接进入动手环节,以用最快的速度部署起一个可用的知识库平台为目标,先用起来,再分各个环节优化。

方案概述
▐ 应用架构
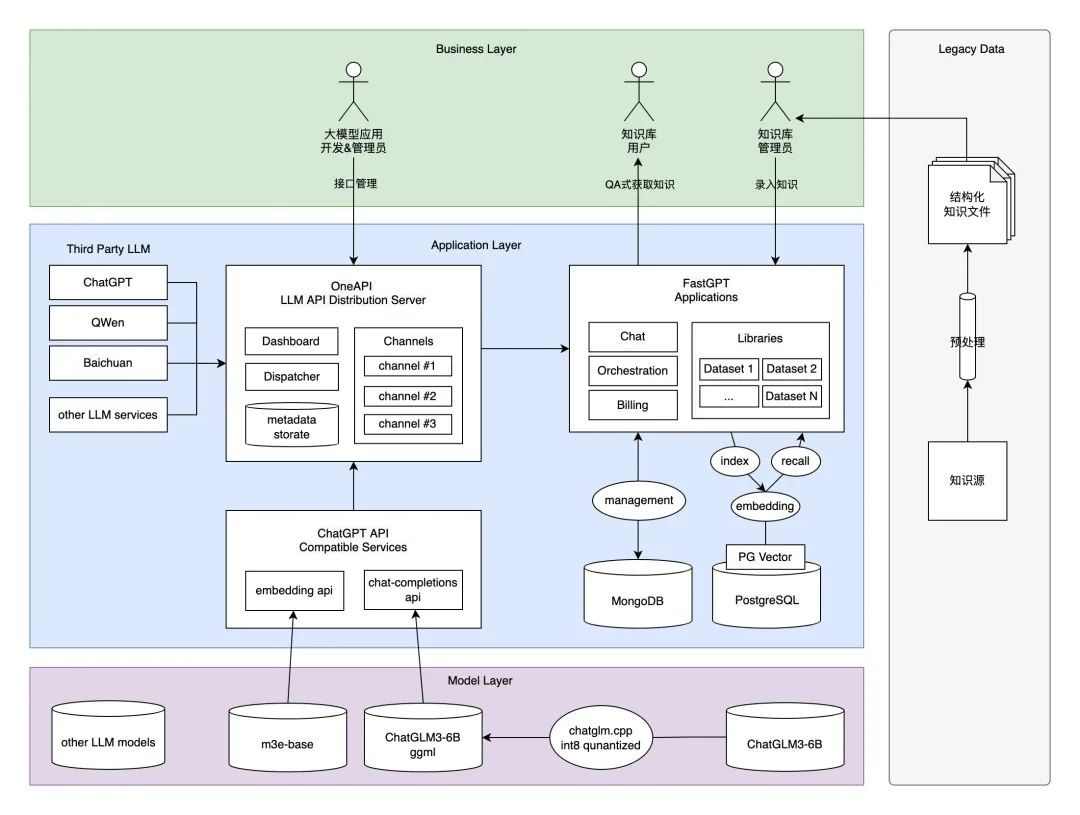
首先来看一下最终方案的应用架构是什么样子(下图)。在这套方案中,我们采用实力排上游、并且在使用上对学术和商业都友好的国产大模型 ChatGLM3-6B 对话模型和基于 m3e-base 模型的 embedding search RAG 方案;基于这两个模型封装和 ChatGPT 兼容的 API 接口协议;通过引入 One API 接口管理&分发系统,形成统一的 LLM 接口渠道管理平台规范,并把封装好的接口协议注册进去;搭建与 Dify.ai 齐名的开源大模型知识库平台管理系统 FastGPT,实现集私有知识数据源预处理、嵌入检索、大模型对话一体的完整知识库应用流程。麻雀虽小五脏俱全,最终形成一套既满足商用标准、又能在 MacBook 跑起来的的方案。虽然智能程度和实际需求还有一定差距,但至少我们在不用额外购买显卡或云服务的情况下,以最小成本部署运行、并且能导入实际业务数据(如语雀知识库)进行实操验证,值得每位工程师都来动手尝试一下。
▐ 成型展示
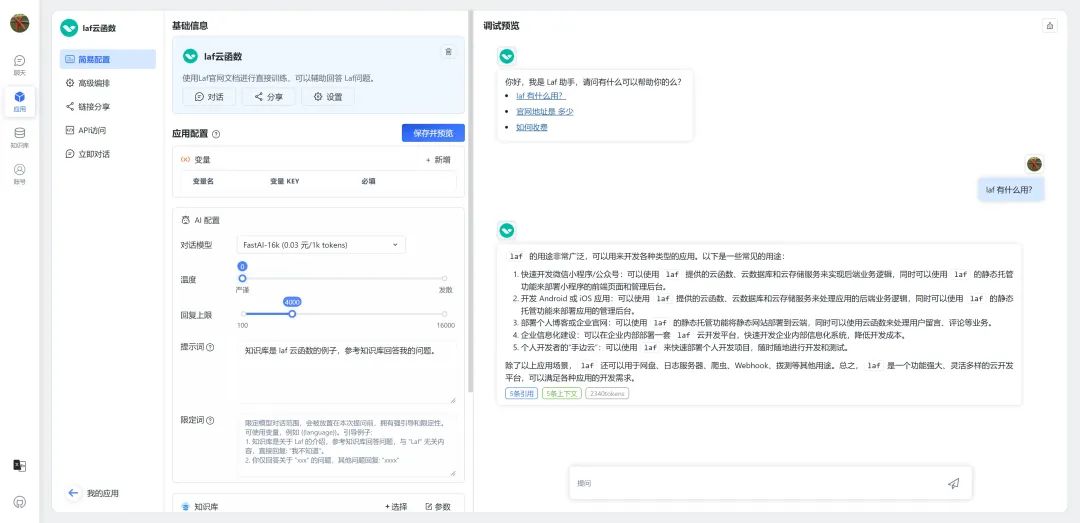
在用户终端,我们基于 FastGPT 提供知识库管理及使用方案。引用其官网介绍:FastGPT 是一个基于 LLM 大语言模型的知识库问答系统,提供开箱即用的数据处理、模型调用等能力。同时可以通过 Flow 可视化进行工作流编排,从而实现复杂的问答场景。
先放一张官网上的图片,来增加一点吸引朋友们动手操作的动力:
▐ 部署要点
本套方案部署分为四个主要环节、14个具体步骤,只要一步步实操下去,每位朋友都可以在自己的本本上拥有属于自己的私有大模型知识库系统,步骤清单如下:
主要环节 | 详细步骤 |
一、准备大模型 | 1.1 下载对话语言模型 ChatGLM3-6B 1.2 下载文本嵌入模型 m3e-base 1.3 使用 chatglm.cpp 对 ChatGLM3-6B 进行量化加速 1.4 验证模型问答效果 |
二、搭建模型API服务 | 2.1 搭建模型API 2.2 搭建 One API 接口管理/分发系统 2.3 验证模型接口能力 |
三、搭建知识库应用 | 3.1 安装 MongoDB 3.2 安装 PostgreSQL & pgvector 3.3 搭建 FastGPT 知识库问答系统 3.4 验证模型对话能力 |
四、知识库问答实战 | 4.1 准备知识库语料 4.2 导入知识库数据 4.3 验证知识库问答效果 |
部分步骤可以简单地通过 Docker 镜像一键部署完成,但本着对细节一杆子插到底的部署思路,还是采取了纯手工作业的方法。注意,下面的步骤中仅包含了关键的命令,完整的命令可以参考对应系统的官网介绍。部分安装步骤如果速度不够理想,可以考虑采用国内源,包含但不限于 go、brew、pip、npm 等。

详细步骤
▐ 准备离线模型
这个环节我们的主要任务是把模型文件准备好、完成量化,并通过命令行的方式,进行交互式对话验证。
下载对话语言模型 ChatGLM3-6B
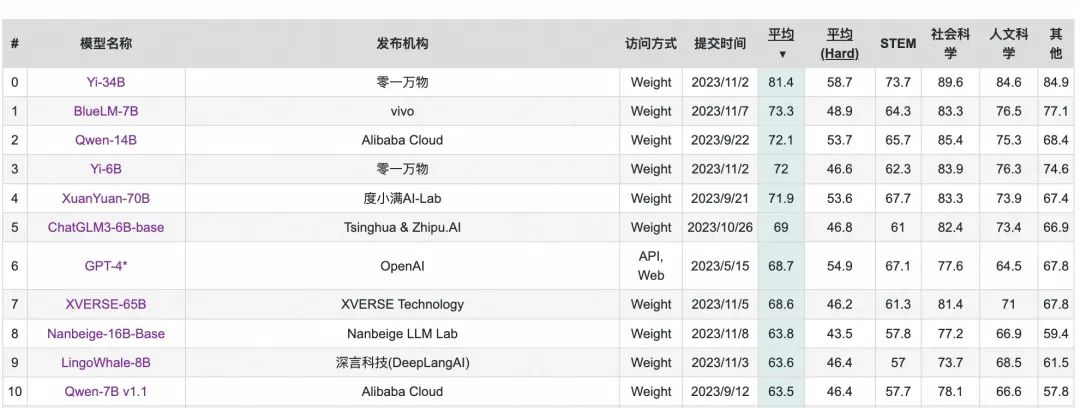
为什么选择 ChatGLM3-6B?常年霸榜的开源国产之光。ChatGLM3 一共开源了对话模型 ChatGLM-6B、基础模型 ChatGLM-6B-Base、长文本对话模型 ChatGLM3-6B-32K,对学术研究完全开放,在填写问卷进行登记后亦允许免费商业使用。无论是用来做上手实践还是微调练习,目前看来都是比较好的选择。
其实最重要的是,看看排行榜上的可选项,我的 MacBook 16G 内存只能带得动 ChatGLM3-6B 量化版本:
ChatGLM3-6B 现在比较方便的下载渠道有 HuggingFace 和 ModelScope,但是很明显能直接下载下来的可能性不大,所以我用家里的旧电脑科学下载后放到私有云CDN上,然后再用公司电脑下载,也方便未来随时随地取用,就是要花点小钱。ModelScope 也试过,不能直接下载文件,并且用 git clone 速度也不太理想,遂放弃。
如果用老一点的版本 ChatGLM2-6B 的话,网上也能找到一些比较好用的第三方镜像站。
HuggingFace:THUDM/chatglm3-6b
ModelScope:ZhipuAI/chatglm3-6b(地址:https://modelscope.cn/models/ZhipuAI/chatglm3-6b/summary)
// 从 Git 仓库下载模型文件
// HuggingFace
git lfs install
git clone https://huggingface.co/THUDM/chatglm3-6b


// ModelScope
git lfs install
git clone https://www.modelscope.cn/ZhipuAI/chatglm3-6b.git
下载文本嵌入模型 m3e-base
为什么选择 moka-ai 的 M3E 模型 m3e-base?M3E 向量模型属于小模型,资源使用不高,CPU 也可以运行,使用场景主要是中文,少量英文的情况。用来验证我们的知识库系统足够了
官方下载地址:moka-ai/m3e-base,先把所有的模型文件 download 下来,后面使用
使用 chatglm.cpp 对 ChatGLM3-6B 进行量化加速
当我第一次知道 chatglm.cpp,只能说好人一生平安,chatglm.cpp 的出现拯救了纯 MacBook 党,让我们能在(低性能的)果本上基于 CPU 进行推理,也不会损失过多的精度。(其实损失多少我也不知道,不影响我们正常进行工程部署验证就行)
Github Repo: https://github.com/li-plus/chatglm.cpp
我使用的 Python 版本:3.11,最好单独准备一个 virtualenv

安装依赖:
cd /Users/yaolu/AGI/github/chatglm.cpp


# 先初始化 git 仓库
git submodule update --init --recursive


# 构建可执行文件
cmake -B build
cmake --build build -j


# 安装 Python 依赖
pip install .
如果发生 No module named 'chatglm_cpp._C' 的错误,把编译出来的文件 _C.cpython-311-darwin.so 放到 chatglm_cpp 目录下。
对 ChatGLM3-6B 进行 8-bit 量化处理:
python ./chatglm_cpp/convert.py -i /Users/yaolu/AGI/huggingface/THUDM/chatglm3-6b -t q8_0 -o chatglm3-ggml-q8.bin如果电脑带不动,还可以尝试 4-bit、5-bit 参数量化,完整参数列表见 chatglm.cpp 的 quantization types
验证模型问答效果
完成模型量化后,就可以在本地把大模型跑起来了,命令如下:
./build/bin/main -m chatglm3-ggml-q8.bin -i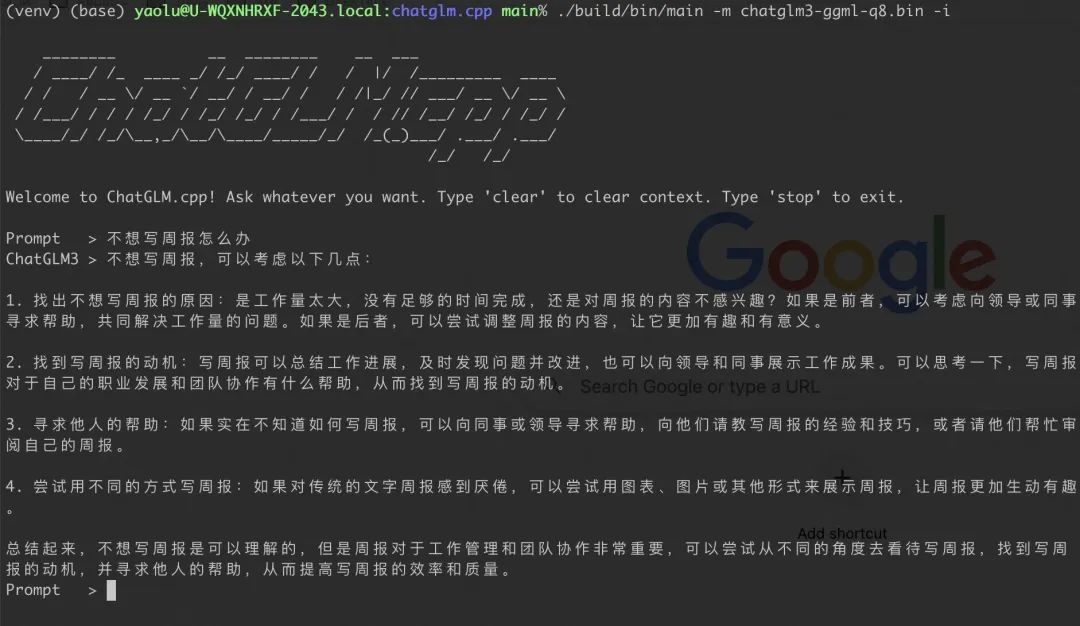
▐ 搭建模型API服务
我们在这个环节要完成的任务是,按照 ChatGPT 的接口规范、基于 FastAPI 封装 ChatGLM3-6B 的对话和 m3e-base 的嵌入能力;并注册到 One API 接口管理/分发系统中。
搭建模型API
用 chatglm.cpp 自带的 openai_api.py 魔改了一下,使其支持完成对话和文本 embedding 的两个核心调用:
/v1/chat/completions
/v1/embeddings
代码如下:
import asyncio
import logging
import time
from typing import List, Literal, Optional, Union


import chatglm_cpp
from fastapi import FastAPI, HTTPException, status, Depends
from fastapi.middleware.cors import CORSMiddleware
from pydantic import BaseModel, Field#, computed_field
#from pydantic_settings import BaseSettings
from sse_starlette.sse import EventSourceResponse


from sentence_transformers import SentenceTransformer
from sklearn.preprocessing import PolynomialFeatures
import numpy as np
import tiktoken


logging.basicConfig(level=logging.INFO, format=r"%(asctime)s - %(module)s - %(levelname)s - %(message)s")


class Settings(object):
    model: str = "/Users/yaolu/AGI/github/chatglm.cpp/chatglm3-ggml-q8.bin"
    num_threads: int = 0


class ChatMessage(BaseModel):
    role: Literal["system", "user", "assistant"]
    content: str


class DeltaMessage(BaseModel):
    role: Optional[Literal["system", "user", "assistant"]] = None
    content: Optional[str] = None


class ChatCompletionRequest(BaseModel):
    model: str = "default-model"
    messages: List[ChatMessage]
    temperature: float = Field(default=0.95, ge=0.0, le=2.0)
    top_p: float = Field(default=0.7, ge=0.0, le=1.0)
    stream: bool = False
    max_tokens: int = Field(default=2048, ge=0)


    model_config = {
        "json_schema_extra": {"examples": [{"model": "default-model", "messages": [{"role": "user", "content": "你好"}]}]}
    }


class ChatCompletionResponseChoice(BaseModel):
    index: int = 0
    message: ChatMessage
    finish_reason: Literal["stop", "length"] = "stop"


class ChatCompletionResponseStreamChoice(BaseModel):
    index: int = 0
    delta: DeltaMessage
    finish_reason: Optional[Literal["stop", "length"]] = None


class ChatCompletionUsage(BaseModel):
    prompt_tokens: int
    completion_tokens: int


    #@computed_field
    @property
    def total_tokens(self) -> int:
        return self.prompt_tokens + self.completion_tokens


class ChatCompletionResponse(BaseModel):
    id: str = "chatcmpl"
    model: str = "default-model"
    object: Literal["chat.completion", "chat.completion.chunk"]
    created: int = Field(default_factory=lambda: int(time.time()))
    choices: Union[List[ChatCompletionResponseChoice], List[ChatCompletionResponseStreamChoice]]
    usage: Optional[ChatCompletionUsage] = None


    model_config = {
        "json_schema_extra": {
            "examples": [
                {
                    "id": "chatcmpl",
                    "model": "default-model",
                    "object": "chat.completion",
                    "created": 1691166146,
                    "choices": [
                        {
                            "index": 0,
                            "message": {"role": "assistant", "content": "你好👋!我是人工智能助手 ChatGLM2-6B,很高兴见到你,欢迎问我任何问题。"},
                            "finish_reason": "stop",
                        }
                    ],
                    "usage": {"prompt_tokens": 17, "completion_tokens": 29, "total_tokens": 46},
                }
            ]
        }
    }


settings = Settings()
app = FastAPI()
app.add_middleware(
    CORSMiddleware, allow_origins=["*"], allow_credentials=True, allow_methods=["*"], allow_headers=["*"]
)
pipeline = chatglm_cpp.Pipeline(settings.model)
lock = asyncio.Lock()


embeddings_model = SentenceTransformer('/Users/yaolu/AGI/huggingface/moka-ai/m3e-base', device='cpu')


def stream_chat(history, body):
    yield ChatCompletionResponse(
        object="chat.completion.chunk",
        choices=[ChatCompletionResponseStreamChoice(delta=DeltaMessage(role="assistant"))],
    )


    for piece in pipeline.chat(
        history,
        max_length=body.max_tokens,
        do_sample=body.temperature > 0,
        top_p=body.top_p,
        temperature=body.temperature,
        num_threads=settings.num_threads,
        stream=True,
    ):
        yield ChatCompletionResponse(
            object="chat.completion.chunk",
            choices=[ChatCompletionResponseStreamChoice(delta=DeltaMessage(content=piece))],
        )


    yield ChatCompletionResponse(
        object="chat.completion.chunk",
        choices=[ChatCompletionResponseStreamChoice(delta=DeltaMessage(), finish_reason="stop")],
    )


async def stream_chat_event_publisher(history, body):
    output = ""
    try:
        async with lock:
            for chunk in stream_chat(history, body):
                await asyncio.sleep(0)  # yield control back to event loop for cancellation check
                output += chunk.choices[0].delta.content or ""
                yield chunk.model_dump_json(exclude_unset=True)
        logging.info(f'prompt: "{history[-1]}", stream response: "{output}"')
    except asyncio.CancelledError as e:
        logging.info(f'prompt: "{history[-1]}", stream response (partial): "{output}"')
        raise e


@app.post("/v1/chat/completions")
async def create_chat_completion(body: ChatCompletionRequest) -> ChatCompletionResponse:
    # ignore system messages
    history = [msg.content for msg in body.messages if msg.role != "system"]
    if len(history) % 2 != 1:
        raise HTTPException(status.HTTP_400_BAD_REQUEST, "invalid history size")


    if body.stream:
        generator = stream_chat_event_publisher(history, body)
        return EventSourceResponse(generator)


    max_context_length = 512
    output = pipeline.chat(
        history=history,
        max_length=body.max_tokens,
        max_context_length=max_context_length,
        do_sample=body.temperature > 0,
        top_p=body.top_p,
        temperature=body.temperature,
    )
    logging.info(f'prompt: "{history[-1]}", sync response: "{output}"')
    prompt_tokens = len(pipeline.tokenizer.encode_history(history, max_context_length))
    completion_tokens = len(pipeline.tokenizer.encode(output, body.max_tokens))


    return ChatCompletionResponse(
        object="chat.completion",
        choices=[ChatCompletionResponseChoice(message=ChatMessage(role="assistant", content=output))],
        usage=ChatCompletionUsage(prompt_tokens=prompt_tokens, completion_tokens=completion_tokens),
    )


class EmbeddingRequest(BaseModel):
    input: List[str]
    model: str


class EmbeddingResponse(BaseModel):
    data: list
    model: str
    object: str
    usage: dict


def num_tokens_from_string(string: str) -> int:
    """Returns the number of tokens in a text string."""
    encoding = tiktoken.get_encoding('cl100k_base')
    num_tokens = len(encoding.encode(string))
    return num_tokens


def expand_features(embedding, target_length):
    poly = PolynomialFeatures(degree=2)
    expanded_embedding = poly.fit_transform(embedding.reshape(1, -1))
    expanded_embedding = expanded_embedding.flatten()
    if len(expanded_embedding) > target_length:
        # 如果扩展后的特征超过目标长度,可以通过截断或其他方法来减少维度
        expanded_embedding = expanded_embedding[:target_length]
    elif len(expanded_embedding) < target_length:
        # 如果扩展后的特征少于目标长度,可以通过填充或其他方法来增加维度
        expanded_embedding = np.pad(expanded_embedding, (0, target_length - len(expanded_embedding)))
    return expanded_embedding


@app.post("/v1/embeddings", response_model=EmbeddingResponse)
async def get_embeddings(request: EmbeddingRequest):


    # 计算嵌入向量和tokens数量
    embeddings = [embeddings_model.encode(text) for text in request.input]


    # 如果嵌入向量的维度不为1536,则使用插值法扩展至1536维度
    embeddings = [expand_features(embedding, 1536) if len(embedding) < 1536 else embedding for embedding in embeddings]


    # Min-Max normalization
    embeddings = [embedding / np.linalg.norm(embedding) for embedding in embeddings]


    # 将numpy数组转换为列表
    embeddings = [embedding.tolist() for embedding in embeddings]
    prompt_tokens = sum(len(text.split()) for text in request.input)
    total_tokens = sum(num_tokens_from_string(text) for text in request.input)


    response = {
        "data": [
            {
                "embedding": embedding,
                "index": index,
                "object": "embedding"
            } for index, embedding in enumerate(embeddings)
        ],
        "model": request.model,
        "object": "list",
        "usage": {
            "prompt_tokens": prompt_tokens,
            "total_tokens": total_tokens,
        }
    }


    return response


class ModelCard(BaseModel):
    id: str
    object: Literal["model"] = "model"
    owned_by: str = "owner"
    permission: List = []


class ModelList(BaseModel):
    object: Literal["list"] = "list"
    data: List[ModelCard] = []


    model_config = {
        "json_schema_extra": {
            "examples": [
                {
                    "object": "list",
                    "data": [{"id": "gpt-3.5-turbo", "object": "model", "owned_by": "owner", "permission": []}],
                }
            ]
        }
    }


@app.get("/v1/models")
async def list_models() -> ModelList:
    return ModelList(data=[ModelCard(id="gpt-3.5-turbo")])
让他跑起来的命令,跑在8000端口下:
uvicorn chatglm_cpp.openai_api:app --host 127.0.0.1 --port 8000运行该程序所需的 Python 依赖项:
accelerate==0.24.1
aiofiles==23.2.1
aiohttp==3.8.6
aiosignal==1.3.1
altair==5.1.2
annotated-types==0.6.0
anyio==3.7.1
async-timeout==4.0.3
attrs==23.1.0
blinker==1.7.0
cachetools==5.3.2
certifi==2023.7.22
charset-normalizer==3.3.2
click==8.1.7
contourpy==1.2.0
cpm-kernels==1.0.11
cycler==0.12.1
fastapi==0.103.2
ffmpy==0.3.1
filelock==3.13.1
fonttools==4.44.0
frozenlist==1.4.0
fsspec==2023.10.0
gitdb==4.0.11
GitPython==3.1.40
gradio==3.50.2
gradio_client==0.6.1
h11==0.14.0
httpcore==1.0.2
httpx==0.25.1
huggingface-hub==0.19.1
idna==3.4
importlib-metadata==6.8.0
importlib-resources==6.1.1
Jinja2==3.1.2
joblib==1.3.2
jsonschema==4.19.2
jsonschema-specifications==2023.7.1
kiwisolver==1.4.5
latex2mathml==3.76.0
linkify-it-py==2.0.2
Markdown==3.5.1
markdown-it-py==2.2.0
MarkupSafe==2.1.3
matplotlib==3.8.1
mdit-py-plugins==0.3.3
mdtex2html==1.2.0
mdurl==0.1.2
mpmath==1.3.0
multidict==6.0.4
networkx==3.2.1
nltk==3.8.1
numpy==1.26.2
orjson==3.9.10
packaging==23.2
pandas==2.1.3
Pillow==10.1.0
protobuf==4.25.0
psutil==5.9.6
pyarrow==14.0.1
pydantic==2.1.1
pydantic_core==2.4.0
pydeck==0.8.1b0
pydub==0.25.1
Pygments==2.16.1
pyparsing==3.1.1
python-dateutil==2.8.2
python-multipart==0.0.6
pytz==2023.3.post1
PyYAML==6.0.1
referencing==0.30.2
regex==2023.10.3
requests==2.31.0
rich==13.6.0
rpds-py==0.12.0
safetensors==0.4.0
scikit-learn==1.3.2
scipy==1.11.3
semantic-version==2.10.0
sentence-transformers==2.2.2
sentencepiece==0.1.99
six==1.16.0
smmap==5.0.1
sniffio==1.3.0
sse-starlette==1.6.5
starlette==0.27.0
streamlit==1.28.2
sympy==1.12
tabulate==0.9.0
tenacity==8.2.3
threadpoolctl==3.2.0
tiktoken==0.5.1
tokenizers==0.13.3
toml==0.10.2
toolz==0.12.0
torch==2.1.0
torchvision==0.16.0
tornado==6.3.3
tqdm==4.66.1
transformers==4.30.2
typing_extensions==4.6.1
tzdata==2023.3
tzlocal==5.2
uc-micro-py==1.0.2
urllib3==2.1.0
uvicorn==0.24.0.post1
validators==0.22.0
websockets==11.0.3
yarl==1.9.2
zipp==3.17.0
搭建 One API 接口管理/分发系统
One API是一套兼容多种 LLM 接口规范的 API 路由方案,支持限额和计费管理,通过标准的 OpenAI API 格式访问所有的大模型,开箱即用,其多模型渠道接入、多用户管理、费用管理、额度管理、以及集群化部署支持等功能,对商用场景都很友好。项目使用 MIT 协议进行开源。
One API 基于 Go 和 Node.js 开发,搭建之前准备好,我的版本是:go1.21.4、Node.js v20.9.0,构建命令如下:
git clone https://github.com/songquanpeng/one-api.git


# 构建前端
cd one-api/web
npm install
npm run build


# 构建后端
cd ..
go mod download
go build -ldflags "-s -w" -o one-api
One API 里面预置了很多市面上的可用模型接口,好处是可以直接使用无需配置,缺点是没有添加自定义(本地)接口的能力。由于我们是自己搭建的 LLM 和 embedding 服务,需要修改其源代码,增加 ChatGLM3 和 m3e-base 的选项。
改动涉及两个文件,分别是 common/model-ratio.go 和 controller/model.go,改动内容如下图:
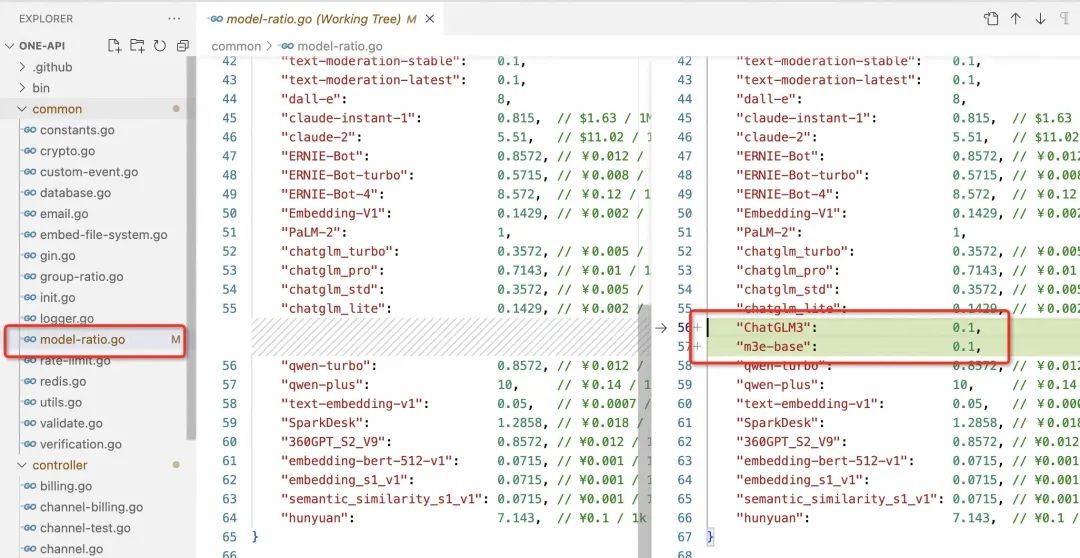

注意,改完文件后记得重新编译可执行文件。本地的元数据存储我使用了 MySQL,编译+启动命令是:
go build -ldflags "-s -w" -o one-api
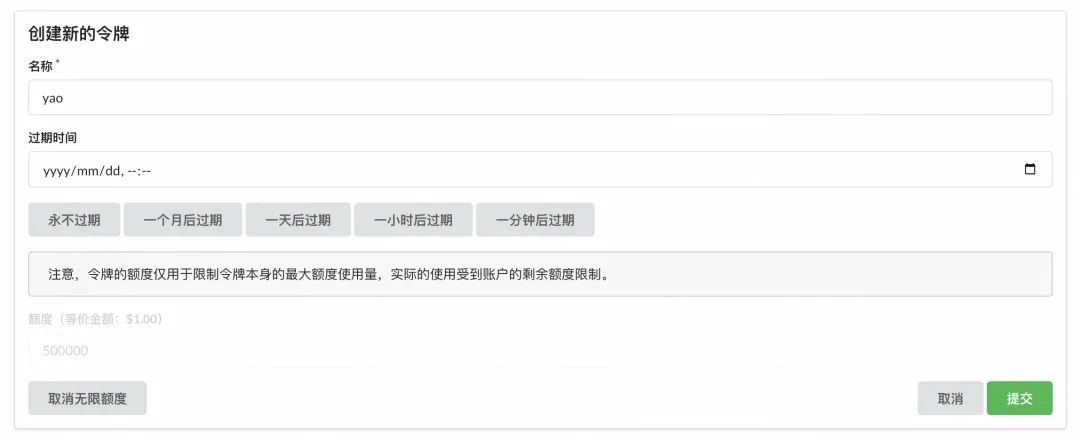
export SQL_DSN=oneapi:oneapi@tcp(localhost:3306)/oneapi && ./one-api --port 3001 --log-dir ./log初始登录进去,创建一个新令牌用于权限管控和计费:
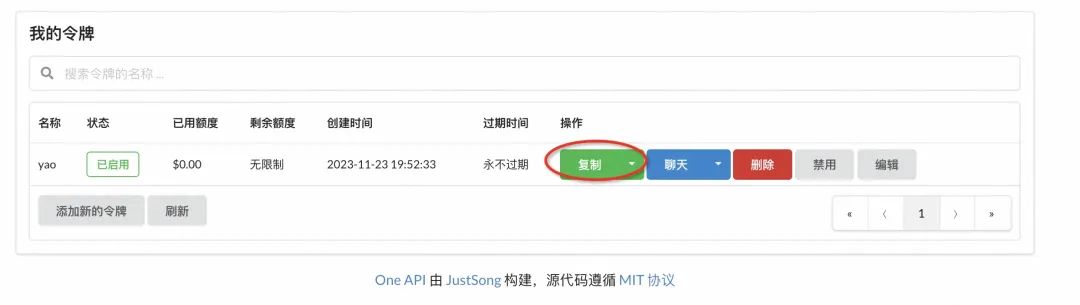
令牌可以从这里复制,下面有用:
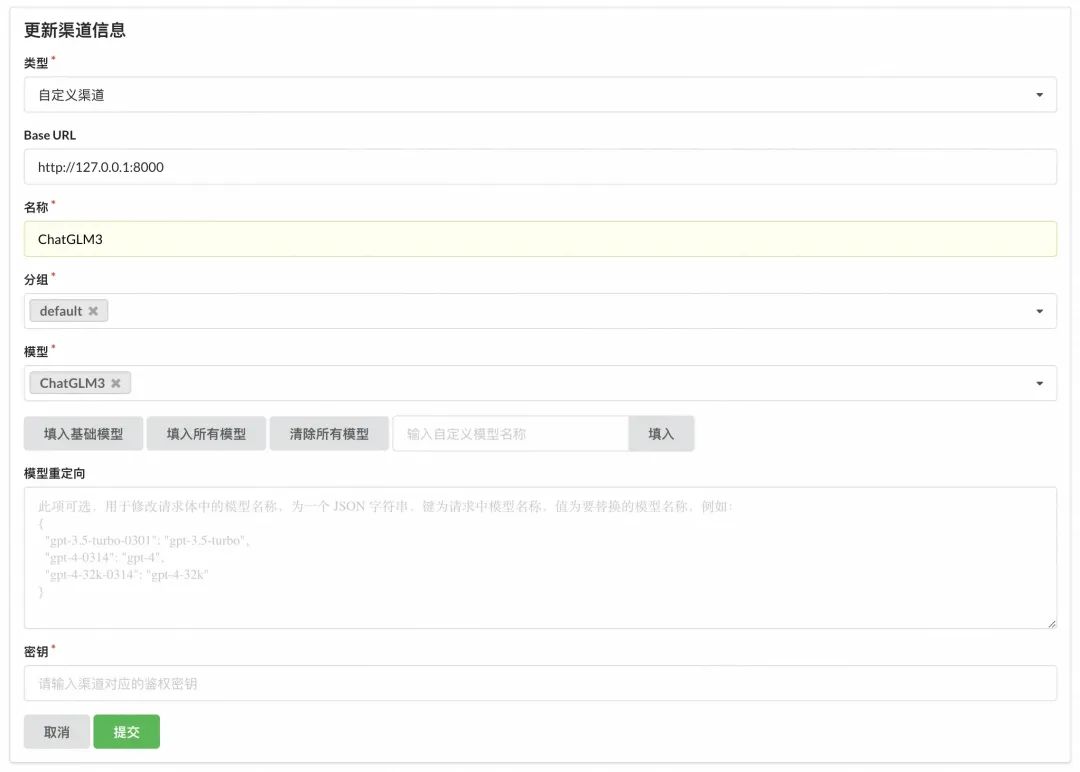
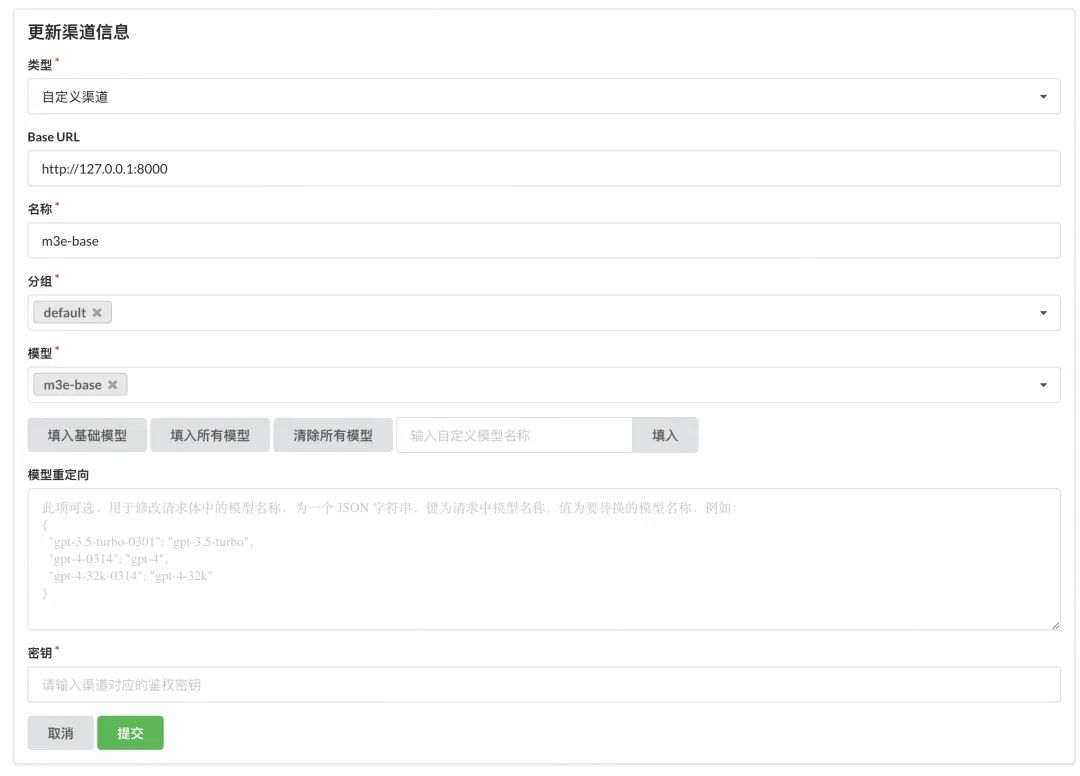
One API 的渠道管理界面如下图,我已经配置了俩渠道,一个 chat 渠道,一个 embedding 渠道:
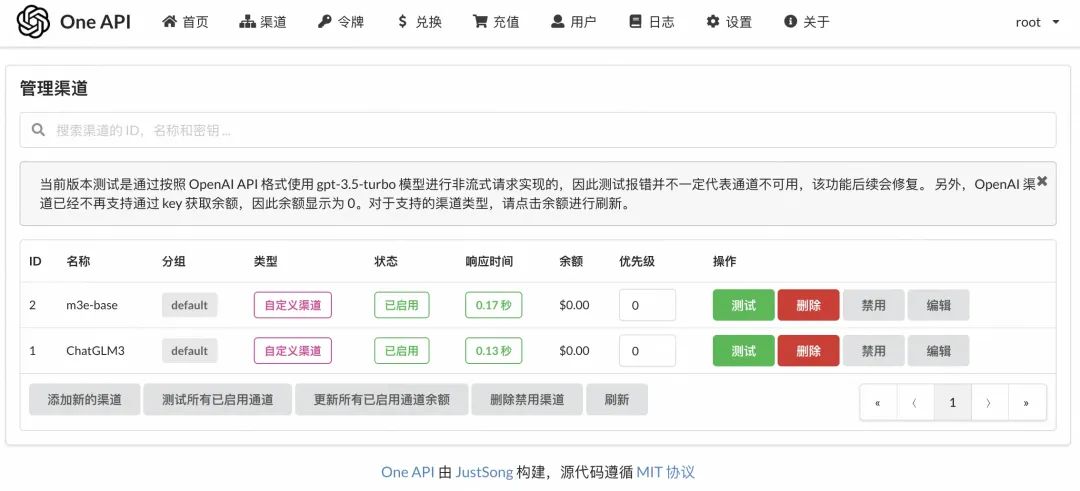
具体的配置值如下图,名称写实际的模型名 ChatGLM3,模型选刚才手动添加上去的 ChatGLM3:
配置完后可以在列表页点一下测试验证,连通无问题就行,但现在似乎一测就会把模型API服务弄挂,不过没关系,不影响后面验证。
▐ 搭建知识库应用
在这个环节里,我们采用类似 Dify.ai (地址:https://dify.ai/)的国产化开源 FastGPT 方案搭建属于自己的本地知识库应用平台。FastGPT 是一个基于 LLM 大语言模型的知识库问答系统,提供开箱即用的数据处理、模型调用等能力。同时可以通过 Flow 可视化进行工作流编排,从而实现复杂的问答场景。FastGPT 遵循 Apache License 2.0 开源协议,我们可以 Fork 之后进行二次开发和发布。
FastGPT 的核心流程图如下:
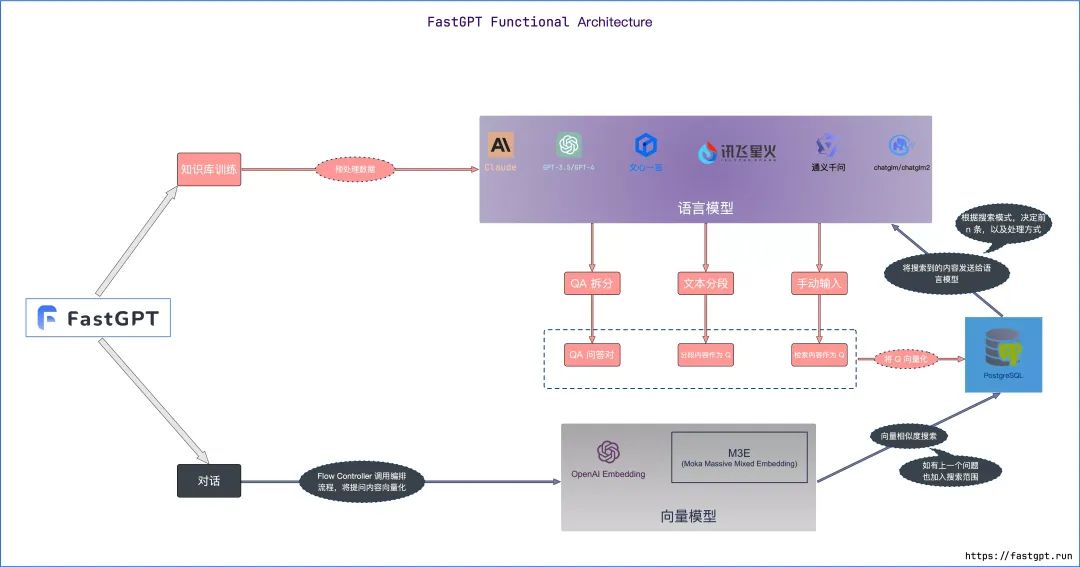
从 FastGPT 官网得知,这套开源系统基于以下几个基本概念进行知识库检索:
向量:将人类直观的语言(文字、图片、视频等)转成计算机可识别的语言(数组)。
向量相似度:两个向量之间可以进行计算,得到一个相似度,即代表:两个语言相似的程度。
语言大模型的一些特点:上下文理解、总结和推理。
结合上述 3 个概念,便有了 “向量搜索 + 大模型 = 知识库问答” 的公式。下图是 FastGPT V3 中知识库问答功能的完整逻辑:
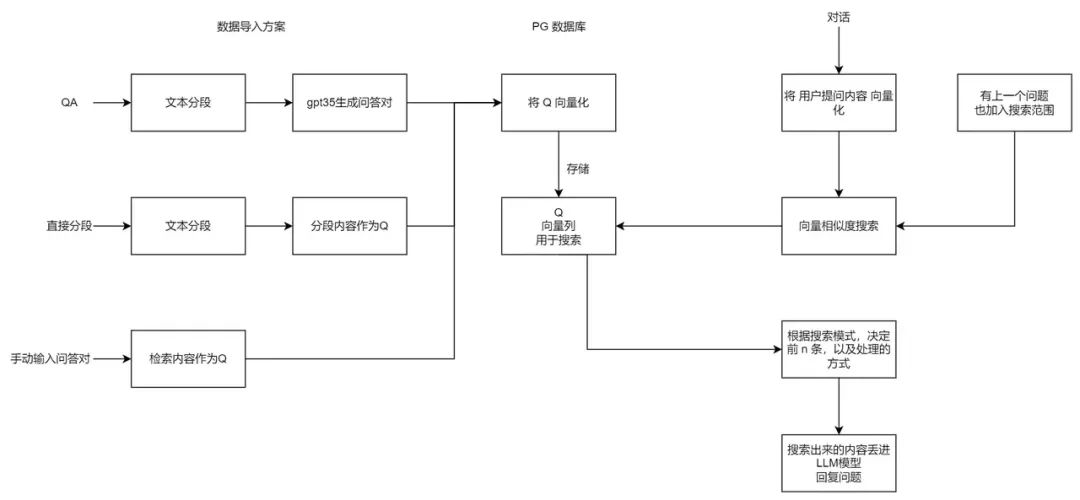
FastGPT 的向量存储方案是 PostgreSQL+pgvector,其他数据放在 MongoDB 里面,因此我们先把这两项依赖搞定。
安装 MongoDB
MacBook 安装 MongoDB 很简单,如果没有特别的安全诉求,可以先不用设置用户名密码
brew install mongodb-community
brew services start mongodb-community
FastGPT 基于 MongoDB 存储知识库索引、会话内容、工作流等管理数据:
安装 PostgreSQL & pgvector
FastGPT 采用了 RAG 中的 Embedding 方案构建知识库,PostgresSQL 的 PG Vector 插件作为向量检索器,索引为HNSW。PostgresSQL 仅用于向量检索,MongoDB用于其他数据的存取。另外也可以采用第三方模型的 Embedding API,比如 ChatGPT embedding,不过为了实现完整的本地化部署,就没有用外部服务。
我们可以从 PostgreSQL 的官网下载 PostgreSQL 安装包:https://www.postgresql.org/download/macosx/
从源码安装 pgvector:https://github.com/pgvector/pgvector
// 安装 pgvector 前指定 PostgreSQL 位置
export PG_CONFIG=/Library/PostgreSQL/16/bin/pg_config
// 如果 pgvector 认错了 MacOS SDK 的位置,还得帮他软链一个
sudo ln -s /Library/Developer/CommandLineTools/SDKs/MacOSX13.sdk /Library/Developer/CommandLineTools/SDKs/MacOSX11.sdk
// 或者用这个命令
export SDKROOT=$(xcrun --sdk macosx --show-sdk-path)
// 源码编译安装
make
make install # may need sudo
// 确保插件已安装到 PostgreSQL 目录下
cd /Library/PostgreSQL/16/share/postgresql/extension/
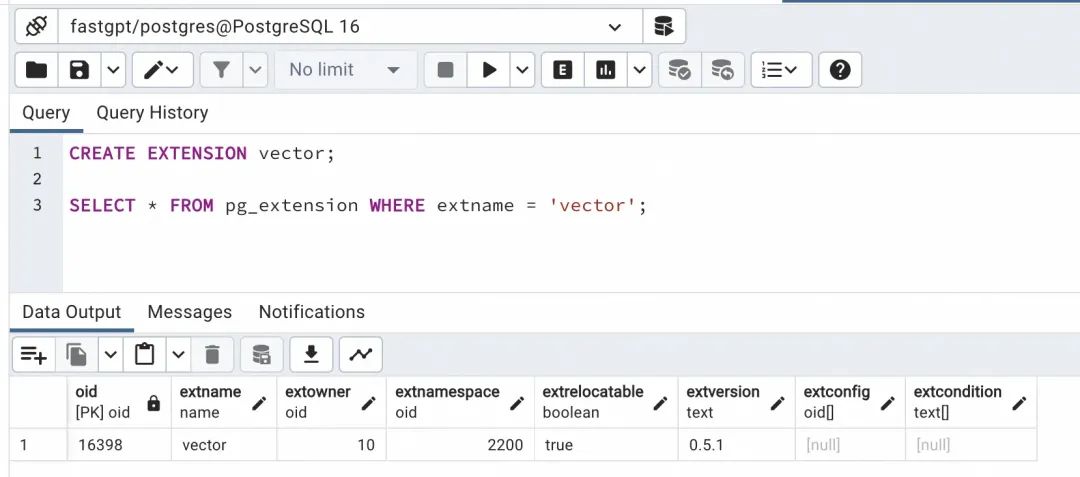
ls | grep vector完成以上步骤后,打开 PostgreSQL 控制台,随便建立一个连接,运行下面的查询:
CREATE EXTENSION vector;


SELECT * FROM pg_extension WHERE extname = 'vector';
如果能出现下图结果,说明 pgvector 已经安装成功:
搭建 FastGPT 知识库问答系统
好,我们的主角终于上场了,下面有请 FastGPT,安装指南见:https://doc.fastgpt.in/docs/development/intro/
第一步,按照里面的步骤,配置 .env.local 文件内容,指定 One API、MongoDB 和 PostgreSQL 的访问地址:
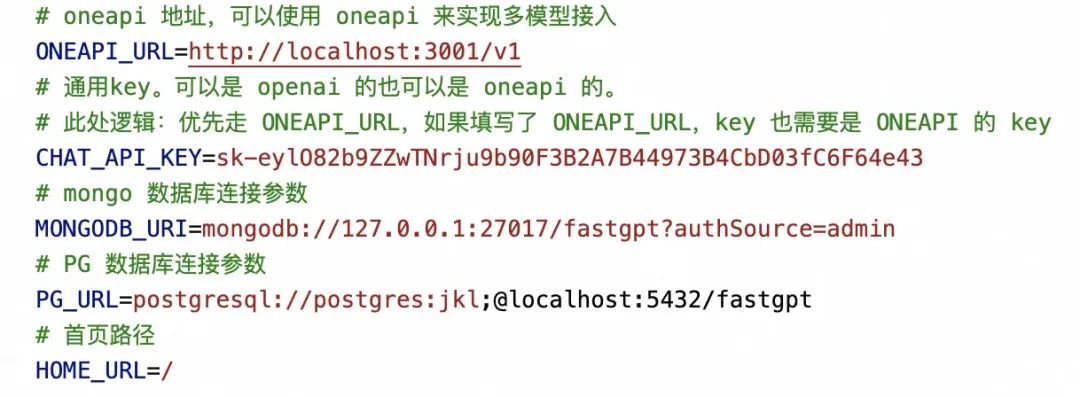
这里的 CHAT_API_KEY 填入上面 OneAPI 创建的令牌
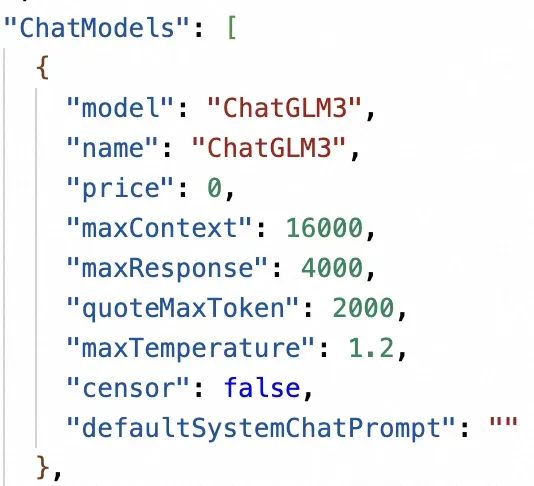
第二步,在 config.local.json 里面注册对话模型和向量嵌入模型,注意这里的 model 值要和 One API 里配置的保持一致:

第三步,安装 Node.js 依赖并以开发模式启动:
# 代码根目录下执行,会安装根 package、projects 和 packages 内所有依赖
pnpm i
# 切换到应用目录
cd projects/app
# 开发模式运行
pnpm dev
第四步,访问本地 FastGPT 地址 http://localhost:3000/,如果能顺利登录,则搭建成功。
验证模型对话能力
创建一个应用:

应用创建完成,进入对话界面,注意 AI 模型选择我们在 One API 里配置的 ChatGLM3。试着问他两个问题,可以看到推理速度还是很快的,分别是 5.83s、7.52s:
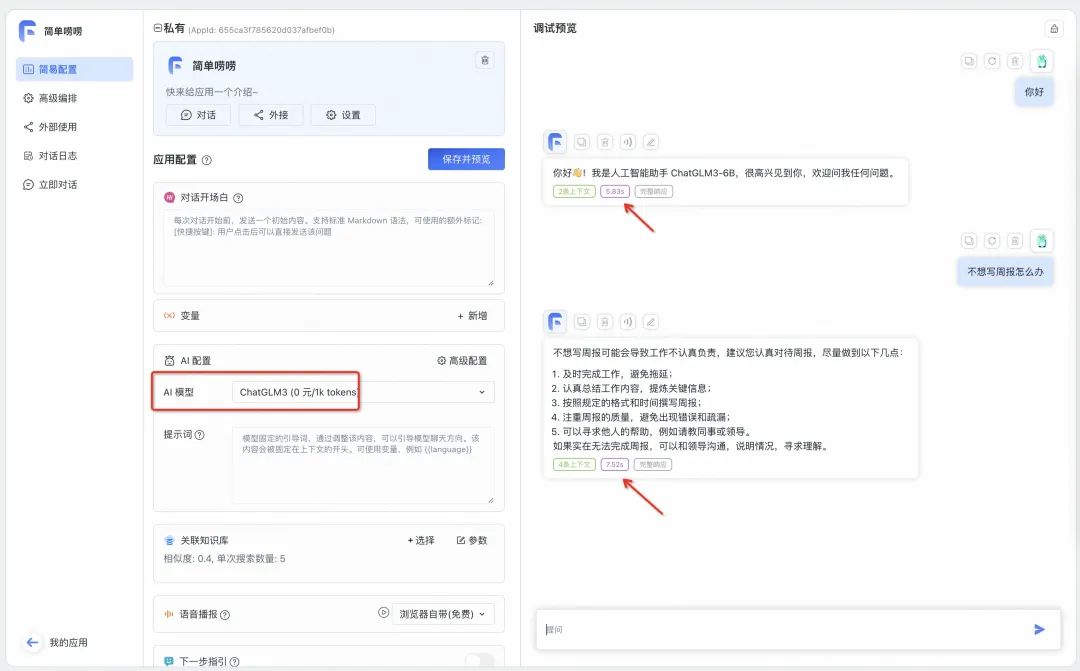
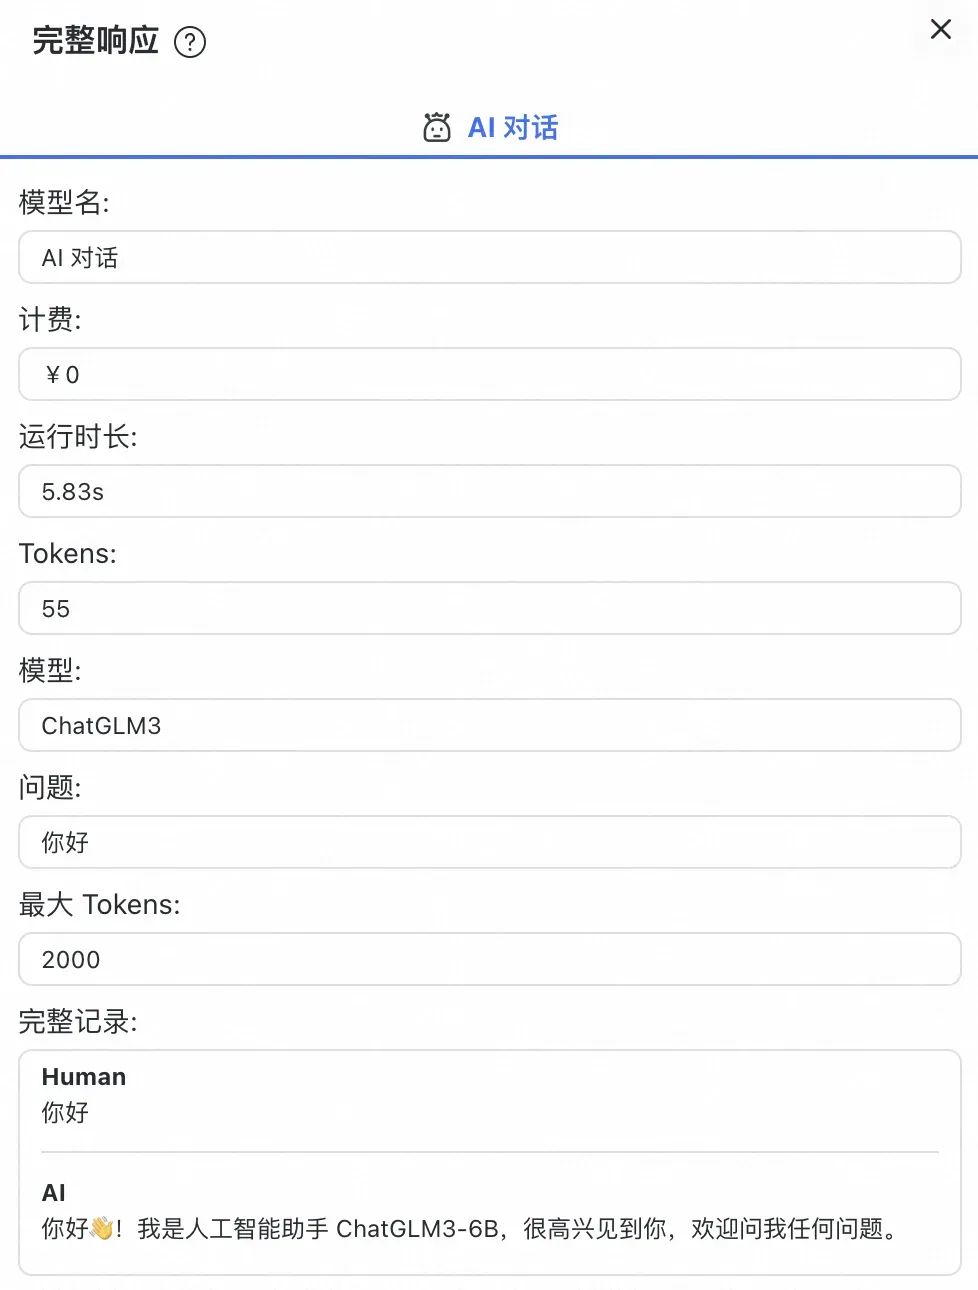
点开单条对话响应,详细的对话参数(消耗 token、响应时长、计费信息)清晰可见:
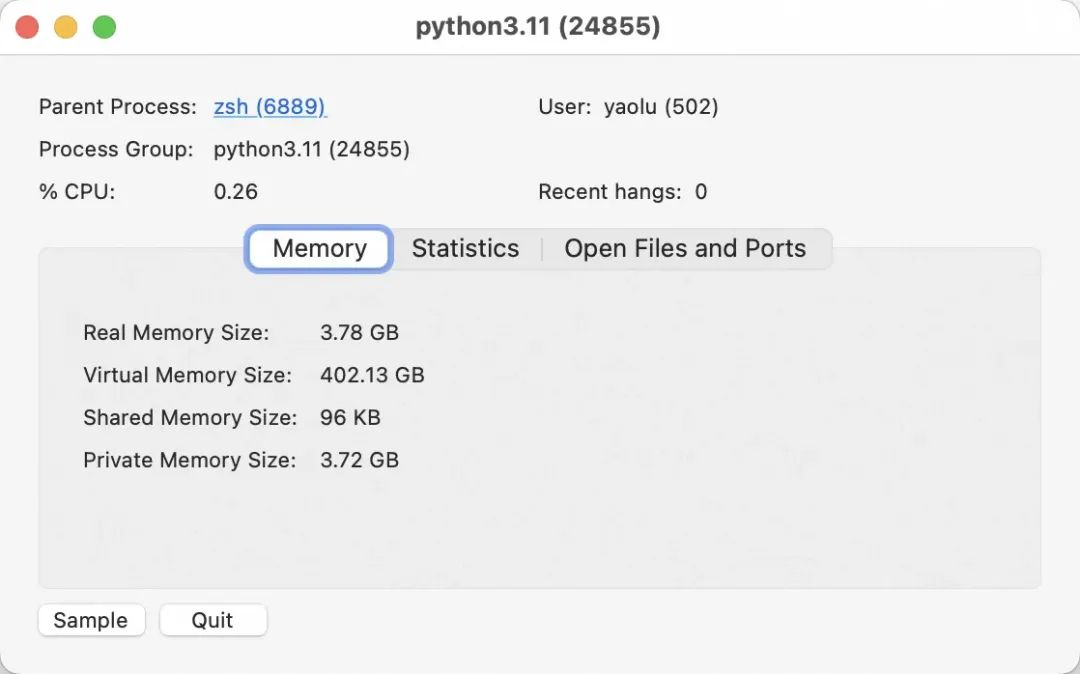
查看 MacBook 上的 ChatGLM3 推理资源占用情况,占用了 3.78GB 内存

知识库问答实战
▐ 准备知识库语料
在有知识库使用诉求的场景,我们一般都积累了比较多的私有知识数据,比如:语雀文档、钉钉文档、PDF、Office文件等,视知识识图的建设标准,需要将它们一一结构化整理。数据的梳理、清洗、结构化是一项繁杂而重要的工作,但也有比较成熟的办法和工具,在此不再赘述。
▐ 导入知识库数据
FastGPT 提供了很多种原始数据导入的办法,并且为了更好地和企业系统集成,FastGPT 支持通过 API 的方式地二次开发导入能力,支持和已有知识管理系统更好地自动化集成。常见的导入方法有:
导入数据方案1 - 直接分段导入:直接分段会利用句子分词器对文本进行一定长度拆分,可以理解为原始文档 Chunk。
导入数据方案2 - QA导入:导入时会调用大模型对分段进行学习,然后直接生成问题-答案。
导入数据方案3 - 手动录入:手动录入问题和答案。
导入数据方案4 - CSV录入:批量快速录入问题答案对。
导入数据方案5 - API导入,详见:OpenAPI 接口文档(地址:https://doc.fastgpt.in/docs/development/openapi/#%E7%9F%A5%E8%AF%86%E5%BA%93%E6%B7%BB%E5%8A%A0%E6%95%B0%E6%8D%AE)
我们先简单地录入几个问题和答案,然后后面快速验证 RAG 效果。
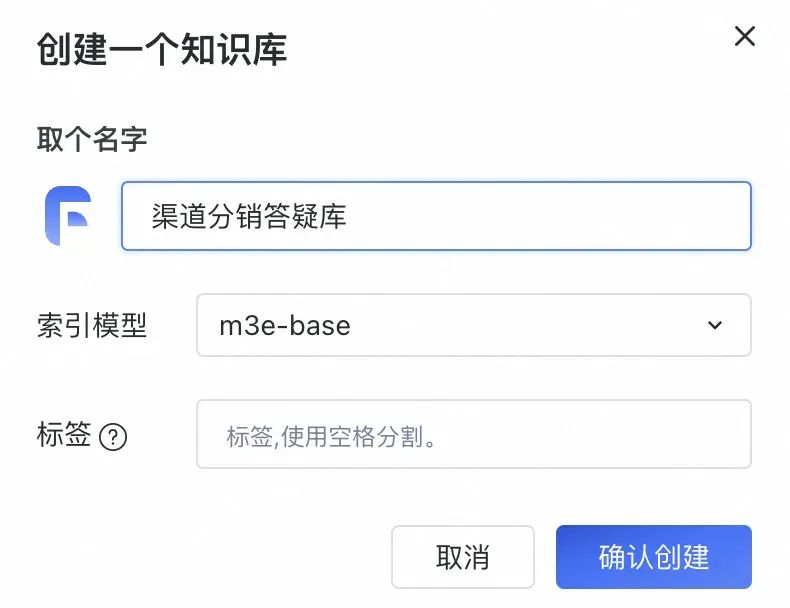
新建一个知识库,注意,索引模型一旦选择不可更改。这里我们选择刚部署好的 m3e-base
进入知识库初始界面,已经默认有了一个“手动录入”文件夹,我们在这里录入几条测试问答
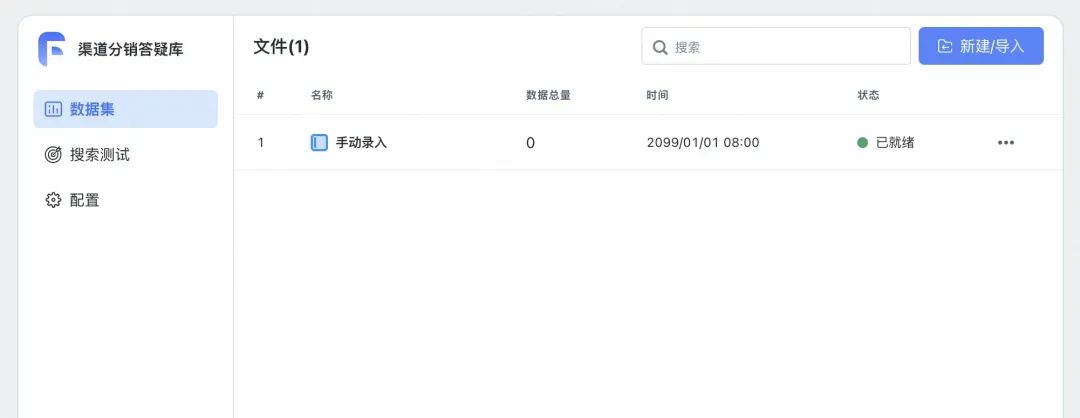
录入内容分两种类型,其中:被搜索的内容指将被向量化的部分,通常是问题,或者精炼扼要的描述,需要准确填写

验证知识库问答效果
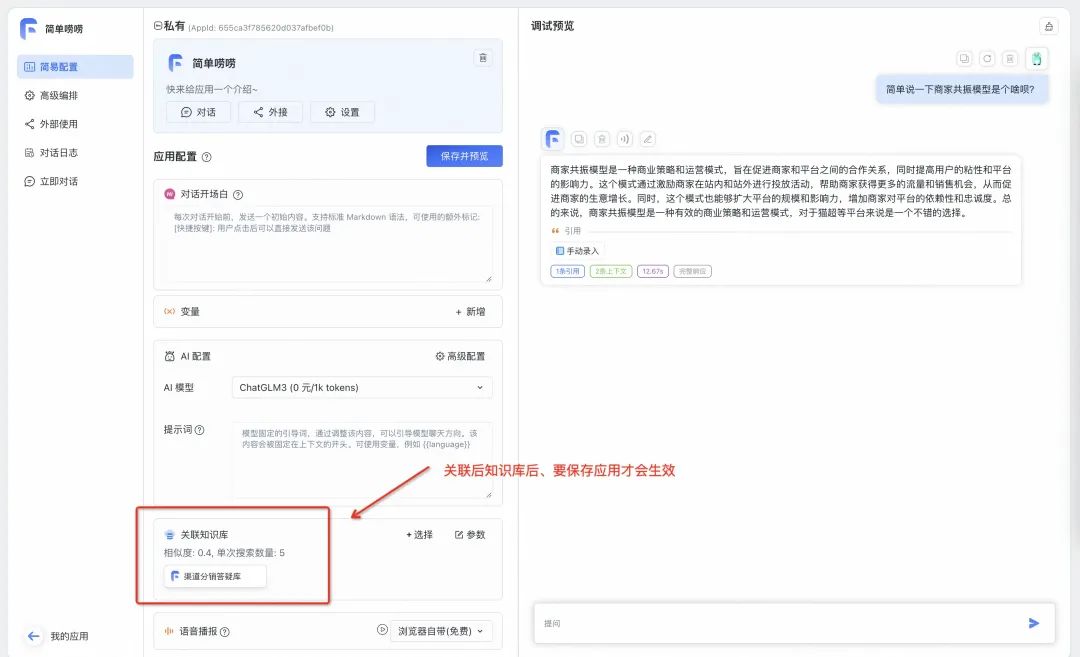
重新打开应用,关联刚才创建好的知识库(注意这里一定要保证才会生效),问他一个简单的问题,回答的质量看起来还可以。
问:简单说一下商家共振模型是个啥呗?
答:商家共振模型是一种商业策略和运营模式,旨在促进商家和平台之间的合作关系,同时提高用户的粘性和平台的影响力。这个模式通过激励商家在站内和站外进行投放活动,帮助商家获得更多的流量和销售机会,从而促进商家的生意增长。同时,这个模式也能够扩大平台的规模和影响力,增加商家对平台的依赖性和忠诚度。总的来说,商家共振模型是一种有效的商业策略和运营模式,对于猫超等平台来说是一个不错的选择。
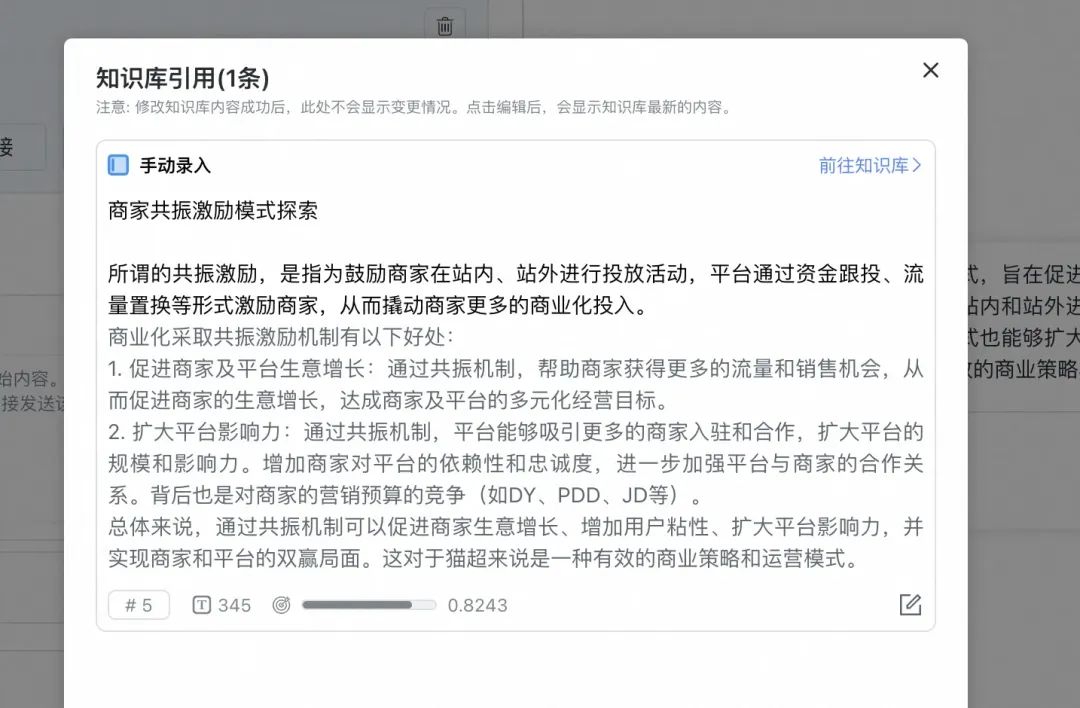
点击答案中的“1条引用”,还可以看到答案的出处来源:
至此,我们就完成了一个简单的知识库构建和应用的过程,也验证了整套本地知识库方案的可行性。

未来展望
串通了整个知识库应用流程,我们完成了从0到1的起步。虽然整体应用架构是按实际商用标准来搭建的,但要想使用效果也达到工业级别的标准,还有很多工作值得进一步探索,包括但不限于:
1️⃣ 大模型应用层面:
1、更好的文档 Chunk、Embedding、多路加权平均搜索召回方案,提升 RAG 整体效能
2、更好的 Prompt Engineering,充分挖掘 LLM 的潜力
3、工作流编排、CoT、Agent,满足实际的企业应用需求
2️⃣ 稳定性层面:如果达到商用级别,需要更高配置的软硬件环境
3️⃣ 落地价值层面:从解决身边的问题开始,解决真金白银的商业问题
希望本文能给每位计划自己搭建大模型知识库应用的工程师一点参考,动手跑通一个程序的乐趣是无穷的,更多的实操作经验分享,我们在评论区交流。

团队介绍
我们是淘天渠道分销技术团队,负责淘天全渠道一盘货产品技术研发。我们通过用技术手段解决电商多段销售中的多角色商业往来问题,构建了灵活的新零售供应链分销产品平台,致力于为商家提供多元化的供给和销售渠道、助力商家在全平台取得更高的成交额。
长期招募人才,欢迎投递简历:xieyi.xie@alibaba-inc.com
¤ 拓展阅读 ¤

旨在为数千万中国开发者提供一个无缝且高效的云端环境,以支持学习、使用和贡献开源项目。
更多推荐


 27
27 0
0- 0


 已为社区贡献4条内容

所有评论(0)