前言:
开源版本Rocket和商业版本的RocketMQ有些不同,研究的是商业版本的RocketMQ,阿里云的官方文档,感觉有点乱。看不咋明白,网上虽然有教程,大都还是有点缺少,有时候会突然跳了步骤,抹去了一些细节。
前置步骤
阿里云MQ开通及子Access账号的权限的生成
阿里云MQ开通
开通阿里云MQ(现在叫阿里云RocketMQ)百度的教程够用,不多记录,需要的参考该地址http://mtw.so/5Q5nHp,进行开通。PS:页面由于开发人员一直在更新,教程的页面不一定和现有页面完全一样,所以不要死脑筋。
子Access账号
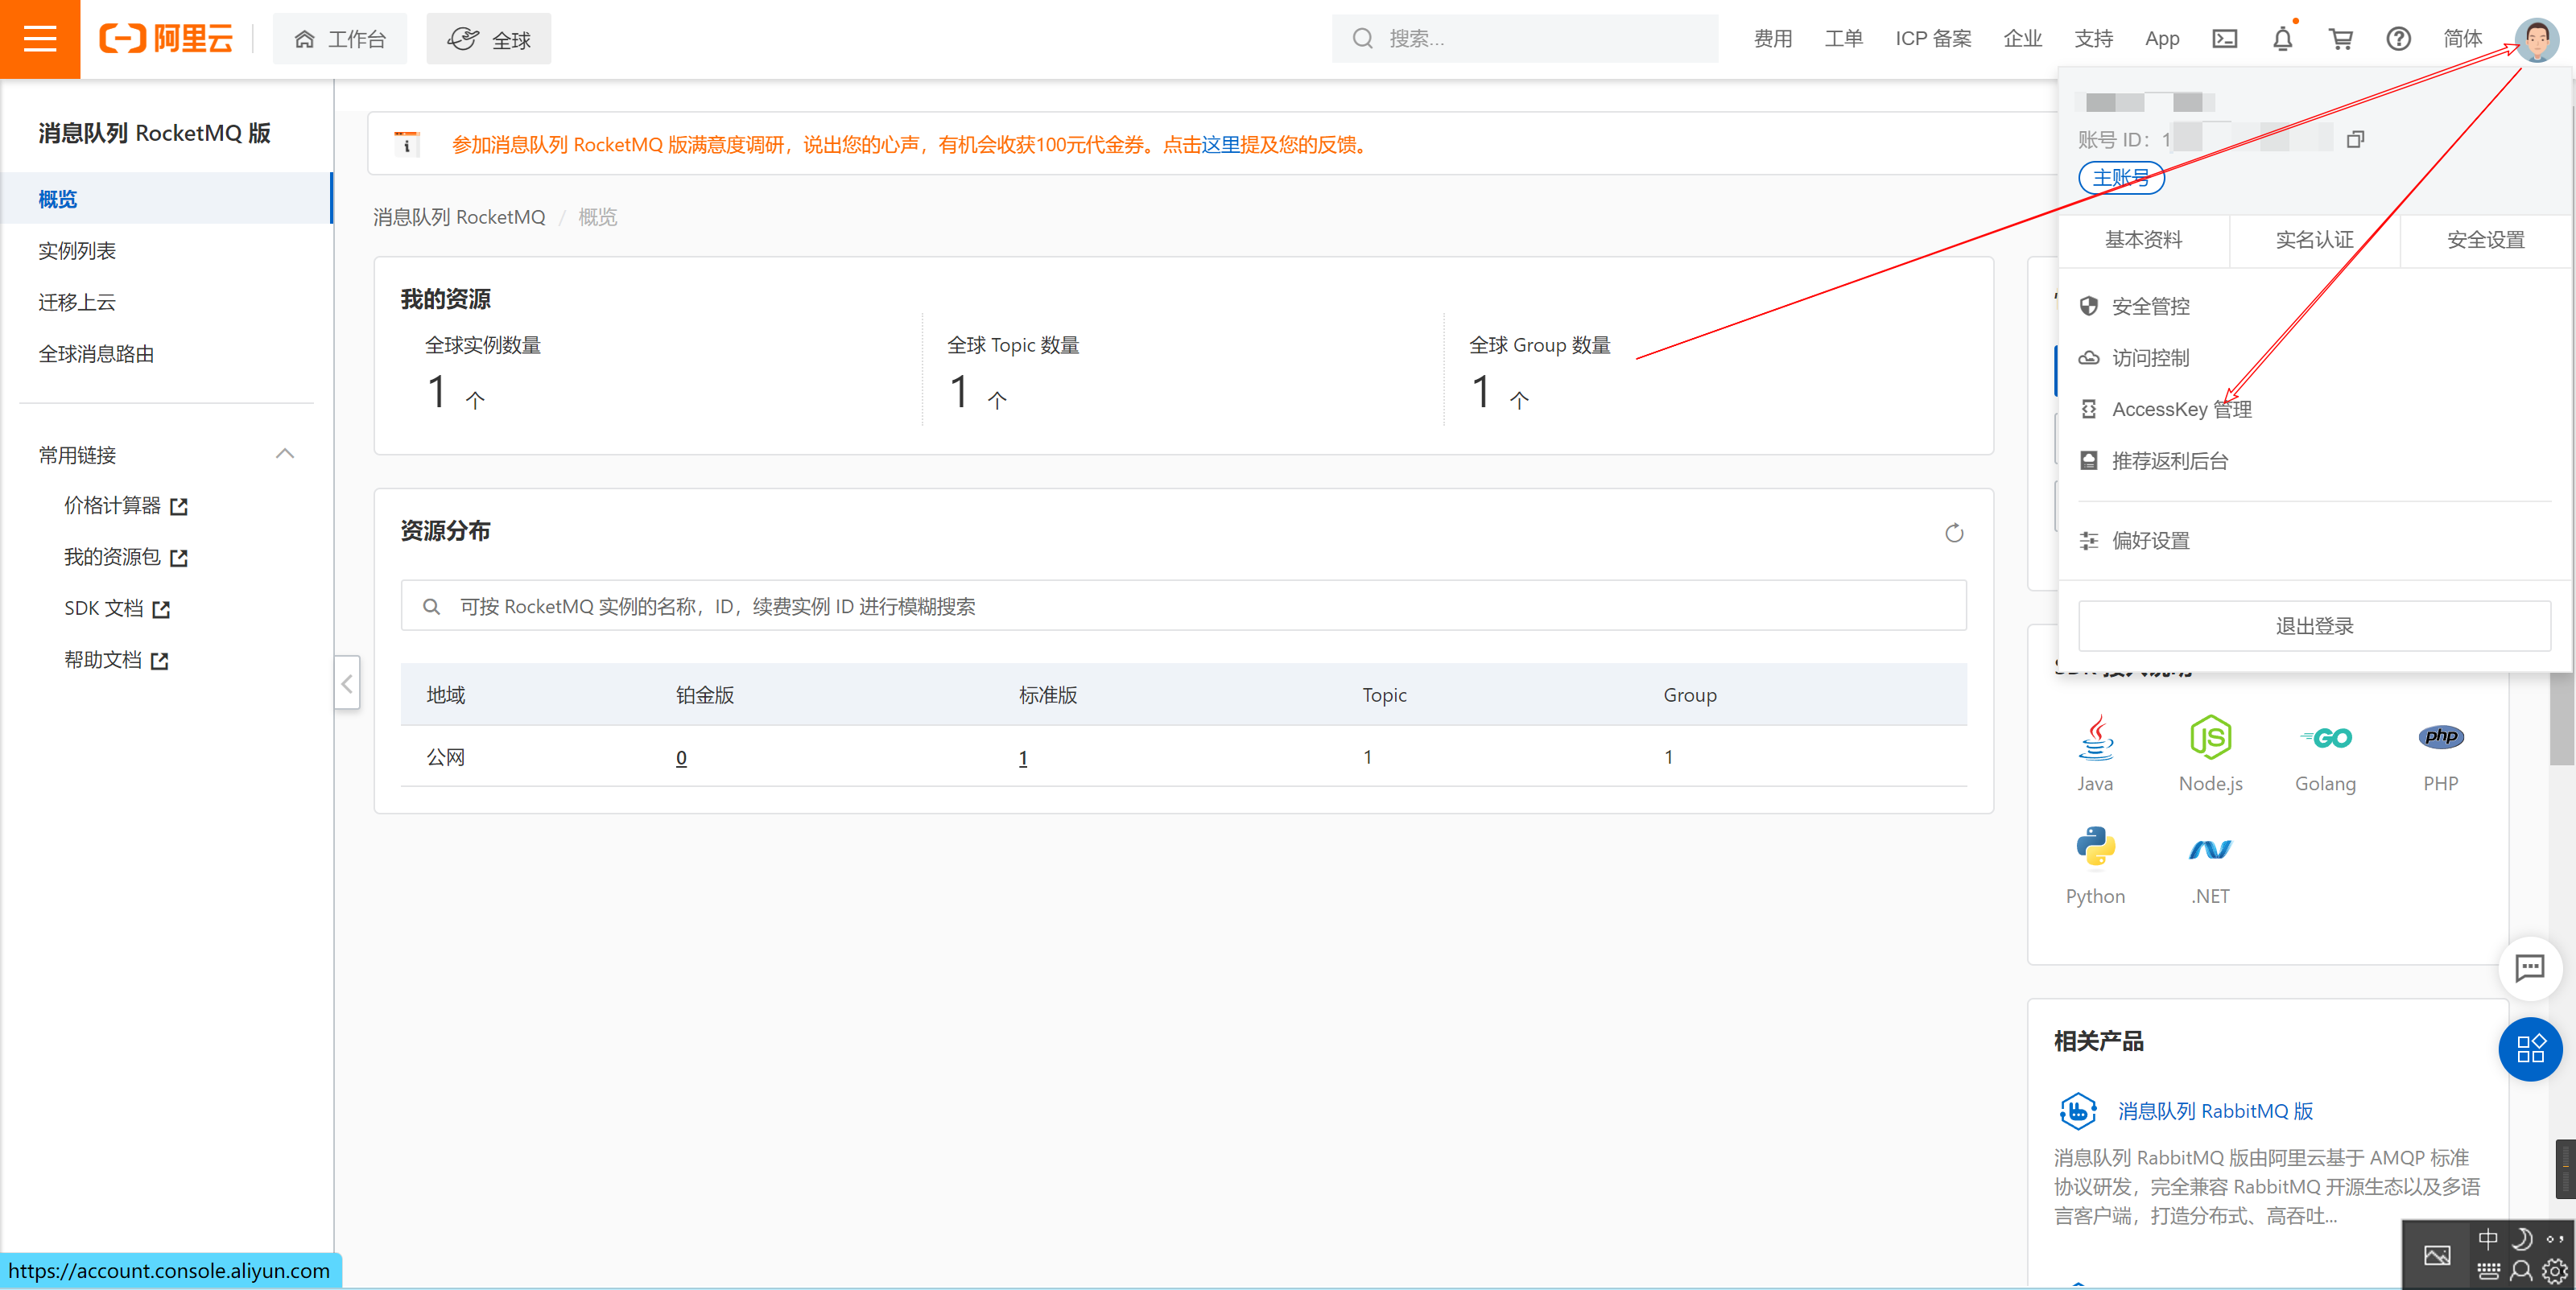
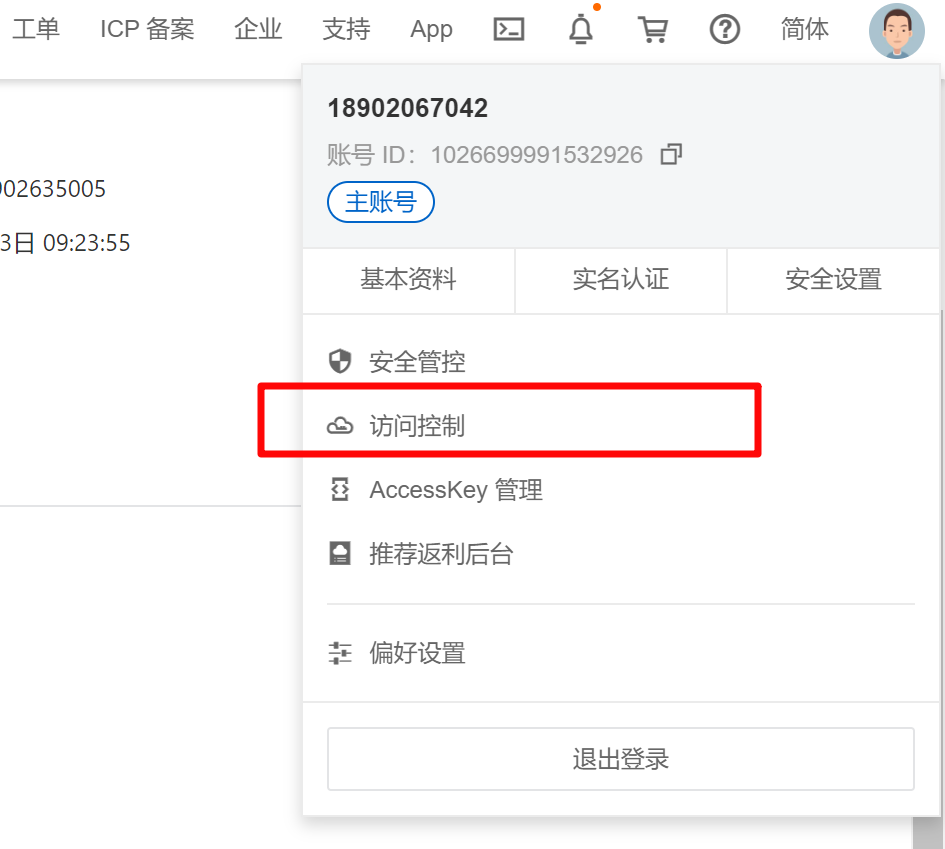
阿里云可以为账号,创建两个字段,用于你身份的验证,下图中可以进入申请子账户
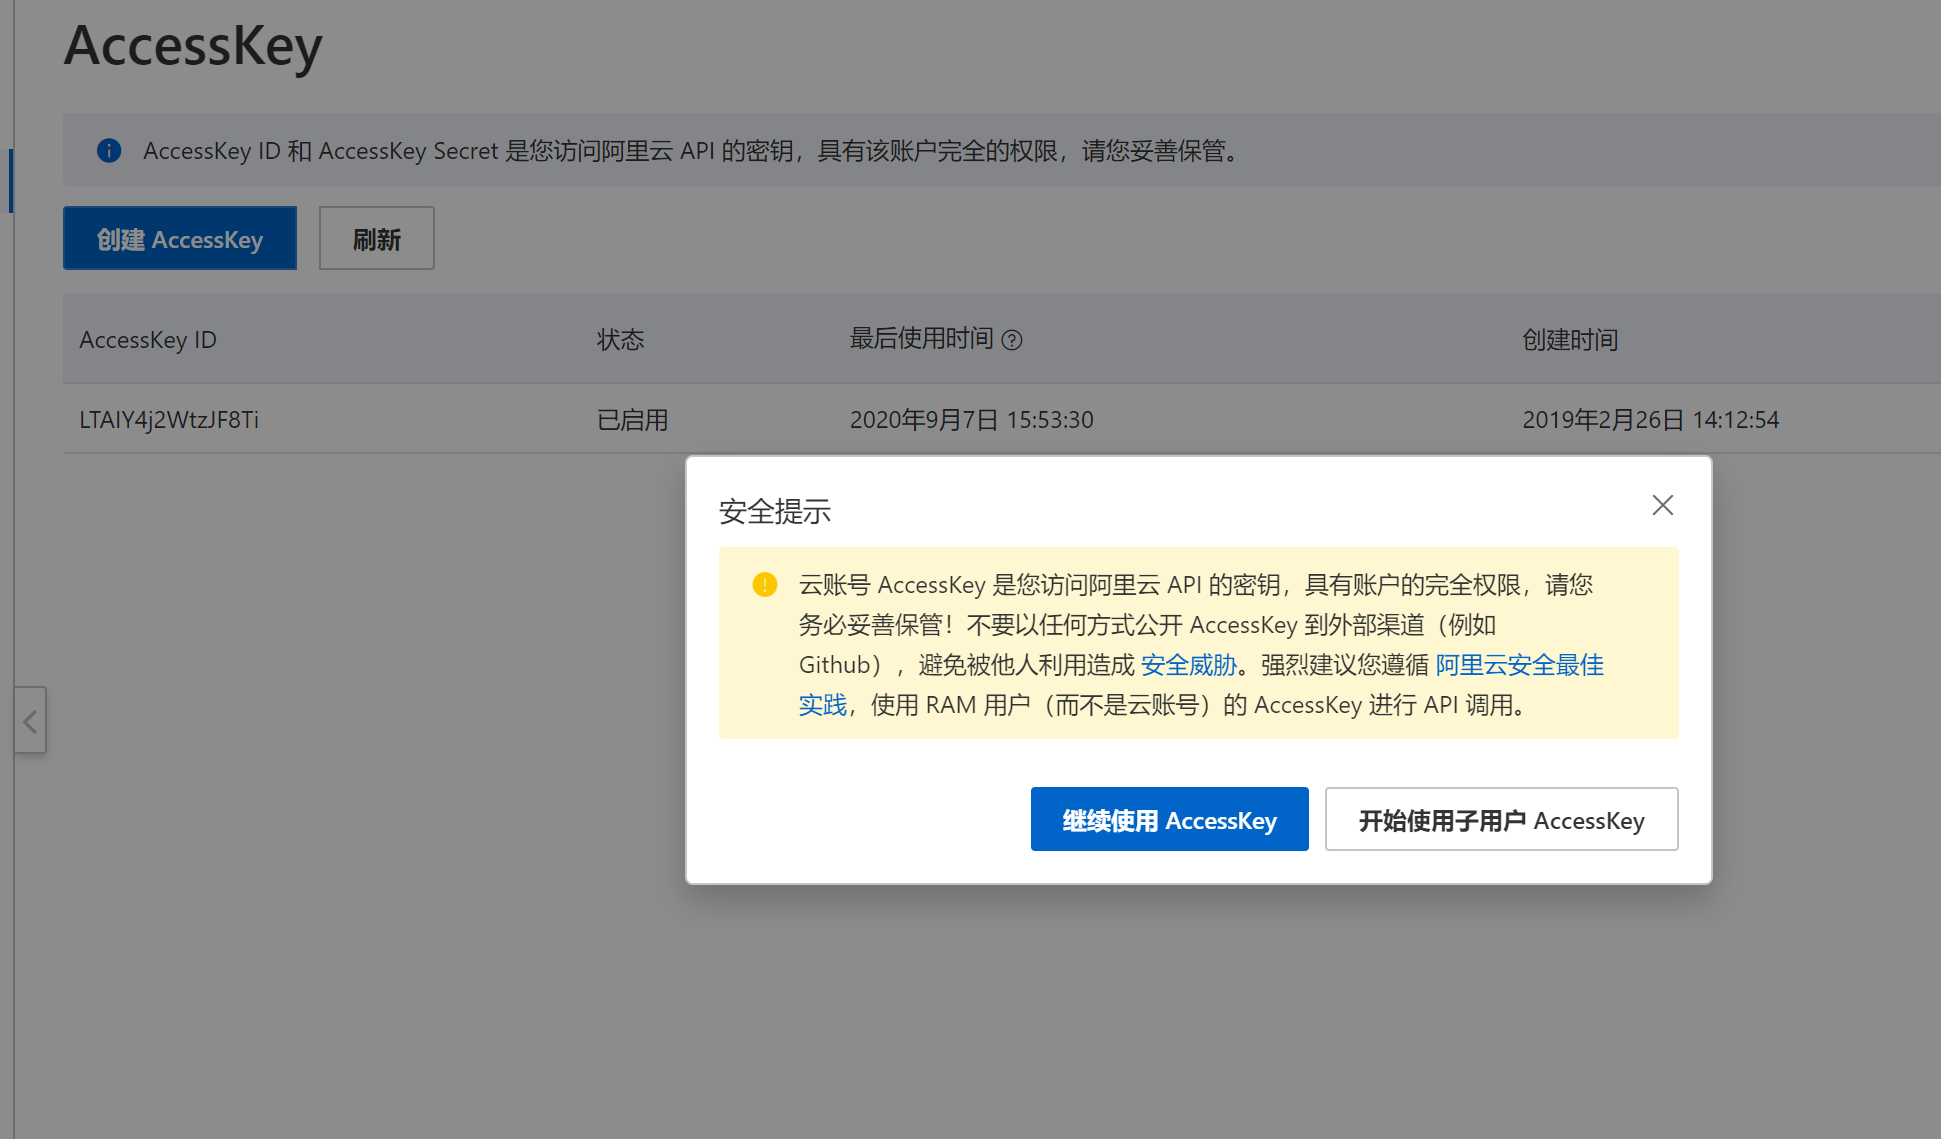
跳出提示,选择开始使用子用户AccessKey
点击 创建用户

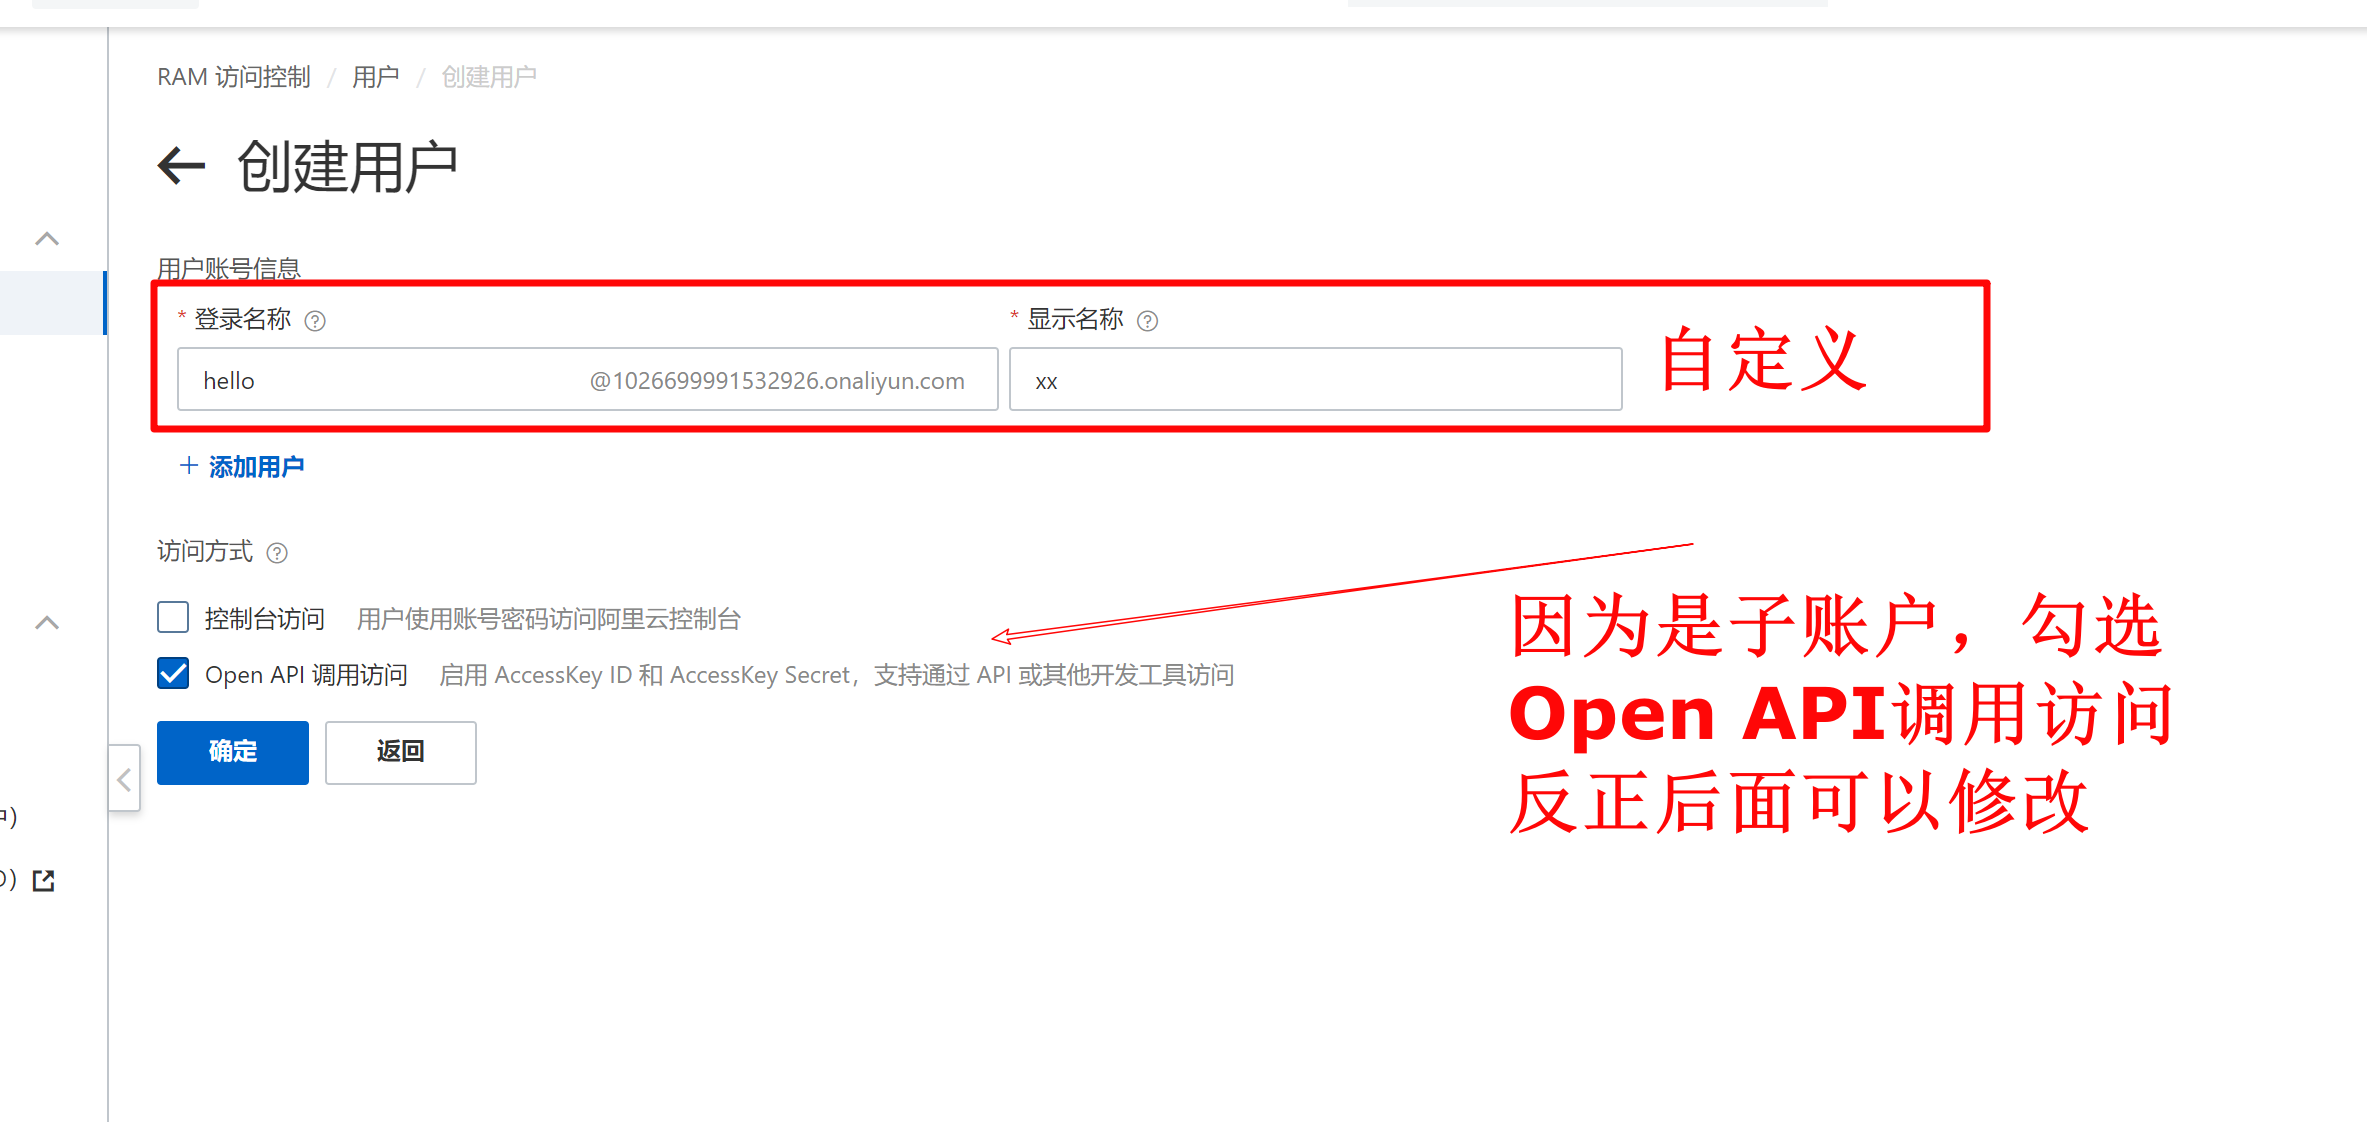
点击确定,会要你验证手机,输入验证码即可
创建完以后会给你两个字段的值,一个是AccessKey ID和AccessKey Secret一定要及时妥善保存,虽然可以重新创建

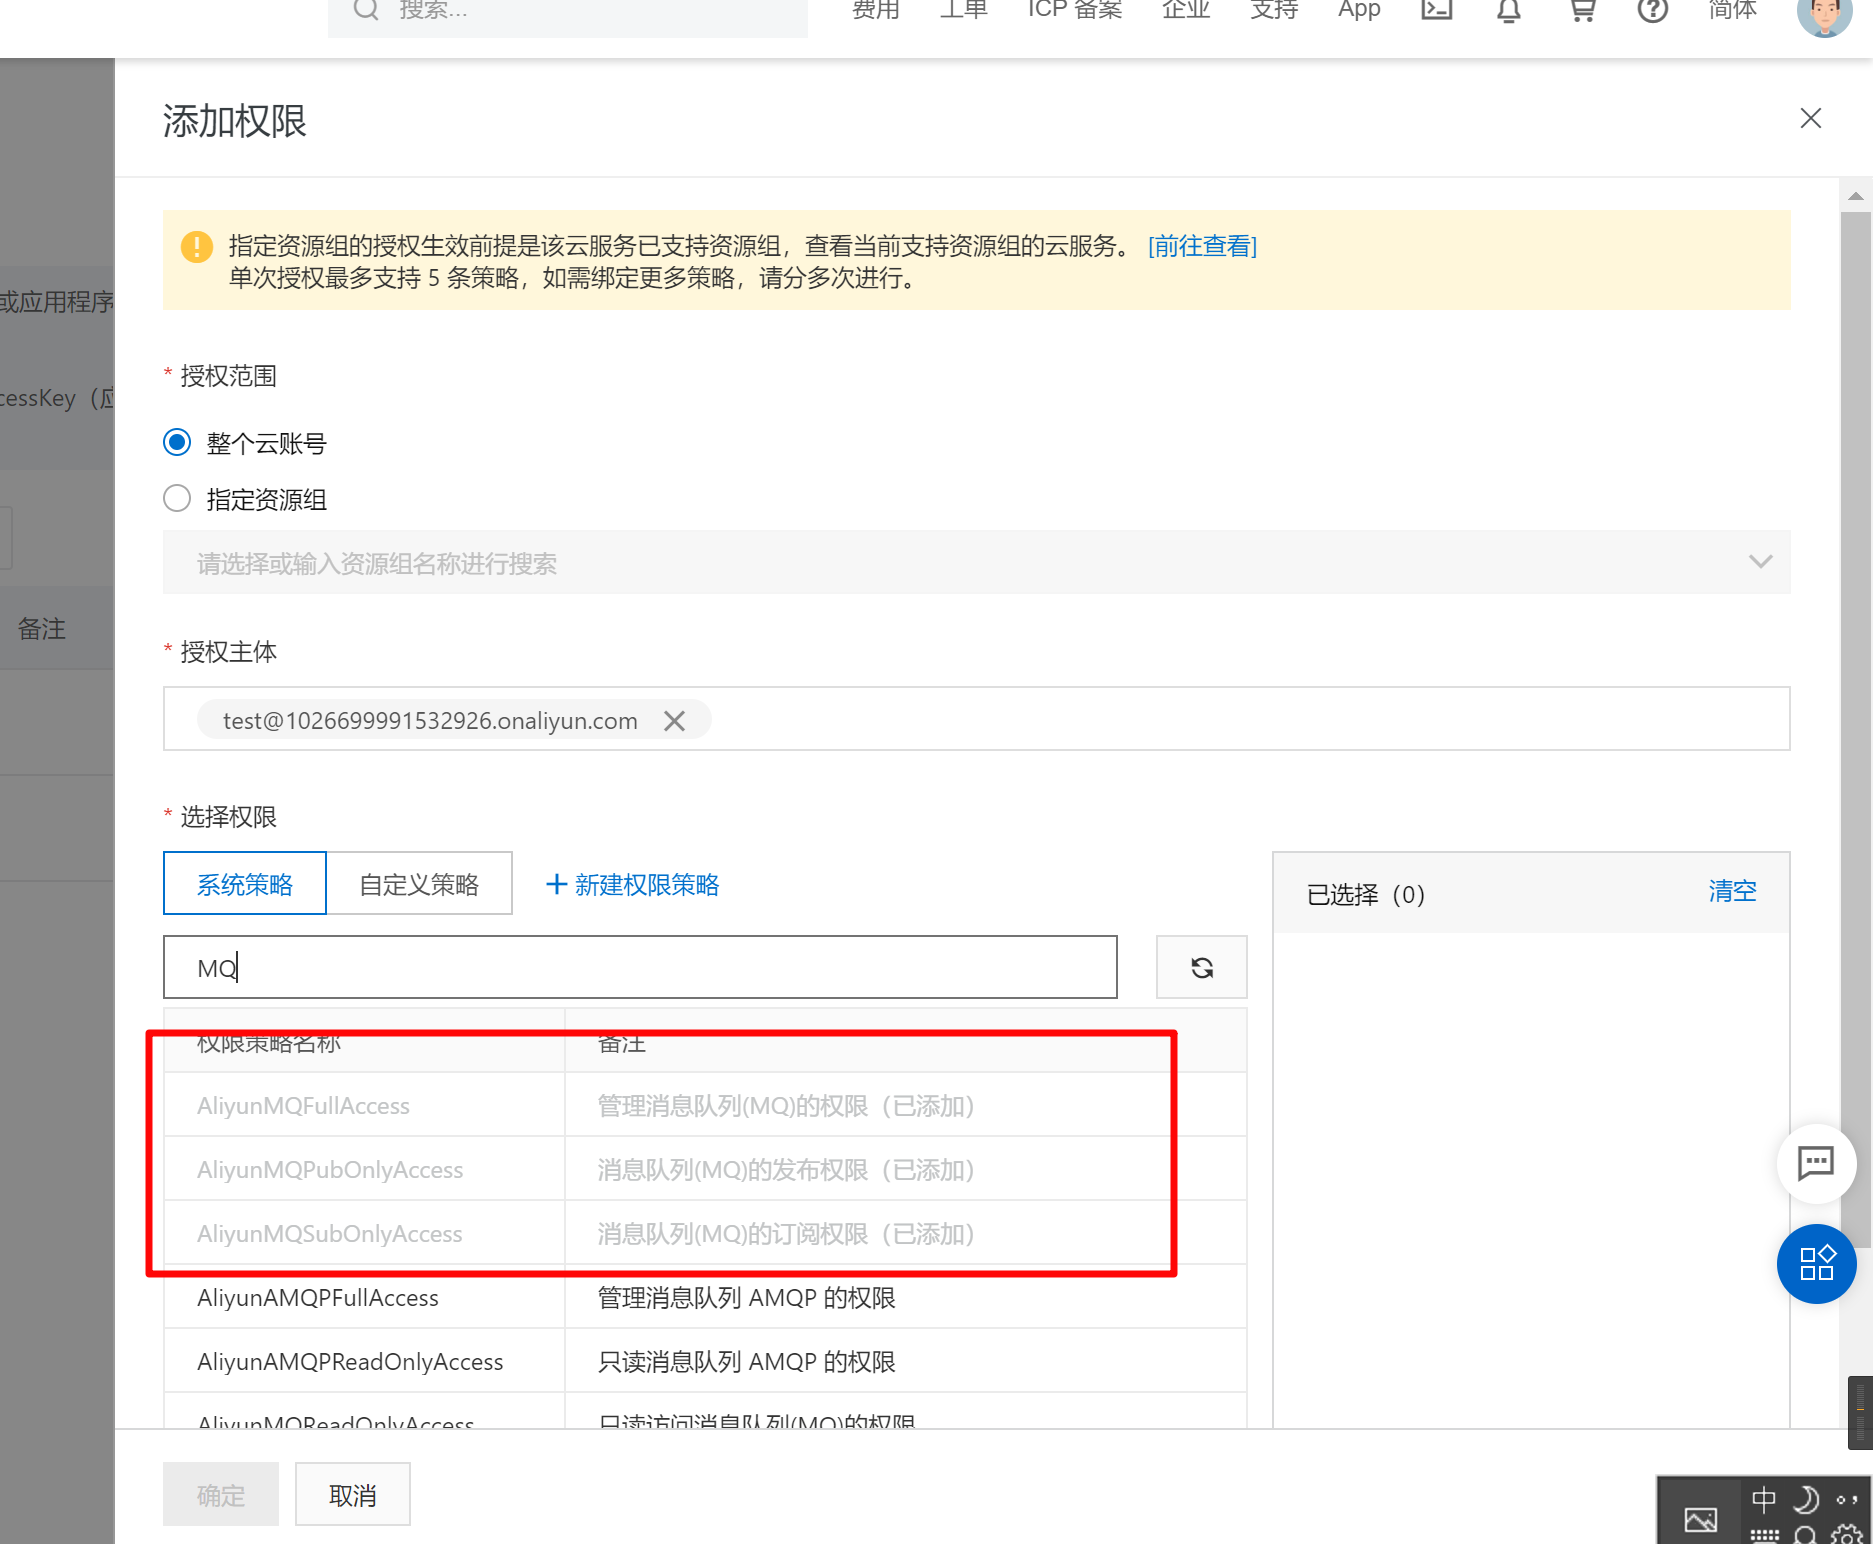
ps:这里别忘了给账户赋予MQ的权限,不然无法进行消息的订阅和发送
如何设置权限?
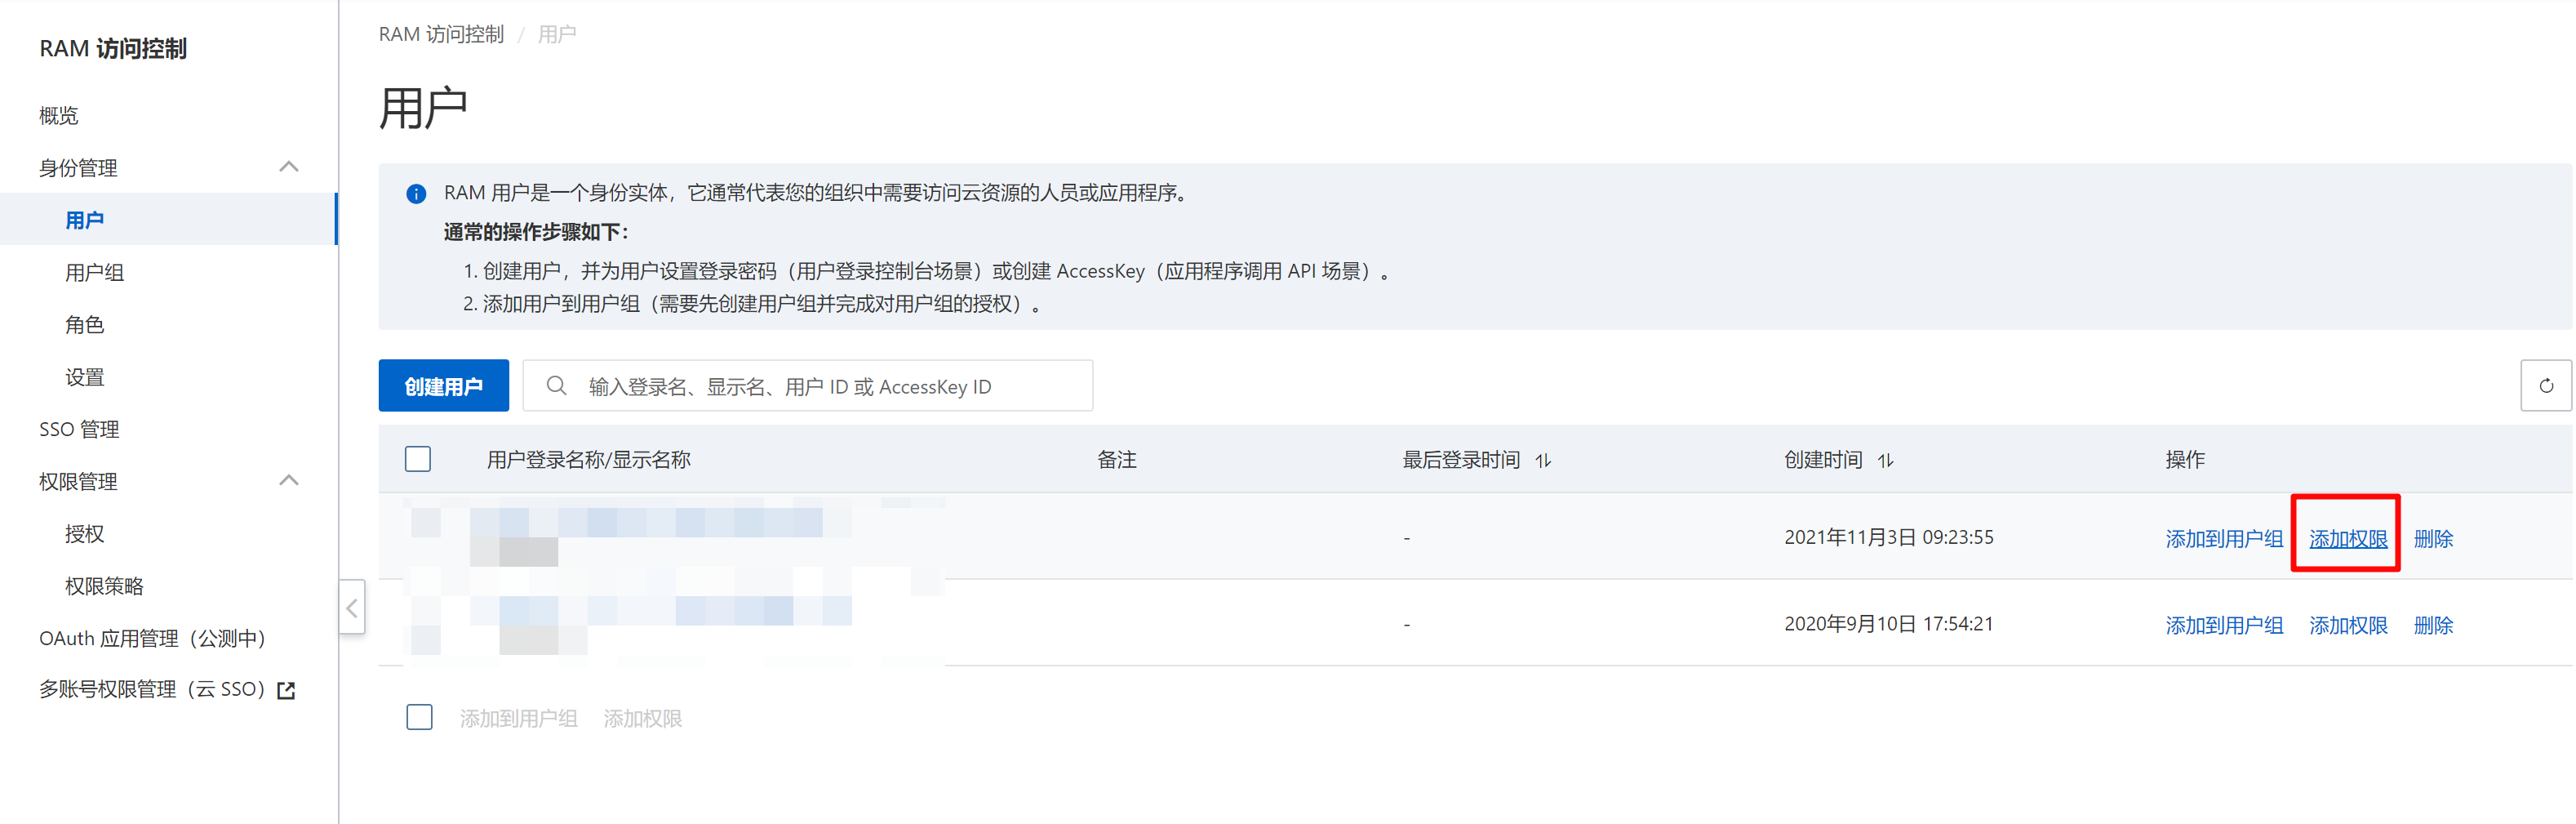
点击添加权限,添加以下权限
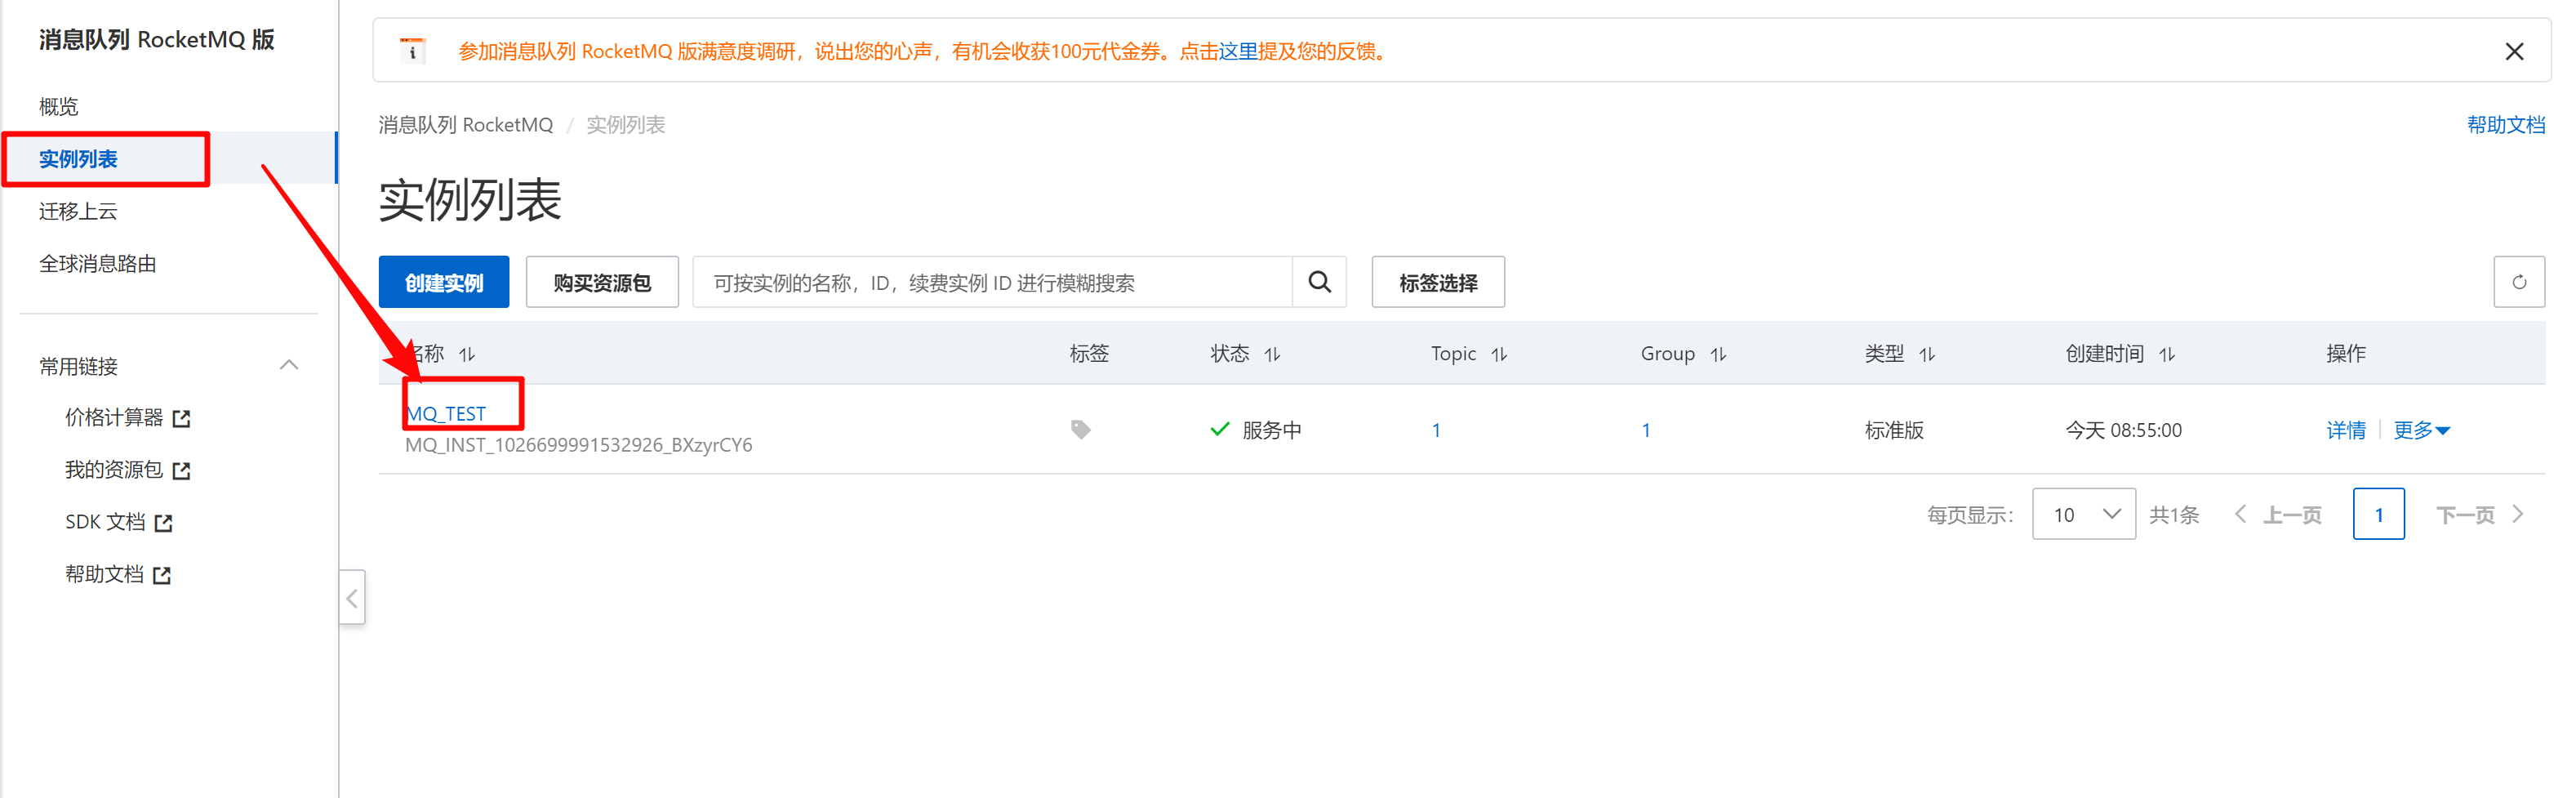
Topic和Group的创建(在阿里云控制台页面进行)
首先创建实例,点击创建实例
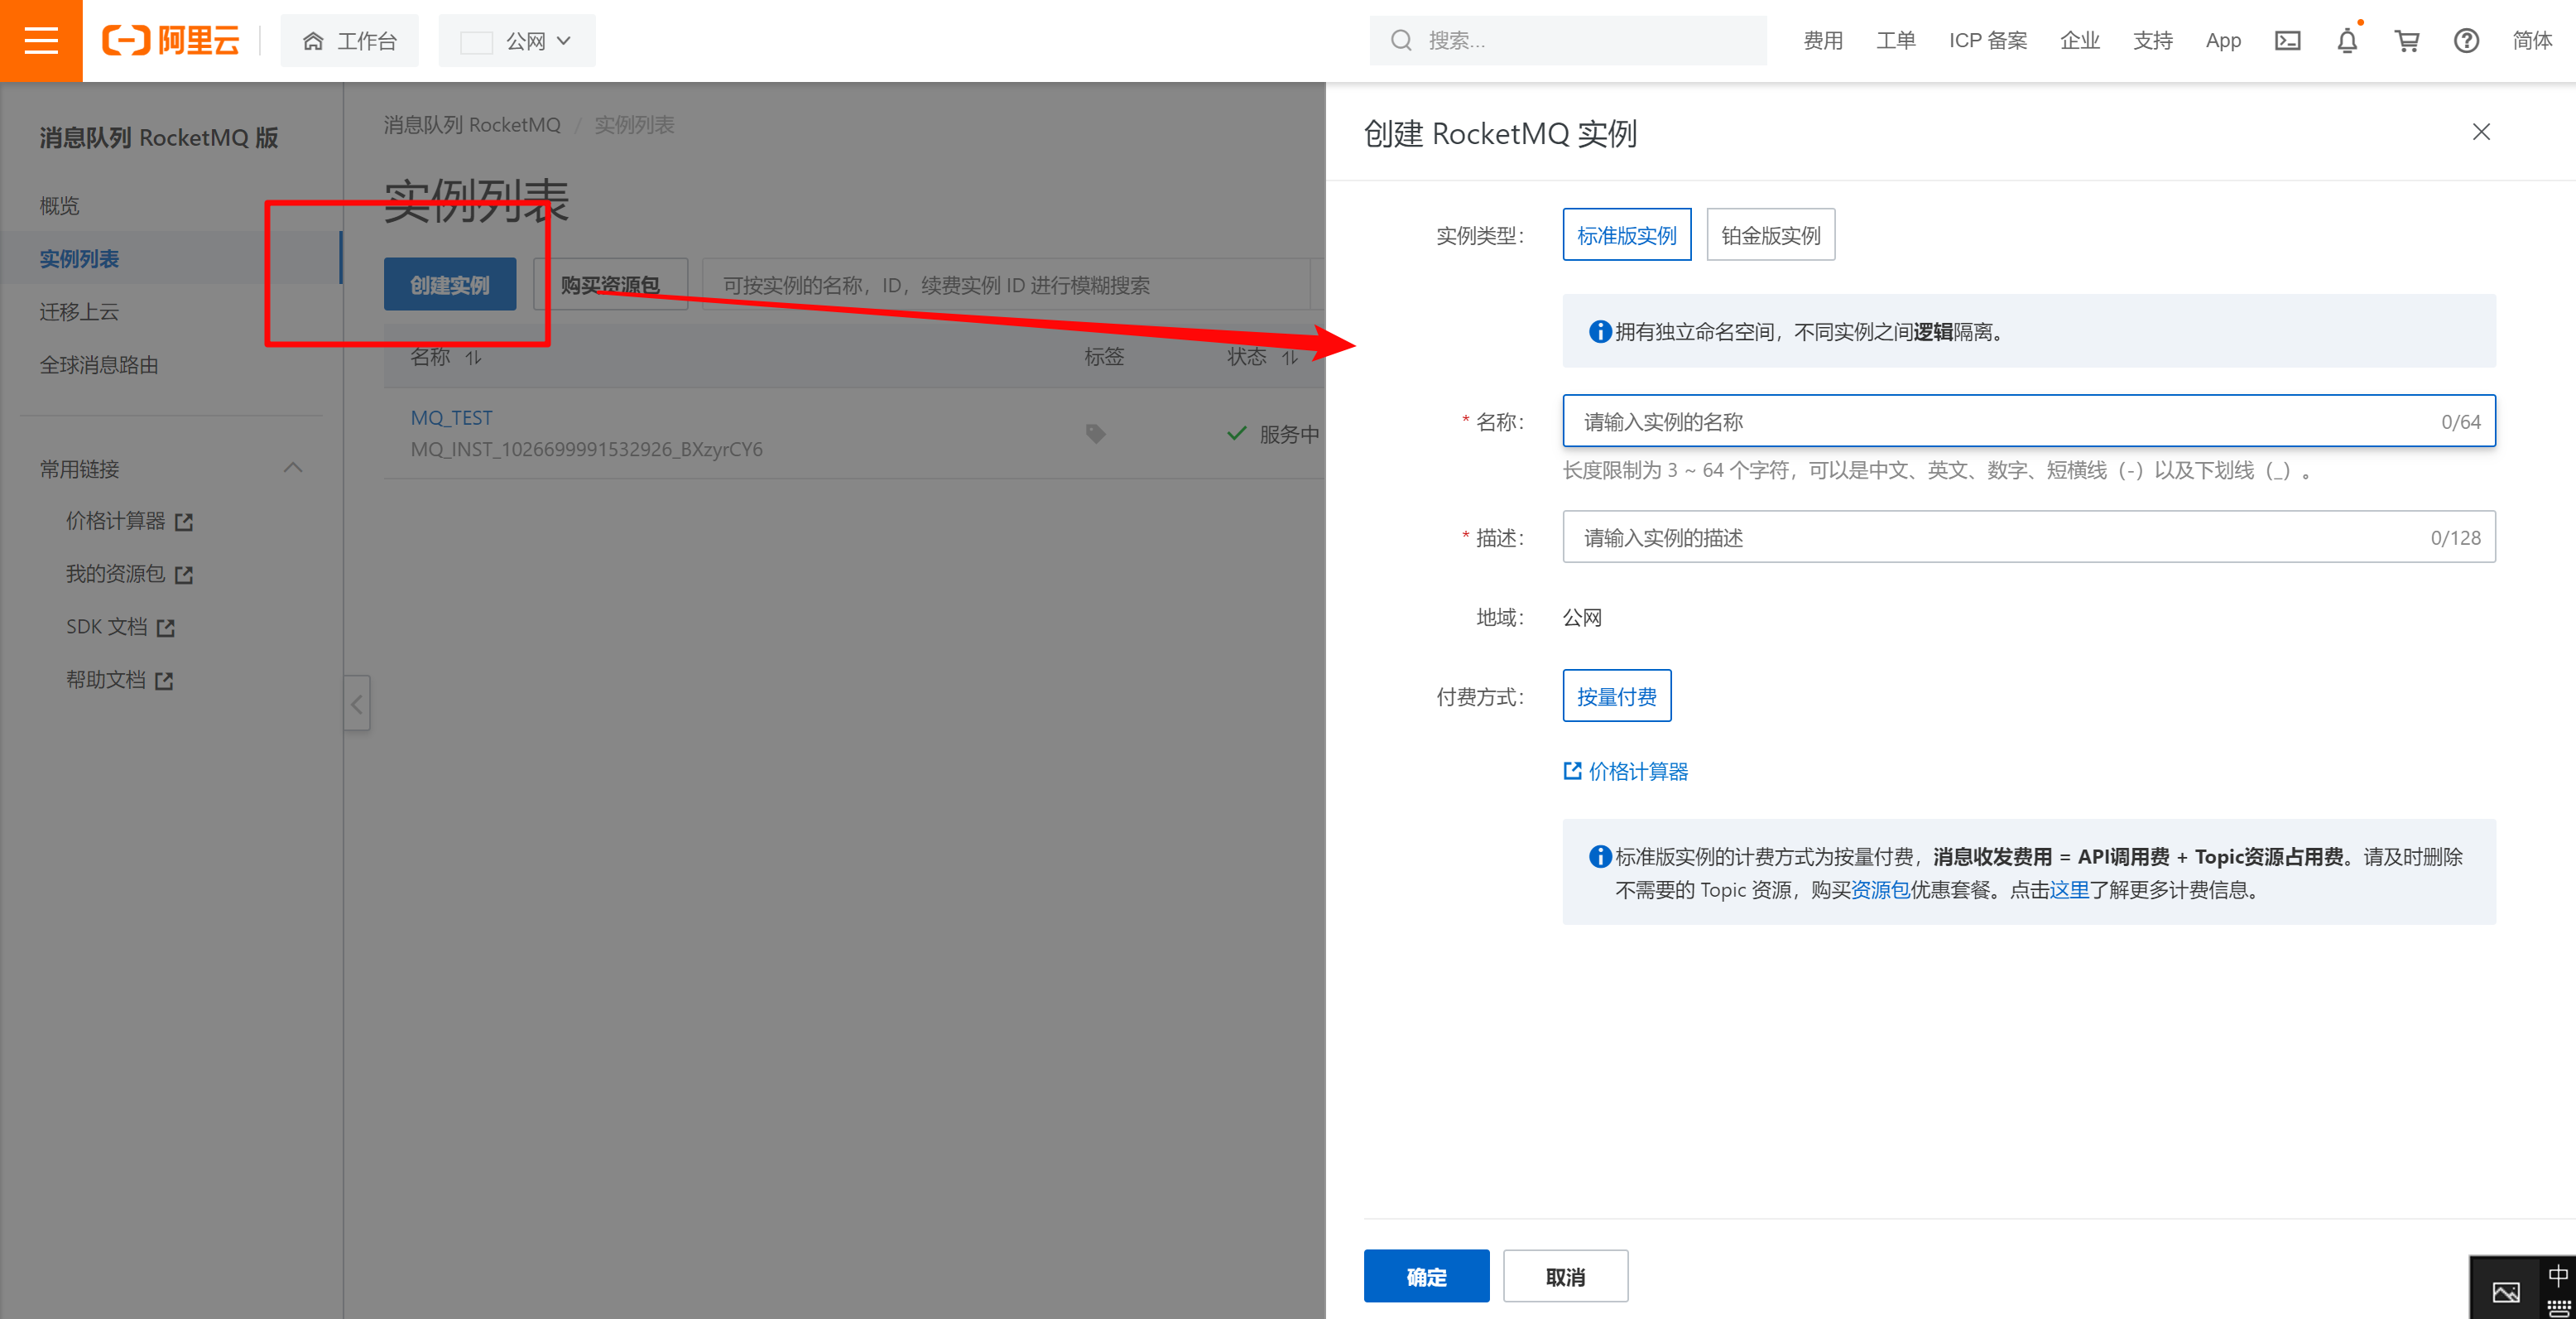
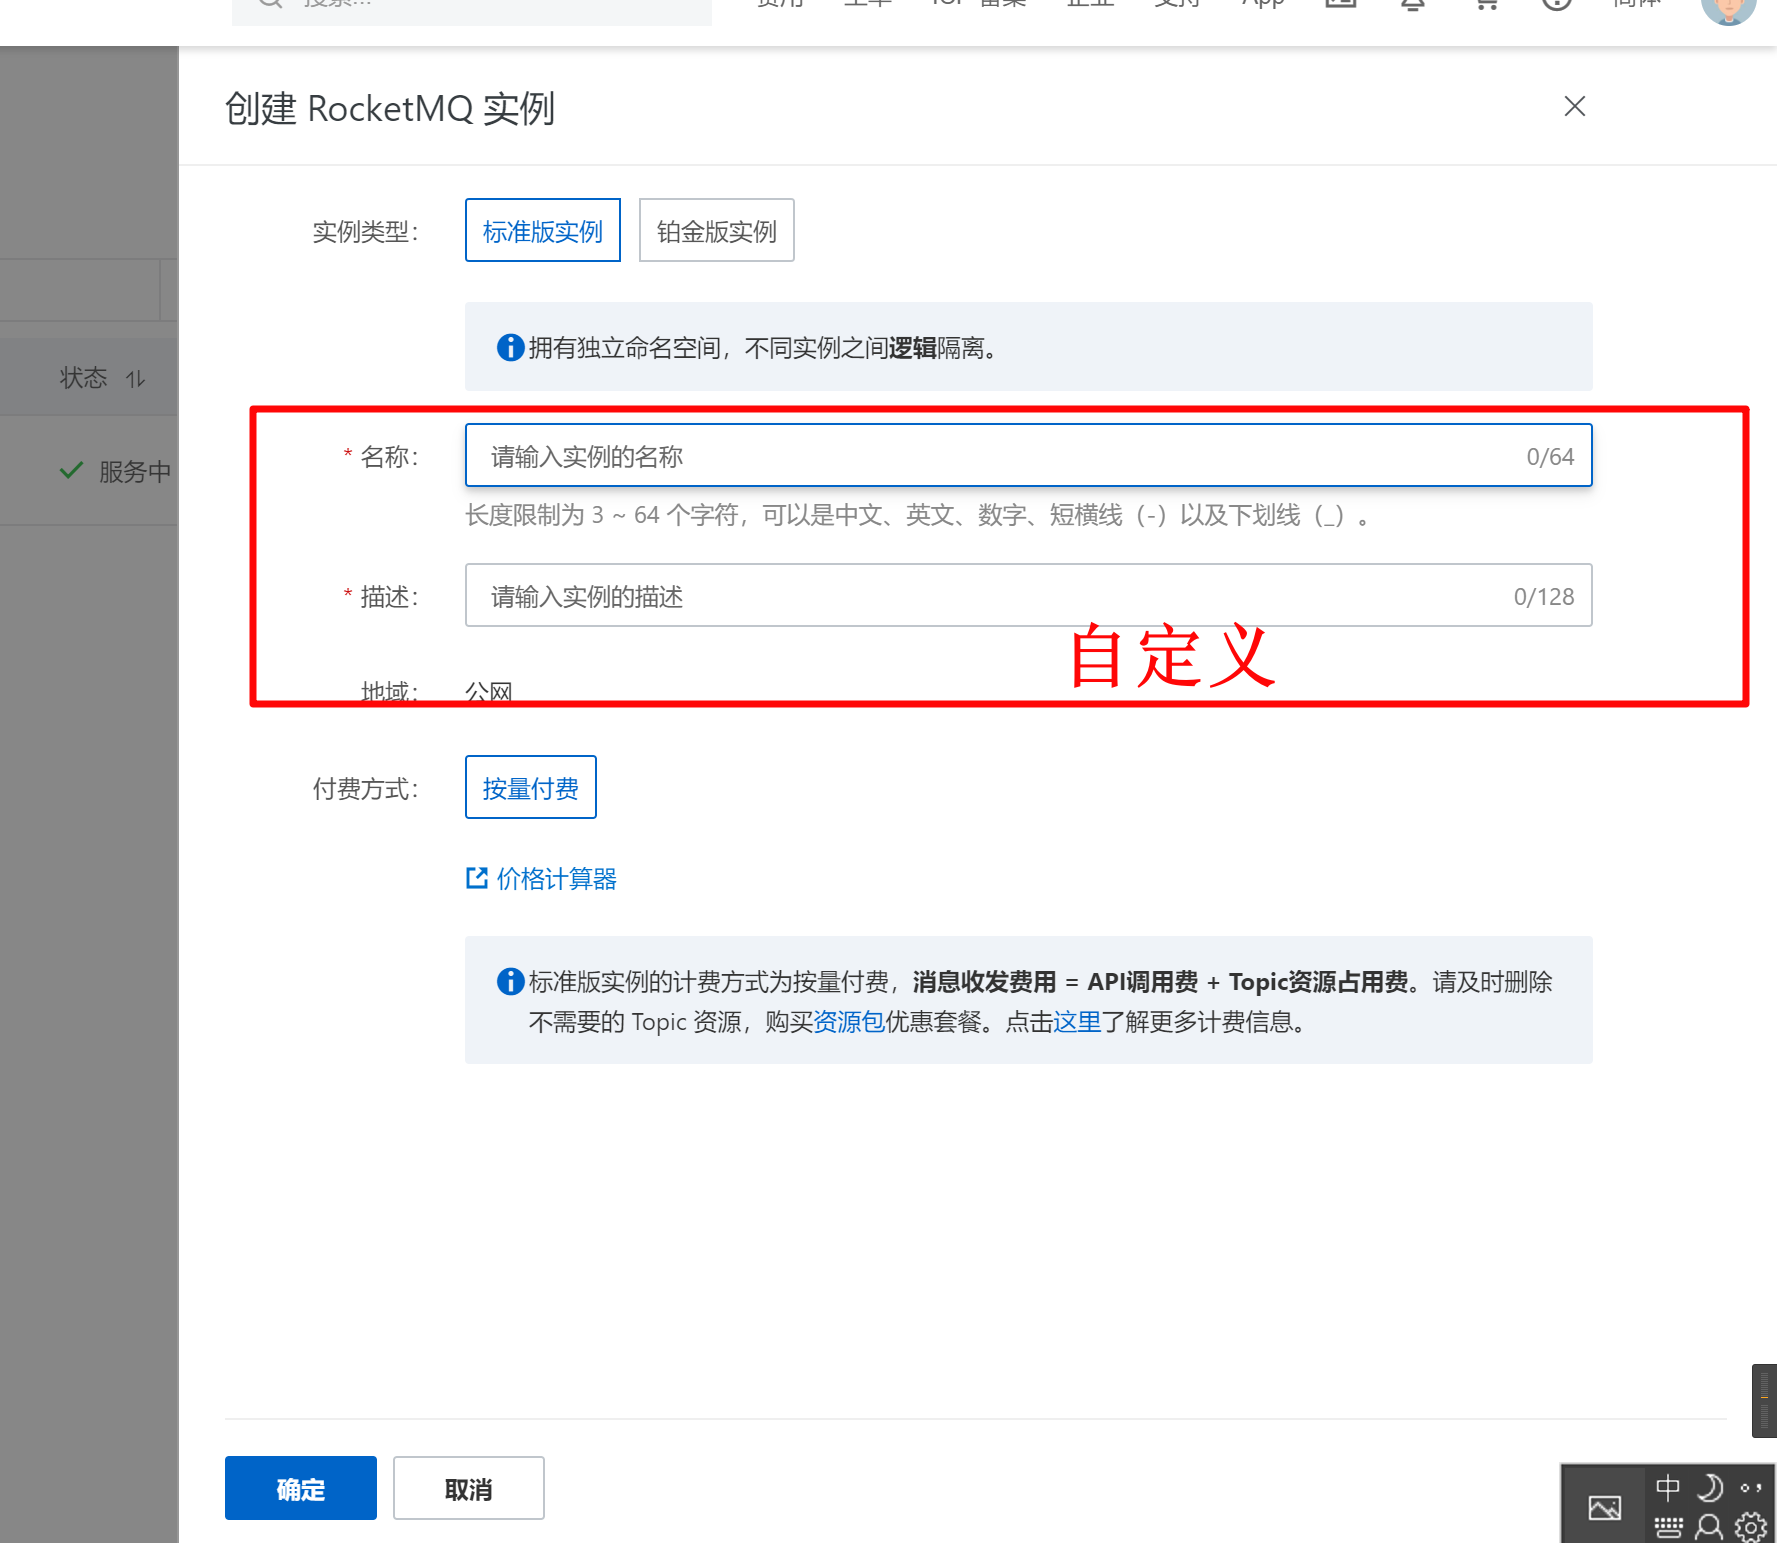
点击确定

按提示创建Group和Topic 即可,然后将Group和Topic的名称,填入到application.properties对应字段中
nameSrvAddr的获取,在创建好Group和Topic后,从这进入到接入点的获取页面

接入点有两个,分别对应了不同的接入方式。TCP和HTTP,我这里用的TCP协议的接入方式
这里只能获取到公网的接入地址,没有内网
开始开发
SpringBoot整合阿里云RocketMQ(普通消息为例)
Maven工程
POM文件依赖
<dependencies>
        <!--主要用来写WEB接口,这里用来测试MQ的生产者-->
        <dependency>
            <groupId>org.springframework.boot</groupId>
            <artifactId>spring-boot-starter-web</artifactId>
        </dependency>
        <!--阿里云ons,方便的接入到云服务-->
        <dependency>
            <groupId>com.aliyun.openservices</groupId>
            <artifactId>ons-client</artifactId>
            <version>1.8.4.Final</version>
        </dependency>
        <!--神器,这里主要用来输出日志@Slf4j-->
        <dependency>
            <groupId>org.projectlombok</groupId>
            <artifactId>lombok</artifactId>
            <version>1.18.16</version>
        </dependency>
        <!--测试用,主要是目的是让功能带着spring容器中进行测试-->
        <dependency>
            <groupId>org.springframework.boot</groupId>
            <artifactId>spring-boot-starter-test</artifactId>
            <scope>test</scope>
        </dependency>
 </dependencies>
application.properties
#启动测试之前请替换如下 XXX 为您的配置,从阿里云MQ里获取,具体获取方式,看下前置步骤
rocketmq.accessKey=xxx
rocketmq.secretKey=xxx
rocketmq.nameSrvAddr=xxx

rocketmq.topic=TpMQTest
rocketmq.groupId=GID_MQTEST
rocketmq.tag=*

rocketmq.orderTopic=XXX
rocketmq.orderGroupId=XXX
rocketmq.orderTag=*
配置类,用于读取application.properties中相应字段的值
import com.aliyun.openservices.ons.api.PropertyKeyConst;
import org.springframework.boot.context.properties.ConfigurationProperties;
import org.springframework.context.annotation.Configuration;

import java.util.Properties;

@Configuration
@ConfigurationProperties(prefix = "rocketmq")
public class MqConfig {

    private String accessKey;
    private String secretKey;
    private String nameSrvAddr;
    private String topic;
    private String groupId;
    private String tag;
    private String orderTopic;
    private String orderGroupId;
    private String orderTag;

    public Properties getMqPropertie() {
        Properties properties = new Properties();
        properties.setProperty(PropertyKeyConst.AccessKey, this.accessKey);
        properties.setProperty(PropertyKeyConst.SecretKey, this.secretKey);
        properties.setProperty(PropertyKeyConst.NAMESRV_ADDR, this.nameSrvAddr);
        return properties;
    }

    public String getAccessKey() {
        return accessKey;
    }

    public void setAccessKey(String accessKey) {
        this.accessKey = accessKey;
    }

    public String getSecretKey() {
        return secretKey;
    }

    public void setSecretKey(String secretKey) {
        this.secretKey = secretKey;
    }

    public String getNameSrvAddr() {
        return nameSrvAddr;
    }

    public void setNameSrvAddr(String nameSrvAddr) {
        this.nameSrvAddr = nameSrvAddr;
    }

    public String getTopic() {
        return topic;
    }

    public void setTopic(String topic) {
        this.topic = topic;
    }

    public String getGroupId() {
        return groupId;
    }

    public void setGroupId(String groupId) {
        this.groupId = groupId;
    }

    public String getTag() {
        return tag;
    }

    public void setTag(String tag) {
        this.tag = tag;
    }

    public String getOrderTopic() {
        return orderTopic;
    }

    public void setOrderTopic(String orderTopic) {
        this.orderTopic = orderTopic;
    }

    public String getOrderGroupId() {
        return orderGroupId;
    }

    public void setOrderGroupId(String orderGroupId) {
        this.orderGroupId = orderGroupId;
    }

    public String getOrderTag() {
        return orderTag;
    }

    public void setOrderTag(String orderTag) {
        this.orderTag = orderTag;
    }
}
消费者的注册类
消费者的build,主要目的是将配置文件里的配置设置到ConsumerBean中,使其在Spring启动时,一同启动。
import com.aliyun.openservices.ons.api.MessageListener;
import com.aliyun.openservices.ons.api.PropertyKeyConst;
import com.aliyun.openservices.ons.api.bean.ConsumerBean;
import com.aliyun.openservices.ons.api.bean.Subscription;
import com.aliyun.openservices.springboot.example.config.MqConfig;
import org.springframework.beans.factory.annotation.Autowired;
import org.springframework.context.annotation.Bean;
import org.springframework.stereotype.Component;
import java.util.HashMap;
import java.util.Map;
import java.util.Properties;
@Configuration
public class ConsumerClient {
@Autowired
private MqConfig mqConfig;
@Autowired
private DemoMessageListener messageListener;
@Bean(initMethod = "start", destroyMethod = "shutdown")
public ConsumerBean buildConsumer() {
ConsumerBean consumerBean = new ConsumerBean();
Properties properties = mqConfig.getMqPropertie();
properties.setProperty(PropertyKeyConst.GROUP_ID, mqConfig.getGroupId());
properties.setProperty(PropertyKeyConst.ConsumeThreadNums, "20");
consumerBean.setProperties(properties);
Map<Subscription, MessageListener> subscriptionTable = new HashMap<Subscription, MessageListener>();
Subscription subscription = new Subscription();
subscription.setTopic(mqConfig.getTopic());
subscription.setExpression(mqConfig.getTag());
subscriptionTable.put(subscription, messageListener);
consumerBean.setSubscriptionTable(subscriptionTable);
return consumerBean;
}
}
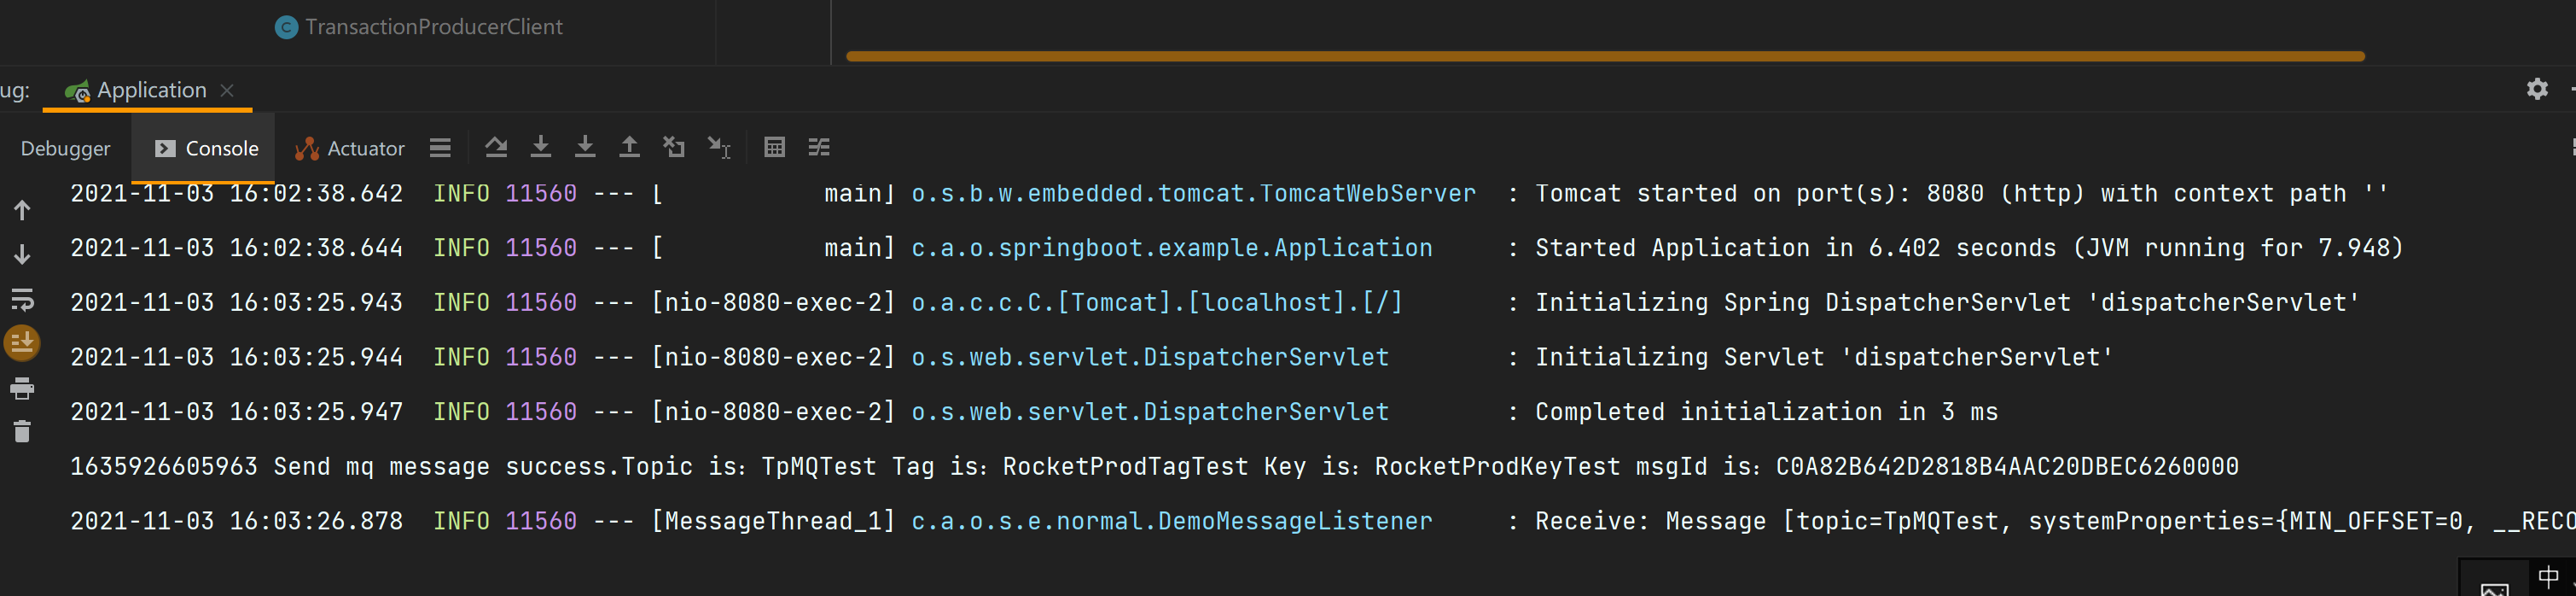
注册完成以后,开启监听,在消息队列有消息时就会进行消费 @Component这个注解,阿里云官方的Demo,并没有出现,导致一直消费者消费不到消息。后来加上以后就能正常消费消息了
import com.aliyun.openservices.ons.api.Action;
import com.aliyun.openservices.ons.api.ConsumeContext;
import com.aliyun.openservices.ons.api.Message;
import com.aliyun.openservices.ons.api.MessageListener;
import lombok.extern.slf4j.Slf4j;
import org.springframework.stereotype.Component;
@Component
@Slf4j
public class DemoMessageListener implements MessageListener {
@Override
public Action consume(Message message, ConsumeContext context) {
log.info("Receive: " + message);
try {
return Action.CommitMessage;
} catch (Exception e) {
return Action.ReconsumeLater;
}
}
}
生产者注册类
import com.aliyun.openservices.ons.api.bean.ProducerBean;
import com.aliyun.openservices.springboot.example.config.MqConfig;
import org.springframework.beans.factory.annotation.Autowired;
import org.springframework.context.annotation.Bean;
import org.springframework.context.annotation.Configuration;

@Configuration
public class ProducerClient {

    @Autowired
    private MqConfig mqConfig;

    @Bean(initMethod = "start", destroyMethod = "shutdown")
    public ProducerBean buildProducer() {
        ProducerBean producer = new ProducerBean();
        producer.setProperties(mqConfig.getMqPropertie());
        return producer;
    }
}
生产者生产消息工具类
import com.aliyun.openservices.ons.api.Message;
import com.aliyun.openservices.ons.api.SendResult;
import com.aliyun.openservices.ons.api.bean.ProducerBean;
import com.aliyun.openservices.ons.api.exception.ONSClientException;
import com.aliyun.openservices.springboot.example.config.MqConfig;
import org.springframework.stereotype.Component;
@Component
public class RocketMessageProducer {
private static ProducerBean producer;
private static MqConfig mqConfig;
public RocketMessageProducer(ProducerBean producer, MqConfig mqConfig) {
this.producer = producer;
this.mqConfig = mqConfig;
}
public static void producerMsg(String tag, String key, String body) {
Message msg = new Message(mqConfig.getTopic(), tag, key, body.getBytes());
long time = System.currentTimeMillis();
try {
SendResult sendResult = producer.send(msg);
assert sendResult != null;
System.out.println(time
+ " Send mq message success.Topic is:" + msg.getTopic()
+ " Tag is:" + msg.getTag() + " Key is:" + msg.getKey()
+ " msgId is:" + sendResult.getMessageId());
} catch (ONSClientException e) {
e.printStackTrace();
System.out.println(time + " Send mq message failed. Topic is:" + msg.getTopic());
}
}
}
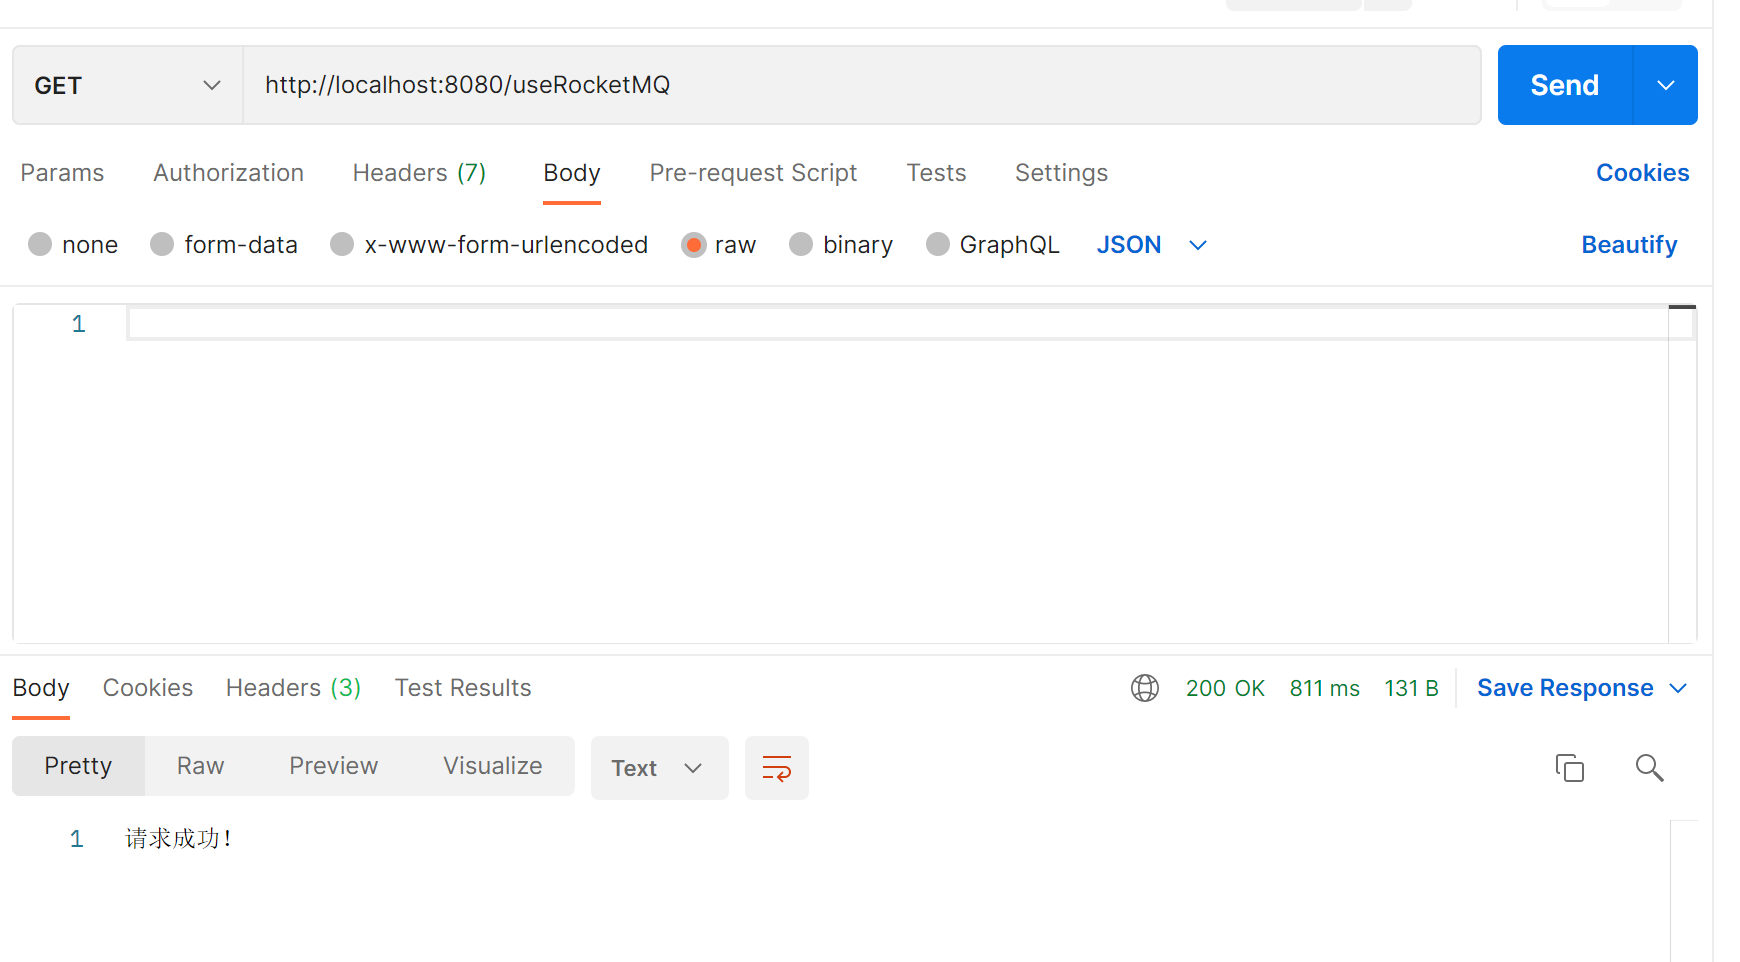
WEB接口,测试Controller类
import com.aliyun.openservices.springboot.example.normal.RocketMessageProducer;
import org.springframework.web.bind.annotation.RequestMapping;
import org.springframework.web.bind.annotation.RequestMethod;
import org.springframework.web.bind.annotation.RestController;
@RestController
public class ProducerController {
@RequestMapping(value = {"/useRocketMQ"}, method = RequestMethod.GET)
public String useRocketMQ() {
RocketMessageProducer.producerMsg("RocketProdTagTest","RocketProdKeyTest","RocketProdBodyTest");
return "请求成功!";
}
}
好了 代码就放在下面了
Gitee代码地址


 已为社区贡献3条内容

所有评论(0)