
构建Ubuntu20.04根文件系统并移植到RK3568
主要通过ubuntu-base最小根文件系统按需去制作对应版本的根文件系统并通过瑞芯微的烧录工具烧录到rootfs中。实际测试时会因为接入网络系统无网络状态,开机时会等待很久,卡在网络上连接要5分钟。因为我需要的是Ubuntu20.04的Ubuntu-base所以我是从。RK3568有两个网络端口,相应的在配置的时候我们要将两个网口都配置上。下载的,具体如图,选择开发板架构的适配类型arm64或者
文章目录
概要
主要通过ubuntu-base最小根文件系统按需去制作对应版本的根文件系统并通过瑞芯微的烧录工具烧录到rootfs中
一 构建流程
- 下载
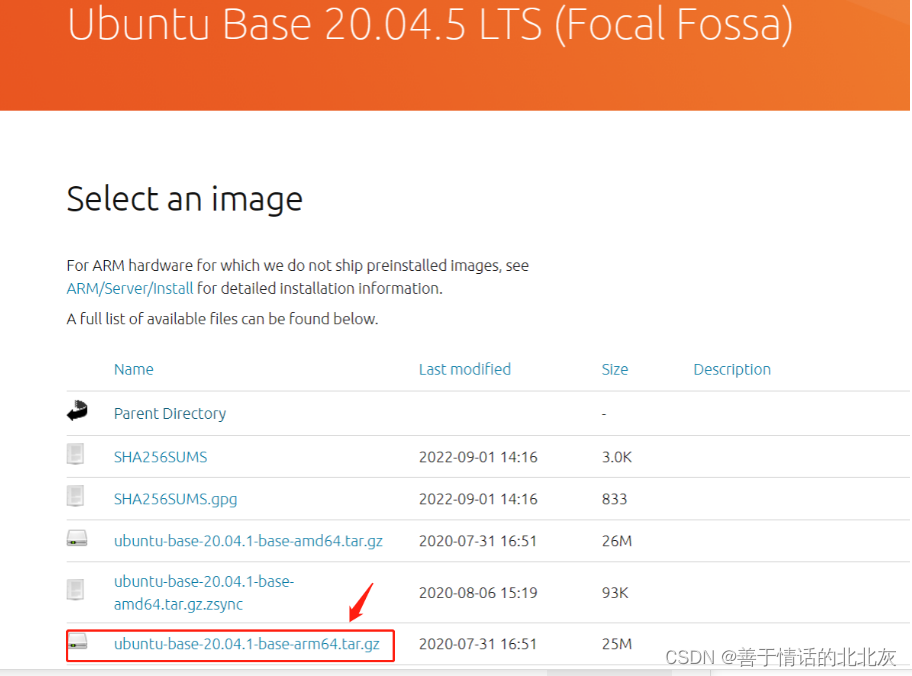
ubuntu-base-20.04.1-base-arm64.tar.gz - 安装
qemu-user-static - 挂载ubuntu_rootfs
- 打包成镜像
- 烧录进开发板
注意:在最后烧录前,要保证你的开发板上的固件包以及boot.img模块是由原厂sdk编译烧录的,否则后期会出现获取不到ip,或者静态设置ip后网络ping不通的情况
1 下载安装ubuntu20.04的根文件系统
因为我需要的是Ubuntu20.04的Ubuntu-base所以我是从Ubuntu Base 20.04.5 LTS (Focal Fossa)下载的,具体如图,选择开发板架构的适配类型arm64或者其他。
2 解压根文件系统
#创建一个文件夹存放根文件系统
mkdir ubuntu_roofs
#解压到文件夹
sudo tar -xvf ubuntu-base-20.04.1-base-arm64.tar.gz -C ubuntu_rootfs/
3 配置根文件系统
- 解压完成后需要配置网络
#拷贝本机的resolv.conf文件
cp /etc/resolv.conf  ubuntu_roofs/etc/resolv.conf
- 更换软件源,编辑根文件系统中的软件源配置文件,ARM版本的镜像为ubuntu-ports
sudo vim ubuntu_rootfs/etc/apt/source.list
# See http://help.ubuntu.com/community/UpgradeNotes for how to upgrade to
   # newer versions of the distribution.
   deb http://mirrors.aliyun.com/ubuntu-ports/ focal main restricted
   # deb-src http://mirrors.aliyun.com/ubuntu-ports/ focal main restricted

    ## Major bug fix updates produced after the final release of the
    ## distribution.
    deb http://mirrors.aliyun.com/ubuntu-ports/ focal-updates main restricted
    # deb-src http://mirrors.aliyun.com/ubuntu-ports/ focal-updates main restricted

    ## N.B. software from this repository is ENTIRELY UNSUPPORTED by the Ubuntu
    ## team. Also, please note that software in universe WILL NOT receive any
    ## review or updates from the Ubuntu security team.
    deb http://mirrors.aliyun.com/ubuntu-ports/ focal universe
    # deb-src http://mirrors.aliyun.com/ubuntu-ports/ focal universe
    deb http://mirrors.aliyun.com/ubuntu-ports/ focal-updates universe
    # deb-src http://mirrors.aliyun.com/ubuntu-ports/ focal-updates universe

     ## N.B. software from this repository is ENTIRELY UNSUPPORTED by the Ubuntu
     ## team, and may not be under a free licence. Please satisfy yourself as to
     ## your rights to use the software. Also, please note that software in
     ## multiverse WILL NOT receive any review or updates from the Ubuntu
     ## security team.
     deb http://mirrors.aliyun.com/ubuntu-ports/ focal multiverse
     # deb-src http://mirrors.aliyun.com/ubuntu-ports/ focal multiverse
     deb http://mirrors.aliyun.com/ubuntu-ports/ focal-updates multiverse
     # deb-src http://mirrors.aliyun.com/ubuntu-ports/ focal-updates multiverse

     ## N.B. software from this repository may not have been tested as
     ## extensively as that contained in the main release, although it includes
     ## newer versions of some applications which may provide useful features.
     ## Also, please note that software in backports WILL NOT receive any review
     ## or updates from the Ubuntu security team.
     deb http://mirrors.aliyun.com/ubuntu-ports/ focal-backports main restricted universe multiverse
     # deb-src http://mirrors.aliyun.com/ubuntu-ports/ focal-backports main restricted universe multiverse

     ## Uncomment the following two lines to add software from Canonical's
     ## 'partner' repository.
     ## This software is not part of Ubuntu, but is offered by Canonical and the
     ## respective vendors as a service to Ubuntu users.
     # deb http://archive.canonical.com/ubuntu focal partner
     # deb-src http://archive.canonical.com/ubuntu focal partner

     deb http://mirrors.aliyun.com/ubuntu-ports/ focal-security main restricted
     # deb-src http://mirrors.aliyun.com/ubuntu-ports/ focal-security main restricted
     deb http://mirrors.aliyun.com/ubuntu-ports/ focal-security universe
     # deb-src http://mirrors.aliyun.com/ubuntu-ports/ focal-security universe
     deb http://mirrors.aliyun.com/ubuntu-ports/ focal-security multiverse
     # deb-src http://mirrors.aliyun.com/ubuntu-ports/ focal-security multiverse
- 配置仿真开发环境,宿主机下的Ubuntu默认不支持ARM架构,通过安装qemu-user-static仿真运行,构建Ubuntu文件系统
//1.安装qemu-user-static仿真器
sudo apt install qemu-user-static
//2.拷贝 qemu-aarch64-static 到 ubuntu_rootfs/usr/bin/ 目录下。
sudo cp /usr/bin/qemu-aarch64-static ubuntu_rootfs/usr/bin/
4 挂载根文件系统
4.1 编写挂载脚本mount.sh,用于挂载根文件系统运行所需要的设备和目录
#!/bin/bash
function mnt() {
    echo "MOUNTING"
    sudo mount -t proc /proc ${2}proc
    sudo mount -t sysfs /sys ${2}sys
    sudo mount -o bind /dev ${2}dev
    #sudo mount -t devpts -o gid=5,mode=620 devpts ${2}dev/pts
    sudo mount -o bind /dev/pts ${2}dev/pts
    sudo chroot ${2}
}
function umnt() {
    echo "UNMOUNTING"
    sudo umount ${2}proc
    sudo umount ${2}sys
    sudo umount ${2}dev/pts
    sudo umount ${2}dev
}
if [ "$1" == "-m" ] && [ -n "$2" ];
then
        mnt $1 $2
elif [ "$1" == "-u" ] && [ -n "$2" ];
then
        umnt $1 $2
else
        echo ""
        echo "Either 1'st, 2'nd or both parameters were missing"
        echo ""
        echo "1'st parameter can be one of these: -m(mount) OR -u(umount)"
        echo "2'nd parameter is the full path of rootfs directory(with tralling '/')"
        echo ""
        echo "For example: ch-mount -m /media/sdcard"
        echo ""
        echo 1st parameter : ${1}
        echo 2nd parameter : $[2]
fi
4.2 增加权限、挂载、卸载
#增加脚本执行权限
sudo chmod +x mount.sh
#挂载根文件系统
./mount -m ubuntu_rootfs/
#退出根文件系统
exit
#卸载根文件系统
./mount.sh -u ubuntu_rootfs/
5 打包根文件系统镜像
//首先创建一个空镜像文件,大小根据根据根文件系统的软件安装大小(是否安装图形化界面图像化界面)
//图形化界面一般要6g大小,非图形化界面2-4g左右都可
1  dd if=/dev/zero of=ubuntu_rootfs.img bs=1M count=4096

//将该文件格式化为ext4文件系统
2  mkfs.ext4 ubuntu_rootfs.img

//将镜像文件挂载到一个空文件中,并将ubuntu_roofs中的文件拷贝到该空文件中
3  mkdir ubuntu_base_rootfs
4  chmod 777 ubuntu_base_rootfs
5  mount ubuntu_rootfs.img ubuntu_base_rootfs
6  cp -rfp ubuntu_rootfs/* ubuntu_base_rootfs/


//复制完以后用e2fsck修复及检测镜像文件系统,resize2fs减小镜像文件的大小
7  umount ubuntu_base_rootfs/
8  e2fsck -p -f ubuntu_rootfs.img
9  resize2fs -M ubuntu_rootfs.img
6 烧录根文件系统镜像到开发板中
用瑞芯微提供的瑞芯微开发工具RKDevTool.exe去烧录文件系统即可
二 技术细节
挂载进入根文件系统后需要安装一些软件和配置信息,确保能够正常使用串口登录以及网络服务,一切配置完以后可以exit退出根文件系统并卸载根文件系统然后进行打包镜像操作
1 安装必要软件
#更新软件
apt update
apt upgrade
#安装必要工具
apt install vim bash-completion net-tools iputils-ping ifupdown ethtool ssh rsync udev htop rsyslog nfs-common language-pack-en-base sudo psmisc
#配置系统的时区、文字编码
apt install locales tzdata
# 时区选择
# Asia/Shanghai
dpkg-reconfigure locales
# 勾选英文和中文环境
# en_US.UTF-8 UTF-8
# zh_CN.UTF-8 UTF-8
2 安装配置配置桌面环境(可选)
apt install ubuntu-desktop
3 设置主机名和主机解析
# 主机名
echo "RK3588" > /etc/hostname
# 主机 IP
echo "127.0.0.1 localhost" >> /etc/hosts
echo "127.0.0.1 RK3588" >> /etc/hosts
echo "127.0.0.1 localhost RK3588" >> /etc/hosts
实际测试时会因为接入网络系统无网络状态,开机时会等待很久,卡在网络上连接要5分钟
//修改下面这个文件
vim /lib/systemd/system/networking.service

//将里面的TimeoutStartSec=5min修改为
TimeoutStartSec=5sec
4 串口调试设置root登录
vi /lib/systemd/system/serial-getty\@.service
# 替换ExecStart这行
ExecStart=-/sbin/agetty --autologin root --noclear %I $TERM
5 禁用系统休眠
# 设置禁止休眠
systemctl mask sleep.target suspend.target hibernate.target hybrid-sleep.target
# 查看休眠状态
systemctl status sleep.target
6 配置dhcp分配网络
RK3568有两个网络端口,相应的在配置的时候我们要将两个网口都配置上
#修改网络配置文件
vim /etc/network/interfaces

以下是该文件具体内容
# interfaces(5) file used by ifup(8) and ifdown(8)
# Include files from /etc/network/interfaces.d:
auto eth0
iface eth0 inet dhcp
auto eth1
iface eth1 inet dhcp
source-directory /etc/network/interfaces.d
7 修改系统重启默认等待时间
重启开发板的时候,会遇到进程没有结束系统在等待,默认的等待时间很长,导致重启时间变慢
我们可以通过修改默认等待时间解决这个问题
vim /etc/systemd/system.conf
找到如下几行,并将其注释解除掉,然后修改 DefaultTimeoutStopSec=1s
 #DefaultTimeoutStartSec=90s
 #DefaultTimeoutStopSec=90s
 #DefaultTRestartSec=100ms
8 扩充emmc分区
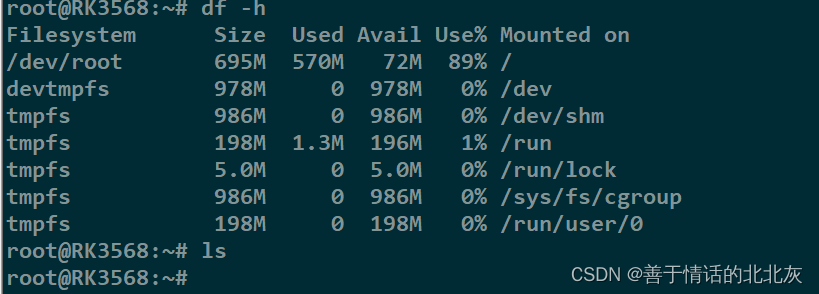
Ubuntu根文件系统打包成镜像并烧录到开发板以后,发现所占分区大小和镜像文件的大小是一样的,而实际上原先由buildroot构建的根文件系统在这个分区上是5.9G,所以下面这个图实际需求这里是不符合的
 参考到其他博主的资料构建Ubuntu根文件系统扩充分区结合实际发现,需要充分利用到emmc的空间,在第一次运行时就要扩充分区大小,RK3568默认是对/dev/mmcblk0p6分区进行扩充。创建一个脚本和服务来扩充分区
如果不知道实际的文件系统设备的话可以用下面的方式进行查询
- mount | grep “^/dev”
- lsblk
扩充分区最主要的就是需要用到resize2fs 这个命令工具,以下是通过脚本和服务实现的过程
- 首先创建一个脚本
vim etc/init.d/firstboot.sh,记得创建完成后要添加可执行权限chmod +x etc/init.d/firstboot.sh
# 以下是firstboot.sh的内容
#!/bin/bash -e
# first boot configure
# resize filesystem mmcblk0p6
if [ ! -e "/usr/local/first_boot_flag" ] ;
then
  echo "Resizing /dev/mmcblk0p6..."
  resize2fs /dev/mmcblk0p6
  touch /usr/local/first_boot_flag
fi
- 其次是创建一个服务去实现脚本
vim lib/systemd/system/firstboot.service,然后再启动该服务systemctl enable firstboot.service
# 以下是firstboot.service的内容
#start
[Unit]
Description=Setup rockchip platform environment
Before=lightdm.service
After=resize-helper.service
[Service]
Type=simple
ExecStart=/etc/init.d/firstboot.sh
[Install]
WantedBy=multi-user.target
#end
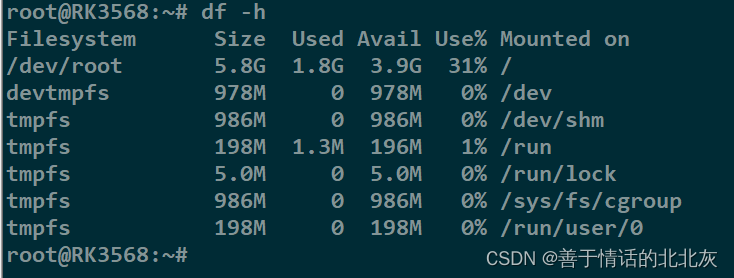
服务启动成功后的结果是这样的
问题小结
1. 折腾的过程中碰到了很多问题,其中最主要的问题便是获取ip的问题,一直只能获取到inet6但是无法获取到inet,排查了很多方向,试过/etc/network/interfaces文件、netplan的配置文件,netmanager网络管理都行不通,再经过排查发现是dhcp分配有问题,但是安装dhcp服务器后对/etc/dhcp/dhcpd.conf和dhcp的监听端口设置进行配置修改也无法成功配置,遂心态崩溃,后面想着是不是驱动内核层面的问题,试着追溯回源,想起自己在烧根文件系统之前烧的boot.img是我之前项目修改过dts的内核模块,非sdk原初厂编译的boot.img,重新烧录后网络问题遂解决
2. 板子跑起来Ubuntu根文件系统后,apt安装软件的时候出现了设备空间不足的情况,发现不到1G,很奇怪觉得板子明明空间那么大,为什么现在就挂载的文件系统那么小,百思不得其解,后面参考了一篇文章才发现原因所在,可从本文中的扩充分区那一节看到具体原因以及解决方案

瓜分20万奖金 获得内推名额 丰厚实物奖励 易参与易上手
更多推荐


 8
8 0
0- 0


 已为社区贡献1条内容

所有评论(0)