
用Shader Graph创建风格化水体Shader | URP
导语这篇教程来自 Unity 社区 @alexanderameye,将一步步介绍怎样用 Unity 的 Shader Graph 创建一款漂亮的风格化水体着色器。我们的目标不是制作物理上精准的水,而是实现一种实时、可控且好看的风格化水体。着色器文件可以在文末找到,一起来学习吧~1.最初准备⚠ 本教程使用Unity 2022.2.6f1和Universal RP 14.0.6制作而成。在开始教程前,
·
导语
这篇教程来自 Unity 社区
@alexanderameye
,将一步步介绍怎样用 Unity 的 Shader Graph 创建一款漂亮的风格化水体着色器。我们的目标不是制作物理上精准的水,而是实现一种
实时、可控且好看的
风格化水体。
着色器文件可以在文末找到,一起来学习吧~

1.最初准备
⚠ 本教程使用 Unity 2022.2.6f1 和 Universal RP 14.0.6 制作而成。
在开始教程前,我们必须先准备好以下几件事。
渲染设定
在 URP 管线配置文件里启用
Depth(深度)和 Opaque(不透明)纹理
。
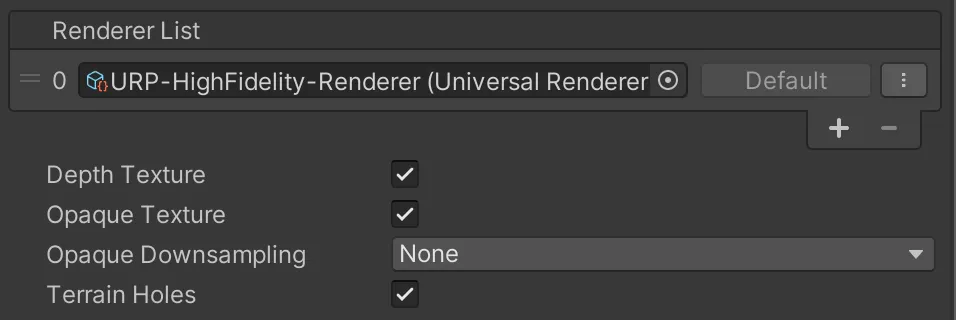
图注:URP 渲染设定
着色器与材质
新建一个
Unlit(不受光)
的 Shader Graph,将材质设为
Unlit
,表面类型设为
Opaque
。

图注:着色器设定
接着用这个着色器创建一份材质。
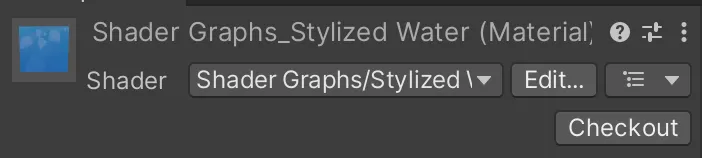
图注:风格化水材质
选中新材质,在 Advanced Options(高级选项)里把 Render Queue(渲染队列)改为
Transparent(透明)
。

图注:材质设定
场景
场景方面,我用了
Artkovski
的
The Illustrated Nature
,不过你可以用别的场景。
在场景里,我新建了一个平面,把材质添加了上去。
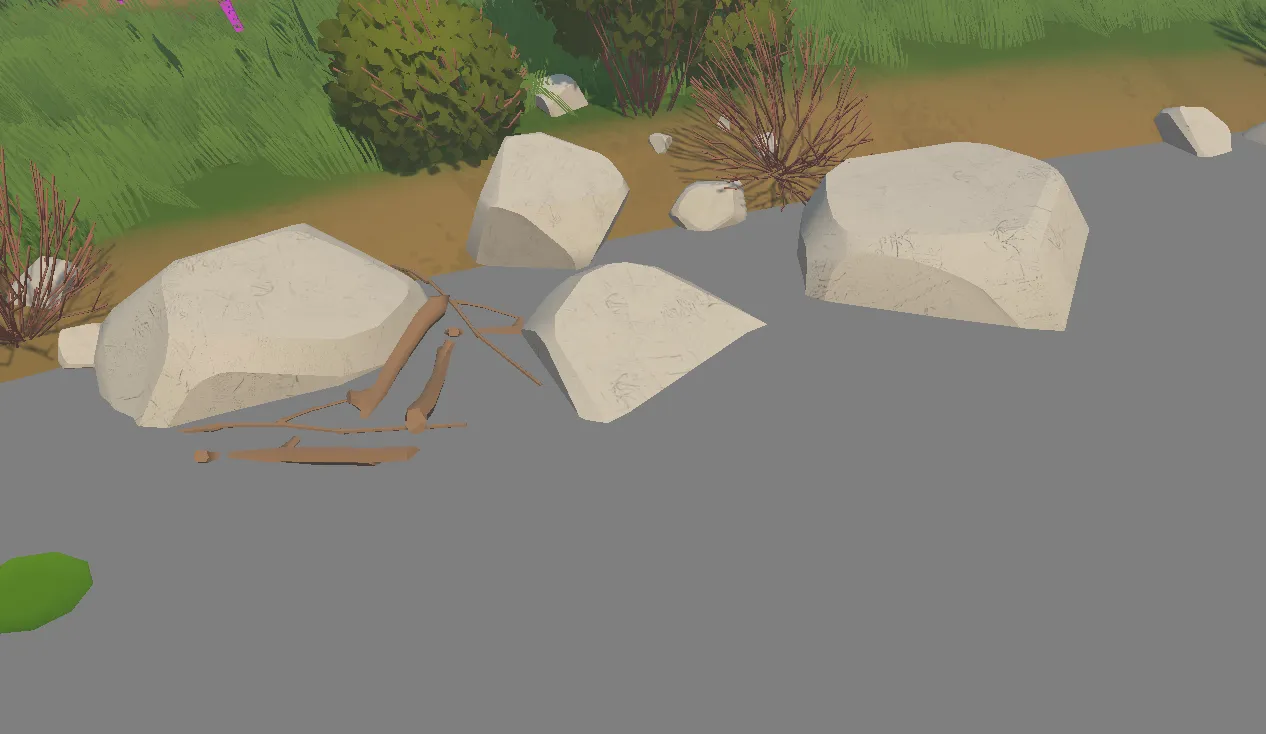
我们接下来就开始吧!
2.求出水深 (Water Depth)
制作水着色器最重要的一步是
确定水的深度 (Water Depth)
。我们会用深度值来驱动许多其他效果,比如变色、透明、和泡沫。
相对摄像机深度
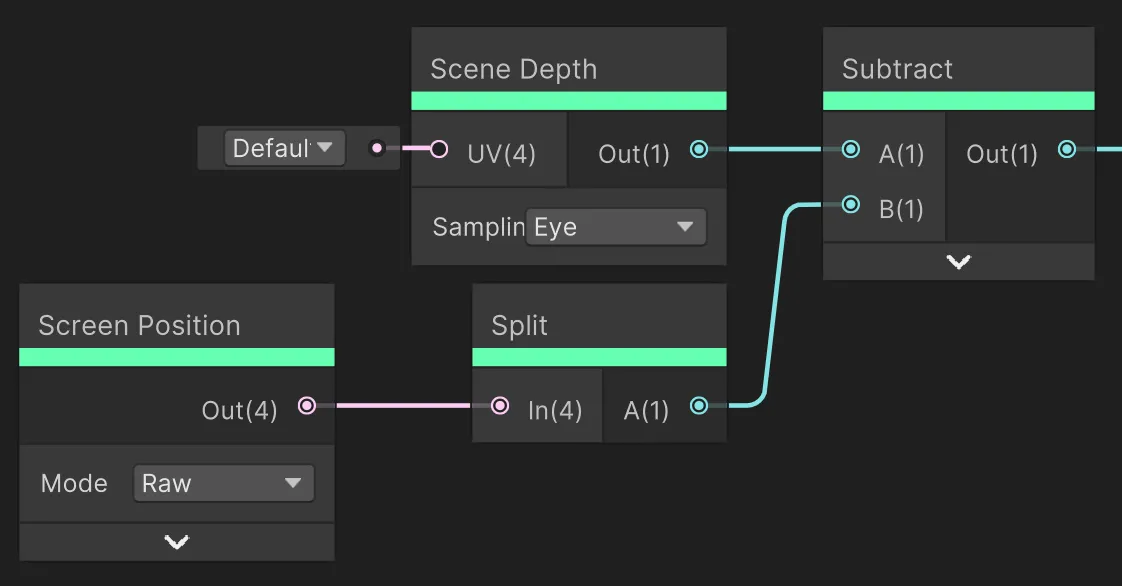
大部分水着色器教程基本都用以下这套节点来计算由浅(1,白色)到深(0,黑色)的渐变深度。

图注:相对于摄像机的渐变深度
在这套节点里,
Scene Depth (Eye)
节点会返回摄像机与水下某个物体的距离(按世界的距离单位米计算)。你可以把它想象成一条从摄像机射向水的射线,它在第一次击中水面下某个物体时便会停止。这条射线所达到的距离就是节点返回的距离。

图注:场景深度(Scene Depth)-屏幕位置(Screen Position)=水深(Water Depth)
我们真正在意的不是摄像机到水底物体的距离,而是
水面到水底物体的距离
。为此,我们能用
Screen Position (Raw)
节点的alpha通道来获取摄像机和水面间的距离,然后两段距离相减来取得代表
水深的距离
。正如上方图表所示。
图注:深度相减
最后我们
Divide
(除以)一个深度范围/距离控制参数,
Saturate
(限值)输出(将范围限为0到1),然后用一个
One Minus
(一减)运算在河岸求得白色值,在水深处得出黑色值。
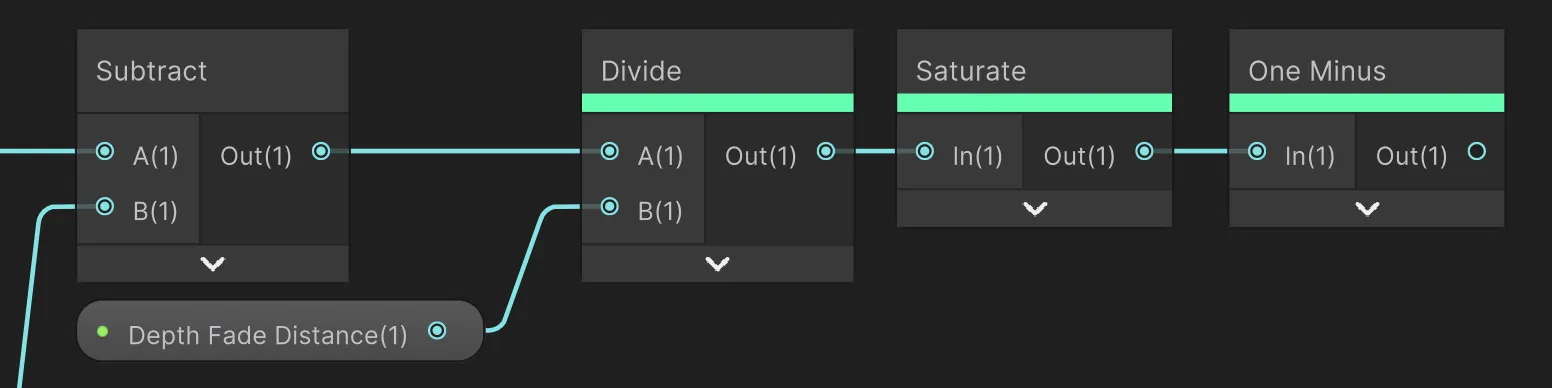
图注:深度除法运算
需要注意的是,这个深度值
不是水的垂直深度
。如果你看向水面,射线会从眼睛向水的某一点发射,而这些节点所求出的距离是射线命中水面到命中水底所穿过的距离。意味着
水面上同一点所返回的深度值将由你看向水面的角度决定
。
这种效果/瑕疵可在下方摄像机晃动的动图中看到。这一点在这块石头上尤为明显,水面上同一点的颜色会根据观测角的大小而变黑或变白。

世界空间深度
个人来说,我不喜欢上边做的深度效果。接收到的深度值会随摄像机的移动而改变,而我更喜欢独立于摄像机位置的固定深度值。
💡这只是个人喜好,你完全可以继续用相对于摄像机的深度运算。
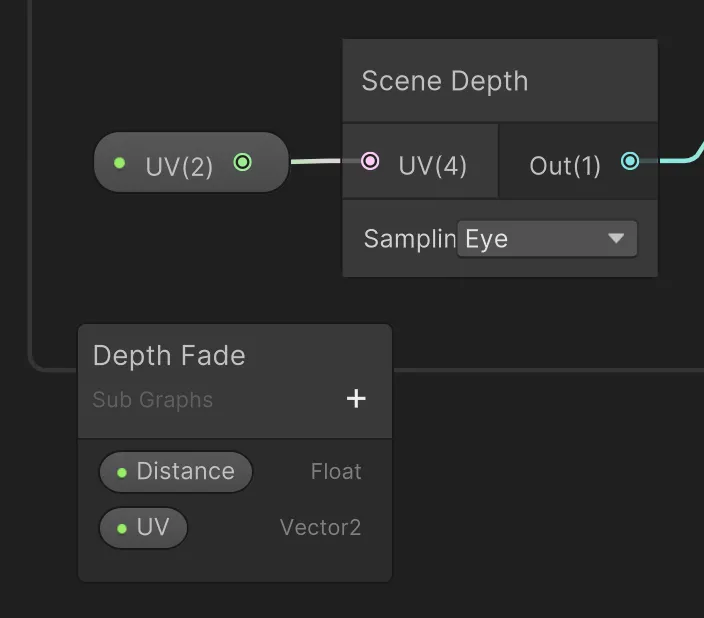
为了“修”这种相对于摄像机的深度,我另找了一种在游戏世界里计算深度的方法。
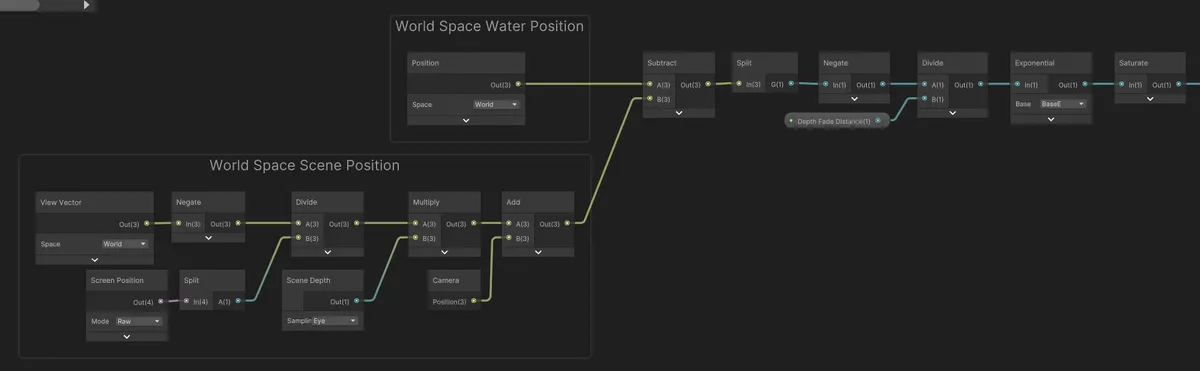
图注:世界空间深度衰减
这套节点的水深测量方式就如同用量尺垂直地伸入水体,量出的是水面到水底的距离。即使摄像机再怎么动,计算出的深度值也不会发生改变。

Depth Fade子图表
为了保持整张表干净整洁,把刚刚创建的所有节点划到一张
Depth Fade
子图表里不失为一个好办法。

图注:深度衰减的子图表
3.颜色与不透明度
在这一节我们将用刚刚求出的深度值为水面上色。
浅水与深水
有了水的深度后,我们能用它来控制水的颜色和透明度。直接把
Depth Fade
子图表的输出(一个0到1之间的值)连到
Lerp
节点,形成浅水色到深水色的渐变。
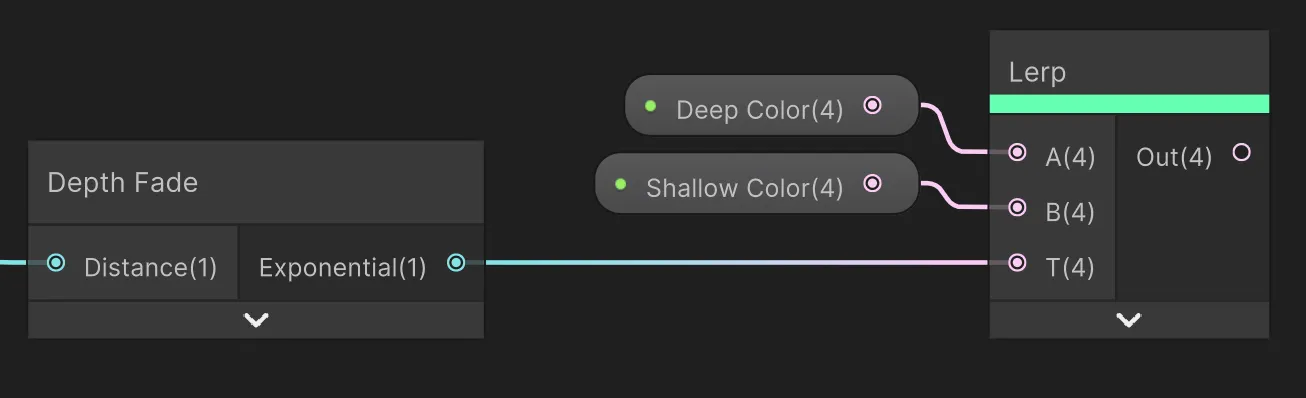
图注:浅水与深水色
深浅水颜色的逐渐变化能带来不错的效果。
拓展:HSV线性渐变
正如Alan Zucconi在他
讨论颜色插值的文章
里所解释的,在HSV空间而不是RGB空间计算渐变可以改善水的颜色。要在Shader Graph里做到这点,我们可以用一个自定义节点将RGB颜色转换成HSV,完成插值后再重新转换成RGB。
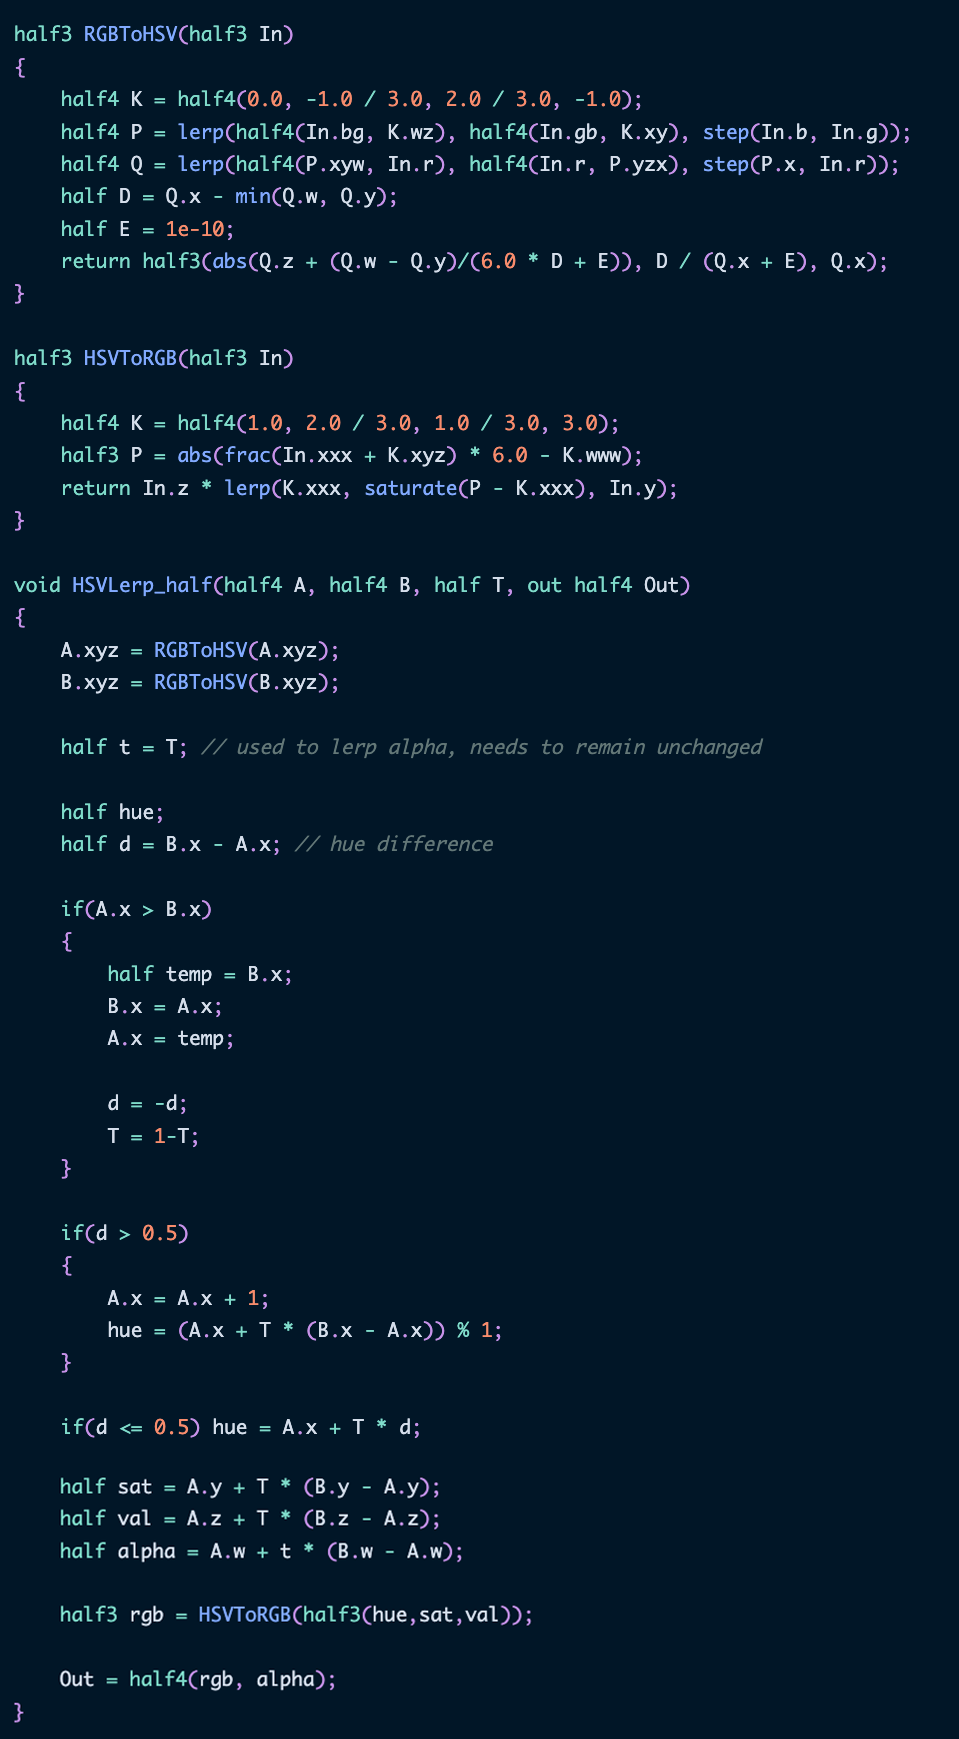
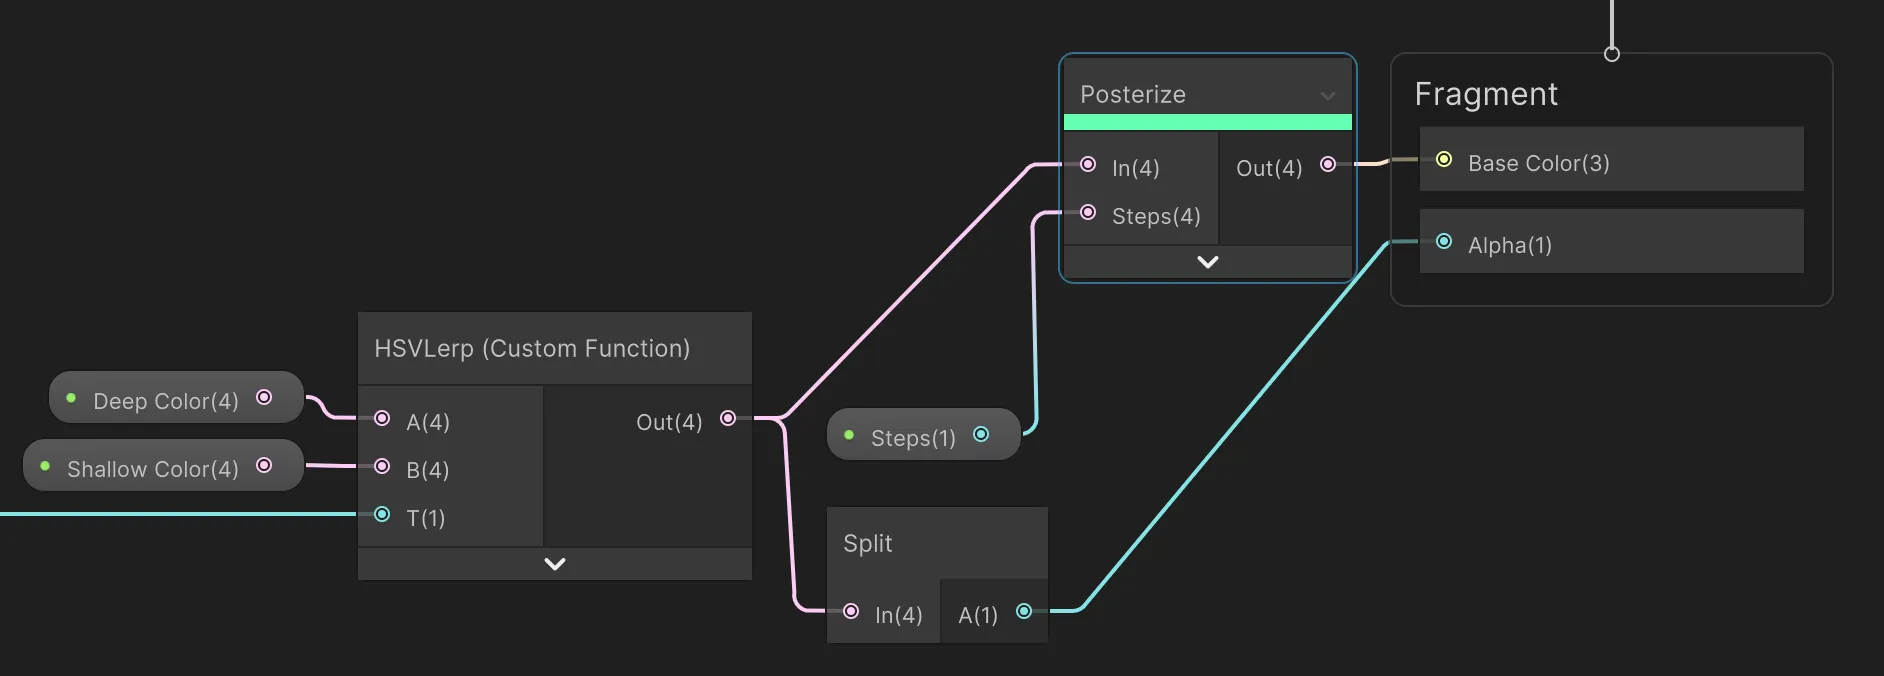
这个自定义节点可以像这样接入前边的图表里。

图注:HSV颜色线性渐变
这样对于水的颜色来说,深水和浅水中间地带的色彩会显得更加鲜艳。
拓展:海报化
海报化是一种很酷又好做的效果。我们只需要添加
Posterize
节点,用一个属性来控制步骤数即可。
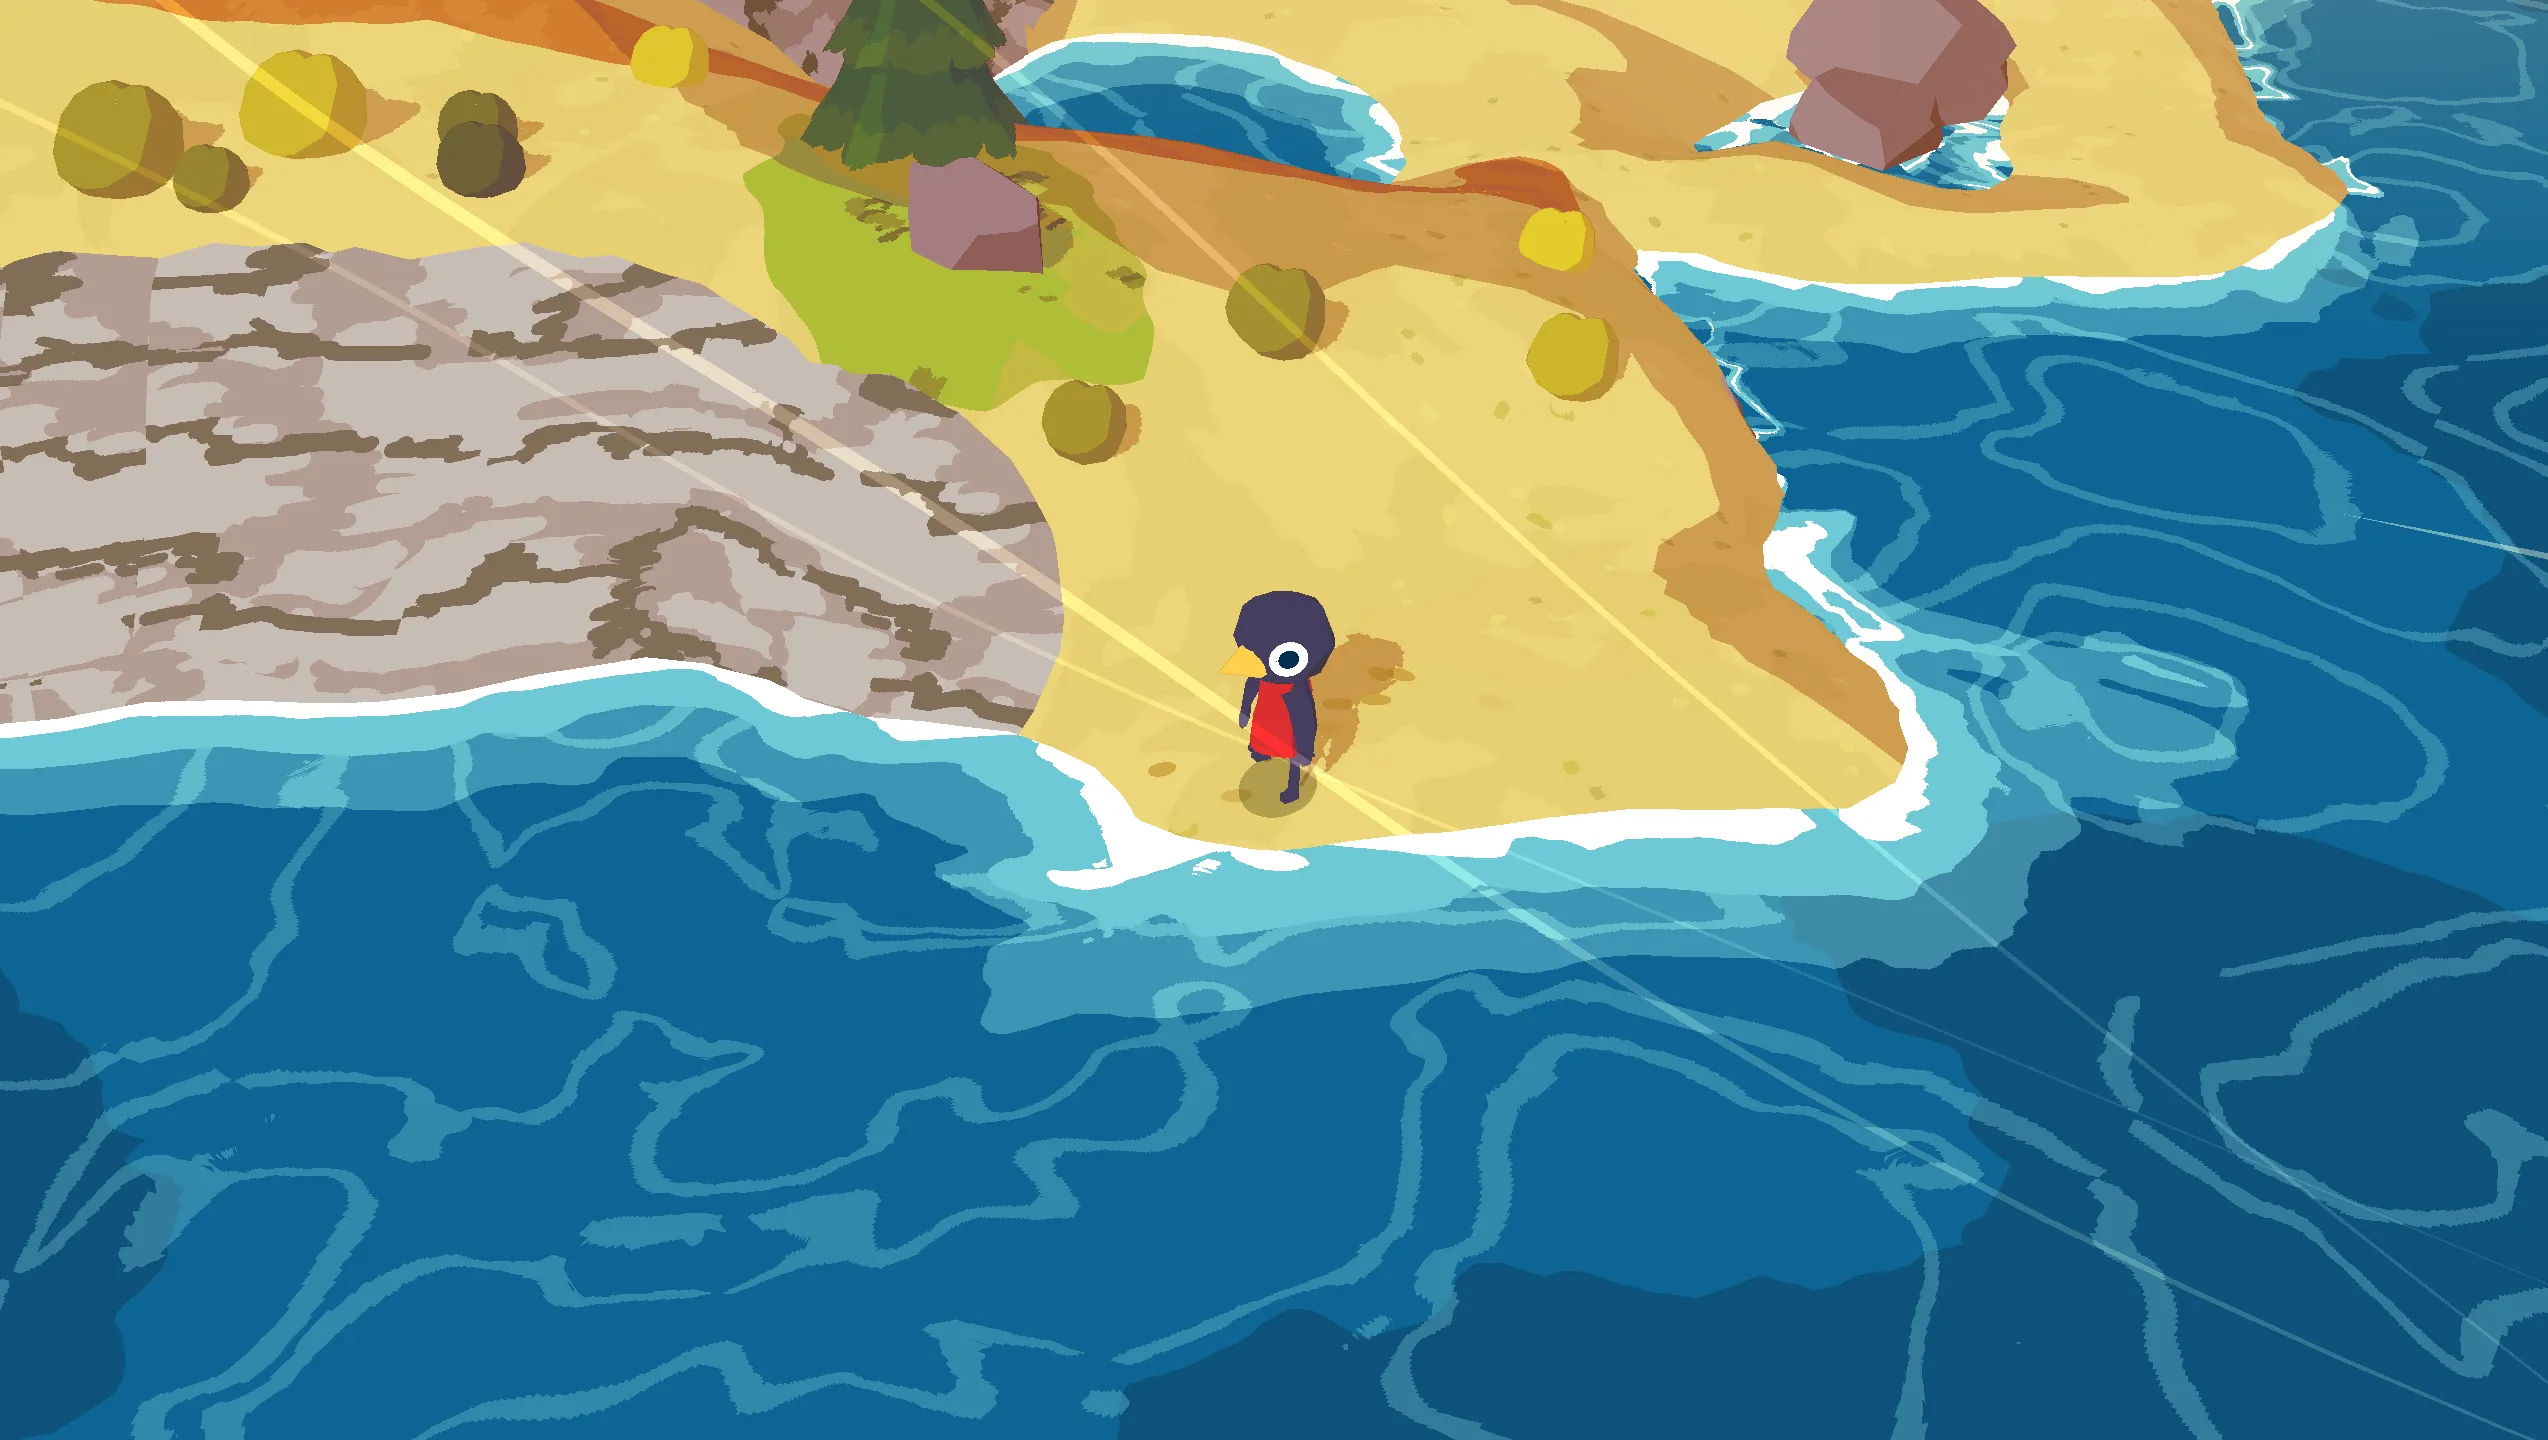
海报化技术在游戏
A Short Hike
里有很好的使用例子。下图里的很多条色带就是海报化的效果。
额外提示:使用渐变色
如果你想要进一步控制水的颜色,可以使用
渐变纹理
来控制颜色。我将下例的渐变色转换成了一张256x1的纹理,再用[0, 1]以内的深度值进行采样。之所以要将渐变色转换成一张纹理,是因为Shader Graph并不支持渐变色属性。

这样一来,你就能做出颜色的硬转换或软转换了。
下方是把渐变色转换成纹理的代码:
     using


     UnityEngine

     ;


     #

     if

      UNITY_EDITOR


     using


     UnityEditor

     ;


     #

     endif


     using


     System

     .

     IO

     ;


     public


     static


     class


     GradientTextureMaker


     {


     public


     static


     int

      width

     =


     128

     ;


     public


     static


     int

      height

     =


     4

     ;


     // needs to be multiple of 4 for DXT1 format compression


     public


     static


     Texture2D


     CreateGradientTexture

     (

     Material

      targetMaterial

     ,


     Gradient

      gradient

     )


     {


     Texture2D

      gradientTexture

     =


     new


     Texture2D

     (

     width

     ,

      height

     ,

      TextureFormat

     .

     ARGB32

     ,


     false

     ,


     false

     )


     {


            name

     =


     "_gradient"

     ,


            filterMode

     =

      FilterMode

     .

     Point

     ,


            wrapMode

     =

      TextureWrapMode

     .

     Clamp


     }

     ;


     for


     (

     int

      j

     =


     0

     ;

      j

     <

      height

     ;

      j

     ++

     )


     {


     for


     (

     int

      i

     =


     0

     ;

      i

     <

      width

     ;

      i

     ++

     )

      gradientTexture

     .

     SetPixel

     (

     i

     ,

      j

     ,

      gradient

     .

     Evaluate

     (

     (

     float

     )

     i

     /


     (

     float

     )

     width

     )

     )

     ;


     }


        gradientTexture

     .

     Apply

     (

     false

     )

     ;


        gradientTexture

     =


     SaveAndGetTexture

     (

     targetMaterial

     ,

      gradientTexture

     )

     ;


     return

      gradientTexture

     ;


     }


     private


     static


     Texture2D


     SaveAndGetTexture

     (

     Material

      targetMaterial

     ,


     Texture2D

      sourceTexture

     )


     {


     string

      targetFolder

     =

      AssetDatabase

     .

     GetAssetPath

     (

     targetMaterial

     )

     ;


        targetFolder

     =

      targetFolder

     .

     Replace

     (

     targetMaterial

     .

     name

     +


     ".mat"

     ,


     string

     .

     Empty

     )

     ;


        targetFolder

     +=


     "Gradient Textures/"

     ;


     if


     (

     !

     Directory

     .

     Exists

     (

     targetFolder

     )

     )


     {


            Directory

     .

     CreateDirectory

     (

     targetFolder

     )

     ;


            AssetDatabase

     .

     Refresh

     (

     )

     ;


     }


     string

      path

     =

      targetFolder

     +

      targetMaterial

     .

     name

     +

      sourceTexture

     .

     name

     +


     ".png"

     ;


        File

     .

     WriteAllBytes

     (

     path

     ,

      sourceTexture

     .

     EncodeToPNG

     (

     )

     )

     ;


        AssetDatabase

     .

     Refresh

     (

     )

     ;


        AssetDatabase

     .

     ImportAsset

     (

     path

     ,

      ImportAssetOptions

     .

     Default

     )

     ;


        sourceTexture

     =


     (

     Texture2D

     )

     AssetDatabase

     .

     LoadAssetAtPath

     (

     path

     ,


     typeof

     (

     Texture2D

     )

     )

     ;


     return

      sourceTexture

     ;


     }


     }
地平线颜色
接下来,我们会为地平线处的水上色。先用
Fresnel Effect
节点添加地平线的颜色和消失距离,取上一节
Depth Color
的输出,与
Horizon Color
形成渐变。

当以极低的角度看向水面时,远处的地平线便会呈现出这种颜色。

水底颜色
目前我们还是直接设定水的颜色,因此水底物体的颜色会失真。为了修正这个问题,我们在渲染水面时必须考虑到水底的颜色。

我们采样的
Scene Color
节点会返回水面以下形状的颜色。我们将其他颜色设为透明,再转而使用水底的颜色。这一步用到了
One Minus
节点。最后把拿到的颜色添加到水体颜色来获取最终效果。
通过修改浅水和深水色的alpha值,我们可以控制水底颜色的显色程度。

4.折射
接下来是超酷的效果,折射!
折射UV
前边用到的许多节点,比如
Scene Color
和
Scene Depth
都有一个
UV
输入参数还未使用。我们首先为
Depth Fade
子图表添加一块UV功能块,把它连上表内的
Scene Depth
节点。
图注:场景深度的UV
可以控制
Depth Fade
子图表的UV后,我们接着就能扭曲UV来产生一种折射效果。
生成折射UV的节点布置如下:

图注:折射UV
在上方节点图里,我们会铺展并偏移
Gradient Noise
,再把结果输入
Remap
将值限制在[-1, 1]范围,用
Multiply
乘上折射强度参数,然后加上
Screen Position (default)
,一张未扭曲的普通UV。
我们最好把这些节点放到一张
Refracted UV
子图表里,保持整张图干净整洁。这些折射UV接着就能接到
Depth Fade
以及为水底上色的
Scene Color
节点的UV输入口。
这下我们就有了漂亮的折射效果啦!
拓展:修补折射瑕疵
你可能已经在截取的片段里发现,目前的反射效果是有瑕疵的。当物体露出水面,某些不应有反射的地方也会有反射:

这里的一种解决办法是先检查水深,再决定应用扭曲或未扭曲的UV。
Scene Position
子图表包含了前边计算世界空间深度一节所创建的节点。
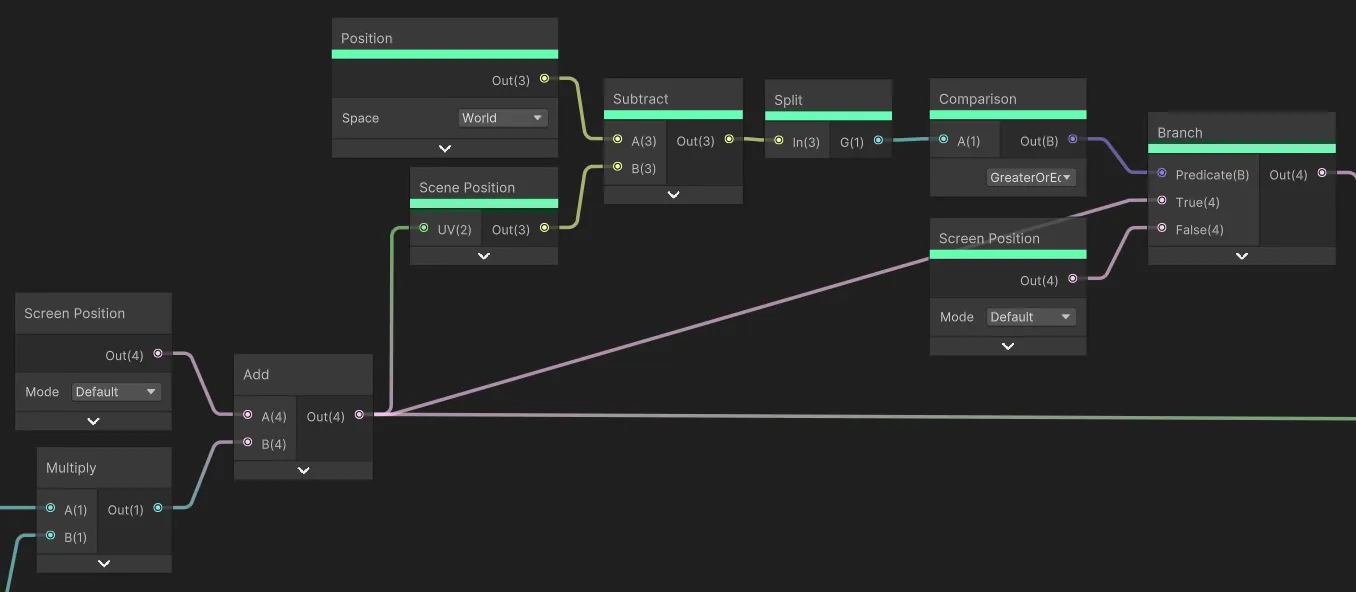
图注:修补折射瑕疵
应用了修补方案后,折射效果就只会在物体与水接触的地方出现了:

5.泡沫
下一步是给水添加泡沫。
水面泡沫
我们首先添加在水面上绘制的泡沫。
滚动UV
我们会一步步为着色器添加水面泡沫,首先开始准备从泡沫纹理采样的UV。新建一张称为
Panning UVs
的子图表并添加如下节点。
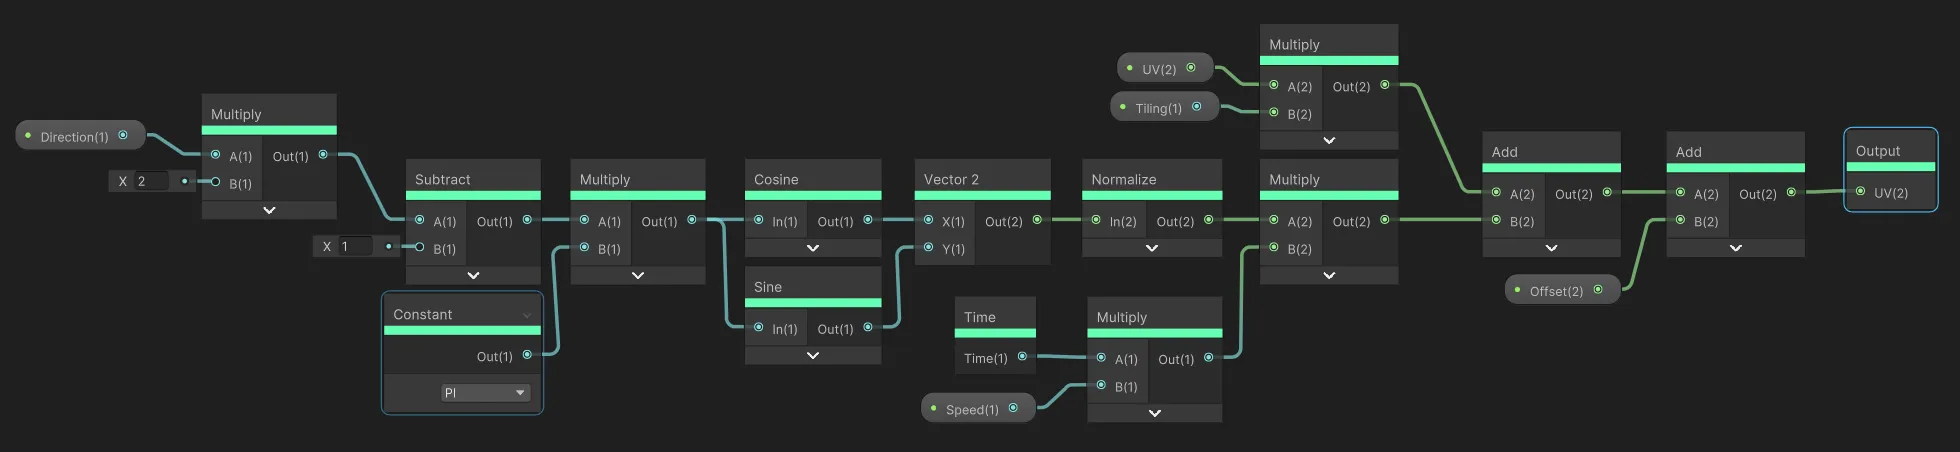
这张子图表会移动接收的UV坐标,加上些
Tiling
和一个
Offset
节点。

左侧的节点会把0到1范围内的方向参数转换成一个方向矢量用于UV运动。你也可以直接输入一个矢量参数,自行设定方向,但这种方法能
用一个0到1的滑条360°地控制运动方向
。如果出于性能原因,也可以省略这一参数,直接设定方向。
扭曲UV
接下来,我们取滚动UV,用正弦函数进行扭曲。为此,我们会用到一个
Custom Function
(自定义函数)节点,要是用节点来重现这些数学运算会很麻烦。
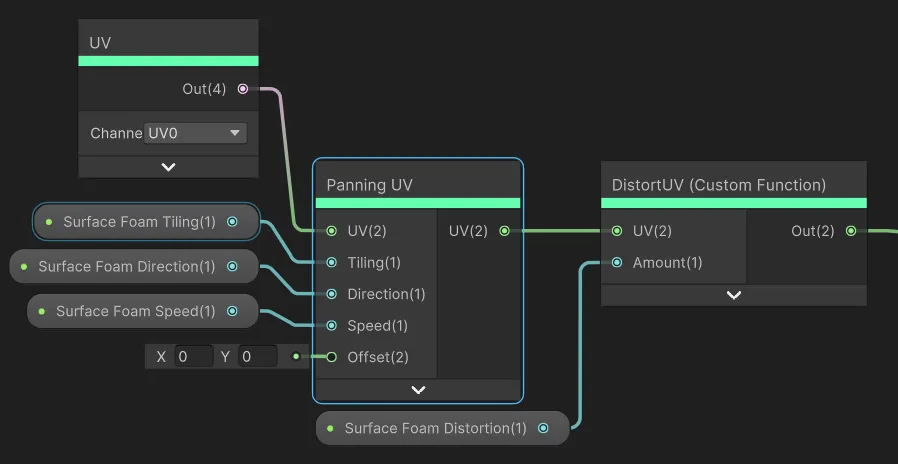
我们将
Panning UV
子图表的输出接入一个
Custom Function
节点,在节点上使用如下代码:
     void


     DistortUV_float

     (

     float2

      UV

     ,


     float

      Amount

     ,


     out


     float2

      Out

     )


     {


     float

      time

     =

      _Time

     .

     y

     ;


    UV

     .

     y

     +=

      Amount

     *


     0.01


     *


     (

     sin

     (

     UV

     .

     x

     *


     3.5


     +

      time

     *


     0.35

     )


     +


     sin

     (

     UV

     .

     x

     *


     4.8


     +

      time

     *


     1.05

     )


     +


     sin

     (

     UV

     .

     x

     *


     7.3


     +

      time

     *


     0.45

     )

     )


     /


     3.0

     ;


    UV

     .

     x

     +=

      Amount

     *


     0.12


     *


     (

     sin

     (

     UV

     .

     y

     *


     4.0


     +

      time

     *


     0.50

     )


     +


     sin

     (

     UV

     .

     y

     *


     6.8


     +

      time

     *


     0.75

     )


     +


     sin

     (

     UV

     .

     y

     *


     11.3


     +

      time

     *


     0.2

     )

     )


     /


     3.0

     ;


    UV

     .

     y

     +=

      Amount

     *


     0.12


     *


     (

     sin

     (

     UV

     .

     x

     *


     4.2


     +

      time

     *


     0.64

     )


     +


     sin

     (

     UV

     .

     x

     *


     6.3


     +

      time

     *


     1.65

     )


     +


     sin

     (

     UV

     .

     x

     *


     8.2


     +

      time

     *


     0.45

     )

     )


     /


     3.0

     ;


    Out

     =

      UV

     ;


     }
这段代码能用正弦函数为UV添加扭曲效果,让泡沫在运动时更有意思:

从泡沫纹理上采样
有了滚动的弯曲UV后,我们可以借此采集一张泡沫纹理的样本,将其添加到水面。
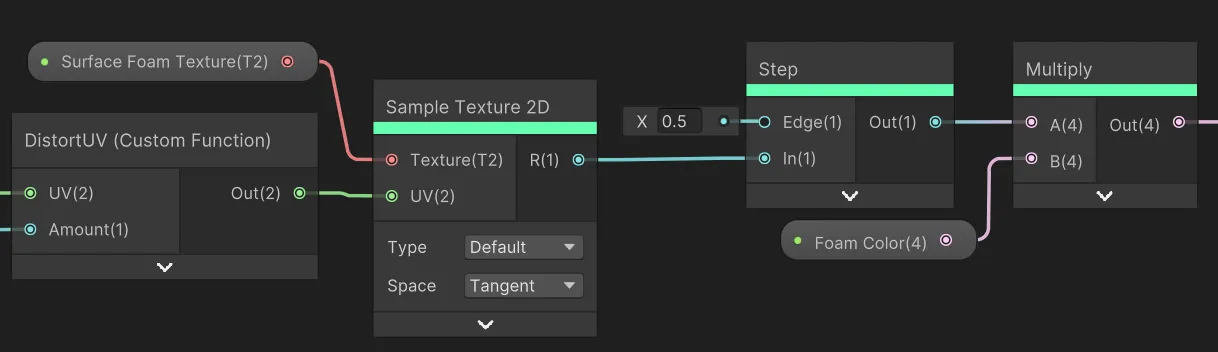
图注:采集泡沫纹理的样本
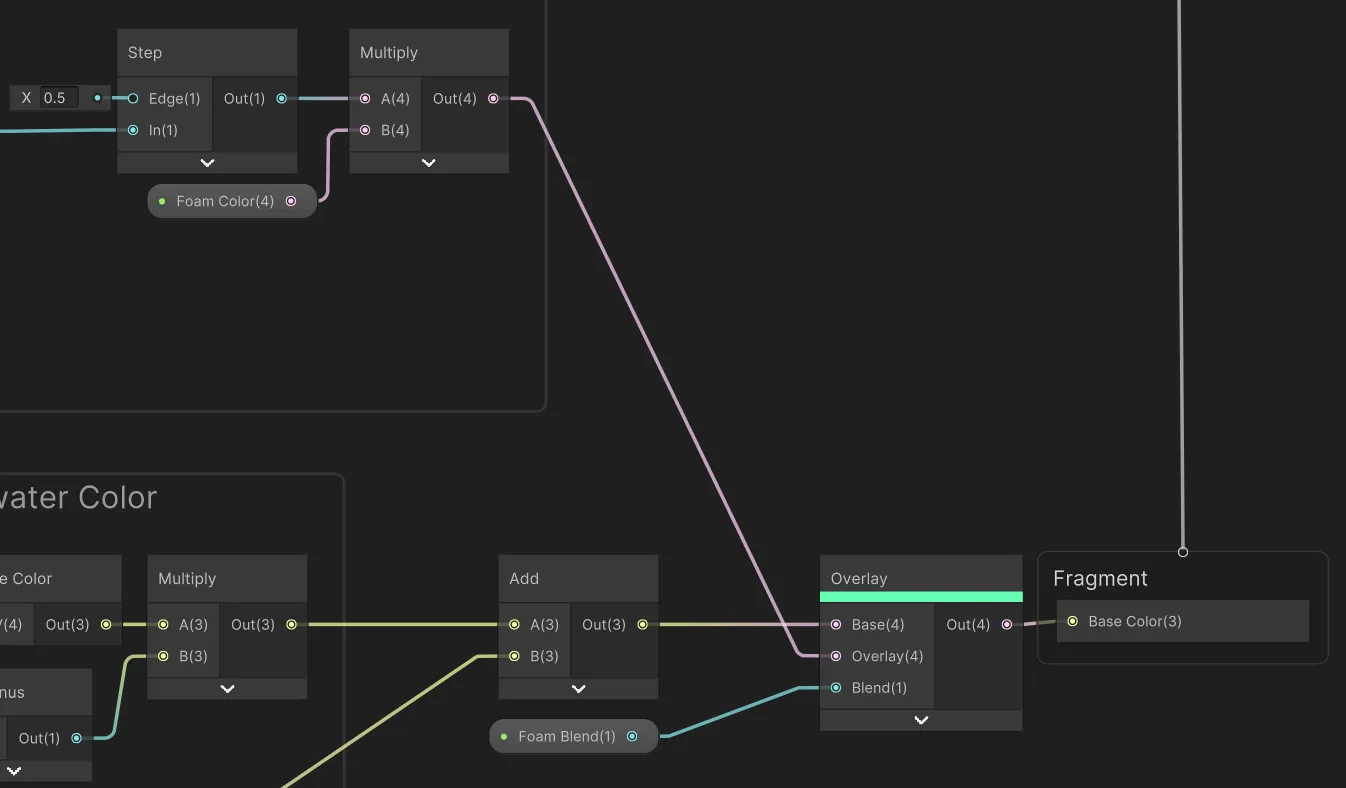
用
Sample Texture 2D
节点采集纹理样本,用
Step
节点裁剪纹理,最后乘上一个泡沫颜色属性。
💡你也可以用 Smoothstep 节点更温和地从泡沫纹理上采样。
我们能用
Add
节点简单地把表面泡沫添加到水体颜色上,但我觉得我们可以创建一张
Overlay
子图表来更好地融合它们。这张子图表包含以下节点:
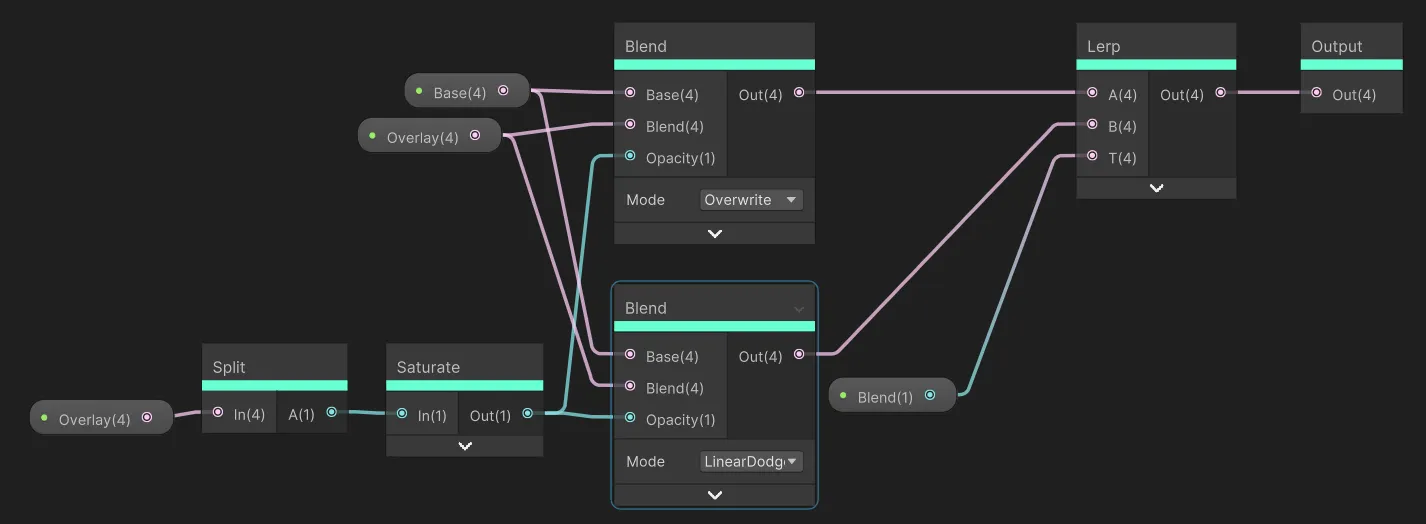
图注:添加泡沫
我们可以用这张
Overlay
表融合现有的水体颜色(Base)与水面泡沫节点的输出(Overlay):
图注:融合泡沫
这样一来,水面泡沫就能受下方水体颜色的影响,更好地融入水体。泡沫不明显,但很好看:

交界处泡沫
下面我们来添加物体表面与水的交界处的泡沫。
交界处泡沫遮罩
我们首先来创建一张确定泡沫出现范围的遮罩。首先拿来先前创建的
Depth Fade
子图表:

图注:交界处泡沫遮罩
用
Depth Fade
根据水深创建遮罩,再用
Intersection Foam Fade
参数来控制遮罩的锐利度。只显示遮罩时,它看起来就像这样:

采集交界处泡沫的样本
泡沫采样部分类似于水面泡沫。同样用
Panning UV
子图表的UV来采集
Intersection Foam Texture
的样本。我们用
Intersection Foam Cutoff
参数和一个
Step
节点来控制泡沫纹理的裁剪位置,将
Intersection Foam Cutoff
乘上遮罩节点中用到的
Depth Fade
子图表的输出。这是为了让泡沫能完整地在物体的边界处形成,而在离岸时逐渐溶解。

图注:交界处泡沫
泡沫的颜色由其他节点设定。
泡沫纹理的alpha(透明)通道还与前边遮罩节点的输出相乘,好让泡沫只出现遮罩以内
。
采样的交界处泡沫纹理可以是下边这样:

图注:交界处泡沫纹理
添加交界处泡沫
和水面泡沫一样,我们用
Overlay
子图表将泡沫与周围的色彩有机的融合起来。

这下我们就给水加上了漂亮的交界处泡沫效果啦!

拓展:在泡沫上应用符号距离场(signed distance field)
当前交界处泡沫的实现方法有一个问题,即泡沫只会在水底物体出现之后才会产生。这里的一种更高级的解决方法是用另一个俯视角正交摄像机将几何形渲染到一张遮罩上,以此生成一张SDF纹理。
Harry Alisavakis
在自己的推文里展示了这种方法。采集这张SDF纹理后便可生成一张更为连贯的交界处泡沫遮罩。
6.光照
水着色器的一个重要特征是与光线的互动。这里,我们追求的是风格化外观,不一定要符合现实。
水面法线贴图
首先,我们从
Normals Texture
上采集并生成水面的法线图。然后用最常见的方法——以两种不同采样属性来采集两次纹理。接着用
Normal Blend
节点把两份样本组合起来。
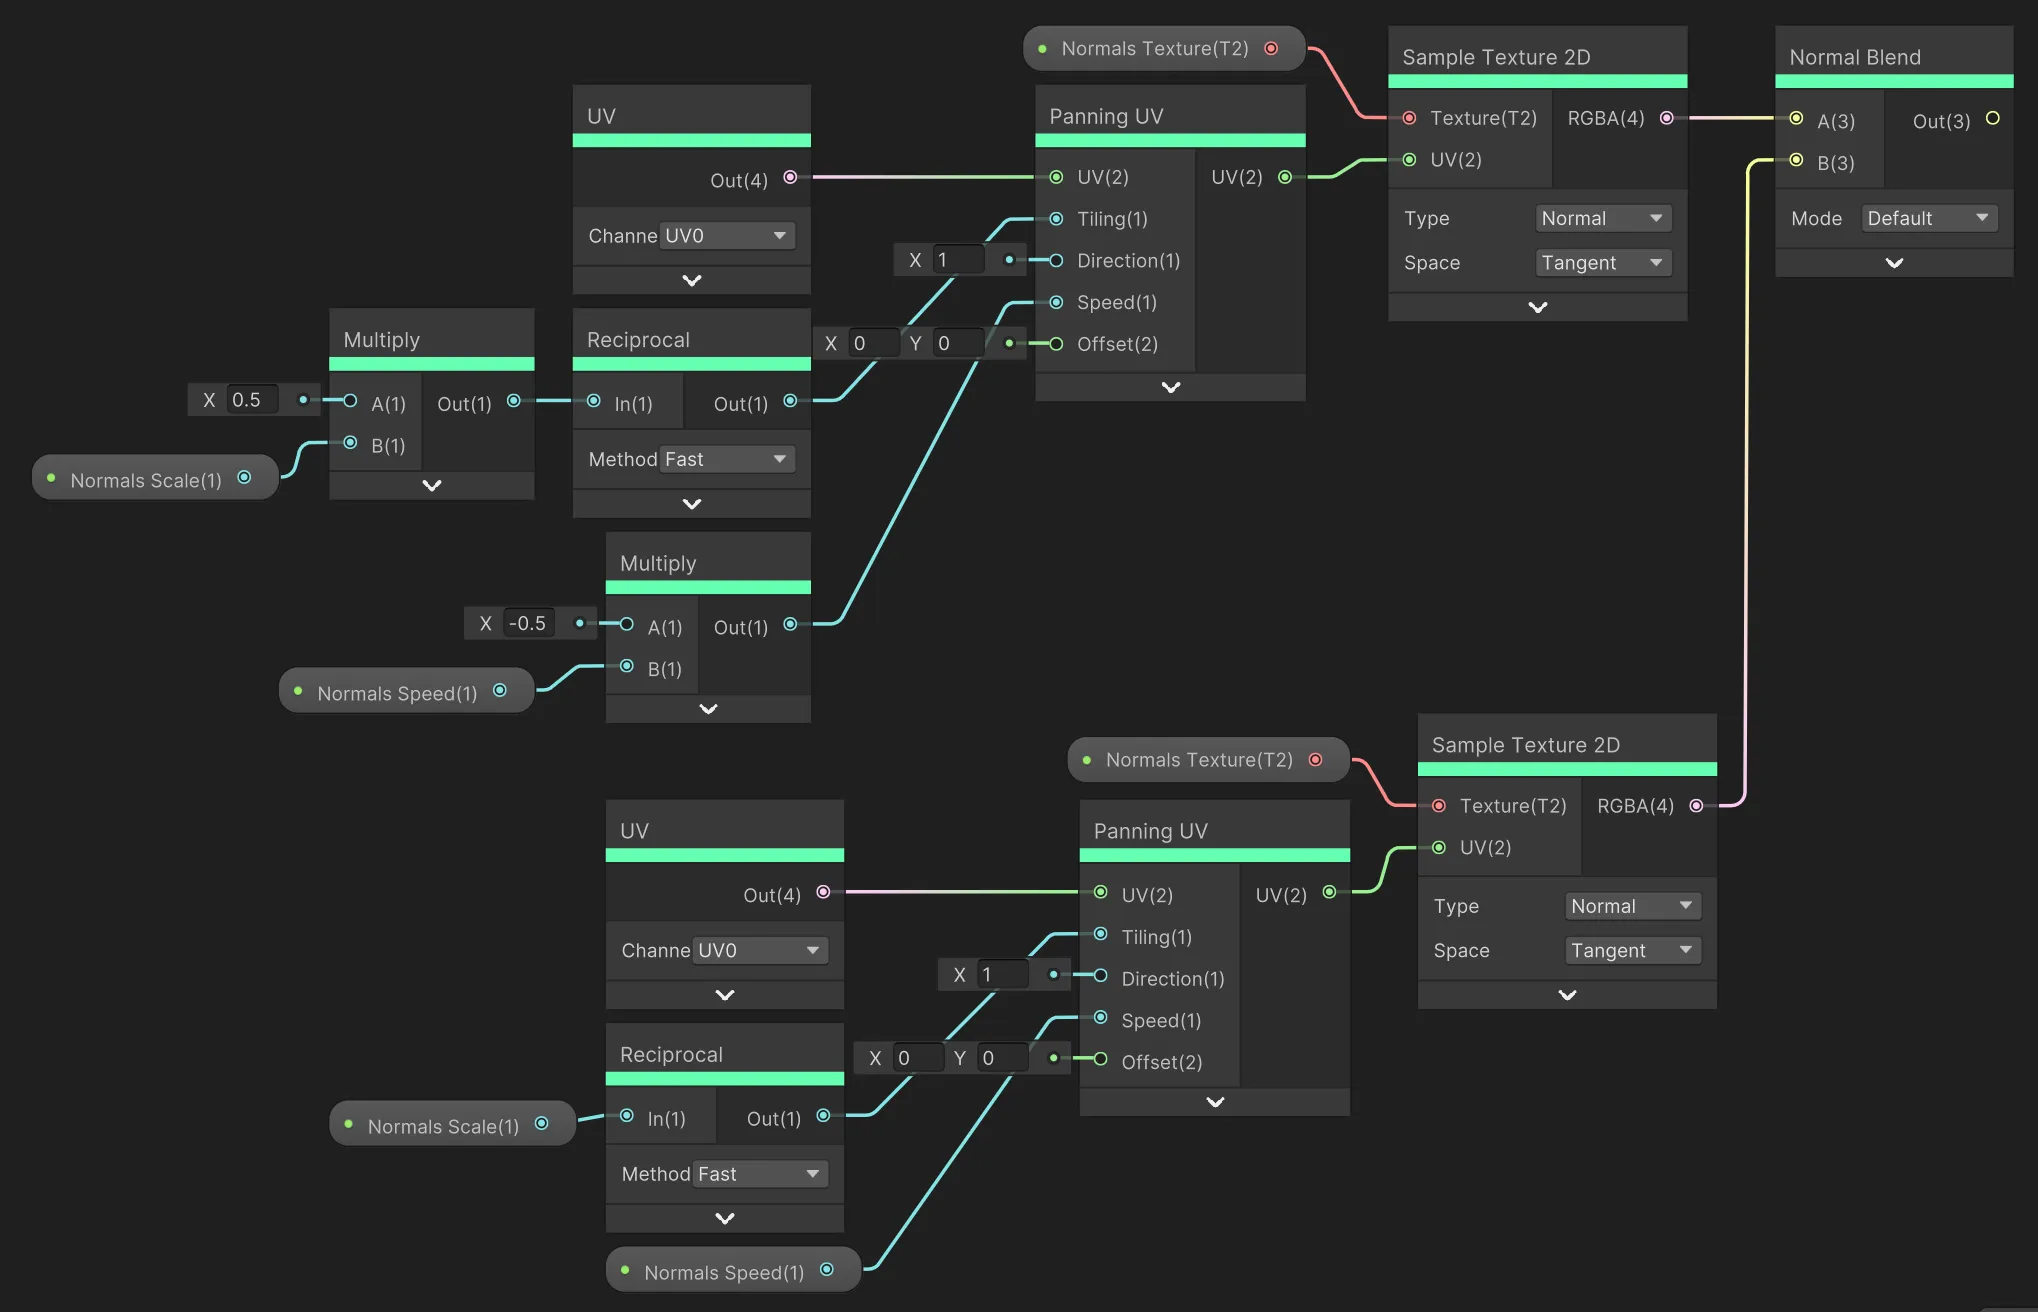
注意我们只用了单个数值来表示
Normals Scale
(法线图比例)和
Normals Speed
(法线图速度)。微调这两个值后再采集一次
Normals Texture
。法线纹理的运动同样使用前边的
Panning UV
做出来的。
上图的节点被我放到了一张叫做
Blended Normals
的子图表里。这些法线输出随后可以用一个
Normal Strength
节点来调整强度。最后我们用
Transform
节点将其转换到世界空间。

水现在有了一套可以运动的法线图,速度、比例和强度都可调整。
光照运算
下一步,我们拿刚刚的法线图来生成
光照效果
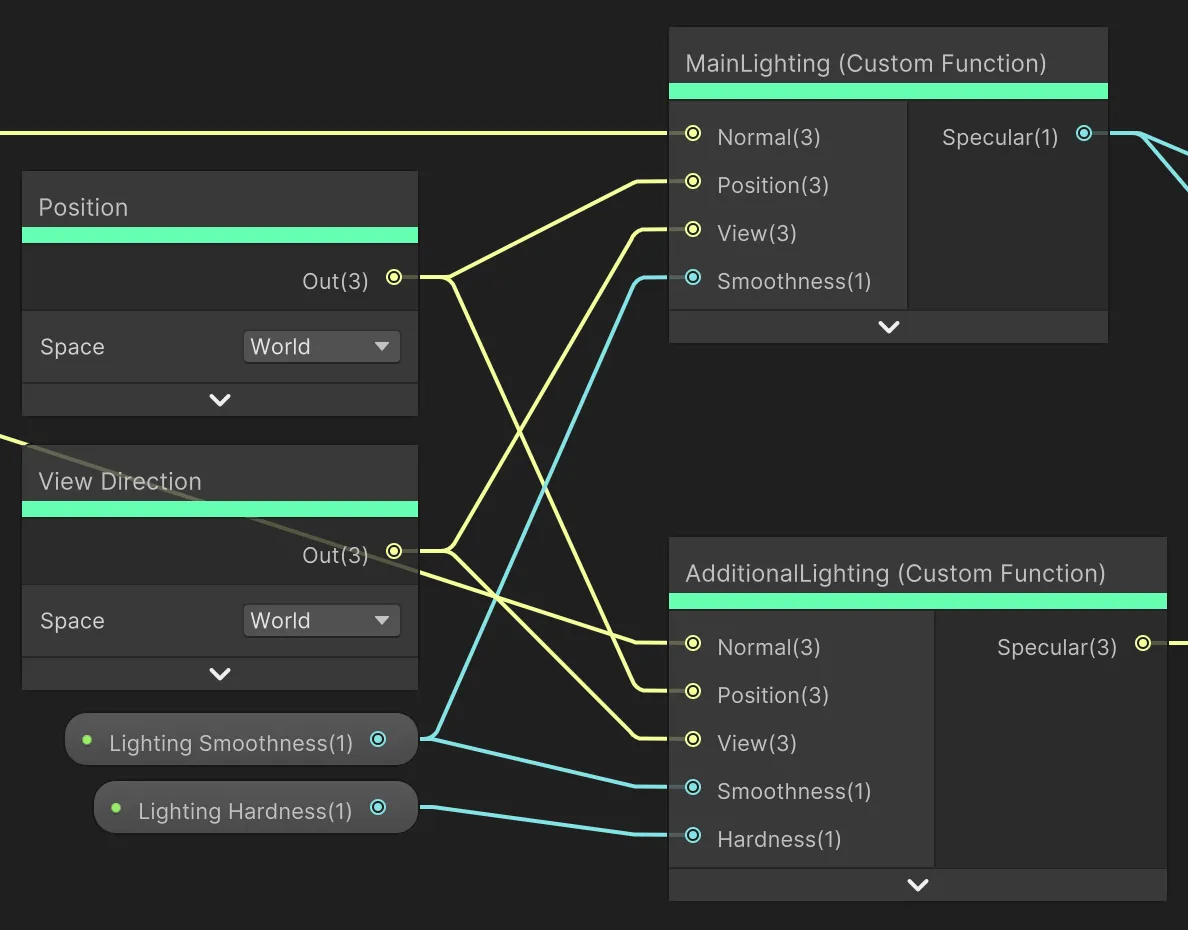
。我们会用两个
Custom Function
节点接收法线矢量、位置和视角方向(皆在世界空间中)。节点会输出一束
Specular
光线。在法线贴图上,我们使用先前转换到世界空间的法线图输出。在位置和视角方向上,我们分别使用
Position
和
View Direciton
节点(也都位于世界空间)。自定义功能节点一个用于
Main Lighting
,一个用于
Additional Lights
。这样光线就能对主光源以及额外的点光源作出反应。
所有光照相关的代码可以被归纳到一起:
     float


     LightingSpecular

     (

     float3

      L

     ,


     float3

      N

     ,


     float3

      V

     ,


     float

      smoothness

     )


     {


     float3

      H

     =


     SafeNormalize

     (

     float3

     (

     L

     )


     +


     float3

     (

     V

     )

     )

     ;


     float

      NdotH

     =


     saturate

     (

     dot

     (

     N

     ,

      H

     )

     )

     ;


     return


     pow

     (

     NdotH

     ,

      smoothness

     )

     ;


     }


     void


     MainLighting_float

     (

     float3

      normalWS

     ,


     float3

      positionWS

     ,


     float3

      viewWS

     ,


     float

      smoothness

     ,


     out


     float

      specular

     )


     {


    specular

     =


     0.0

     ;


     #ifndef SHADERGRAPH_PREVIEW


    smoothness

     =


     exp2

     (

     10


     *

      smoothness

     +


     1

     )

     ;


    normalWS

     =


     normalize

     (

     normalWS

     )

     ;


    viewWS

     =


     SafeNormalize

     (

     viewWS

     )

     ;


     Light

      mainLight

     =


     GetMainLight

     (

     TransformWorldToShadowCoord

     (

     positionWS

     )

     )

     ;


    specular

     =


     LightingSpecular

     (

     mainLight

     .

     direction

     ,

      normalWS

     ,

      viewWS

     ,

      smoothness

     )

     ;


     #

     endif


     }


     void


     AdditionalLighting_float

     (

     float3

      normalWS

     ,


     float3

      positionWS

     ,


     float3

      viewWS

     ,


     float

      smoothness

     ,


     float

      hardness

     ,


     out


     float3

      specular

     )


     {


    specular

     =


     0

     ;


     #ifndef SHADERGRAPH_PREVIEW


    smoothness

     =


     exp2

     (

     10


     *

      smoothness

     +


     1

     )

     ;


    normalWS

     =


     normalize

     (

     normalWS

     )

     ;


    viewWS

     =


     SafeNormalize

     (

     viewWS

     )

     ;


     // additional lights


     int

      pixelLightCount

     =


     GetAdditionalLightsCount

     (

     )

     ;


     for


     (

     int

      i

     =


     0

     ;

      i

     <

      pixelLightCount

     ;


     ++

     i

     )


     {


     Light

      light

     =


     GetAdditionalLight

     (

     i

     ,

      positionWS

     )

     ;


     float3

      attenuatedLight

     =

      light

     .

     color

     *

      light

     .

     distanceAttenuation

     *

      light

     .

     shadowAttenuation

     ;


     float

      specular_soft

     =


     LightingSpecular

     (

     light

     .

     direction

     ,

      normalWS

     ,

      viewWS

     ,

      smoothness

     )

     ;


     float

      specular_hard

     =


     smoothstep

     (

     0.005

     ,

     0.01

     ,

     specular_soft

     )

     ;


     float

      specular_term

     =


     lerp

     (

     specular_soft

     ,

      specular_hard

     ,

      hardness

     )

     ;


        specular

     +=

      specular_term

     *

      attenuatedLight

     ;


     }


     #

     endif


     }
然后我们能把
Main Lighting
和
Additional Lighting
组合起来,首先在主光照上用
Step
节点求得清晰的光照,再乘上一个
Specular Color
。

最后直接把光照用
Add
叠加到图表的输出上:

这下水体就有挺复杂的光照效果了,可以在平缓/湍急的水面、强烈/柔和的光线间切换,还受主光源及点光源等其他光源的影响。
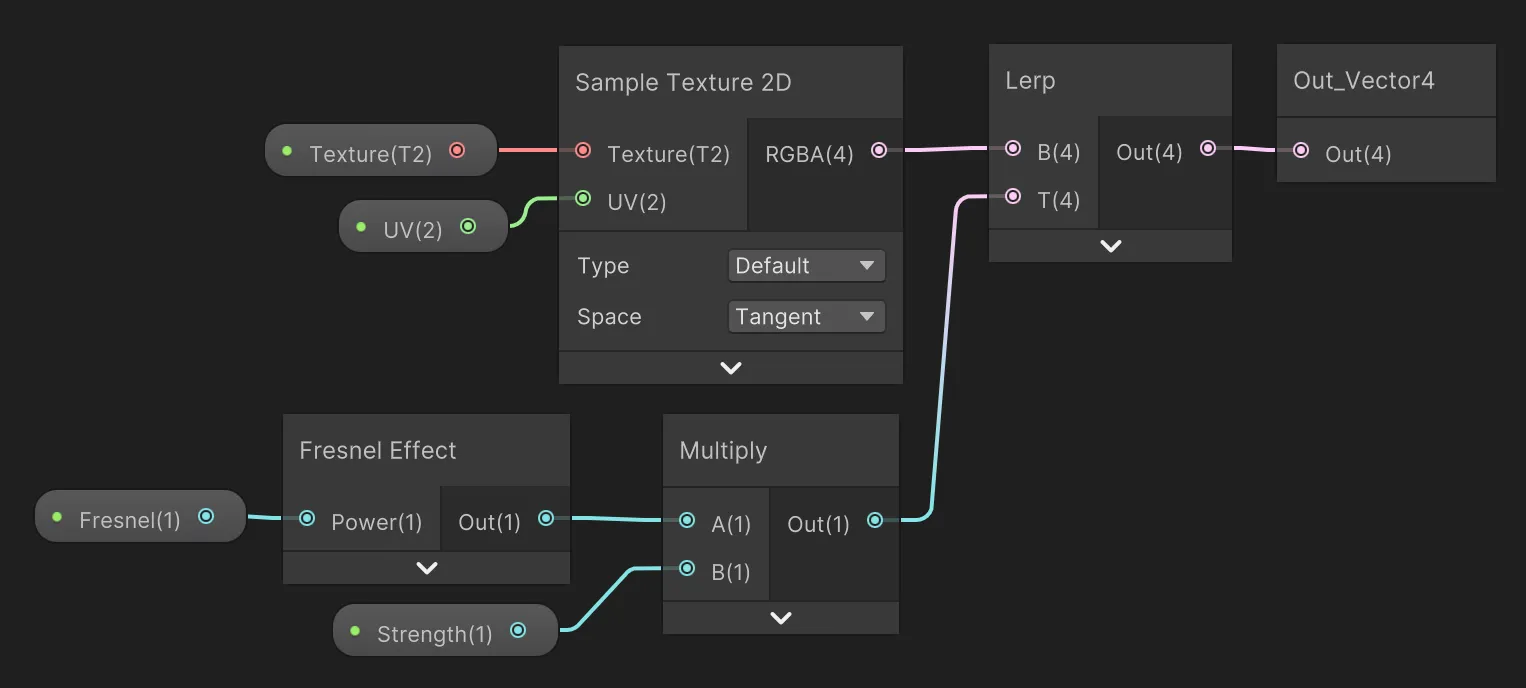
额外技巧:用水面法线图影响折射
相比于前边那样用渐变色噪点来产生折射效果,用水面法线图来影响折射强度是个更好的方法。这能让图像更美观。为此,我们需要把法线图从
Tangent
空间转换到
View
空间,再用
Multiply
乘上一个
Refraction Strength
参数,然后将结果添加到
Screen Position
来生成折射UV。

图注:用法线图生成的折射
7.波浪
大部分的水体Shader外观已经完成,现在我们来加些运动感。
顶点偏移
我们会
用顶点着色器移动水平面的顶点
来加上波浪运动。要做出不错的效果,水平面的顶点必须足够密集,有足够的顶点数用于偏移。
下方节点是一套非常简单的顶点偏移例子。我们接收顶点原本的世界位置,添加一个原点(这里是0,0,0),然后从
World空间
转换到
Object空间
,再连到顶点的Position接口。

Gerstner波形
波浪位移的模拟分为许多等级。你可以先试试
简单的正弦波浪
或直接创建
FFT波浪模拟
。我们会用一种画质介于中间的技术:
Gerstner Waves
。这里我会解释着色器里的实施方法,如果想要了解更多,我推荐你看看
Catlike Coding的这篇波浪教程
。
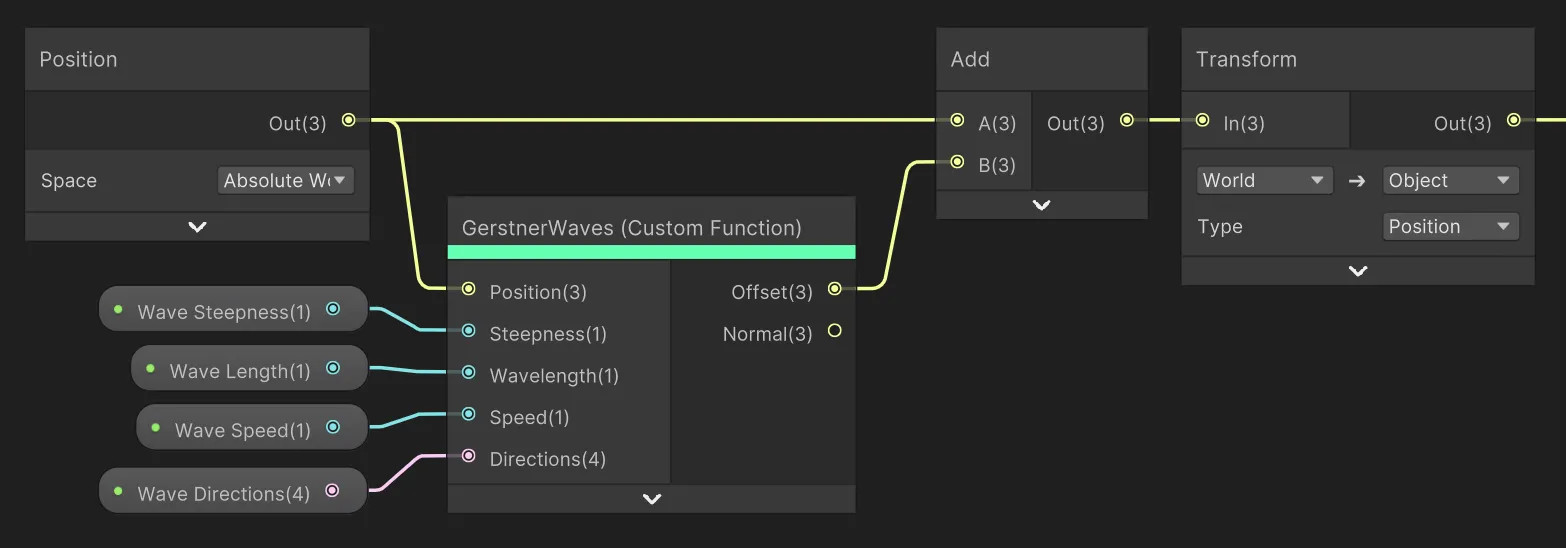
由于波浪代码蕴含大量数学运算,我们还是会像前边那样,用
Custom Function
节点的输出作为世界位置里的偏移量。
下方代码会生成四股波浪,再将其叠加在一起:
     float3


     GerstnerWave

     (

     float3

      position

     ,


     float

      steepness

     ,


     float

      wavelength

     ,


     float

      speed

     ,


     float

      direction

     ,

      inout

     float3

      tangent

     ,

      inout

     float3

      binormal

     )


     {


    direction

     =

      direction

     *


     2


     -


     1

     ;


     float2

      d

     =


     normalize

     (

     float2

     (

     cos

     (

     3.14


     *

      direction

     )

     ,


     sin

     (

     3.14


     *

      direction

     )

     )

     )

     ;


     float

      k

     =


     2


     *


     3.14


     /

      wavelength

     ;


     float

      f

     =

      k

     *


     (

     dot

     (

     d

     ,

      position

     .

     xz

     )


     -

      speed

     *

      _Time

     .

     y

     )

     ;


     float

      a

     =

      steepness

     /

      k

     ;


    tangent

     +=


     float3

     (


     -

     d

     .

     x

     *

      d

     .

     x

     *


     (

     steepness

     *


     sin

     (

     f

     )

     )

     ,


    d

     .

     x

     *


     (

     steepness

     *


     cos

     (

     f

     )

     )

     ,


     -

     d

     .

     x

     *

      d

     .

     y

     *


     (

     steepness

     *


     sin

     (

     f

     )

     )


     )

     ;


    binormal

     +=


     float3

     (


     -

     d

     .

     x

     *

      d

     .

     y

     *


     (

     steepness

     *


     sin

     (

     f

     )

     )

     ,


    d

     .

     y

     *


     (

     steepness

     *


     cos

     (

     f

     )

     )

     ,


     -

     d

     .

     y

     *

      d

     .

     y

     *


     (

     steepness

     *


     sin

     (

     f

     )

     )


     )

     ;


     return


     float3

     (


    d

     .

     x

     *


     (

     a

     *


     cos

     (

     f

     )

     )

     ,


    a

     *


     sin

     (

     f

     )

     ,


    d

     .

     y

     *


     (

     a

     *


     cos

     (

     f

     )

     )


     )

     ;


     }


     void


     GerstnerWaves_float

     (

     float3

      position

     ,


     float

      steepness

     ,


     float

      wavelength

     ,


     float

      speed

     ,


     float4

      directions

     ,


     out


     float3

      Offset

     ,


     out


     float3

      normal

     )


     {


    Offset

     =


     0

     ;


     float3

      tangent

     =


     float3

     (

     1

     ,


     0

     ,


     0

     )

     ;


     float3

      binormal

     =


     float3

     (

     0

     ,


     0

     ,


     1

     )

     ;


    Offset

     +=


     GerstnerWave

     (

     position

     ,

      steepness

     ,

      wavelength

     ,

      speed

     ,

      directions

     .

     x

     ,

      tangent

     ,

      binormal

     )

     ;


    Offset

     +=


     GerstnerWave

     (

     position

     ,

      steepness

     ,

      wavelength

     ,

      speed

     ,

      directions

     .

     y

     ,

      tangent

     ,

      binormal

     )

     ;


    Offset

     +=


     GerstnerWave

     (

     position

     ,

      steepness

     ,

      wavelength

     ,

      speed

     ,

      directions

     .

     z

     ,

      tangent

     ,

      binormal

     )

     ;


    Offset

     +=


     GerstnerWave

     (

     position

     ,

      steepness

     ,

      wavelength

     ,

      speed

     ,

      directions

     .

     w

     ,

      tangent

     ,

      binormal

     )

     ;


    normal

     =


     normalize

     (

     cross

     (

     binormal

     ,

      tangent

     )

     )

     ;


     //TBN = transpose(float3x3(tangent, binormal, normal));


     }
函数会接收波浪的
Steepness
(陡峭度)、
Wavelength
(波长)和
Speed
(速度),以及4个位于[0, 1]之间、分别控制各波浪方向的
Direction
值。法线矢量也会在此计算。
💡你可以多加几层波浪,我觉得4层是一个不错的起点。
波浪看起来简单,但也非常不错:

额外提示:用浪高改变水色
你可以用
Gerstner Waves
自定义功能节点的
Offset
输出的Y参数来影响水的颜色,赋予浪尖另一种颜色。
8.浮力
逼真的浮力模拟是一个庞大且复杂的课题。不过,这里我会分享怎样为水添加基本的浮力效果。
CPU模拟
目前我们都是在GPU上用顶点着色器来模拟波浪。要创建浮力模拟,我们需要用一份C#脚本在CPU上重现波浪的运动。整套方案与前边的非常类似:先创建一个
GetWaveDisplacement
函数,接收位置及部分波浪函数,然后返回四层波浪叠加生成的偏移量。下方脚本的作用是获取和顶点着色器一样的输出,但它运行在CPU上。
脚本:GerstnerWaveDisplacement.cs
     using


     UnityEngine

     ;


     public


     static


     class


     GerstnerWaveDisplacement


     {


     private


     static


     Vector3


     GerstnerWave

     (

     Vector3

      position

     ,


     float

      steepness

     ,


     float

      wavelength

     ,


     float

      speed

     ,


     float

      direction

     )


     {


        direction

     =

      direction

     *


     2


     -


     1

     ;


     Vector2

      d

     =


     new


     Vector2

     (

     Mathf

     .

     Cos

     (

     Mathf

     .

     PI

     *

      direction

     )

     ,

      Mathf

     .

     Sin

     (

     Mathf

     .

     PI

     *

      direction

     )

     )

     .

     normalized

     ;


     float

      k

     =


     2


     *

      Mathf

     .

     PI

     /

      wavelength

     ;


     float

      a

     =

      steepness

     /

      k

     ;


     float

      f

     =

      k

     *


     (

     Vector2

     .

     Dot

     (

     d

     ,


     new


     Vector2

     (

     position

     .

     x

     ,

      position

     .

     z

     )

     )


     -

      speed

     *

      Time

     .

     time

     )

     ;


     return


     new


     Vector3

     (

     d

     .

     x

     *

      a

     *

      Mathf

     .

     Cos

     (

     f

     )

     ,

      a

     *

      Mathf

     .

     Sin

     (

     f

     )

     ,

      d

     .

     y

     *

      a

     *

      Mathf

     .

     Cos

     (

     f

     )

     )

     ;


     }


     public


     static


     Vector3


     GetWaveDisplacement

     (

     Vector3

      position

     ,


     float

      steepness

     ,


     float

      wavelength

     ,


     float

      speed

     ,


     float

     [

     ]

      directions

     )


     {


     Vector3

      offset

     =

      Vector3

     .

     zero

     ;


        offset

     +=


     GerstnerWave

     (

     position

     ,

      steepness

     ,

      wavelength

     ,

      speed

     ,

      directions

     [

     0

     ]

     )

     ;


        offset

     +=


     GerstnerWave

     (

     position

     ,

      steepness

     ,

      wavelength

     ,

      speed

     ,

      directions

     [

     1

     ]

     )

     ;


        offset

     +=


     GerstnerWave

     (

     position

     ,

      steepness

     ,

      wavelength

     ,

      speed

     ,

      directions

     [

     2

     ]

     )

     ;


        offset

     +=


     GerstnerWave

     (

     position

     ,

      steepness

     ,

      wavelength

     ,

      speed

     ,

      directions

     [

     3

     ]

     )

     ;


     return

      offset

     ;


     }


     }
浮力脚本
接下来,我们用CPU模拟的波浪让物体浮在水面。为此我会用一种
浮力作用点
的方法。这些作用点是物体上的几个点,点会采集波浪偏移量的样本,再向物体施加对应的力。一个物体的表面可以有许多个作用点。
在场景里,我在模拟浮力的物体上添加了这几个空的子对象作为作用点。

然后可以创建一份
BuoyantObject
脚本,引用这些作用点并向其施加力。

脚本:BuoyantObject.cs
     [

     RequireComponent

     (

     typeof

     (

     Rigidbody

     )

     )

     ]


     public


     class


     BuoyantObject


     :


     MonoBehaviour


     {


     private


     readonly


     Color

      red

     =


     new

     (

     0.92f

     ,


     0.25f

     ,


     0.2f

     )

     ;


     private


     readonly


     Color

      green

     =


     new

     (

     0.2f

     ,


     0.92f

     ,


     0.51f

     )

     ;


     private


     readonly


     Color

      blue

     =


     new

     (

     0.2f

     ,


     0.67f

     ,


     0.92f

     )

     ;


     private


     readonly


     Color

      orange

     =


     new

     (

     0.97f

     ,


     0.79f

     ,


     0.26f

     )

     ;


     [

     Header

     (

     "Water"

     )

     ]


     [

     SerializeField

     ]


     private


     float

      waterHeight

     =


     0.0f

     ;


     [

     Header

     (

     "Waves"

     )

     ]


     [

     SerializeField

     ]


     float

      steepness

     ;


     [

     SerializeField

     ]


     float

      wavelength

     ;


     [

     SerializeField

     ]


     float

      speed

     ;


     [

     SerializeField

     ]


     float

     [

     ]

      directions

     =


     new


     float

     [

     4

     ]

     ;


     [

     Header

     (

     "Buoyancy"

     )

     ]


     [

     Range

     (

     1

     ,


     5

     )

     ]


     public


     float

      strength

     =


     1f

     ;


     [

     Range

     (

     0.2f

     ,


     5

     )

     ]


     public


     float

      objectDepth

     =


     1f

     ;


     public


     float

      velocityDrag

     =


     0.99f

     ;


     public


     float

      angularDrag

     =


     0.5f

     ;


     [

     Header

     (

     "Effectors"

     )

     ]


     public


     Transform

     [

     ]

      effectors

     ;


     private


     Rigidbody

      rb

     ;


     private


     Vector3

     [

     ]

      effectorProjections

     ;


     private


     void


     Awake

     (

     )


     {


     // Get rigidbody


        rb

     =


     GetComponent

     <

     Rigidbody

     >

     (

     )

     ;


        rb

     .

     useGravity

     =


     false

     ;


        effectorProjections

     =


     new


     Vector3

     [

     effectors

     .

     Length

     ]

     ;


     for


     (

     var

      i

     =


     0

     ;

      i

     <

      effectors

     .

     Length

     ;

      i

     ++

     )

      effectorProjections

     [

     i

     ]


     =

      effectors

     [

     i

     ]

     .

     position

     ;


     }


     private


     void


     OnDisable

     (

     )


     {


        rb

     .

     useGravity

     =


     true

     ;


     }


     private


     void


     FixedUpdate

     (

     )


     {


     var

      effectorAmount

     =

      effectors

     .

     Length

     ;


     for


     (

     var

      i

     =


     0

     ;

      i

     <

      effectorAmount

     ;

      i

     ++

     )


     {


     var

      effectorPosition

     =

      effectors

     [

     i

     ]

     .

     position

     ;


            effectorProjections

     [

     i

     ]


     =

      effectorPosition

     ;


            effectorProjections

     [

     i

     ]

     .

     y

     =

      waterHeight

     +

      GerstnerWaveDisplacement

     .

     GetWaveDisplacement

     (

     effectorPosition

     ,

      steepness

     ,

      wavelength

     ,

      speed

     ,

      directions

     )

     .

     y

     ;


     // gravity


            rb

     .

     AddForceAtPosition

     (

     Physics

     .

     gravity

     /

      effectorAmount

     ,

      effectorPosition

     ,

      ForceMode

     .

     Acceleration

     )

     ;


     var

      waveHeight

     =

      effectorProjections

     [

     i

     ]

     .

     y

     ;


     var

      effectorHeight

     =

      effectorPosition

     .

     y

     ;


     if


     (

     !

     (

     effectorHeight

     <

      waveHeight

     )

     )


     continue

     ;


     // submerged


     var

      submersion

     =

      Mathf

     .

     Clamp01

     (

     waveHeight

     -

      effectorHeight

     )


     /

      objectDepth

     ;


     var

      buoyancy

     =

      Mathf

     .

     Abs

     (

     Physics

     .

     gravity

     .

     y

     )


     *

      submersion

     *

      strength

     ;


     // buoyancy


            rb

     .

     AddForceAtPosition

     (

     Vector3

     .

     up

     *

      buoyancy

     ,

      effectorPosition

     ,

      ForceMode

     .

     Acceleration

     )

     ;


     // drag


            rb

     .

     AddForce

     (

     -

     rb

     .

     velocity

     *


     (

     velocityDrag

     *

      Time

     .

     fixedDeltaTime

     )

     ,

      ForceMode

     .

     VelocityChange

     )

     ;


     // torque


            rb

     .

     AddTorque

     (

     -

     rb

     .

     angularVelocity

     *


     (

     angularDrag

     *

      Time

     .

     fixedDeltaTime

     )

     ,

      ForceMode

     .

     Impulse

     )

     ;


     }


     }


     private


     void


     OnDrawGizmos

     (

     )


     {


     if


     (

     effectors

     ==


     null

     )


     return

     ;


     for


     (

     var

      i

     =


     0

     ;

      i

     <

      effectors

     .

     Length

     ;

      i

     ++

     )


     {


     if


     (

     !

     Application

     .

     isPlaying

     &&

      effectors

     [

     i

     ]


     !=


     null

     )


     {


                Gizmos

     .

     color

     =

      green

     ;


                Gizmos

     .

     DrawSphere

     (

     effectors

     [

     i

     ]

     .

     position

     ,


     0.06f

     )

     ;


     }


     else


     {


     if


     (

     effectors

     [

     i

     ]


     ==


     null

     )


     return

     ;


                Gizmos

     .

     color

     =

      effectors

     [

     i

     ]

     .

     position

     .

     y

     <

      effectorProjections

     [

     i

     ]

     .

     y

     ?

      red

     :

      green

     ;


     // submerged


                Gizmos

     .

     DrawSphere

     (

     effectors

     [

     i

     ]

     .

     position

     ,


     0.06f

     )

     ;


                Gizmos

     .

     color

     =

      orange

     ;


                Gizmos

     .

     DrawSphere

     (

     effectorProjections

     [

     i

     ]

     ,


     0.06f

     )

     ;


                Gizmos

     .

     color

     =

      blue

     ;


                Gizmos

     .

     DrawLine

     (

     effectors

     [

     i

     ]

     .

     position

     ,

      effectorProjections

     [

     i

     ]

     )

     ;


     }


     }


     }


     }
需要注意的是,
BuoyantObject
脚本的波浪参数必须匹配水着色器上的参数。在项目里,我通常会让
BuoyantObject
脚本直接引用水体并读取这些属性,而不是手动设置。

图注:波浪属性
这下我们就有了简单又好玩的浮力效果了!

焦散效果
焦散效果可以为水体锦上添花。如果你喜欢这篇教程,可以去看看我的焦散效果资产
Water Caustics for URP
。它可以添加到任何水着色器上,包含许多不错的功能。这里有一段效果的示意:
额外提示:反射
平面反射效果可以用
这份脚本
添加(后果自负,我已经很久没测过了😅)。它会从上到下把所有东西渲染到一张称为
PlanarReflectionTexture
的纹理上。你可以用以下节点来采集该纹理的样本:
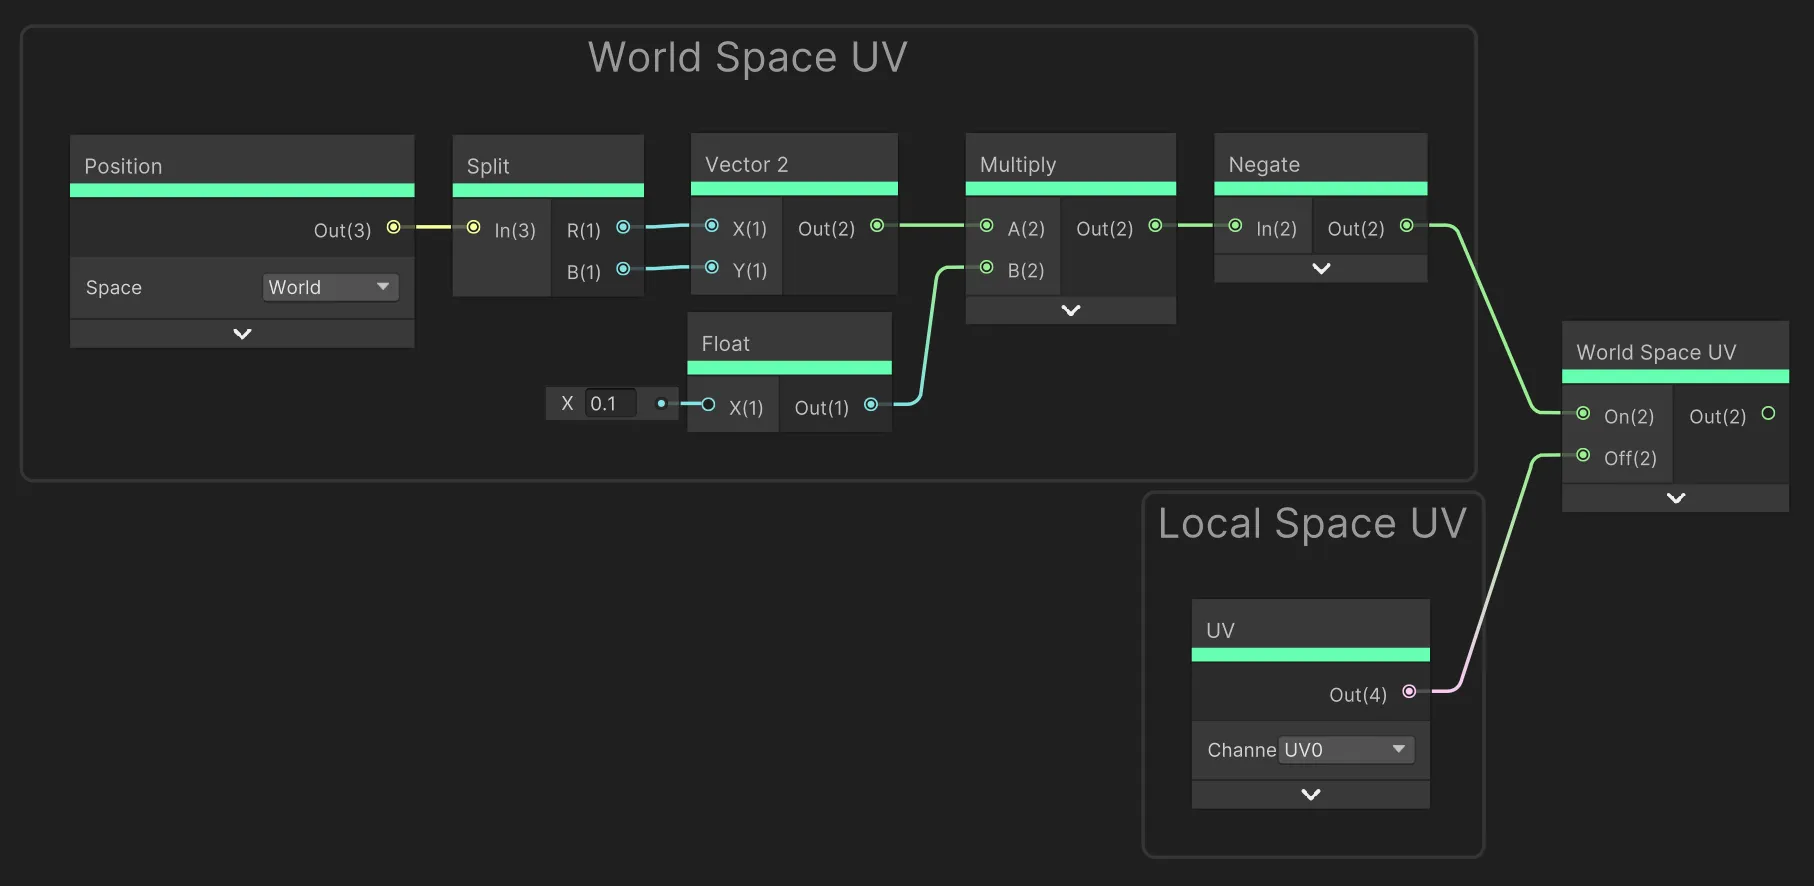
额外提示:世界空间UV
相比于用普通的UV来完成纹理采样等,你可以试着用世界空间UV。这些UV可以划分出相衔接的
水体图块
,所有图块都会整齐的排列!
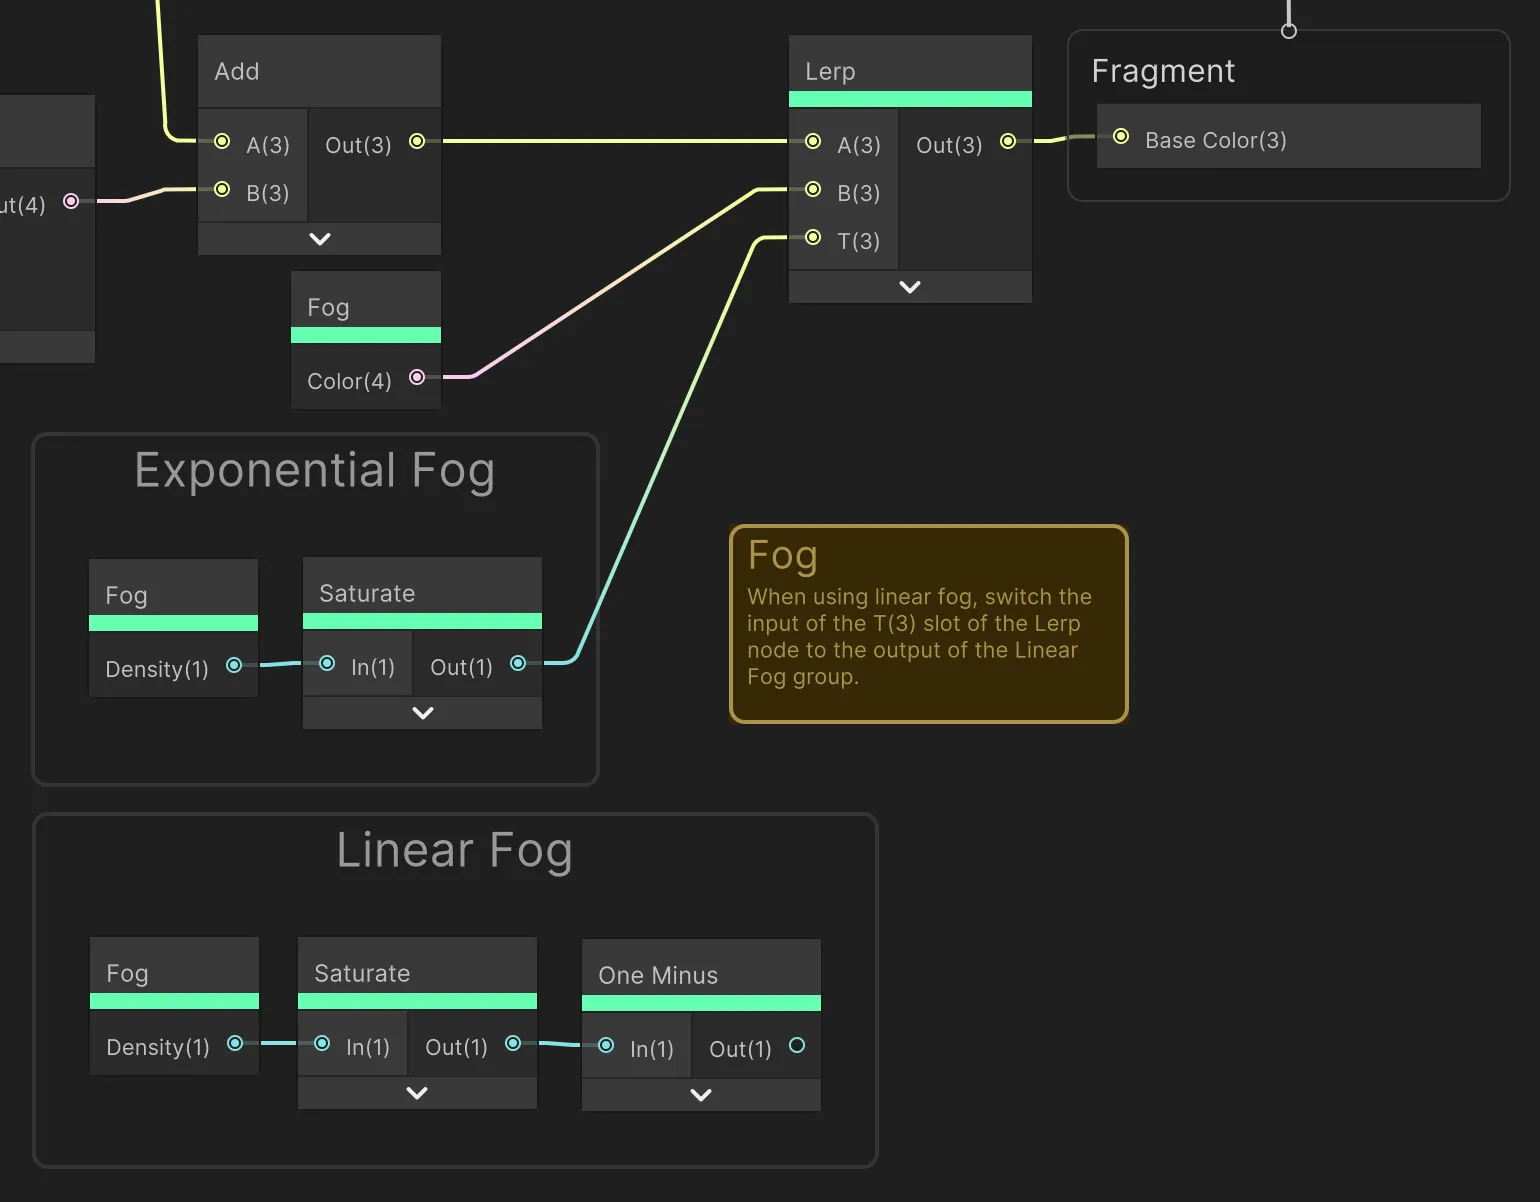
额外提示:雾气
雾气可以像下方这样轻松添加:
额外提示:水面痕迹
水面痕迹可以用粒子效果制作。参考这篇
Minions Art的教程
。
结语
希望你能喜欢这篇教程。有任何想法可在Twitter上找到作者
@alexanderameye
!
本文介绍的
风格化水体Shader文件
可在这里找到:
stylized-water.unitypackage
更多资源

分享前沿Unity技术干货和开发经验,精彩的Unity活动和社区相关信息
更多推荐


 2
2 0
0- 0


 已为社区贡献690条内容

所有评论(0)