
springboot集成swagger
springboot集成swagger
swagger概述
swagger是当下比较流行的实时接口文文档生成工具。接口文档是当前前后端分离项目中必不可少的工具,在前后端开发之前,后端要先出接口文档,前端根据接口文档来进行项目的开发,双方开发结束后在进行联调测试。
swagger提供了界面可视化的api接口文档工具,项目部署后即可看到最新的api接口文档,同时swagger还可以与离线接口文档工具YAPI配合使用。
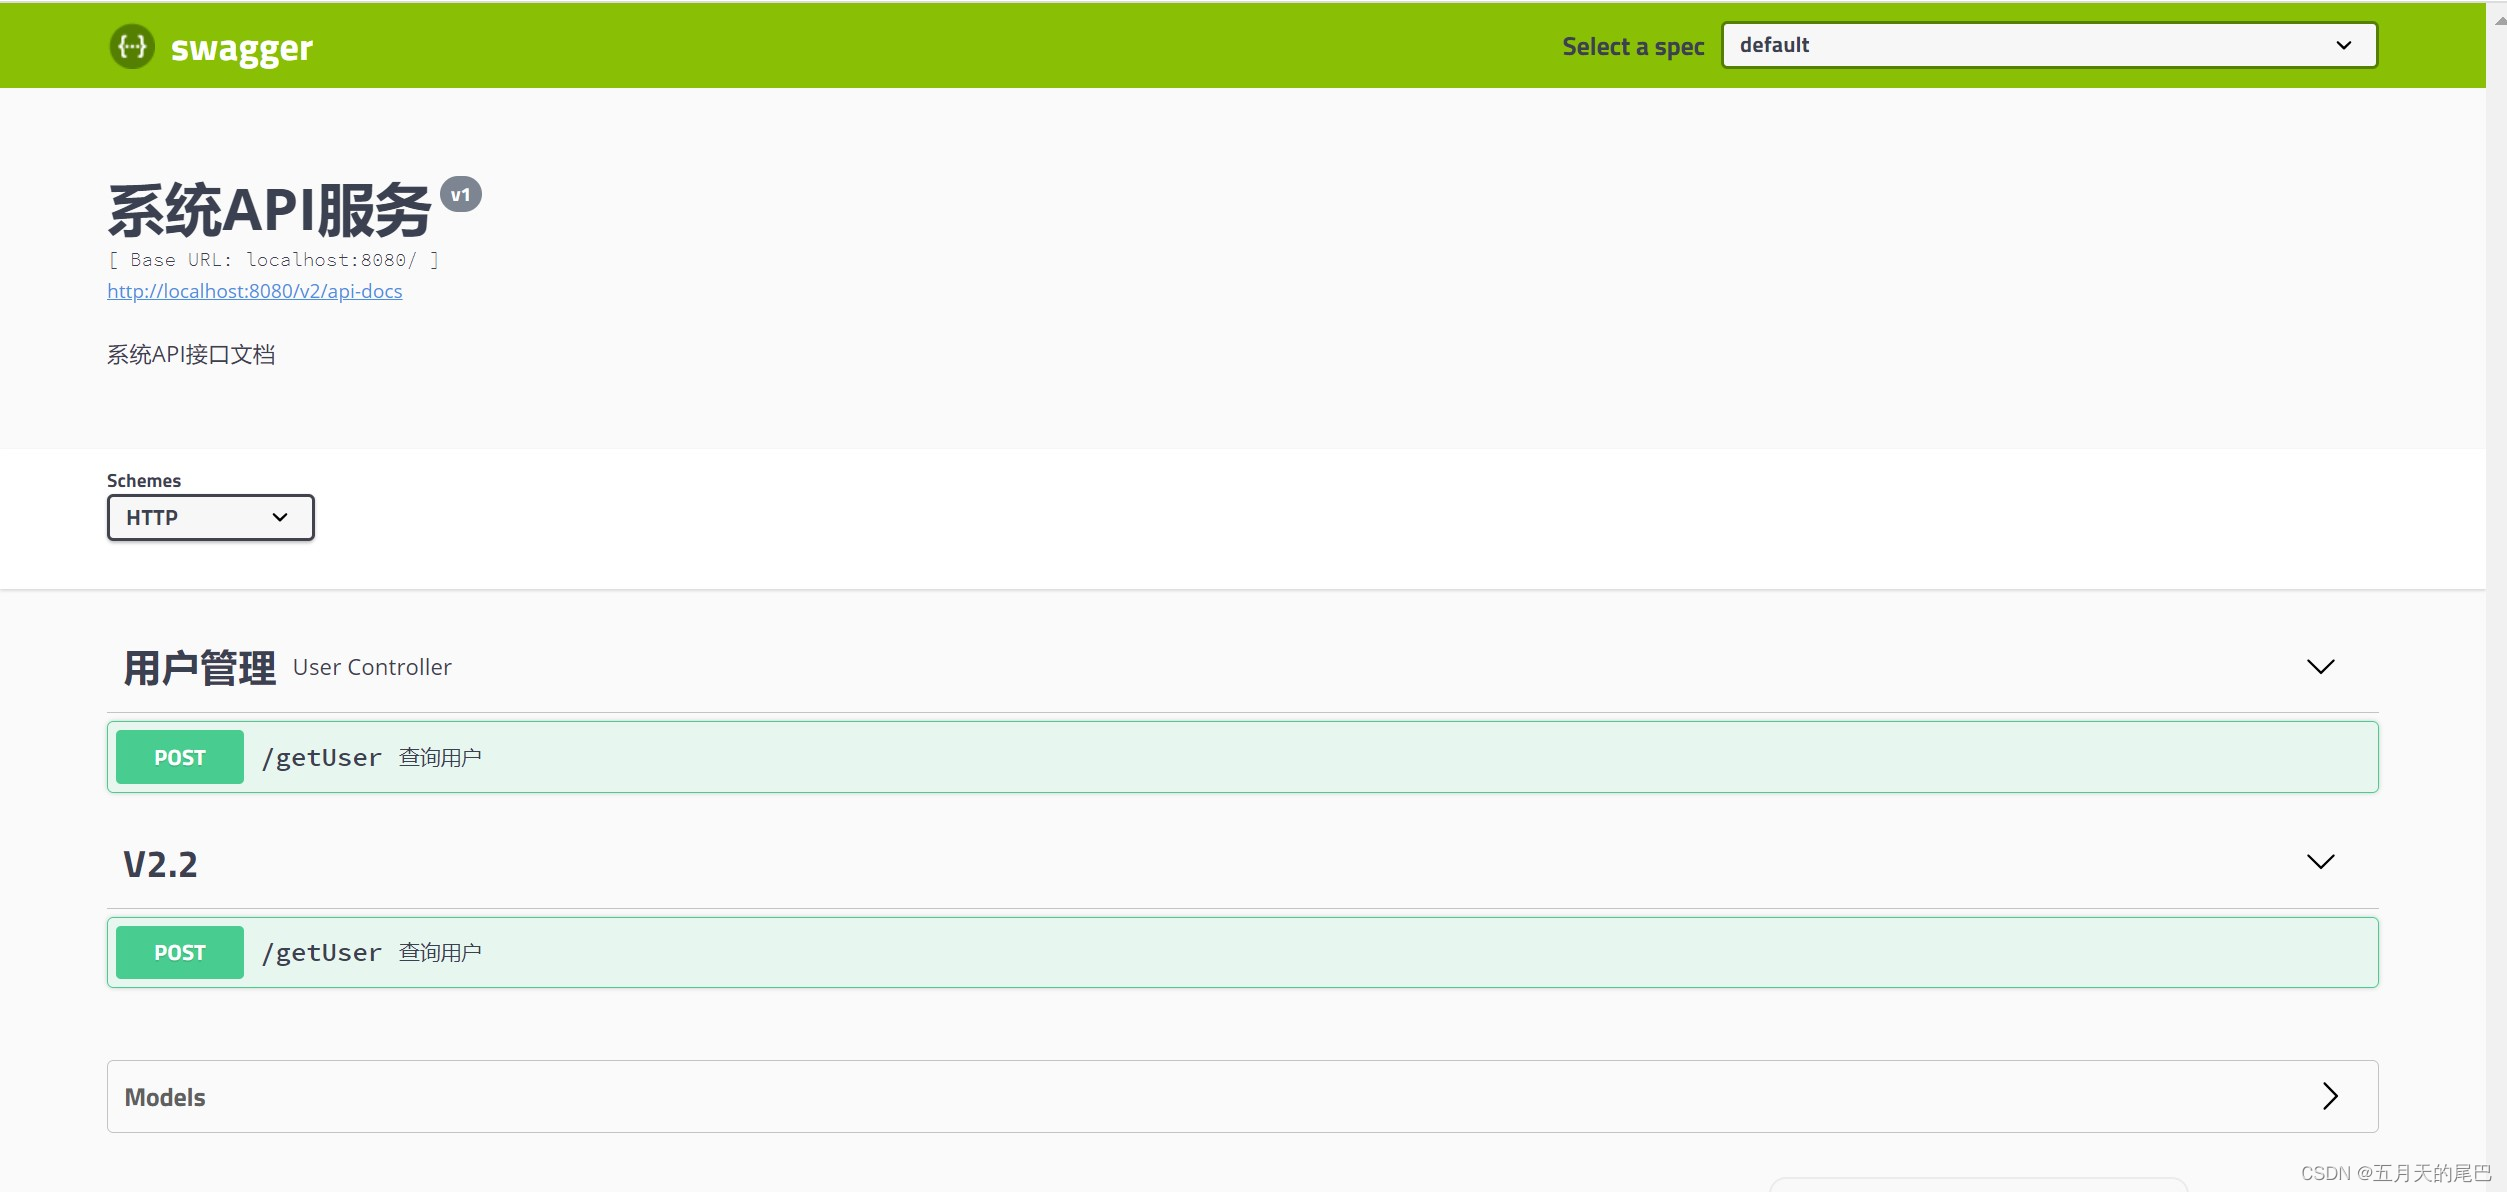
可视化界面地址:
swagger2访问地址: http://ip地址:端口/swagger-ui.html
swagger3访问地址:http://ip地址:端口/swagger-ui/index.html
可视化界面如下:
swagger常用注解
注释汇总
| API注解 | 作用范围 | 使用位置 |
|---|---|---|
| @Api | 协议集描述 | 用于controller类名的上面 |
| @ApiOperation | 协议描述,对方法添加说明 | 用在controller的方法上 |
| @ApiResponses | Response集 | 用在controller的方法上 |
| @ApiResponse | Response | 用在 @ApiResponses里边 |
| @ApiImplicitParams | 非对象参数集 | 用在controller的方法上 |
| @ApiImplicitParam | 非对象参数描述 | 用在@ApiImplicitParams的方法里边 |
| @ApiModel | 描述请求/响应对象的意义 | 用在请求/响应对象类上 |
| @ApiModelProperty | 对象属性 | 用在出入参数对象的字段上 |
示例:
package com.springboot.swagger.controller;
import com.springboot.swagger.qo.UserQo;
import com.springboot.swagger.vo.UserVo;
import io.swagger.annotations.*;
import org.springframework.web.bind.annotation.PostMapping;
import org.springframework.web.bind.annotation.RequestBody;
import org.springframework.web.bind.annotation.RestController;
import springfox.documentation.annotations.ApiIgnore;
import java.util.Map;
@RestController(value = "/user")
@Api(value = "用户管理功能集", tags = "用户管理")
public class UserController {
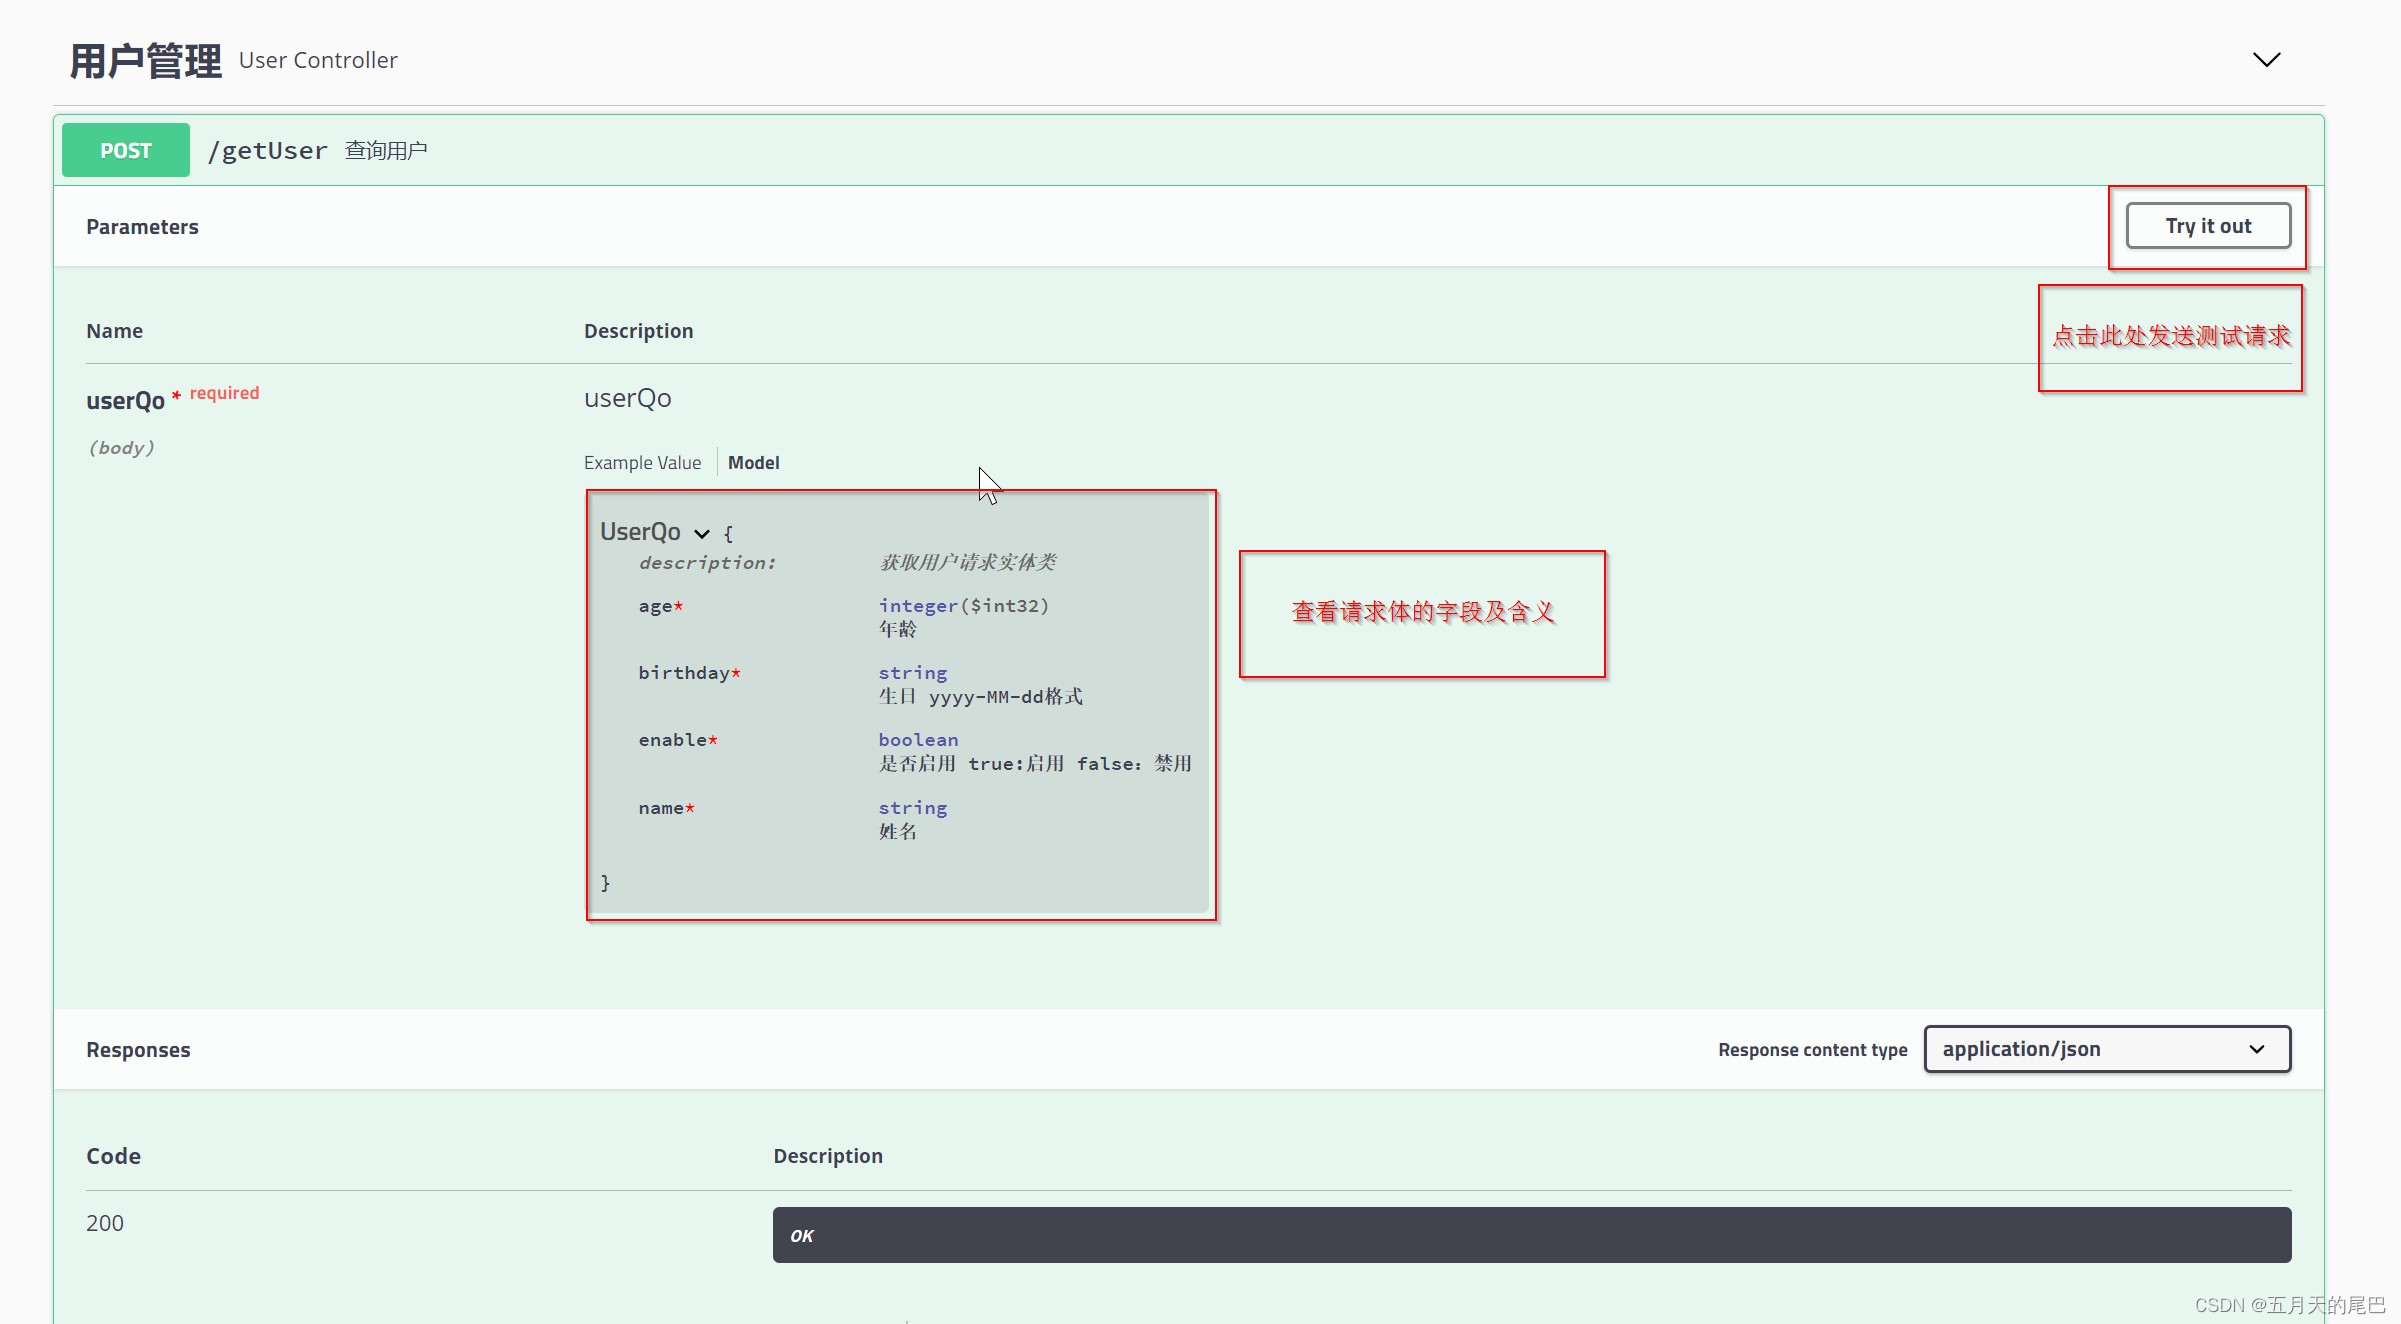
@PostMapping(value = "/getUser")
/**
* value: 描述当前方法的作用
* tags: 对当前方法打标签,如每期开发时都可以打一个标签,标明该方法是那期修改的
*/
@ApiOperation(value = "查询用户",notes = "返回用户信息",tags = "V2.2")
@ApiResponses(value = {
@ApiResponse(code = 200, message = "请求已完成"),
@ApiResponse(code = 201, message = "资源成功被创建"),
@ApiResponse(code = 400, message = "请求中有语法问题,或不能满足请求"),
@ApiResponse(code = 401, message = "未授权客户机访问数据"),
@ApiResponse(code = 403, message = "服务器接受请求,但是拒绝处理"),
@ApiResponse(code = 404, message = "服务器找不到给定的资源;文档不存在"),
@ApiResponse(code = 500, message = "服务器出现异常")}
)
public UserVo getUser(@RequestBody UserQo userQo){
return null;
}
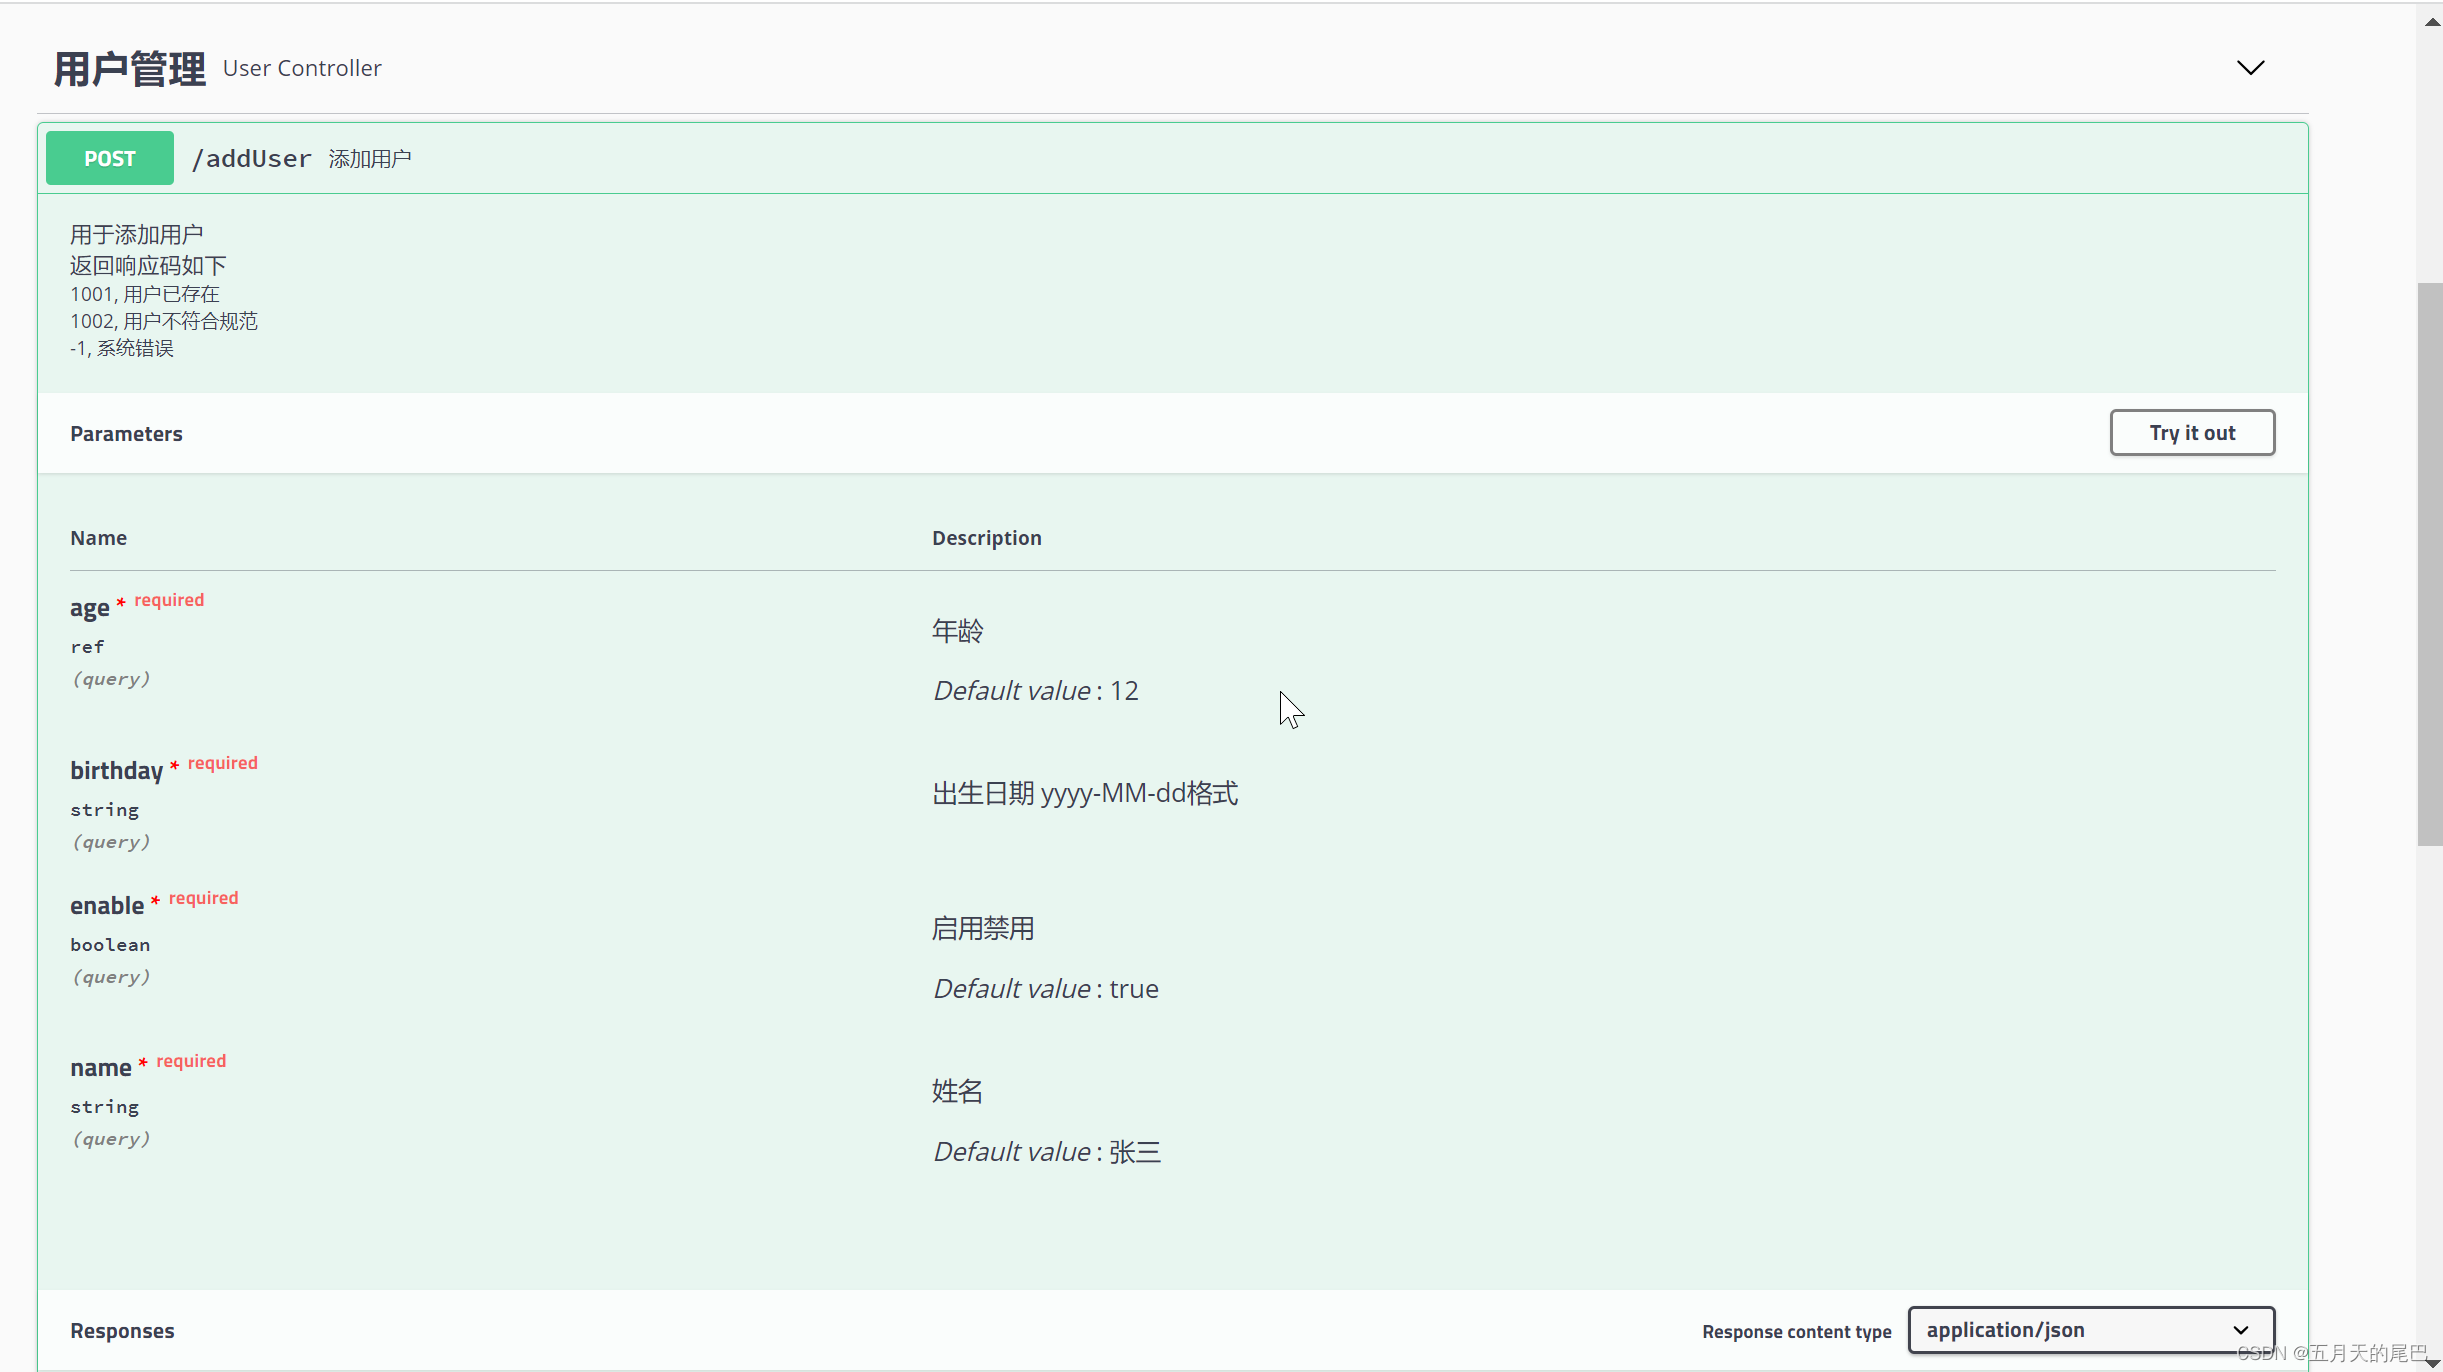
@PostMapping(value = "/addUser")
/**
* value: 描述当前方法的作用
* tags: 对当前方法打标签,如每期开发时都可以打一个标签,标明该方法是那期修改的
*/
@ApiOperation(value = "添加用户",tags = "V2.2",notes = "用于添加用户" +
"<p>返回响应码如下</p>" +
"1001, 用户已存在 \n" +
"1002, 用户不符合规范 \n" +
"-1, 系统错误 \n"
)
@ApiImplicitParams({
@ApiImplicitParam(name = "name", value = "姓名", required = true, dataType = "String", paramType = "query", defaultValue = "张三"),
@ApiImplicitParam(name = "age", value = "年龄", required = true, dataType = "Integer", paramType = "query", defaultValue = "12"),
@ApiImplicitParam(name = "birthday", value = "出生日期 yyyy-MM-dd格式", required = true, dataType = "String", paramType = "query", example = "2020-01-23"),
@ApiImplicitParam(name = "enable", value = "启用禁用", required = true, dataType = "boolean", paramType = "query", defaultValue = "true"),
})
public Map<String,String> addUser(String name,Integer age, String birthday,boolean enable){
return null;
}
@PostMapping("/error")
/**
* 若添加了@ApiIgnore这个注解, 则会在swagger api中忽略此方法
*
*/
@ApiIgnore
@ApiOperation(value = "返回错误",notes = "错误接口",tags = "V2.2")
public void error(){
}
}
package com.springboot.swagger.qo;

import io.swagger.annotations.ApiModel;
import io.swagger.annotations.ApiModelProperty;
import lombok.Data;

@Data
/* 对实体类进行注解 */
@ApiModel(description = "获取用户请求实体类")
public class UserQo {

    // dataType一般swagger自己能识别出来,所以不用输入也可以
    @ApiModelProperty(value = "姓名",required = true,dataType = "String")
    private String name;
    @ApiModelProperty(value = "年龄",required = true)
    private Integer age;
    @ApiModelProperty(value = "生日 yyyy-MM-dd格式",required = true,example = "2020-01-23")
    private String birthday;
    @ApiModelProperty(value = "是否启用 true:启用 false:禁用",required = true)
    private boolean enable;

}
@ApiImplicitParam
| 属性 | 取值 | 作用 |
|---|---|---|
| paramType | 查询参数类型 | |
| path | 以地址的形式提交数据 | |
| query | 直接跟参数完成自动映射赋值 | |
| body | 以流的形式提交 仅支持POST | |
| header | 参数在request headers 里边提交 | |
| form | 以form表单的形式提交 仅支持POST | |
| dataType | 参数的数据类型 只作为标志说明,并没有实际验证 | |
| Long | ||
| String | ||
| … | ||
| name | 接收参数名 | |
| value | 接收参数的意义描述 | |
| required | 参数是否必填(默认false) | |
| true | 必填 | |
| false | 非必填 | |
| defaultValue | 默认值 |
paramType 示例详解
path
@PostMapping(value = "/getUser/{id}")
@ApiOperation(value = "获取用户",tags = "V2.2")
@ApiImplicitParams({
        @ApiImplicitParam(name = "id", value = "姓名", required = true, dataType = "String", paramType = "path", defaultValue = "张三"),
})
public Map<String,String> getUser(@PathVariable(name = "id") Long id){
    return null;
}
body
@ApiImplicitParams({ @ApiImplicitParam(paramType = "body", dataType = "MessageParam", name = "param", value = "信息参数", required = true) })
  @RequestMapping(value = "/findById", method = RequestMethod.POST)

  @RequestBody MessageParam param
header
 @ApiImplicitParams({ @ApiImplicitParam(paramType = "header", dataType = "Long", name = "id", value = "信息id", required = true) })

 String idstr = request.getHeader("id");
 if (StringUtils.isNumeric(idstr)) {
     id = Long.parseLong(idstr);
 }
form
@ApiImplicitParams({ @ApiImplicitParam(paramType = "form", dataType = "Long", name = "id", value = "信息id", required = true) })
 @RequestMapping(value = "/findById", method = RequestMethod.POST, produces = MediaType.APPLICATION_JSON_UTF8_VALUE, consumes = MediaType.APPLICATION_FORM_URLENCODED_VALUE)
swagger的集成方式
集成swagger2.9
1.pom.xml引入依赖包
 <!-- swagger2 集成-->
 <dependency>
     <groupId>io.springfox</groupId>
     <artifactId>springfox-swagger2</artifactId>
     <version>2.9.2</version>
 </dependency>
 <dependency>
     <groupId>io.springfox</groupId>
     <artifactId>springfox-swagger-ui</artifactId>
     <version>2.9.2</version>
 </dependency>
2.开启swagger功能
在启动类中添加@EnableSwagger2注解开启swagger功能
package com.springboot.swagger;


import org.springframework.boot.SpringApplication;
import org.springframework.boot.autoconfigure.SpringBootApplication;
import springfox.documentation.swagger2.annotations.EnableSwagger2;

@SpringBootApplication
//开启swagger功能
@EnableSwagger2
public class MainApplication {

    public static void main(String[] args) {
        SpringApplication.run(MainApplication.class,args);
    }
}
3.添加config配置类
package com.springboot.swagger.config;

import com.google.common.collect.Sets;
import org.springframework.beans.factory.annotation.Value;
import org.springframework.context.annotation.Bean;
import org.springframework.context.annotation.Configuration;
import springfox.documentation.builders.ApiInfoBuilder;
import springfox.documentation.builders.PathSelectors;
import springfox.documentation.builders.RequestHandlerSelectors;
import springfox.documentation.service.ApiInfo;
import springfox.documentation.service.Contact;
import springfox.documentation.spi.DocumentationType;
import springfox.documentation.spring.web.plugins.Docket;
import springfox.documentation.swagger2.annotations.EnableSwagger2;

/**
 * Swagger2的Java配置类
 *
 * @version 1.0
 */
@Configuration
//@EnableSwagger2  若不想在启动类中添加注解,也可以在这里添加注解,开启swagger功能
public class Swagger2Config {
    @Value("${swagger.enable}")
    private boolean enable;

    @Bean
    public Docket createRestApi() {
        return new Docket(DocumentationType.SWAGGER_2)
                .enable(enable)
                .produces(Sets.newHashSet("application/json"))
                .consumes(Sets.newHashSet("application/json"))
                .protocols(Sets.newHashSet("http", "https"))
                .apiInfo(apiInfo())
                .forCodeGeneration(true)
                .select()
                // 指定controller存放的目录路径
                .apis(RequestHandlerSelectors.basePackage("com.springboot.swagger"))
//                .paths(PathSelectors.ant("/api/v1/*"))
                .paths(PathSelectors.any())
                .build();
    }

    private ApiInfo apiInfo() {
        return new ApiInfoBuilder()
                // 文档标题
                .title("系统API服务")
                // 文档描述
                .description("系统API接口文档")
                .version("v1")
                .build();
    }
}
4.配置文件添加启用/禁用swagger
由于本人在生产环境禁用掉了swagger,所以在application.yml文件中添加了如下配置
#swagger配置,  配置是否启用swagger  生产环境一般禁用掉swagger
swagger:
  enable: true
集成swagger2.10
2.9.2与2.10.5之间不同的是2.10需要多引入一个依赖包,并且启用swagger注解由@EnableSwagger2换到了@EnableSwagger2WebMvc注解,其他部分与2.9.2保持一致即可
1.引入依赖
<!-- swagger2 集成-->
<dependency>
    <groupId>io.springfox</groupId>
    <artifactId>springfox-swagger2</artifactId>
    <version>2.10.5</version>
</dependency>
<dependency>
    <groupId>io.springfox</groupId>
    <artifactId>springfox-swagger-ui</artifactId>
    <version>2.10.5</version>
</dependency>
<dependency>
    <groupId>io.springfox</groupId>
    <artifactId>springfox-spring-webmvc</artifactId>
    <version>2.10.5</version>
</dependency>
2.开启swagger
注意:2.10.5要使用@EnableSwagger2WebMvc注解
package com.springboot.swagger;


import org.springframework.boot.SpringApplication;
import org.springframework.boot.autoconfigure.SpringBootApplication;
import springfox.documentation.swagger2.annotations.EnableSwagger2WebMvc;

@SpringBootApplication
//开启swagger功能
@EnableSwagger2WebMvc
public class MainApplication {

    public static void main(String[] args) {
        SpringApplication.run(MainApplication.class,args);
    }
}
集成swagger3
集成swagger3后,访问地址变成了http://ip地址:端口/swagger-ui/index.html
1.引入依赖
<dependency>
  <groupId>io.springfox</groupId>
  <artifactId>springfox-boot-starter</artifactId>
  <version>3.0.0</version>
</dependency>
2.开启swagger
在启动类中添加@EnableOpenApi注解
3.添加配置类
package com.springboot.swagger.config;

import org.springframework.context.annotation.Bean;
import org.springframework.context.annotation.Configuration;
import springfox.documentation.builders.RequestHandlerSelectors;
import springfox.documentation.spi.DocumentationType;
import springfox.documentation.spring.web.plugins.Docket;

/**
 * Swagger3的Java配置类
 *
 * @version 1.0
 */
@Configuration
public class Swagger3Config {

    @Bean
    public Docket createRestApi() {
        return new Docket(DocumentationType.OAS_30) // v2 不同
                .select()
                .apis(RequestHandlerSelectors.basePackage("com.springboot.swagger")) // 设置扫描路径
                .build();
    }

}
springboot集成swagger的demo已上传到gitee, 地址:
https://gitee.com/jianlwang/springboot-bucket

旨在为数千万中国开发者提供一个无缝且高效的云端环境,以支持学习、使用和贡献开源项目。
更多推荐


 0
0 0
0- 0


 已为社区贡献31条内容

所有评论(0)