

二、若依验证码后端代码讲解
又因为后端的ajax返回了uuid与图片,因而res能够得到后端向前端返回的ajax信息,并直接调用)*-*若是 char 型,则采用下面一套代码(这玩意没懂,主要是captchaType声明那块用的 .getCaptchaType方法没懂)该代码的作用就是返回一个AjaxResult对象,是一个用于后台给前台发送数据的模型(称为R或VO),参数分别为状态、信息和数据。*-*首先就是创建一个Aja
1、后端验证码部分相关代码
/**
     * 生成验证码
     */
    @GetMapping("/captchaImage")
    public AjaxResult getCode(HttpServletResponse response) throws IOException
    {
        AjaxResult ajax = AjaxResult.success();
        boolean captchaEnabled = configService.selectCaptchaEnabled();
        ajax.put("captchaEnabled", captchaEnabled);
        if (!captchaEnabled)
        {
            return ajax;
        }

        // 保存验证码信息
        String uuid = IdUtils.simpleUUID();
        String verifyKey = CacheConstants.CAPTCHA_CODE_KEY + uuid;

        String capStr = null, code = null;
        BufferedImage image = null;

        // 生成验证码
        String captchaType = RuoYiConfig.getCaptchaType();
        if ("math".equals(captchaType))
        {
            String capText = captchaProducerMath.createText();
            capStr = capText.substring(0, capText.lastIndexOf("@"));
            code = capText.substring(capText.lastIndexOf("@") + 1);
            image = captchaProducerMath.createImage(capStr);
        }
        else if ("char".equals(captchaType))
        {
            capStr = code = captchaProducer.createText();
            image = captchaProducer.createImage(capStr);
        }

        redisCache.setCacheObject(verifyKey, code, Constants.CAPTCHA_EXPIRATION, TimeUnit.MINUTES);
        // 转换流信息写出
        FastByteArrayOutputStream os = new FastByteArrayOutputStream();
        try
        {
            ImageIO.write(image, "jpg", os);
        }
        catch (IOException e)
        {
            return AjaxResult.error(e.getMessage());
        }

        ajax.put("uuid", uuid);
        ajax.put("img", Base64.encode(os.toByteArray()));
        return ajax;
    }
}
2、验证码相关代码逐功能讲解
- 数据准备
AjaxResult ajax = AjaxResult.success();
*-*首先就是创建一个Ajax对象,然后你通过追踪success()方法可以发现,最终追溯到了下文代码
public static AjaxResult success(String msg, Object data)
    {
        return new AjaxResult(HttpStatus.SUCCESS, msg, data);
    }
该代码的作用就是返回一个AjaxResult对象,是一个用于后台给前台发送数据的模型(称为R或VO),参数分别为状态、信息和数据。
最终的目的就是把后台要发送给前端的数据使劲往这个AjaxResult对象 ajax中装。
- 判断验证是否开启
boolean captchaEnabled = configService.selectCaptchaEnabled();
//下面这一句是用来将判断验证是否开启的判断值存入ajax中
ajax.put("captchaEnabled", captchaEnabled);
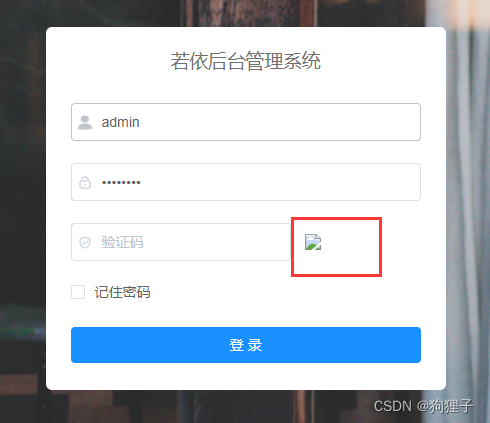
//若captchaEnabled为false,则证明验证未开启,则直接返回ajax,前端对应页面会如下图所示(验证码图片无法显示):
 if (!captchaEnabled)
        {
            return ajax;
        }
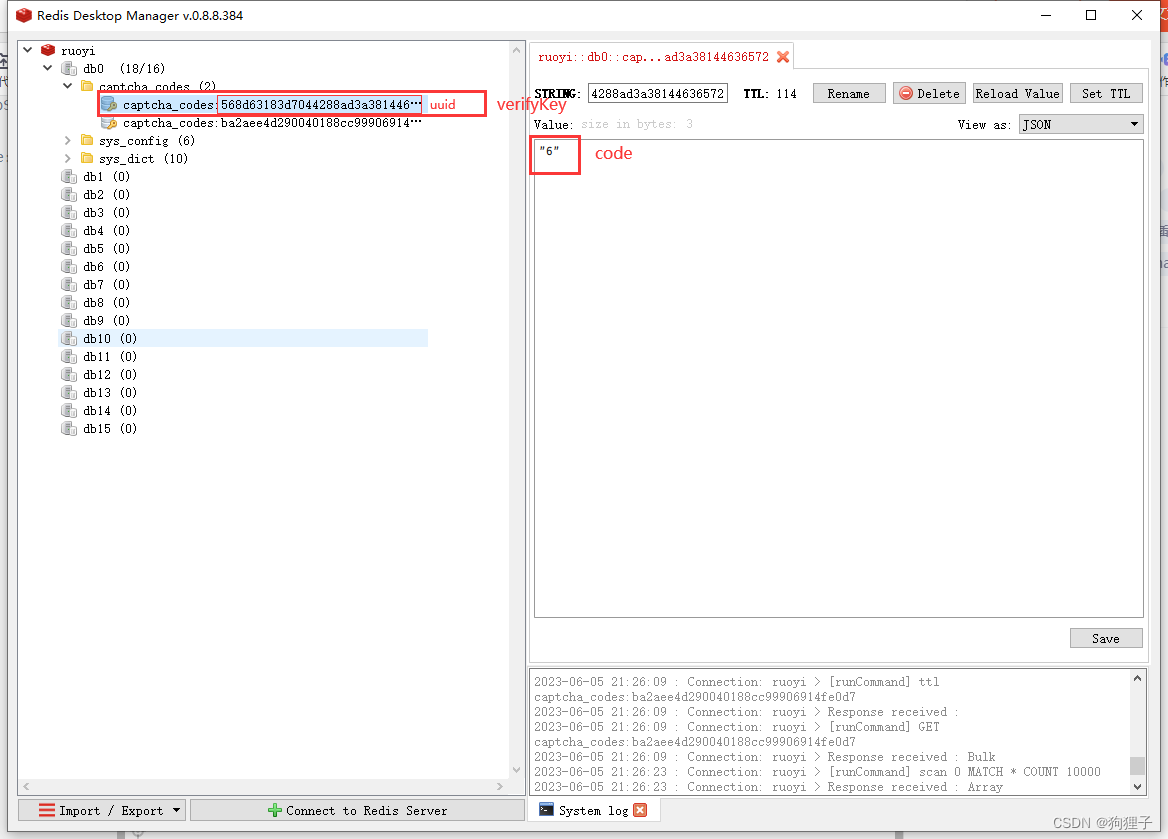
- 保存验证码信息
	String uuid = IdUtils.simpleUUID();
    String verifyKey = CacheConstants.CAPTCHA_CODE_KEY + uuid;

    String capStr = null, code = null;
    BufferedImage image = null;
这里的uuid通过代码可以追溯到下文代码中,证明UUID是经过伪随机生成的
public static UUID randomUUID(boolean isSecure)
    {
        final Random ng = isSecure ? Holder.numberGenerator : getRandom();

        byte[] randomBytes = new byte[16];
        ng.nextBytes(randomBytes);
        randomBytes[6] &= 0x0f; /* clear version */
        randomBytes[6] |= 0x40; /* set to version 4 */
        randomBytes[8] &= 0x3f; /* clear variant */
        randomBytes[8] |= 0x80; /* set to IETF variant */
        return new UUID(randomBytes);
    }
这样一来verifyKey值便可定下了(由定值 CAPTHCHA_CODE_KEY + uuid 组成)。
- 生成验证码表达式并将相关数据存入Redis
*-*首先判断生成的验证码的类型
String captchaType = RuoYiConfig.getCaptchaType();
*-*若是 math 型,则采用这一套代码进行表达式的分割
if ("math".equals(captchaType))
        {
            String capText = captchaProducerMath.createText();  //capText:”4+1=?@5“
            capStr = capText.substring(0, capText.lastIndexOf("@"));  //capStr= "4+1=?"
            code = capText.substring(capText.lastIndexOf("@") + 1);  //code: "5"
            image = captchaProducerMath.createImage(capStr);
        }
*-*若是 char 型,则采用下面一套代码(这玩意没懂,主要是captchaType声明那块用的 .getCaptchaType方法没懂)
 else if ("char".equals(captchaType))
        {
            capStr = code = captchaProducer.createText();
            image = captchaProducer.createImage(capStr);
        }
*-*然后把下列东西存到Redis中
 redisCache.setCacheObject(verifyKey, code, Constants.CAPTCHA_EXPIRATION, TimeUnit.MINUTES);
 //Constants.CAPTCHA_EXPIRATION是有效期为‘2’,TimeUnit.MINUTES是‘分钟’
 //因而存到Redis中的数据仅有两分钟的存活期
- 将生成的表达式转换成图片(转换流信息写出)
 // 转换流信息写出
        FastByteArrayOutputStream os = new FastByteArrayOutputStream();
        try
        {
            ImageIO.write(image, "jpg", os);
        }
        catch (IOException e)
        {
            return AjaxResult.error(e.getMessage());
        }
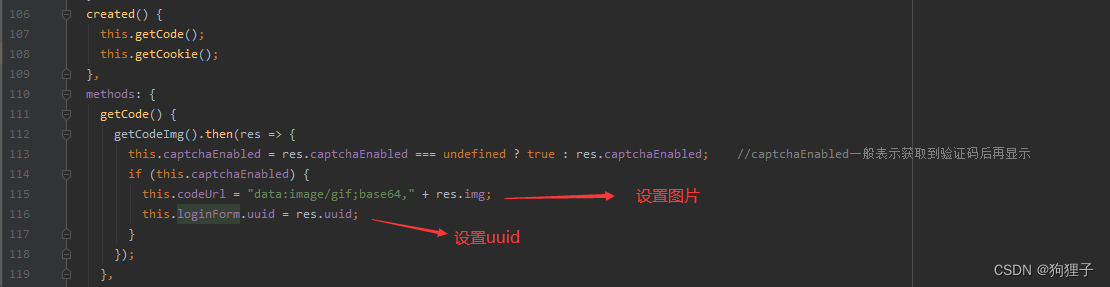
- 把生成的图片和 uuid 放入 ajax 中,返回给前端
(图片不需要存到本地,直接传到前端了)
 		ajax.put("uuid", uuid);
        ajax.put("img", Base64.encode(os.toByteArray()));
        return ajax;
这里对应着前端的设置图片,与设置uuid。(由this的指向可知,这里因为是在箭头函数中被使用的,因而指向的是Window;又因为后端的ajax返回了uuid与图片,因而res能够得到后端向前端返回的ajax信息,并直接调用)

快速构建 Web 应用程序
更多推荐
 1
1 0
0- 0


 已为社区贡献8条内容

所有评论(0)