
SpringCache详解
SpringCache详解
一、前言
1、SpringCache是Spring提供的一个缓存框架,在Spring3.1版本开始支持将缓存添加到现有的spring应用程序中,在4.1开始,缓存已支持JSR-107注释和更多自定义的选项。
2、Spring Cache利用了AOP,实现了基于注解的缓存功能,并且进行了合理的抽象,业务代码不用关心底层是使用了什么缓存框架,只需要简单地加一个注解,就能实现缓存功能了,做到了对代码侵入性做小。
3、由于市面上的缓存工具实在太多,SpringCache框架还提供了CacheManager接口,可以实现降低对各种缓存框架的耦合。它不是具体的缓存实现,它只提供一整套的接口和代码规范、配置、注解等,用于整合各种缓存方案,比如Caffeine、Guava Cache、Ehcache。
二、SpringCache深入
一、SpringCache大致原理
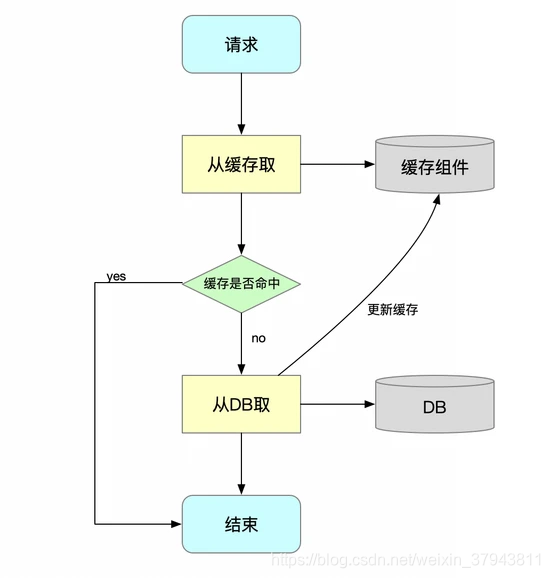
在SpringCache官网中,有一个缓存抽象的概念,其核心就是将缓存应用于Java方法中,从而减少基于缓存中可用信息的执行次数。换句话来说。就是每次调用目标方法前,SpringCache都会先检查该方法是否正对给定参数执行,如果已经执行过,就直接返回缓存的结果。(通俗的讲,就是查看缓存里面是否有对应的数据,如果有就返回缓存的数据),而无需执行实际方法、如果该方法上位执行。则执行该方法(缓存中没有对应的数据就执行方法获取对应数据,并进行缓存),并缓存结果并返回给用户。这样就不用多次去执行数据库操作,减少cpu和io的消耗。
二、SpringCache为我们提供了两个接口:
1、org.springframework.cache.Cache:
Cache接口为缓存的组件规范定义,包含缓存的各种操作集合
2、org.springframework.cache.CacheManager:
CacheManager接口下Spring提供了各种xxxCache的实现;如RedisCache、EhCacheCache、ConcurrentMapCache等;
三、SpringCache概念
1、Cache接口:缓存接口,定义缓存操作。实现有 如RedisCache、EhCacheCache、ConcurrentMapCache等
2、cacheResolver:指定获取解析器
3、CacheManager:缓存管理器,管理各种缓存(Cache)组件;如:RedisCacheManager,使用redis作为缓存。指定缓存管理器
4、@Cacheable:在方法执行前查看是否有缓存对应的数据,如果有直接返回数据,如果没有调用方法获取数据返回,并缓存起来。
5、@CacheEvict:将一条或多条数据从缓存中删除。
6、@CachePut:将方法的返回值放到缓存中
7、@EnableCaching:开启缓存注解功能
8、@Caching:组合多个缓存注解;
9、@CacheConfig:统一配置@Cacheable中的value值
四、SpringCache注解中公共的属性
1、cacheNames:每个注解中都有自己的缓存名字。该名字的缓存与方法相关联,每次调用时,都会检查缓存以查看是否有对应cacheNames名字的数据,避免重复调用方法。名字可以可以有多个,在这种情况下,在执行方法之前,如果至少命中一个缓存,则返回相关联的值。( Springcache提供两个参数来指定缓存名:value、cacheNames,二者选其一即可,每一个需要缓存的数据都需要指定要放到哪个名字的缓存,缓存的分区,按照业务类型分 )
@Cacheable(cacheNames = "tets")
@Cacheable({"books", "isbns"})
public Book findBook(ISBN isbn) {...}
2、KeyGenerator:key生成器
缓存的本质是key-value存储模式,每一次方法的调用都需要生成相应的Key, 才能操作缓存。
通常情况下,@Cacheable有一个属性key可以直接定义缓存key,开发者可以使用SpEL语言定义key值。若没有指定属性key,缓存抽象提供了 KeyGenerator来生成key ,具体源码如下,

由图可看出
- 如果没有参数,则直接返回SimpleKey.EMPTY;
- 如果只有一个参数,则直接返回该参数;
- 若有多个参数,则返回包含多个参数的SimpleKey对象。
当然Spring Cache也考虑到需要自定义Key生成方式,需要我们实现org.springframework.cache.interceptor.KeyGenerator 接口。
默认的 key 生成器要求参数具有有效的 hashCode() 和 equals() 方法实现。
3、key:缓存的key,如果是redis,则相当于redis的key
可以为空,如果需要可以使用spel表达式进行表写。如果为空,则缺省默认使用key表达式生成器进行生成。默认的 key 生成器要求参数具有有效的 hashCode() 和 equals() 方法实现。key的生成器。key/keyGenerator二选一使用
4、condition:缓存的条件,对入参进行判断
可以为空,如果需要指定,需要使用SPEL表达式,返回true/false,只有返回true的时候才会对数据源进行缓存/清除缓存。在方法调用之前或之后都能进行判断。
condition=false时,不读取缓存,直接执行方法体,并返回结果,同时返回结果也不放入缓存。
condition=true时,读取缓存,有缓存则直接返回。无则执行方法体,同时返回结果放入缓存(如果配置了result,且要求不为空,则不会缓存结果)。
注意:
condition 属性使用的SpEL语言只有#root和获取参数类的SpEL表达式,不能使用返回结果的#result 。 所以 condition = "#result != null" 会导致所有对象都不进入缓存,每次操作都要经过数据库。
五、Spel表达式
一、spel语法
具体语法可以参考此篇博客:SpEL表达式总结 - 简书
二、SpringCache也提供了root对象,具体功能使用如下。

三、使用spel表达式栗子
1、使用参数作为key:使用方法参数时我们可以直接使用“#参数名”或者“#p参数index”。
- @Cacheable(value="users", key="#id")
- public User find(Integer id) {
- returnnull;
- }
- @Cacheable(value="users", key="#p0")
- public User find(Integer id) {
- returnnull;
- }
- @Cacheable(value="users", key="#user.id")
- public User find(User user) {
- returnnull;
- }
- @Cacheable(value="users", key="#p0.id")
- public User find(User user) {
- returnnull;
- }
2、当我们要使用root对象的属性作为key时我们也可以将“#root”省略,因为Spring默认使用的就是root对象的属性。如:
- @Cacheable(value={"users", "xxx"}, key="caches[1].name")
- public User find(User user) {
- returnnull;
- }
如果要调用类里面的方法:
- @Cacheable(value={"TeacherAnalysis_public_chart"}, key="#root.target.getDictTableName() + '_' + #root.target.getFieldName()")
- public List<Map<String, Object>> getChartList(Map<String, Object> paramMap) {
- }
- public String getDictTableName(){
- return "";
- }
- public String getFieldName(){
- return "";
- }
3、最好使用所有参数作为key,当然,也分情况。
@Cacheable(cacheNames = "c2",key = "#id")
public User getUserById(Long id,String username){
User user = new User();
user.setId(id);
return user;
}
@Test
void testGetUserById() {
User u1 = userService.getUserById(98L, "dong");
User u2 = userService.getUserById(98L, "lisi");
}以参数id作为key会出现逻辑错误,当调用第一次getUserById方法时,存入key为id,值为dong,当调用第二次getUserById方法时,因为已经存入缓存id,所以不会进入第二次getUserById方法,所以lisi不能进入缓存
4、自定义key生成器
@Component
public class MyKeyGenerate implements KeyGenerator {
@Override
public Object generate(Object target, Method method, Object... params) {
String s = target.toString()+":"+method.getName()+":"+ Arrays.toString(params);
return s;
}
}//将myKeyGenerate注入
@Cacheable(cacheNames = "test",keyGenerator = "myKeyGenerate")
public User getUserById(Long id,String username){
User user = new User();
user.setId(id);
user.setUsername(username);
return user;
}
五、各个注解详解
在四当中,已经把各个注解的公共属性抽了出来,这里只做一些注解的特有属性,当然,可能某些属性也是公有的。
一、@Cacheable:在方法执行前查看是否有缓存对应的数据,如果有直接返回数据,如果没有调用方法获取数据返回,并缓存起来。
1、unless:条件符合则不缓存,是对出参进行判断
unless属性可以使用#result表达式。效果: 缓存如果有符合要求的缓存数据则直接返回,没有则去数据库查数据,查到了就返回并且存在缓存一份,没查到就不存缓存。
condition 不指定相当于 true,unless 不指定相当于 false
当 condition = false,一定不会缓存;
当 condition = true,且 unless = true,不缓存;
当 condition = true,且 unless = false,缓存;
2、sync:是否使用异步,默认是false.
在一个多线程的环境中,某些操作可能被相同的参数并发地调用,同一个 value 值可能被多次计算(或多次访问 db),这样就达不到缓存的目的。针对这些可能高并发的操作,我们可以使用 sync 参数来告诉底层的缓存提供者将缓存的入口锁住,这样就只能有一个线程计算操作的结果值,而其它线程需要等待。当值为true,相当于同步可以有效的避免缓存击穿的问题。
@Cacheable(value="user_cache",key="#userId", unless="#result == null")
public User getUserById(Long userId) {
 User user = userMapper.getUserById(userId);
 return user;
}
二、@CachePut:缓存更新
与@Cacheable不同的是使用@CachePut标注的方法在执行前不会去检查缓存中是否存在之前执行过的结果,而是每次都会执行该方法,并将执行结果以键值对的形式存入指定的缓存中。
他所具有的属性与@Cacheable相同就不多描述。
@CachePut(value = "user_cache", key="#user.id", unless = "#result != null")
public User updateUser(User user) {
 userMapper.updateUser(user);
 return user;
}
当调用updateUser方法时,每次方法都会被执行,但是因为unless属性每次都是true,所以并没有将结果缓存。当去掉unless属性,则结果会被缓存。
三、@CacheEvict:清空缓存
注解的方法在调用时会从缓存中移除已存储的数据。
@CacheEvict(value = "user_cache", key = "#id")
public void deleteUserById(Long id) {
 userMapper.deleteUserById(id);
}
1、allEntries:是否清空左右缓存。默认为false
当指定了allEntries为true时,Spring Cache将忽略指定的key
2、beforeInvocation:是否在方法执行前就清空,默认为 false
清除操作默认是在对应方法成功执行之后触发的,即方法如果因为抛出异常而未能成功返回时也不会触发清除操作。使用beforeInvocation可以改变触发清除操作的时间,当我们指定该属性值为true时,Spring会在调用该方法之前清除缓存中的指定元素。
四、@Caching:可以让我们在一个方法或者类上同时指定多个Spring Cache相关的注解
1、其拥有三个属性:cacheable、put和evict,分别用于指定@Cacheable、@CachePut和@CacheEvict。
    @Caching(
            cacheable = {@Cacheable(value = "stu",key = "#userName")},
            put = {@CachePut(value = "stu", key = "#result.id"),
                    @CachePut(value = "stu", key = "#result.age")
            }
    )
    public Student getStuByStr(String userName) {
        StudentExample studentExample = new StudentExample();
        studentExample.createCriteria().andUserNameEqualTo(userName);
        List<Student> students = studentMapper.selectByExample(studentExample);
        return Optional.ofNullable(students).orElse(null).get(0);
    }
五、@CacheConfig 抽取缓存的公共配置
我们每个缓存注解中 都指定 了value = "stu" / cacheNames="stu" ,可以抽离出来,在整个类上添加
@CacheConfig(cacheNames = "stu"),之后每个方法中都默认使用 cacheNames = “stu”
@CacheConfig(cacheNames = "stu")
@Service
public class StudentServiceImpl implements StudentService {

    @Resource
    private StudentMapper studentMapper;

    @CachePut(key = "#result.id")
    @Override
    public Student updateStu(Student student){
        System.out.println(student);
        studentMapper.updateByPrimaryKey(student);
        return student;
    }
    /**
     * Cacheable
     * @param id
     * @return
     *
     * key = "#root.methodName+'['+#id+']'"
     */
    @Cacheable(key = "#id")
    @Override
    public Student getStu(Integer id) {
        Student student = studentMapper.selectByPrimaryKey(id);
        System.out.println(student);
        return student;
    }

    @CacheEvict(allEntries = true, beforeInvocation = true)
    public void delSut(Integer id) {
        System.out.println(id);
        studentMapper.deleteByPrimaryKey(id);
    }

    @Caching(
            cacheable = {@Cacheable(key = "#userName")},
            put = {@CachePut(key = "#result.id"),
                    @CachePut(key = "#result.age")
            }
    )
    public Student getStuByStr(String userName) {
        StudentExample studentExample = new StudentExample();
        studentExample.createCriteria().andUserNameEqualTo(userName);
        List<Student> students = studentMapper.selectByExample(studentExample);
        return Optional.ofNullable(students).orElse(null).get(0);
    }
}
三、SpringCache使用步骤:
一、Springboot整合redis与cache :
1、对于使用Springboot进行整合redis与cache,我们只需要引入
<!-- Redis Client 3版本以上会报错与spring-boot-starter-data-redis冲突 -->
<dependency>
<groupId>redis.clients</groupId>
<artifactId>jedis</artifactId>
<version>3.3.0</version>
</dependency>
<dependency>
<groupId>org.springframework.boot</groupId>
<artifactId>spring-boot-starter-data-redis-reactive</artifactId>
</dependency>
<dependency>
<groupId>org.springframework.boot</groupId>
<artifactId>spring-boot-starter-cache</artifactId>
</dependency>
2、默认行为
1、如果缓存中有数据,不会调用方法从数据库中获取数据
2、key默认自动生成,缓存名字::SimpleKey[]
3、缓存的value值默认使用jdk序列化机制,序列化后放入redis
4、默认ttl(过期时间)为-1;即永不1过期。
3、然后再yaml文件配置好redis属性,再配置缓存类型就好了
spring:
thymeleaf:
cache: false
redis:
#REDIS 数据库索引(默认为0)
database: 1
#redis服务地址
host: 127.0.0.1
#redis服务连接端口
port: 6379
#redis密码(没有密码默认为空)
password:
#连接池最大连接数(使用负值表示没有限制)
jedis:
pool:
max-active: 8
lettuce:
pool:
# 连接池中的最小空闲连接
min-idle: 8
# 连接池中的最大空闲连接
max-idle: 500
# 连接池最大连接数(使用负值表示没有限制)
max-active: 2000
# 连接池最大阻塞等待时间(使用负值表示没有限制)
max-wait: 10000
#连接超时时间(毫秒)
timeout: 5000cache:
type: redis
redis:
time-to-live: 1000
#缓存key过期时间(毫秒)
#打印sql日志
logging:
level:
root: debug
4、Springboot添加启动注解
@SpringBootApplication
//扫描容器
@ComponentScan(basePackages = {"com.lwq.demo.*"})
//扫描mapper层
@MapperScan("com.lwq.demo.dao")
//启动缓存
@EnableCaching
public class DemoApplication {
public static void main(String[] args) {
SpringApplication.run(DemoApplication.class, args);
}
}
5、如果不配置序列化机制,那么数据进入到redis时默认使用的是jdk序列化机制,一般系统都是使用json序列化机制,使用jdk就可能会出现不兼容问题。

这是没有反序列化的数据,如果你项目以前用到缓存的 你反序列化以后如果不清缓存的话会报错 报500 这时清下缓存就好了
package com.hete.mall.pdc.config;

import org.springframework.boot.autoconfigure.cache.CacheProperties;
import org.springframework.boot.context.properties.EnableConfigurationProperties;
import org.springframework.context.annotation.Bean;
import org.springframework.context.annotation.Configuration;
import org.springframework.data.redis.cache.RedisCacheConfiguration;
import org.springframework.data.redis.serializer.GenericJackson2JsonRedisSerializer;
import org.springframework.data.redis.serializer.RedisSerializationContext;
import org.springframework.data.redis.serializer.StringRedisSerializer;

/**
 * @Description :原理
 * 1、springcache的所有配置信息都会放到CacheAutoConfiguration这个类下。这个类绑定了@EnableConfigurationProperties({CacheProperties.class})
 * CacheProperties这个类就是接受我们配置在yaml文件上的属性
 * 2、在这个CacheAutoConfiguration配置类里面有一个静态方法CacheConfigurationImportSelector,这个方法会导入缓存的配置类,由于用的是redis,所以会导入与redis相关的配置类
 *  mappings.put(CacheType.REDIS, RedisCacheConfiguration.class.getName());也就是RedisCacheConfiguration
 * 3、RedisCacheConfiguration配置缓存管理器RedisCacheManager,在这里会按照我们在yaml文件中的配置初始化缓存,
 * 并且里面会调用determineConfiguration这个方法。
 * 4、determineConfiguration这个方法里面会判断,RedisCacheConfiguration这个配置文件是否为空,如果我们有重写这个配置文件,就会使用我们的,
 * 否者就是用默认的
 * 5、所以想改缓存配置就需要放入一个自定义的RedisCacheConfiguration
 *
 *6、由于CacheProperties这个类,没有注入容器,所以想要使用可以参考源码CacheAutoConfiguration里面的使用方式
 * 使用@EnableConfigurationProperties({CacheProperties.class})注解导入进行即可
 *
 *
 * @Author :
 * @Date : 2023/10/29 16:29
 **/

@Configuration
@EnableConfigurationProperties({CacheProperties.class})
public class SpringCacheConfig {


    @Bean
    RedisCacheConfiguration redisCacheConfiguration(CacheProperties cacheProperties){
        CacheProperties.Redis redisProperties = cacheProperties.getRedis();
        org.springframework.data.redis.cache.RedisCacheConfiguration config = org.springframework.data.redis.cache.RedisCacheConfiguration.defaultCacheConfig();
        /*key为String,可以到对应方法fromSerializer里面找到RedisSerializer接口,使用快捷键ctrl+h找到RedisSerializer的实现类放入进去,
          每次改完之后都是生成一个新对象,下次再使用 config改的时候,之前改的属性才会存在
         */
        config = config.serializeKeysWith(RedisSerializationContext.SerializationPair.fromSerializer(new StringRedisSerializer()));
        // value以json格式放入redis
        config.serializeValuesWith(RedisSerializationContext.SerializationPair.fromSerializer(new GenericJackson2JsonRedisSerializer()));

        // 如果不写一下代码,由于这里新建了RedisCacheConfiguration,,则不会使用cacheProperties里面配置好的数据,只会使用默认值
        if (redisProperties.getTimeToLive() != null) {
            config = config.entryTtl(redisProperties.getTimeToLive());
        }

        if (redisProperties.getKeyPrefix() != null) {
            config = config.prefixCacheNameWith(redisProperties.getKeyPrefix());
        }

        if (!redisProperties.isCacheNullValues()) {
            config = config.disableCachingNullValues();
        }

        if (!redisProperties.isUseKeyPrefix()) {
            config = config.disableKeyPrefix();
        }
        return config;

    }
}
总结起来就是,引入redis包和cache包,配置好redis的yaml,使用注解开启缓存就可以了
缓存分页具体可以参考一下博客:

旨在为数千万中国开发者提供一个无缝且高效的云端环境,以支持学习、使用和贡献开源项目。
更多推荐


 29
29 0
0- 0


 已为社区贡献2条内容

所有评论(0)