幻宇机器人使用简介
幻宇无人驾驶机器人学习
幻宇机器人使用简介
连接
使用linux远程链接幻宇机器人。
1. 连接幻宇的AP
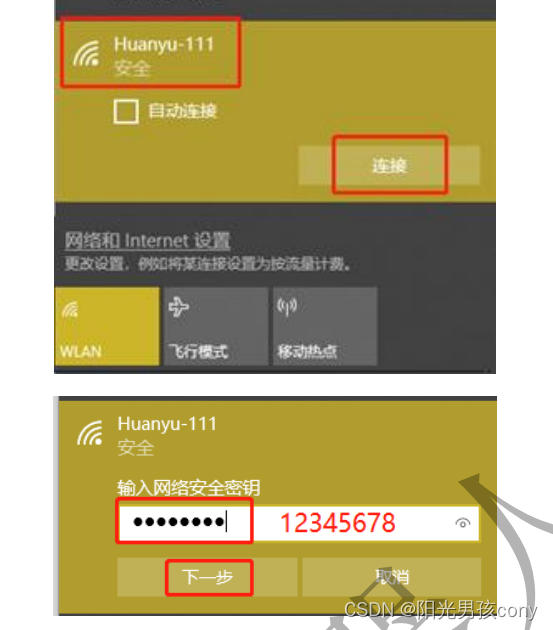
2. 使用ssh连接幻宇
- 如知晓机器人IP地址
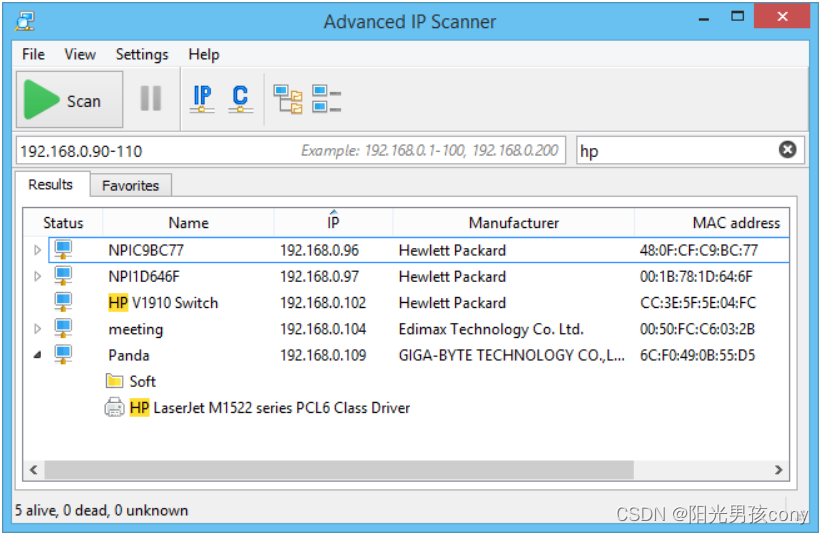
ssh huike@192.168.12.1 #该机器密码为huike - 如不知晓机器人IP地址可使用
Advanced IP Scanner 点击获取软件 软件可以查看同区段ip地址。
3. 修改机器人时间。
-
首先需要使用date查看本机时间(连接机器人的上位机)。
-
在ssh连接窗口使用执行命令将机器人时间进行修改.
sudo date -s "2022-2-22 22:22:22"该命令需要在每次机器人开机时进行执行。
4.使用rviz查看
- 准备
在对话题(topic)查看前,需要在机器人ROS master上启动roscore。
- 启动节点
幻宇将所有的节点整合再了一起,启动盘节点的同时也会启动其他的节点。
roslaunch huanyu_robot_start Huanyu_robot_start.launch - 使用
在ubuntu开发机上驱动rviz,或者使用rostopic,查看有那些话题。
- 配置参数
- 思岚a1雷达(LaserScan)
topic:
/scan
fixed frame:laserroslaunch huanyu_robot_start camera_image.launch- 彩色图像(Image)
topic:
/camera/rgb/image_raw
Transport Hint:compressedroslaunch huanyu_robot_start astra_rgb_ir_depth.launch- 同时打开彩色图像、深度图像、三维点云图
fixed frame:camera_link
- 彩色图像
topic:/camera/rgb/image_raw
Transport Hint:compressedDepth - 深度图像
topic:/camera/ depth_registered /image_raw
Transport Hint:compressed - 三维点云
topic:/camera/depth/points
Style:Flat Squares
Color Transformer:AxisColor
- 三维点云(PointCloud2)
topic:
/camera/depth/points
Style:Points
Color Transformer:AxisColor
fixed frame:odom_combined- 地图(map)
topic:
/map
fixed frame:map- PoseWithCovariance
topic:/robot_pose_ekf/odom_combined
Covariance:不勾选- MarkerArray
topic:/trajectory_node_list(用于显示机器人运动轨迹)
- PoseArray
topic :/move_base/TebLocalPlannerROS/teb_poses (用于显示机器人局部规划路径中的机器人位姿)
- 保存参数.
第一次查看时需要输入启动,完成后可以将参数保存至
robot_ws(ros环境的工作空间,可以使用catkin_make创建),的新建目录rviz下,方便下次查看。
5.启动机器人地盘节点
机器人地盘控制节点默认没有驱动
roslaunch huanyu_robot_start Huanyu_robot_start.launch
6.开发环境配置
ROS master在用户目录下的./bashrc下添加
export ROS_MASTER_URI=http://192.168.12.1:11311
export ROS_HOSTNAME=192.168.12.1
ROS 从同样需要在用户目录下的./bashrc下添加
export ROS_MASTER_URI=http://192.168.12.1:11311
export ROS_HOSTNAME=192.168.12.113(本机)
当ROS master启动后,ROS从才可以运行节点,相当宇调用了ROS master的驱动配置。
想需要退出ROS组网,也只需要将上述的两行注释就可以了。
7. arbotix_gui控制机器人移动
-
准备
想要机器人移动,首先需要启动地盘控制节点节点(5)。
-
启动程序
arbotix_gui拖动界面中的红点,就可以移动了
-
监听移动
rostopic echo /cmd_vel输出/cmd_vel话题,可以查看arbotix_gui发出的话题信息。
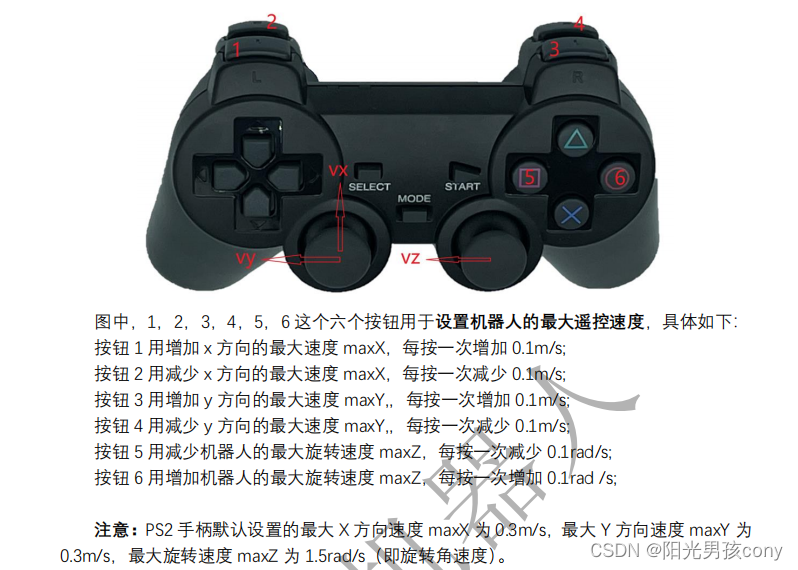
8. 手柄控制机器人移动
- 手柄接收器配对
需要先给接收器上电,再启动手柄,正常三秒钟就可以连接,但是反之则配对不成功。
- 设置手柄
- 首先连接机器人。
- 跟新系统时间。
- 启动手柄控制节点
roslaunch huanyu_joy huanyu_ps2_control.launch- 查看输入设备
ls /dev/input若存在
js0开始的设备付,这说明手柄识别成功,反正可以尝试,更换接受器的usb接口后再次尝试。 - 使用手柄控制机器人移动
启动地盘控制节点(5)
 4.监听移动
rostopic echo /cmd_vel输出/cmd_vel话题(速度话题),可以查看arbotix_gui发出的话题信息。
9. gmapping建图
-
准备
首先,将机器人放置在四周 50cm 没有障碍物的地方(否则将影响后面地图在导航的使用);
然后,打开机器人电源启动机器人;
然后,确认 ubuntu 开发环境已成功连接到机器人发出的 AP;
并确认已配置好 ROS 分布式组网;
并使用 ifconfig 查看开发环境的 IP 是不是和~/.bashrc 文件中的 ROS_HOSTNAME 变量的 IP 一样,若不是,则修改 ROS_HOSTNAME 变量的 IP,并 source ~/.bashrc 使之生效; -
启动底盘节点
先更新日期
sudo date -s"2022-2-22 22:22:22"启动底盘控制节点
roslaunch huanyu_robot_start Huanyu_robot_start.launch -
启动建图节点
- 先使用ssh连接机器人。
- 执行启动节点命令
roslaunch huanyu_robot_start gmapping_slam.launch -
查看建图
打开rviz
添加显示类型 RobotModel、LaserScan 和PoseWithCovariance。
先对LaserScan 和PoseWithCovariance进行参数配置。
后再添加map对map进行参数配置。注意
此 时 使 用 的 全 局 Fixed Frame 为 map, 你 也 可 以 使 用 里 程 计 融 合 坐 标 系
odom_combined。建议使用 map 坐标系,这样的话建图时地图逐渐增大,方便查看;
而使用 odom_combined 坐标系时,在机器人运动过程中 rviz 显示的地图也会随之平移
或旋转。 -
使用arbotix_gui移动机器人进行建图
运行arbotix_gui
arbotix_gui注意
机器人运动速度不要过快,不要控制机器人持续的旋转,前进和旋转控制要分开,这
样建的地图才比较好。 -
保存地图
- 使用ssh连接机器人
- 切换到保存地图的目录
cd robot_ws/src/huanyu_robot_start/map- 可以使用ls与rm查看与删除目录
- 保存目录
rosrun map_server map_saver -f map-f后跟着的是目录名,保存后会生成两个文件,
.pgm后缀为地图图片文件,.yaml后缀为地图参数文件,
10. karto建图
karto 建图也是使用激光雷达数据来创建环境的栅格地图,当机器人慢速移动时,karto
建图是优于 gmapping 建图的。
-
前两部与gmapping建图相同
-
启动 karto 建图节点
roslaunch huanyu_robot_start karto_slam.launch -
查看建图与gmapping建图相同
但是karto 建图方式不同于 gmapping,是基于图优化的,一上来不会看到一大片。
11. 启动 Hector_slam 建图节点
注意gmapping是最好的,尽量使用它。
启动 Hector_slam 建图节点
roslaunch huanyu_robot_start hector_slam.launch
12.cartographer 建图
在建图面积较小场景下,gmapping 的建图效果是优于 cartographer 的,但
cartographer 的好处是在建图的过程中可以随意移动机器人,由于它的后端优化,回环检
测的能力比较强,所以地图一直保持很好的状态;但 gmapping 不一样,一旦机器人运动过
快就会造成地图偏斜,由于它没有回环检测,后面也不能进行优化。Cartographer 建图时,
先在小区域回环,然后再大区域回环,这样建图的话,上万平米环境也能创建很好的地图。
Cartographer 建图生成的地图格式是.pbstream,不能直接在 ROS 中使用,需要进行地图格
式转换。
Cartographer 建图有两种方式:分别是使用 IMU 数据的,和不使用 IMU 数据的。
-
启动 Cartographer 建图节点
roslaunch cartographer_ros huanyu_rplidar.launch我们打开 rqt_graph 来查看 ROS 节点的话题订阅关系
rqt_graph接下来,我们将看到 rqt_graph 窗口,如下图所示。图中可以看到 cartographer 节点没
有订阅了 IMU 话题,说明此时的 cartographer 建图不使用 IMU 数据。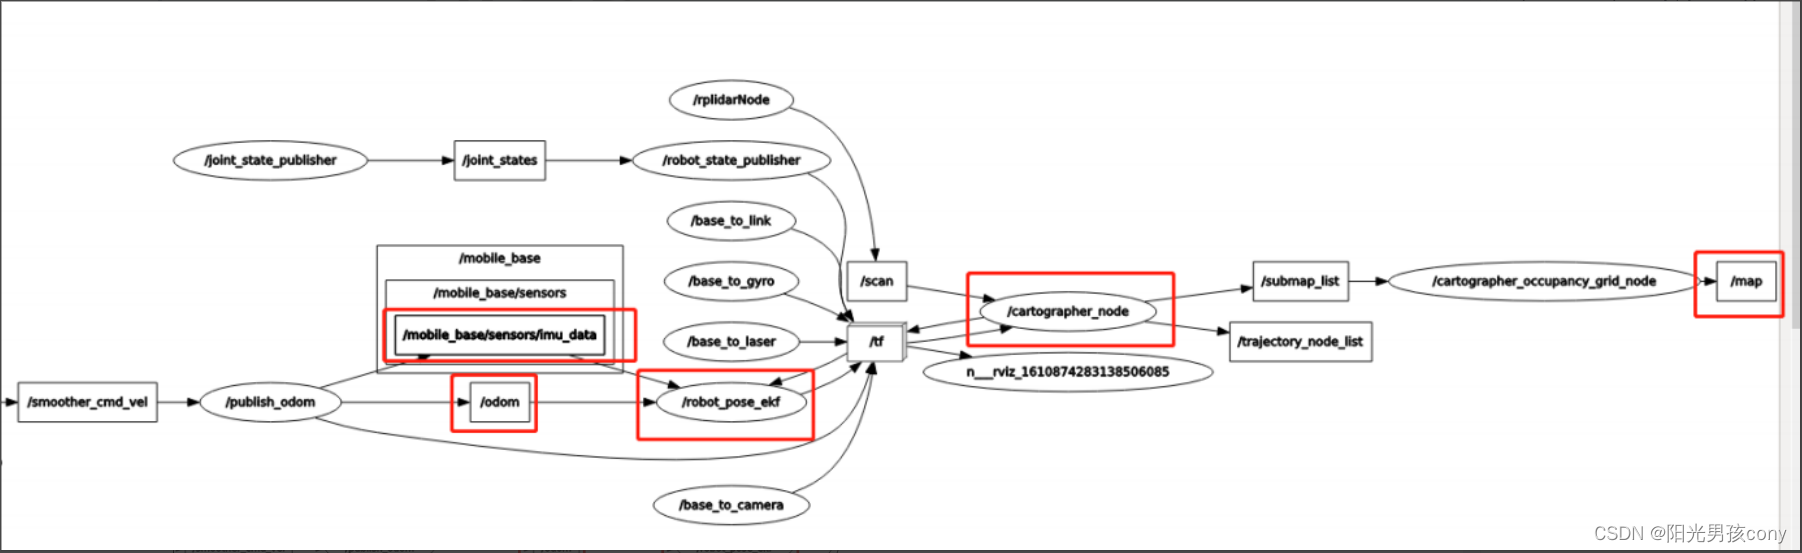
-
查看建图
这时我们使用的是MarkerArray而不是前面的PoseWithCovariance。
注意:建图时让机器人来回多运动几次,图片会建的越真实,并且运动速度不要过快。
由于刚才我们使用的是思岚 A1 雷达的 5hz 扫描频率来建图,所以创建的地图效果略差。若
是购买的思岚 A1 雷达高速版,可以将雷达扫描频率调到 16hz,然后重新建图看看效果,大
家可以自己尝试一下。

手动搬动机器人建图:下面我们使用思岚 A1 雷达高速版,手动搬动机器人在房间里建图,
虽然没有使用 IMU 数据,机器人的位姿会丢,但 Cartographer 建图的后端回环优化能力将
其纠正,激光数据和地图的边缘没有偏离,总体上创建的地图效果还行,如下图所示。

-
保存地图
开始保存地图,首先调用请求停止建图服务,然后调用保存地图服务,命令如下:
rosservice call /finish_trajectory 0
rosservice call /write_state "{filename: 'mymap.pbstream'}"
其中,Cartographer 所创建的地图格式为.pbstream,mymap.pbstream 为生成的地图
文件名。然后将在~/.ros/目录下生成地图文件 mymap.pbstream,可以使用 ls 命令查看。
ls ~/.ros/因为 Cartographer 所创建的地图格式为.pbstream,不能直接在 ROS 中使用,需要转
成 ROS 支持的地图格式,命令如下rosrun cartographer_ros cartographer_pbstream_to_ros_map -map_filestem=/home/huike/robot_ws/src/huanyu_robot_start/map/map -pbstream_filename=/home/huike/.ros/mymap.pbstream -resolution=0.05
12.cartographer 使用 IMU 数据建图
在上一节,我们介绍如何使用 cartographer 建图创建环境地图后,本节我们将介绍如
何配置 cartographer 使用 IMU 数据来建图。
在 cartographer 建图节点中添加 IMU,让 cartographer 建图节跟随 IMU 的 frameid 进
行建图,好处是:1)建图的范围可以扩大,可建大一点的地图;2)我们在地图当中搬动机
器人等,机器人的位姿不会丢;3)在机器人高速移动中也能建很好的地图。
Cartographer 使用思岚雷达 A1 标准版建图时,机器人移动速度不能快,否则轮廓不清
晰,轮廓重叠回环能力差。为了能支持快速移动下 SLAM 建图,我们强烈建议使用思岚雷达
A1 高速版(16hz),这样 cartographer 建图的回环能力,建图场景的大小能力,建图的轮
廓清晰度等等方面都会有所提升。
Cartographer 使用 IMU 建图过程同上一节一样,只不过要配置其使用 IMU。
13. 机器人导航
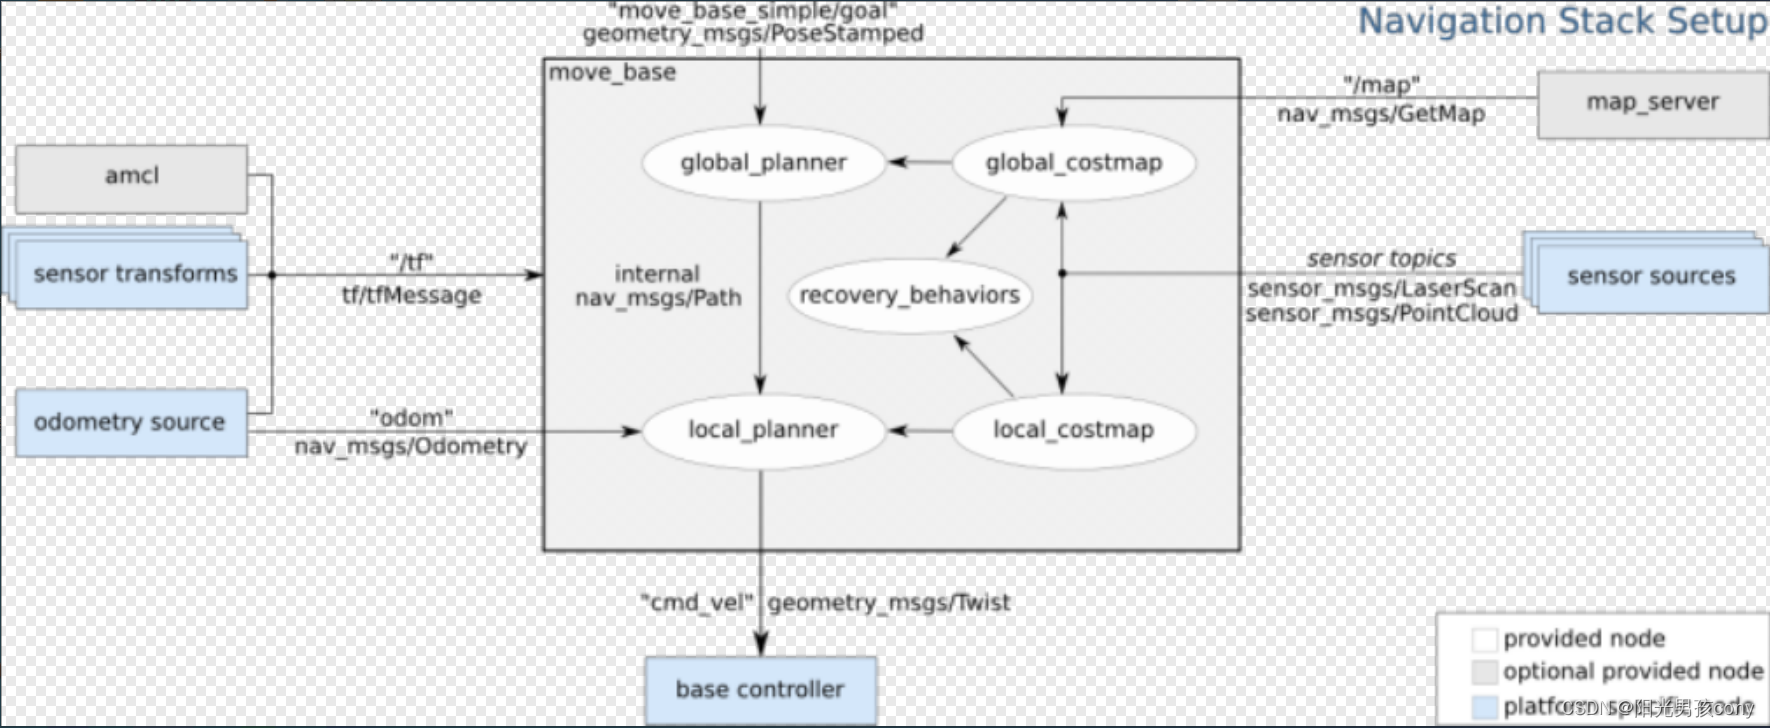
1. 导航框架
- move_base
根据参照的消息进行路径规划,使移动机器人到达指定的位置;
- amcl
根据已经有的地图进行定位。
- 规划
其中,白色框内的是 ROS 已经为我们准备好的必须使用的组件,灰色框内的是 ROS 中可选的组件,蓝色的是用户需要提供的机器人平台上的组件。在总体框架图中可以看到,move_base 提供了 ROS 导航的配置、运行、交互接口,它主要包括两个部分:
(1) 全局路径规划(global planner):根据给定的目标位置进行总体路径的规划;
(2) 本地实时规划(local planner):根据附近的障碍物进行躲避路线规划。
move_base 功能包,以插件的形式组织全局路径规划、局部路径规划、代价地图更新维护、行为恢复等。
- map_server
在 ROS 的导航中,costmap_2d 这个包主要负责根据传感器的信息建立和更新二维或三维的地图。ROS 的地图(costmap)采用网格(grid)的形式,每个网格的值从 0~255,分为三种状态:占用(有障碍物)、无用(空闲的)、未知。具体状态和值的对应关系如下:
上图共分为五个部分:(下面的红色框图是机器人的轮廓,旁边的黑框是上图的映射位
置)
1)Lethal(致命的):机器人的中心与该网格的中心重合,此时机器人必然与障碍物冲
突。
2)Inscribed(内切):网格的外切圆与机器人的轮廓内切,此时机器人也必然与障碍
物冲突。
3)Possibly circumscribed(外切):网格的外切圆与机器人的轮廓外切,此时机器人
相当于靠在障碍物附近,所以不一定冲突。
4)Freespace(自由空间):没有障碍物的空间。
5)Unknown(未知):未知的空间。
- 传感器 TF 变换(sensor transforms)
其中涉及到使用 tf 进行传感器坐标的转换,因为我们使用的机器人的控制中心不一定是在传感器上,所以要把传感器的数据转换成在控制中心上的坐标信息。
- 传感器信息(sensor source)
导航功能包集使用来自传感器的信息避开现实环境中的障碍物,它假定这些传感器在
ROS 上不断发布 sensor_msgs/LaserScan 消息或者 sensor_msgs/PointCloud 消息。有关在ROS 上发布这些消息的教程,请查阅在 ROS 上发布传感器数据流。
- 里程信息(odometry source)
导航功能包集需要使用 tf 和 nav_msgs/Odometry 消息发布的里程信息。这里有一篇发布里程信息的教程:在 ROS 上发布里程信息.
- 基座控制器(base controller)
导航功能包集假定它可以通过话题"cmd_vel"发布 geometry_msgs/Twist 类型的消息,
这个消息基于机器人的基座坐标系,它传递的是运动命令。这意味着必须有一个节点订阅"cmd_vel" 话 题 , 将 该 话 题 上 的 速 度 命 令 (vx, vy, vtheta 转 换 为 电 机 命 令(cmd_vel.linear.x, cmd_vel.linear.y, cmd_vel.angular.z)发送给移动基座,这就是基
座控制器。

2. TEB导航参数
-
启动导航
roslaunch huanyu_robot_start teb_navigation_slam.launch下面我们来看看 teb_navigation_slam.launch 中的内容:该 launch 启动文件中一共启动三个节点:map_server、amcl 和 move_base。下面我们将分别查看这三个启动节点配置:
-
map_server 节点:
map_server 节点用于加载我们之前创建的环境地图,注意启动节点的参数为地图的YAML 文件的路径,这是我们默认的地图路径,你也可以修改成其它地图。

-
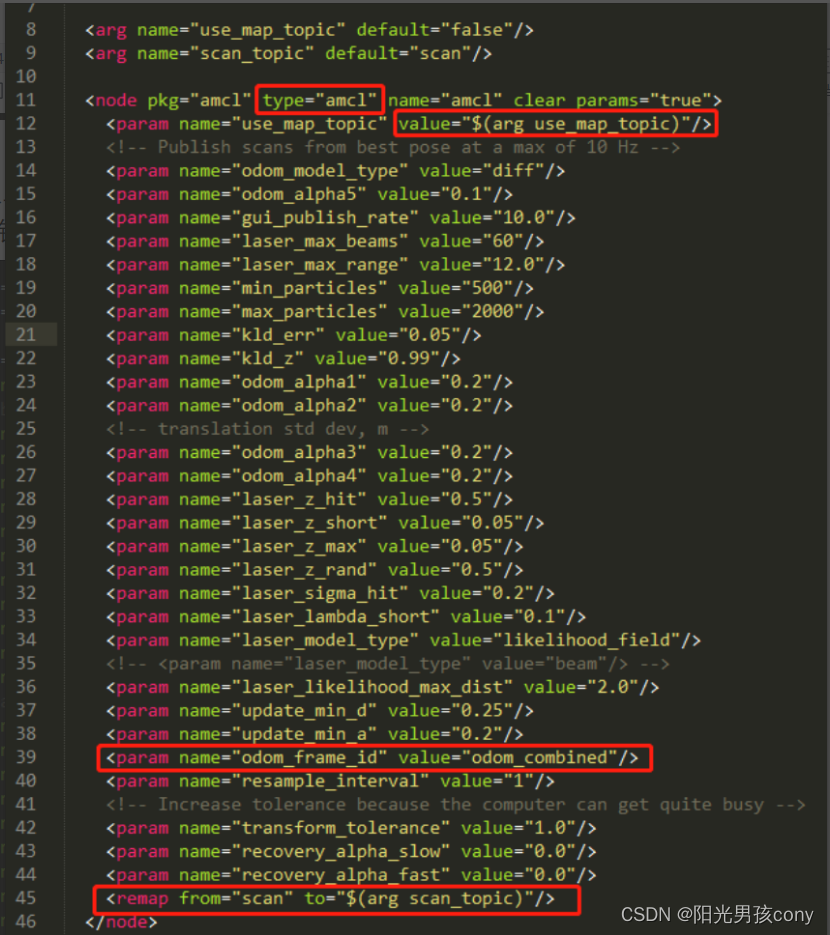
amcl 节点:
amcl 是移动机器人二维环境下的概率定位系统。它实现了自适应(或 KLD 采样)的蒙特卡罗定位方法,其中针对已有的地图使用粒子滤波器跟踪一个机器人的姿态。
-
move_base 节点:

move_base 导航配置参数文件,有以下 5 个文件
costmap_common_params.yaml #代价地图的常见参数 global_costmap_params.yaml #全局地图的常见参数 local_costmap_params.yaml #局部地图的常见参数 move_base_params.yaml # move_base 自身参数 teb_local_planner_params.yaml #TEB 局部路径规划参数-
costmap_common_params.yaml
footprint: [ [-0.05,-0.1], [0.18,-0.1], [0.18,0.1], [-0.05,0.1] ] #设置机器人的占用面积或者圆形 #机器人的半径 transform_tolerance: 0.2 # 等待坐标变换发布信息的超时时间,单位秒 map_type: costmap # 地图类型 obstacle_layer: # 障碍层 enabled: true obstacle_range: 2.5 # 指定被放入代价地图中的障碍物距离范围,单位米。这里,机器人 #只会将距离其移动基座 2.5 米以内的障碍物的信息更新到地图中。 raytrace_range: 3.0 # 用于清除指定范围外的空间中的障碍物。这里,机器人将尝试清除 #3 米外的空间,即在代价地图中清除离机器人 3 米外的障碍物。 inflation_radius: 0.05 # 膨胀半径 track_unknown_space: false combination_method: 1 observation_sources: laser_scan_sensor # 传感器源参数,定义把信息传递给代价地图的传 #感器列表,以空格分隔每个传感器,每个传感器分别定义。 laser_scan_sensor: {data_type: LaserScan, topic: scan, marking: true, clearing: true} # 设置上 #述传感器源 observation_sources 的传感器信息,其中:“data_type”参数为对应话题使用的 #消息类型,topic 为传感器发布数据的话题。“marking”参数确定传感器是否向代价地图添加 #障碍物信息, “clearing” 参数确定是否从代价地图中清除障碍物信息。 inflation_layer: #膨胀层 enabled: true # 使能 cost_scaling_factor: 10.0 # (double, default: 10.0) 代价比例系数,越大则代价值越小 inflation_radius: 0.1 # (double, default: 0.55) 膨胀半径,扩展在碰撞区域以外的代 #价区域,使得机器人规划路径避开障碍物 static_layer: #静态层 enabled: true # 使能 map_topic: "/map" # 使用的地图话题名 -
global_costmap_params.yaml
global_costmap: # 全局代价地图 global_frame: map # (string, default: "/map") 代价地图的世界坐标系 robot_base_frame: base_footprint # (string, default: "base_link") 机器人底座的局部坐标系 update_frequency: 1.0 # (double, default: 5.0) 代价地图的更新频率 publish_frequency: 0.5 # (double, default: 0.0) 代价地图的发布频率 static_map: true # 设置为静态地图 transform_tolerance: 0.5 # (double, default: 0.2) 等待坐标变换发布信息的超时时间 plugins: - {name: static_layer, type: "costmap_2d::StaticLayer"} - {name: obstacle_layer, type: "costmap_2d::VoxelLayer"} - {name: inflation_layer, type: "costmap_2d::InflationLayer"} #(sequence, default: pre-Hydro behavior)地图序列,每层一个。每个地图都是一个包含名称和类型字段的字典。 -
local_costmap_params.yaml
local_costmap: # 局部代价地图 global_frame: map # (string, default: "/map") 代价地图的世界坐标系 robot_base_frame: base_footprint # (string, default: "base_link") 机器人底座的局部坐标系 update_frequency: 5.0 # (double, default: 5.0) 代价地图的更新频率 publish_frequency: 5.0 # (double, default: 0.0) 代价地图的发布频率 static_map: false # 设置为非静态地图 rolling_window: true # (bool, default: false)是否使用动态窗口,若为 true,则地图是变化 的 width: 3 # (int, default: 10)代价地图宽度 height: 3 # (int, default: 10)代价地图高度 resolution: 0.05 #(double, default: 0.05)代价地图精度,即每个网格的尺寸 transform_tolerance: 0.5 # (double, default: 0.2) #等待坐标变换发布信息的超时时间 plugins: - {name: static_layer, type: "costmap_2d::StaticLayer"} - {name: obstacle_layer, type: "costmap_2d::ObstacleLayer"} # (sequence, default: pre-Hydro behavior)地图序列,每层一个。每个地图都是一个包含 #名称和类型字段的字典。 -
move_base_params.yaml
# Move base node parameters. For full documentation of the parameters in this file, please see # http://www.ros.org/wiki/move_base # shutdown_costmaps: false #(bool, default: false)当 move_base 不活动时,是否关闭代价地图的加载 controller_frequency: 3.0 # 3.0 向底盘控制移动话题 cmd_vel 发送命令的频率 controller_patience: 3.0 # 在空间清理操作执行前,控制器花多长时间等有效控制下发 planner_frequency: 1.0 # 全局规划操作的执行频率。如果设置为 0.0,则全局规划器仅 #在接收到新的目标点或者局部规划器报告路径堵塞时才会重新执行规划操作。 planner_patience: 5.0 # 在空间清理操作执行前,留给规划器多长时间来找出一条有效规划。 oscillation_timeout: 20.0 # (double, default: 0.0)在执行恢复行为之前允许振荡的时间(秒)。 oscillation_distance: 0.6 # (double, default: 0.5)机器人必须移动多远(以米计)才能被视 #为不摆动。如果出现摆动则说明全局规划失败,那么将在超时后执行恢复模块。 recovery_behavior_enabled: false #(bool, default: true)是否使用恢复模块 # local planner - default is trajectory rollout # base_local_planner: "dwa_local_planner/DWAPlannerROS" base_local_planner: "teb_local_planner/TebLocalPlannerROS" # 指定 move_base 使用的局 #部规划器插件名称,局部规划器,用于运动过程中的动态避障,默认值现在通常设置为 dwa_local_planner/DWAPlannerROS base_global_planner: "navfn/NavfnROS" # 指定 move_base 使用 #的全局规划器插件名称,全局规划器,用于规划最优路径。 #alternatives: global_planner/GlobalPlanner, carrot_planner/CarrotPlanner -
teb_local_planner_params.yaml
TebLocalPlannerROS: # TEB 局部路径规划器
odom_topic: odom # 使用的里程计坐标系

# Trajectory

teb_autosize: True #(bool, default: True)优化期间允许改变轨迹的时域长度;Enable the
#automatic resizing of the trajectory during optimization (based on the temporal resolution
#of the trajectory, recommended)
dt_ref: 0.5 # (double, 0.01~1.0, default: 0.3) 局部路径规划的解析度; Temporal resolution
#of the planned trajectory (usually it is set to the magnitude of the 1/control_rate)
dt_hysteresis: 0.1 # (double, 0.002~0.5, default: 0.1)允许改变的时域解析度的浮动范围,
#一般为 dt_ref 的 10% 左右; Hysteresis that is utilized for automatic resizing depending
#on the current temporal resolution (dt): usually 10% of dt_ref
max_samples: 500
global_plan_overwrite_orientation: True #(bool, default: True) 覆盖全局路径中局部路径点
#的朝向,Some global planners are not considering the orientation at local subgoals
#between start and global goal, therefore determine it automatically
allow_init_with_backwards_motion: True#(bool, default: False) 允许在开始时想后退来执行
#轨迹,If true, the underlying trajectories might be initialized with backwards motions in
#case the goal is behind the start within the local costmap (this is only recommended if the
#robot is equipped with rear sensors)
max_global_plan_lookahead_dist: 3.0 # (double, 0.0~50.0, default: 3.0) 考虑优化的全局
#计划子集的最大长度(累积欧几里得距离)(如果为 0 或负数:禁用;长度也受本地 Costmap
#大小的限制), Specify maximum length (cumulative Euclidean distances) of the subset of
#the global plan taken into account for optimization [if 0 or negative: disabled; the length is
#also bounded by the local costmap size
global_plan_viapoint_sep: -1 # (double, -0.1~5.0, default: -0.1) 从全局计划中提取的每两
#个连续通过点之间的最小间隔[如果为负:禁用], Min. separation between each two
#consecutive via-points extracted from the global plan [if negative: disabled]
global_plan_prune_distance: 1
exact_arc_length: False #(bool, default: False)如果为真,规划器在速度、加速度和转弯率计
#算中使用精确的弧长[->增加的 CPU 时间],否则使用欧几里德近似。If true, the planner
#uses the exact arc length in velocity, acceleration and turning rate computations [->
#increased cpu time], otherwise the euclidean approximation is used.
feasibility_check_no_poses: 2 # (int, 0~50, default:5)检测位姿可到达的时间间隔,Specify up
#to which pose on the predicted plan the feasibility should be checked each sampling interval
publish_feedback: False #(bool, default: False) 发布包含完整轨迹和活动障碍物列表的规
#划器反馈,Publish planner feedback containing the full trajectory and a list of active
#obstacles (should be enabled only for evaluation or debugging purposes)

# Robot

max_vel_x: 0.25 # (double, 0.01~100.0, default: 0.4) 最 大 x 前 向 速 度 ,Maximum
translational velocity of the robot
max_vel_x_backwards: 0.25# (double, 0.01~100.0, default: 0.2)最大 x 后退速度,Maximum
translational velocity of the robot for driving backwards
max_vel_y: 0.0 # (double, 0.0~100.0, default: 0.0)最大 y 方向速度, Maximum strafing
velocity of the robot (should be zero for non-holonomic robots!)
max_vel_theta: 0.63 # (double, 0.01~100.0, default: 0.3)最大转向角速度 Maximum
angular velocity of the robot,the angular velocity is also bounded by min_turning_radius in
case of a carlike robot (r = v / omega)
acc_lim_x: 0.5 # (double, 0.01~100.0, default: 0.5)最大 x 加速度,Maximum translational
acceleration of the robot
acc_lim_theta: 0.7 # (double, 0.01~100.0, default: 0.5)最大角加速度,Maximum angular
acceleration of the robot
# ********************** Carlike robot parameters ********************
min_turning_radius: 0.35 # (double, 0.0~50, default: 0.0)车类机器人的最小转弯半
#径,Minimum turning radius of a carlike robot (diff-drive robot: zero) (compute value using a
#model or adjust with rqt_reconfigure manually)
wheelbase: 0.163 # (double, -10.0~10.0, default: 1.0)轴距:驱动轴和转
#向轴之间的距离(仅适用于启用了“Cmd_angle_而不是_rotvel”的 Carlike 机器人);对于后轮
#式机器人,该值可能为负值! The distance between the drive shaft and steering axle (only
#required for a carlike robot with ‘cmd_angle_instead_rotvel’ enabled); The value might be
#negative for back-wheeled robots! t
cmd_angle_instead_rotvel: False #(bool, default: False)将收到的角速度消息转换为操作上的
#角度变化。 Substitute the rotational velocity in the commanded velocity message by the
#corresponding steering angle (check ‘axles_distance’)
# ********************************************************************
footprint_model:
 type: "line" # 将机器人模型设为线,可选类型有: "point", "circular", "two_circles", "line",
"polygon"
 line_start: [0.05, 0.0] #线的起点 for type "line"
 line_end: [0.10, 0.0] #线的终点 for type "line"
# GoalTolerance

xy_goal_tolerance: 0.2 # (double, 0.001~10.0, default: 0.2) 目标 xy 偏移容忍度,Allowed
#final euclidean distance to the goal position
yaw_goal_tolerance: 0.1 # (double, 0.001~3.2, default: 0.1) 目标角度偏移容忍度, Allowed
#final orientation error to the goal orientation
free_goal_vel: False #(bool, default: False) 允许机器人以最大速度驶向目的地, Allow the
#robot’s velocity to be nonzero for planning purposes (the robot can arrive at the goal with
#max speed)
complete_global_plan: True

# Obstacles

min_obstacle_dist: 0.12 # (double, 0.0~10.0, default: 0.5) 和障碍物最小距离, Minimum
#desired separation from obstacles. This value must also include our robot's expansion, since
footprint_model is set to "line".
inflation_dist: 0.6 # (double, 0.0~15.0, default: 0.6)障碍物膨胀距离, Buffer zone around
#obstacles with non-zero penalty costs (should be larger than min_obstacle_dist in order to
#take effect)
include_costmap_obstacles: True #(bool, default: True) costmap 中的障碍物是否被直接考
#虑, Specify whether the obstacles in the costmap should be taken into account directly (this
#is necessary if no seperate clustering and detection is implemented)
costmap_obstacles_behind_robot_dist: 1.5 # (double, 0.0~20.0, default: 1.5)
obstacle_poses_affected: 15 # (int, 0 ~200, default: 30) The obstacle position is attached to
#the closest pose on the trajectory to reduce computational effort, but take a number of
#neighbors into account as well
dynamic_obstacle_inflation_dist: 0.6 # (double, 0.0~15.0, default: 0.6) 动态障碍物的膨胀范
#围, Buffer zone around predicted locations of dynamic obstacles with non-zero penalty
#costs (should be larger than min_obstacle_dist in order to take effect)
include_dynamic_obstacles: True #(bool, default: False) 是否将动态障碍物预测为速度模型,
#Specify whether the movement of dynamic obstacles should be predicted by a constant
#velocity model (this also changes the homotopy class search). If false, all obstacles are
#considered to be static.
costmap_converter_plugin: ""
costmap_converter_spin_thread: True
costmap_converter_rate: 5
# Optimization

no_inner_iterations: 5 # (int, 1 ~100, default: 5) 被外循环调用后内循环执行优化次数,
#Number of solver iterations called in each outerloop iteration
no_outer_iterations: 4 # (int, 1 ~100, default: 4) 执行的外循环的优化次数,Each outerloop
#iteration automatically resizes the trajectory and invokes the internal optimizer with
#no_inner_iterations
optimization_activate: True #(bool, default: True) 激活优化, Activate the optimization
optimization_verbose: False #(bool, default: False) 打印优化过程详情, Print verbose information
penalty_epsilon: 0.1 # (double, 0.0~1.0, default: 0.1) 对于硬约束近似,在惩罚函数中添加
#安全范围,Add a small safty margin to penalty functions for hard-constraint approximations
obstacle_cost_exponent: 4
weight_max_vel_x: 2 # (double, 0.0~1000.0, default: 2.0) 最大 x 速度权重, Optimization
#weight for satisfying the maximum allowed translational velocity
weight_max_vel_theta: 1 # (double, 0.0~1000.0, default: 1.0) 最 大 角 速 度 权 重 ,
#Optimization weight for satisfying the maximum allowed angular velocity
weight_acc_lim_x: 1 # (double, 0.0~1000.0, default: 1.0) 最大 x 加速度权重,Optimization
#weight for satisfying the maximum allowed translational acceleration
weight_acc_lim_theta: 1 # (double, 0.0~1000.0, default: 1.0) 最 大 角 加 速 度 权 重 ,
#Optimization weight for satisfying the maximum allowed angular acceleration
weight_kinematics_nh: 1000 # (double, 0.0~1000.0, default: 1000.0) Optimization weight for
#satisfying the non-holonomic kinematics
weight_kinematics_forward_drive: 1 # (double, 0.0~1000.0, default: 1.0) 优化过程中,迫使
#机器人只选择前进方向,差速轮适用,Optimization weight for forcing the robot to choose
#only forward directions (positive transl. velocities, only diffdrive robot)
weight_kinematics_turning_radius: 1 # (double, 0.0~1000.0, default: 1.0) 优化过程中,车型
#机器人的最小转弯半径的权重。 Optimization weight for enforcing a minimum turning
#radius (carlike robots)
weight_optimaltime: 1 # (double, 0.0~1000.0, default: 1.0) 优化过程中,基于轨迹的时间上
#的权重, Optimization weight for contracting the trajectory w.r.t transition time. must be > 0
weight_shortest_path: 0
weight_obstacle: 100 # (double, 0.0~1000.0, default: 50.0) 优化过程中,和障碍物最小距离
#的权重,Optimization weight for satisfying a minimum seperation from obstacles
weight_inflation: 0.2 # (double, 0.0~10.0, default: 0.1) 优化过程中, 膨胀区的权重,
#Optimization weight for the inflation penalty (should be small)
weight_dynamic_obstacle: 10 # (double, 0.0~1000.0, default: 50.0) 优化过程中,和动态障
#碍物最小距离的权重,Optimization weight for satisfying a minimum seperation from
#dynamic obstacles
weight_dynamic_obstacle_inflation: 0.2 # (double, 0.0~10.0, default: 0.1) 优化过程中,和动
#态障碍物膨胀区的权重,Optimization weight for the inflation penalty of dynamic obstacles
#(should be small)
weight_viapoint: 1 # (double, 0.0~1000.0, default: 1.0) 优化过程中,和全局路径采样点距
#离的权重, Optimization weight for minimizing the distance to via-points
weight_adapt_factor: 2 # (double, 1.0~100.0, default: 2.0) Some special weights (currently
#‘weight_obstacle’) are repeatedly scaled by this factor in each outer TEB iteration
#(weight_new: weight_old * factor); Increasing weights iteratively instead of setting a huge
#value a-priori leads to better numerical conditions of the underlying optimization problem.
# Homotopy Class Planner
enable_homotopy_class_planning: False
enable_multithreading: True #(bool, default: True) 允许多线程并行处理, Activate multiple
#threading for planning multiple trajectories in parallel
max_number_classes: 4 # (int, 1 ~100, default: 5) 允许的线程数, Specify the maximum
#number of allowed alternative homotopy classes (limits computational effort)
selection_cost_hysteresis: 1.0 # (double, 0.0~2.0, default: 1.0) Specify how much trajectory
#cost must a new candidate have w.r.t. a previously selected trajectory in order to be selected
#(selection if new_cost < old_cost*factor)
selection_prefer_initial_plan: 0.95 # (double, 0.0~1.0, default: 0.95)Specify a cost reduction
#in the interval (0,1) for the trajectory in the equivalence class of the initial plan.)
selection_obst_cost_scale: 1.0 # (double, 0.0~1000.0, default: 100.0) Extra scaling of
#obstacle cost terms just for selecting the ‘best’ candidate (new_obst_cost: obst_cost*factor)
selection_alternative_time_cost: False # (bool, default: False)If true, time cost is replaced
#by the total transition time.
roadmap_graph_no_samples: 15 # (int, 1 ~100, default: 15) Specify the number of
#samples generated for creating the roadmap graph, if simple_exploration is turend off
roadmap_graph_area_width: 5 # (double, 0.1~20.0, default: 5.0) Specify the width of the
#area in which sampled will be generated between start and goal [m ] (the height equals the
#start-goal distance)
roadmap_graph_area_length_scale: 1.0 # (double, 0.5~2.0, default: 1.0) The length of
#the rectangular region is determined by the distance between start and goal. This parameter
#further scales the distance such that the geometric center remains equal!)
h_signature_prescaler: 0.5 # (double, 0.2~1.0, default: 1.0) Scale number of obstacle value
#in order to allow huge number of obstacles. Do not choose it extremly low, otherwise
#obstacles cannot be distinguished from each other (0.2<H<=1)
h_signature_threshold: 0.1 # (double, 0.0~1.0, default: 0.1) Two h-signuteres are assumed
#to be equal, if both the difference of real parts and complex parts are below the specified
#threshold
obstacle_heading_threshold: 0.45 # (double, 0.0~1.0, default: 0.45) Specify the value of the
#normalized scalar product between obstacle heading and goal heading in order to take
#them (obstacles) into account for exploration)
switching_blocking_period: 0.0 # (double, 0.0~60.0, default: 0.0) Specify a time duration in
#seconds that needs to be expired before a switch to new equivalence class is allowed
viapoints_all_candidates: True #(bool, default: True) If true, all trajectories of different
#topologies are attached to the set of via-points, otherwise only the trajectory sharing the
#same one as the initial/global plan is attached (no effect in test_optim_node).
delete_detours_backwards: True
max_ratio_detours_duration_best_duration: 3.0
visualize_hc_graph: False #(bool, default: False) Visualize the graph that is created for
#exploring new homotopy classes
visualize_with_time_as_z_axis_scale: False
# Recovery
shrink_horizon_backup: True #(bool, default: True) 当规划器检测到系统异常,允许缩小时
#域规划 范围。Allows the planner to shrink the horizon temporary (50%) in case of
#automatically detected issues.
shrink_horizon_min_duration: 10
oscillation_recovery: False #(bool, default: True) 尝试检测和解决振荡,Try to detect and
#resolve oscillations between multiple solutions in the same equivalence class (robot
#frequently switches between left/right/forward/backwards).
oscillation_v_eps: 0.1
oscillation_omega_eps: 0.1
oscillation_recovery_min_duration: 10
oscillation_filter_duration: 10
-
3. TEB导航使用
-
准备
首先,将机器人放置在四周 50cm 没有障碍物的地方(否则将影响后面地图在导航的使用);
然后,打开机器人电源启动机器人;
然后,确认 ubuntu 开发环境已成功连接到机器人发出的 AP;
并确认已配置好 ROS 分布式组网;
并使用 ifconfig 查看开发环境的 IP 是不是和~/.bashrc 文件中的 ROS_HOSTNAME 变量的 IP 一样,若不是,则修改 ROS_HOSTNAME 变量的 IP,并 source ~/.bashrc 使之生效; -
启动地盘节点
先要使用ssh远程连接幻宇机器人
ssh huike@192.168.12.1更新时间
sudo date -s "2021-1-9 16:15:30" (修改为当前的日期和时间)启动地盘节点
roslaunch huanyu_robot_start Huanyu_robot_start.launch -
启动导航节点
新打开终端
使用ssh远程连接
启动导航节点roslaunch huanyu_robot_start teb_navigation_slam.launch -
打开rviz
新开终端打开rviz
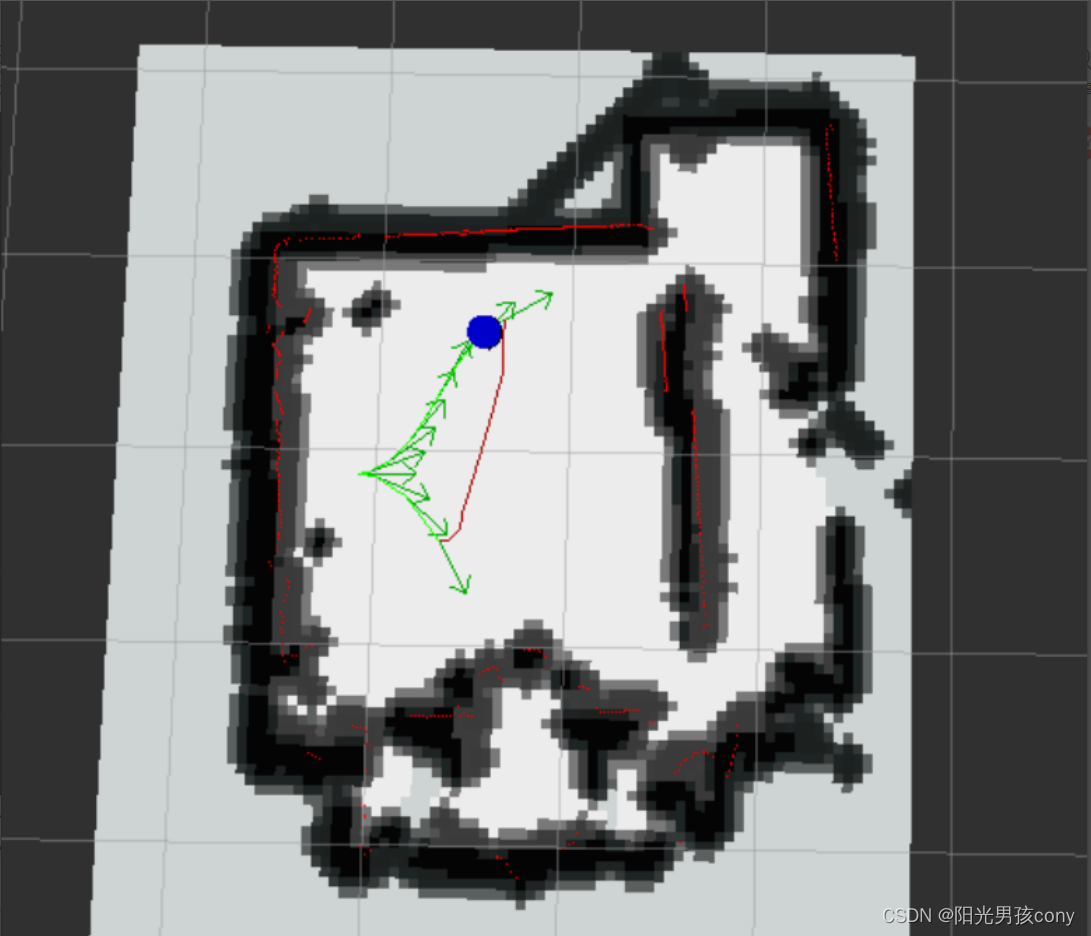
将Fixed Frame设置为map,添加显示类型RobotModel、LaserScan 和 PoseArray并将 LaserScan 的 Topic 话题选择为/scan,PoseArray 的 Topic 话题选择为/move_base/TebLocalPlannerROS/teb_poses (用于显示机器人局部规划路径中的机器人位姿),设置其颜色。- 添加两个显示类型 Map,将一个显示类型 Map 的 Topic 选择为/map,用于显示加载的静态地图,
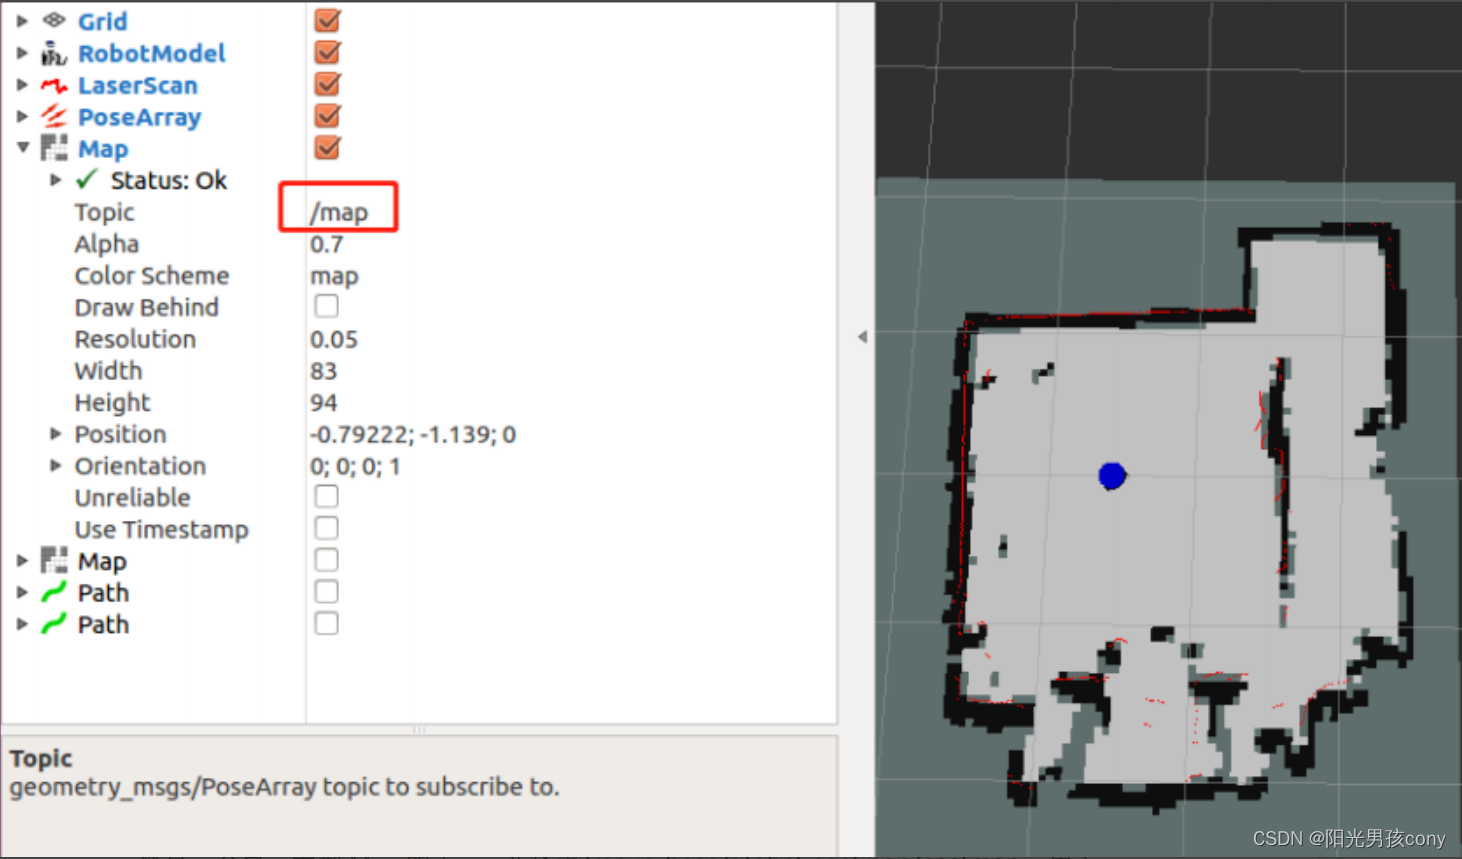
将另一个显示类型 Map 的 Topic 选择为/move_base/global_costmap/costmap,用于显示全局代价地图,该地图是原有静态地图的基础上增加了膨胀层,用于让机器人导航时远离障碍物
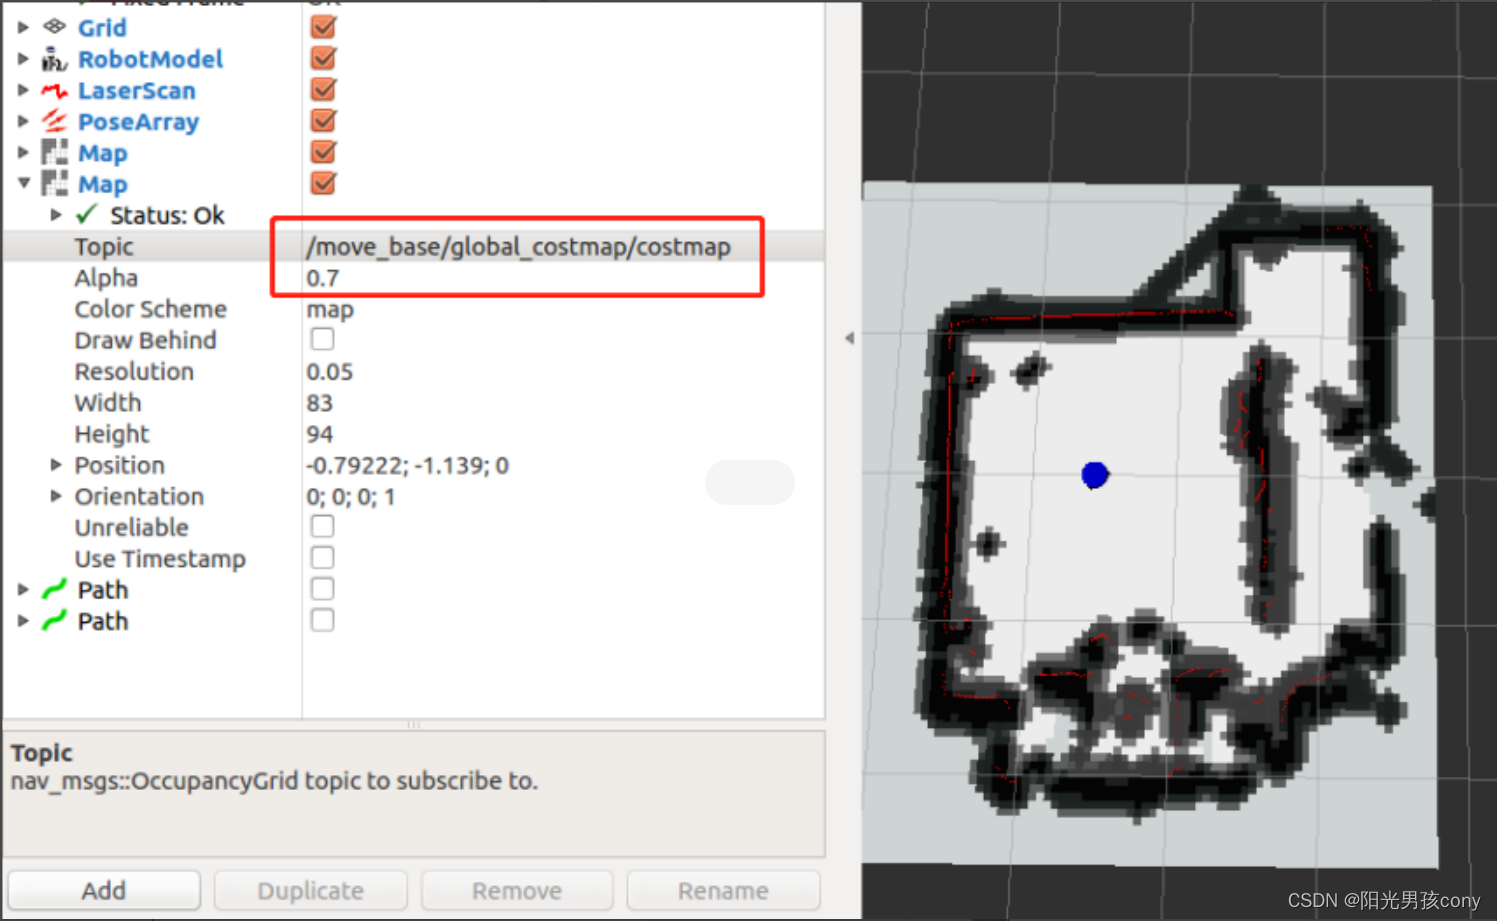
- 然后在 Rviz 中添加了两个 Path 显示类型,分别显示全局规则路径和局部规划路径。其中显示全局规则路径的 Path 的 Topic 为/move_base/NavfnROS/plan,路径颜色参数 Color 为红色;显示局部规则路径的 Path 的 Topic 为/move_base/TebLocalPlannerROS/local_plan,路径颜色参数 Color 为绿色,中下图所示。

- 添加两个显示类型 Map,将一个显示类型 Map 的 Topic 选择为/map,用于显示加载的静态地图,
4. TEB导航使用测试
- 设置机器人姿态
注意:
若发现机器人的激光数据与地图边缘不匹配,则需要人为设定机器人的位姿来纠正。若导航前,已将机器人放到地图的原点且方向正确,则无需再设定机器人初始位姿。
设置机器人初始位姿:
在 Rviz 界面中使用鼠标左键点击界面上方工具栏中的 按钮,然后出现绿色箭头,然后再将鼠标左键点击到地图中机器人正确位姿,并且旋转箭头来设置机器人的方向,然后松开鼠标,则设置机器人的初始位姿完成。
 - 测试导航
在 Rviz 界面中使用鼠标左键点击界面上方工具栏中的
 按钮,然后出现绿色箭头,然后再将鼠标左键点击到地图中你想要机器人去的地方,并且旋转箭头来设置机器人到达目标点后的方向,然后松开鼠标,则设置机器人的导航点完成。
下面我们将看到地图中显示出红色路径(全局规则路径)和绿色路径(局部规划路径),以及在局部路径上对应机器人位姿的绿色箭头,同时机器人开始沿着局部规则路径向目标点运动,最后到来目标点。过程中你也会发现,TEB 导航时机器人会倒车,所以要使用 360度雷达,而在实际导航中环境障碍物较多时,倒车会导航的安全性较低。
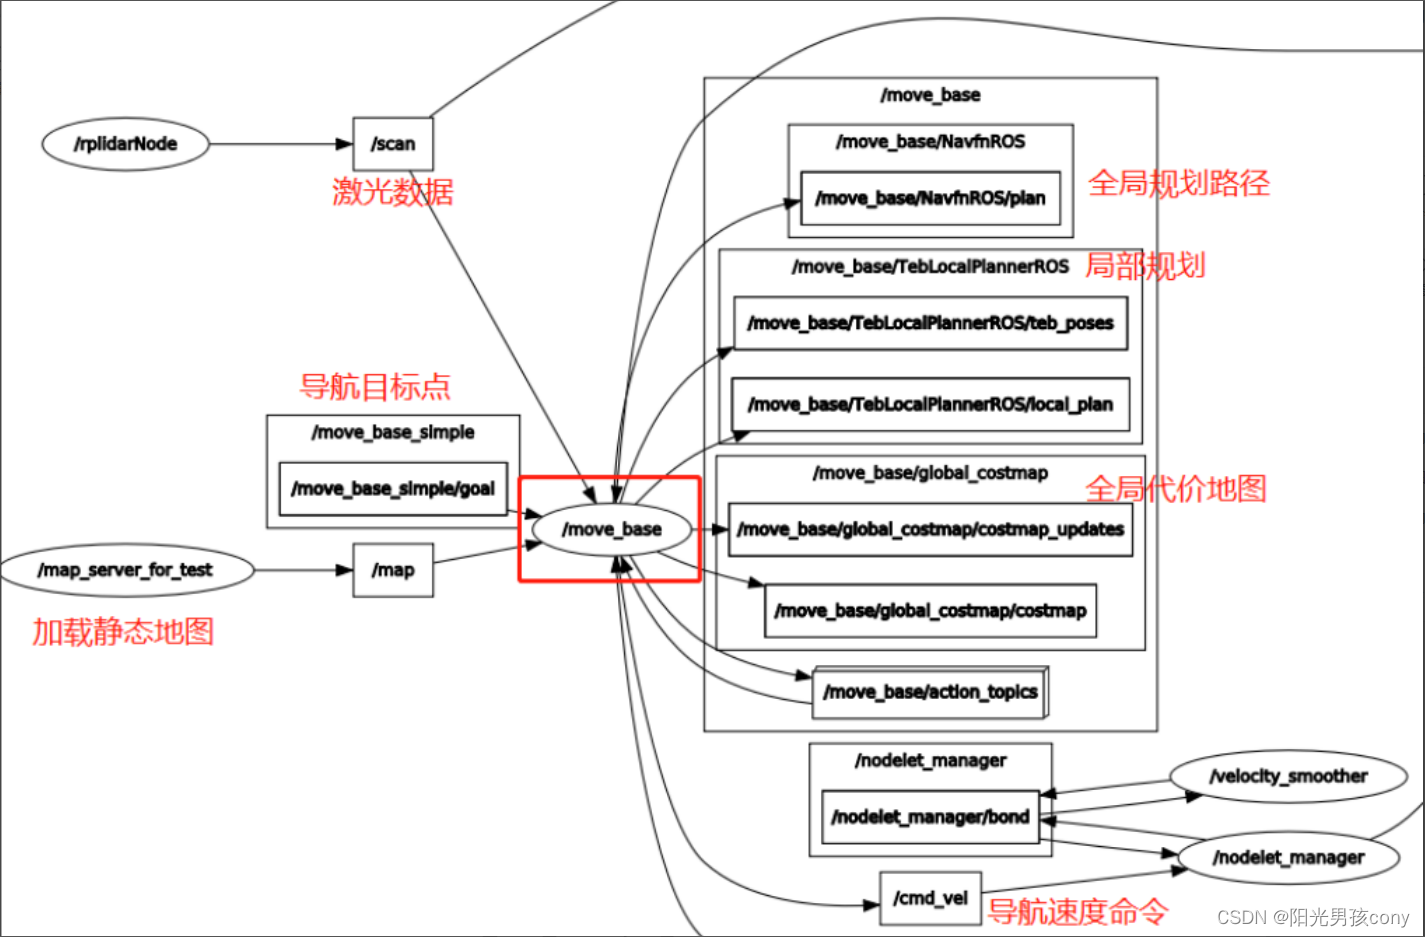
5. 导航节点话题关系图
rqt_graph
6.DWA导航参数
7.DWA导航
- 准备
与TEB相同
- 导航节点启动
roslaunch huanyu_robot_start navigation_slam.launch
8.DWA导航测试
需要的操作与TEB也是相同的。
当做好路径规划后,不同于 TEB 导航时机器人会倒车,DWA 导航,首先将旋转机器人,让机器人的方向对着导航点,然后前进到导航点,最后旋转到指定的方向,在障碍物较多的环境中导航时,安全性较高,不会碰到障碍物。

CSDN联合极客时间,共同打造面向开发者的精品内容学习社区,助力成长!
更多推荐


 6
6 0
0- 0


 已为社区贡献1条内容

所有评论(0)