【安卓逆向】xposed hook native 函数
xposed 集成dobby 实现 hook native 函数
前言
最近开始学习用xp框架来hook native函数。然后看了珍惜大佬和littleQ Q佬的视频,已经可以做简单的hook native层函数的传参,写篇文章记录下。
准备
- xposed框架(我用的edxposed)
- native hook 框架 (我用的dobby,上手简单)。
需要dobby.h + (32/64)位的 dobby.a
头文件里会定义方法、构造体等等,dobby.a就是dobby项目代码编译好的文件。大家也可以去github上clone一整个项目代码下来,拉到项目里,然后在CMAKE里编译(也就是多写点代码)。而我选择偷懒~
这是我的目录结构,然后下面是CMakeLists.txt代码
# Sets the minimum version of CMake required to build the native library.
#指定 需要CMAKE的 最小版本要求
cmake_minimum_required(VERSION 3.10.2)


# Creates and names a library, sets it as either STATIC
# or SHARED, and provides the relative paths to its source code.
# You can define multiple libraries, and CMake builds them for you.
# Gradle automatically packages shared libraries with your APK.
include_directories(
        src/main/jni/dobby
)
#添加内联汇编支持
enable_language(C ASM)

#添加一个 远程链接库
add_library( # Sets the name of the library. (我们用C/C++ 文件生成的 动态库 so名字 )
        LVmp

        # Sets the library as a shared library.(表明用于共享的 动态库 so结尾)
        SHARED

        # Provides a relative path to your source file(s).(
        # 这里就是 我们的 C的 文件的 路径 可以修改 有多少个 文件
        # 就添加多个 文件 如果 需要 生成 多个 so就需要 添加多个 add_library)
        src/main/jni/main.cpp
        )

include_directories(dobby)
add_library(local_dobby STATIC IMPORTED)
set_target_properties(local_dobby PROPERTIES IMPORTED_LOCATION ${CMAKE_CURRENT_SOURCE_DIR}/libs/${ANDROID_ABI}/libdobby.a)


# Searches for a specified prebuilt library and stores the path as a
# variable. Because CMake includes system libraries in the search path by
# default, you only need to specify the name of the public NDK library
# you want to add. CMake verifies that the library exists before
# completing its build.

find_library( # Sets the name of the path variable.(调用系统的日志库)
        log-lib

        # Specifies the name of the NDK library that
        # you want CMake to locate.
        log)

# Specifies libraries CMake should link to your target library. You
# can link multiple libraries, such as libraries you define in this
# build script, prebuilt third-party libraries, or system libraries.
find_library(android-lib android)
target_link_libraries( # Specifies the target library. 链接 我们自己生成的库 名字要和add_library 一样
        LVmp

        # Links the target library to the log library
        # included in the NDK.
        local_dobby
        ${log-lib}
        ${android-lib}
        )
hook逻辑是写在main.cpp里的,然后我们要把dobby这个hook框架集成到项目里,这样main.cpp里就能使用dobby的hook api。最后打包成一个so文件。
正文
编写hook代码
main.h
#ifndef FENXIANG_MAIN_H
#define FENXIANG_MAIN_H

#include <jni.h>
#include <android/log.h>
#include <string.h>
#include <malloc.h>
#include <stdbool.h>
#include <stdlib.h>
#include <stdio.h>
#include <dlfcn.h>
#include <link.h>
#include <inttypes.h>
#include <unistd.h>

void *(*old_strstr)(char *, char *) = nullptr;
#endif //FENXIANG_MAIN_H
main.cpp
void *new_strstr(char *a1, char *a2) {
    __android_log_print(6, "test", "strstr hook  %s  %s", a1, a2);
    void *result = old_strstr(a1, a2);
    // 这里strstr返回结果是字符串,我们把指针强转成char *。如果匹配到则返回a1,没匹配到则返回null。
    __android_log_print(6, "test", "strstr result  %s", (char *)result);
    return result;
}

jint JNICALL JNI_OnLoad(JavaVM *vm, void *reserved) {
	__android_log_print(6, "test", "插件 JNI_OnLoad 开始加载 ");
    //在 onload 改变 指定函数 函数地址 替换成自己的
    JNIEnv *env = nullptr;
    if (vm->GetEnv((void **) &env, JNI_VERSION_1_6) == JNI_OK) {
//        hook strstr
        void *strstr_addr = DobbySymbolResolver("/system/lib/libc.so", "strstr", nullptr);
        __android_log_print(6, "test", "strstr_addr -> %x ",strstr_addr);
        DobbyHook(strstr_addr, (void *) new_strstr, (void **) &old_strstr);
        return JNI_VERSION_1_6;
    }

    return 0;
}
这里的代码是只hook libc.so 的 strstr 函数。
做个简单说明,这里用DobbySymbolResolver 通过符号来获取函数在目标app里的函数地址。第一个参数是so的路径,第二个参数是hook 函数在so里的符号。
函数地址也等于so在内存里的地址+函数在so里的偏移地址(0x66438)。
我们用ida打开它并搜索strstr
可以看到他的符号就是strstr。
DobbyHook,这个就是hook api了。第一个参数就是获取到的函数地址,第二个参数是我们自己定义的方法。在走到真正的strstr函数前,他会先走到我们定义的方法里,这样我们就能拿到strstr函数的传参了,然后第三个参数old_strstr就是原本的strstr函数。
有没有感觉和JS 里的hook很像,JS里是用apply方法来传递参数到原函数,并获取返回值的。
最后安装xp插件到手机里之后,去路径 /data/app/(app包名)-(一串不知名字符串)/lib/(arm/arm64)/ 下查看编译好的so了。
不会以为到这里就结束了吧!?好戏才刚刚开始~
注入LVmp.so
接着我们需要把so注入到目标app中,不是xp插件去加载 LVmp.so哈。
intversion = android.os.Build.VERSION.SDK_INT;
Log.e(TAG,"当前系统 版本号 " + version);
//android 9.0没有 doLoad 方法
if (version >= 28) {
    XposedHelpers.callMethod(Runtime.getRuntime(), "nativeLoad", path, arg);
} else {
    XposedHelpers.callMethod(Runtime.getRuntime(), "doLoad", path, arg);
}
安卓9的话,底层代码加载so是走 nativeLoad方法,安卓9以下则走doLoad方法。path是我们libLVmp.so的路径,arg是目标app的classLoader。如果我们hook的是系统so,那我们注入的时机一定要快,需要在app加载自己so之前。所以我们要在app启动的时候,拿到context,用context去得到目标app的classLoader,然后让目标app加载我们的so。
class_loader = context.getClassLoader();
这是安卓8里的源码,System.loadLibraray最终会走到了doLoad方法
获取目标app的context有几种方式,通过hook如下方法获取
1. android.content.ContextWrapper 的 getApplicationContext
2. Application.class 的 attach  (加壳app会触发)
3. android.app.ContextImpl 的 createAppContext
4. 内存漫游。感兴趣的可以看看珍惜大佬写的文章,https://bbs.pediy.com/thread-269094.htm
5. 直接创建context
如果是hook 目标app的so,我们是要在目标app加载完毕后再注入so,否则会找不到这个so导致hook失败。
我们可以hook java层的nativeload或doload方法,在afterHookedMethod的时候注入我们的so,这个时候我们还能拿到目标app加载so时使用的classLoder,来为我们所用~
目标app so的路径则应该是
/data/app/(app包名)-(一串不知名字符串)/lib/(arm/arm64)/xxx.so
打开app后, /proc/(pid)/maps 文件里有该app加载的所有so的路径,以及其在内存里的地址区间。
执行hook代码
加载so后,如果so中有JNI_OnLoad方法的话,就会优先执行JNI_OnLoad方法,所以我们会将hook 逻辑的代码放到JNI_OnLoad中。 JNI_OnLoad有执行则说明 so 注入成功了~
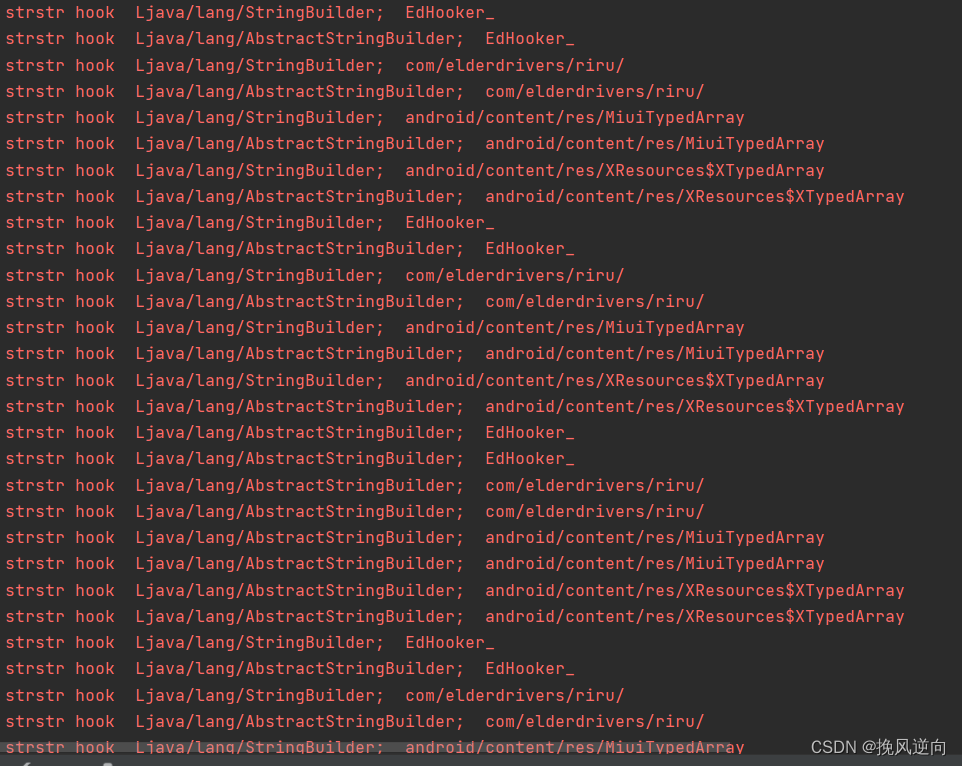
运行结果
总结
 1. 集成dobby hook 框架
 2. 利用dobby api 编写我们的hook代码,打包成so
 3. 将so注入到目标app中,实现hook
 4. 要注意注入so的时机。如果是hook 系统so的函数,我们需要在app加载其本身的so之前。
 	如果是hook app某个so里的函数,我们需要等这个so加载后,注入我们的so。
有不懂的小伙伴可以私聊问我~目前我也有不少盲区,可以一起学习

为开发者提供学习成长、分享交流、生态实践、资源工具等服务,帮助开发者快速成长。
更多推荐


 3
3 0
0- 0


 已为社区贡献1条内容

所有评论(0)