
SpringBoot RestTemplate详解
RestTemplate是Spring提供的进行远程调用客户端RestTemplate提供了很多远程调用的方法,能够大大提高客户端的编写效率。调用RestTemplate的默认构造函数,RestTemplate对象在底层通过使用java.net包下的实现创建HTTP 请求可以通过使用ClientHttpRequestFactory指定不同的HTTP请求方式ClientHttpRequestFact
参考自:http://events.jianshu.io/p/477e7a3179c6
大家都知道在SpringBoot中一般适用RestTemplate来进行远程调用,那么SpringBoot中如何默认配置RestTemplate,以及如何自定义配置自己的RestTemplate,RestTemplate异步请求如何实现等
1、什么是RestTemplate?
- RestTemplate是Spring提供的进行远程调用客户端
- RestTemplate提供了很多远程调用的方法,能够大大提高客户端的编写效率。
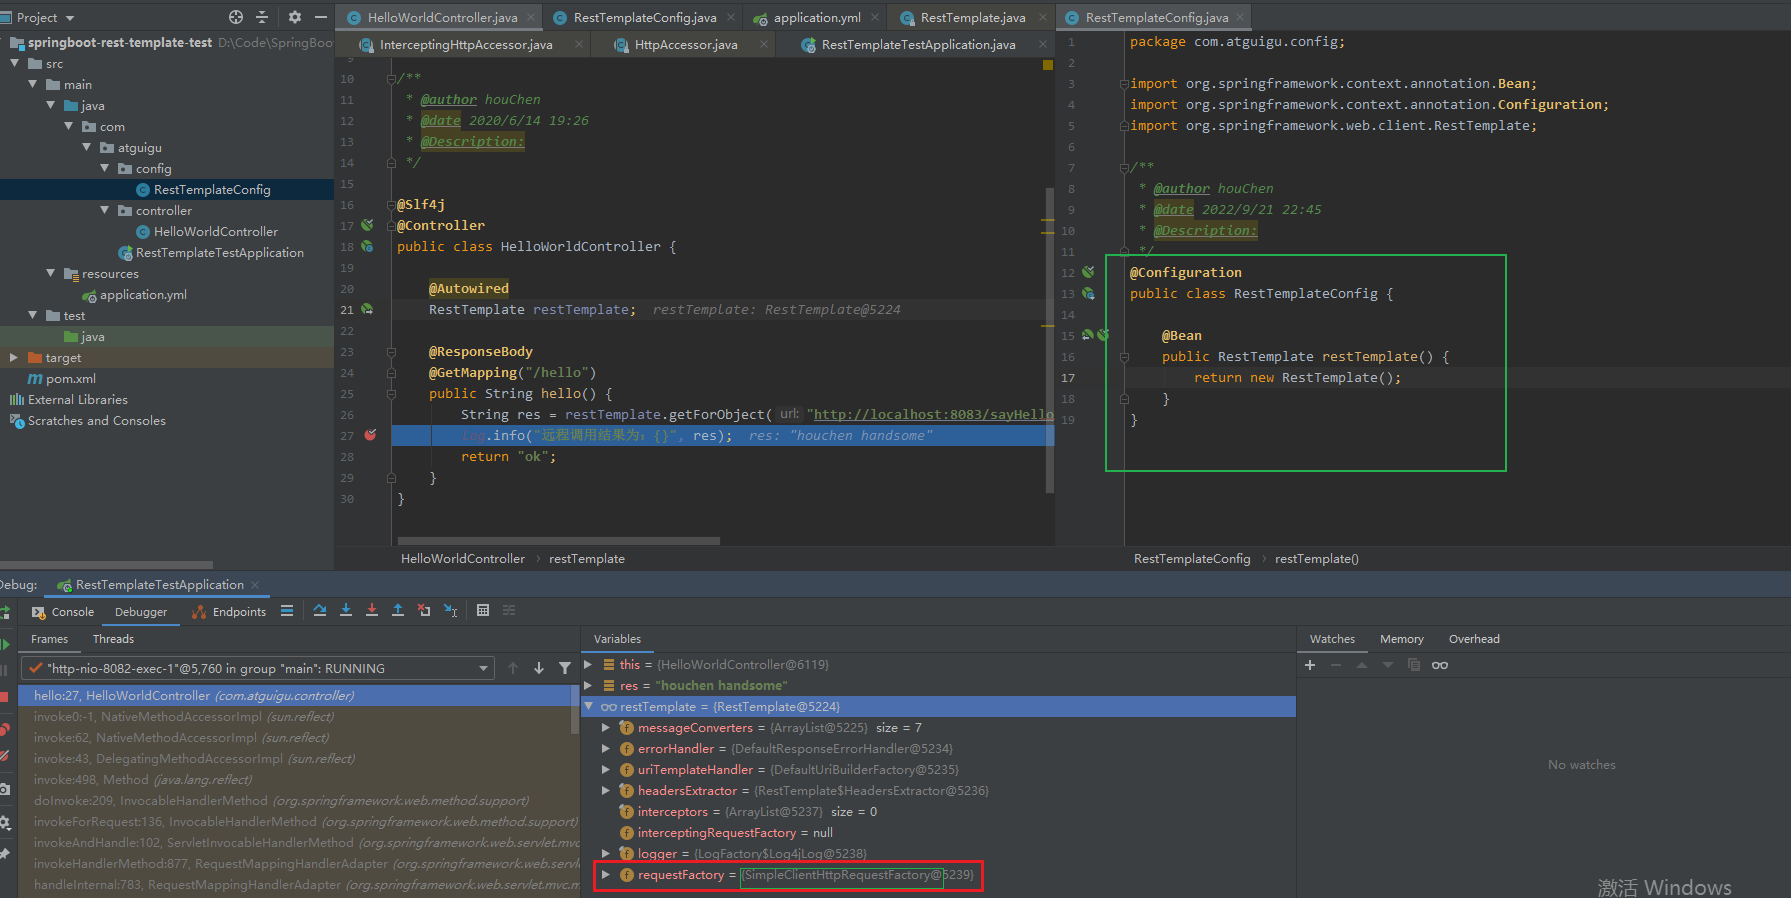
调用RestTemplate的默认构造函数,RestTemplate对象在底层通过使用java.net包下的实现创建HTTP 请求
可以通过使用ClientHttpRequestFactory指定不同的HTTP请求方式
ClientHttpRequestFactory接口主要提供了三种实现方式
- 一种是SimpleClientHttpRequestFactory,使用J2SE提供的方式(既java.net包提供的方式)创建底层的Http请求连接
- 一种方式是使用HttpComponentsClientHttpRequestFactory方式,底层使用HttpClient访问远程的Http服务,使用HttpClient可以配置连接池和证书等信息
- 第三种方式是使用OkHttp3ClientHttpRequestFactory方式,底层使用OkHttp访问远程的Http服务,使用HttpClient可以配置连接池和证书等信息
2、RestTemplate的优缺点
优点:连接池、超时时间设置、支持异步、请求和响应的编解码
缺点:依赖别的spring版块、参数传递不灵活
RestTemplate默认是使用SimpleClientHttpRequestFactory,内部是调用jdk的HttpConnection,默认超时为-1
3、RestTemplate使用httpclient
1)引入依赖
<dependency>
    <groupId>org.apache.httpcomponents</groupId>
    <artifactId>httpclient</artifactId>
    <version>4.5.13</version>
</dependency>

<dependency>
    <groupId>org.springframework.boot</groupId>
    <artifactId>spring-boot-starter-web</artifactId>
</dependency>
2) yaml中添加HttpClientConnection连接池的配置
http:
  maxTotal: 100         #最大连接数
  defaultMaxPerRoute: 20  #并发数
  connectTimeout: 1000   #创建连接的最长时间
  connectionRequestTimeout: 500  #从连接池中获取到连接的最长时间
  socketTimeout: 10000 #数据传输的最长时间
  staleConnectionCheckEnabled: true  #提交请求前测试连接是否可用
  validateAfterInactivity: 3000000   #可用空闲连接过期时间,重用空闲连接时会先检查是否空闲时间超过这个时间,如果超过,释放socket重新建立
3)注入RestTemplate
@Configuration
public class RestTemplateConfig {

    /*@Bean
    public RestTemplate restTemplate() {
        return new RestTemplate();
    }*/

    @Value("${http.maxTotal}")
    private Integer maxTotal;

    @Value("${http.defaultMaxPerRoute}")
    private Integer defaultMaxPerRoute;

    @Value("${http.connectTimeout}")
    private Integer connectTimeout;

    @Value("${http.connectionRequestTimeout}")
    private Integer connectionRequestTimeout;

    @Value("${http.socketTimeout}")
    private Integer socketTimeout;

    @Value("${http.staleConnectionCheckEnabled}")
    private boolean staleConnectionCheckEnabled;

    @Value("${http.validateAfterInactivity}")
    private Integer validateAfterInactivity;


    @Bean
    public RestTemplate restTemplate() {
        return new RestTemplate(httpRequestFactory());
    }

    @Bean
    public ClientHttpRequestFactory httpRequestFactory() {
        return new HttpComponentsClientHttpRequestFactory(httpClient());
    }

    @Bean
    public HttpClient httpClient() {
        Registry<ConnectionSocketFactory> registry = RegistryBuilder.<ConnectionSocketFactory>create()
                .register("http", PlainConnectionSocketFactory.getSocketFactory())
                .register("https", SSLConnectionSocketFactory.getSocketFactory())
                .build();
        PoolingHttpClientConnectionManager connectionManager = new PoolingHttpClientConnectionManager(registry);
        connectionManager.setMaxTotal(maxTotal); // 最大连接数
        connectionManager.setDefaultMaxPerRoute(defaultMaxPerRoute);    //单个路由最大连接数
        connectionManager.setValidateAfterInactivity(validateAfterInactivity); // 最大空间时间

        RequestConfig requestConfig = RequestConfig.custom()
                .setSocketTimeout(socketTimeout)        //服务器返回数据(response)的时间,超过抛出read timeout
                .setConnectTimeout(connectTimeout)      //连接上服务器(握手成功)的时间,超出抛出connect timeout
                .setStaleConnectionCheckEnabled(staleConnectionCheckEnabled) // 提交前检测是否可用
                .setConnectionRequestTimeout(connectionRequestTimeout)//从连接池中获取连接的超时时间,超时间未拿到可用连接,会抛出org.apache.http.conn.ConnectionPoolTimeoutException: Timeout waiting for connection from pool
                .build();

        //headers
        List<Header> headers = new ArrayList<>();
        headers.add(new BasicHeader("User-Agent", "Mozilla/5.0 (Windows NT 6.1) AppleWebKit/537.36 (KHTML, like Gecko) Chrome/31.0.1650.16 Safari/537.36"));
        headers.add(new BasicHeader("Accept-Encoding", "gzip,deflate"));
        headers.add(new BasicHeader("Accept-Language", "zh-CN"));
        headers.add(new BasicHeader("Connection", "Keep-Alive"));
        headers.add(new BasicHeader("Content-type", "application/json;charset=UTF-8"));

        return HttpClientBuilder.create()
                .setDefaultRequestConfig(requestConfig)
                .setConnectionManager(connectionManager)
                .setDefaultHeaders(headers)
                // 保持长连接配置,需要在头添加Keep-Alive
                .setKeepAliveStrategy(new DefaultConnectionKeepAliveStrategy())
                //重试次数,默认是3次,没有开启
                .setRetryHandler(new DefaultHttpRequestRetryHandler(2, true))
                .build();
    }
}
【一些配置解释】
- 设置请求配置的超时时间:为了防止请求时间过长而引起资源的过渡浪费。如果在超过设置的timeout还没有数据返回,就直接断开连接
- headers:添加默认的请求头,这里设置了传送的格式为json,语言为中-英等等属性。HttpClientBuilder.create设置请求头到HttpClient,然后在设置保持的时间,重试的次数,注入给httpClient进行封装。
4、RestTemplate使用okhttp
懒得写了:http://events.jianshu.io/p/477e7a3179c6
5、HttpClient和okhttp的使用以及区别
见我的博客:https://blog.csdn.net/hc1285653662/article/details/127001439
6、RestTemplate异步调用
参考:
https://blog.csdn.net/qq_38622452/article/details/81874483
https://blog.csdn.net/Carson073/article/details/108147005
1、通过 AsyncRestTemplate
AsyncRestTemplate是在Spring4.0中对RestTemplate进行扩展产生的新类,通过返回ListenableFuture对象生成回调机制,以达到异步非阻塞发送http请求
缺点:
- AsyncRestTemplate已经过期
- AsyncRestTemplate调用服务时,被调用服务不可达的时候,会抛出异常
- AsyncRestTemplate不能携带traceId
@GetMapping("/sync/hello")
    public String syncHello() {
        AsyncRestTemplate template = new AsyncRestTemplate();
        String url = "http://localhost:8083/sync/hello";//休眠5秒的服务
        //调用完后立即返回(没有阻塞)
        ListenableFuture<ResponseEntity<String>> forEntity = template.getForEntity(url, String.class);
        //异步调用后的回调函数
        forEntity.addCallback(new ListenableFutureCallback<ResponseEntity<String>>() {
            //调用失败
            @Override
            public void onFailure(Throwable ex) {
                log.error("远程调用faliure");
            }
            //调用成功
            @Override
            public void onSuccess(ResponseEntity<String> result) {
                log.info("res---->"+result.getBody());
            }
        });
        log.info("调用结束");
        return "ok";
    }

2、通过 CompletableFuture 进行异步请求
CompletableFuture 学习见我博客:
- 首先需要自自定义一个线程池
@Component
@ConfigurationProperties(prefix = "my.thread")
@Data
public class ThreadPoolConfigProperties {

    private Integer coreSize;

    private Integer maxSize;

    private Integer keepAliveTime;
}


/**
 * @author houChen
 * @date 2021/12/11 10:35
 * @Description:   自定义线程池配置类
 */
@Configuration
public class MyThreadConfig {

    @Bean
    public ThreadPoolExecutor threadPoolExecutor(ThreadPoolConfigProperties properties){

        ThreadPoolExecutor threadPoolExecutor = new ThreadPoolExecutor(
                properties.getCoreSize(),
                properties.getMaxSize(),
                properties.getKeepAliveTime(),
                TimeUnit.SECONDS,
                new LinkedBlockingQueue<>(100000),
                Executors.defaultThreadFactory(),
                new ThreadPoolExecutor.AbortPolicy());

        return threadPoolExecutor;
    }
}
2)通过CompletableFuture 发起异步请求
 /**
     * @Description: 通过CompletableFuture异步发起请求
     * @author houChen
     * @date 2022/9/24 20:18
     */
    @GetMapping("/sync/hello1")
    public String syncHello1() {
        CompletableFuture.supplyAsync(() -> {
            String url = "http://localhost:8083/sync/hello";//休眠5秒的服务
            return restTemplate.getForEntity(url, String.class);
        }, threadPoolExecutor)
                .thenAccept(res -> {
                    log.info("res: {}", res.getBody());
                }).exceptionally(e -> {
            log.error("err:{}", e);
            return null;
        });
        return "ok";
    }
请求: http://localhost:8082/sync/hello1

3、通过@async注解来进行异步调用
 @GetMapping("/sync/hello2")
    public String syncHello2() {
        helloWorldService.asyncRequest();
        return "ok";
    }

@Slf4j
@Service
public class HelloWorldService {

    @Autowired
    RestTemplate restTemplate;

    // 指定使用自己定义的线程池中的线程就行调用
    @Async("threadPoolExecutor")
    public void asyncRequest() {
        String url = "http://localhost:8083/sync/hello";//休眠5秒的服务
        String res = restTemplate.getForEntity(url, String.class).getBody();
        log.info("res :{}", res);
    }
}

7、总结

旨在为数千万中国开发者提供一个无缝且高效的云端环境,以支持学习、使用和贡献开源项目。
更多推荐


 7
7 0
0- 0


 已为社区贡献3条内容

所有评论(0)