
python微信公众号自动推送(十分简单的教程)
一、注册微信公众号1.注册链接https://mp.weixin.qq.com/debug/cgi-bin/sandboxinfo?action=showinfo&t=sandbox/indexhttps://mp.weixin.qq.com/debug/cgi-bin/sandboxinfo?action=showinfo&t=sandbox/index到达这个界面微信扫码登录即
目录
2023年五月五日更:
自五月四日起原来的微信公众号模版将不再生效,可根据最新的开发文档更新的规则对自己的模版进行修改,修改过后即可重新获取到有内容的微信公众号推送
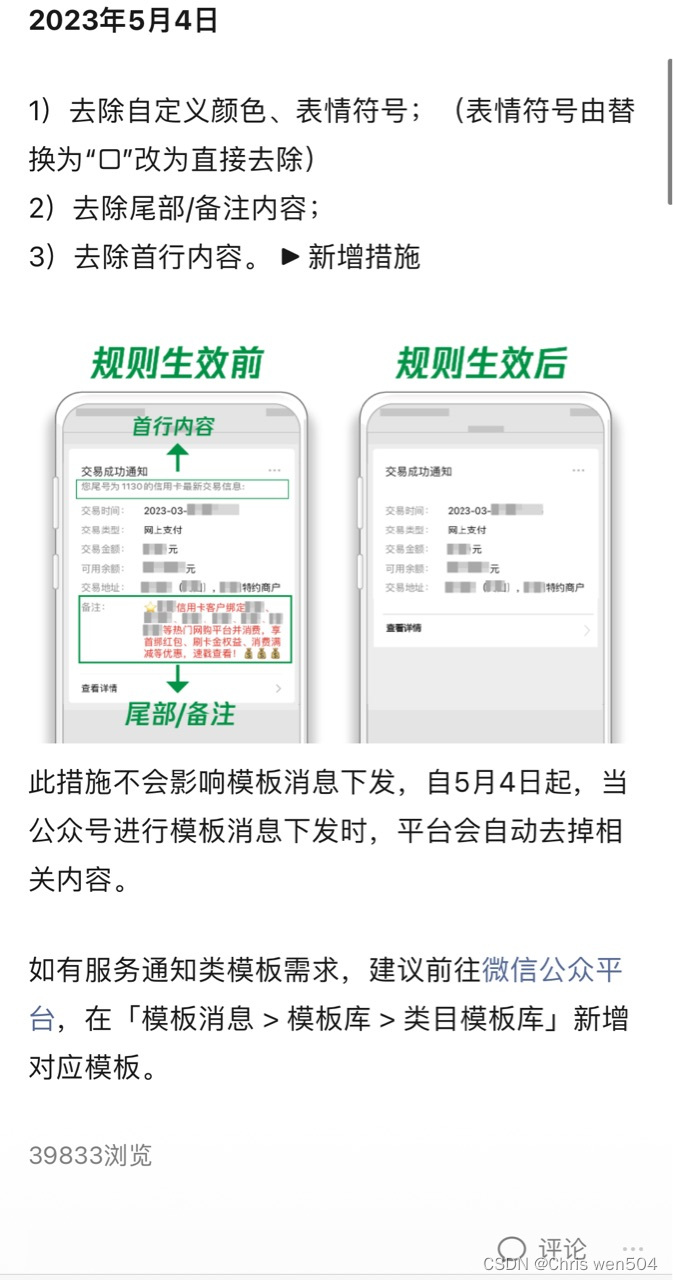
也就是说现在的公众号模板的格式必须是正文中的第二种模板也就是下面这样 关键词:{{xxx.DATA}},而且现在\n也不能使用无法换行了,只能到达字数限制后自动换行而且字数太多还会省...... 我只能说钩史微信还老子女神!!!
一、注册微信公众号
1.注册链接
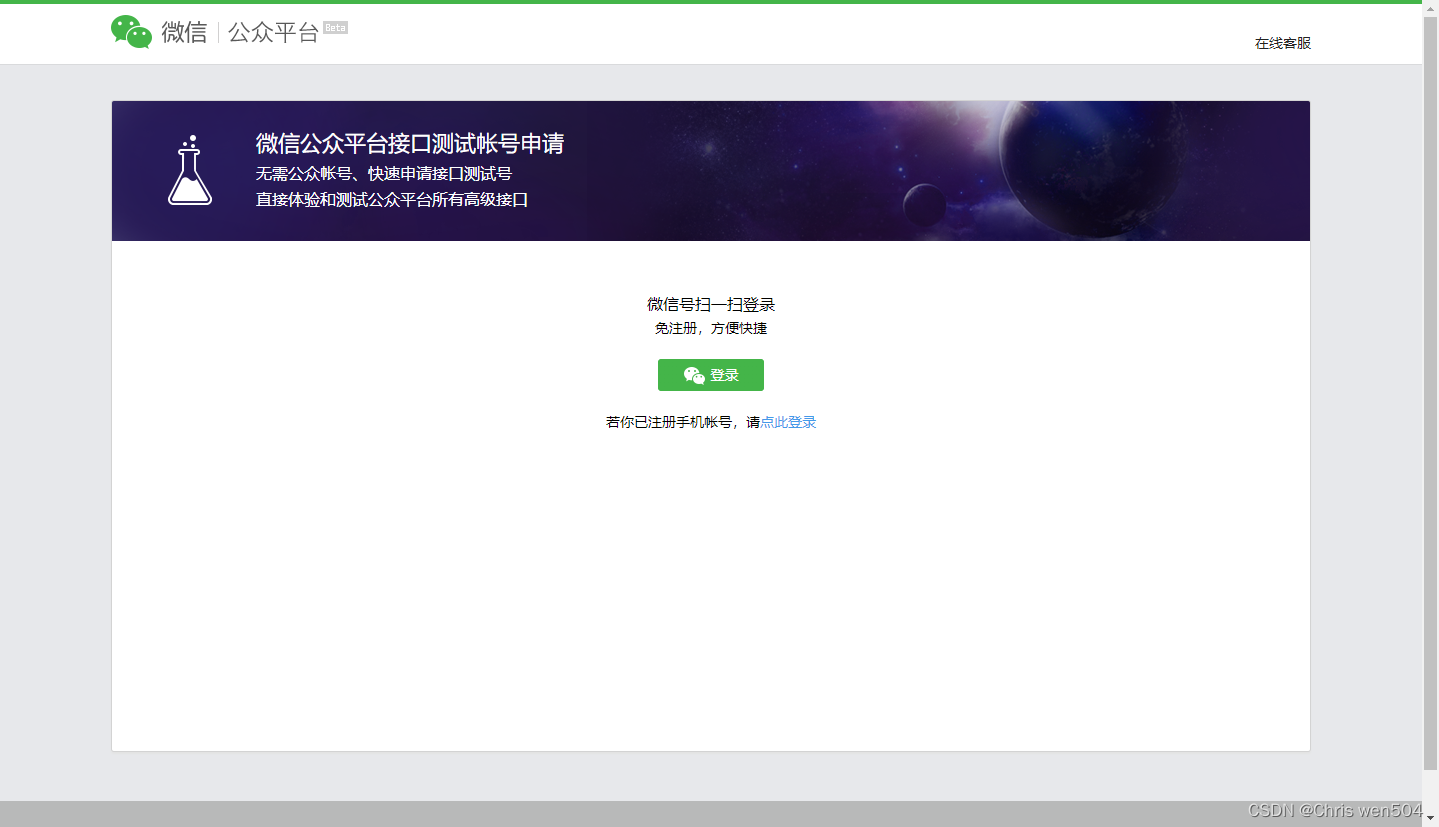
到达这个界面微信扫码登录即可(若出现登录失败问题则建议换一个更好的网络环境再尝试或者尝试刷新网页)
2.登录成功

登录成功后会自动生成你的appid和appsecret(后面会用到) 接口信息等暂时不用管若后期想完全实现自动推送则需要挂自己的服务器(后续会更新)
3.关注该公众号
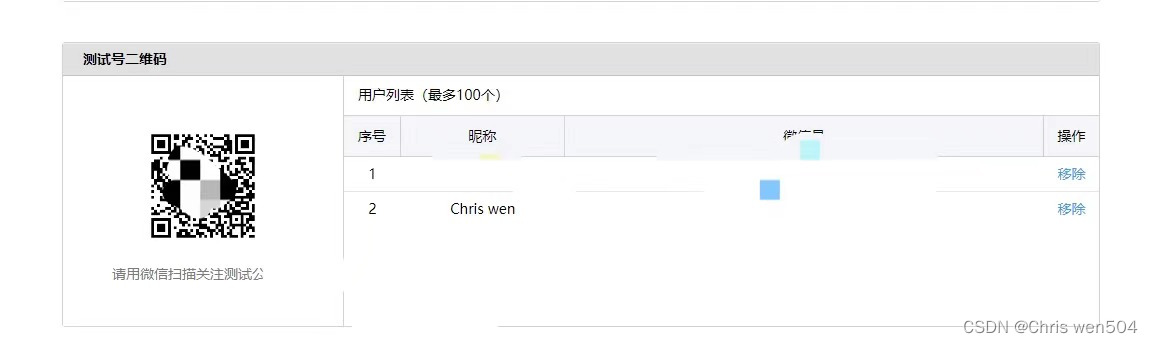
扫码关注即可(建议不要心急自己调试好了再让npy关注)
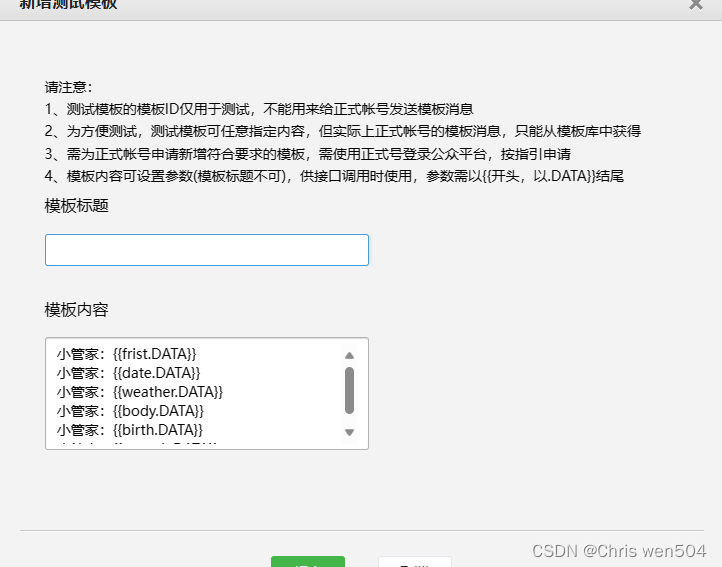
4.创建模板
创建模板时既可以将所有的 文本文字+数据 放在一起当作数据像这样
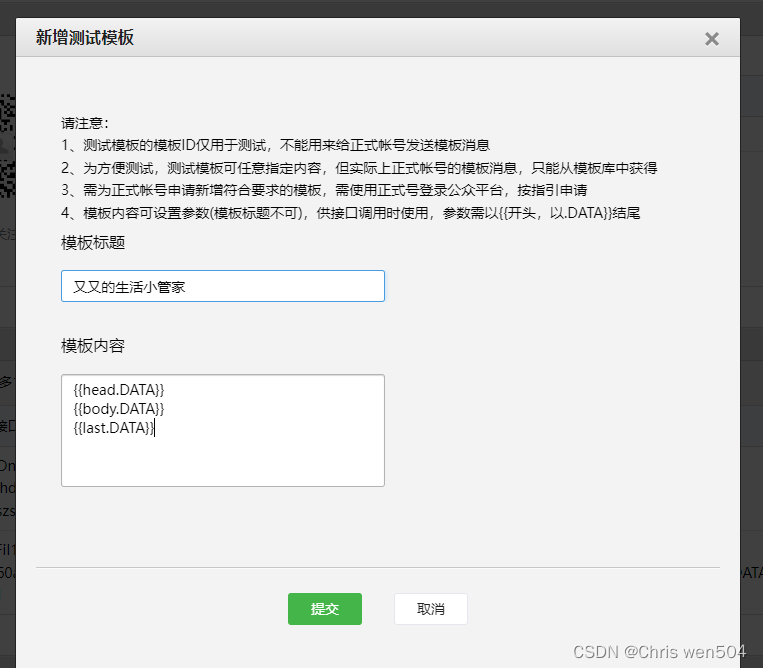
也可以再模板内先写出来,但是这种方法会让模板的灵活性变小做大的修改只能重新创建新的模板

创建好模板微信公众号注册的工作就结束了
二、代码实现
首先了解以下的几个库
import requests
import json
import datetime
import time
from bs4 import BeautifulSoup
from zhdate import ZhDate
#用到的库
1.爬取天气信息
def get_weather(self):
        """
        该方法中用到了beautifulsoup的一些基本用法
        感兴趣可以深入了解python爬虫
        """
        url = 'http://www.weather.com.cn/weather/101290101.shtml'     #昆明天气网站
        sysdate = datetime.date.today()
        r = requests.get(url, timeout=30)                             # 用requests抓取网页
        r.raise_for_status()                                          # 异常时停止
        r.encoding = r.apparent_encoding                              # 编码格式
        html = r.text
        final_list = []
        soup = BeautifulSoup(html, 'html.parser')       # 用BeautifulSoup库解析网页
        body = soup.body                                  # 从soup里截取body的一部分
        data = body.find('div', {'id': '7d'})        #在网页浏览器按F12遍历div 找到 id = 7d
                                             #的对应标签 会发现七天的天气信息都包括在子节点中
        ul = data.find('ul')                                          #用find方法找ul标签
        lis = ul.find_all('li')                                       #找到ul中的li标签也就是列表其中存放着 日期 天气 风力等信息

        for day in lis:
            temp_list = []

            date = day.find('h1').string                              # 找到日期
            if date.string.split('日')[0] == str(sysdate.day):
                temp_list = []

                date = day.find('h1').string                          # 找到日期
                temp_list.append(date)

                info = day.find_all('p')                              # 找到所有的p标签
                temp_list.append(info[0].string)

                if info[1].find('span') is None:                      # 找到p标签中的第二个值'span'标签——最高温度
                    temperature_highest = ' '                         # 用一个判断是否有最高温度
                else:
                    temperature_highest = info[1].find('span').string
                    temperature_highest = temperature_highest.replace('℃', ' ')

                if info[1].find('i') is None:                         # 找到p标签中的第二个值'i'标签——最高温度
                    temperature_lowest = ' '                          # 用一个判断是否有最低温度
                else:
                    temperature_lowest = info[1].find('i').string
                    temperature_lowest = temperature_lowest.replace('℃', ' ')

                temp_list.append(temperature_highest)                 # 将最高气温添加到temp_list中
                temp_list.append(temperature_lowest)                  # 将最低气温添加到temp_list中

                final_list.append(temp_list)                          # 将temp_list列表添加到final_list列表中
                return '天气情况:' + final_list[0][1] + '\n温度:' + final_list[0][3].strip() + '~' + \
final_list[0][2].strip() + '℃'2.计算生日天数
 def get_herbirthday(self):
        """
        获取npy生日 这里还用到了农历时间库
        可以去网上查阅 ZhDate库 其他基本上是datetime中的一些获取当前日期和toordinal
        没什么特别难的
        """
        today = datetime.datetime.now()                               #获取现在时间信息
        data_str = today.strftime('%Y-%m-%d')
        herbirthDay = ZhDate(today.year, 1, 18).to_datetime()          #将农历1.18号的时间转换为公历时间再转换为datetime类型的时间
        if herbirthDay >today :                                        #如果ta的生日日期比今天靠后则直接计算这两天的序号之差
            difference = herbirthDay.toordinal() - today.toordinal()
            return ("\n距离熊又又生日,还有 %d 天。" % (difference))
        elif herbirthDay <today:                                       #如果ta的生日日期比今天靠前则给ta的生日加上一年再计算这两天的序号之差
            herbirthDay = herbirthDay.replace(today.year+1)
            difference = herbirthDay.toordinal() - today.toordinal()
            return ("\n距离熊又又生日,还有 %d 天。" % (difference))
        else:
            return ('生日快乐bb!!')
3.获取access token
获取公众号的access_token值,access_token是公众号全局唯一接口调用凭据,公众号调用各接口时都需要使用access_token。api接口:接口调用请求说明
https请求方式:
https://api.weixin.qq.com/cgi-bin/token?grant_type=client_credential&appid={你的appid}&secret={你的appsecret} def get_access_token(self):
"""
获取access_token
通过查阅微信公众号的开发说明就清晰明了了
"""
url = 'https://api.weixin.qq.com/cgi-bin/token?grant_type=client_credential&appid={}&secret={}'.\
format(self.appID, self.appsecret)
headers = {
'User-Agent': 'Mozilla/5.0 (Macintosh; Intel Mac OS X 10_14_6) AppleWebKit/537.36 (KHTML, like Gecko) Chrome/87.0.4280.67 Safari/537.36'
}
response = requests.get(url, headers=headers).json()
access_token = response.get('access_token')
return access_token4.获取关注者的openid
opend_id是(有关注公众号的微信账号)用户id,想要消息推送过去就必须要获取open_id
获取open id的https请求方式为
https://api.weixin.qq.com/cgi-bin/user/get?access_token={获取的access token}&next_openid={}def get_openid(self):
"""
获取所有用户的openid
微信公众号开发文档中可以查阅获取openid的方法
"""
next_openid = ''
url_openid = 'https://api.weixin.qq.com/cgi-bin/user/get?access_token=%s&next_openid=%s' % (self.access_token, next_openid)
ans = requests.get(url_openid)
open_ids = json.loads(ans.content)['data']['openid']
return open_ids5.向用户广播消息
http请求方式:
POST https://api.weixin.qq.com/cgi-bin/message/custom/send?access_token=ACCESS_TOKENdef sendmsg(self):
"""
给所有用户发送消息
"""
url = "https://api.weixin.qq.com/cgi-bin/message/template/send?access_token={}".format(self.access_token)
if self.opend_ids != '':
for open_id in self.opend_ids:
body = {
"touser": open_id,
"template_id": self.template_id,
"url": "https://www.baidu.com/",
"topcolor": "#FF0000",
#对应模板中的数据模板
"data": {
"frist": {
"value": self.dataJson.get("frist"),
"color": "#FF99CC" #文字颜色
},
"body": {
"value": self.dataJson.get("body"),
"color": "#EA0000"
},
"weather": {
"value": self.dataJson.get("weather"),
"color": "#00EC00"
},
"date": {
"value": self.dataJson.get("date"),
"color": "#6F00D2"
},
"remark": {
"value": self.dataJson.get("remark"),
"color": "#66CCFF"
}
}
}
data = bytes(json.dumps(body, ensure_ascii=False).encode('utf-8')) #将数据编码json并转换为bytes型
response = requests.post(url, data=data)
result = response.json() #将返回信息json解码
print(result) # 根据response查看是否广播成功
else:
print("当前没有用户关注该公众号!")
6.最终代码
import requests
import json
import datetime
import time
from bs4 import BeautifulSoup
from zhdate import ZhDate
class SendMessage(): #定义发送消息的类
def __init__(self):
date = self.get_date() #获取当前日期
weather = self.get_weather() #获取天气信息
lovedate = self.get_loveday() #获取纪念日
herbirthday = self.get_herbirthday() #获取npy生日
mybirthday = self.get_mybirthday() #获取自己生日
body =lovedate+"\n"+herbirthday+mybirthday
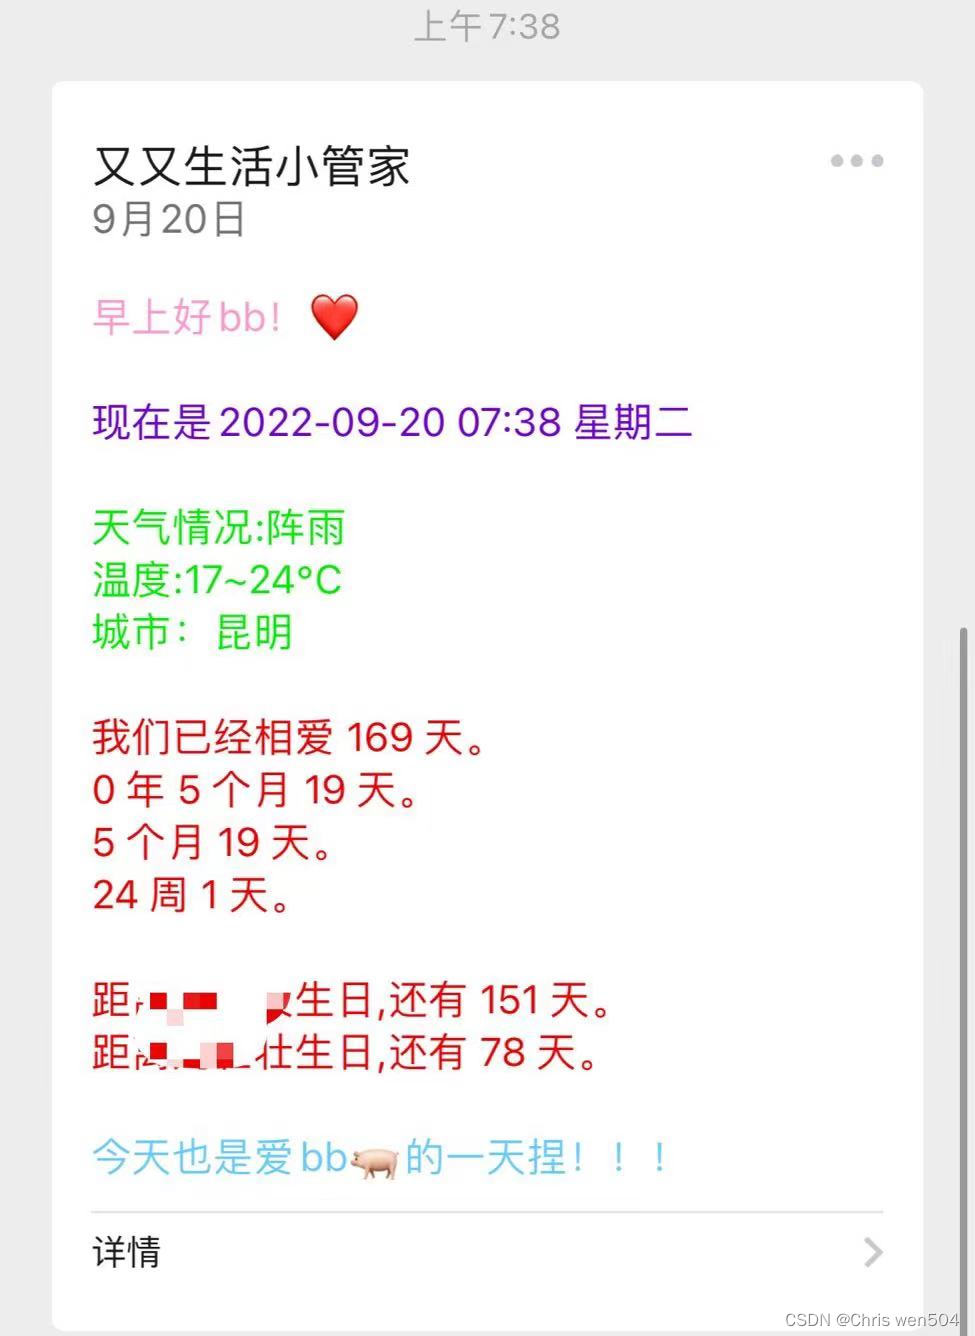
self.dataJson ={"frist":"早上好bb!❤\n", #最终要发送的json
"date":date+'\n',
"body":body+" ",
"weather":weather+'\n城市:昆明'+'\n', #因为还没写获取地理位置的所以城市暂时写死 后续将会改为获取当前位置并爬取对应城市的天气信息版本
"last":'\n今天也是爱bb🐖的一天捏!!!'
}
self.appID = '' #appid 注册时有
self.appsecret = '' #appsecret 同上
self.template_id = '' # 模板id
self.access_token = self.get_access_token() #获取 access token
self.opend_ids = self.get_openid() #获取关注用户的openid
def get_weather(self):
"""
该方法中用到了beautifulsoup的一些基本用法
感兴趣可以深入了解python爬虫
"""
url = 'http://www.weather.com.cn/weather/101290101.shtml' #昆明天气网站
sysdate = datetime.date.today()
r = requests.get(url, timeout=30) # 用requests抓取网页信息
r.raise_for_status() # 异常时停止
r.encoding = r.apparent_encoding # 编码格式
html = r.text
final_list = []
soup = BeautifulSoup(html, 'html.parser') # 用BeautifulSoup库解析网页 #soup里有对当前天气的建议
body = soup.body # 从soup里截取body的一部分
data = body.find('div', {'id': '7d'}) #在网页浏览器按F12遍历div 找到 id = 7d 的对应标签 会发现七天的天气信息都包括在子节点中
ul = data.find('ul') #用find方法找ul标签
lis = ul.find_all('li') #找到ul中的li标签也就是列表其中存放着 日期 天气 风力等信息
for day in lis:
temp_list = []
date = day.find('h1').string # 找到日期
if date.string.split('日')[0] == str(sysdate.day):
temp_list = []
date = day.find('h1').string # 找到日期
temp_list.append(date)
info = day.find_all('p') # 找到所有的p标签
temp_list.append(info[0].string)
if info[1].find('span') is None: # 找到p标签中的第二个值'span'标签——最高温度
temperature_highest = ' ' # 用一个判断是否有最高温度
else:
temperature_highest = info[1].find('span').string
temperature_highest = temperature_highest.replace('℃', ' ')
if info[1].find('i') is None: # 找到p标签中的第二个值'i'标签——最高温度
temperature_lowest = ' ' # 用一个判断是否有最低温度
else:
temperature_lowest = info[1].find('i').string
temperature_lowest = temperature_lowest.replace('℃', ' ')
temp_list.append(temperature_highest) # 将最高气温添加到temp_list中
temp_list.append(temperature_lowest) # 将最低气温添加到temp_list中
final_list.append(temp_list) # 将temp_list列表添加到final_list列表中
return '天气情况:' + final_list[0][1] + '\n温度:' + final_list[0][3].strip() + '~' + \
final_list[0][2].strip() + '℃'
def get_date(self):
"""
这些都是datetime库中的用法
若零基础可以去python的开发文档中查阅
"""
sysdate = datetime.date.today() # 只获取日期
now_time = datetime.datetime.now() # 获取日期加时间
week_day = sysdate.isoweekday() # 获取周几
week = ['星期一', '星期二', '星期三', '星期四', '星期五', '星期六', '星期天']
return '现在是' + str(now_time)[0:16] + ' ' + week[week_day - 1]
def get_herbirthday(self):
"""
获取npy生日 这里还用到了农历时间库
可以去网上查阅 ZhDate库 其他基本上是datetime中的一些获取当前日期和toordinal
没什么特别难的
"""
today = datetime.datetime.now() #获取现在时间信息
data_str = today.strftime('%Y-%m-%d')
herbirthDay = ZhDate(today.year, 1, 18).to_datetime() #将农历1.18号的时间转换为公历时间再转换为datetime类型的时间
if herbirthDay >today : #如果ta的生日日期比今天靠后则直接计算这两天的序号之差
difference = herbirthDay.toordinal() - today.toordinal()
return ("\n距离熊又又生日,还有 %d 天。" % (difference))
elif herbirthDay <today: #如果ta的生日日期比今天靠前则给ta的生日加上一年再计算这两天的序号之差
herbirthDay = herbirthDay.replace(today.year+1)
difference = herbirthDay.toordinal() - today.toordinal()
return ("\n距离熊又又生日,还有 %d 天。" % (difference))
else:
return ('生日快乐bb!!')
def get_mybirthday(self):
"""
同上
"""
today = datetime.datetime.now()
data_str = today.strftime('%Y-%m-%d')
mybirthDay = datetime.datetime(today.year,12,7)
if mybirthDay >today :
difference = mybirthDay.toordinal() - today.toordinal()
return ("\n距离刘壮壮生日,还有 %d 天。" % (difference))
elif mybirthDay <today:
mybirthDay = mybirthDay.replace(today.year+1)
difference = mybirthDay.toordinal() - today.toordinal()
return ("\n距离刘壮壮生日,还有 %d 天。" % (difference))
else:
return ('祝我生日快乐!!')
def get_loveday(self):
"""用法同上"""
today = datetime.datetime.now()
data_str = today.strftime('%Y-%m-%d')
oneDay = datetime.date(2022, 4, 4)
d = today.toordinal()-oneDay.toordinal()
return ("我们已经相爱 %d 天。\n%d 年 %d 个月 %d 天。\n%d 个月 %d 天。\n%d 周 %d 天。" % (d,d // 365, (d % 365) // 30, (d % 365) % 30, d // 30, d % 30, d // 7, d % 7))
 def get_access_token(self):
        """
        获取access_token
        通过查阅微信公众号的开发说明就清晰明了了
        """
        url = 'https://api.weixin.qq.com/cgi-bin/token?grant_type=client_credential&appid={}&secret={}'.\
            format(self.appID, self.appsecret)
        headers = {
            'User-Agent': 'Mozilla/5.0 (Macintosh; Intel Mac OS X 10_14_6) AppleWebKit/537.36 (KHTML, like Gecko) Chrome/87.0.4280.67 Safari/537.36'
        }
        response = requests.get(url, headers=headers).json()
        access_token = response.get('access_token')
        return access_token
def get_openid(self):
        """
        获取所有用户的openid
        微信公众号开发文档中可以查阅获取openid的方法
        """
        next_openid = ''
        url_openid = 'https://api.weixin.qq.com/cgi-bin/user/get?access_token=%s&next_openid=%s' % (self.access_token, next_openid)
        ans = requests.get(url_openid)
        open_ids = json.loads(ans.content)['data']['openid']
        return open_ids
def sendmsg(self):
"""
给所有用户发送消息
"""
url = "https://api.weixin.qq.com/cgi-bin/message/template/send?access_token={}".format(self.access_token)
if self.opend_ids != '':
for open_id in self.opend_ids:
body = {
"touser": open_id,
"template_id": self.template_id,
"url": "https://www.baidu.com/",
"topcolor": "#FF0000",
#对应模板中的数据模板
"data": {
"frist": {
"value": self.dataJson.get("frist"),
"color": "#FF99CC" #文字颜色
},
"body": {
"value": self.dataJson.get("body"),
"color": "#EA0000"
},
"weather": {
"value": self.dataJson.get("weather"),
"color": "#00EC00"
},
"date": {
"value": self.dataJson.get("date"),
"color": "#6F00D2"
},
"last": {
"value": self.dataJson.get("last"),
"color": "#66CCFF"
}
}
}
data = bytes(json.dumps(body, ensure_ascii=False).encode('utf-8')) #将数据编码json并转换为bytes型
response = requests.post(url, data=data)
result = response.json() #将返回信息json解码
print(result) # 根据response查看是否广播成功
else:
print("当前没有用户关注该公众号!")
if __name__ == "__main__":
sends = SendMessage()
sends.sendmsg()代码还有很多需要改进的地方
大佬轻喷!!!

为开发者提供学习成长、分享交流、生态实践、资源工具等服务,帮助开发者快速成长。
更多推荐


 30
30 0
0- 0


 已为社区贡献1条内容

所有评论(0)