
KVM--virsh虚拟机的日常操作(开关,挂起虚拟机,导配置文件,磁盘增容,转化磁盘格式等)
var/lib/libvirt/images/: 这是我们放镜像的地方。修改虚拟机配置信息(用来修改系统内存大小、磁盘文件等信息)在宿主机上查看kvm虚拟机centos7.0 的dns地址。这是的centos7.0 的配置文件已经没有了。再看一下状态,发现有centos7.1。生成快照(理解成VMware的快照)开启这个图centos7.1。大家在做的时候看自己的情况。相当于编辑上面的配置文件。查
| virsh list –all | 查看虚拟机和状态 |
| virsh start test | 启动该虚拟机 |
| virsh reboot test | 重启虚拟机 |
| virsh suspend test | 虚拟机处于paused暂停状态,一般情况下是被admin运行了virsh suspend才会处于这种状态,但是仍然消耗资源,只不过不被超级管理程序调度而已。 |
| virsh resume test | 把虚拟机唤醒,使其恢复到running状态 |
| virsh shutdown test | 关闭指令,是虚拟机进入shutoff状态,系统提示虚拟机正在被关闭,却未必能成功 |
| virsh destroy test | 强制关闭该虚拟机,但并非真的销毁该虚拟机,只是关闭而已。 |
| virsh save test a | 将该虚拟机的运行状态存储到文件a中 |
| virsh restore a | 根据文件a恢复被存储状态的虚拟机的状态,即便虚拟机被删除也可以恢复(如果虚拟机已经被undefine移除,那么恢复的虚拟机也只是一个临时的状态,关闭后自动消失) |
| virsh undefine test | 移除虚拟机,虚拟机处于关闭状态后还可以启动,但是被该指令删除后不能启动。在虚拟机处于Running状态时,调用该指令,该指令暂时不生效,但是当虚拟机被关闭后,该指令生效移除该虚拟机,也可以在该指令生效之前调用define+TestKVM.xml取消该指令 |
| virsh edit test | 修改TestKVM的配置文件,效果等于先dumpxml得到配置文件,然后vi xml,最后后define该xml文件(建议关机修改,修改完virsh define防止不生效) |
| virt-clone -o test -n test01 –file /data/test01.img | 在-o后面为被克隆虚拟机名称,-n后克隆所得虚拟机名称,file为克隆所得虚拟机镜像存放地址。 克隆的好处在于,假如一个虚拟机上安装了操作系统和一些软件,那么从他克隆所得的虚拟机也有一样的系统和软件,大大节约了时间。 |
一、 查看命令帮助
[root@localhost ~]# virsh -h
virsh [options]... [<command_string>]
virsh [options]... <command> [args...]
options:
-c | --connect=URI hypervisor connection URI
-d | --debug=NUM debug level [0-4]
-e | --escape <char> set escape sequence for console
-h | --help this help
-k | --keepalive-interval=NUM
keepalive interval in seconds, 0 for disable
-K | --keepalive-count=NUM
number of possible missed keepalive messages
-l | --log=FILE output logging to file
-q | --quiet quiet mode
-r | --readonly connect readonly
-t | --timing print timing information
-v short version
-V long version
--version[=TYPE] version, TYPE is short or long (default short)
commands (non interactive mode):
Domain Management (help keyword 'domain')
attach-device 从一个XML文件附加装置
attach-disk 附加磁盘设备
attach-interface 获得网络界面
autostart 自动开始一个域
blkdeviotune 设定或者查询块设备 I/O 调节参数。
blkiotune 获取或者数值 blkio 参数
blockcommit 启动块提交操作。
blockcopy 启动块复制操作。
blockjob 管理活跃块操作
blockpull 使用其后端映像填充磁盘。
blockresize 创新定义域块设备大小
change-media 更改 CD 介质或者软盘驱动器
console 连接到客户会话
cpu-stats 显示域 cpu 统计数据
create 从一个 XML 文件创建一个域
define 从一个 XML 文件定义(但不开始)一个域
desc 显示或者设定域描述或者标题
destroy 销毁(停止)域
detach-device 从一个 XML 文件分离设备
detach-device-alias detach device from an alias
detach-disk 分离磁盘设备
detach-interface 分离网络界面
domdisplay 域显示连接 URI
domfsfreeze Freeze domain's mounted filesystems.
domfsthaw Thaw domain's mounted filesystems.
domfsinfo Get information of domain's mounted filesystems.
domfstrim 在域挂载的文件系统中调用 fstrim。
domhostname 输出域主机名
domid 把一个域名或 UUID 转换为域 id
domif-setlink 设定虚拟接口的链接状态
domiftune 获取/设定虚拟接口参数
domjobabort 忽略活跃域任务
domjobinfo 域任务信息
domname 将域 id 或 UUID 转换为域名
domrename rename a domain
dompmsuspend 使用电源管理功能挂起域
dompmwakeup 从 pmsuspended 状态唤醒域
domuuid 把一个域名或 id 转换为域 UUID
domxml-from-native 将原始配置转换为域 XML
domxml-to-native 将域 XML 转换为原始配置
dump 把一个域的内核 dump 到一个文件中以方便分析
dumpxml XML 中的域信息
edit 编辑某个域的 XML 配置
event Domain Events
inject-nmi 在虚拟机中输入 NMI
iothreadinfo view domain IOThreads
iothreadpin control domain IOThread affinity
iothreadadd add an IOThread to the guest domain
iothreaddel delete an IOThread from the guest domain
send-key 向虚拟机发送序列号
send-process-signal 向进程发送信号
lxc-enter-namespace LXC 虚拟机进入名称空间
managedsave 管理域状态的保存
managedsave-remove 删除域的管理保存
managedsave-edit edit XML for a domain's managed save state file
managedsave-dumpxml Domain information of managed save state file in XML
managedsave-define redefine the XML for a domain's managed save state file
memtune 获取或者数值内存参数
perf Get or set perf event
metadata show or set domain's custom XML metadata
migrate 将域迁移到另一个主机中
migrate-setmaxdowntime 设定最大可耐受故障时间
migrate-getmaxdowntime get maximum tolerable downtime
migrate-compcache 获取/设定压缩缓存大小
migrate-setspeed 设定迁移带宽的最大值
migrate-getspeed 获取最长迁移带宽
migrate-postcopy Switch running migration from pre-copy to post-copy
numatune 获取或者数值 numa 参数
qemu-attach QEMU 附加
qemu-monitor-command QEMU 监控程序命令
qemu-monitor-event QEMU Monitor Events
qemu-agent-command QEMU 虚拟机代理命令
reboot 重新启动一个域
reset 重新设定域
restore 从一个存在一个文件中的状态恢复一个域
resume 重新恢复一个域
save 把一个域的状态保存到一个文件
save-image-define 为域的保存状态文件重新定义 XML
save-image-dumpxml 在 XML 中保存状态域信息
save-image-edit 为域保存状态文件编辑 XML
schedinfo 显示/设置日程安排变量
screenshot 提取当前域控制台快照并保存到文件中
set-lifecycle-action change lifecycle actions
set-user-password set the user password inside the domain
setmaxmem 改变最大内存限制值
setmem 改变内存的分配
setvcpus 改变虚拟 CPU 的号
shutdown 关闭一个域
start 开始一个(以前定义的)非活跃的域
suspend 挂起一个域
ttyconsole tty 控制台
undefine 取消定义一个域
update-device 从 XML 文件中关系设备
vcpucount 域 vcpu 计数
vcpuinfo 详细的域 vcpu 信息
vcpupin 控制或者查询域 vcpu 亲和性
emulatorpin 控制火车查询域模拟器亲和性
vncdisplay vnc 显示
guestvcpus query or modify state of vcpu in the guest (via agent)
setvcpu attach/detach vcpu or groups of threads
domblkthreshold set the threshold for block-threshold event for a given block device or it's backing chain element
Domain Monitoring (help keyword 'monitor')
domblkerror 在块设备中显示错误
domblkinfo 域块设备大小信息
domblklist 列出所有域块
domblkstat 获得域设备块状态
domcontrol 域控制接口状态
domif-getlink 获取虚拟接口链接状态
domifaddr Get network interfaces' addresses for a running domain
domiflist 列出所有域虚拟接口
domifstat 获得域网络接口状态
dominfo 域信息
dommemstat 获取域的内存统计
domstate 域状态
domstats get statistics about one or multiple domains
domtime domain time
list 列出域
Host and Hypervisor (help keyword 'host')
allocpages Manipulate pages pool size
capabilities 性能
cpu-baseline 计算基线 CPU
cpu-compare 使用 XML 文件中描述的 CPU 与主机 CPU 进行对比
cpu-models CPU models
domcapabilities domain capabilities
freecell NUMA可用内存
freepages NUMA free pages
hostname 打印管理程序主机名
hypervisor-cpu-baseline compute baseline CPU usable by a specific hypervisor
hypervisor-cpu-compare compare a CPU with the CPU created by a hypervisor on the host
maxvcpus 连接 vcpu 最大值
node-memory-tune 获取或者设定节点内存参数
nodecpumap 节点 cpu 映射
nodecpustats 输出节点的 cpu 状统计数据。
nodeinfo 节点信息
nodememstats 输出节点的内存状统计数据。
nodesuspend 在给定时间段挂起主机节点
sysinfo 输出 hypervisor sysinfo
uri 打印管理程序典型的URI
version 显示版本
Interface (help keyword 'interface')
iface-begin 生成当前接口设置快照,可在今后用于提交 (iface-commit) 或者恢复 (iface-rollback)
iface-bridge 生成桥接设备并为其附加一个现有网络设备
iface-commit 提交 iface-begin 后的更改并释放恢复点
iface-define define an inactive persistent physical host interface or modify an existing persistent one from an XML file
iface-destroy 删除物理主机接口(启用它请执行 "if-down")
iface-dumpxml XML 中的接口信息
iface-edit 为物理主机界面编辑 XML 配置
iface-list 物理主机接口列表
iface-mac 将接口名称转换为接口 MAC 地址
iface-name 将接口 MAC 地址转换为接口名称
iface-rollback 恢复到之前保存的使用 iface-begin 生成的更改
iface-start 启动物理主机接口(启用它请执行 "if-up")
iface-unbridge 分离其辅助设备后取消定义桥接设备
iface-undefine 取消定义物理主机接口(从配置中删除)
Network Filter (help keyword 'filter')
nwfilter-define 使用 XML 文件定义或者更新网络过滤器
nwfilter-dumpxml XML 中的网络过滤器信息
nwfilter-edit 为网络过滤器编辑 XML 配置
nwfilter-list 列出网络过滤器
nwfilter-undefine 取消定义网络过滤器
nwfilter-binding-create create a network filter binding from an XML file
nwfilter-binding-delete delete a network filter binding
nwfilter-binding-dumpxml XML 中的网络过滤器信息
nwfilter-binding-list list network filter bindings
Networking (help keyword 'network')
net-autostart 自动开始网络
net-create 从一个 XML 文件创建一个网络
net-define define an inactive persistent virtual network or modify an existing persistent one from an XML file
net-destroy 销毁(停止)网络
net-dhcp-leases print lease info for a given network
net-dumpxml XML 中的网络信息
net-edit 为网络编辑 XML 配置
net-event Network Events
net-info 网络信息
net-list 列出网络
net-name 把一个网络UUID 转换为网络名
net-start 开始一个(以前定义的)不活跃的网络
net-undefine undefine a persistent network
net-update 更新现有网络配置的部分
net-uuid 把一个网络名转换为网络UUID
Node Device (help keyword 'nodedev')
nodedev-create 根据节点中的 XML 文件定义生成设备
nodedev-destroy 销毁(停止)节点中的设备
nodedev-detach 将节点设备与其设备驱动程序分离
nodedev-dumpxml XML 中的节点设备详情
nodedev-list 这台主机中中的枚举设备
nodedev-reattach 重新将节点设备附加到他的设备驱动程序中
nodedev-reset 重置节点设备
nodedev-event Node Device Events
Secret (help keyword 'secret')
secret-define 定义或者修改 XML 中的 secret
secret-dumpxml XML 中的 secret 属性
secret-event Secret Events
secret-get-value secret 值输出
secret-list 列出 secret
secret-set-value 设定 secret 值
secret-undefine 取消定义 secret
Snapshot (help keyword 'snapshot')
snapshot-create 使用 XML 生成快照
snapshot-create-as 使用一组参数生成快照
snapshot-current 获取或者设定当前快照
snapshot-delete 删除域快照
snapshot-dumpxml 为域快照转储 XML
snapshot-edit 编辑快照 XML
snapshot-info 快照信息
snapshot-list 为域列出快照
snapshot-parent 获取快照的上级快照名称
snapshot-revert 将域转换为快照
Storage Pool (help keyword 'pool')
find-storage-pool-sources-as 找到潜在存储池源
find-storage-pool-sources 发现潜在存储池源
pool-autostart 自动启动某个池
pool-build 建立池
pool-create-as 从一组变量中创建一个池
pool-create 从一个 XML 文件中创建一个池
pool-define-as 在一组变量中定义池
pool-define define an inactive persistent storage pool or modify an existing persistent one from an XML file
pool-delete 删除池
pool-destroy 销毁(删除)池
pool-dumpxml XML 中的池信息
pool-edit 为存储池编辑 XML 配置
pool-info 存储池信息
pool-list 列出池
pool-name 将池 UUID 转换为池名称
pool-refresh 刷新池
pool-start 启动一个(以前定义的)非活跃的池
pool-undefine 取消定义一个不活跃的池
pool-uuid 把一个池名称转换为池 UUID
pool-event Storage Pool Events
Storage Volume (help keyword 'volume')
vol-clone 克隆卷。
vol-create-as 从一组变量中创建卷
vol-create 从一个 XML 文件创建一个卷
vol-create-from 生成卷,使用另一个卷作为输入。
vol-delete 删除卷
vol-download 将卷内容下载到文件中
vol-dumpxml XML 中的卷信息
vol-info 存储卷信息
vol-key 为给定密钥或者路径返回卷密钥
vol-list 列出卷
vol-name 为给定密钥或者路径返回卷名
vol-path 为给定密钥或者路径返回卷路径
vol-pool 为给定密钥或者路径返回存储池
vol-resize 创新定义卷大小
vol-upload 将文件内容上传到卷中
vol-wipe 擦除卷
Virsh itself (help keyword 'virsh')
cd 更改当前目录
echo echo 参数
exit 退出这个非交互式终端
help 打印帮助
pwd 输出当前目录
quit 退出这个非交互式终端
connect 连接(重新连接)到 hypervisor
(指定 help <group> 获取组中命令的详情)
(使用 --help <command> 来获得这个命令的详细信息)
二、虚拟机管理
2.1. 查看 KVM 的配置文件存放目录
[root@localhost ~]# ll /etc/libvirt/qemu/
总用量 8
-rw-------. 1 root root 4631 6月  30 16:11 centos7.0.xml
drwx------. 3 root root   42 4月  28 2021 networks

#用 ps -ef |grep qemu可以看到正在运行的虚拟机的磁盘内容等。
2.2. 列出全部虚拟机
[root@localhost ~]# virsh list --all
 Id    名称                         状态
----------------------------------------------------
 4     centos7.0                      running

[root@localhost ~]#
列出运行的虚拟机
[root@kvm images]# virsh list
 Id    Name                           State
----------------------------------------------------
2.3. 开启虚拟机
[root@localhost ~]# virsh start centos7.0
域 centos7.0 已开始
2.4. 关闭虚拟机
[root@localhost ~]# virsh shutdown centos7.0
域 centos7.0 被关闭
2.5. 强制关闭
如果执行了shutdown但是vnc的虚拟机仍在运行,此时要强制关机(拔电源关机,数据会丢失)
[root@localhost ~]# virsh destroy centos7.0

# 结果
[root@localhost ~]# virsh list --all
 Id    名称                         状态
----------------------------------------------------
 -     centos7.0                      关闭
2.6. 重启虚拟机
[root@kvm images]# virsh reboot nebula12.7. 查看配置文件
[root@kvm images]# virsh dumpxml nebula12.8. 导出虚拟机配置到其它虚拟机中
把centos7.0 的配置放到centos7.1 里:
[root@localhost ~]# virsh dumpxml centos7.0 > /etc/libvirt/qemu/centos7.1

# 查看配置文件是否生效
[root@localhost ~]# ls /etc/libvirt/qemu/
autostart  centos7.0.xml  centos7.1  networks
2.9 导出虚拟机配置到XML文件
# 将这个配置文件写入到一个文件里,就可以看到内存,cpu,磁盘等情况。
[root@kvm images]# virsh dumpxml nebula1>>nebula1.xml
2.10 基于配置文件,创建虚拟机
只要有磁盘文件+配置文件,虚拟机就可以迁移到任何电脑上
# 只要有磁盘文件+配置文件,虚拟机就可以迁移到任何电脑上,
# 将配置文件导入, 就可以迁移到其他主机上了
# 基于配置文件,创建虚拟机
[root@kvm images]# virsh define nebula1.xml
2.11 通过配置文件启动虚拟机系统
create时需要相应的qcow2磁盘文件
[root@localhost ~]# virsh create /etc/libvirt/qemu/centos7.0.xml
域 centos7.0 被创建(从 /etc/libvirt/qemu/centos7.0.xml)

# 重启后的状态
[root@localhost ~]# virsh list --all
 Id    名称                         状态
----------------------------------------------------
 6     centos7.0                      running
2.12. 配置虚拟机开机自启动
[root@localhost ~]# virsh autostart centos7.0
域 centos7.0标记为自动开始
# 查看开机启动虚拟机列表
[root@kvm ~]# cd /etc/libvirt/qemu
[root@kvm qemu]# ls       ###看到有一个autostart, 就是开机自启动的目录
autostart  nebula1.xml  networks
[root@kvm qemu]# cd autostart/       ###进入到此目录,看有哪些是开机自启动
[root@kvm autostart]# ls             ###看到nebula1是设置了开机自启动
nebula1.xml
[root@kvm autostart]# ll -h nebula1.xml        ###这是一个软链接文件,如果把源文件删除掉了,那么即使给它设置了开机自启动,它也启动不起来
lrwxrwxrwx 1 root root 29 May  1 15:15 nebula1.xml -> /etc/libvirt/qemu/nebula1.xml
[root@kvm autostart]# ln -s /etc/libvirt/qemu/nebula1.xml /etc/libvirt/qemu/autostart #如果没有设置开机自启动,也可以直接给它做软链接2.13 取消开机自启动
[root@kvm autostart]# virsh autostart --disable nebula1
Domain nebula1 unmarked as autostarted

[root@kvm ~]# cd /etc/libvirt/qemu/autostart
[root@kvm autostart]# ls   ###这个目录下没内容了,实质上就是删除了软链接
[root@kvm autostart]#
2.14 挂起虚拟机
[root@localhost ~]# virsh suspend centos7.0
域 centos7.0 被挂起

# 结果
[root@localhost ~]# virsh list --all
 Id    名称                         状态
----------------------------------------------------
 6     centos7.0                      暂停
2.15 恢复虚拟机
# 虚拟机处于paused暂停状态,一般情况下是被admin运行了virsh suspend才会处于这种状态,
# 但是仍然消耗资源,只不过不被超级管理程序调度而已。
[root@localhost ~]# virsh resume centos7.0
2.16 删除虚拟机
[root@localhost ~]# virsh undefine centos7.0
域 centos7.0 已经被取消定义

# 结果: centos7.0 的配置文件已经没有了
[root@localhost ~]# ls /etc/libvirt/qemu/
autostart  centos7.1  networks

# 现在没有运行的虚拟机
[root@localhost ~]# virsh  list --all
 Id    名称                         状态
----------------------------------------------------

# 恢复删除了虚拟机:
[root@kvm images]# virsh define nebula1.xml2.17 虚拟机重命名
# 虚拟机关闭后才能重命名
[root@localhost ~]# virsh shutdown centos7.0
[root@kvm images]# virsh domrename centos7.0 web-blog2.18 查看vnc端口号
[root@kvm ~]# virsh vncdisplay nebula1
:100502.19 进入到命令行版的控制台页面:(可以代替vnc,console登录)
[root@kvm autostart]# virsh console nebula1
Connected to domain nebula1
Escape character is ^]           ###用^和 ]才可以退出来,长按Ctrl+]
[root@kvm autostart]#2.20 配置文件重命名
进入到配置文件目录,进行配置文件的重命名
[root@localhost ~]# cd /etc/libvirt/qemu/
[root@localhost qemu]# mv centos7.1 centos7.0

# 重新定义
[root@localhost qemu]# virsh define centos7.0
定义域 centos7.0(从 centos7.0)

# 结果
[root@localhost qemu]# virsh list  --all
 Id    名称                         状态
----------------------------------------------------
 -     centos7.0                      关闭
2.21 修改虚拟机配置信息(用来修改系统内存大小、磁盘文件等信息)
# 1.直接通过 vim 命令修改:
[root@localhost qemu]# vim centos7.0
# 或者
# (相当于编辑上面的配置文件):
[root@localhost qemu]# virsh edit centos7.0

# 2. 修改完成关闭虚拟机
[root@localhost qemu]# virsh shutdown centos7.0

# 3. 启动虚拟机,生效
[root@localhost qemu]# virsh start centos7.0
2.22 修kvm的虚拟机的内核参数:
[root@kvm ~]# grubby --update-kernel=ALL --args="console=ttyS0,115200n8"
reboot,必须重启才有效
2.23 查看虚拟机状态
[root@localhost ~]# virsh domstate tidb-vm12.24 kvm查看虚拟机ip
1、查看win7虚拟机mac
   [root@localhost home]# virsh dumpxml <vm-name> | grep mac
2、显示mac与ip对应关系
   [root@localhost home]# arp -a

3、示例:
	步骤一;
	[root@localhost home]# virsh dumpxml openshift-vm1 | grep mac
	[root@localhost home]# virsh dumpxml tidb-vm1 | grep mac
		<partition>/machine</partition>
		<type arch='x86_64' machine='pc-i440fx-rhel7.0.0'>hvm</type>
		  <mac address='52:54:04:8d:56:bt'/>

	步骤二:
		[root@localhost home]# arp -a | grep 52:54:00:8d:56:ba
		? (192.168.122.70) at 52:54:00:8d:56:ba [ether] on virbr0

	步骤三:
		[root@localhost home]# ssh 192.168.122.70
说明:
	1、openshift-vm1是虚拟机名称;
	2、arp -a | grep 52:54:00:11:c5:4e 是找mac对应的ip。
2.25 网络管理
# 查看虚拟网络
[root@test ~]# virsh net-list

# 查看所有虚拟网络
virsh net-list --all

# 创建虚拟网络vbr
[root@test ~]# virsh net-define vbr.xml

# 从一个default.xml文件定义(但不启动)一个网络
[root@test ~]# virsh net-define /usr/share/libvirt/networks/default.xml

# 删除虚拟网络vbr, 彻底删除,重启系统后也不会恢复
[root@test ~]# virsh net-undefine vbr

# 启劢虚拟网络vbr
[root@test ~]# virsh net-start vbr

# 停止虚拟网络, 重启libvirtd服务后会恢复
[root@test ~]# virsh net-destroy vbr

# 修改 vbr 网络的配置
[root@test ~]# virsh net-edit vbr

# 设置vbr虚拟网络开机自启劢
[root@test ~]# virsh net-autostart vbr
2.26 查看KVM宿主机信息
# 查看KVM节点(服务器)信息
[root@test ~]# virsh nodeinfo
三、虚拟机磁盘管理
3.1. 修改虚拟机磁盘路径
也可以利用该方法给磁盘重命名:先关闭虚拟机,然后重命名qcow2磁盘文件,最后通过下面的virsh edit方式更新到新的qcow2文件名称。
[root@kvm images]# mkdir /data
[root@kvm images]# mv nebula1.qcow2 /data/

[root@kvm images]# cd /etc/libvirt/qemu
[root@kvm images]# ls /etc/libvirt/qemu
autostart  nebula1.xml  networks
[root@kvm images]# virsh edit nebula1(其实就是vim nebula1.xml,不过为了安全起见,配置文件里面让我们选择这种修改方式)
修改内容如下:
  <driver name='qemu' type='qcow2'/>
  <source file='/data/nebula1.qcow2'/>
3.2. 查看当前磁盘格式(qemu -img info)
# 安装libguestfs-tools
[root@localhost ~]# yum install libguestfs-tools -y

# 镜像目录: /var/lib/libvirt/images/
[root@localhost ~]# qemu-img info /var/lib/libvirt/images/centos7.0.qcow2
image: /var/lib/libvirt/images/centos7.0.qcow2
file format: qcow2
virtual size: 5.0G (5368709120 bytes)
disk size: 5.0G
cluster_size: 65536
Format specific information:
    compat: 1.1
    lazy refcounts: true
[root@localhost ~]#

# 查看qcow2快照:
	qemu-img snapshot -l /home/kvm/vmfs/openshift-vm1.qcow2

# 删除qcow2快照:
	qemu-img snapshot /home/kvm/vmfs/openshift-vm1.qcow2 -d openshift-vm1-20221227
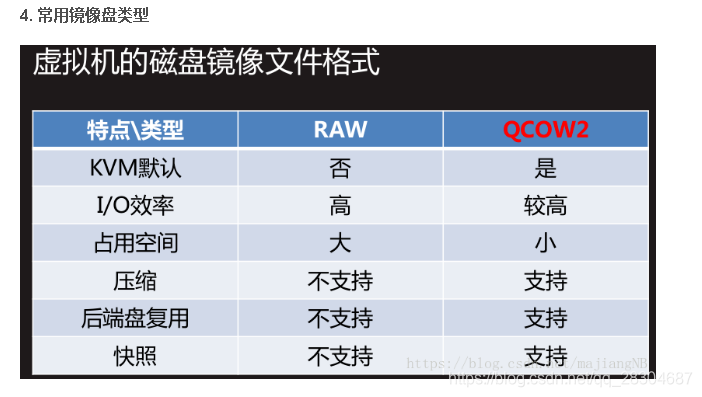
3.3. kvm虚拟机虚拟磁盘格式转化:
raw:
    裸格式,占用空间大,有多少空间直接占满,不支持快照,性能较好,不方便传输;
qcow2:
    cow(copy on write),要用多少内存给多少内存,不会一下子占完,
    占用空间小,支持快照,性能比raw能差一点,方便传输。

# 虚拟机磁盘工具的常用命令:
qemu -img info,create,resize,covert
3.4. 创建磁盘
创建一块大小为1G的qcow2格式的虚拟磁盘:
[root@kvm data]# qemu-img create -f qcow2 /data/ll.qcow2 1G
image: ll.qcow2
file format: qcow2
virtual size: 1.0G (1073741824 bytes)
3.5. 调整磁盘容量(给磁盘加100G容量)
qcow2格式的磁盘只能加不能减,raw格式的盘可以减。
# 1.查看需要扩容的磁盘信息
[root@localhost ~]# virsh domblklist tidb-vm1 (tidb-vm1: 虚拟机名字)
Target Source
------------------------------------------------
hda /data/vmfs/tidb-vm1.qcow2
hdb -
# 可以看到,目前大小200G
[root@localhost ~]# qemu-img info /data/vmfs/tidb-vm1.qcow2
image: /data/vmfs/tidb-vm1.qcow2
file format: qcow2
virtual size: 200G (214748364800 bytes)
disk size: 2.3G
cluster_size: 65536
Snapshot list:
ID TAG VM SIZE DATE VM CLOCK
1 1664466694 459M 2022-09-29 23:51:34 00:01:52.471
Format specific information:
compat: 1.1
lazy refcounts: true
# 2.虚拟机停机
[root@kvm data]# virsh shutdown vm-name
# 3. 扩容
# qcow2是一个写时复制的磁盘格式,给这个磁盘写入2G的内容,ll -h看就增加了2G,
# 如果此时删掉了2G的内容,再df -h查看,原来增加的2G内存还在,
# 因为qcow2格式文件只能增,不能减。
[root@kvm data]# qemu-img resize /data/vmfs/tidb-vm1.qcow2 +100G
Image resized.
# 4.重新定义虚拟机(不必执行)
# [root@kvm data]# virsh define /etc/libvirt/qemu/tidb-vm1.xml
# local.xml
[root@kvm data]# ll -h /data/vmfs/tidb-vm1.qcow2
-rw------- 1 qemu qemu 2.4G Sep 30 14:40 /data/vmfs/tidb-vm1.qcow2
# 5.查看虚拟机磁盘容量
[root@kvm data]# qemu-img info /data/vmfs/tidb-vm1.qcow2
image: /data/vmfs/tidb-vm1.qcow2
file format: qcow2
virtual size: 200G (214748364800 bytes) ###可以看到内存由1G加到了2G
disk size: 2.4G
cluster_size: 65536
Snapshot list:
ID TAG VM SIZE DATE VM CLOCK
1 1664466694 459M 2022-09-29 23:51:34 00:01:52.471
Format specific information:
compat: 1.1
lazy refcounts: true6. 启动并进入虚拟机,以下在虚拟机中操作
df -h 查看更新前容量

- 开始分区:
- 查看设备:fdisk -l
fdisk /dev/sda (因为我们是扩容的sda,所以在sda新增一个分区)
p查询分区
n创建分区,其他默认
p查询分区
t设置新创建的分区格式8e
p查询分区格式是否设置成功
w保存退出
partprobe重读分区表


创建物理卷扩容:
创建物理卷: pvcreate /dev/sda3
- 查询pv: pvs
- 查询group: vgs
- 扩容: vgextend centos /dev/sda3
- 查看逻辑卷: lvdisplay
- 扩容逻辑卷大小: lvextend -l +100%FREE /dev/centos/root
- 更新修改到文件系统: xfs_growfs /dev/centos/root

- 查询更新后容量: df -h

前后对比,从6.5G已经扩容到17G,扩容容量10G左右,扩容成功。
3.6. 给raw盘缩容(生产上不要缩容,会丢失数据!!!)
[root@kvm data]# qemu-img info liyu.raw
image: liyu.raw
file format: raw
virtual size: 2.0G (2147483648 bytes)     ###可以看到原来是2G内存

# 减掉1G内存:
[root@kvm data]# qemu-img resize liyu.raw -1G
Image resized.

[root@kvm data]# qemu-img info liyu.raw
image: liyu.raw
file format: raw
virtual size: 1.0G (1073741824 bytes)       ###缩容成功
3.7. 磁盘格式转化:
# -f指定将raw格式,转化为-O,qcow2格式, 后面跟着两个要转化的文件
[root@kvm data]# qemu-img convert -f raw -O qcow2 liyu.raw liyu.qcow2

[root@kvm data]# ll -h
total 1.3G
-rw-r--r-- 1 root root 193K May  1 17:03 liyu.qcow2
-rw-r--r-- 1 root root 1.0G May  1 16:50 liyu.raw
-rw------- 1 qemu qemu  11G May  1 17:03 nebula1.qcow2

#格式转化完之后,要修改配置文件才起效:(以liyu举例)
[root@kvm data]# virsh edit liyu
#修改disk里的raw为qcow2,修改type的raw为qcow2。修改两处

# 再开启它:
[root@kvm data]# virsh start liyu

# qcow2 convert
qemu-img convert -O qcow2 old.qcow2 new.qcow2
3.7.1 虚拟机磁盘瘦身
# 按照如下命令转换后, qcow2文件就会变小,重新启动虚拟机即可。
# qcow2 convert
qemu-img convert -O qcow2 old.qcow2 new.qcow23.8. 查看系统配置信息:
[root@localhost ~]# yum -y install libguestfs-tools-c

[root@localhost ~]# virt-cat -a /var/lib/libvirt/images/centos7.0.qcow2 /etc/sysconfig/grub
GRUB_TIMEOUT=5
GRUB_DISTRIBUTOR="$(sed 's, release .*$,,g' /etc/system-release)"
GRUB_DEFAULT=saved
GRUB_DISABLE_SUBMENU=true
GRUB_TERMINAL_OUTPUT="console"
GRUB_CMDLINE_LINUX="crashkernel=auto rd.lvm.lv=centos/root rd.lvm.lv=centos/swap rhgb quiet"
GRUB_DISABLE_RECOVERY="true"
3.9. 在宿主机上查看kvm虚拟机centos7.0 的dns地址
root@localhost ~]# virt-edit -a /var/lib/libvirt/images/centos7.0.qcow2  /etc/resolv.conf

# Generated by NetworkManager
3.10. 查看虚拟机存储状态
[root@localhost ~]# virt-df -h centos7.0
文件系统                            大小 已用空间 可用空间 使用百分比%
centos7.0:/dev/sda1                      1014M       105M       909M   11%
centos7.0:/dev/centos/root                3.5G       1.3G       2.2G   39%
[root@localhost ~]#
四、虚拟机克隆
4.1 克隆虚拟机
# 1. 克隆
# -o指定旧的虚拟机,-n指定新的虚拟机
[root@localhost ~]# virt-clone \
-o centos7.0 \
-n centos7.1 \
-f /var/lib/libvirt/images/centos7.1.qcow2

正在分配 'centos7.1.qcow2'                                | 5.0 GB  00:00:24

成功克隆 'centos7.1'。

## use
virt-clone \
-o openshift-vm1 \
-n openshift-vm2 \
-f /data/vmfs/openshift-vm2.qcow2

# 2. 再看一下状态,发现有centos7.1
[root@localhost ~]# virsh list --all
 Id    名称                         状态
----------------------------------------------------
 -     centos7.0                      关闭
 -     centos7.1                      关闭

# 3. 开启centos7.1
[root@localhost ~]# virsh start centos7.1
域 centos7.1 已开始
4.2 修改新克隆虚拟机配置
进入新建虚拟机的命令行,执行如下命令:
hostnamectl set-hostname centos-7.1
vi /etc/sysconfig/network-scripts/ifcfg-ens3
修改完成后,重启虚拟机: virsh reboot centos-7.1
TYPE="Ethernet"
PROXY_METHOD="none"
BROWSER_ONLY="no"
#BOOTPROTO="dhcp"
DEFROUTE="yes"
IPV4_FAILURE_FATAL="no"
IPV6INIT="yes"
IPV6_AUTOCONF="yes"
IPV6_DEFROUTE="yes"
IPV6_FAILURE_FATAL="no"
IPV6_ADDR_GEN_MODE="stable-privacy"
NAME="ens3"
#UUID="a6fd0deb-887c-4752-8343-048f1b6f4236"
DEVICE="ens3"
ONBOOT="yes"

IPADDR=192.168.0.120
PREFIX=24
GATEWAY=192.168.0.1
DNS=114.114.114.114
DNS1=114.114.114.114
BOOTPROTO=static
虚拟机克隆命令参数详解:
[root@ren12 ~]# virt-clone --help
usage: virt-clone --original [NAME] ...
复制一个虚拟机,需修改如 MAC 地址,名称等所有主机端唯一的配置。
虚拟机的内容并没有改变:virt-clone 不修改任何客户机系统内部的配置,它只复制磁盘和主机端的修改。所以像修改密码,修改静态 IP 地址等操作都在本工具复制范围内。如何修改此类型的配置,请参考 virt-sysprep(1)。
optional arguments:
  -h, --help            show this help message and exit
  --version             show program's version number and exit
  --connect URI         通过 libvirt URI 连接到虚拟机管理程序
通用选项:
  -o ORIGINAL_GUEST, --original ORIGINAL_GUEST
                        原始客户机名称;必须为关闭或者暂停状态。
  --original-xml ORIGINAL_XML
                        将 XML 文件用于原始客户机。
  --auto-clone          从原始客户机配置中自动生成克隆名称和存储路径。
  -n NEW_NAME, --name NEW_NAME
                        新客户机的名称
  --reflink             使用 btrfs COW 轻量副本
存储配置:
  -f NEW_DISKFILE, --file NEW_DISKFILE
                        为新客户机使用新的磁盘镜像文件
  --force-copy TARGET   强制复制设备(例如:如果 'hdc'是只读光驱设备,则使用 --force-copy=hdc)
  --nonsparse           不使用稀疏文件作为克隆的磁盘镜像
  --preserve-data       不克隆存储,通过 --file参数指定的新磁盘镜像将保留不变
  --nvram NEW_NVRAM     New file to use as storage for nvram VARS
联网配置:
  -m NEW_MAC, --mac NEW_MAC
                        为克隆客户机生成新的固定 MAC地址。默认为随机生成 MAC。
其它选项:
  --replace             不检查命名冲突,覆盖任何使用相同名称的客户机。
  --print-xml           打印生成的 XML 域,而不是创建客户机。
  --check CHECK         启用或禁用验证检查。例如:
                        --check path_in_use=off
                        --check all=off
  -q, --quiet           抑制非错误输出
  -d, --debug           输入故障排除信息
请参考 man 手册,以便了解示例和完整的选项语法。
五、快照管理
定时创建和删除虚拟机快照,请参考: KVM虚拟机定时创建和删除快照
5.1. 创建快照
快照会保存在磁盘文件里,所以每创建一个快照,磁盘文件的内存就会越变越大,
快照保存目录:/var/lib/libvirt/qemu/snapshot/{虚拟机名称}/
# 创建快照(理解成VMware的快照)
[root@localhost ~]# virsh snapshot-create centos7.0
已生成域快照 1656584049

# 根据默认生成的快照名字(默认以时间戳为名字命名快照), 查看快照创建日期
[root@localhost ~]# date -d @1664466694
Thu Sep 29 23:51:34 CST 2022
自定义快照名称:
[root@localhost ~]# virsh snapshot-create-as gitlab-vm --name gitlab-vm-`date +%Y%m%d%H%M%S`
Domain snapshot gitlab-vm-20221021120551 created

[root@localhost ~]# virsh snapshot-list gitlab-vm
 Name                 Creation Time             State
------------------------------------------------------------
 gitlab-vm-20221021120551 2022-10-21 12:05:51 +0800 running

# 快照默认存储路径: /var/lib/libvirt/qemu/snapshot/gitlab-vm/gitlab-vm-20221009-0933.xml
5.2. 删除快照
[root@localhost ~]# virsh snapshot-delete centos7.0 1656584049
已删除域快照 1656584049
5.3. 查看快照时间
[root@localhost ~]# virsh snapshot-list centos7.0
 名称               生成时间              状态
------------------------------------------------------------
 1656584049           2022-06-30 18:14:09 +0800 shutoff
 1656584521           2022-06-30 18:22:01 +0800 shutoff
5.4. 应用快照
[root@localhost ~]# virsh snapshot-revert centos7.0 1656584049
恢复到指定的版本1475214943 ,没有任何输出则代表恢复成功:
[root@kvm ~]# virsh snapshot-revert snale 1475214943确定是否恢复到了指定版本:
 [root@kvm ~]#virsh snapshot-current snale|grep creationTime
   <creationTime>1475214943</creationTime>
5.5. 查看快照信息
[root@localhost ~]# virsh snapshot-current centos7.0
[root@localhost ~]# virsh  snapshot-current centos7.0
<domainsnapshot>
  <name>1656584049</name>
  <state>shutoff</state>
  <creationTime>1656584049</creationTime>
  <memory snapshot='no'/>
  <disks>
    <disk name='vda' snapshot='internal'/>
    <disk name='hda' snapshot='no'/>
  </disks>
  <domain type='kvm'>
    <name>centos7.0</name>
    <uuid>8f9cd4d6-a1d1-4296-bf6e-379682af6b05</uuid>
    <memory unit='KiB'>1048576</memory>
    <currentMemory unit='KiB'>1048576</currentMemory>
    <vcpu placement='static'>1</vcpu>
    <resource>
      <partition>/machine</partition>
    </resource>
    <os>
      <type arch='x86_64' machine='pc-i440fx-rhel7.0.0'>hvm</type>
    </os>
    <features>
      <acpi/>
      <apic/>
    </features>
    <cpu mode='custom' match='exact' check='full'>
      <model fallback='forbid'>Broadwell-IBRS</model>
      <feature policy='disable' name='md-clear'/>
      <feature policy='disable' name='ssbd'/>
      <feature policy='disable' name='hle'/>
      <feature policy='disable' name='rtm'/>
      <feature policy='require' name='spec-ctrl'/>
      <feature policy='require' name='hypervisor'/>
      <feature policy='require' name='xsaveopt'/>
    </cpu>
    <clock offset='utc'>
      <timer name='rtc' tickpolicy='catchup'/>
      <timer name='pit' tickpolicy='delay'/>
      <timer name='hpet' present='no'/>
    </clock>
    <on_poweroff>destroy</on_poweroff>
    <on_reboot>restart</on_reboot>
    <on_crash>destroy</on_crash>
    <pm>
      <suspend-to-mem enabled='no'/>
      <suspend-to-disk enabled='no'/>
    </pm>
    <devices>
      <emulator>/usr/libexec/qemu-kvm</emulator>
      <disk type='file' device='disk'>
        <driver name='qemu' type='qcow2'/>
        <source file='/var/lib/libvirt/images/centos7.0.qcow2'/>
        <target dev='vda' bus='virtio'/>
        <boot order='1'/>
        <address type='pci' domain='0x0000' bus='0x00' slot='0x07' function='0x0'/>
      </disk>
      <disk type='file' device='cdrom'>
        <driver name='qemu' type='raw'/>
        <target dev='hda' bus='ide'/>
        <readonly/>
        <boot order='2'/>
        <address type='drive' controller='0' bus='0' target='0' unit='0'/>
      </disk>
      <controller type='usb' index='0' model='ich9-ehci1'>
        <address type='pci' domain='0x0000' bus='0x00' slot='0x05' function='0x7'/>
      </controller>
      <controller type='usb' index='0' model='ich9-uhci1'>
        <master startport='0'/>
        <address type='pci' domain='0x0000' bus='0x00' slot='0x05' function='0x0' multifunction='on'/>
      </controller>
      <controller type='usb' index='0' model='ich9-uhci2'>
        <master startport='2'/>
        <address type='pci' domain='0x0000' bus='0x00' slot='0x05' function='0x1'/>
      </controller>
      <controller type='usb' index='0' model='ich9-uhci3'>
        <master startport='4'/>
        <address type='pci' domain='0x0000' bus='0x00' slot='0x05' function='0x2'/>
      </controller>
      <controller type='ide' index='0'>
        <address type='pci' domain='0x0000' bus='0x00' slot='0x01' function='0x1'/>
      </controller>
      <controller type='virtio-serial' index='0'>
        <address type='pci' domain='0x0000' bus='0x00' slot='0x06' function='0x0'/>
      </controller>
      <controller type='pci' index='0' model='pci-root'/>
      <interface type='network'>
        <mac address='52:54:00:8d:e0:b0'/>
        <source network='default'/>
        <model type='virtio'/>
        <boot order='3'/>
        <address type='pci' domain='0x0000' bus='0x00' slot='0x03' function='0x0'/>
      </interface>
      <serial type='pty'>
        <target type='isa-serial' port='0'>
          <model name='isa-serial'/>
        </target>
      </serial>
      <console type='pty'>
        <target type='serial' port='0'/>
      </console>
      <channel type='unix'>
        <target type='virtio' name='org.qemu.guest_agent.0'/>
        <address type='virtio-serial' controller='0' bus='0' port='1'/>
      </channel>
      <channel type='spicevmc'>
        <target type='virtio' name='com.redhat.spice.0'/>
        <address type='virtio-serial' controller='0' bus='0' port='2'/>
      </channel>
      <input type='tablet' bus='usb'>
        <address type='usb' bus='0' port='1'/>
      </input>
      <input type='mouse' bus='ps2'/>
      <input type='keyboard' bus='ps2'/>
      <graphics type='vnc' port='-1' autoport='yes' listen='127.0.0.1' keymap='en-us'>
        <listen type='address' address='127.0.0.1'/>
      </graphics>
      <sound model='ich6'>
        <address type='pci' domain='0x0000' bus='0x00' slot='0x04' function='0x0'/>
      </sound>
      <video>
        <model type='qxl' ram='65536' vram='65536' vgamem='16384' heads='1' primary='yes'/>
        <address type='pci' domain='0x0000' bus='0x00' slot='0x02' function='0x0'/>
      </video>
      <redirdev bus='usb' type='spicevmc'>
        <address type='usb' bus='0' port='2'/>
      </redirdev>
      <redirdev bus='usb' type='spicevmc'>
        <address type='usb' bus='0' port='3'/>
      </redirdev>
      <memballoon model='virtio'>
        <address type='pci' domain='0x0000' bus='0x00' slot='0x08' function='0x0'/>
      </memballoon>
    </devices>
    <seclabel type='dynamic' model='selinux' relabel='yes'/>
    <seclabel type='dynamic' model='dac' relabel='yes'/>
  </domain>
</domainsnapshot>
六、 虚拟机热添加及热修改
所谓热添加就是在开机状态下添加
6.1、在线热添加硬盘(含临时,永久添加及剥离硬盘)
先给nebula1的磁盘加5G容量
[root@kvm data]# qemu-img create -f qcow2 nebula1-add.qcow2 5G
然后再来创建磁盘(源虚拟机,源虚拟机磁盘路径,目标磁盘)
[root@kvm data]# virsh attach-disk nebula1 /data/nebula1-add.qcow2 vdb
Disk attached successfully
此时vdb磁盘已经添加成功,在kvm虚拟机里执行fdisk -l就可以看到添加的磁盘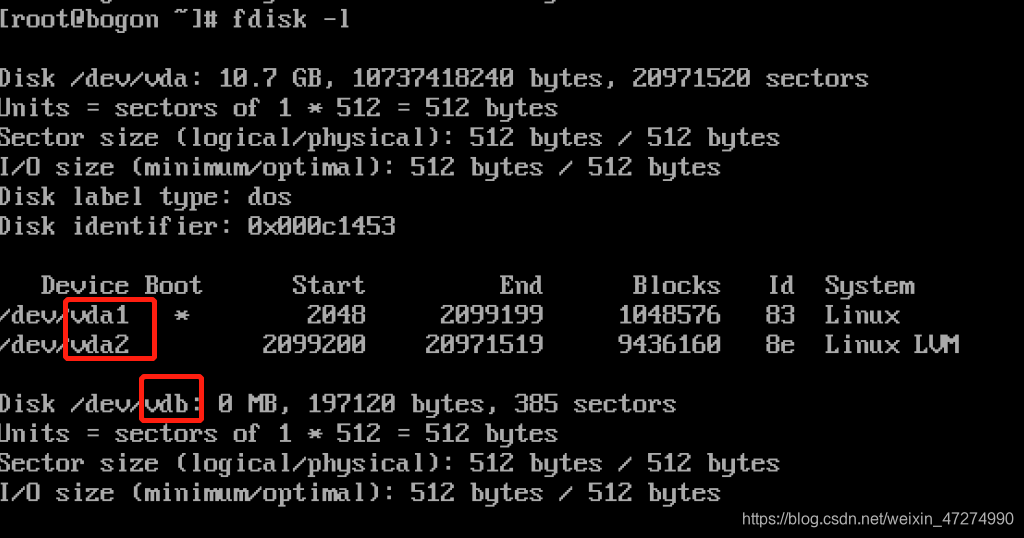
可是为什么刚才明明加了5G内容,vdb上面却显示0MB呢?因为添加硬盘的时候要指定磁盘类型,不指定默认为raw类型,qcow2的磁盘肯定显示不了raw磁盘的大小,所以我们现在要把添加的硬盘剥离出来,使用以下命令:(临时剥离硬盘),要想永久剥离硬盘和下面永久添加硬盘一样,加上- -config参数
[root@kvm data]# virsh detach-disk nebula1 vdb
Disk detached successfully
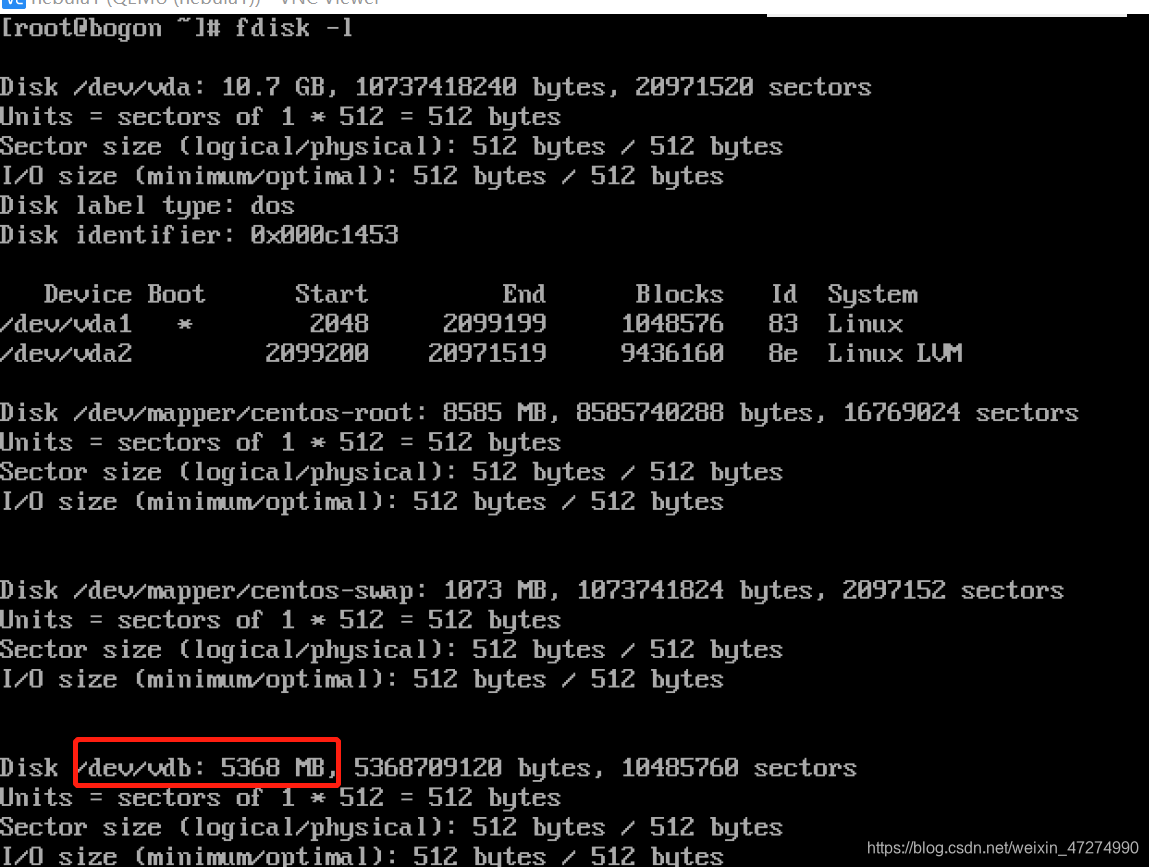
然后要指定添加硬盘的类型为qcow2,添加最后一个参数
[root@kvm images]# virsh attach-disk nebula1 /data/nebula1-add.qcow2 vdb --subdriver qcow2
Disk attached successfully
这下再进到kvm虚拟机里fdisk -l就可以看到刚才添加的5G硬盘容量了
但是!在我们强制关机之后,再次开机进入到kvm虚拟机以后,添加的硬盘又不见了,因为这只是临时添加,所以我们想要以后开机添加的硬盘永久存在就得永久添加,加上下列参数即可。
[root@kvm images]# virsh attach-disk nebula1 /data/nebula1-add.qcow2 vdb --subdriver qcow2 --config
- -config这个参数是在下次重启的时候才生效。
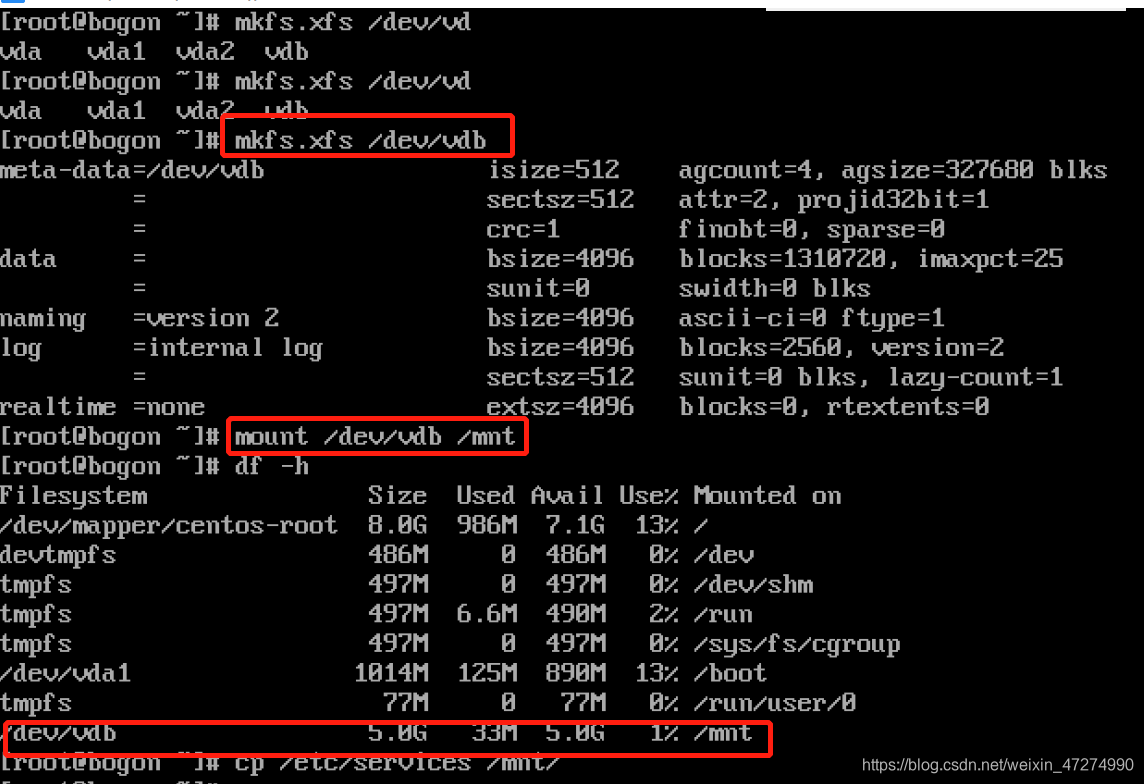
要想这块添加的盘能用还得格式化(mkfs.xfs /dev/vdb),再进行挂载,查看
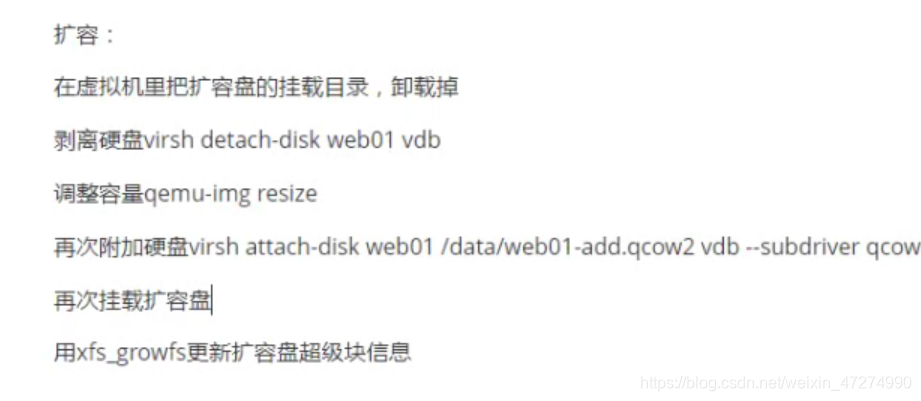
6.2、在线扩容
在进行扩容时,必须要将刚才挂载的硬盘卸载掉
umount /mnt
还要把刚才添加的硬盘剥离出来
[root@kvm images]# virsh detach-disk nebula1 vdb
Disk detached successfully
再给它进行扩容然后进行查看,磁盘容量已经由我们添加的5G变为8G了
[root@kvm images]# qemu-img resize /data/nebula1-add.qcow2 +3G
Image resized.
[root@kvm images]# qemu-img info /data/nebula1-add.qcow2
image: /data/nebula1-add.qcow2
file format: qcow2
virtual size: 8.0G (8589934592 bytes)
disk size: 16M
cluster_size: 65536
Format specific information:
    compat: 1.1
    lazy refcounts: false
现在再将磁盘添加上去
[root@kvm images]# virsh attach-disk nebula1 /data/nebula1-add.qcow2 vdb --subd                                                 river qcow2
Disk attached successfully
再在kvm虚拟机的磁盘挂载上去,我们看到之前拷贝的文件也没有丢失,但是df -h时看到磁盘还是5G,并没有更新到8G
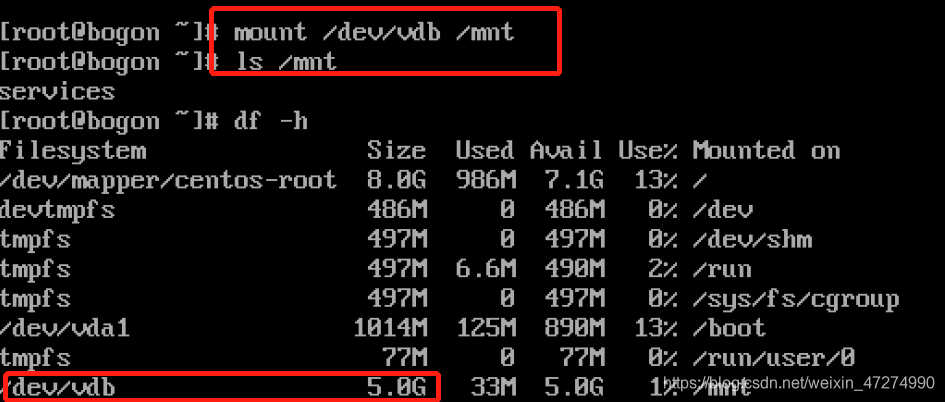
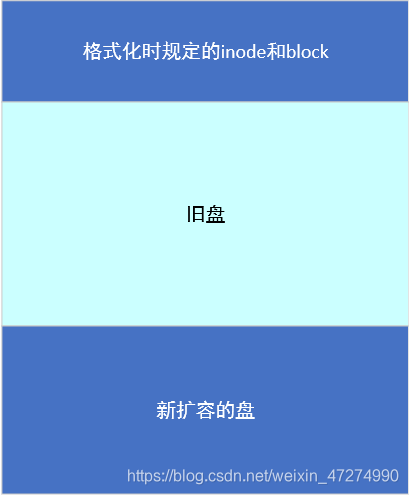
为什么呢?因为我们在格式化时已经规定了inode和block大小(超级块),但是我们扩容的盘在后面,所以得更新一下超级块信息
用以下命令更新超级块信息,可以看到block信息已经更新了
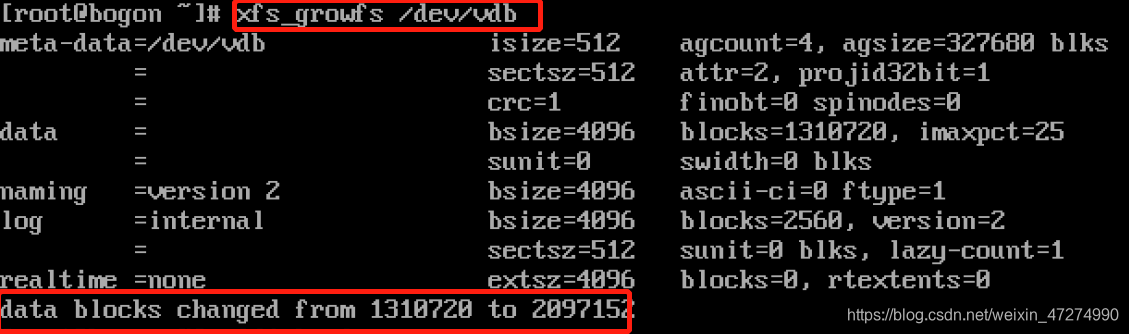
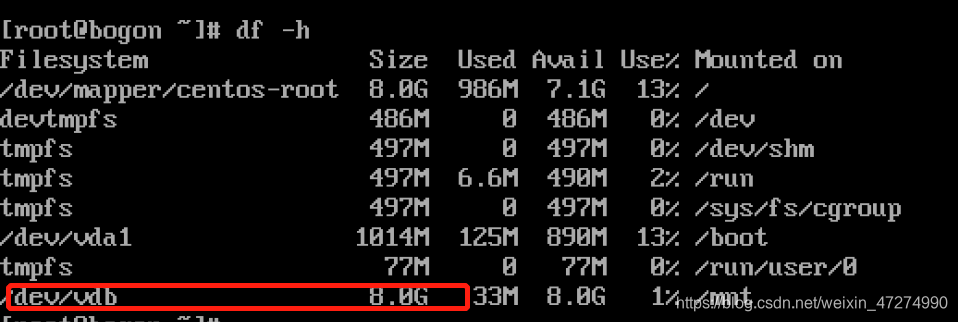
再次df -h查看,由5G变成8G了
如果是ext3/ext4文件系统,则用resize2fs /dev/vdb来更新
扩容的思路:
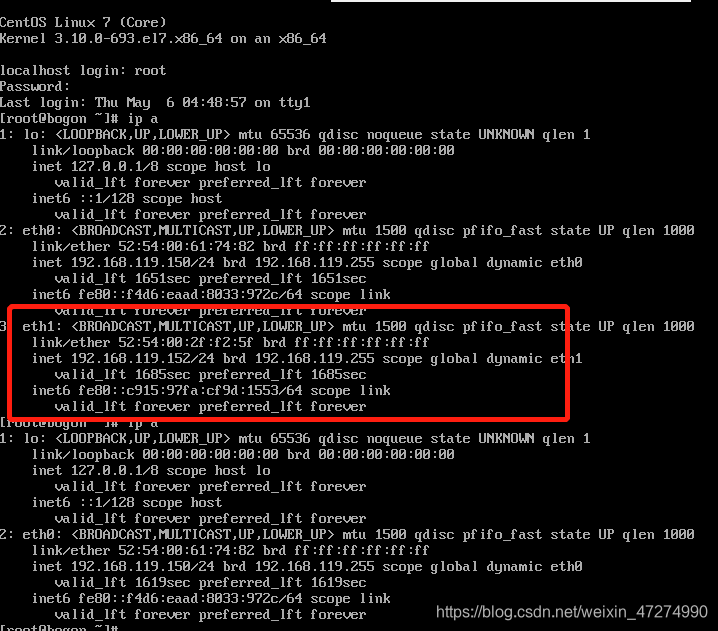
6.3、在线热添加网卡(含移除网卡)
添加- -model virtio参数,附加的网卡就是按顺序来的,eth0,eth1
[root@kvm ~]# virsh attach-interface nebula1 --type bridge --source virbr0 --model virtio
Interface attached successfully
在kvm虚拟机里可以查看IP,看到新增网卡eth1

移除网卡:
[root@kvm images]# virsh detach-interface nebula1 --type bridge
error: Domain has 2 interfaces. Please specify which one to detach using --mac
error: Failed to detach interface
上述方式移除网卡会提示有两块接口都是bridge类型,需要指定mac地址进行移除,看到上图eth1的mac地址为52:54:00:2f:f2:5f,所以加上mac参数
[root@kvm images]# virsh detach-interface nebula1 --type bridge --mac 52:54:00:2f:f2:5f
Interface detached successfully
可以看到kvm虚拟机里的eth1没了,移除网卡成功
这只是临时修改,要想永久生效还得加上- -config参数
[root@kvm images]# virsh detach-interface nebula1 --config --type bridge --mac 52:54:00:2f:f2:5f
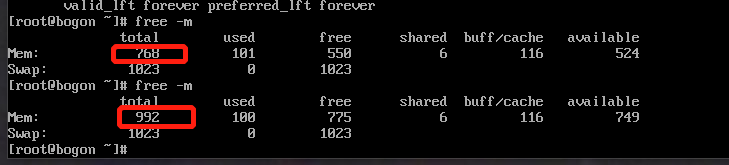
Interface detached successfully6.4、在线热添加内存
注意这里刚开始安装的Kvm虚拟机要指定现有内存以及最大内存,才方便以后添加内存
virt-install --name=nebula --virt-type=kvm --memory 800,maxmemory=1024 --vcpus 1 --cdrom=/home/iso/CentOS-7-x86_64-Minimal-1708.iso --disk path=/home/images/nebula.qcow2,size=10 --network bridge=br0 --graphicsvnc --vncport=15950 --vnclisten=0.0.0.0 --noautoconsole --autostart
添加内存的命令如下
[root@kvm images]# virsh setmem nebula1 1024M
在kvm虚拟机里查看内存容量,就看到增加了
但是如果我们安装kvm虚拟机的时候没有指定最大内存,那么就要进入到配置文件里面修改了,你可以将单位修改为MIB,保存文件再次进入时系统就会自动转换单位为KB
[root@kvm images]# vim nebula1.xml
 <memory unit='KiB'>1048576</memory>
 <currentMemory unit='KiB'>819200</currentMemory>
如果修改的虚拟机处于运行状态,那么修改的配置文件是不会生效的,需要重启才会生效。
6.5、在线热添加cpu
用下列命令安装kvm虚拟机的时候,就有添加cpu信息,最大cpu数量
virt-install \
--name=nebula \
--virt-type=kvm \
--memory 800,maxmemory=1024  \
--vcpus 1,maxvcpus=10 \
--cdrom=/home/iso/CentOS-7-x86_64-Minimal-1708.iso \
--disk path=/home/images/nebula.qcow2,size=10 \
--network bridge=br0 \
--graphicsvnc \
--vncport=15950 \
--vnclisten=0.0.0.0 \
--noautoconsole \
--autostart
然后再设置CPU数量,将nebula1的CPU调整为2
[root@kvm images]# virsh setvcpus nebula1 2
再lscpu查看就可以看到两个cpu了,原来只有0,现在是0和1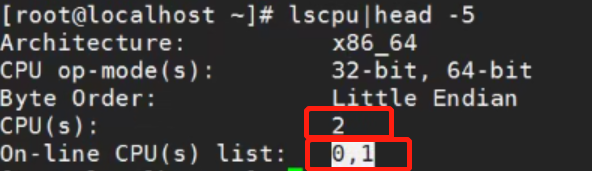
那么cpu可以加,可以减吗?我们试一下,可以看到之前的cpu数量是6,现在设置为2,提示不支持CPU回收

6.6、kvm虚拟机的热迁移
热迁移的原理如下:
想将一台正在运行的虚拟机迁移过去必须借助共享存储,将磁盘挂载到共享存储上,谁想用就挂载

三台机器的环境配置如下:

在nfs主机上的文件配置如下命令
[root@nfs01 data]# vim /etc/exports
#shared dir
/data 192.168.119.0/24(rw,async,no_root_squash,no_all_squash)
在两边kvm虚拟机上进行测试
[root@kvm ~]# showmount -e 192.168.119.129
Export list for 192.168.119.129:

[root@backup ~]# showmount -e 192.168.119.146
Export list for 192.168.119.146:
两台宿主机上将磁盘文件所在路径挂载到nfs的/data目录
[root@kvm images]# cd /data/
[root@kvm data]# ls
nebula1.qcow2  nebula1.xml
[root@kvm data]# mount -t nfs 192.168.119.7:/data /home/images
[root@kvm data]# mv /data/nebula1.qcow2 /home/images/

[root@backup ~]# mount -t nfs 192.168.119.7:/data /home/images/
再在nfs主机上进行查看
[root@nfs01 data]# ll -h
total 1.7G
-rw-------. 1  107  107 11G May  6  2021 nebula1.qcow2
qemu放入UID就是107
再在第一台主机上安装kvm虚拟机
[root@kvm data]# virt-install \
--virt-type kvm \
--os-type=linux \
--name web01 \
--memory 1024 \
--vcpus 1,maxvcpus=10 \
--cdrom=/home/iso/CentOS-7-x86_64-Minimal-1708.iso  \
--disk /home/images/web01.qcow2,size=10 \
--network bridge=virbr0 \
--graphics vnc,listen=0.0.0.0 \
--noautoconsole \
--check disk_size=off

Starting install...
Allocating 'web01.qcow2'                                                                                 |  10 GB  00:00:00
Domain installation still in progress. You can reconnect to the console to complete the installation process.
在第二台主机上查看有磁盘文件,证明nfs共享存储成功
[root@backup ~]# ls /home/images/
nebula1.qcow2  web01.qcow2
在两台主机上做好host解析,添加如下内容
192.168.119.146 kvm
192.168.119.129 backup
然后在kvm上面做迁移,再次进行查看virsh list,kvm虚拟机都不在了,被迁移到backup上去了
[root@kvm data]# virsh migrate \
--live \
--verbose web01 qemu+ssh://192.168.119.129/system \
--unsafe
参数解释:
migrate 迁移的意思
- -live 运行的状态迁移
- -verbose 迁移哪一台Kvm虚拟机
qemu+ssh://192.168.119.129/system qemu+ssh认证,IP为backup的IP
- -unsafe 这个参数一定要加,不然会报错,不让迁移

旨在为数千万中国开发者提供一个无缝且高效的云端环境,以支持学习、使用和贡献开源项目。
更多推荐


 4
4 0
0- 0


 已为社区贡献37条内容

所有评论(0)