初学uniapp上手项目
uniapp迷你商城是一款移动端app项目,采用uniapp小程序技术进行开发。迷你商城是一款电商类小程序,类似于淘宝、京东淘宝一类的购物APP
UNIAPP迷你商城
前言
学习一门新的技术,不仅仅是要了解学习该技术的基本知识,更要学会进阶学习,探究其中的价值。掌握一门技术,俗话讲的好,“千学不如一看,千看不如一练”,为此,在掌握一些基本知识之后,上手练习才是熟悉掌握技术的要点。
初探uniapp,技术不精,敬请谅解
基础要求
-
了解Vue框架的基本结构与语法(十分重要)
-
了解微信小程序的基本结构与语法(较轻)
项目概述
项目简介
uniapp迷你商城是一款移动端app项目,采用uniapp小程序技术进行开发。迷你商城是一款电商类小程序,类似于淘宝、京东淘宝一类的购物APP
项目结构
前后端分离开发
后端接口文档链接(接口文档取自网络)
https://www.showdoc.com.cn/128719739414963/2513235043485226
开发H5、小程序两端页面
开发工具
- HbuildX
- 微信开发者工具
需求分析
- 实现商城商品的搜索与展示
- 编写模块页面
项目结构图

项目保真图
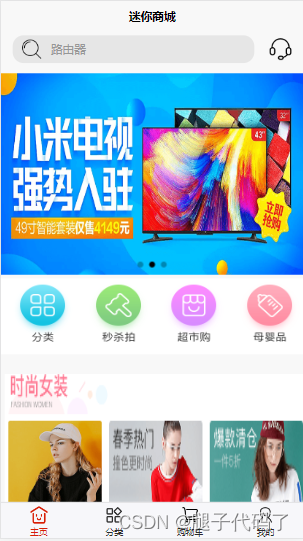
首页

搜索页

展览页

商品详情页

分类

购物车

我的

项目搭建
配置Tabbar
在page.json文件当中配置tabbar
"tabBar": {
		"color": "#2c2c2c",
		"selectedColor": "#d81e06",
		"list": [
			{
				"pagePath": "pages/index/index",
				"iconPath": "static/tabbar/home.png",
				"selectedIconPath": "./static/tabbar/selecthome.png",
				"text": "主页"
			},
			{
				"pagePath": "pages/sort/sort",
				"iconPath": "static/tabbar/sort.png",
				"selectedIconPath": "./static/tabbar/sortSelect.png",
				"text": "分类"
			},
			{
				"pagePath": "pages/shop/shop",
				"iconPath": "./static/tabbar/shop.png",
				"selectedIconPath": "./static/tabbar/shopSelect.png",
				"text": "购物车"
			},
			{
				"pagePath": "pages/mind/mind",
				"iconPath": "./static/tabbar/me.png",
				"selectedIconPath": "./static/tabbar/meSelect.png",
				"text": "我的"
			}
		]
	}
配置小程序当中的下方导航
| 名称 | 描述 |
|---|---|
| pagePath | 页面的路径 |
| iconPath | 页面导航图标 |
| selectedIconPath | 页面选中时的导航 |
| text | 导航名称 |
封装uniRequest请求
const BASE_URL ='https://api-hmugo-web.itheima.net/api/public/v1'
export const myRequest=(option)=>{
	return new Promise((resolve,reject)=>{
		uni.request({
			url:BASE_URL+option.url,
			method:option.method || 'GET',
			data:option.data || {},
			success:(res)=>{
				if(res.data.meta.status !==200){
					return uni.showToast({
						title:'获取数据失败!'
					})
				}
				resolve(res)
			},
			fail: (err) => {
				return uni.showToast({
					title:'获取接口失败'
				})
				reject(err);
			}
		})
	})
}
封装uni.request接口,减少代码量,只需要传递参数即可实现对与数据的请求
将封装的api挂载到Vue原型上
找到目录main.js文件
import {myRequest} from './util/api.js'
Vue.prototype.$myRequest=myRequest
之后就可以通过this.$myRequest调用
首页
在小程序当中,view标签相当于web端的div标签
<template>
	<view class="home">
		<search></search>    <!-- 子组件引用,为搜索框 -->
		<view class="lunbo">
			<swiper class="swiper" autoplay circular interval="2000" indicator-dots>
				<swiper-item class="lunboitem" v-for="item in swiperList" :key="item.goods_id">
					<image :src="item.image_src"></image>
				</swiper-item>
			</swiper>
		</view>
		<!-- 导航 -->
		<view class="nav">
			<image :src="item.image_src" v-for="(item,index) in navigationList" :key="index"></image>
		</view>
		<!-- 楼层 -->
		<view class="floor">
			<view class="list" v-for="(item,index) in menuList" :key="index">
				<image :src="item.floor_title.image_src"></image>
				<view class="list11" >
					<image :src="item1.image_src" v-for="(item1,index) in item.product_list" :key="index"></image>
				</view>
			</view>
		</view>
	</view>
</template>
<script>
	import Search from '../../components/search/search.vue'  //引入组件
	export default {
		data() {
			return {
				swiperList:[],
				navigationList:[],
				menuList:[]
			}
		},
		onLoad() {
			this.getSwiper();
			this.getNavigate();
			this.getMenu()
		},
		methods: {
			//获取轮播图列表
			async getSwiper(){
				const {data:res}=await this.$myRequest({
					url:'/home/swiperdata',
					method:'GET'
				})
				this.swiperList=res.message;
			},
			//获取导航列表
			async getNavigate(){
				const {data:res}=await this.$myRequest({
					url:'/home/catitems',
					method:'GET'
				})
				this.navigationList=res.message;
			},
			//获取菜单列表
			async getMenu(){
				const {data:res}=await this.$myRequest({
					url:'/home/floordata'
				})
				this.menuList=res.message;
			}
		},
		components:{'Search':Search}  //注册组件
	}
</script>
CSS代码暂未粘贴
轮播图代码
<swiper class="swiper" autoplay circular interval="2000" indicator-dots>
		<swiper-item>
			<image :src="#"></image>
		</swiper-item>
</swiper>
| 值 | 描述 |
|---|---|
| autoplay | 是否自动切换 |
| circular | 是否衔接从头播放 |
| interval | 切换间隔 |
| indicator-dots | 是否显示轮播指示点 |
Search搜索框组件
<template>
	<view class="searchbox">
		<view class="search" @click="SearchGoods">
			<image src="../../static/icon/find.png"></image>
			<view>路由器</view>
		</view>
		<view class="inform">
			<image src="../../static/icon/coustomer.png"></image>
		</view>
	</view>
</template>

<script>
	export default {
		data() {
			return {

			}
		},
		methods: {
			SearchGoods(){
				//跳转到搜索页面
				uni.navigateTo({
					url:'../../pages/find/find'
				})
			}
		}
	}
</script>

<style>
.searchbox{
	display: flex;
	width: 100%;
	height: 80rpx;
	margin-bottom: 20rpx;
	justify-content: space-between;
	align-items: center;
	box-sizing: border-box;
}
.search{
	display: flex;
	width: 80%;
	height: 70rpx;
	border-radius: 15px;
	margin-left: 30rpx;
	background-color: rgb(230, 230, 230);

}
.search image{
	margin: auto 0;
	margin-left: 20rpx;
	width: 30px;
	height: 30px;
}
.search view{
	margin: auto 0;
	margin-left: 20rpx;
	color: rgb(150, 150, 150);
}
.inform{
	width: 30px;
	height: 30px;
	margin-right: 30rpx;
	box-sizing: border-box;
}
.inform image{
	width: 100%;
	height: 100%;
}
</style>
这个search组件主要目的是点击跳转到搜索页面用。
为什么要写这个页面而不是直接在首页页面当中编写搜索框然后添加点击事件跳转?
因为当时编写首页页面时,并没有加入这个功能,后面修改的时候想要添加上的。这就说明开发前一定要组织好布局与页面的数量。!!!
搜索页面
<template>
	<view>
		<SearchHeader :pinputInfo='inputInfo' @pfindGoodsInfo='findGoodsInfo'></SearchHeader>
		<!-- 推荐区 -->
		<view class="findbox">
			<view class="searchfind">搜索发现</view>
			<view class="findinfo">
				<view class="col">
					<view @click="findGoodsInfo(item,1)" v-for="(item,index) in recomList.goodsname1" :key="index">{{item}}</view>
				</view>
				<view class="col">
					<view @click="findGoodsInfo(item,1)" v-for="(item,index) in recomList.goodsname2" :key="index">{{item}}</view>
				</view>
			</view>
		</view>
	</view>
</template>

<script>
	import SearchHeader from '../../components/SearchHeader/SearchHeader.vue'
	export default {
		data() {
			return {
				inputInfo:'路由器',
				recomList:{}
			}
		},
		onLoad() {
			this.getRecomList()
		},
		methods: {

			async findGoodsInfo(prop,type){
					const {data:res} =await this.$myRequest({
						url:'/goods/qsearch?query='+prop
					})
					this.getListRequest(res,prop);
					this.inputInfo =prop;
			},
			//初始化推荐列表
			getRecomList(){
				this.recomList={
					'goodsname1':['OPPO','短袖','苹果手机','华为手机','蓝牙耳机'],
					'goodsname2':['平板电脑','充电宝','裙子','帽子']
				}
			},
			//发送获取商品列表请求
			getListRequest(res,prop){
				uni.navigateTo({
					url:'../../pages/product/product?res='+JSON.stringify(res)+'&wd='+prop
				})
			}
		},
		components:{'SearchHeader':SearchHeader}
	}
</script>

<style>

.findbox{
	width: 650rpx;
	height: 500rpx;
	margin: 0 30rpx;
}
.findinfo{
	margin-top: 20rpx;
	display: flex;
	justify-content:space-around
}
.col view{
	margin-top: 20rpx;
}
</style>
页面搜索引入真正的搜索框组件,并且将方法与数据传递给子组件(搜索头组件)
子组件中搜索后,调用父组件中的查询方法,从而携带数据跳转到指定展示页面
SearchHeader搜索头组件
<template>
	<view>
		<view class="searchbox">
			<view class="search" >
				<image src="../../static/icon/find.png"></image>
				<view>
					<input class="uni-input" v-model="inputInfo" focus placeholder=" " />
				</view>
			</view>
			<view class="inform" @click="findGoodsInfo('',0)">
				搜索
			</view>
		</view>

	</view>
</template>

<script>
	export default {

		props:['pinputInfo'],
		data() {
			return {
				inputInfo:''
			}
		},
		mounted() {
			this.inputInfo=this.$options.propsData.pinputInfo
		},
		methods:{
			findGoodsInfo(value,type){
				this.$emit('pfindGoodsInfo',this.inputInfo,type);
			}
		}
	}
</script>

<style>
.searchbox{
	display: flex;
	width: 100%;
	height: 80rpx;
	margin-bottom: 20rpx;
	justify-content: space-between;
	align-items: center;
	box-sizing: border-box;
}
.search{
	display: flex;
	width: 75%;
	height: 70rpx;
	border-radius: 15px;
	margin-left: 30rpx;
	background-color: rgb(230, 230, 230);

}
.search image{
	margin: auto 0;
	margin-left: 20rpx;
	width: 30px;
	height: 30px;
}
.search view{
	margin: auto 0;
	margin-left: 20rpx;
	color: rgb(150, 150, 150);
}
.inform{
	width: 70px;
	height: 30px;
	text-align: center;
	line-height: 30px;
	box-sizing: border-box;
}
</style>
| 值 | 描述 |
|---|---|
| props | 用来接收父组件传递过来的参数 |
| $emit | 用来调用父组件传递过来的方法(简而言之就是子组件调用父组件方法) |
商品展示页面
<template>
	<view>
		<SearchHeader :pinputInfo='inputInfo' @pfindGoodsInfo='findGoodsInfo'></SearchHeader>
		<view  class="productbox">
			<view class="goodsbox" v-for="item in DaList" :key="item.goods_id" @click="toGoodsView(item.goods_id)">
				<view class="imagebox">
					<image src="../../static/logo.png"></image>
				</view>
				<view class="textbox">
					<view class="text">{{item.goods_name}}</view>
					<view class="price">¥199</view>
				</view>
			</view>
		</view>
	</view>
</template>

<script>
	import SearchHeader from '../../components/SearchHeader/SearchHeader.vue'
	export default {
		data() {
			return {
				DaList:[],
				inputInfo:''
			}
		},
		onLoad(option) {
			this.inputInfo=option.wd
			var text2=JSON.parse(option.res);
			this.DaList=text2.message;
		},
		methods: {
            //调用查询商品关键字的请求
			async findGoodsInfo(prop,type){
					const {data:res} =await this.$myRequest({
						url:'/goods/qsearch?query='+prop
					})
					this.getListRequest(res,prop);
					this.inputInfo =prop;
			},
			//发送获取商品列表请求并且将页面商品信息展示出
			getListRequest(res,prop){
				uni.navigateTo({
					url:'../../pages/product/product?res='+JSON.stringify(res)+'&wd='+prop
				})
			},
			//跳转到商品详情页面
			toGoodsView(goodsid){
				uni.navigateTo({
					url:'../../pages/Goods/Goods?goods_id='+goodsid
				})
			}
		}
	}
</script>

<style>
.productbox{
	width: 100%;
	height: 100%;
	box-sizing: border-box;
	background-color: rgb(250,250,250);
	border-top:1px solid white;
}
.goodsbox{
	margin: 0 auto;
	margin-top: 20rpx;
	width: 90%;
	height: 100%;
	display: flex;
	box-sizing: border-box;
	background-color: rgb(255, 255, 255);
}
.imagebox{
	margin: 50rpx;
	width: 160rpx;
	/* height: 140rpx; */
}
.imagebox image{
	width: 100%;
	height: 100%;
}
.textbox{
	display: flex;
	flex-direction: column;
	justify-content: space-between;
	margin: 30rpx;
	margin-top: 50rpx;
	width: 100%;
	height: 150rpx;
}
.text{
	width: 100%;
	height: 100rpx;
	font-size: 18px;
	text-overflow: ellipsis;  /*多余字符省略号*/
	overflow: hidden;
}
.price{
	color: red;
	font-size: 24px;
	font-weight: 600;
}
</style>
进行组件的重复性利用
将搜索页的搜索组件封装,引用到商品展示页面,再次使用搜索组件进行搜索查询
(在这有一个想法,就是将使用Vuex进行管理数据,方便快捷。还有也可以将查询方法封装为全局方法。这样在每个组件当中都可以直接调用,这样就避免了在不同父组件当中使用搜索组件时,重复性在父组件当中书写查询方法)
商品详情页面
发送请求通过id进行跳转到商品详情页面组件
<template>
	<view class="div">
		<view class="goodpic">
			<image  v-if="DataList.goods_big_logo!=''" :src="DataList.goods_big_logo"></image>
			<image v-else src="../../static/loding.gif"></image>
		</view>
		<view class="goodPrice">
			<view class="price">¥{{DataList.goods_price}}</view>
		</view>
		<!-- 名字name -->
		<view class="goodName">
			<view class="name">{{DataList.goods_name}}</view>
			<view class="info">
				<view class="goodw">商品重量:{{DataList.goods_weight}}g</view>
				<view class="goodn">库存数量:{{DataList.goods_number}}件</view>
			</view>
		</view>

		<!-- 参数 -->
		<view class="propdiv">
			<view class="onediv" v-for="item in DataList.attrs" :key="item.attr_id">
				<view class="onetitle">{{item.attr_name}}</view>
				<view class="onecontent">品牌:{{item.attr_sel}}</view>
				<view class="onecontent">属性1:{{item.attr_vals}}</view>
				<view class="onecontent">属性2:{{item.attr_value}}</view>
				<view class="onecontent">写入方式:{{item.attr_write}}</view>
			</view>
		</view>

		<!-- 富文本 -->
		<view class="introduce">
			<rich-text :nodes="DataList.goods_introduce"></rich-text>
		</view>

		<!-- 底部购物车 -->
		<view class="shopbox">
			<view class="kefu">
				<image src="../../static/icon/kefu.png"></image>
				<view>客服</view>
			</view>
			<view class="shop">
				<image src="../../static/icon/shop.png"></image>
				<view>购物车</view>
			</view>
			<view class="joinshop">加入购物车</view>
			<view class="buy">立即购买</view>
		</view>
	</view>
</template>

<script>
	export default {
		data() {
			return {
				goods_id:0,
				mynodes:'',
				DataList:{}
			}
		},
		onLoad(option) {
			this.goods_id=option.goods_id;
			this.getInitData(option.goods_id);
		},
		methods: {
			//获取初始化数据
			async getInitData(id){
				const {data:res}=await this.$myRequest({
					url:'/goods/detail?goods_id='+id,
					methods:'GET'
				})
				this.DataList=res.message;
			}
		}
	}
</script>
因css较多,暂且不进行展示
虽然实现这个页面以及数据的展示,但购物车并未实现,后期将继续加以完善
Tabber分类
<template>
	<view class="content">
		<!-- 做展示区 -->
		<!-- <view>商品分类</view> -->
		<scroll-view scroll-y  class="leftnav">
			<view :class="active==index ?'active':''" v-for="(item,index) in SortGoodList" :key="item.cat_id" @click="clickNav(index)">{{item.cat_name}}</view>
		</scroll-view>
		<!-- 右展示区 -->
		<view class="rightnav">
			<GoodsView :childrenList="childerList"></GoodsView>
		</view>
	</view>
</template>

<script>
	import GoodsView from '../../components/GoodsView/GoodsView.vue'
	export default {
		data() {
			return {
				SortGoodList:[],
				active:0,
				childerList:[]
			}
		},
		onLoad(option) {
			this.getSortGoods();

		},
		methods: {
			//获取商品分类
			async getSortGoods(){
				const {data:res} =await this.$myRequest({
					url:'/categories'
				})
				this.SortGoodList=res.message;
				this.childerList=this.SortGoodList[0].children
			console.log(res);
			},
			//点击事件
			clickNav(index){
				this.active=index;
				this.childerList=this.SortGoodList[index].children
				console.log(this.childerList);
			}
		},
		components:{
			"GoodsView":GoodsView
		}
	}
</script>

<style>
.content{
	display: flex;
	width: 100%;
}
.leftnav{
	width: 200rpx;
}
.leftnav view{
	margin-top: 5rpx;
	width: 200rpx;
	height: 100rpx;
	text-align: center;
	line-height: 100rpx;
	font-weight: 600;
	border-bottom: 1px rgb(230, 230, 230) solid;
}
.rightnav{
	width: 100%;
}
.active{
	background-color: red;
	color: white;
}
</style>
GoodView组件
<template>
	<view class="rightcontent">
		<view v-for="item in childrenList" :key="item.cat_id" class="box1">
			<view class="title">{{item.cat_name}}</view>
			<view class="goodcontent" >
				<view class="goodbox" v-for="item1 in item.children" :key="item1.cat_id">
					<image :src="item1.cat_icon"></image>
					<view class="goodtext">
						{{item1.cat_name}}
					</view>
				</view>
			</view>
		</view>
	</view>
</template>

<script>
	export default {
		props:['childrenList'],
		data() {
			return {

			}
		},
		methods: {

		}
	}
</script>

<style>
.rightcontent{
		width: 100%;
		height: 100%;
		box-sizing: border-box;
		background-color: rgb(250, 250, 250);
	}
.box1{
	width: 100%;

}
.title{
	margin-top: 10rpx;
	width: 100%;
	height: 100rpx;
	font-size: 36rpx;
	text-align: center;
	line-height: 100rpx;
	font-weight: 600;
	background-color: rgb(255, 255, 255);
	border-bottom: 1px solid rgb(230, 230, 230);
}
.goodcontent{
	width: 100%;
	display: flex;
	flex-wrap: wrap;
	justify-content: space-between;
	background-color: rgb(250, 250, 250);

}
.goodbox{
	margin-top: 10rpx;
	width: 260rpx;
	padding: 10rpx;
	background-color: aqua;
	background-color: rgb(255, 255, 255);
	box-sizing: border-box;
}
.goodbox image{
	width: 100%;
	height: 255rpx;
}
.goodtext{
	width: 100%;
	height: 50rpx;
	font-weight: 600;
}
</style>
因购物车页面太过简单和我的页面代码重复性太高(没有数据渲染,遍历组件),所以需要大量重复写代码暂且不展示
项目打包
首先找到manifest.json文件
获取自己的AppID

配置好应用名称就可以进行发布了

这两个一定要选上。要不然在打包后的index页面当中可能会出现资源找不到的问题
打包

点击之后 修改标题后,发布即可
项目总结
总体项目难度不大,主要为了初学uniapp的童鞋上手项目,同时对Vue、html、css等进行巩固。
更多推荐
 已为社区贡献1条内容


所有评论(0)