Android 实现动态切换Theme style 中的Splash(app 启动时背景图)
一般情况下,开发APP时为避免启动闪黑白屏的情况,我们会在AndroidManifest.xml中或者节点设置android:theme属性,并将背景设为透明@color/transparent这样就可避免启动闪黑白屏,但这种处理方式有一个弊端就是会让人产生启动比较慢的感觉,体验不太好。所以很多时候我们会将android:windowBackground设置一张启动图片,比如splash.png,
一般情况下,开发APP时为避免启动闪黑白屏的情况,我们会在AndroidManifest.xml中<application>或者<activity>节点设置android:theme属性,并将背景设为透明
<item name="android:windowBackground">@color/transparent</item>
这样就可避免启动闪黑白屏,但这种处理方式有一个弊端就是会让人产生启动比较慢的感觉,体验不太好。所以很多时候我们会将android:windowBackground设置一张启动图片,比如splash.png,这样就会无缝衔接启动,体验更流畅。
但是如果碰到需要动态更新style.xml中的splash.png 启动图的需求怎么办?
我是做ROM方案定制的,所以不同客户想用不同的启动图,不可能每个客户都单独编译,肯定要做到通用的可定制化。我们的方案是打包固件时,在特定目录放置不同splash图片资源,APP启动时动态加载该图片并设置。
一把情况会使用 getWindow().getDecorView().setBackground(background);方法来设置,但我发现很多时候并不会生效。既然应用层搞不定,那就从framework层想办法。先来回顾一下APP启动流程和界面加载流程:

Activity的启动过程——由ActivityManagerService通过Bindler进程间通信机制向客户端进程ActivityThread发送创建新的Activity对象的通知,所有Activity的创建都在对应应用程序进程ActivityThread中完成。
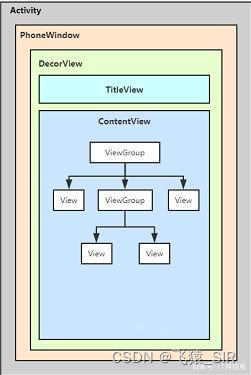
在Activity创建完成后,会调用Activity的attach方法。在attach方法中首先创建一个PhoneWindow,PhoneWindow是实现了抽象类Window的子类;然后将当前Activity的WindowManager对象设置给PhoneWindow,通过Activity的setContentView()调用到PhoneWindow的setContentView(),而PhoneWindow的setContentView的实现过程就是将layout给inflate到window上。最终Activity是通过ActivityThread的handleResumeActivity来启动Activity,通过WindowManager的addView方法来对Window的View进行添加。
既然是要动态改变Theme style中的windowbackground属性,那就找到系统解析Theme的地方进行动态设置。源码位于frameworks\base\core\java\com\android\internal\policy\PhoneWindow.java
 @Override
    public void setContentView(int layoutResID) {
        // Note: FEATURE_CONTENT_TRANSITIONS may be set in the process of installing the window
        // decor, when theme attributes and the like are crystalized. Do not check the feature
        // before this happens.
        if (mContentParent == null) {
            installDecor();
        } else if (!hasFeature(FEATURE_CONTENT_TRANSITIONS)) {
            mContentParent.removeAllViews();
        }

        if (hasFeature(FEATURE_CONTENT_TRANSITIONS)) {
            final Scene newScene = Scene.getSceneForLayout(mContentParent, layoutResID,
                    getContext());
            transitionTo(newScene);
        } else {
            mLayoutInflater.inflate(layoutResID, mContentParent);
        }
        mContentParent.requestApplyInsets();
        final Callback cb = getCallback();
        if (cb != null && !isDestroyed()) {
            cb.onContentChanged();
        }
        mContentParentExplicitlySet = true;
    }
DecorView为window的根布局,在初始化时会调用generateLayout(),Theme 属性就是在这个方法中进行解析的。
 private void installDecor() {
        mForceDecorInstall = false;
        if (mDecor == null) {
            mDecor = generateDecor(-1);
            mDecor.setDescendantFocusability(ViewGroup.FOCUS_AFTER_DESCENDANTS);
            mDecor.setIsRootNamespace(true);
            if (!mInvalidatePanelMenuPosted && mInvalidatePanelMenuFeatures != 0) {
                mDecor.postOnAnimation(mInvalidatePanelMenuRunnable);
            }
        } else {
            mDecor.setWindow(this);
        }
        if (mContentParent == null) {
            mContentParent = generateLayout(mDecor);

            // Set up decor part of UI to ignore fitsSystemWindows if appropriate.
            mDecor.makeOptionalFitsSystemWindows();
...
}
protected ViewGroup generateLayout(DecorView decor) {
// Apply data from current theme.
TypedArray a = getWindowStyle();
...
if (getContainer() == null) {
if (mBackgroundDrawable == null) {
if (mBackgroundResource == 0) {
mBackgroundResource = a.getResourceId(
R.styleable.Window_windowBackground, 0);
}
if (mFrameResource == 0) {
mFrameResource = a.getResourceId(R.styleable.Window_windowFrame, 0);
}
mBackgroundFallbackResource = a.getResourceId(
R.styleable.Window_windowBackgroundFallback, 0);
if (false) {
System.out.println("Background: "
+ Integer.toHexString(mBackgroundResource) + " Frame: "
+ Integer.toHexString(mFrameResource));
}
}
if (mLoadElevation) {
mElevation = a.getDimension(R.styleable.Window_windowElevation, 0);
}
mClipToOutline = a.getBoolean(R.styleable.Window_windowClipToOutline, false);
mTextColor = a.getColor(R.styleable.Window_textColor, Color.TRANSPARENT);
}
...
// Remaining setup -- of background and title -- that only applies
// to top-level windows.
if (getContainer() == null) {
final Drawable background;
if (mBackgroundResource != 0) {
background = getContext().getDrawable(mBackgroundResource);
} else {
background = mBackgroundDrawable;
}
//设置decorview 背景的地方,在此处修改
mDecor.setWindowBackground(background);
....
修改如下:
            //找到当前要修改的主题APP包名就行修改
            if("APP包名".equals(context.getApplicationInfo().packageName)){
                Bitmap bitmap=BitmapFactory.decodeFile("/system/media/wallpaper.png");
                BitmapDrawable bd=new BitmapDrawable(bitmap);
                mDecor.setWindowBackground(bd);
            }else{
                mDecor.setWindowBackground(background);
            }
这样对应定制ROM需求的就可以实现外部配置修改启动图了

为开发者提供学习成长、分享交流、生态实践、资源工具等服务,帮助开发者快速成长。
更多推荐


 4
4 0
0- 0


 已为社区贡献8条内容

所有评论(0)