android开发基础1-界面布局(明日科技教程)
界面布局
用户界面设计
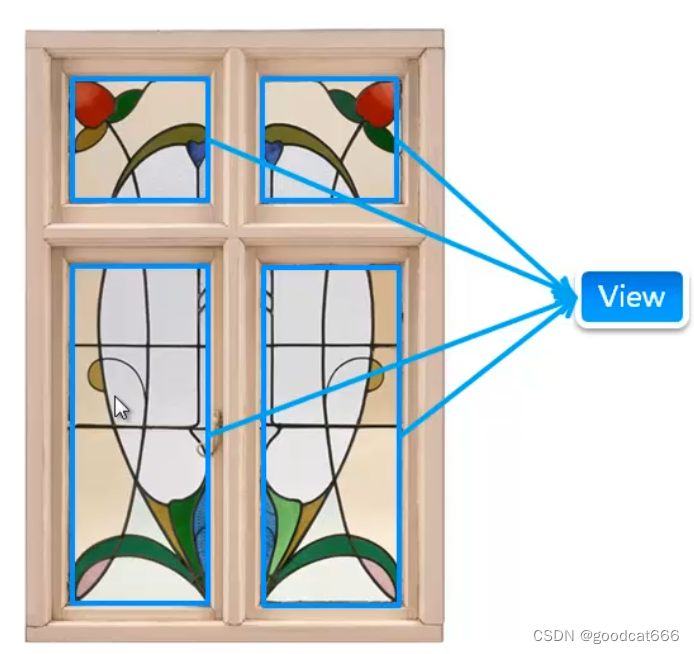
View
view:可以理解为视图,占据屏幕上的一块矩形区域,负责提供组建绘制和事件处理的方法
如果把android界面比喻成一个窗口,则每个view都是一块玻璃。一般是使用view类的子类
view类及其子类不位于同一个包中:View类位于android.view包;View类的子类位于android.widget包中
View类常用属性
android:id属性 - 该view的唯一标识
android:id="@id/user"
android:background属性 - 设置背景的图片或者颜色
设置图片,前提是bg名称的图片已经放置到mipmap目录下
android:background="@mipmap/bg"
设置颜色
android:background="#FF6600"
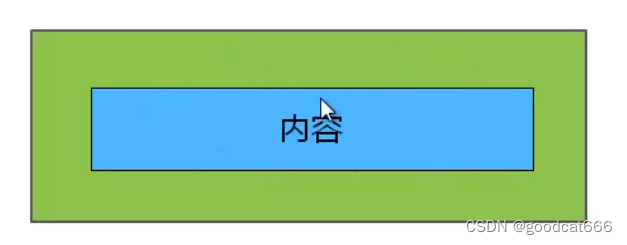
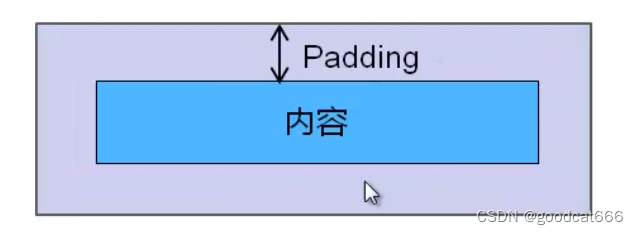
android:padding属性 - 上下左右的内边距
整个绿色的矩形是一个view,其中蓝色为其中的内容,则紫色的区域就是这个view的内边距
将组件上下左右的内边距都设置为16dp
android:padding="16dp"
也可以先定义一个尺寸资源,再引用这个尺寸资源
android:padding="@dimen/activity_margin"
如果想把上下左右的内边距设置为不同的值,可以使用下面的属性
android:paddingLeft
android:paddingTop
android:paddingRight
android:paddingBotton
android api 17 之后又定义了两个设置左右内边距的属性
android:paddingStart == android:paddingLeft
android:paddingEnd == android:paddingRight
ViewGroup
在前面的举例中,view比喻成玻璃,则ViewGroup可以理解为窗户框,用于控制玻璃是怎么摆放的
ViewGroup继承与View类,是用于容纳其他View的容器,由于ViewGroup是个抽象类,所以使用ViewGroup的子类作为容器
ViewGroup控制其子组件分布时依赖的内部类
- ViewGroup.LayoutParams类
- ViewGroup.MarginLayoutParams类
ViewGroup.LayoutParams类 - 控制布局的位置,宽度和高度
通常使用如下两个属性
android:layout_height  <!-- 设置布局的高度 -->
android.layout_width <!-- 设置布局的宽度 -->
可以使用具体的数值来设置高度宽度
android:layout_height = "100dp"
也可以使用常量来设置
FILL_PARENT <!-- 设置组件的宽度与父容器相同 -->
MATCH_PARENT <!-- android API 8 之后设置组件的宽度与父容器相同 -->
WARP_CONTENT <!-- 设置组件包裹其自身的内容 -->
ViewGroup.MarginLayoutParams类 - 控制子组件的外边距
下图中组件外边蓝色的区域就是外边距
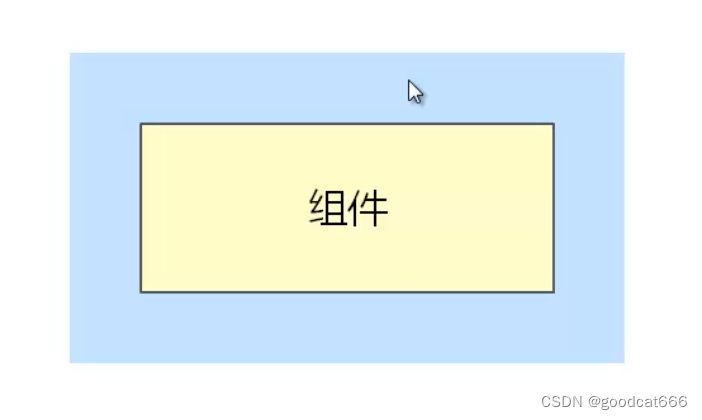
可以使用如下的属性设置外边距
android:layout_marginTop
android:layout_marginLeft = android:layout_marginStart <!-- android api 17 之后才能用后面的属性 -->
android:layout_marginBottom
android:layout_marginRight = android:layout_marginEnd <!-- android api 17 之后才能用后面的属性 -->
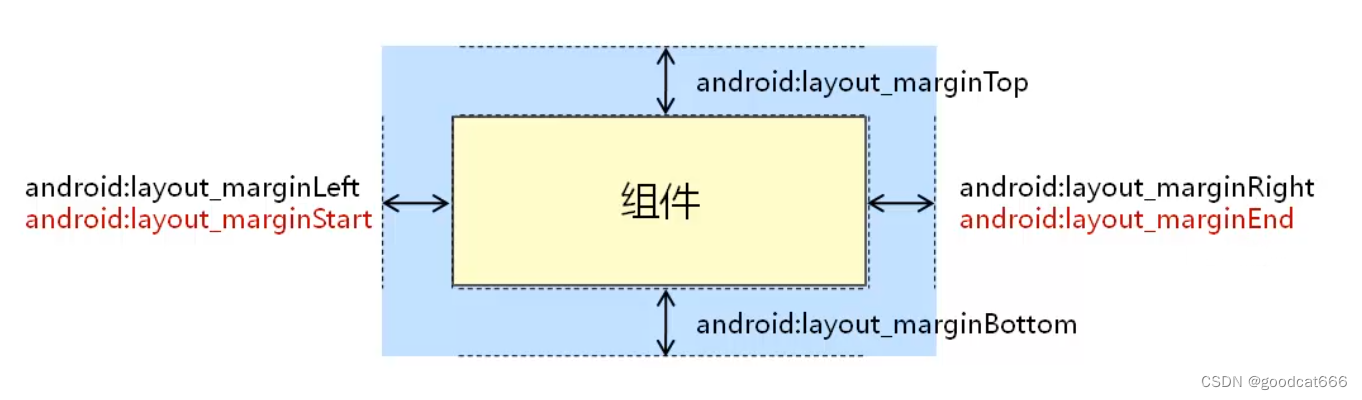
关于如何设置外边距:与内边距设置一样
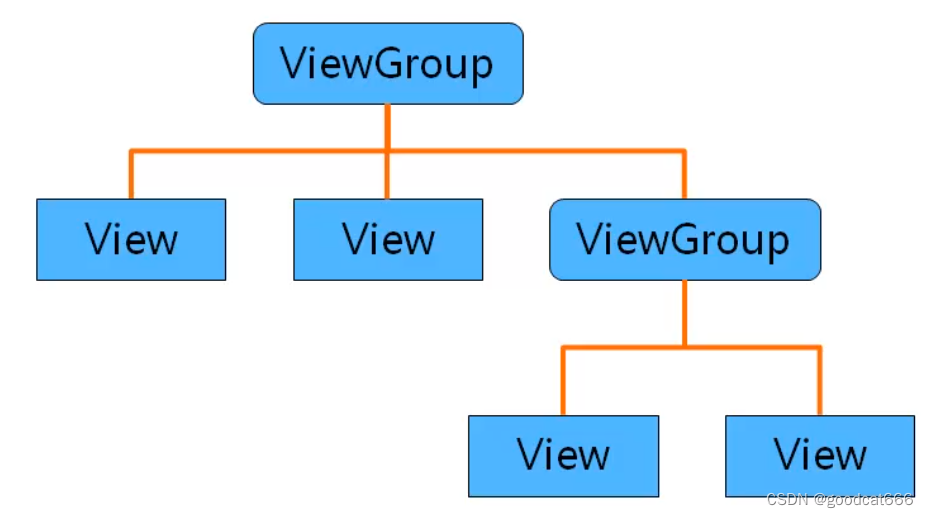
Anroid UI组件的层次结构
在android中所有的界面都是View类、ViewGroup类及其子类组合而成的
使用XML布局文件控制UI界面
控制UI界面的几种方法
- 使用XML布局文件控制UI界面
- 在java代码中控制UI界面
- 使用XML和java代码混合控制UI界面
- 开发自定义的View
使用XML布局文件控制UI界面
步骤:
- 在android应用的res/layout目录下编写XML布局文件
- 如 编写 activity_main.xmll
- 在activity中使用java代码显示XML中布局的内容
- setContentView(R.id.activity_main);
<?xml version="1.0" encoding="utf-8"?>
<androidx.constraintlayout.widget.ConstraintLayout xmlns:android="http://schemas.android.com/apk/res/android"
    xmlns:app="http://schemas.android.com/apk/res-auto"
    xmlns:tools="http://schemas.android.com/tools"
    android:layout_width="match_parent"
    android:layout_height="match_parent"
    tools:context=".MainActivity">

    <TextView
        android:layout_width="wrap_content"
        android:layout_height="wrap_content"
        android:text="Hello World!"
        app:layout_constraintBottom_toBottomOf="parent"
        app:layout_constraintLeft_toLeftOf="parent"
        app:layout_constraintRight_toRightOf="parent"
        app:layout_constraintTop_toTopOf="parent" />

</androidx.constraintlayout.widget.ConstraintLayout>
public class MainActivity extends AppCompatActivity {

    @Override
    protected void onCreate(Bundle savedInstanceState) {
        super.onCreate(savedInstanceState);
        // 指定当前的activity使用的布局文件
        setContentView(R.layout.activity_main);
    }
}
效果如下

使用XML布局文件实现游戏的开始界面
要求
- 在界面当中添加一个布局管理器
- 给界面设置背景图片
- 在布局管理器的居中位置添加一个文本框组件,设置文本框的内容为"开始游戏"
1、创建一个项目,将图片bg.png复制到mipmap目录下
2、在values/strings.xml中添加一项内容,用于字符串引用
<string name="start">开始游戏</string>
3、修改布局其中的内容,将布局器改写为FrameLayout布局器
<?xml version="1.0" encoding="utf-8"?>
<FrameLayout xmlns:android="http://schemas.android.com/apk/res/android"
    xmlns:app="http://schemas.android.com/apk/res-auto"
    xmlns:tools="http://schemas.android.com/tools"
    android:layout_width="match_parent"
    android:layout_height="match_parent"
    android:background="@mipmap/bg" <!-- 添加背景 -->
    tools:context=".MainActivity">

    <TextView
        android:layout_width="wrap_content"
        android:layout_height="wrap_content"
        android:layout_gravity="center" <!--设置文本框组件居中-->
        android:textSize="18sp"  <!-- 设置文字大小,通过sp单位 -->
        android:text="@string/start" <!--引用values/strings.xml中定义的字符串-->
        android:textColor="#115570" <!-- 设置字体颜色 -->
        app:layout_constraintBottom_toBottomOf="parent"
        app:layout_constraintLeft_toLeftOf="parent"
        app:layout_constraintRight_toRightOf="parent"
        app:layout_constraintTop_toTopOf="parent" />

</FrameLayout>
4、在java代码中引用布局
public class MainActivity extends AppCompatActivity {

    @Override
    protected void onCreate(Bundle savedInstanceState) {
        super.onCreate(savedInstanceState);
        setContentView(R.layout.activity_main);
    }
}
效果图如下

在java代码中控制UI界面
public class MainActivity extends AppCompatActivity {

    public TextView textView;

    @Override
    protected void onCreate(Bundle savedInstanceState) {
        super.onCreate(savedInstanceState);
        // setContentView(R.layout.activity_main);

        // 创建布局管理器,并将该管理器设置为当前activity的布局
        FrameLayout frameLayout = new FrameLayout(this);
        frameLayout.setBackgroundResource(R.mipmap.bg);
        setContentView(frameLayout);

        // 创建文本框
        textView = new TextView(this);
        textView.setText("开始游戏");
        textView.setTextSize(TypedValue.COMPLEX_UNIT_SP, 18);
        textView.setTextColor(Color.rgb(17,85,114));
        // 创建布局规则(位置、高度、宽度),并将文本框适用于该规则
        FrameLayout.LayoutParams params = new FrameLayout.LayoutParams(
                ViewGroup.LayoutParams.WRAP_CONTENT,
                ViewGroup.LayoutParams.WRAP_CONTENT);
        params.gravity = Gravity.CENTER;
        textView.setLayoutParams(params);

        textView.setOnClickListener(new View.OnClickListener() {
            @Override
            public void onClick(View view) {
                new AlertDialog.Builder(MainActivity.this).setTitle("系统提示")
                        .setMessage("游戏有风险,进入需谨慎,真的要进入吗?")
                        .show();
            }
        });

        // 将文本框添加到布局管理器中
        frameLayout.addView(textView);

    }
}
使用XML和java代码混合控制UI界面
- 将一些布局代码,或者变化不大的代码放置到xml文件中
- 将复杂的代码放置到java代码中
实现相册列表
1、将用到的12张图片资源放置到图片资源文件夹中
2、创建一个xml布局文件
<?xml version="1.0" encoding="utf-8"?>
<GridLayout xmlns:android="http://schemas.android.com/apk/res/android" <!-- 网格布局 -->
    xmlns:app="http://schemas.android.com/apk/res-auto"
    xmlns:tools="http://schemas.android.com/tools"
    android:layout_width="match_parent"
    android:layout_height="match_parent"
    android:orientation="horizontal" <!-- 水平方向 -->
    android:id="@+id/layout"  <!-- 名称 -->
    android:rowCount="3" <!-- 3行 -->
    android:columnCount="4" <!-- 4列 -->
    tools:context=".MainActivity">

</GridLayout>
3、修改java文件
public class MainActivity extends AppCompatActivity {

    private ImageView[] imageViews = new ImageView[12];
    private int[] imagesPath = new int[]{
            R.mipmap.img01,R.mipmap.img02,R.mipmap.img03,R.mipmap.img04,
            R.mipmap.img05,R.mipmap.img06,R.mipmap.img07,R.mipmap.img08,
            R.mipmap.img09,R.mipmap.img10,R.mipmap.img11,R.mipmap.img12
    };

    @Override
    protected void onCreate(Bundle savedInstanceState) {
        super.onCreate(savedInstanceState);
        setContentView(R.layout.activity_main);

        // 获取 R.layout.activity_main 中的网格布局器
        GridLayout layout = (GridLayout) findViewById(R.id.layout);
        for(int i=0;i<imagesPath.length;i++){
            imageViews[i] = new ImageView(MainActivity.this);
            imageViews[i].setImageResource(imagesPath[i]);
            imageViews[i].setPadding(2,2,2,2);
            ViewGroup.LayoutParams params = new ViewGroup.LayoutParams(116,68);
            imageViews[i].setLayoutParams(params);
            layout.addView(imageViews[i]);
        }

    }
}
开发自定义的View
跟随手指的小兔子
1、准备两个图片:背景图片,小兔子图片
2、创建FrameLayout布局管理器
<?xml version="1.0" encoding="utf-8"?>
<FrameLayout xmlns:android="http://schemas.android.com/apk/res/android"
    xmlns:app="http://schemas.android.com/apk/res-auto"
    xmlns:tools="http://schemas.android.com/tools"
    android:layout_width="match_parent"
    android:layout_height="match_parent"
    android:background="@mipmap/background" <!-- 设置背景 -->
    android:id="@+id/mylayout" <!-- 由于后期还用到该布局管理器,给他创建一个id -->
    tools:context=".MainActivity">

</FrameLayout>
3、创建自定义的View
public class RabbitView extends View {

    public float bitmapX;
    public float bitmapY;

    public RabbitView(Context context) {
        super(context);
        bitmapX = 290;
        bitmapY = 130;
    }

    @Override
    protected void onDraw(Canvas canvas) {
        super.onDraw(canvas);
        // 定义画笔
        Paint paint = new Paint();
        // 小兔子图片
        Bitmap bitmap = BitmapFactory.decodeResource(this.getResources(),R.mipmap.rabbit);
        canvas.drawBitmap(bitmap, bitmapX, bitmapY, paint);
        // 回收图片
        if(bitmap.isRecycled()){
            bitmap.recycle();
        }
    }
}
4、在布局管理器中添加小兔子的view
public class MainActivity extends AppCompatActivity {

    @Override
    protected void onCreate(Bundle savedInstanceState) {
        super.onCreate(savedInstanceState);
        setContentView(R.layout.activity_main);

        // 把小兔子添加到布局文件中
        FrameLayout frameLayout = (FrameLayout) findViewById(R.id.mylayout);
        final RabbitView rabbitView = new RabbitView(this);
        rabbitView.setOnTouchListener(new View.OnTouchListener() {
            @Override
            public boolean onTouch(View view, MotionEvent motionEvent) {
                rabbitView.bitmapX = motionEvent.getX();
                rabbitView.bitmapY = motionEvent.getY();
                // 重绘
                rabbitView.invalidate();
                return true;
            }
        });
        frameLayout.addView(rabbitView);
    }
}
相对布局管理器
相对:需要有一个参考点,别的组件相对这个参考点进行摆放
android:gravity 布局管理器中各组件的摆放方式
android:ignoreGravity 哪个不见不受android:gravity限制
下面例子,在只添加了android:gravity=“center"之后,TextView居中
在添加了android:ignoreGravity=”@id/textview"之后,TextView不受android:gravity="center"约束
<?xml version="1.0" encoding="utf-8"?>
<RelativeLayout xmlns:android="http://schemas.android.com/apk/res/android"
    xmlns:app="http://schemas.android.com/apk/res-auto"
    xmlns:tools="http://schemas.android.com/tools"
    android:layout_width="match_parent"
    android:layout_height="match_parent"
    android:gravity="center"
    android:ignoreGravity="@id/textview"
    tools:context=".MainActivity">

    <TextView
        android:layout_width="wrap_content"
        android:layout_height="wrap_content"
        android:text="Hello World!"
        android:id="@+id/textview"
        app:layout_constraintBottom_toBottomOf="parent"
        app:layout_constraintLeft_toLeftOf="parent"
        app:layout_constraintRight_toRightOf="parent"
        app:layout_constraintTop_toTopOf="parent" />

</RelativeLayout>
RalativeLayout.LayoutParams - 在相对布局的组件上设置的属性
组件相对于参考组件位置
android:layout_above
android:layout_below
android:layout_toLeftOf
android:layout_toRightOf
组件与布局管理器对其方式
android:layout_alignParentBottom
android:layout_alignParentLeft
android:layout_alignParentRight
android:layout_alignParentTop
组件与哪个组件的上下左右边界对齐
android:layout_alignBottom
android:layout_alignLeft
android:layout_alignRight
android:layout_alignTop
组件位于布局管理器的哪个位置
android:layout_centerHorizontal 组件位于布局管理器水平居中的位置
android:layout_centerInParent 组件位于布局管理器居中的位置
android:layout_centerVertical 组件位于布局垂直居中的位置
textview1居中,且textview2位于textview1的下方
<?xml version="1.0" encoding="utf-8"?>
<RelativeLayout xmlns:android="http://schemas.android.com/apk/res/android"
    xmlns:app="http://schemas.android.com/apk/res-auto"
    xmlns:tools="http://schemas.android.com/tools"
    android:layout_width="match_parent"
    android:layout_height="match_parent"
    tools:context=".MainActivity">

    <TextView
        android:layout_width="wrap_content"
        android:layout_height="wrap_content"
        android:text="Hello World! user1"
        android:id="@+id/textview1"
        android:layout_centerInParent="true"
        app:layout_constraintBottom_toBottomOf="parent"
        app:layout_constraintLeft_toLeftOf="parent"
        app:layout_constraintRight_toRightOf="parent"
        app:layout_constraintTop_toTopOf="parent" />

    <TextView
        android:layout_width="wrap_content"
        android:layout_height="wrap_content"
        android:layout_below="@+id/textview1"
        android:text="Hello World! user2"
        android:id="@+id/textview2"
        app:layout_constraintBottom_toBottomOf="parent"
        app:layout_constraintLeft_toLeftOf="parent"
        app:layout_constraintRight_toRightOf="parent"
        app:layout_constraintTop_toTopOf="parent" />

</RelativeLayout>
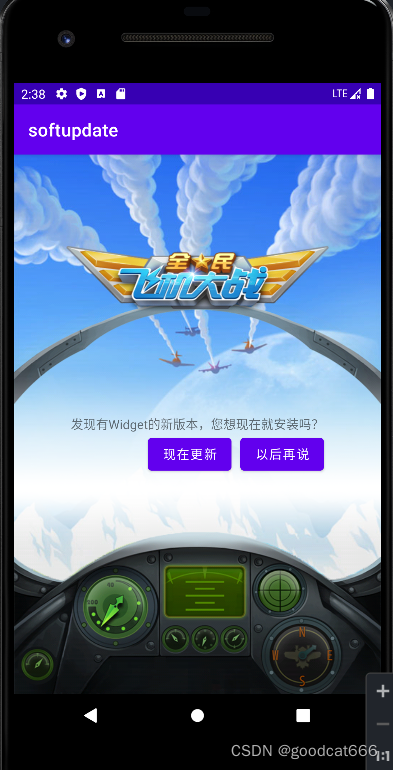
实例:实现软件更新提示页面
要求:
1、在布局管理器的中央位置放置一个文本框组件
2、在文本框下方方式两个按钮,"以后再说"按钮与文本框右对其,"以后再说"左侧放置"现在更新"按钮
步骤:
1、将背景图片拷贝到资源中
2、在values/strings.xml添加文本资源
<resources>
    <string name="app_name">softupdate</string>
    <string name="updateTip">发现有Widget的新版本,您想现在就安装吗?</string>
    <string name="updateNow">现在更新</string>
    <string name="notNow">以后再说</string>
</resources>
2、RelativeLayout布局
<?xml version="1.0" encoding="utf-8"?>
<RelativeLayout xmlns:android="http://schemas.android.com/apk/res/android"
    xmlns:app="http://schemas.android.com/apk/res-auto"
    xmlns:tools="http://schemas.android.com/tools"
    android:layout_width="match_parent"
    android:layout_height="match_parent"
    android:background="@mipmap/bg"
    tools:context=".MainActivity">

    <TextView
        android:layout_width="wrap_content"
        android:layout_height="wrap_content"
        android:text="@string/updateTip"
        android:layout_centerInParent="true"
        android:id="@+id/textview" />

    <Button
        android:layout_width="wrap_content"
        android:layout_height="wrap_content"
        android:text="@string/notNow"
        android:layout_below="@+id/textview"
        android:layout_alignRight="@+id/textview"
        android:id="@+id/button_notNow"
        />

    <Button
        android:layout_width="wrap_content"
        android:layout_height="wrap_content"
        android:text="@string/updateNow"
        android:layout_marginRight="10dp"
        android:id="@+id/update_now"
        android:layout_toLeftOf="@+id/button_notNow"
        android:layout_below="@+id/textview"
        />

</RelativeLayout>
线性布局管理器
将放置到线性布局管理器中的组件按照水平或者是垂直进行排列
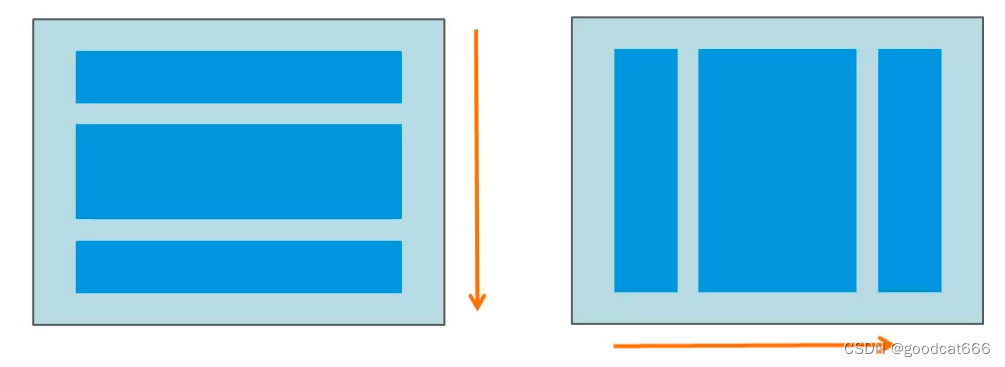
通过将android:orientation属性设置为vertical或horizontal
线性布局管理器
- 垂直:一行只能放一个组件,当组件多于屏幕时,多余的将不被显示
- 水平:一列只能放一个组件,当组件多于屏幕时,多余的将不被显示
定义线性布局管理器
使用LinearLayout标签
可该标签内可使用的属性
android:orientation  水平或垂直
android:gravity  组件居中、居左、居右显示(可以组合  right|bottom )
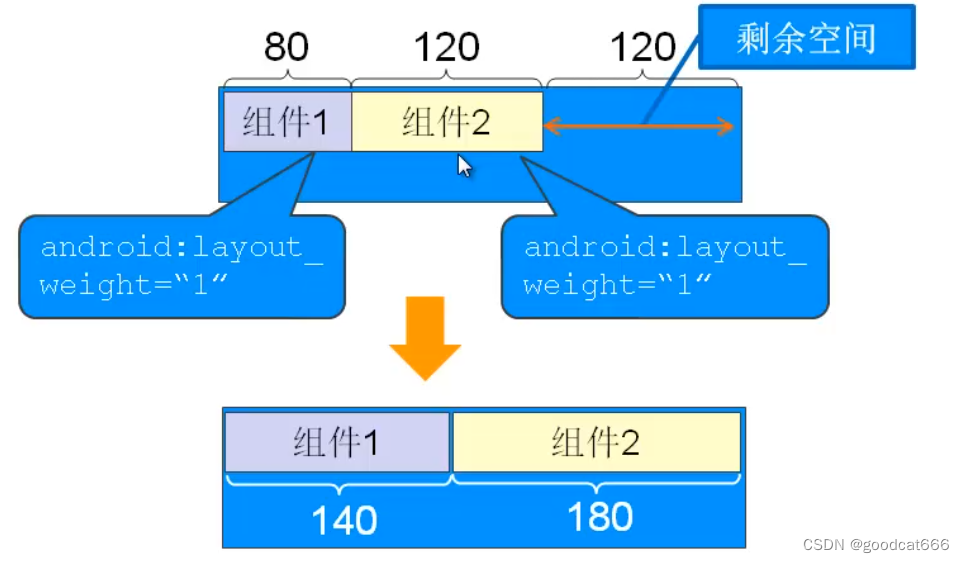
在组件的属性
android:layout_width 组件占父容器剩余空间的权重
假设线性布局管理总的宽度是320,水平布局
组件1设置的宽度是80,android:layout_width=“1”
组件2设置的宽度是120,android:layout_width=“1”
原本还剩余120的空间,但是由于设置layout_width都是1,则组件1和组件2平分对于的空间
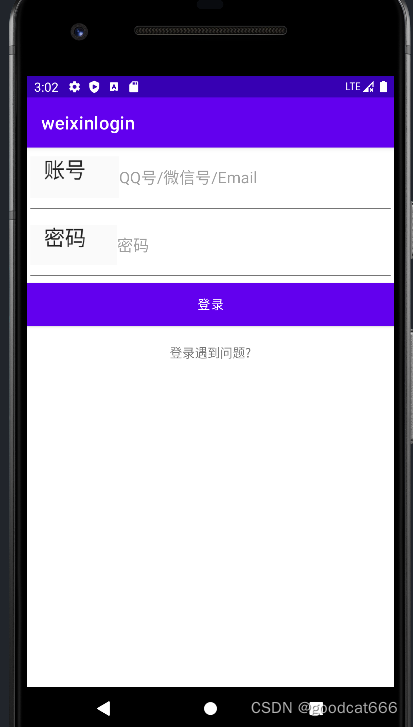
实例 - 微信登陆界面
<?xml version="1.0" encoding="utf-8"?>
<LinearLayout xmlns:android="http://schemas.android.com/apk/res/android"
    xmlns:app="http://schemas.android.com/apk/res-auto"
    xmlns:tools="http://schemas.android.com/tools"
    android:layout_width="match_parent"
    android:layout_height="match_parent"
    android:orientation="vertical"
    tools:context=".MainActivity">

    <!--第一行-->
    <EditText
        android:layout_width="match_parent"
        android:layout_height="wrap_content"
        android:paddingBottom="20dp"
        android:hint="QQ号/微信号/Email"
        android:drawableLeft="@mipmap/zhanghao"
        />
    <!--第二行-->
    <EditText
        android:layout_width="match_parent"
        android:layout_height="wrap_content"
        android:paddingBottom="20dp"
        android:hint="密码"
        android:drawableLeft="@mipmap/mima"
        />
    <!--第三行-->
    <Button
        android:layout_width="match_parent"
        android:layout_height="wrap_content"
        android:text="登录"
        android:textColor="#FFFFFF"
        android:background="#FF009688"/>
    <!--第四行-->
    <TextView
        android:layout_width="match_parent"
        android:layout_height="wrap_content"
        android:text="登录遇到问题?"
        android:gravity="center_horizontal"
        android:paddingTop="20dp"/>

</LinearLayout>
帧布局管理器
为每一个放入的组件放置一个空白的区域,按照先后顺序层叠放置,后面的组件会覆盖先放入的组件
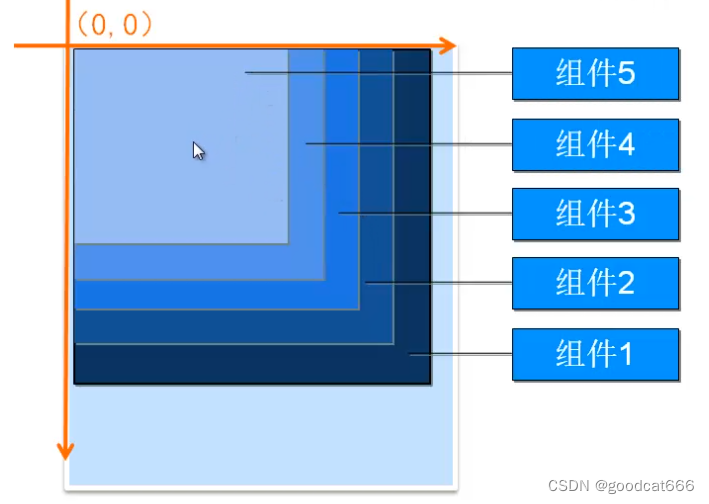
用于显示层叠的效果:时钟等
帧布局管理属性
使用FrameLayout标记添加该管理器
android:foreground  为帧布局管理器设置前景图像(前景图像 始终位于最上层的图片,其他图像不能将其盖住)
android:foregroundGravity 为帧布局管理器设置前景图像的位置
实例:居中显示的正方形,并添加前景图标
<?xml version="1.0" encoding="utf-8"?>
<FrameLayout xmlns:android="http://schemas.android.com/apk/res/android"
    xmlns:app="http://schemas.android.com/apk/res-auto"
    xmlns:tools="http://schemas.android.com/tools"
    android:layout_width="match_parent"
    android:layout_height="match_parent"
    android:foreground="@mipmap/ic"
    android:foregroundGravity="right|bottom"
    tools:context=".MainActivity">

    <!-- 添加居中显示的蓝色背景的TextView,将显示在最下层 -->
    <TextView
        android:id="@+id/textView1"
        android:layout_width="380dp"
        android:layout_height="680dp"
        android:layout_gravity="center"
        android:background="#FF0000FF"
        android:textColor="#FFFFFF"
        android:text="蓝色背景的TextView" />
    <!-- 添加居中显示的天蓝色背景的TextView,将显示在中间层 -->
    <TextView
        android:id="@+id/textView2"
        android:layout_width="230dp"
        android:layout_height="230dp"
        android:layout_gravity="center"
        android:background="#FF0077FF"
        android:textColor="#FFFFFF"
        android:text="天蓝色背景的TextView" />
    <!-- 添加居中显示的水蓝色背景的TextView,将显示在最上层 -->
    <TextView
        android:id="@+id/textView3"
        android:layout_width="180dp"
        android:layout_height="180dp"
        android:layout_gravity="center"
        android:background="#FF00B4FF"
        android:textColor="#FFFFFF"
        android:text="水蓝色背景的TextView" />

</FrameLayout>

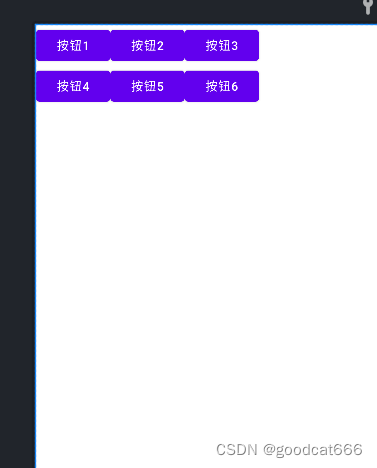
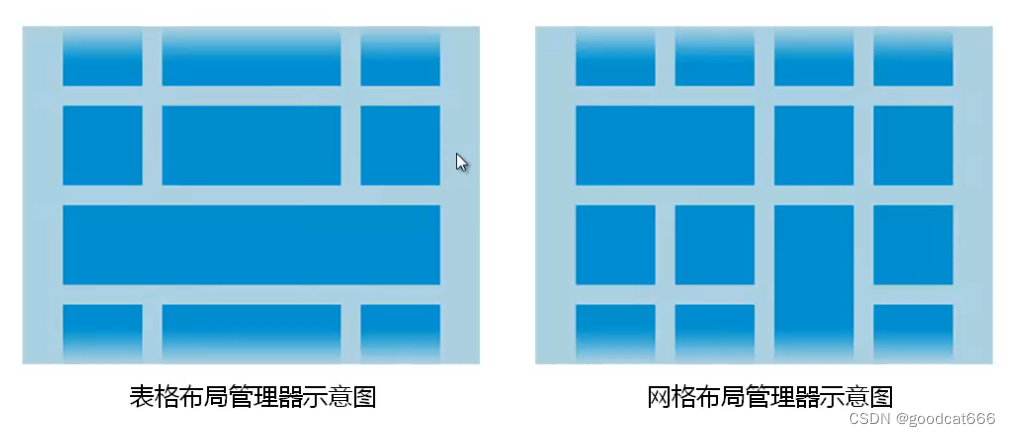
表格布局管理器
以行列的形式,组织放入的组件
TableLayout 使用
可以直接在TableLayout中添加组件,每添加一个组件,这个组件占据一行
一般需要配合TableRow标签使用,只有行标签没有列标签
<?xml version="1.0" encoding="utf-8"?>
<TableLayout xmlns:android="http://schemas.android.com/apk/res/android"
    xmlns:app="http://schemas.android.com/apk/res-auto"
    xmlns:tools="http://schemas.android.com/tools"
    android:layout_width="match_parent"
    android:layout_height="match_parent"
    tools:context=".MainActivity">

    <TableRow>
        <Button
            android:layout_width="wrap_content"
            android:layout_height="wrap_content"
            android:text="按钮1" />
        <Button
            android:layout_width="wrap_content"
            android:layout_height="wrap_content"
            android:text="按钮2" />
        <Button
            android:layout_width="wrap_content"
            android:layout_height="wrap_content"
            android:text="按钮3" />
    </TableRow>

    <TableRow>
        <Button
            android:layout_width="wrap_content"
            android:layout_height="wrap_content"
            android:text="按钮4" />
        <Button
            android:layout_width="wrap_content"
            android:layout_height="wrap_content"
            android:text="按钮5" />
        <Button
            android:layout_width="wrap_content"
            android:layout_height="wrap_content"
            android:text="按钮6" />
    </TableRow>

</TableLayout>
可以设置列隐藏、拉伸、收缩
android:collapseColumns="0"  列是从0开始,隐藏第一列,可以通过逗号隐藏多个列
android:stretchColumns="2"  拉伸
android:shrinkColumns="1"  收缩 - 下面的没有设置收缩

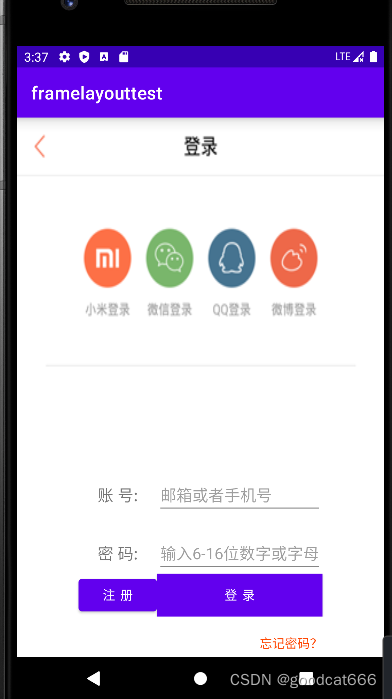
实例:实现喜马拉雅登录界面
<?xml version="1.0" encoding="utf-8"?>
<TableLayout xmlns:android="http://schemas.android.com/apk/res/android"
    xmlns:tools="http://schemas.android.com/tools"
    android:layout_width="match_parent"
    android:layout_height="match_parent"
    android:background="@mipmap/biaoge"
    android:stretchColumns="0,3"
    tools:context=".MainActivity">

    <!--第一行-->
    <TableRow
        android:layout_width="wrap_content"
        android:layout_height="wrap_content"
        android:paddingTop="400dp"
        >
        <TextView />
        <TextView
            android:layout_width="wrap_content"
            android:layout_height="wrap_content"
            android:textSize="18sp"
            android:text="账 号:"
            android:gravity="center_horizontal"
            />
        <EditText
            android:layout_width="match_parent"
            android:layout_height="wrap_content"
            android:hint="邮箱或者手机号"
            />
        <TextView />
    </TableRow>
    <!--第二行-->
    <TableRow
        android:layout_width="wrap_content"
        android:layout_height="wrap_content"
        android:paddingTop="20dp"
        >
        <TextView />
        <TextView
            android:layout_width="wrap_content"
            android:layout_height="wrap_content"
            android:textSize="18sp"
            android:text="密 码:"
            android:gravity="center_horizontal"
            />
        <EditText
            android:layout_width="wrap_content"
            android:layout_height="wrap_content"
            android:hint="输入6-16位数字或字母"
            />
        <TextView />
    </TableRow>
    <!--第三行-->
    <TableRow
        android:layout_width="wrap_content"
        android:layout_height="wrap_content">
        <TextView />
        <Button
            android:layout_width="wrap_content"
            android:layout_height="wrap_content"
            android:text="注 册"
            />
        <Button
            android:layout_width="wrap_content"
            android:layout_height="wrap_content"
            android:background="#FF8247"
            android:text="登 录"/>
        <TextView />
    </TableRow>
    <!--第四行-->
    <TableRow
        android:layout_width="wrap_content"
        android:layout_height="wrap_content"
        android:paddingTop="20dp"
        >
        <TextView />
        <TextView />
        <TextView
            android:text="忘记密码?"
            android:textColor="#FF4500"
            android:gravity="right"
            />
        <TextView />
    </TableRow>

</TableLayout>
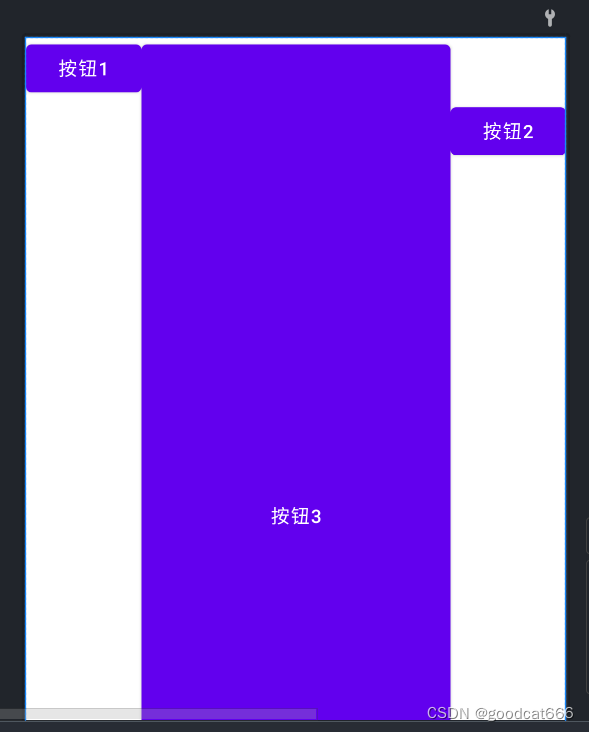
网格布局管理器
屏幕被虚拟的行列虚线划分成单元格,每个组件占据一个或多个单元格
与表格布局管理器相比,网格布局管理器可以跨行列显示
网格布局管理器属性
网格布局管理器使用标签 GridLayout标记
android:columnCount  网格的最大列数
android:orientation  没有为放入的组件指定行列时,组件的排列方式,默认是水平排列
android:rowCount     网格的最大列数
GridLayout.LayoutParams 网络布局管理器中组件的属性
android:layout_column  指定组件位于第几列
android:layout_columnSpan  指定组件横向跨几列,使用该属性时,需要和android:layout_gravity一起使用
android:layout_columnWeight 指定组件水平方向的权重:占剩余空间的比例
android:layout_gravity 组件通过什么方式占据这个网格空间

android:layout_row  指定组件位于第几列
android:layout_rowSpan  指定组件横向跨几列
android:layout_rowWeight 指定组件水平方向的权重:占剩余空间的比例
<?xml version="1.0" encoding="utf-8"?>
<GridLayout xmlns:android="http://schemas.android.com/apk/res/android"
    xmlns:tools="http://schemas.android.com/tools"
    android:layout_width="match_parent"
    android:layout_height="match_parent"
    tools:context=".MainActivity">

    <Button
        android:layout_width="wrap_content"
        android:layout_height="wrap_content"
        android:layout_column="0"
        android:layout_row="0"
        android:text="按钮1" />

    <Button
        android:layout_width="wrap_content"
        android:layout_height="wrap_content"
        android:layout_column="2"
        android:layout_row="1"
        android:text="按钮2" />

    <Button
        android:layout_width="wrap_content"
        android:layout_height="wrap_content"
        android:layout_column="1"
        android:layout_row="0"
        android:layout_rowSpan="2"
        android:layout_gravity="fill"
        android:text="按钮3" />


</GridLayout>
实例:实现QQ聊天信息列表布局
<?xml version="1.0" encoding="utf-8"?>
<GridLayout xmlns:android="http://schemas.android.com/apk/res/android"
    xmlns:tools="http://schemas.android.com/tools"
    android:layout_width="match_parent"
    android:layout_height="match_parent"

    android:background="@mipmap/bg"
    android:columnCount="6"
    tools:context=".MainActivity" >
    <!-- 第一行 -->
    <ImageView
        android:id="@+id/imageView1"
        android:src="@mipmap/a1"
        android:layout_gravity="end"
        android:layout_columnSpan="2"
        android:layout_column="4"
        android:layout_row="0"
        android:layout_marginRight="5dp"
        android:layout_marginBottom="20dp"
        />
    <ImageView
        android:id="@+id/imageView2"
        android:src="@mipmap/ico2"
        android:layout_column="5"
        android:layout_row="0"
        />
    <!-- 第二行 -->
    <ImageView
        android:id="@+id/imageView3"
        android:src="@mipmap/ico1"
        android:layout_column="0"
        android:layout_row="1"
        />
    <ImageView
        android:id="@+id/imageView4"
        android:src="@mipmap/b1"
        android:layout_row="1"
        android:layout_marginBottom="20dp"
        />
    <!-- 第三行 -->
    <ImageView
        android:id="@+id/imageView5"
        android:src="@mipmap/a2"
        android:layout_gravity="end"
        android:layout_columnSpan="4"
        android:layout_column="4"
        android:layout_row="2"
        android:layout_marginRight="5dp"
        android:layout_marginBottom="20dp"
        />
    <ImageView
        android:id="@+id/imageView6"
        android:src="@mipmap/ico2"
        android:layout_column="5"
        android:layout_row="2"
        />

    <!-- 第4行 -->
    <ImageView
        android:id="@+id/imageView7"
        android:src="@mipmap/ico1"
        android:layout_column="0"
        android:layout_row="3"
        />
    <ImageView
        android:id="@+id/imageView8"
        android:src="@mipmap/b2"
        android:layout_marginBottom="20dp"
        android:layout_row="3"
        />

</GridLayout>
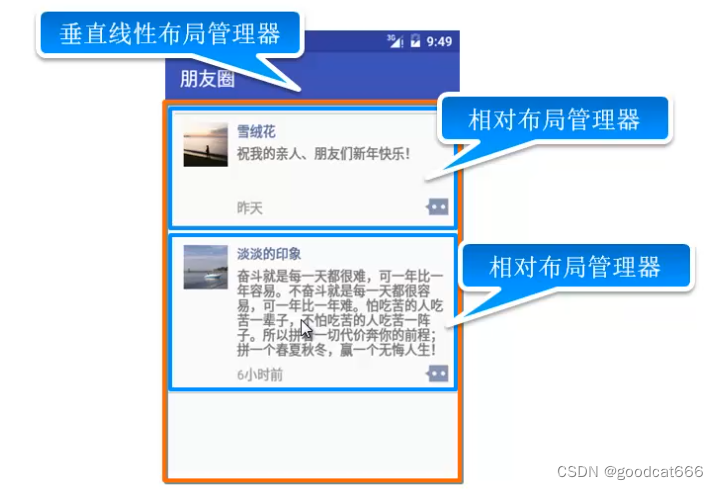
布局管理器嵌套
1、根布局管理器必须包含xmlns属性
2、在一个布局文件中,最多只能有一个根布局管理器,如果需要有多个还需要使用一个布局管理器将他们括起来
3、不能嵌套太深,如果嵌套太深,则会影响性能
需要实现的效果
<?xml version="1.0" encoding="utf-8"?>
<LinearLayout xmlns:android="http://schemas.android.com/apk/res/android"
    xmlns:tools="http://schemas.android.com/tools"
    android:layout_width="match_parent"
    android:layout_height="match_parent"
    android:orientation="vertical"
    tools:context="com.mingrisoft.MainActivity" >
    <!-- 第一条信息 -->
     <RelativeLayout
         android:layout_width="match_parent"
         android:layout_height="wrap_content"
         android:layout_margin="10dp" >
         <ImageView
             android:id="@+id/ico1"
             android:layout_width="wrap_content"
             android:layout_height="wrap_content"
             android:layout_alignParentLeft="true"
             android:layout_margin="10dp"
             android:src="@mipmap/v_ico1" />
         <TextView
             android:id="@+id/name1"
             android:layout_width="wrap_content"
             android:layout_height="wrap_content"
             android:layout_marginTop="10dp"
             android:layout_toRightOf="@+id/ico1"
             android:text="雪绒花"
             android:textColor="#576B95" />
         <TextView
             android:id="@+id/content1"
             android:layout_width="wrap_content"
             android:layout_height="wrap_content"
             android:layout_below="@id/name1"
             android:layout_marginBottom="5dp"
             android:layout_marginTop="5dp"
             android:layout_toRightOf="@+id/ico1"
             android:minLines="3"
             android:text="祝我的亲人、朋友们新年快乐!" />
         <TextView
             android:id="@+id/time1"
             android:layout_width="wrap_content"
             android:layout_height="wrap_content"
             android:layout_below="@id/content1"
             android:layout_marginTop="3dp"
             android:layout_toRightOf="@id/ico1"
             android:text="昨天"
             android:textColor="#9A9A9A" />
          <ImageView
              android:id="@+id/comment1"
              android:layout_width="wrap_content"
              android:layout_height="wrap_content"
              android:layout_alignParentRight="true"
              android:layout_below="@id/content1"
              android:src="@mipmap/comment" />
          <ImageView
              android:layout_width="match_parent"
              android:layout_height="wrap_content"
              android:background="@mipmap/line" />
     </RelativeLayout>
    <!-- 分隔线 -->
    <ImageView
        android:layout_width="match_parent"
        android:layout_height="wrap_content"
        android:background="@mipmap/line" />
    <!-- 第二条信息 -->

    <RelativeLayout
        android:layout_width="match_parent"
        android:layout_height="wrap_content"
        android:layout_margin="10dp" >

        <ImageView
            android:id="@+id/ico2"
            android:layout_width="wrap_content"
            android:layout_height="wrap_content"
            android:layout_alignParentLeft="true"
            android:layout_margin="10dp"
            android:src="@mipmap/v_ico2" />

        <TextView
            android:id="@+id/name2"
            android:layout_width="wrap_content"
            android:layout_height="wrap_content"
            android:layout_marginTop="10dp"
            android:layout_toRightOf="@id/ico2"
            android:text="淡淡的印象"
            android:textColor="#576B95" />

        <TextView
            android:id="@+id/content2"
            android:layout_width="wrap_content"
            android:layout_height="wrap_content"
            android:layout_below="@id/name2"
            android:layout_marginBottom="5dp"
            android:layout_marginTop="5dp"
            android:layout_toRightOf="@id/ico2"
            android:minLines="3"
            android:text="奋斗就是每一天都很难,可一年比一年容易。不奋斗就是每一天都很容易,可一年比一年难。怕吃苦的人吃苦一辈子,不怕吃苦的人吃苦一阵子。所以拼着一切代价奔你的前程;拼一个春夏秋冬,赢一个无悔人生!" />

        <TextView
            android:id="@+id/time2"
            android:layout_width="wrap_content"
            android:layout_height="wrap_content"
            android:layout_below="@id/content2"
            android:layout_marginTop="3dp"
            android:layout_toRightOf="@id/ico2"
            android:text="6小时前"
            android:textColor="#9A9A9A" />

        <ImageView
            android:id="@+id/comment2"
            android:layout_width="wrap_content"
            android:layout_height="wrap_content"
            android:layout_alignParentRight="true"
            android:layout_below="@id/content2"
            android:src="@mipmap/comment" />
    </RelativeLayout>
    <!-- 分隔线 -->
    <ImageView
        android:layout_width="match_parent"
        android:layout_height="wrap_content"
        android:background="@mipmap/line" />

</LinearLayout>

为开发者提供学习成长、分享交流、生态实践、资源工具等服务,帮助开发者快速成长。
更多推荐


 1
1 0
0- 0


 已为社区贡献4条内容

所有评论(0)