vue3 组件初始化流程(vue3 源码系列)
学习完成响应式系统后,咋们来看看vue3组件的初始化流程既然是看vue组件的初始化流程,咋们先来创建基本的代码,跑跑流程(在app.vue中写入以下内容,来跑流程)import { h, ref } from "vue";export default {name: 'App',setup() {const count = ref(0);return {count};},render() {retu
学习完成响应式系统后,咋们来看看
vue3组件的初始化流程
既然是看vue组件的初始化流程,咋们先来创建基本的代码,跑跑流程
(在app.vue中写入以下内容,来跑流程)
import { h, ref } from "vue";

export default {
  name: 'App',
  setup() {
    const count = ref(0);

    return {
      count
    };
  },
  render() {
    return h('div', { pId: '"helloWorld"' }, [
      h('p', {}, 'hello world'),
      h('p', {}, `count的值是: ${this.count}`),
    ])
  }
}
createApp
咋们在一开始调用createApp会发生什么事情呢?看下图:

在createApp 主要会发生这些事情:
- 在外部调用
createApp的时候,在函数内部会调用ensureRenderer()这个函数 - 在
ensureRenderer这个函数中,判断renderer是否存在,不存在则创建,并且传入一系列的api去初始化
function ensureRenderer() {
  // 如果 renderer 有值的话,那么以后都不会初始化了
  return (
    renderer ||
    (renderer = createRenderer({
      // 创建dom节点,div,li,等
      createElement,
      // 创建文本节点
      createText,
      // 给文本节点设置文本  node.nodeValue = text
      setText,
      //给dom设置文本 el.textContent = text;
      setElementText,
      // 对比更新属性方法
      patchProp,
      // 节点插入方法 parent.insertBefore(child, anchor)
      insert,
      // 移除节点 parent.removeChild(child);
      remove,
      ...
    }))
  );
}
- 在
createRenderer中会直接调用createAppAPI这个方法,并且返回一个对象{createApp: createAppAPI(render)} - 最后在
createAppAPI中调用createApp方法并且拓展了一个mount方法
export function createAppAPI(render) {
  return function createApp(rootComponent) {
    const app = {
      _component: rootComponent,
      mount(rootContainer) {
        const vnode = createVNode(rootComponent);
        // 调用 createAPI 里面传入的render方法
        render(vnode, rootContainer);
      },
    };
    return app;
  };
}
请注意图中有好几处方法的名称都是 createApp, 每一处的createApp的作用是不一样的,这里不是递归调用哦!
具体流程如下图

上图是整个mount阶段和更新阶段都会经过流程了,是不是感觉有一丢丢的小复杂😆😆😆
接下来咋们就单重我们代码的执行角度来分析下mount流程
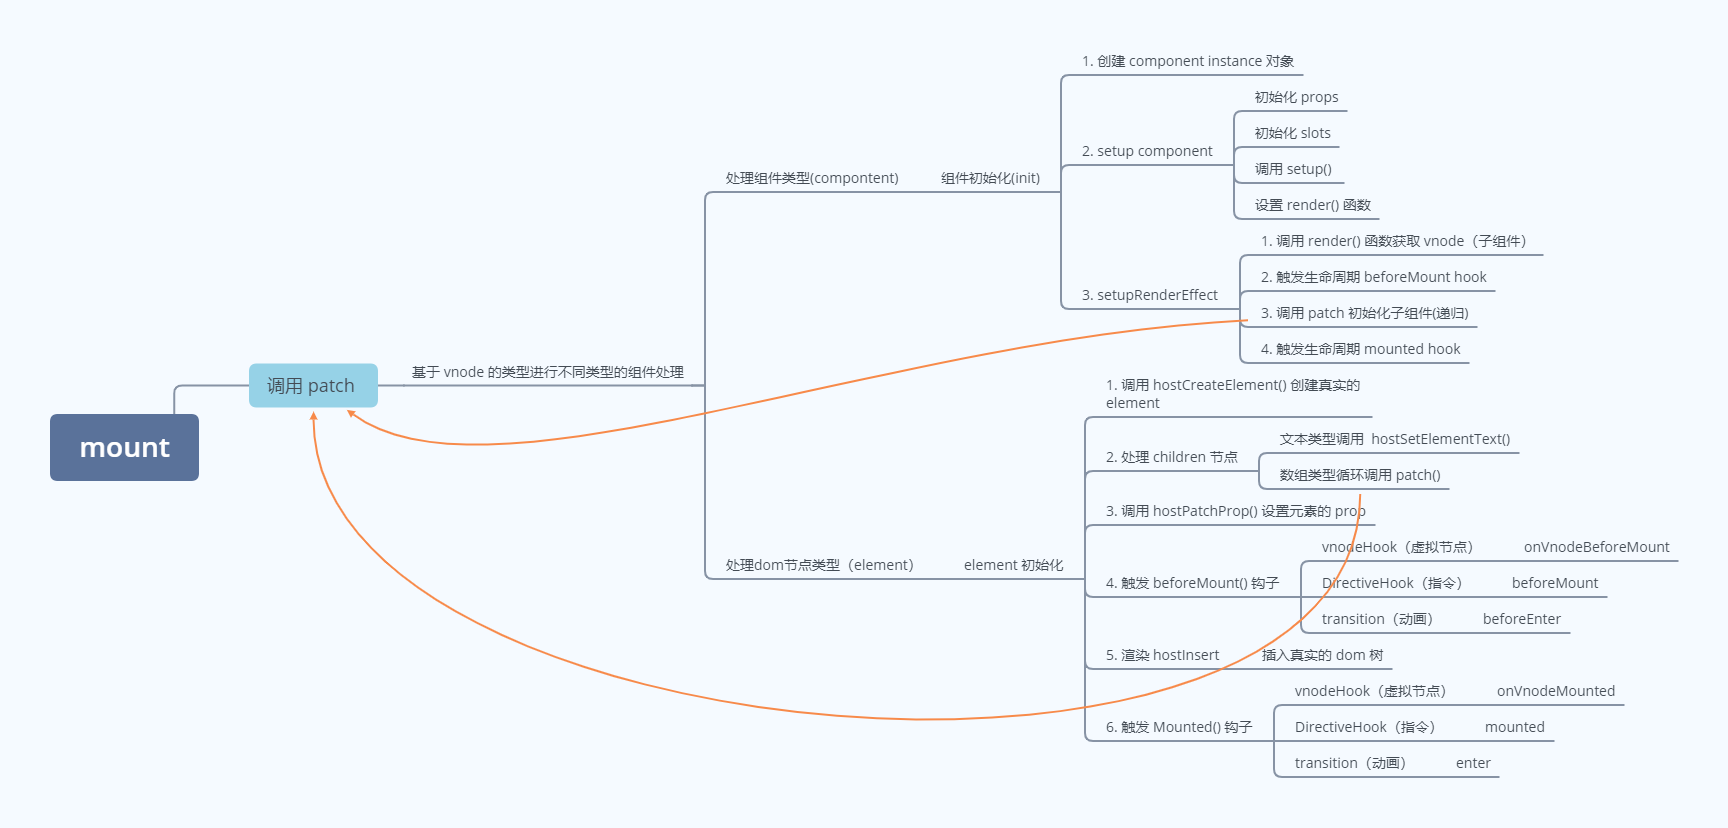
mount
咋们把所有的update的去掉,他就是mount阶段了。
- 在上面
createApp的阶段后,咋们就能获取到rootCompontent,rootComponent是整个APP.js导出的一个对象,rootContainer 则是需要挂载的真实dom节点;

- 调用
createVNode创建虚拟节点;

- 拿到虚拟节点后,调用
render(vnode); - 在
render中直接调用patch(null, vnode, container)方法,并传入对应的参数; - 传入的
APP.js是一个组件,走组件处理逻辑并传入对应的参数processComponent(n1, n2, container, parentComponent); - 由于传入的参数
n1为null,那么进入组件的mount逻辑并传入对应的参数mountComponent(n2, container, parentComponent);;

- 在
mountComponent中需要经过三层处理,把组件渲染为render函数和对render函数进行依赖收集
- 7.1 创建组件的实例

- 7.2 初始化组件的内容,在初始化组件内容中,会对组件的props,slots 等绑定到
instance当中

-
- 7.2.1 在
instance上面绑定props
- 7.2.1 在
-
- 7.2.2 在
instance上面绑定slots
- 7.2.2 在
-
- 7.2.3 调用
setupStatefulComponent给instance上面绑定其他的内容,并且把组件转成render函数
- 7.2.3 调用
-
-
- 7.2.3.1 由于咋们
App.js中是传了setup函数的,所以接下来走setup的流程,调用createSetupContext(instance)对setup设置上下文
- 7.2.3.1 由于咋们
-

-
-
- 7.2.3.2
setup && setup(shallowReadonly(instance.props), setupContext)传入参数执行setup函数并且获得setup函数的执行结果
- 7.2.3.2
-
-
-
- 7.2.3.3 调用
handleSetupResult(instance, setupResult)根据setup函数的返回结果来做对应的事情
- 7.2.3.3 调用
-

-
-
- 7.2.3.4 由于咋们的的setup返回的结果是一个object,所以给当前组件的instance.setupState= proxyRef(setupResult),
proxyRefs的作用就是把setupResult对象做一层代理,方便用户直接访问 ref 类型的值
- 7.2.3.4 由于咋们的的setup返回的结果是一个object,所以给当前组件的instance.setupState= proxyRef(setupResult),
-
-
- 7.2.4 咋们的
APP.js到目前位置都还没有render函数,调用finishComponentSetup(instance);完成组件的setup操作,给实例赋值 render函数
- 7.2.4 咋们的

-
-
- 7.2.4.1 由于咋们组件是传了render函数的,所以直接把组件的render函数赋值给instance
-
在这里咋们可以看到,组件的render函数的优先级是高于template的,只有组件里面没有写render函数,还会去编译模板里面的内容,并且放到组件中作为render函数
-
- 7.2.5 上面
7.2.4主要就是为了给组件实例赋值好render函数,有了render函数,那么就需要来进行依赖收集啦!!! 调用setupRenderEffect(instance, initialVNode, container)来进行依赖收集
- 7.2.5 上面
-
-
- 7.2.5.1 effect方法还记得吧😄😁😃有不明白的请看这里, 给实例赋值上一个update方法,方便后续的依赖trigger,在effect当中,会默认执行一次
fn;
- 7.2.5.1 effect方法还记得吧😄😁😃有不明白的请看这里, 给实例赋值上一个update方法,方便后续的依赖trigger,在effect当中,会默认执行一次
-
instance.update = effect(componentUpdateFn, {
      scheduler: () => {
        // 把 effect 推到微任务的时候在执行
        // queueJob(effect);
        queueJob(instance.update);
      },
    });
-
-
- 7.2.5.2 调用
componentUpdateFn来挂载组件
- 7.2.5.2 调用
-

-
-
- 7.2.5.3 调用
instance.subTree = normalizeVNode(instance.render.call(proxyToUse, proxyToUse)))获取子组件
- 7.2.5.3 调用
-

-
-
- 7.2.5.4 触发
beforeMount hook
- 7.2.5.4 触发
-
-
-
- 7.2.5.5 调用
patch(null, subTree, container, null, instance)方法来处理子组件
- 7.2.5.5 调用
-

-
-
- 7.2.5.6 调用
processElement(n1, n2, container, anchor, parentComponent);来处理元素
- 7.2.5.6 调用
-

-
-
- 7.2.5.7 由于 n1是空,调用
mountElement(n2, container, anchor)来挂载元素
- 7.2.5.7 由于 n1是空,调用
-

-
-
- 7.2.5.8 调用
hostCreateElement(vnode.type);来创建真实的dom
- 7.2.5.8 调用
-

-
-
- 7.2.5.9 根据shapeFlag来判断,由于咋们是有子组件的,调用
mountChildren(vnode.children, el)则进入到挂载子组件
- 7.2.5.9 根据shapeFlag来判断,由于咋们是有子组件的,调用
-
-
- -7.2.5.10 依次传入参数,调用patch方法来patch子组件
-
-
- 7.2.5.11 重复
7.2.5.7操作来传教子组件的真实dom
- 7.2.5.11 重复
-
-
-
- 7.2.5.12 如果存在属性的话,遍历props,调用
hostPatchProp(el, key, null, nextVal);来给dom绑定值
- 7.2.5.12 如果存在属性的话,遍历props,调用
-

-
-
- 7.2.5.13 执行
beforemounted 钩子
- 7.2.5.13 执行
-
-
-
- 7.2.5.14 执行
beforeEnter 钩子
- 7.2.5.14 执行
-
-
-
- 7.2.5.15 调用
hostInsert(el, container, anchor);插入真实节点,完成dom的渲染
- 7.2.5.15 调用
-

-
-
- 7.2.5.16 触发 mounted操作,完成组件的挂载
-
到了这一步,咋们就可以知道vue组件的挂载顺序是 父 before mounted -> before mounted ->子 mounted -> 父mounted类型与koa中间件执行的洋葱模型
-
-
- 7.2.5.17 执行
mounted 钩子
- 7.2.5.17 执行
-
-
-
- 7.2.5.18 执行
Entered 钩子
- 7.2.5.18 执行
-
这就是组件初始化的全部流程,有了init的流程后,在后续的更新其实就是差一个 vue diff 算法啦😃😃😃
源代码地址: https://github.com/cll123456/my-study/tree/master/my-vue3-code/2-comp-init

前往低代码交流专区
更多推荐

 4
4 0
0- 0


 已为社区贡献13条内容

所有评论(0)