
【线程池】线程池的使用案例
【线程池】线程池的使用案例
- 【一】自定义线程池
- 【二】java自带的线程池
- 【三】线程不安全的案例
- 【四】execute+Runnable
- 【五】submit+Callable
- 【六】返回结果
- 【七】保证线程安全
- 【八】线程间的通信
- 【九】区别对比
【一】自定义线程池
(1)为什么使用线程池
每一个线程的启动和结束都是比较消耗时间和占用资源的。使用线程池的过程中创建固定数量的线程,不用创建多余新的线程,而是循环使用那些已经存在的线程。
(2)自定义线程池设计思路
1-准备一个任务容器
2-一次性启动10个消费者线程
3-刚开始任务容器是空的,所以线程都wait在上面
4-直到一个外部线程往这个任务容器中扔了一个“任务”,就会有一个消费者线程被唤醒
5-这个消费者线程取出“任务”,并且执行这个任务,执行完毕后,继续等待下一次任务的到来
6-如果短时间内,有较多的任务加入,name就会有多个线程被唤醒,去执行这些任务
public class ThreadPool {

    // 线程池大小
    int threadPoolSize;

    // 任务容器
    LinkedList<Runnable> tasks = new LinkedList<Runnable>();

    // 试图消费任务的线程

    public ThreadPool() {
        threadPoolSize = 10;

        // 启动10个任务消费者线程
        synchronized (tasks) {
            for (int i = 0; i < threadPoolSize; i++) {
                new TaskConsumeThread("任务消费者线程 " + i).start();
            }
        }
    }

    public void add(Runnable r) {
        synchronized (tasks) {
            tasks.add(r);
            // 唤醒等待的任务消费者线程
            tasks.notifyAll();
        }
    }

    class TaskConsumeThread extends Thread {
        public TaskConsumeThread(String name) {
            super(name);
        }

        Runnable task;

        public void run() {
            System.out.println("启动: " + this.getName());
            while (true) {
                synchronized (tasks) {
                    while (tasks.isEmpty()) {
                        try {
                            tasks.wait();
                        } catch (InterruptedException e) {
                            // TODO Auto-generated catch block
                            e.printStackTrace();
                        }
                    }
                    task = tasks.removeLast();
                    // 允许添加任务的线程可以继续添加任务
                    tasks.notifyAll();

                }
                System.out.println(this.getName() + " 获取到任务,并执行");
                task.run();
            }
        }
    }

}
public class TestThread {

    public static void main(String[] args) {
        ThreadPool pool = new ThreadPool();

        for (int i = 0; i < 5; i++) {
            Runnable task = new Runnable() {
                @Override
                public void run() {
                    //System.out.println("执行任务");
                    //任务可能是打印一句话
                    //可能是访问文件
                    //可能是做排序
                }
            };

            pool.add(task);

            try {
                Thread.sleep(1000);
            } catch (InterruptedException e) {
                // TODO Auto-generated catch block
                e.printStackTrace();
            }
        }

    }

}
【二】java自带的线程池
【1】如何创建线程池
(1)使用Executors工厂类
1.1 固定大小线程池
ExecutorService executor = Executors.newFixedThreadPool(10); // 固定10个线程
1.2 单线程线程池
ExecutorService executor = Executors.newSingleThreadExecutor(); // 只有一个线程
1.3 可缓存线程池
ExecutorService executor = Executors.newCachedThreadPool(); // 线程数自动调整
1.4 定时任务线程池
ScheduledExecutorService executor = Executors.newScheduledThreadPool(5);
(2)手动创建ThreadPoolExecutor
int corePoolSize = 5; // 核心线程数
int maxPoolSize = 10; // 最大线程数
long keepAliveTime = 60L; // 空闲线程存活时间(单位由TimeUnit指定)
TimeUnit unit = TimeUnit.SECONDS; // 时间单位
BlockingQueue<Runnable> workQueue = new LinkedBlockingQueue<>(100); // 任务队列(有界队列)
ThreadFactory threadFactory = Executors.defaultThreadFactory(); // 线程工厂
RejectedExecutionHandler handler = new ThreadPoolExecutor.AbortPolicy(); // 拒绝策略

ExecutorService executor = new ThreadPoolExecutor(
    corePoolSize,
    maxPoolSize,
    keepAliveTime,
    unit,
    workQueue,
    threadFactory,
    handler
);
(3)拒绝策略
Java内置4种拒绝策略:
(1)AbortPolicy(默认):抛出RejectedExecutionException
(2)CallerRunsPolicy:由提交任务的线程自己执行
(3)DiscardPolicy:直接丢弃任务
(4)DiscardOldestPolicy:丢弃队列最前面的任务,重新提交被拒绝的任务
(4)自定义线程工厂
ThreadFactory customFactory = r -> {
    Thread t = new Thread(r);
    t.setName("custom-pool-" + t.getId());
    t.setPriority(Thread.NORM_PRIORITY);
    t.setUncaughtExceptionHandler((thread, ex) ->
        log.error("Uncaught exception in thread: " + thread.getName(), ex));
    return t;
};
【2】如何关闭线程池
(1)关闭线程池的思路
// 1. 停止接收新任务
executor.shutdown();

try {
    // 2. 等待现有任务完成
    if (!executor.awaitTermination(60, TimeUnit.SECONDS)) {
        // 3. 强制取消所有任务
        executor.shutdownNow();
        // 再次等待
        if (!executor.awaitTermination(60, TimeUnit.SECONDS)) {
            log.error("Thread pool did not terminate");
        }
    }
} catch (InterruptedException e) {
    executor.shutdownNow();
    Thread.currentThread().interrupt();
}
(2)关闭线程池的核心方法
(1)shutdown()
调用后线程池进入SHUTDOWN状态
停止接受新任务
已提交的任务会继续执行
队列中等待的任务也会执行
(2)awaitTermination()
阻塞当前线程,直到:
所有任务完成执行
超时发生
当前线程被中断
返回结果是布尔值,所有任务在超时前完成返回true,等待超时返回false
(3)shutdownNow()
尝试停止所有正在执行的任务
停止处理等待的任务,返回等待执行的任务列表
无法保证能停止正在处理的任务
(4)isTerminated()
检查所有任务是否已完成,所有任务已完成返回true
(5)isShutdown():关闭流程已启动返回true
(3)封装的关闭线程池的工具方法
package 练习11_线程池综合使用案例;

import java.util.List;
import java.util.concurrent.ExecutorService;
import java.util.concurrent.ThreadPoolExecutor;
import java.util.concurrent.TimeUnit;

/**
 * @ClassName: ThreadPoolShutdownHelper
 * @Author: AllenSun
 * @Date: 2025/10/25 03:51
 */
public class ThreadPoolShutdownHelper {

    /**
     * 优雅关闭线程池(推荐使用)
     *
     * @param executor 线程池实例
     * @return true: 所有任务完成关闭; false: 超时强制关闭
     */
    public static boolean gracefulShutdown(ExecutorService executor) {
        return gracefulShutdown(executor, 60, TimeUnit.SECONDS);
    }

    /**
     * 优雅关闭线程池(推荐使用)
     *
     * @param executor 线程池实例
     * @param timeout 等待超时时间
     * @param unit 时间单位
     * @return true: 所有任务完成关闭; false: 超时强制关闭
     */
    public static boolean gracefulShutdown(ExecutorService executor, long timeout, TimeUnit unit) {
        if (executor == null || executor.isTerminated()) {
            return true;
        }

        try {
            // 1. 停止接收新任务
            executor.shutdown();
            System.out.println("【关闭线程池】停止接收新任务");

            // 2. 等待现有任务完成
            if (executor.awaitTermination(timeout, unit)) {
                System.out.println("【关闭线程池】所有任务正常完成,关闭成功");
                return true; // 所有任务正常完成
            }

            // 3. 超时后尝试取消任务
            System.out.println("【关闭线程池】等待现有任务完成超时");
            return forceShutdown(executor, timeout / 2, unit);
        } catch (InterruptedException e) {
            // 4. 处理中断异常
            System.out.println("【关闭线程池】出现中断异常");
            Thread.currentThread().interrupt(); // 重置中断状态
            return forceShutdown(executor, 0, unit); // 立即强制关闭
        }
    }

    /**
     * 强制关闭线程池
     *
     * @param executor 线程池实例
     * @param timeout 等待取消任务的时间
     * @param unit 时间单位
     * @return true: 部分任务被取消; false: 仍有任务未完成
     */
    private static boolean forceShutdown(ExecutorService executor, long timeout, TimeUnit unit) {
        // 1. 尝试取消所有任务
        List<Runnable> unfinishedTasks = executor.shutdownNow();
        System.out.println("【关闭线程池】尝试取消所有任务");

        // 2. 记录未完成任务
        logUnfinishedTasks(unfinishedTasks);
        System.out.println("【关闭线程池】记录未完成任务");

        try {
            // 3. 等待任务响应取消
            System.out.println("【关闭线程池】等待任务响应取消");
            return executor.awaitTermination(timeout, unit);
        } catch (InterruptedException e) {
            Thread.currentThread().interrupt();
            return false;
        } finally {
            // 4. 确保资源释放
            cleanUpResources(executor);
        }
    }

    /**
     * 记录未完成任务信息
     */
    private static void logUnfinishedTasks(List<Runnable> tasks) {
        if (tasks.isEmpty()) {
            return;
        }

        int count = tasks.size();
        String taskType = tasks.get(0).getClass().getSimpleName();

        // 记录日志
        System.err.printf("[WARN] %d tasks of type %s were cancelled%n", count, taskType);

        // 可扩展:持久化未完成任务
        // saveTasksForRecovery(tasks);
    }

    /**
     * 清理线程池资源
     */
    private static void cleanUpResources(ExecutorService executor) {
        // 如果是ThreadPoolExecutor,关闭相关资源
        if (executor instanceof ThreadPoolExecutor) {
            ThreadPoolExecutor tpe = (ThreadPoolExecutor) executor;

            // 关闭可能关联的资源(如数据库连接池)
            // if (tpe.getQueue() instanceof ResourceHolder) {
            //     ((ResourceHolder) tpe.getQueue()).releaseResources();
            // }
        }

        // 可扩展:移除监控等
        // removeFromMonitoring(executor);
    }
}
(4)关闭线程池的案例
【3】如何监控线程池和线程的状态
(1)监控线程池的工具方法
package 练习11_线程池综合使用案例;

import java.lang.reflect.Field;
import java.util.Map;
import java.util.concurrent.*;
import java.util.concurrent.atomic.AtomicInteger;
import java.util.stream.Collectors;

/**
 * @ClassName: ThreadPoolMonitorHelper
 * @Author: AllenSun
 * @Date: 2025/10/25 04:27
 */
public class ThreadPoolMonitorHelper {
    /**
     * 监测线程池状态并打印日志
     *
     * @param executor 线程池实例
     * @param poolName 线程池名称(用于日志标识)
     */
    public static void monitor(ExecutorService executor, String poolName) {
        if (executor instanceof ThreadPoolExecutor) {
            ThreadPoolExecutor tpe = (ThreadPoolExecutor) executor;
            printThreadPoolStatus(tpe, poolName);
        } else if (executor instanceof ScheduledThreadPoolExecutor) {
            ScheduledThreadPoolExecutor stpe = (ScheduledThreadPoolExecutor) executor;
            printThreadPoolStatus(stpe, poolName);
        } else {
            System.out.println("[WARN] Unsupported executor type: " + executor.getClass().getName());
        }
    }

    /**
     * 监测线程状态并打印日志
     *
     * @param groupName 线程组名称(用于日志标识)
     */
    public static void monitorThreads(String groupName) {
        printThreadGroupStatus(groupName);
    }

    /**
     * 打印线程池状态
     */
    private static void printThreadPoolStatus(ThreadPoolExecutor executor, String poolName) {
        // 1. 基础状态
        String status = String.format(
                "\n[线程池状态] %s\n" +
                        "├── 活动线程: %d\n" +
                        "├── 活动核心线程: %d\n" +
                        "├── 活动非核心线程: %d\n" +
                        "├── 核心线程: %d\n" +
                        "├── 最大线程: %d\n" +
                        "├── 队列大小: %d/%d\n" +
                        "├── 任务统计: %d (完成) + %d (执行中) = %d (总数)\n" +
                        "├── 拒绝次数: %d\n" +
                        "├── 拒绝策略: %s\n" +
                        "└── 存活时间: %d秒",
                poolName,
                executor.getActiveCount(),
                executor.getActiveCount()>executor.getCorePoolSize()?
                        executor.getCorePoolSize():executor.getActiveCount(),
                executor.getActiveCount()>executor.getCorePoolSize()?
                        executor.getActiveCount()-executor.getCorePoolSize():0,
                executor.getCorePoolSize(),
                executor.getMaximumPoolSize(),
                executor.getQueue().size(),
                executor.getQueue().remainingCapacity() + executor.getQueue().size(),
                executor.getCompletedTaskCount(),
                executor.getTaskCount() - executor.getCompletedTaskCount(),
                executor.getTaskCount(),
                getRejectedCount(executor),
                getRejectionPolicyName(executor.getRejectedExecutionHandler()),
                executor.getKeepAliveTime(TimeUnit.SECONDS)
        );

        // 2. 队列详情
        String queueInfo = getQueueInfo(executor.getQueue());

        // 3. 线程状态分布
        String threadStates = getThreadStates(executor);

        // 4. 拒绝策略详情
        String rejectionDetails = getRejectionDetails(executor);

        System.out.println(status + "\n" + queueInfo + "\n" + threadStates + "\n" + rejectionDetails);
    }

    /**
     * 打印线程组状态
     */
    private static void printThreadGroupStatus(String groupName) {
        // 获取所有线程
        Map<Thread, StackTraceElement[]> allThreads = Thread.getAllStackTraces();

        // 按状态分组
        Map<Thread.State, Long> stateCount = allThreads.keySet().stream()
                .collect(Collectors.groupingBy(Thread::getState, Collectors.counting()));

        // 按线程组过滤
        Map<Thread.State, Long> groupStateCount = allThreads.keySet().stream()
                .filter(t -> t.getThreadGroup().getName().contains(groupName))
                .collect(Collectors.groupingBy(Thread::getState, Collectors.counting()));

        // 构建状态字符串
        String states = stateCount.entrySet().stream()
                .map(e -> String.format("%s: %d", e.getKey(), e.getValue()))
                .collect(Collectors.joining(", "));

        String groupStates = groupStateCount.entrySet().stream()
                .map(e -> String.format("%s: %d", e.getKey(), e.getValue()))
                .collect(Collectors.joining(", "));

        System.out.printf(
                "\n[线程状态] %s\n" +
                        "├── 系统线程总数: %d\n" +
                        "├── 系统线程状态: %s\n" +
                        "├── 分组线程总数: %d\n" +
                        "└── 分组线程状态: %s\n",
                groupName,
                allThreads.size(),
                states,
                groupStateCount.values().stream().mapToLong(Long::longValue).sum(),
                groupStates
        );
    }

    /**
     * 获取拒绝策略执行次数
     */
    private static long getRejectedCount(ThreadPoolExecutor executor) {
        try {
            // 通过反射获取拒绝次数(适用于大多数实现)
            Field rejectedField = ThreadPoolExecutor.class.getDeclaredField("rejectedCount");
            rejectedField.setAccessible(true);
            return (long) rejectedField.get(executor);
        } catch (Exception e) {
            // 使用自定义计数器
            return RejectedCounter.getCount(executor);
        }
    }

    /**
     * 获取队列详情
     */
    private static String getQueueInfo(BlockingQueue<Runnable> queue) {
        StringBuilder info = new StringBuilder("[队列详情]\n");

        if (queue instanceof LinkedBlockingQueue) {
            info.append("├── 类型: LinkedBlockingQueue\n");
            info.append("└── 特性: 基于链表,吞吐量高");
        } else if (queue instanceof ArrayBlockingQueue) {
            info.append("├── 类型: ArrayBlockingQueue\n");
            info.append("└── 特性: 基于数组,公平性好");
        } else if (queue instanceof SynchronousQueue) {
            info.append("├── 类型: SynchronousQueue\n");
            info.append("└── 特性: 无缓冲,直接传递");
        } else if (queue instanceof PriorityBlockingQueue) {
            info.append("├── 类型: PriorityBlockingQueue\n");
            info.append("└── 特性: 优先级排序");
        } else {
            info.append("├── 类型: ").append(queue.getClass().getSimpleName()).append("\n");
            info.append("└── 特性: 自定义实现");
        }

        return info.toString();
    }

    /**
     * 获取线程状态分布
     */
    private static String getThreadStates(ThreadPoolExecutor executor) {
        // 获取线程工厂
        ThreadFactory factory = executor.getThreadFactory();
        String threadPrefix;

        // 尝试获取线程名前缀
        if (factory instanceof NamedThreadFactory) {
            threadPrefix = ((NamedThreadFactory) factory).getNamePrefix();
        } else {
            threadPrefix = "Unknown";
        }

        // 获取所有线程
        Map<Thread, StackTraceElement[]> allThreads = Thread.getAllStackTraces();

        // 过滤属于该线程池的线程
        Map<Thread.State, Long> stateCount = allThreads.keySet().stream()
                .filter(t -> t.getName().startsWith(threadPrefix))
                .collect(Collectors.groupingBy(Thread::getState, Collectors.counting()));

        // 构建状态字符串
        return "└── 线程状态: " + stateCount.entrySet().stream()
                .map(e -> String.format("%s=%d", e.getKey(), e.getValue()))
                .collect(Collectors.joining(", "));
    }

    /**
     * 获取拒绝策略名称
     */
    private static String getRejectionPolicyName(RejectedExecutionHandler handler) {
        if (handler instanceof ThreadPoolExecutor.AbortPolicy) {
            return "AbortPolicy (抛出异常)";
        } else if (handler instanceof ThreadPoolExecutor.CallerRunsPolicy) {
            return "CallerRunsPolicy (调用者执行)";
        } else if (handler instanceof ThreadPoolExecutor.DiscardPolicy) {
            return "DiscardPolicy (静默丢弃)";
        } else if (handler instanceof ThreadPoolExecutor.DiscardOldestPolicy) {
            return "DiscardOldestPolicy (丢弃最旧)";
        } else if (handler instanceof RejectedCounter.CustomRejectionHandler) {
            return "CustomRejectionHandler (自定义策略)";
        } else {
            return handler.getClass().getSimpleName();
        }
    }

    /**
     * 获取拒绝策略详情
     */
    private static String getRejectionDetails(ThreadPoolExecutor executor) {
        RejectedExecutionHandler handler = executor.getRejectedExecutionHandler();
        StringBuilder details = new StringBuilder("[拒绝策略详情]\n");

        if (handler instanceof ThreadPoolExecutor.AbortPolicy) {
            details.append("├── 策略: 当任务被拒绝时抛出RejectedExecutionException\n");
            details.append("├── 适用场景: 需要严格保证任务不被丢失的关键业务\n");
            details.append("└── 风险: 可能导致调用方异常中断");
        } else if (handler instanceof ThreadPoolExecutor.CallerRunsPolicy) {
            details.append("├── 策略: 由提交任务的线程直接执行被拒绝的任务\n");
            details.append("├── 适用场景: 不希望任务丢失且可接受调用方阻塞的场景\n");
            details.append("└── 风险: 可能阻塞调用线程,影响整体性能");
        } else if (handler instanceof ThreadPoolExecutor.DiscardPolicy) {
            details.append("├── 策略: 静默丢弃被拒绝的任务\n");
            details.append("├── 适用场景: 可容忍任务丢失的非关键业务\n");
            details.append("└── 风险: 任务丢失无任何提示");
        } else if (handler instanceof ThreadPoolExecutor.DiscardOldestPolicy) {
            details.append("├── 策略: 丢弃队列中最旧的任务,然后重试提交新任务\n");
            details.append("├── 适用场景: 可接受丢失旧任务的新任务优先场景\n");
            details.append("└── 风险: 可能丢失重要任务");
        } else if (handler instanceof RejectedCounter.CustomRejectionHandler) {
            details.append("├── 策略: 自定义拒绝处理逻辑\n");
            details.append("├── 行为: ").append(((RejectedCounter.CustomRejectionHandler) handler).getDescription()).append("\n");
            details.append("└── 处理方式: ").append(((RejectedCounter.CustomRejectionHandler) handler).getAction());
        } else {
            details.append("├── 策略: 未知拒绝策略\n");
            details.append("└── 类型: ").append(handler.getClass().getName());
        }

        return details.toString();
    }

    /**
     * 自定义线程工厂(用于线程命名)
     */
    public static class NamedThreadFactory implements ThreadFactory {
        private final String namePrefix;
        private final AtomicInteger threadCount = new AtomicInteger(1);

        public NamedThreadFactory(String namePrefix) {
            this.namePrefix = namePrefix;
        }

        public String getNamePrefix() {
            return namePrefix;
        }

        @Override
        public Thread newThread(Runnable r) {
            Thread t = new Thread(r, namePrefix + "-" + threadCount.getAndIncrement());
            t.setUncaughtExceptionHandler((thread, ex) ->
                    System.err.println("Uncaught exception in " + thread.getName() + ": " + ex));
            return t;
        }
    }

    /**
     * 拒绝策略计数器
     */
    static class RejectedCounter {
        private static final Map<ExecutorService, AtomicInteger> counters = new ConcurrentHashMap<>();

        public static RejectedExecutionHandler createHandler() {
            return (r, executor) -> {
                counters.computeIfAbsent(executor, k -> new AtomicInteger()).incrementAndGet();
                System.err.println("Task rejected: " + r.toString());
            };
        }

        public static long getCount(ExecutorService executor) {
            AtomicInteger counter = counters.get(executor);
            return counter != null ? counter.get() : 0;
        }

        /**
         * 自定义拒绝策略处理器
         */
        public static class CustomRejectionHandler implements RejectedExecutionHandler {
            private final String description;
            private final String action;

            public CustomRejectionHandler(String description, String action) {
                this.description = description;
                this.action = action;
            }

            @Override
            public void rejectedExecution(Runnable r, ThreadPoolExecutor executor) {
                // 记录日志
                System.err.println("Task rejected: " + r.toString());

                // 增加计数器
                counters.computeIfAbsent(executor, k -> new AtomicInteger()).incrementAndGet();

                // 执行自定义操作
                if ("log".equals(action)) {
                    System.err.println("Logging rejected task: " + r);
                } else if ("requeue".equals(action)) {
                    try {
                        executor.getQueue().put(r);
                    } catch (InterruptedException e) {
                        Thread.currentThread().interrupt();
                    }
                }
            }

            public String getDescription() {
                return description;
            }

            public String getAction() {
                return action;
            }
        }
    }
}
(2)监控线程池的使用案例
public class ThreadPoolStudy00_unsafe {

    public static void main(String[] args) {
        UserAccount zhangsan = new UserAccount("张三",100);
        UserAccount lisi = new UserAccount("李四",0);

        // ExecutorService executorService = Executors.newFixedThreadPool(10);
        ThreadPoolExecutor executorService =
                new ThreadPoolExecutor(
                        5, 10, 30, TimeUnit.SECONDS,
                        new ArrayBlockingQueue<>(90),
                        new ThreadPoolMonitorHelper.NamedThreadFactory("app-worker"),
                        // ThreadPoolMonitorHelper.RejectedCounter.createHandler()
                        new ThreadPoolExecutor.CallerRunsPolicy()
                );
        double amount = 1;
        int taskCount = 100;
        CountDownLatch countDownLatch = new CountDownLatch(taskCount);
        // 启动监控任务(每5秒监控一次)
        ScheduledExecutorService monitorExecutor =
                Executors.newSingleThreadScheduledExecutor();
        monitorExecutor.scheduleAtFixedRate(() -> {
            try {
                ThreadPoolMonitorHelper.monitor(executorService, "Worker线程池");
                ThreadPoolMonitorHelper.monitorThreads("main");
            } catch (Exception e) {
                e.printStackTrace();
            }

        }, 0, 5, TimeUnit.SECONDS);

        for (int i = 0; i < taskCount; i++) {

            executorService.execute(()->{
                try {
                    transfer01(zhangsan,lisi,amount);
                } catch (Exception e) {
                    System.out.println(e.getMessage());
                    throw new RuntimeException(e);
                } finally {
                    countDownLatch.countDown();
                }
            });

        }
        try {
            countDownLatch.await();
        } catch (InterruptedException e) {
            throw new RuntimeException(e);
        }

        ThreadPoolShutdownHelper.gracefulShutdown(executorService);
        ThreadPoolShutdownHelper.gracefulShutdown(monitorExecutor);

    }

    public synchronized static void transfer01(UserAccount from,UserAccount to,double amount) throws InterruptedException {
        double fromBalance = from.getBalance();
        double toBalance = to.getBalance();
        if (fromBalance >= amount) {
            from.setBalance(fromBalance - amount);
            Thread.sleep(1000);
            to.setBalance(toBalance + amount);
            System.out.println("当前线程:"+Thread.currentThread().getName()+";转出账户:" + from.getUserName() + ",余额:" + from.getBalance()+
                    ";转入账户:" + to.getUserName() + ",余额:" + to.getBalance());
        } else {
            System.out.println("当前线程:"+Thread.currentThread().getName()+";余额不足");
        }
    }
}
(3)监控线程池的日志效果
[线程池状态] Worker线程池
├── 活动线程: 0
├── 活动核心线程: 0
├── 活动非核心线程: 0
├── 核心线程: 5
├── 最大线程: 10
├── 队列大小: 0/90
├── 任务统计: 0 (完成) + 0 (执行中) = 0 (总数)
├── 拒绝次数: 0
├── 拒绝策略: CallerRunsPolicy (调用者执行)
└── 存活时间: 30秒
[队列详情]
├── 类型: ArrayBlockingQueue
└── 特性: 基于数组,公平性好
└── 线程状态: BLOCKED=9, TIMED_WAITING=1
[拒绝策略详情]
├── 策略: 由提交任务的线程直接执行被拒绝的任务
├── 适用场景: 不希望任务丢失且可接受调用方阻塞的场景
└── 风险: 可能阻塞调用线程,影响整体性能

[线程状态] main
├── 系统线程总数: 16
├── 系统线程状态: BLOCKED: 9, TIMED_WAITING: 1, RUNNABLE: 3, WAITING: 3
├── 分组线程总数: 13
└── 分组线程状态: BLOCKED: 9, TIMED_WAITING: 1, RUNNABLE: 2, WAITING: 1
当前线程:app-worker-1;转出账户:张三,余额:99.0;转入账户:李四,余额:1.0
当前线程:app-worker-10;转出账户:张三,余额:98.0;转入账户:李四,余额:2.0
当前线程:app-worker-10;转出账户:张三,余额:97.0;转入账户:李四,余额:3.0
当前线程:app-worker-10;转出账户:张三,余额:96.0;转入账户:李四,余额:4.0

[线程池状态] Worker线程池
├── 活动线程: 10
├── 活动核心线程: 5
├── 活动非核心线程: 5
├── 核心线程: 5
├── 最大线程: 10
├── 队列大小: 86/90
├── 任务统计: 4 (完成) + 96 (执行中) = 100 (总数)
├── 拒绝次数: 0
├── 拒绝策略: CallerRunsPolicy (调用者执行)
└── 存活时间: 30秒
[队列详情]
├── 类型: ArrayBlockingQueue
└── 特性: 基于数组,公平性好
└── 线程状态: BLOCKED=9, TIMED_WAITING=1
[拒绝策略详情]
├── 策略: 由提交任务的线程直接执行被拒绝的任务
├── 适用场景: 不希望任务丢失且可接受调用方阻塞的场景
└── 风险: 可能阻塞调用线程,影响整体性能

[线程状态] main
├── 系统线程总数: 16
├── 系统线程状态: BLOCKED: 9, TIMED_WAITING: 1, RUNNABLE: 3, WAITING: 3
├── 分组线程总数: 13
└── 分组线程状态: BLOCKED: 9, TIMED_WAITING: 1, RUNNABLE: 2, WAITING: 1
当前线程:app-worker-9;转出账户:张三,余额:95.0;转入账户:李四,余额:5.0
当前线程:app-worker-9;转出账户:张三,余额:94.0;转入账户:李四,余额:6.0
当前线程:app-worker-9;转出账户:张三,余额:93.0;转入账户:李四,余额:7.0
当前线程:app-worker-8;转出账户:张三,余额:92.0;转入账户:李四,余额:8.0
当前线程:app-worker-7;转出账户:张三,余额:91.0;转入账户:李四,余额:9.0

[线程池状态] Worker线程池
├── 活动线程: 10
├── 活动核心线程: 5
├── 活动非核心线程: 5
├── 核心线程: 5
├── 最大线程: 10
├── 队列大小: 81/90
├── 任务统计: 9 (完成) + 91 (执行中) = 100 (总数)
├── 拒绝次数: 0
├── 拒绝策略: CallerRunsPolicy (调用者执行)
└── 存活时间: 30秒
[队列详情]
├── 类型: ArrayBlockingQueue
└── 特性: 基于数组,公平性好
└── 线程状态: BLOCKED=9, TIMED_WAITING=1
[拒绝策略详情]
├── 策略: 由提交任务的线程直接执行被拒绝的任务
├── 适用场景: 不希望任务丢失且可接受调用方阻塞的场景
└── 风险: 可能阻塞调用线程,影响整体性能

[线程状态] main
├── 系统线程总数: 16
├── 系统线程状态: BLOCKED: 9, TIMED_WAITING: 1, RUNNABLE: 3, WAITING: 3
├── 分组线程总数: 13
└── 分组线程状态: BLOCKED: 9, TIMED_WAITING: 1, RUNNABLE: 2, WAITING: 1
(4)总结线程池的执行逻辑
(1)初始阶段:线程池创建,此时没有线程,当第一个任务提交时,线程池会创建一个核心线程来处理任务。
(2)填充核心线程:前5个任务(任务0到任务4)提交时,线程池会创建5个核心线程(达到核心线程数)来处理这些任务。
(3)任务入队:当第6个任务到来时,因为核心线程都在忙,所以任务会被放入工作队列(ArrayBlockingQueue)。由于队列容量为100,所以第6到第105个任务(共100个)会被放入队列中等待。
(4)创建非核心线程:当队列满了以后(即第106个任务到来时),线程池会创建新的线程(非核心线程)来处理任务。由于最大线程数是10,所以线程池会再创建5个线程(总线程数达到10个)。因此,第106到110个任务会由新创建的5个非核心线程执行。
(5)触发拒绝策略:当第111个任务到来时,此时队列已满(100个任务在队列中),并且所有线程(10个)都在忙,所以会触发拒绝策略(CallerRunsPolicy)。CallerRunsPolicy会让提交任务的线程(这里是主线程)来执行这个任务。因此,主线程会执行第111个任务。
(6)后续任务:后续的任务(第112到1000)会继续尝试提交,但每次提交时,如果线程池的状态没有改变(队列满且线程都在忙),则都会触发拒绝策略,由提交任务的线程(主线程)执行。
(7)任务执行与线程回收:随着任务的执行,队列中的任务会被线程池中的线程取出执行。当线程空闲时,如果空闲时间超过keepAliveTime(默认60秒),非核心线程会被回收,直到线程数回到核心线程数(5个)。但是在这个例子中,由于任务持续提交,线程会一直处于忙碌状态,所以非核心线程不会被回收。
但是,由于我们假设每个任务执行需要10毫秒,而主线程也在执行任务(因为拒绝策略),所以实际上主线程执行任务会占用主线程的时间,导致提交任务的速度变慢。这样,线程池中的线程就有机会去处理队列中的任务,从而队列可能会逐渐有空闲位置,后续的任务又可以放入队列中。
【三】线程不安全的案例
在没有加锁的情况下,用户A给用户B转账,遍历100次转账
【1】代码案例
package 练习11_线程池综合使用案例;

import java.util.concurrent.*;

/**
 * @ClassName: ThreadPoolStudy01
 * @Author: AllenSun
 * @Date: 2025/10/23 23:17
 */
public class ThreadPoolStudy00_unsafe {

    public static void main(String[] args) {
        UserAccount zhangsan = new UserAccount("张三",100);
        UserAccount lisi = new UserAccount("李四",0);

        // ExecutorService executorService = Executors.newFixedThreadPool(10);
        ThreadPoolExecutor executorService =
                new ThreadPoolExecutor(
                        5, 10, 30, TimeUnit.SECONDS,
                        new ArrayBlockingQueue<>(90),
                        new ThreadPoolMonitorHelper.NamedThreadFactory("app-worker"),
                        // ThreadPoolMonitorHelper.RejectedCounter.createHandler()
                        new ThreadPoolExecutor.CallerRunsPolicy()
                );
        double amount = 1;
        int taskCount = 100;
        CountDownLatch countDownLatch = new CountDownLatch(taskCount);
        // 启动监控任务(每5秒监控一次)
        ScheduledExecutorService monitorExecutor =
                Executors.newSingleThreadScheduledExecutor();
        monitorExecutor.scheduleAtFixedRate(() -> {
            try {
                ThreadPoolMonitorHelper.monitor(executorService, "Worker线程池");
                ThreadPoolMonitorHelper.monitorThreads("main");
            } catch (Exception e) {
                e.printStackTrace();
            }

        }, 0, 5, TimeUnit.SECONDS);

        for (int i = 0; i < taskCount; i++) {

            executorService.execute(()->{
                try {
                    transfer01(zhangsan,lisi,amount);
                } catch (Exception e) {
                    System.out.println(e.getMessage());
                    throw new RuntimeException(e);
                } finally {
                    countDownLatch.countDown();
                }
            });

        }
        try {
            countDownLatch.await();
        } catch (InterruptedException e) {
            throw new RuntimeException(e);
        }

        ThreadPoolShutdownHelper.gracefulShutdown(executorService);
        ThreadPoolShutdownHelper.gracefulShutdown(monitorExecutor);

    }

    public static void transfer01(UserAccount from,UserAccount to,double amount) throws InterruptedException {
        double fromBalance = from.getBalance();
        double toBalance = to.getBalance();
        if (fromBalance >= amount) {
            from.setBalance(fromBalance - amount);
            Thread.sleep(1000);
            to.setBalance(toBalance + amount);
            System.out.println("当前线程:"+Thread.currentThread().getName()+";转出账户:" + from.getUserName() + ",余额:" + from.getBalance()+
                    ";转入账户:" + to.getUserName() + ",余额:" + to.getBalance());
        } else {
            System.out.println("当前线程:"+Thread.currentThread().getName()+";余额不足");
        }
    }
}
【2】日志效果
当前线程:app-worker-2;转出账户:张三,余额:90.0;转入账户:李四,余额:1.0
当前线程:app-worker-10;转出账户:张三,余额:90.0;转入账户:李四,余额:1.0
当前线程:app-worker-7;转出账户:张三,余额:90.0;转入账户:李四,余额:1.0
当前线程:app-worker-3;转出账户:张三,余额:90.0;转入账户:李四,余额:1.0
当前线程:app-worker-9;转出账户:张三,余额:90.0;转入账户:李四,余额:1.0
当前线程:app-worker-8;转出账户:张三,余额:90.0;转入账户:李四,余额:1.0
当前线程:app-worker-6;转出账户:张三,余额:90.0;转入账户:李四,余额:1.0
当前线程:app-worker-4;转出账户:张三,余额:90.0;转入账户:李四,余额:1.0
当前线程:app-worker-1;转出账户:张三,余额:90.0;转入账户:李四,余额:1.0
当前线程:app-worker-5;转出账户:张三,余额:90.0;转入账户:李四,余额:1.0
当前线程:app-worker-2;转出账户:张三,余额:80.0;转入账户:李四,余额:2.0
当前线程:app-worker-3;转出账户:张三,余额:79.0;转入账户:李四,余额:2.0
当前线程:app-worker-1;转出账户:张三,余额:79.0;转入账户:李四,余额:2.0
当前线程:app-worker-9;转出账户:张三,余额:79.0;转入账户:李四,余额:2.0
当前线程:app-worker-7;转出账户:张三,余额:79.0;转入账户:李四,余额:2.0
当前线程:app-worker-10;转出账户:张三,余额:79.0;转入账户:李四,余额:2.0
当前线程:app-worker-4;转出账户:张三,余额:79.0;转入账户:李四,余额:2.0
当前线程:app-worker-6;转出账户:张三,余额:79.0;转入账户:李四,余额:2.0
当前线程:app-worker-5;转出账户:张三,余额:79.0;转入账户:李四,余额:2.0
当前线程:app-worker-8;转出账户:张三,余额:79.0;转入账户:李四,余额:2.0
当前线程:app-worker-2;转出账户:张三,余额:70.0;转入账户:李四,余额:3.0
当前线程:app-worker-1;转出账户:张三,余额:70.0;转入账户:李四,余额:3.0
【四】execute+Runnable
【1】exacutor的使用方式
(1)仅接受 Runnable任务
(2)无返回值(无法获取任务执行结果)
(3)无法抛出受检异常
(4)是线程池最基础的任务提交方式
【2】exacutor处理异常
使用线程池的execute方法提交任务时,任务中的异常不会被自动捕获并打印(默认情况下),因此我们需要手动处理异常。
(1)在任务内部使用try-catch捕获异常
这是最直接的方法,在任务的run方法中捕获所有异常并进行处理。
executor.execute(() -> {
    try {
        // 业务代码
        doSomething();
    } catch (Exception e) {
        // 处理异常
        e.printStackTrace();
        // 或者使用日志记录
        logger.error("任务执行异常", e);
    }
});
(2)自定义线程工厂,为线程设置未捕获异常处理器
通过自定义线程工厂,为每个线程设置一个未捕获异常处理器(UncaughtExceptionHandler)。这样,当线程中抛出未捕获的异常时,就会调用该处理器。
// 自定义线程工厂
ThreadFactory factory = new ThreadFactory() {
    private final AtomicInteger threadCount = new AtomicInteger(0);

    @Override
    public Thread newThread(Runnable r) {
        Thread t = new Thread(r);
        t.setName("worker-" + threadCount.getAndIncrement());
        // 设置未捕获异常处理器
        t.setUncaughtExceptionHandler((thread, throwable) -> {
            System.err.println("线程 " + thread.getName() + " 发生异常: " + throwable.getMessage());
            throwable.printStackTrace();
        });
        return t;
    }
};
【3】exacutor的几种写法
(1)基础 Lambda 表达式写法(最常用)
package 练习11_线程池综合使用案例;

import java.util.concurrent.ExecutorService;
import java.util.concurrent.Executors;

/**
 * @ClassName: ThreadPoolStudy01
 * @Author: AllenSun
 * @Date: 2025/10/23 23:17
 */
public class ThreadPoolStudy01_execute {
    public static void main(String[] args) {
        UserAccount zhangsan = new UserAccount("张三",100);
        UserAccount lisi = new UserAccount("李四",0);

        ExecutorService executorService = Executors.newFixedThreadPool(10);

        double amount = 1;

        for (int i = 0; i < 10; i++) {

            executorService.execute(()->{
                try {
                    transfer01(zhangsan,lisi,amount);
                } catch (Exception e) {
                    System.out.println(e.getMessage());
                    throw new RuntimeException(e);
                }
            });

        }

        ThreadPoolShutdownHelper.gracefulShutdown(executorService);

    }

    public static void transfer01(UserAccount from,UserAccount to,double amount) throws InterruptedException {
        synchronized (UserAccount.class) {
            double fromBalance = from.getBalance();
            double toBalance = to.getBalance();
            if (fromBalance >= amount) {
                from.setBalance(fromBalance - amount);
                Thread.sleep(100);
                to.setBalance(toBalance + amount);
                System.out.println("当前线程:"+Thread.currentThread().getName()+";转出账户:" + from.getUserName() + ",余额:" + from.getBalance()+
                        ";转入账户:" + to.getUserName() + ",余额:" + to.getBalance());
            } else {
                System.out.println("当前线程:"+Thread.currentThread().getName()+";余额不足");
            }
        }
    }
}
(2)方法引用写法(简洁高效)
public class TaskRunner {
    public void processData() {
        // 数据处理逻辑
    }

    public static void cleanup() {
        // 清理逻辑
    }
}

// 使用
TaskRunner runner = new TaskRunner();
pool.execute(runner::processData); // 实例方法引用
pool.execute(TaskRunner::cleanup); // 静态方法引用
(3)匿名内部类写法(兼容旧代码)
package 练习11_线程池综合使用案例;

import java.util.concurrent.ExecutorService;
import java.util.concurrent.Executors;

/**
 * @ClassName: ThreadPoolStudy01
 * @Author: AllenSun
 * @Date: 2025/10/23 23:17
 */
public class ThreadPoolStudy01_execute {
    public static void main(String[] args) {
        UserAccount zhangsan = new UserAccount("张三",100);
        UserAccount lisi = new UserAccount("李四",0);

        ExecutorService executorService = Executors.newFixedThreadPool(10);

        double amount = 1;

        for (int i = 0; i < 10; i++) {
            executorService.execute(new Runnable() {

                @Override
                public void run() {
                    try {
                        transfer01(zhangsan,lisi,amount);
                    } catch (Exception e) {
                        System.out.println(e.getMessage());
                        throw new RuntimeException(e);
                    }
                }
            });

        }

        ThreadPoolShutdownHelper.gracefulShutdown(executorService);

    }

    public static void transfer01(UserAccount from,UserAccount to,double amount) throws InterruptedException {
        synchronized (UserAccount.class) {
            double fromBalance = from.getBalance();
            double toBalance = to.getBalance();
            if (fromBalance >= amount) {
                from.setBalance(fromBalance - amount);
                Thread.sleep(100);
                to.setBalance(toBalance + amount);
                System.out.println("当前线程:"+Thread.currentThread().getName()+";转出账户:" + from.getUserName() + ",余额:" + from.getBalance()+
                        ";转入账户:" + to.getUserName() + ",余额:" + to.getBalance());
            } else {
                System.out.println("当前线程:"+Thread.currentThread().getName()+";余额不足");
            }
        }
    }
}
(4)预定义 Runnable 对象写法(任务复用)
public class ReportGenerator implements Runnable {
    private final ReportConfig config;

    public ReportGenerator(ReportConfig config) {
        this.config = config;
    }

    @Override
    public void run() {
        generateReport(config);
    }
}

// 使用
ReportConfig dailyConfig = new ReportConfig(ReportType.DAILY);
pool.execute(new ReportGenerator(dailyConfig));
【4】Runnable的特点
(1)Runnable任务通过线程池的execute(Runnable command)方法提交
(2)无返回值
Runnable接口的run()方法没有返回值。如果任务需要返回结果,应该使用Callable接口,并通过submit()方法提交,返回一个Future对象。(3)异常处理
Runnable的run()方法不能抛出受检异常(checked exception),但可以抛出运行时异常(runtime exception)。在Runnable任务中抛出的异常不会被传播到调用线程(即提交任务的线程)。如果没有适当的异常处理机制,异常可能会被忽略,导致问题难以追踪。
【五】submit+Callable
【1】submit的使用方式
(1)submit的特点
(1)可以提交Callable任务,也可以提交Runnable任务(通过重载)。
(2)返回Future对象,通过Future可以获取任务执行结果(对于Callable)或判断任务是否完成(对于Runnable)。
(3)任务中的异常会被封装在Future中,当调用Future.get()时,会抛出ExecutionException,通过这个异常可以获取到任务中抛出的原始异常。
(4)可以通过Future取消任务、查询任务状态等。
(2)submit的基本使用案例
ExecutorService executor = Executors.newFixedThreadPool(4);

// 提交Callable任务
Future<Integer> future = executor.submit(() -> {
    // 复杂计算
    return 42;
});

// 获取结果(阻塞)
try {
    int result = future.get(); // 阻塞直到结果就绪
    System.out.println("结果: " + result);
} catch (InterruptedException | ExecutionException e) {
    // 处理中断或执行异常
}
【2】submit的处理异常
(1)通过Future.get()获取异常
当调用Future.get()方法获取结果时,如果任务中抛出了异常,该方法会抛出ExecutionException,我们可以通过这个异常获取到原始异常
ExecutorService executor = Executors.newFixedThreadPool(1);
Future<String> future = executor.submit(() -> {
    // 模拟抛出异常
    throw new RuntimeException("Task exception!");
});

try {
    String result = future.get(); // 这里会抛出ExecutionException
} catch (InterruptedException e) {
    // 处理中断异常
    Thread.currentThread().interrupt(); // 重置中断状态
} catch (ExecutionException e) {
    // 获取原始异常
    Throwable cause = e.getCause();
    // 处理原始异常
    if (cause instanceof RuntimeException) {
        System.err.println("捕获到运行时异常: " + cause.getMessage());
    }
}
(2)使用CompletableFuture(Java 8+)
CompletableFuture提供了更灵活的异常处理方式,可以使用exceptionally方法处理异常。
ExecutorService executor = Executors.newFixedThreadPool(1);
CompletableFuture.supplyAsync(() -> {
    // 执行任务,可能抛出异常
    if (true) {
        throw new RuntimeException("Task exception!");
    }
    return "Success";
}, executor).exceptionally(ex -> {
    // 处理异常
    System.err.println("捕获到异常: " + ex.getMessage());
    return "Fallback"; // 提供降级结果
});
(3)自定义线程工厂设置未捕获异常处理器
虽然submit方法提交的任务异常会被封装在Future中,但有时我们可能希望有一个全局的异常处理机制。可以通过自定义线程工厂,为线程设置未捕获异常处理器,但注意:对于submit提交的Callable任务,如果异常被Future封装,则不会触发未捕获异常处理器。因此,这种方法主要适用于execute方法提交的任务。
ThreadFactory factory = r -> {
    Thread t = new Thread(r);
    t.setUncaughtExceptionHandler((thread, ex) -> {
        System.err.println("线程 " + thread.getName() + " 抛出异常: " + ex.getMessage());
    });
    return t;
};

ExecutorService executor = new ThreadPoolExecutor(..., factory);
executor.execute(() -> { throw new RuntimeException("execute exception"); }); // 会触发处理器
executor.submit(() -> { throw new RuntimeException("submit exception"); }); // 不会触发处理器
【3】submit的几种写法
【4】Callable的特点
(1)有返回值
Callable任务最大的特点是它可以返回一个结果。与Runnable的run方法(void)不同,Callable的call方法可以返回任意类型的值。
(2)异常抛出
Callable的call方法可以抛出异常,而Runnable的run方法不能抛出受检异常(只能处理或转为非受检异常抛出)。Callable任务抛出的异常会被封装在ExecutionException中,当调用Future.get()时,这个异常会被抛出。
(3)与Future结合
当使用线程池的submit方法提交Callable任务时,会返回一个Future对象。通过Future对象,我们可以:
获取任务执行结果(get())
取消任务(cancel())
判断任务是否完成(isDone())
判断任务是否被取消(isCancelled())
(4)任务取消
Callable任务可以通过Future的cancel方法来取消。可以设置是否中断正在执行的任务。
(5)超时控制
在获取Callable任务结果时,可以设置超时时间,避免无限期阻塞。
(6)批量执行
线程池提供了invokeAll和invokeAny方法,可以批量提交Callable任务:
invokeAll:提交一组任务,等待所有任务完成,返回Future列表
invokeAny:提交一组任务,返回任意一个已完成任务的结果(其他任务会被取消)
【六】返回结果
【1】Future的作用和使用(有返回值)
Future的作用:
(1)异步计算结果的获取:Future允许我们在需要的时候获取计算结果,如果计算尚未完成,我们可以选择等待(阻塞)或者轮询。
(2)任务取消:我们可以通过Future的cancel方法来尝试取消任务的执行。
(3)任务状态查询:可以查询任务是否已经完成(isDone)、是否被取消(isCancelled)等。
(4)结果获取:当任务完成时,可以通过Future的get方法获取结果。
使用场景:
(1)并行计算:将一个大任务分解成多个小任务,使用Future获取每个小任务的结果,最后合并结果。
(2)异步IO操作:如从多个网络源获取数据,每个请求在一个单独的线程中执行,通过Future获取结果。
(3)超时控制:使用带超时的get方法,避免长时间阻塞。
【2】Future的get方法原理
(1)阻塞场景
ExecutorService executor = Executors.newSingleThreadExecutor();
Future<String> future = executor.submit(() -> {
    Thread.sleep(5000); // 模拟耗时操作
    return "结果";
});

// 此时调用get会阻塞
String result = future.get(); // 主线程阻塞5秒
(2)阻塞原理
【3】FutureTask的作用和使用(结合Runnable和Future)
(1)FutureTask和Future的区别和优势
FutureTask实现了RunnableFuture接口,而RunnableFuture接口继承了Runnable和Future接口。因此,FutureTask既是Runnable(可被线程执行)又是Future(可获取结果),提供了对Future接口的基本实现
Future是一个接口,而FutureTask是Future接口的一个实现类,同时也实现了Runnable接口。因此,FutureTask既可以作为Runnable被线程执行,也可以作为Future获取任务执行的结果。
优点如下:
(1)可执行性(Runnable):FutureTask实现了Runnable接口,因此可以直接被线程执行(通过Thread或ExecutorService的execute方法)。而Future本身只是一个表示异步计算结果的接口,不能直接被线程执行。
(2)任务与结果的一体化:FutureTask将任务(Callable或Runnable)和结果存储结合在一起。一旦执行完成,结果就被设置到FutureTask中,可以通过Future的get方法获取。
(3)状态管理:FutureTask内部维护了任务的状态(例如未开始、运行中、完成、取消等),并提供了相应的方法来查询状态(isDone, isCancelled)。
(4)可取消性:FutureTask提供了cancel方法来取消任务的执行,并且可以指定是否中断正在执行任务的线程。
(5)一次性执行:FutureTask的run方法只能执行一次,即使多次调用run方法,任务也不会重复执行。
(6)回调支持:FutureTask提供了done()方法,可以在任务完成时被调用(无论是正常完成、取消还是异常),子类可以重写这个方法来实现回调逻辑。
(7)灵活的构造方式:FutureTask可以通过Callable构造,也可以通过Runnable和结果值构造(将Runnable转换为Callable)。
(8)可以手动设置结果或异常:FutureTask提供了一些受保护的方法(set, setException),可以在任务执行过程中手动设置结果或异常(通常不需要直接使用,但在某些高级场景可能有用)。
(9)支持中断:FutureTask对中断的处理是完善的,当调用cancel(true)时,它会尝试中断执行任务的线程。
(10)组合性:由于FutureTask本身是Runnable,它可以被提交到线程池,同时它又提供了Future的功能,因此可以方便地组合使用。
(2)FutureTask的作用
(1)可执行的任务:由于实现了Runnable,可以交给Executor执行
(2)可获取结果:同时提供了Future的功能,可以获取任务执行结果
(3)状态转换:管理任务的生命周期状态(未启动、已启动、已完成、已取消)
(4)回调机制:任务完成后可以触发依赖操作(通过重写done()方法)
(3)FutureTask的案例
(1)基本使用案例
ExecutorService executor = Executors.newFixedThreadPool(2);

// 提交FutureTask
FutureTask<Integer> futureTask = new FutureTask<>(() -> {
    Thread.sleep(1000);
    return 123;
});

executor.execute(futureTask); // 因为FutureTask是Runnable

// 获取结果
System.out.println(futureTask.get());
(2)编排使用案例
// 创建任务链
FutureTask<User> authTask = new FutureTask<>(this::authenticate);
FutureTask<Profile> profileTask = new FutureTask(() ->
    fetchProfile(authTask.get()) // 依赖认证结果
);
FutureTask<Recommendations> recTask = new FutureTask(() ->
    getRecommendations(profileTask.get()) // 依赖资料结果
);

// 并行执行
ExecutorService executor = Executors.newFixedThreadPool(3);
executor.execute(authTask);
executor.execute(profileTask);
executor.execute(recTask);

// 获取最终结果
Recommendations recs = recTask.get();
【4】CompletableFuture的作用和使用(更强编排、非阻塞获取结果)
(1)CompletableFuture对比FutureTask的区别和优势
(1)区别
(1)设计目标和定位
1-FutureTask:是Future接口的一个基础实现,同时也实现了Runnable。它代表一个异步计算的任务,可以取消,可以查询状态,可以获取结果(阻塞直到完成)。它主要解决了异步任务执行和结果获取的问题,但没有提供非阻塞的回调机制。
2-CompletableFuture:实现了CompletionStage和Future接口。它不仅提供了异步计算的能力,还提供了强大的非阻塞的回调机制和组合异步操作的能力。它允许你以声明式的方式组合多个异步任务,处理它们的完成结果(无论成功或异常)。
(2)功能对比
1-FutureTask:
基本功能:异步执行任务,获取结果(阻塞或超时获取),取消任务。
需要自己管理线程执行,或者通过线程池提交。
获取结果时,如果任务未完成,会阻塞调用线程。
不支持非阻塞的回调,需要自己轮询或使用其他机制。
2-CompletableFuture:
支持非阻塞的回调:当任务完成时,可以自动触发后续操作(如thenApply, thenAccept, thenRun等)。
支持组合多个异步任务:例如,将两个异步任务的结果合并(thenCombine),或者当一个任务完成后触发另一个任务(thenCompose)。
支持处理异常:有专门的方法处理异步计算中的异常(exceptionally, handle)。
支持多个任务的组合:例如,等待所有任务完成(allOf),或者等待任意一个任务完成(anyOf)。
可以手动设置完成结果:通过complete方法手动设置结果,或者通过completeExceptionally设置异常结果。
(3)编程模型
1-FutureTask:命令式编程模型。你需要显式地启动任务,然后在需要结果的地方调用get()方法,这会导致阻塞。
2-CompletableFuture:函数式编程模型。你可以通过链式调用组合多个操作,每个操作在前一个操作完成时自动触发,无需阻塞等待。
(4)异常处理
1-FutureTask:在任务执行中抛出异常,会在调用get()方法时抛出ExecutionException,需要捕获并处理。
2-CompletableFuture:提供了更灵活的异常处理机制。例如:
3-exceptionally:相当于捕获异常并返回一个替代值。
4-handle:无论成功或异常都会被调用,可以同时处理结果和异常。
5-whenComplete:可以处理结果和异常,但不会改变结果。
(5)组合能力
1-FutureTask:没有内置的组合多个任务的能力。如果需要组合多个任务,需要自己编写复杂的逻辑(例如,使用ExecutorService的invokeAll,或者使用循环和get方法,这可能导致阻塞)。
2-CompletableFuture:提供了丰富的组合方法,例如:
thenCompose:用于连接两个有依赖关系的异步任务(前一个任务的结果作为后一个任务的输入)。
thenCombine:合并两个独立任务的结果。
allOf:等待多个任务全部完成。
anyOf:等待任意一个任务完成。
(6)手动完成
1-FutureTask:一旦任务开始执行,就不能手动设置结果(除非取消)。它只能通过运行任务来设置结果。
2-CompletableFuture:可以在任何时候通过complete方法手动设置结果,或者通过completeExceptionally设置异常。这使得它可以用于那些不是由线程执行的任务,比如事件回调。
(7)性能与资源利用
1-FutureTask:在获取结果时阻塞线程,可能导致线程资源浪费(尤其是在需要等待多个任务完成时)。
2-CompletableFuture:非阻塞的回调机制可以避免线程阻塞,提高资源利用率。回调函数会在任务完成时被触发,通常由完成任务的线程执行回调(或者由指定的线程池执行)。
(2)CompletableFuture的优势
(1)非阻塞:通过回调机制,避免了阻塞等待。
(2)组合性:提供了丰富的组合方法,可以构建复杂的异步工作流。
(3)灵活性:支持手动完成,可以用于各种异步场景。
(4)异常处理:内置了更强大的异常处理机制。
(5)函数式编程:支持函数式编程风格,代码更简洁。
(6)线程池集成:可以方便地指定任务执行的线程池,以及回调执行的线程池。
(3)适用场景
(1)FutureTask:适用于简单的异步任务,不需要复杂的组合和回调,或者对线程控制有特殊要求的场景。
(2)CompletableFuture:适用于需要构建复杂异步任务链、需要非阻塞回调、需要组合多个异步任务结果的场景。特别是在现代异步编程、响应式编程中,CompletableFuture是更优的选择。
(4)CompletableFuture非阻塞回调的原理
(2)CompletableFuture的核心方法
(1)创建CompletableFuture
(1)supplyAsync(Supplier supplier)
异步执行一个有返回值的任务,使用默认的ForkJoinPool。
(2)supplyAsync(Supplier supplier, Executor executor)
指定线程池执行有返回值的任务。
(3)runAsync(Runnable runnable)
异步执行一个无返回值的任务,使用默认的ForkJoinPool。
(4)runAsync(Runnable runnable, Executor executor)
指定线程池执行无返回值的任务。
(5)completedFuture(U value)
返回一个已经完成并带有指定结果的CompletableFuture。
(2)结果转换(类似于Stream的map)
(1)thenApply(Function<? super T,? extends U> fn)
当前阶段正常完成后,对结果应用函数fn,返回新的CompletableFuture。
(2)thenApplyAsync(Function<? super T,? extends U> fn)
异步执行thenApply,使用默认线程池。
(3)thenApplyAsync(Function<? super T,? extends U> fn, Executor executor)
使用指定线程池异步执行thenApply。
(3)结果消费(类似于Stream的forEach)
(1)thenAccept(Consumer<? super T> action)
当前阶段完成后,使用结果执行Consumer,返回CompletableFuture。
(2)thenAcceptAsync(Consumer<? super T> action)
异步执行thenAccept。
(3)thenRun(Runnable action)
当前阶段完成后执行Runnable,不消费结果。
(4)组合两个阶段
(1)thenCompose(Function<? super T, ? extends CompletionStage> fn) 当前阶段完成后,将结果传递给函数fn,返回新的CompletableFuture(扁平化,避免嵌套)。 (2)thenCombine(CompletionStage<? extends U> other, BiFunction<? super T,? super U,? extends V> fn) 当当前阶段和另一个阶段other都完成后,将两个结果传递给fn,返回新的CompletableFuture。 (3)thenAcceptBoth(CompletionStage<? extends U> other, BiConsumer<? super T, ? super U> action) 两个阶段都完成后,使用两个结果执行BiConsumer。 (4)runAfterBoth(CompletionStage<?> other, Runnable action)
两个阶段都完成后执行Runnable。
(5)组合两个阶段(任一完成)
(1)applyToEither(CompletionStage<? extends T> other, Function<? super T, U> fn) 当前阶段或other阶段任一完成,将其结果传递给fn,返回新的CompletableFuture。 (2)acceptEither(CompletionStage<? extends T> other, Consumer<? super T> action) 任一阶段完成后,使用其结果执行Consumer。 (3)runAfterEither(CompletionStage<?> other, Runnable action)
任一阶段完成后执行Runnable。
(6)多任务组合
(1)allOf(CompletableFuture<?>... cfs) 返回一个新的CompletableFuture,当所有给定的CompletableFuture完成时完成。 (2)anyOf(CompletableFuture<?>… cfs)
返回一个新的CompletableFuture,当任意一个给定的CompletableFuture完成时完成。
(7)异常处理
(1)exceptionally(Function<Throwable, ? extends T> fn)
当阶段抛出异常时,使用异常执行fn,返回处理后的结果。
(2)handle(BiFunction<? super T, Throwable, ? extends U> fn)
无论阶段正常完成还是异常,都会执行fn,可以处理结果和异常。
(3)whenComplete(BiConsumer<? super T, ? super Throwable> action)
阶段完成时执行action,可以访问结果或异常,但不改变结果。
(8)完成控制(手动设置结果)
(1)complete(T value)
手动完成CompletableFuture,设置结果值。
(2)completeExceptionally(Throwable ex)
手动以异常完成CompletableFuture。
(3)cancel(boolean mayInterruptIfRunning)
取消任务(实际上是调用completeExceptionally)。
(9)获取结果
(1)get()
阻塞获取结果,抛出受检异常。
(2)get(long timeout, TimeUnit unit)
带超时的阻塞获取。
(3)join()
阻塞获取结果,抛出非受检异常(在CompletableFuture链中常用)。
(4)getNow(T valueIfAbsent)
立即获取结果,如果未完成则返回valueIfAbsent。
(10)状态检查
(1)isDone()
是否完成(包括正常完成、异常完成、取消)。
(2)isCompletedExceptionally()
是否异常完成。
(3)isCancelled()
是否被取消。
(11)其他实用方法
(1)orTimeout(long timeout, TimeUnit unit)
设置超时时间,超时后以TimeoutException异常完成。
(2)completeOnTimeout(T value, long timeout, TimeUnit unit)
超时后使用给定的默认值完成。
(12)完整案例
CompletableFuture<Order> orderFuture = CompletableFuture.supplyAsync(() ->
    createOrder(request), orderExecutor);

CompletableFuture<Inventory> inventoryFuture = orderFuture.thenComposeAsync(order ->
    reserveInventory(order), inventoryExecutor);

CompletableFuture<Payment> paymentFuture = orderFuture.thenComposeAsync(order ->
    processPayment(order), paymentExecutor);

CompletableFuture<Shipping> shippingFuture = inventoryFuture.thenCombineAsync(
    paymentFuture,
    (inventory, payment) -> scheduleShipping(inventory, payment),
    shippingExecutor
);

shippingFuture
    .thenAccept(shipping -> sendConfirmation(shipping))
    .exceptionally(ex -> {
        handleOrderFailure(ex);
        return null;
    });
(3)CompletableFuture的案例
(1)场景1:顺序执行任务链
(1)FutureTask实现:
FutureTask<String> task1 = new FutureTask<>(() -> step1());
FutureTask<String> task2 = new FutureTask<>(() -> step2(task1.get()));
FutureTask<String> task3 = new FutureTask<>(() -> step3(task2.get()));

ExecutorService executor = Executors.newFixedThreadPool(3);
executor.execute(task1);
executor.execute(task2);
executor.execute(task3);

String result = task3.get(); // 阻塞等待
(2)CompletableFuture实现:
CompletableFuture.supplyAsync(() -> step1())
    .thenApplyAsync(step1Result -> step2(step1Result))
    .thenApplyAsync(step2Result -> step3(step2Result))
    .thenAccept(finalResult -> process(finalResult));
(3)优势:
非阻塞等待
自动线程调度
链式表达更清晰
(2)场景2:并行任务聚合
(1)FutureTask实现:
List<FutureTask<Integer>> tasks = IntStream.range(0, 10)
    .mapToObj(i -> new FutureTask<>(() -> compute(i)))
    .collect(Collectors.toList());

ExecutorService executor = Executors.newFixedThreadPool(4);
tasks.forEach(executor::execute);

int sum = 0;
for (FutureTask<Integer> task : tasks) {
    sum += task.get(); // 顺序阻塞等待
}
(2)CompletableFuture实现:
List<CompletableFuture<Integer>> futures = IntStream.range(0, 10)
    .mapToObj(i -> CompletableFuture.supplyAsync(() -> compute(i)))
    .collect(Collectors.toList());

CompletableFuture<Void> allDone = CompletableFuture.allOf(futures.toArray(new CompletableFuture[0]));

CompletableFuture<Integer> sumFuture = allDone.thenApply(v ->
    futures.stream()
           .map(CompletableFuture::join)
           .reduce(0, Integer::sum)
);

sumFuture.thenAccept(sum -> System.out.println("总和: " + sum));
(3)优势:
非阻塞聚合
自动并行处理
内置聚合方法
(3)场景3:超时控制
(1)FutureTask实现:
FutureTask<String> task = new FutureTask<>(() -> longRunningTask());
executor.execute(task);

try {
    String result = task.get(5, TimeUnit.SECONDS);
} catch (TimeoutException e) {
    task.cancel(true);
    handleTimeout();
}
(2)CompletableFuture实现:
CompletableFuture<String> future = CompletableFuture.supplyAsync(() -> longRunningTask());

future.orTimeout(5, TimeUnit.SECONDS) // Java 9+
     .exceptionally(ex -> {
         if (ex instanceof TimeoutException) {
             return "超时默认值";
         }
         return "其他错误";
     });
(3)优势:
链式超时处理
无需显式取消
统一错误处理
【七】保证线程安全
【1】sychronized的使用方式
(1)同步实例方法(对象锁)
在实例方法声明中使用synchronized关键字,锁是当前实例对象(即this)。同一时间只能有一个线程访问该对象的这个同步方法。
public synchronized void synchronizedMethod() {
    // 同步代码
}
(2)同步静态方法(类锁)
在静态方法声明中使用synchronized关键字,锁是当前类的Class对象(即类名.class)。同一时间只能有一个线程访问该类的这个静态同步方法。
public static synchronized void staticSynchronizedMethod() {
    // 同步代码
}
(3)同步代码块(指定对象锁)(对象锁)
使用synchronized关键字修饰代码块,并指定一个对象作为锁。可以是任意对象,包括实例对象、Class对象或其他对象。
public void method() {
    // 非同步代码

    synchronized (lockObject) {
        // 同步代码块,锁是lockObject
    }

    // 非同步代码
}
(4)同步代码块(使用this)(对象锁)
在代码块中使用synchronized(this),锁是当前实例对象(与同步实例方法使用的锁相同)。
public void method() {
    synchronized (this) {
        // 同步代码块,锁是当前实例对象
    }
}
(5)同步代码块(使用Class对象)(类锁)
在代码块中使用synchronized(类名.class),锁是当前类的Class对象(与同步静态方法使用的锁相同)。
public void method() {
    synchronized (MyClass.class) {
        // 同步代码块,锁是MyClass类的Class对象
    }
}
【2】sychronized对象锁和类锁
(1)对象锁和类锁的区别
(1)对象锁(实例锁)
1-作用范围:对象锁用于实例方法或实例对象的代码块。它锁定的是当前对象实例(即this),因此同一个对象实例的同步方法或代码块在同一时刻只能被一个线程访问。
2-锁对象:锁是当前对象实例(this)或指定的实例对象。
3-影响:不同对象实例之间不会相互影响。例如,一个线程访问一个实例的同步方法时,另一个线程可以同时访问另一个实例的同一个同步方法。
(2)类锁
1-作用范围:类锁用于静态方法或类的Class对象的代码块。它锁定的是类的Class对象(每个类只有一个Class对象),因此同一时刻只能有一个线程访问该类的任意一个同步静态方法或同步代码块(以Class对象为锁)。
2-锁对象:锁是当前类的Class对象(如MyClass.class)。
3-影响:类锁会影响该类的所有实例。因为所有实例共享同一个Class对象,所以当一个线程访问一个同步静态方法时,其他线程不能访问该类的任何同步静态方法,也不能访问以Class对象为锁的同步代码块。
(2)对象锁案例
在银行系统中,每个账户需要保证余额操作的原子性,但不同账户之间可以并行操作。
import java.util.concurrent.ExecutorService;
import java.util.concurrent.Executors;

class BankAccount {
    private final String accountId;
    private double balance;

    public BankAccount(String accountId, double balance) {
        this.accountId = accountId;
        this.balance = balance;
    }

    // 对象锁:保护实例变量
    public synchronized void deposit(double amount) {
        System.out.println(Thread.currentThread().getName() +
            " 存款到账户 " + accountId + ": " + amount);
        balance += amount;
        System.out.println("账户 " + accountId + " 新余额: " + balance);
    }

    public synchronized void withdraw(double amount) {
        if (balance >= amount) {
            System.out.println(Thread.currentThread().getName() +
                " 从账户 " + accountId + " 取款: " + amount);
            balance -= amount;
            System.out.println("账户 " + accountId + " 新余额: " + balance);
        } else {
            System.out.println("账户 " + accountId + " 余额不足");
        }
    }

    // 转账(需要两把对象锁)
    public void transferTo(BankAccount target, double amount) {
        // 锁排序避免死锁
        BankAccount first = this.accountId.compareTo(target.accountId) < 0 ? this : target;
        BankAccount second = first == this ? target : this;

        synchronized (first) {
            synchronized (second) {
                if (this.balance >= amount) {
                    this.balance -= amount;
                    target.balance += amount;
                    System.out.println(Thread.currentThread().getName() +
                        " 转账成功: " + amount + " 从 " + accountId + " 到 " + target.accountId);
                } else {
                    System.out.println("转账失败: " + accountId + " 余额不足");
                }
            }
        }
    }
}

public class ObjectLockDemo {
    public static void main(String[] args) {
        ExecutorService executor = Executors.newFixedThreadPool(4);

        BankAccount acc1 = new BankAccount("A001", 1000);
        BankAccount acc2 = new BankAccount("A002", 2000);

        // 不同账户操作可并行
        executor.execute(() -> acc1.deposit(500));
        executor.execute(() -> acc2.withdraw(300));

        // 相同账户操作需串行
        executor.execute(() -> acc1.deposit(200));
        executor.execute(() -> acc1.withdraw(100));

        // 转账操作(涉及两个账户)
        executor.execute(() -> acc1.transferTo(acc2, 400));
        executor.execute(() -> acc2.transferTo(acc1, 200));

        executor.shutdown();
    }
}
输出示例
pool-1-thread-1 存款到账户 A001: 500.0
账户 A001 新余额: 1500.0
pool-1-thread-2 从账户 A002 取款: 300.0
账户 A002 新余额: 1700.0
pool-1-thread-3 存款到账户 A001: 200.0
账户 A001 新余额: 1700.0
pool-1-thread-4 从账户 A001 取款: 100.0
账户 A001 新余额: 1600.0
pool-1-thread-1 转账成功: 400.0 从 A001 到 A002
pool-1-thread-2 转账成功: 200.0 从 A002 到 A001
(3)类锁案例
系统需要生成全局唯一的ID,多个线程需要安全地获取下一个ID值。
import java.util.concurrent.ExecutorService;
import java.util.concurrent.Executors;

class GlobalIdGenerator {
    private static long nextId = 1; // 静态变量

    // 类锁:保护静态变量
    public static synchronized long getNextId() {
        System.out.println(Thread.currentThread().getName() +
            " 获取ID: " + nextId);
        return nextId++;
    }

    // 替代方案:类锁代码块
    public static long getNextIdV2() {
        synchronized (GlobalIdGenerator.class) {
            System.out.println(Thread.currentThread().getName() +
                " 获取ID: " + nextId);
            return nextId++;
        }
    }
}

public class ClassLockDemo {
    public static void main(String[] args) {
        ExecutorService executor = Executors.newFixedThreadPool(5);

        // 多个线程获取全局ID
        for (int i = 0; i < 10; i++) {
            executor.execute(() -> {
                long id = GlobalIdGenerator.getNextId();
                // 使用ID进行后续操作...
            });
        }

        executor.shutdown();
    }
}
pool-1-thread-1 获取ID: 1
pool-1-thread-2 获取ID: 2
pool-1-thread-3 获取ID: 3
pool-1-thread-4 获取ID: 4
pool-1-thread-5 获取ID: 5
pool-1-thread-1 获取ID: 6
pool-1-thread-2 获取ID: 7
pool-1-thread-3 获取ID: 8
pool-1-thread-4 获取ID: 9
pool-1-thread-5 获取ID: 10
(4)使用场景
(1)对象锁适用场景
1.保护实例状态:如账户余额
2.相同对象操作:同一账户的存取款
3.对象级别隔离:不同账户可并行操作
4.细粒度控制:只锁定相关对象
(2)类锁适用场景
1.保护静态资源:如全局计数器
2.类级别操作:初始化静态数据
3.单例模式:确保唯一实例创建
4.全局配置:加载或更新共享配置
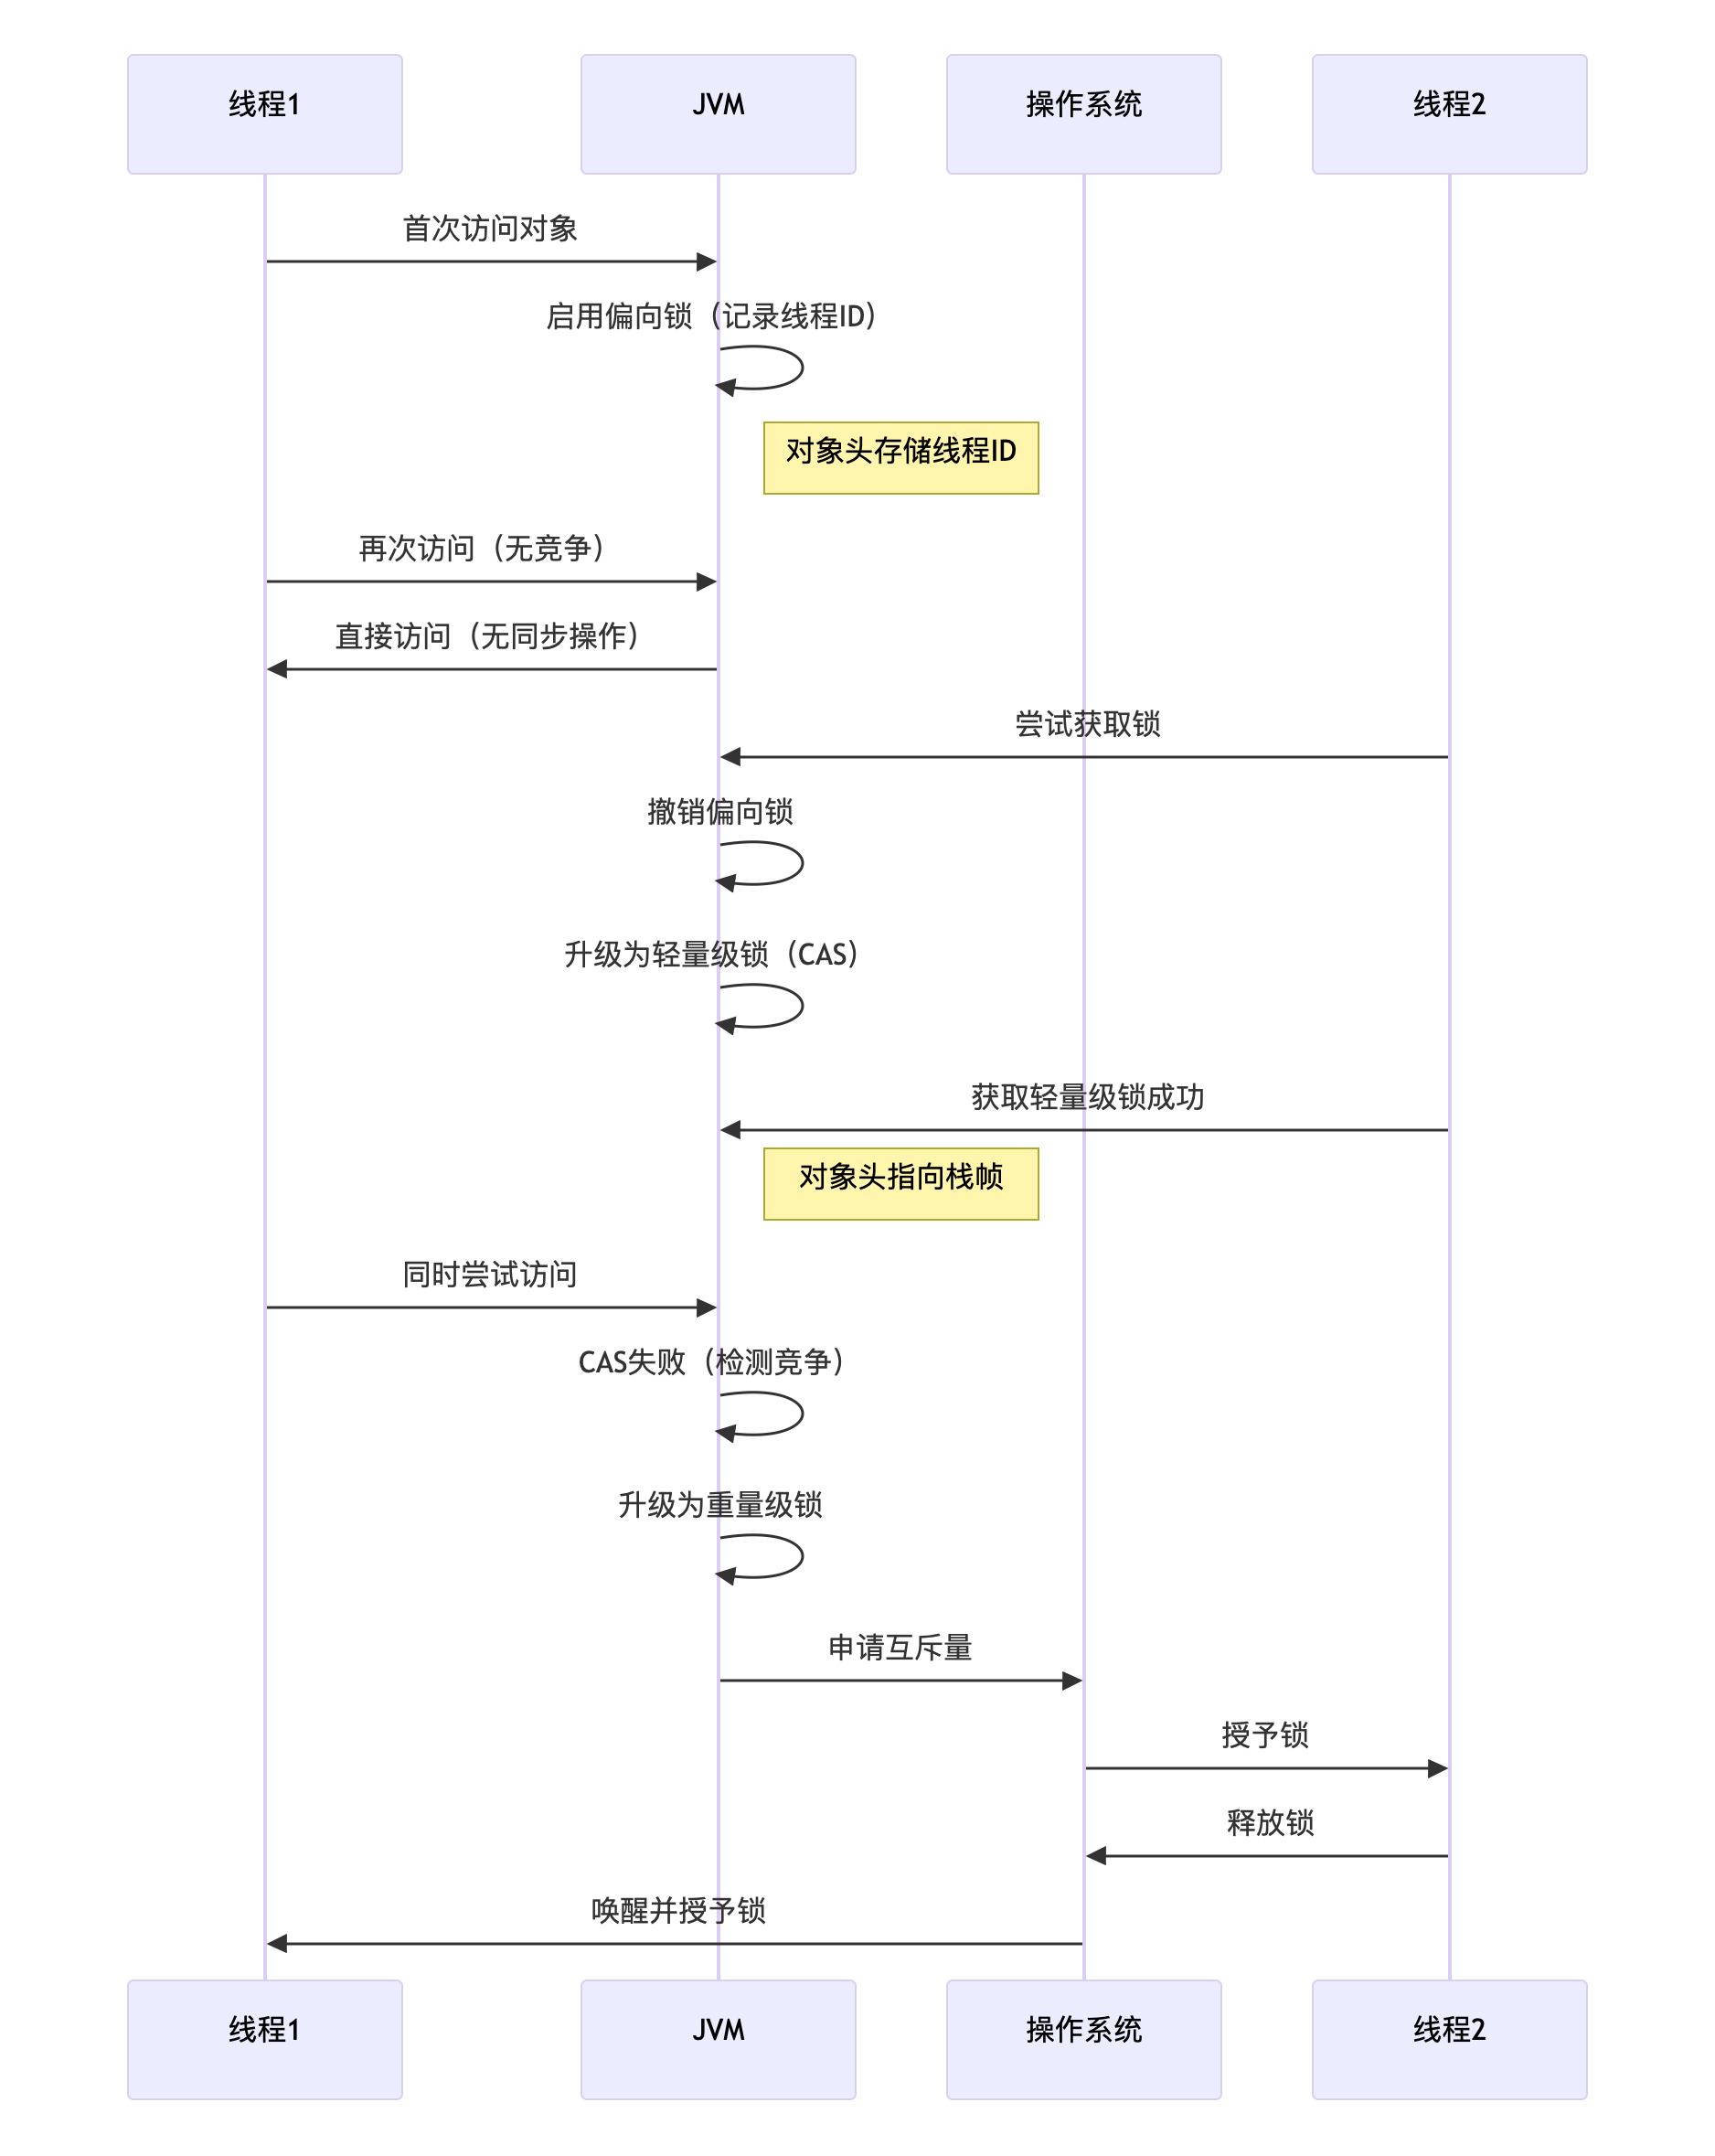
【3】sychronized锁升级的原理
(1)偏向锁
假设"只有一个线程访问",对象头存储线程ID(无需实际加锁),适用单线程重复访问的场景
升级触发条件:
1-第二个线程尝试获取锁
2-批量重偏向阈值达到(默认20次)
3-批量撤销阈值达到(默认40次)
(2)轻量级锁(Lightweight Locking)
使用CAS操作替代操作系统互斥,在用户空间解决轻度竞争
适用场景:低并发、短临界区
升级过程:
1-在栈帧创建Lock Record
2-CAS将对象头指向Lock Record
3-成功:获取轻量级锁
4-失败:膨胀为重量级锁
(3)重量级锁(Heavyweight Locking)
使用操作系统mutex实现,线程进入阻塞状态
适用场景:高竞争、长临界区

【4】ReentrantLock的使用
ReentrantLock是Java并发包中提供的一个可重入互斥锁,它提供了比synchronized更灵活的锁控制能力
(1)ReentrantLock的核心方法
(1)构造方法
// 创建非公平锁(默认)
ReentrantLock lock = new ReentrantLock();

// 创建公平锁
ReentrantLock fairLock = new ReentrantLock(true);
(2)基础加锁方法
// 阻塞式获取锁
void lock() {
    lock.lock(); // 阻塞直到获取锁,必须获取锁的场景
    try {
        // 临界区操作
    } finally {
        lock.unlock(); // 必须在finally中释放
    }
}
阻塞直到获取锁
必须在 finally 块中释放
支持重入(同一线程可多次获取)
(3)非阻塞加锁
// 尝试获取锁(立即返回)
if (lock.tryLock()) {
    try {
        // 获取锁成功
    } finally {
        lock.unlock();
    }
} else {
    // 执行备选方案
}
立即返回获取结果
成功返回 true,失败返回 false
避免线程阻塞
(4)超时加锁
// 带超时的尝试获取锁
if (lock.tryLock(5, TimeUnit.SECONDS)) {
    try {
        // 获取锁成功
    } finally {
        lock.unlock();
    }
} else {
    // 超时处理
}
支持超时等待
可响应中断
避免无限期阻塞
(5) 可中断加锁
try {
    lock.lockInterruptibly(); // 可响应中断
    try {
        // 临界区
    } finally {
        lock.unlock();
    }
} catch (InterruptedException e) {
    // 中断处理
}
等待时可响应中断
抛出 InterruptedException
适合需要取消操作的场景
(6)锁释放
void unlock() {
    lock.unlock(); // 释放锁
}
必须显式调用
建议放在 finally 块
未持有锁时调用会抛 IllegalMonitorStateException
(7)条件变量支持
// 创建条件变量
Condition condition = lock.newCondition();

// 等待条件
lock.lock();
try {
    while (!conditionSatisfied) {
        condition.await(); // 释放锁并等待
    }
    // 条件满足后继续执行
} finally {
    lock.unlock();
}

// 通知条件
lock.lock();
try {
    // 改变条件状态
    condition.signalAll(); // 唤醒所有等待线程
} finally {
    lock.unlock();
}
(8)锁状态查询
// 查询锁是否被持有
boolean isLocked = lock.isLocked();

// 查询当前线程是否持有锁
boolean heldByCurrent = lock.isHeldByCurrentThread();

// 查询等待线程数
int queuedThreads = lock.getQueueLength();

// 查询是否有等待线程
boolean hasQueued = lock.hasQueuedThreads();
(9)锁特性查询
// 是否是公平锁
boolean isFair = lock.isFair();

// 查询重入次数
int holdCount = lock.getHoldCount();
(10)监控方法
// 获取等待条件变量的线程数
int waitingThreads = condition.getWaitQueueLength();

// 查询是否有线程在等待条件
boolean hasWaiters = lock.hasWaiters(condition);
(2)ReentrantLock的使用案例
ReentrantLock的使用案例
public class BankAccount {
    private final ReentrantLock lock = new ReentrantLock();
    private int balance;

    public void transfer(BankAccount target, int amount) {
        // 锁排序防止死锁
        boolean fromLock = false;
        boolean toLock = false;
        try {
            while (true) {
                if (fromLock = this.lock.tryLock()) {
                    if (toLock = target.lock.tryLock()) {
                        // 双锁获取成功
                        this.balance -= amount;
                        target.balance += amount;
                        return;
                    }
                }
                // 失败时释放已有锁重试
                if (fromLock) {
                    this.lock.unlock();
                    fromLock = false;
                }
                if (toLock) {
                    target.lock.unlock();
                    toLock = false;
                }
                // 随机休眠避免活锁
                Thread.sleep(10);
            }
        } catch (InterruptedException e) {
            Thread.currentThread().interrupt();
        } finally {
            if (fromLock) this.lock.unlock();
            if (toLock) target.lock.unlock();
        }
    }
}
synchronized锁的案例
class BankAccount {
    private final String accountId;
    private double balance;

    public BankAccount(String accountId, double balance) {
        this.accountId = accountId;
        this.balance = balance;
    }

    // 对象锁:保护实例变量
    public synchronized void deposit(double amount) {
        System.out.println(Thread.currentThread().getName() +
            " 存款到账户 " + accountId + ": " + amount);
        balance += amount;
        System.out.println("账户 " + accountId + " 新余额: " + balance);
    }

    public synchronized void withdraw(double amount) {
        if (balance >= amount) {
            System.out.println(Thread.currentThread().getName() +
                " 从账户 " + accountId + " 取款: " + amount);
            balance -= amount;
            System.out.println("账户 " + accountId + " 新余额: " + balance);
        } else {
            System.out.println("账户 " + accountId + " 余额不足");
        }
    }

    // 转账(需要两把对象锁)
    public void transferTo(BankAccount target, double amount) {
        // 锁排序避免死锁
        BankAccount first = this.accountId.compareTo(target.accountId) < 0 ? this : target;
        BankAccount second = first == this ? target : this;

        synchronized (first) {
            synchronized (second) {
                if (this.balance >= amount) {
                    this.balance -= amount;
                    target.balance += amount;
                    System.out.println(Thread.currentThread().getName() +
                        " 转账成功: " + amount + " 从 " + accountId + " 到 " + target.accountId);
                } else {
                    System.out.println("转账失败: " + accountId + " 余额不足");
                }
            }
        }
    }
}
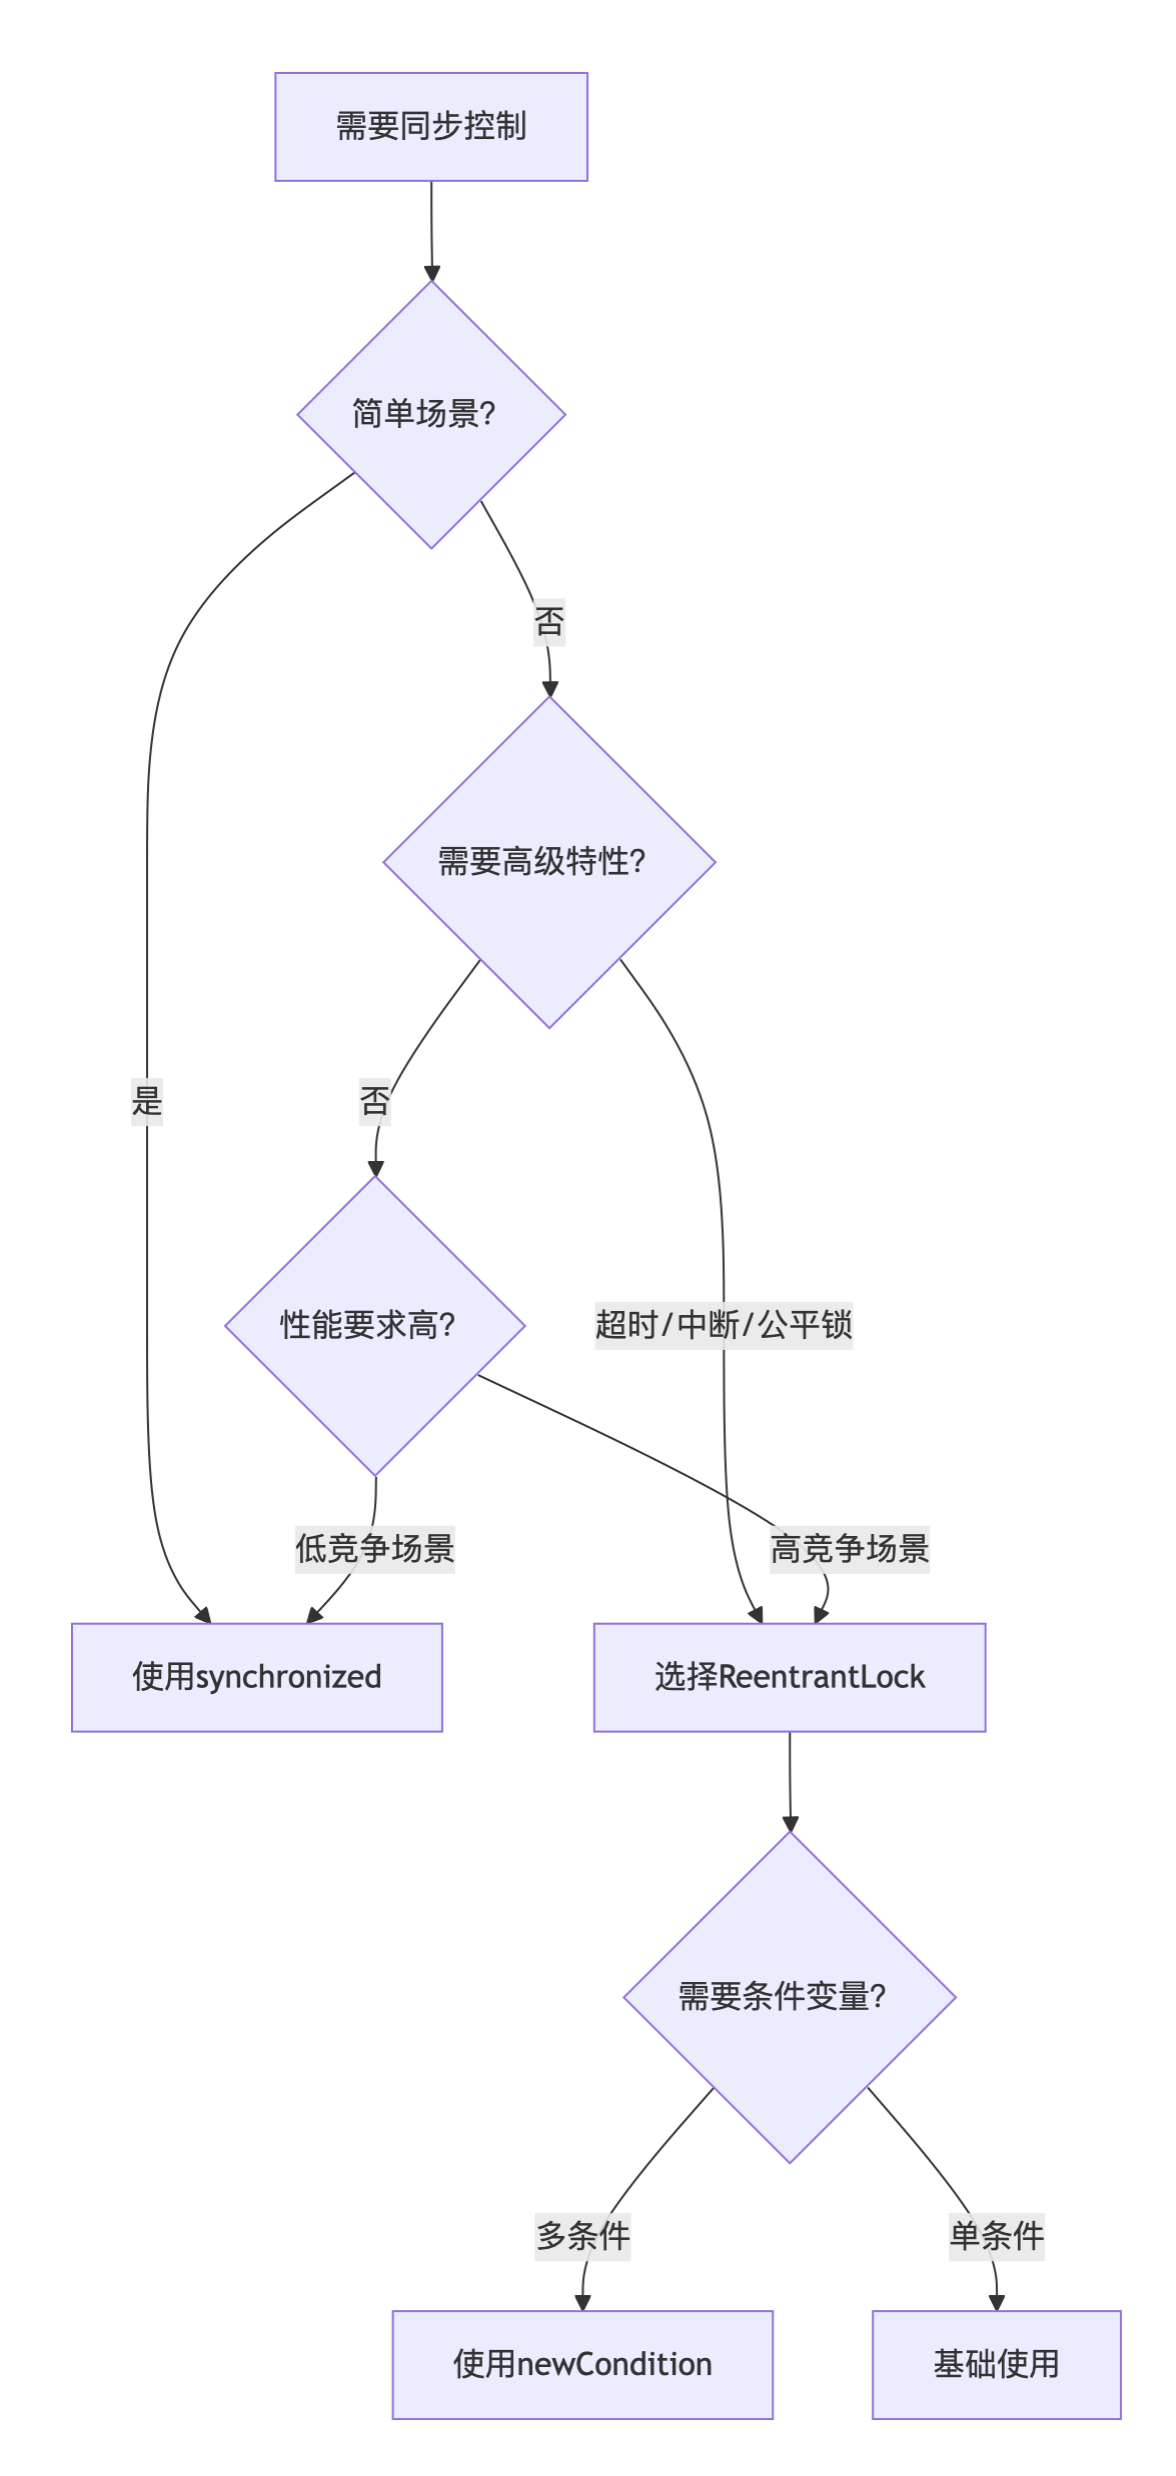
(3)ReentrantLock和sychronized的对比
(1)选型对比
(1)性能对比
低竞争场景:synchronized吞吐量较高,内存开销较低
高竞争场景:ReentrantLock吞吐量较高,有AQS优化,synchronized会升级为重量级锁
(2)功能对比
简单场景优先选择synchronized,依赖JVM自动释放,默认是不公平锁
ReentrantLock可以开启公平锁,获取锁可以添加超时控制,finally块中必须手动unlock()释放锁
(2)使用对比
(1)synchronized实现
// synchronized实现(可能性能瓶颈)
public class SyncTradingSystem {
    private final Map<String, Double> accounts = new HashMap<>();

    public synchronized void transfer(String from, String to, double amount) {
        if (accounts.get(from) >= amount) {
            accounts.put(from, accounts.get(from) - amount);
            accounts.put(to, accounts.get(to) + amount);
        }
    }
}
(2)ReentrantLock实现
// ReentrantLock实现(细粒度控制)
public class LockTradingSystem {
    private final Map<String, Account> accounts = new ConcurrentHashMap<>();

    public void transfer(String fromId, String toId, double amount) {
        Account from = accounts.get(fromId);
        Account to = accounts.get(toId);

        // 锁排序避免死锁
        Account first = from.id.compareTo(to.id) < 0 ? from : to;
        Account second = first == from ? to : from;

        first.lock.lock();
        try {
            second.lock.lock();
            try {
                if (from.balance >= amount) {
                    from.balance -= amount;
                    to.balance += amount;
                }
            } finally {
                second.lock.unlock();
            }
        } finally {
            first.lock.unlock();
        }
    }

    static class Account {
        final String id;
        double balance;
        final ReentrantLock lock = new ReentrantLock();
    }
}
(3)ReentrantLock的实现原理
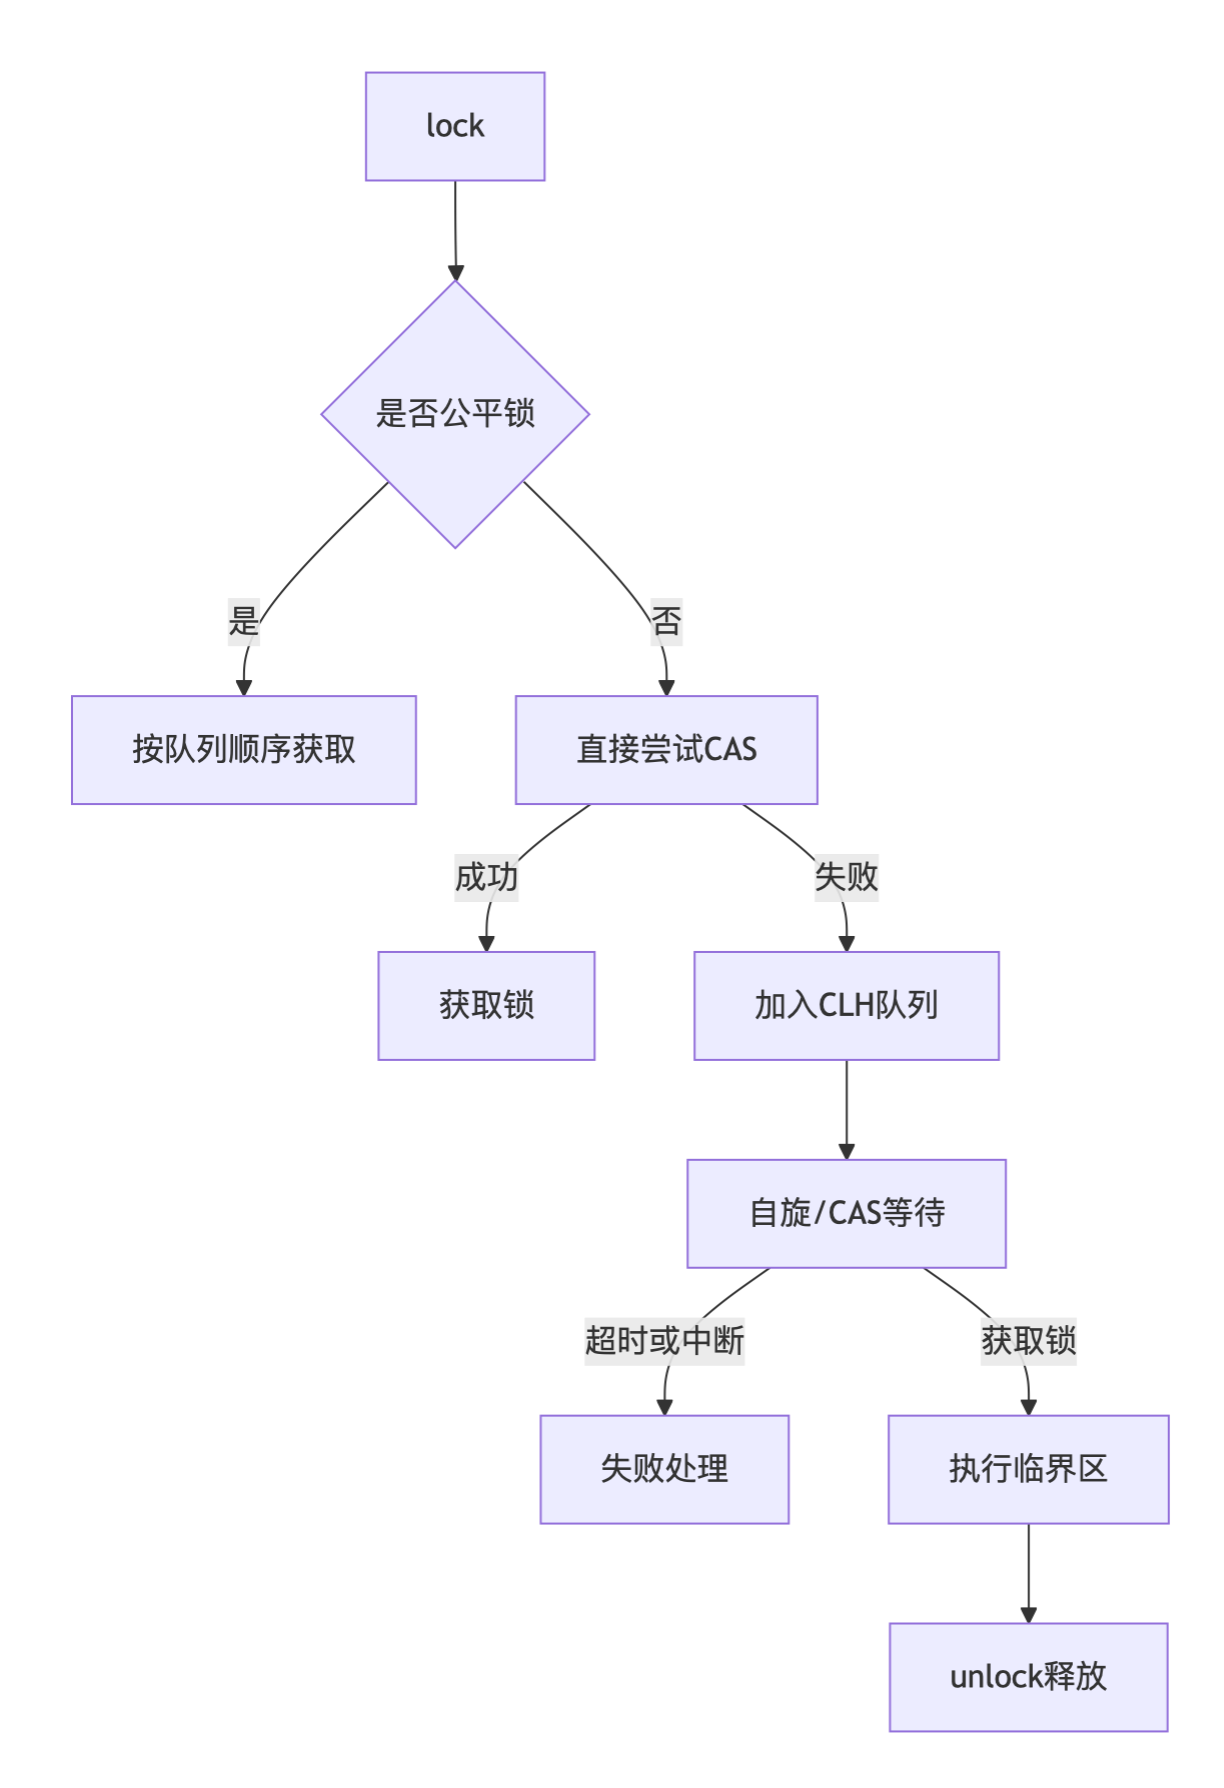
(4)ReentrantLock的公平锁(特有)
ReentrantLock的公平锁实现原理主要依赖于AbstractQueuedSynchronizer(AQS)框架,公平锁使用FIFO队列严格维护请求顺序,新请求线程首先检查是否有等待线程,有则加入队列尾部
(1)新请求判断锁是否空闲
如果锁被占用:创建新节点加入队列尾部,初始化状态
如果锁没占用,等待队列有节点:创建新节点加入队列尾部,初始化状态
如果锁没占用,等待队列也没有节点:立刻获取锁
(2)只唤醒首节点
(3)超时/中断时标记节点状态,跳过取消节点
(5)ReentrantLock的非公平锁
(6)ReentrantLock的可重入锁
【5】CAS + Volatile的使用
使用volatile变量保证可见性,使用CAS操作来保证原子性。
import java.util.concurrent.atomic.AtomicIntegerFieldUpdater;

public class AtomicCounter {
    // volatile保证可见性
    private volatile int value;

    // 原子更新器
    private static final AtomicIntegerFieldUpdater<AtomicCounter> UPDATER =
        AtomicIntegerFieldUpdater.newUpdater(AtomicCounter.class, "value");

    public int increment() {
        int current;
        do {
            current = UPDATER.get(this); // volatile读
        } while (!UPDATER.compareAndSet(this, current, current + 1));
        return current + 1;
    }

    public int get() {
        return value;
    }
}
【6】Redis分布式锁的使用
【7】ThreadLocal的使用
(1)日期格式化安全
public class DateFormatter {
    // SimpleDateFormat非线程安全
    private static final ThreadLocal<SimpleDateFormat> formatter =
        ThreadLocal.withInitial(() -> new SimpleDateFormat("yyyy-MM-dd"));

    public static String format(Date date) {
        return formatter.get().format(date);
    }

    public static void cleanup() {
        formatter.remove();
    }
}
(2)多租户数据隔离
public class TenantContext {
    private static final ThreadLocal<String> currentTenant = new ThreadLocal<>();

    public static void setTenant(String tenantId) {
        currentTenant.set(tenantId);
    }

    public static String getTenant() {
        return currentTenant.get();
    }

    public static void clear() {
        currentTenant.remove();
    }
}

// MyBatis拦截器实现多租户
public class TenantInterceptor implements Interceptor {
    @Override
    public Object intercept(Invocation invocation) throws Throwable {
        String tenantId = TenantContext.getTenant();
        if (tenantId != null) {
            MetaObject metaObject = SystemMetaObject.forObject(invocation.getArgs()[0]);
            metaObject.setValue("tenantId", tenantId);
        }
        return invocation.proceed();
    }
}

// Spring Security集成
public class TenantAuthenticationFilter extends OncePerRequestFilter {
    @Override
    protected void doFilterInternal(HttpServletRequest request, HttpServletResponse response, FilterChain chain) {
        String tenantId = request.getHeader("X-Tenant-ID");
        try {
            TenantContext.setTenant(tenantId);
            chain.doFilter(request, response);
        } finally {
            TenantContext.clear();
        }
    }
}
【八】线程间的通信
【1】CountDownLauch的使用
【九】区别对比
(1)Runnable 和 Callable 的区别
Runnable自 Java 1.0 以来一直存在,但Callable仅在 Java 1.5 中引入,目的就是为了来处理Runnable不支持的用例。Runnable 接口不会返回结果或抛出检查异常,但是Callable 接口可以。所以,如果任务不需要返回结果或抛出异常推荐使用 Runnable 接口,这样代码看起来会更加简洁。
工具类 Executors 可以实现 Runnable 对象和 Callable 对象之间的相互转换
@FunctionalInterface
public interface Runnable {
   /**
    * 被线程执行,没有返回值也无法抛出异常
    */
    public abstract void run();
}
@FunctionalInterface
public interface Callable<V> {
    /**
     * 计算结果,或在无法这样做时抛出异常。
     * @return 计算得出的结果
     * @throws 如果无法计算结果,则抛出异常
     */
    V call() throws Exception;
}
(2)⭐️execute() 和 submit()的区别
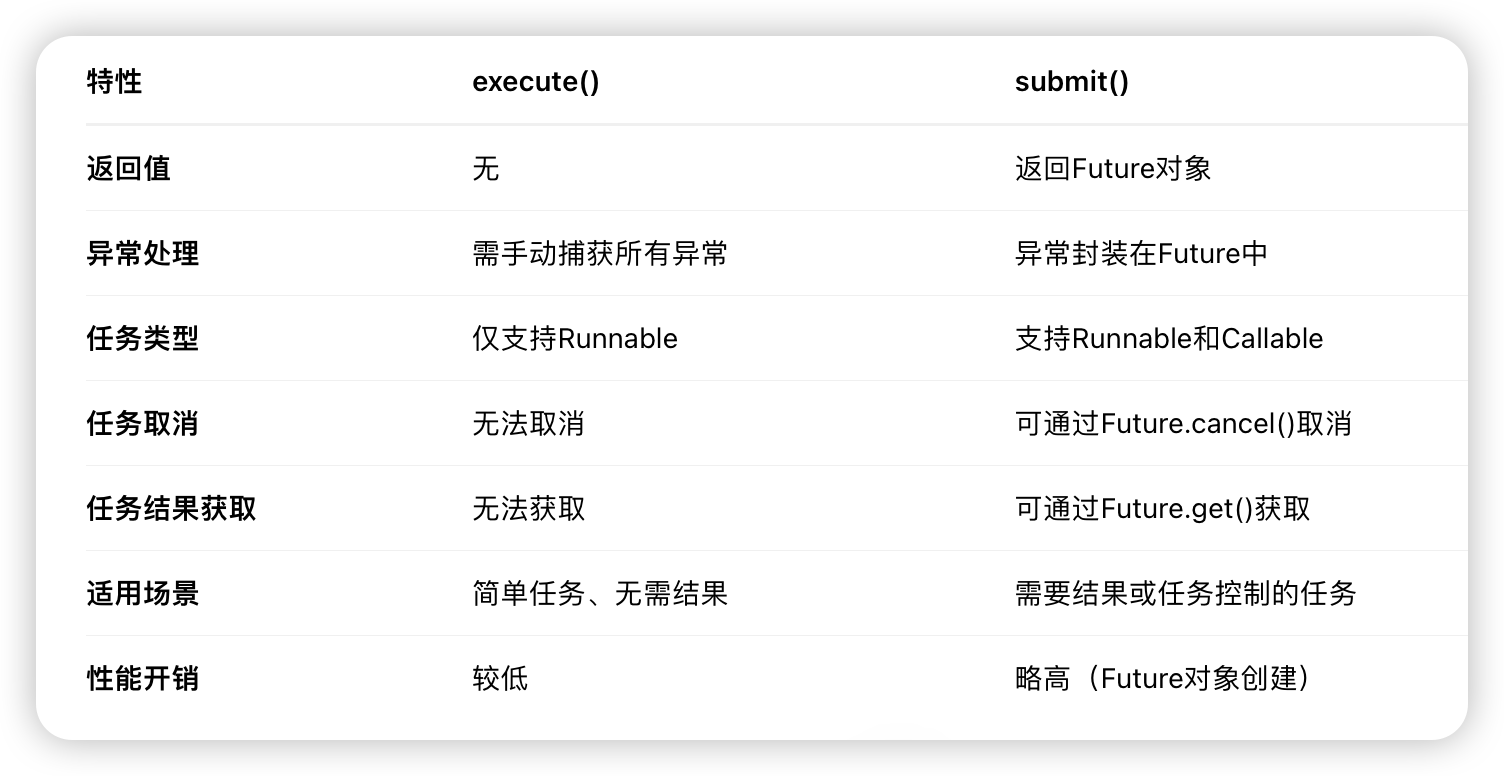
(1)execute()方法用于提交不需要返回值的任务,所以无法判断任务是否被线程池执行成功与否;
execute方法的参数是一个 Runnable,也没有返回值。因此提交后无法判断该任务是否被线程池执行成功。
(2)submit()方法用于提交需要返回值的任务。线程池会返回一个 Future 类型的对象,通过这个 Future 对象可以判断任务是否执行成功,并且可以通过 Future 的 get()方法来获取返回值,get()方法会阻塞当前线程直到任务完成,而使用 get(long timeout,TimeUnit unit)方法则会阻塞当前线程一段时间后立即返回,这时候有可能任务没有执行完。
submit() 有三种重载,参数可以是 Callable 也可以是 Runnable。
<T> Future<T> submit(Callable<T> task);
<T> Future<T> submit(Runnable task, T result);
Future<?> submit(Runnable task);
同时它会返回一个 Funture 对象,通过它我们可以判断任务是否执行成功。
获得执行结果调用 Future.get() 方法,这个方法会阻塞当前线程直到任务完成。
ExecutorService executorService = Executors.newFixedThreadPool(2);
//提交第一个任务返回结果
Future<String> future = executorService.submit(new Callable<String>() {
    @Override
    public String call() throws Exception {
        log.debug("running");
        TimeUnit.SECONDS.sleep(1);
        return "ok";
    }
});
//提交第二个任务返回结果
Future<String> future2 = executorService.submit(() -> {
    log.debug("running");
    TimeUnit.SECONDS.sleep(1);
    return "success";
});

try {
    String res = future.get();
    String res2 = future2.get();
    log.debug("res={}", res);
    log.debug("res2={}", res2);
} catch (Exception e) {
    e.printStackTrace();
}
(3)shutdown() 和 shutdownNow() 的区别
(1)shutdown() :关闭线程池,线程池的状态变为 SHUTDOWN。线程池不再接受新任务了,但是队列里的任务得执行完毕
(2)shutdownNow() :关闭线程池,线程的状态变为 STOP。线程池会终止当前正在运行的任务,并停止处理排队的任务并返回正在等待执行的 List
调用完 shutdownNow 和 shuwdown 方法后,并不代表线程池已经完成关闭操作,它只是异步的通知线程池进行关闭处理。如果要同步等待线程池彻底关闭后才继续往下执行,需要调用awaitTermination方法进行同步等待。
在调用 awaitTermination() 方法时,应该设置合理的超时时间,以避免程序长时间阻塞而导致性能问题。另外。由于线程池中的任务可能会被取消或抛出异常,因此在使用 awaitTermination() 方法时还需要进行异常处理。awaitTermination() 方法会抛出 InterruptedException 异常,需要捕获并处理该异常,以避免程序崩溃或者无法正常退出。
// ...
// 关闭线程池
executor.shutdown();
try {
    // 等待线程池关闭,最多等待5分钟
    if (!executor.awaitTermination(5, TimeUnit.MINUTES)) {
        // 如果等待超时,则打印日志
        System.err.println("线程池未能在5分钟内完全关闭");
    }
} catch (InterruptedException e) {
    // 异常处理
}
(4)isTerminated() 和 isShutdown() 的区别
(1)isShutDown (判断线程池是否已经关闭)
当调用 shutdown() 方法后返回为 true
(2)isTerminated (判断线程池的任务是否已经停止)
当调用 shutdown() 方法后,并且所有提交的任务完成后返回为 true
(5)invokeAll和invokeAny
(1)invokeAll:提交一个任务集合返回任务集合的所有执行结果
带超时时间的invokeAll方法,如果规定的时间没有线程池中的任务没有执行完,会把后续的取消掉
ExecutorService executorService = Executors.newFixedThreadPool(3);
        List<Callable<String>> callableList = Arrays.asList(
            () -> {
                log.debug("第一个任务");
                TimeUnit.SECONDS.sleep(1);
                return "first blood";
            },
            () -> {
                log.debug("第二个任务");
                TimeUnit.SECONDS.sleep(2);
                return "second blood";
            },
            () -> {
                log.debug("第三个任务");
                TimeUnit.SECONDS.sleep(3);
                return "third blood";
            }
        );

        try {
            List<Future<String>> futures = executorService.invokeAll(callableList);
            futures.forEach(f -> {
                try {
                    String s = f.get();
                    log.debug("s={}", s);
                } catch (Exception e1) {
                    e1.printStackTrace();
                }
            });
        } catch (Exception e) {
            e.printStackTrace();
        }
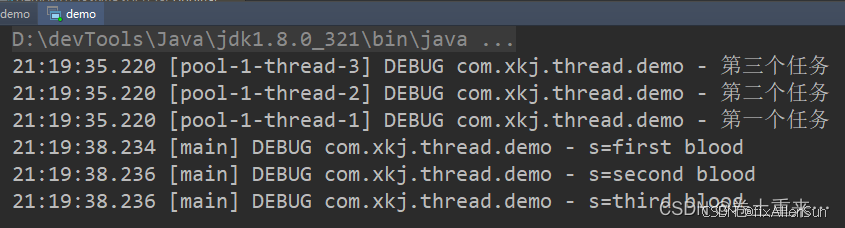
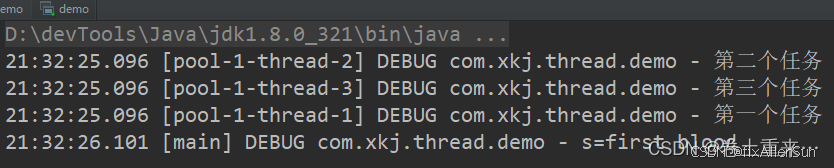
(2)invokeAny:任务集合中只要有一个任务执行完就返回结果,并取消其他任务
ExecutorService executorService = Executors.newFixedThreadPool(3);
        List<Callable<String>> callableList = Arrays.asList(
                () -> {
                    log.debug("第一个任务");
                    TimeUnit.SECONDS.sleep(1);
                    return "first blood";
                },
                () -> {
                    log.debug("第二个任务");
                    TimeUnit.SECONDS.sleep(2);
                    return "second blood";
                },
                () -> {
                    log.debug("第三个任务");
                    TimeUnit.SECONDS.sleep(3);
                    return "third blood";
                }
        );

        try {
            String future = executorService.invokeAny(callableList);
            log.debug("s={}", future);
        } catch (Exception e) {
            e.printStackTrace();
        }
(6)invokeAll和invokeAny哪个更快
(1)invokeAll:执行所有任务,等待全部完成后返回包含所有任务结果的列表(可能包含异常)。所有任务完成或线程池被中断的时候返回List<Future>。当业务逻辑必须等待所有任务完成并获取全部结果时,invokeAll 是唯一选择。当所有任务的执行时间差异较小时,invokeAll 的整体耗时约等于最长任务的耗时,此时无需使用 invokeAny 提前终止其他任务。因为终止其他任务也需要开销。
(2)invokeAny:执行所有任务,只要有一个成功完成就返回其结果,其他任务会被取消。适合 “竞争” 场景(如查询多个数据源,取第一个返回的结果),性能取决于最快的任务。
哪个更快取决于具体场景:
(1)任务耗时均匀且无依赖:
invokeAll 更快:因为所有任务并行执行,整体耗时约等于最长任务的耗时,此时无需使用 invokeAny 提前终止其他任务,终止其他任务也是需要开销的。
invokeAny 更慢:需要额外处理任务取消逻辑,即使所有任务几乎同时完成,也必须等待其中一个被选中并返回。
(2)任务耗时差异大:
invokeAny 可能更快:如果某个任务很快完成,其他耗时任务会被提前取消,节省资源。
invokeAll 更慢:必须等待所有任务完成,包括最慢的任务。
(3)任务有依赖或需全部结果:
只能使用 invokeAll,性能取决于最慢的任务。
import java.util.Arrays;
import java.util.List;
import java.util.concurrent.*;

public class InvokeAllVsInvokeAny {
    public static void main(String[] args) throws Exception {
        ExecutorService executor = Executors.newFixedThreadPool(3);

        // 场景1:所有任务耗时相近
        System.out.println("=== 任务耗时相近 ===");
        testUniformTasks(executor);

        // 场景2:任务耗时差异大
        System.out.println("\n=== 任务耗时差异大 ===");
        testVaryingTasks(executor);

        executor.shutdown();
    }

    private static void testUniformTasks(ExecutorService executor) throws Exception {
        List<Callable<String>> tasks = Arrays.asList(
            () -> { Thread.sleep(500); return "Task 1"; },
            () -> { Thread.sleep(550); return "Task 2"; },
            () -> { Thread.sleep(600); return "Task 3"; }
        );

        long startAll = System.currentTimeMillis();
        executor.invokeAll(tasks);
        System.out.println("invokeAll 耗时: " + (System.currentTimeMillis() - startAll) + "ms");

        long startAny = System.currentTimeMillis();
        executor.invokeAny(tasks);
        System.out.println("invokeAny 耗时: " + (System.currentTimeMillis() - startAny) + "ms");
    }

    private static void testVaryingTasks(ExecutorService executor) throws Exception {
        List<Callable<String>> tasks = Arrays.asList(
            () -> { Thread.sleep(100); return "Fast Task"; },
            () -> { Thread.sleep(500); return "Medium Task"; },
            () -> { Thread.sleep(1000); return "Slow Task"; }
        );

        long startAll = System.currentTimeMillis();
        executor.invokeAll(tasks);
        System.out.println("invokeAll 耗时: " + (System.currentTimeMillis() - startAll) + "ms");

        long startAny = System.currentTimeMillis();
        executor.invokeAny(tasks);
        System.out.println("invokeAny 耗时: " + (System.currentTimeMillis() - startAny) + "ms");
    }
}
使用总结:
(1)所有结果均需处理:invokeAll
(2)任务耗时相近:invokeAll
(3)任务耗时差距较大,且只需要一个结果:invokeAny
(4)任务间存在依赖:invokeAll
(5)需完整上下文或资源管理:invokeAll
(6)优先使用 invokeAll:除非明确需要 “最快结果” 且其他任务无副作用。
(7)结合 CompletableFuture:对于复杂的并行任务(如需要部分结果先行处理),可使用 CompletableFuture.allOf 替代 invokeAll,提供更灵活的组合方式。
(7)Future和FutureTask的区别
(8)FutureTask和CompletableFuture的区别

权威|前沿|技术|干货|国内首个API全生命周期开发者社区
更多推荐


 3
3 0
0- 0


 已为社区贡献1条内容

所有评论(0)