C++智能指针总结二——unique_ptr
C++智能指针总结二1.往期回顾2.auto_ptr的缺陷1.缺陷一2.缺陷二3.unique_ptr1."更安全的赋值"2.支持创建动态数组3.补充API1.往期回顾2.auto_ptr的缺陷1.缺陷一先来看下面的代码:#include <Windows.h>#include <iostream>#include <string>#include <ve
C++智能指针总结二——unique_ptr
1.往期回顾
2.auto_ptr的缺陷
1.缺陷一
先来看下面的代码:
#include <Windows.h>
#include <iostream>
#include <string>
#include <vector>
#include <memory>
using namespace std;
class DEMO {
public:
DEMO(int data) {
this->data = data;
cout << "创建text" << endl;
cout << "data=" << data << endl;
}
~DEMO() {
cout << "析构text" << endl;
cout << "data=" << data << endl;
}
private:
int data;
};
int main(void) {
auto_ptr<int> ptr(new int);
auto_ptr<DEMO> ptr1(new DEMO(1));
auto_ptr<DEMO> ptr2(new DEMO(2));
cout << endl;
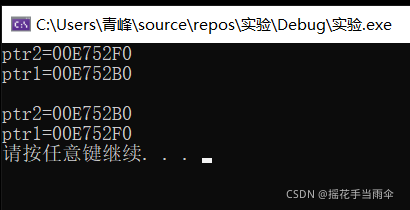
cout << "ptr2=" << ptr2.get() << endl; //ptr2=ptr1之前
cout << "ptr1=" << ptr1.get() << endl;
ptr2 = ptr1; //将ptr1赋值给ptr2
cout << "ptr2=" << ptr2.get() << endl; //ptr2=ptr1之后
cout << "ptr1=" << ptr1.get() << endl;
system("pause");
return 0;
}
运行结果如下图:
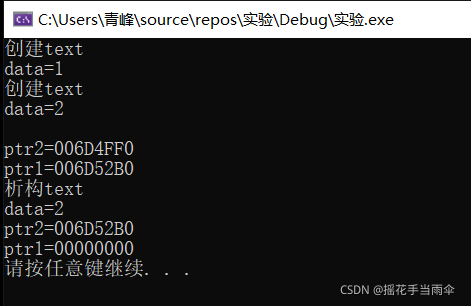
使用.get()方法获取智能指针绑定的动态内存首地址。
为什么会这样呢,这是因为auto_ptr具有排他所有权性,即一块动态内存只能被一个智能指针绑定,所以在执行ptr2=ptr1之后就相当于把ptr1绑定的动态内存交给ptr2控制,但ptr2之前绑定了动态内存,所以它会先把自己绑定的动态内存先释放(delete掉),然后绑定ptr1的动态内存,最后ptr1的内置指针变量被置为空指针。
这种行为其实是很奇怪的,因为在我们之前的语法中赋值操作都不会产生如此怪异的行为。因此如果我们以往的思维方式去使用智能指针赋值操作就很可能产生你无法轻易察觉的错误。
2.缺陷二
不支持对象数组的内存管理
即不能使用auto_ptr指针分配数组,如:

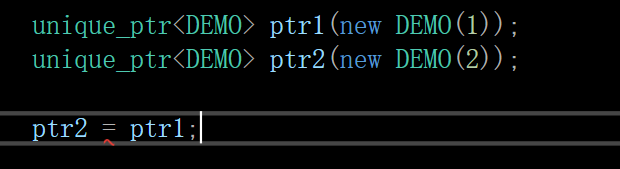
3.unique_ptr
1.“更安全的赋值”
由于auto_ptr存在的种种缺陷,C++11标准使用新的,更安全的unique_ptr取代auto_ptr。
unique_ptr具有与auto_ptr一样的排他所有权性,同一块动态内存也只允许一个智能指针对象绑定。
但是unique_ptr不允许这样的直接赋值。
只能这样使用:
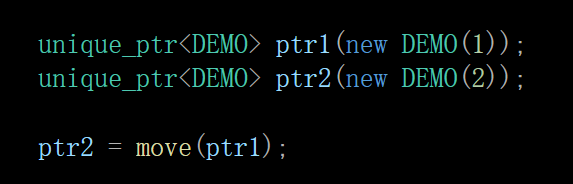
加一个move相当于向编译器声明你知道这样操作的风险和后果。实际上这样使用和auto_ptr的直接赋值也没有区别了,只是多了一个move提醒你自己智能指针赋值的特殊性。
2.支持创建动态数组
#include <Windows.h>
#include <iostream>
#include <string>
#include <vector>
#include <memory>
using namespace std;
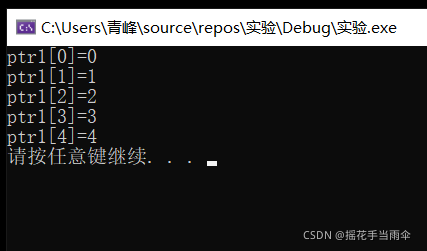
int main(void) {
unique_ptr<int []> ptr1(new int[5]); //分配动态数组
for (int count = 0; count < 5; ++count) {
ptr1[count] = count;
}
for (int count = 0; count < 5; ++count) {
cout << "ptr1[" << count << "]=" << ptr1[count] << endl;
}
system("pause");
return 0;
}
结果:
3.补充API
如 .release(),.reset() 方法和auto_ptr是一样的。详情可参考我的上一篇博文。这里主要讲一下新的。
.swap()方法:
#include <Windows.h>
#include <iostream>
#include <string>
#include <vector>
#include <memory>
using namespace std;
int main(void) {
unique_ptr<int []> ptr1(new int[5]);
unique_ptr<int []> ptr2(new int[5]);
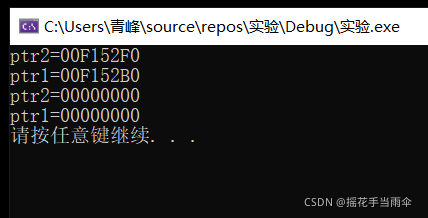
cout << "ptr2=" << ptr2.get() << endl;
cout << "ptr1=" << ptr1.get() << endl;
ptr1.swap(ptr2); //交换两个智能指针绑定的动态内存
cout << endl;
cout << "ptr2=" << ptr2.get() << endl;
cout << "ptr1=" << ptr1.get() << endl;
system("pause");
return 0;
}
结果:
功能即交换两个智能指针绑定的动态内存。
主动释放对象:
#include <Windows.h>
#include <iostream>
#include <string>
#include <vector>
#include <memory>

using namespace std;

int main(void) {

    unique_ptr<int []> ptr1(new int[5]);
    unique_ptr<int []> ptr2(new int[5]);

    cout << "ptr2=" << ptr2.get() << endl;
    cout << "ptr1=" << ptr1.get() << endl;

    ptr1 = nullptr;
    ptr2 = NULL;

    cout << "ptr2=" << ptr2.get() << endl;
    cout << "ptr1=" << ptr1.get() << endl;


    system("pause");

    return 0;
}
结果:
底层源码:
 unique_ptr& operator=(nullptr_t) noexcept {
        reset();
        return *this;
    }
可以看到,unique_ptr重载了“=”号运算符,执行reset()函数,且注意到当reset()函数传入的参数为空时,参数默认初始化为nullptr,即能达到的效果为释放原先绑定的动态内存,再将对象指针赋值为nullptr。
reset()函数:
void reset(_Ty* _Ptr = nullptr) noexcept { // destroy designated object and store new pointer
        if (_Ptr != _Myptr) {
            delete _Myptr;
        }

        _Myptr = _Ptr;
    }
4.后续篇章

CSDN联合极客时间,共同打造面向开发者的精品内容学习社区,助力成长!
更多推荐


 0
0 0
0- 0


 已为社区贡献1条内容

所有评论(0)