
使用VScode开发ESP32,PlatformIO开发ESP32
arduino IDE安装开发板库安装arduino IDE首先下载arduino IDE并安装。在官网下载即可。如果官网下载慢,可以找第三方资源下载。下载开发板库安装后进入“文件”-“首选项”,在附加开发板管理器地址后添加https://dl.espressif.com/dl/package_esp32_index.json之后点击工具 - 开发板 - 开发板管理器找到 esp32 并安装:安装
arduino IDE安装开发板库
安装arduino IDE
首先下载arduino IDE并安装。在官网下载即可。如果官网下载慢,可以找第三方资源下载。
下载开发板库
安装后进入“文件”-“首选项”,在附加开发板管理器地址后添加https://dl.espressif.com/dl/package_esp32_index.json

之后点击工具 - 开发板 - 开发板管理器

找到 esp32 并安装:

安装的过程中要从github上下载东西,因此要保证自己PC能正常打开github,否则会失败。
如果最新版本不能安装,换个老点的版本,我安装的1.0.4,安装很顺利。
安装完成后,重启 Arduino IDE 软件。在工具 - 开发板选项中即会看到 ESP32开发板的选项:

测试并下载程序
打开获取芯片ID的例程

把ESP32的GPIO0短接到地,其他保持和推荐电路一致,然后上电。
选好开发板和COM口,我的设置如下:

点击上传,等待上传成功即可。

使用VScode开发ESP32
安装arduino扩展并配置
然后打开VScode安装arduino扩展

“File”-“Preference”-“settings”

打开设置窗口,输入arduino搜索,往下拉找到arduino Path,把刚才arduino IDE的安装路径复制进去,注意要将 “\” 改为 “/”

编写并下载程序
新建一个文件夹,在其中新建一个.ino文件。

然后用VScode打开这个文件夹。

PS:不能只打开ino文件,因为VScode有一些配置文件需要保存,因此它需要文件夹。
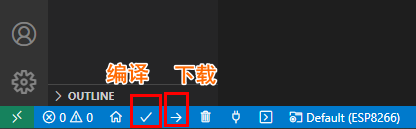
打开文件夹后,在VScode中打开.ino文件,点击右下角来配置编程器、开发板参数、COM口,和在arduino IDE中一样。


ESP32的GPIO0短接到地上电,点击右上角下载程序。
等待下载完成即可。

使用platformIO
platformIO介绍
PlatformIO 是一个用于物联网开发的开源生态系统。它提供跨平台的开发环境和统一的调试器,还支持远程单元测试和固件更新等。也就是基本常见的单片机都可以用它来开发,免去了你用Keil,我用IAR,他用gcc…最后还得移植才能共用的麻烦。现在已经支持:
Platforms: Atmel AVR, Atmel SAM, Espressif 32, Espressif 8266, Freescale Kinetis, Infineon XMC, Intel ARC32, Intel MCS-51 (8051), Kendryte K210, Lattice iCE40, Maxim 32, Microchip PIC32, Nordic nRF51, Nordic nRF52, NXP LPC, RISC-V, Samsung ARTIK, Silicon Labs EFM32, ST STM32, ST STM8, Teensy, TI MSP430, TI Tiva, WIZNet W7500
Frameworks: Arduino, ARTIK SDK, CMSIS, ESP-IDF, ESP8266 RTOS SDK, Freedom E SDK, Kendryte Standalone SDK, Kendryte FreeRTOS SDK, libOpenCM3, mbed, PULP OS, Pumbaa, Simba, SPL, STM32Cube, Tizen RT, WiringPi, Zephyr RTOS
PlatformIO 解决的问题
嵌入式开发的世界让很多人望而却步的主要原因是针对某一个单片机或开发板开发环境复杂的配置过程:交叉编译链工具下载、安装和配置,另外还得使用厂商独有的 IDE (有时还不是免费的) ,还有有时还不得不使用 IDE 只支持的 Windows
多个硬件平台 (单片机, 开发板) 需要不同交叉编译链工具和开发环境, 所有相应的开发人员需要花费大量精力在配置新的开发环境上
为了学习如何使用常规的传感器或执行器件等外设,需要花时间查找合适的库和例程
每个团队成员可能会使用不用的操作系统,这就为他们之间共享成果形成阻碍
安装

我的VScode是1.62.3版本,我记得我没装PlatformIO 扩展,它自己就有了,不知道是不是这个版本的VScode自带了。
打开PlatformIO
点击左下角PlatformIO Home启动

确保自己的电脑能正常访问,否则会报
Error: C:\Users\qlexcel\.platformio\penv\lib\site-packages\platformio\__main__.py:70: DeprecationWarning: 'resultcallback' has been renamed to 'result_callback'. The old name will be removed in Click 8.1.
  @cli.resultcallback()
ERROR:    [Errno 10048] error while attempting to bind on address ('127.0.0.1', 8010): 通常每个套接字地址(协议/网络地址/端口)只允许使用一次。

	at c:\Users\qlexcel\.vscode\extensions\platformio.platformio-ide-2.4.0\node_modules\platformio-node-helpers\dist\index.js:1:9851
	at ChildProcess.r (c:\Users\qlexcel\.vscode\extensions\platformio.platformio-ide-2.4.0\node_modules\platformio-node-helpers\dist\index.js:1:5134)
	at ChildProcess.emit (events.js:315:20)
	at ChildProcess.EventEmitter.em...
报错后,可以重启VScode,再打开试试。
没啥问题,顺利打开后:

新建工程
点击“New Project”

工程名和开发板,开发板可以输入“esp32”搜索,选择一个与自己开发板相近的。工程名随便起。

点击Finish,第一次创建工程需要下载固件库,是从github上下载,所以一定要保证能正常连上github,而且固件库还不小,根据自己的网速等两三个小时都很正常。
创建完成后,可以从下面打开它。

PlatformIO 工程目录作用如下:

.pio 文件夹:存放编译产生的中间文件和最后生成的执行文件;
lib 文件夹:存放库文件;
src 文件夹:存放源文件,其内部默认生成名为 main.cpp 的源文件;
platformio.ini:工程的配置文件
简单开发
打开平台

打开自带示例

往下滑,找到提供的闪灯例程

复制上面的例程,然后打开src文件夹下的main.cpp,复制进去
/*
 * Blink
 * Turns on an LED on for one second,
 * then off for one second, repeatedly.
 */

#include <Arduino.h>

// Set LED_BUILTIN if it is not defined by Arduino framework
// #define LED_BUILTIN 2

void setup()
{
  // initialize LED digital pin as an output.
  pinMode(LED_BUILTIN, OUTPUT);
}

void loop()
{
  // turn the LED on (HIGH is the voltage level)
  digitalWrite(LED_BUILTIN, HIGH);
  // wait for a second
  delay(1000);
  // turn the LED off by making the voltage LOW
  digitalWrite(LED_BUILTIN, LOW);
   // wait for a second
  delay(1000);
}

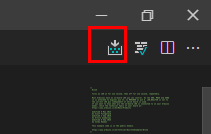
点击左下角按钮编译
此时编译会失败,提示没找到LED_BUILTIN的定义

复制如下信息到platformio.ini中

platformio.ini是保存工程配置信息的,直接把宏定义LED_BUILTIN在此处此赋值,那么全工程都可以使用了

再次编译,即可编译成功

然后点击下载

Executing task in folder IronMan: C:\Users\qlexcel\.platformio\penv\Scripts\platformio.exe run --target upload <

Processing esp32dev (platform: espressif32; board: esp32dev; framework: arduino)
----------------------------------------------------------------------------------------------------------------------------------------------------------------------------------------------------------------------------Tool Manager: Installing platformio/tool-mkspiffs @ ~2.230.0
Tool Manager: Error: Please read https://bit.ly/package-manager-ioerror
Tool Manager: Warning! Package Mirror: ('Connection aborted.', TimeoutError(10060, '由于连接方在一段时间后没有正确答复或连接的主机没有反应,连接尝试失败。', None, 10060, None))
Tool Manager: Looking for another mirror...
Downloading  [####################################]  100%
Unpacking  [####################################]  100%
Tool Manager: tool-mkspiffs @ 2.230.0 has been installed!
Verbose mode can be enabled via `-v, --verbose` option
CONFIGURATION: https://docs.platformio.org/page/boards/espressif32/esp32dev.html
PLATFORM: Espressif 32 (3.4.0) > Espressif ESP32 Dev Module
HARDWARE: ESP32 240MHz, 320KB RAM, 4MB Flash
DEBUG: Current (esp-prog) External (esp-prog, iot-bus-jtag, jlink, minimodule, olimex-arm-usb-ocd, olimex-arm-usb-ocd-h, olimex-arm-usb-tiny-h, olimex-jtag-tiny, tumpa)
PACKAGES:
 - framework-arduinoespressif32 3.10006.210326 (1.0.6)
 - tool-esptoolpy 1.30100.210531 (3.1.0)
 - tool-mkspiffs 2.230.0 (2.30)
 - toolchain-xtensa32 2.50200.97 (5.2.0)
LDF: Library Dependency Finder -> https://bit.ly/configure-pio-ldf
LDF Modes: Finder ~ chain, Compatibility ~ soft
Found 28 compatible libraries
Scanning dependencies...
No dependencies
Building in release mode
Retrieving maximum program size .pio\build\esp32dev\firmware.elf
Checking size .pio\build\esp32dev\firmware.elf
Advanced Memory Usage is available via "PlatformIO Home > Project Inspect"
RAM:   [          ]   4.1% (used 13384 bytes from 327680 bytes)
Flash: [==        ]  15.4% (used 202134 bytes from 1310720 bytes)
Configuring upload protocol...
AVAILABLE: esp-prog, espota, esptool, iot-bus-jtag, jlink, minimodule, olimex-arm-usb-ocd, olimex-arm-usb-ocd-h, olimex-arm-usb-tiny-h, olimex-jtag-tiny, tumpa
CURRENT: upload_protocol = esptool
Looking for upload port...
Auto-detected: COM13
Uploading .pio\build\esp32dev\firmware.bin
esptool.py v3.1
Serial port COM13
Connecting....
Chip is ESP32-PICO-D4 (revision 1)
Features: WiFi, BT, Dual Core, 240MHz, Embedded Flash, VRef calibration in efuse, Coding Scheme None
Crystal is 40MHz
MAC: 4c:75:25:c1:75:f4
Uploading stub...
Running stub...
Stub running...
Changing baud rate to 460800
Changed.
Configuring flash size...
Auto-detected Flash size: 4MB
Flash will be erased from 0x00001000 to 0x00005fff...
Flash will be erased from 0x00008000 to 0x00008fff...
Flash will be erased from 0x0000e000 to 0x0000ffff...
Flash will be erased from 0x00010000 to 0x00041fff...
Compressed 17104 bytes to 11191...
Writing at 0x00001000... (100 %)
Wrote 17104 bytes (11191 compressed) at 0x00001000 in 0.5 seconds (effective 254.2 kbit/s)...
Hash of data verified.
Compressed 3072 bytes to 128...
Writing at 0x00008000... (100 %)
Wrote 3072 bytes (128 compressed) at 0x00008000 in 0.1 seconds (effective 448.0 kbit/s)...
Hash of data verified.
Compressed 8192 bytes to 47...
Writing at 0x0000e000... (100 %)
Wrote 8192 bytes (47 compressed) at 0x0000e000 in 0.1 seconds (effective 631.8 kbit/s)...
Hash of data verified.
Compressed 202240 bytes to 103705...
Writing at 0x00010000... (14 %)
Writing at 0x0001eb1c... (28 %)
Writing at 0x000242e6... (42 %)
Writing at 0x0002d55b... (57 %)
Writing at 0x0003395f... (71 %)
Writing at 0x00039757... (85 %)
Writing at 0x0003f289... (100 %)
Wrote 202240 bytes (103705 compressed) at 0x00010000 in 2.8 seconds (effective 587.5 kbit/s)...
Hash of data verified.

Leaving...
Hard resetting via RTS pin...
=============================================================================================== [SUCCESS] Took 70.13 seconds ===============================================================================================
Terminal will be reused by tasks, press any key to close it.
下载成功,重新上电程序正常运行。

旨在为数千万中国开发者提供一个无缝且高效的云端环境,以支持学习、使用和贡献开源项目。
更多推荐


 16
16 0
0- 0


 已为社区贡献49条内容

所有评论(0)