

Vue+element Upload利用http-request实现第三方地址图片上传
vue element upload图片上传http-request方法后端oss图片上传接口简单实现
一键AI生成摘要,助你高效阅读
问答
·
vue第三方地址图片上传+后端图片上传接口开发+postman测试图片上传
- Vue + element (el-upload)中的:http-request图片上传
- java后端上传接口,利用OSS存储图片
- postman测试图片上传功能及方法
对比:服务端签名后直传
Vue+element Upload利用http-request实现第三方地址图片上传
前言
使用element UI 的el-upload实现第三方地址图片上传,替换原来的action方法
一、Vue + el-upload
直接上传方法如下:上传图片根据action地址请求后获取到图片url地址

具体方法官网有定义,action为必传项


二、实现第三方地址图片上传
不使用action地址,又由于action为必传项,改为 action=" #",新增 :http-request
页面:
<el-form :model="form">
  <el-form-item label="图片" v-model="form.imageUrl">
    <el-upload
      action="#"
      list-type="picture-card"
      :http-request="httpRequest"
      :before-upload="beforeAvatarUpload"
    >
      <i class="el-icon-plus"></i>
    </el-upload>
    <el-dialog :visible.sync="dialogVisible">
      <img width="100%" :src="dialogImageUrl" alt />
    </el-dialog>
  </el-form-item>
  <el-form-item>
    <el-button type="primary" @click="onSubmit">立即创建</el-button>
    <el-button>取消</el-button>
  </el-form-item>
</el-form>
方法:
methods: {
    httpRequest(data) {
      console.log("自定义上传", data);
      // 封装FormData对象
      var formData = new FormData();
      formData.append("file", data.file);
      console.log("formData",formData);
      // 调用后端接口
      uploadByServer(formData).then(res => {
        console.log(res);
      }).catch(err=>{})
    },
    beforeAvatarUpload(file) {
      //   console.log("上传前", file);
      const isImg = file.size / 1024 / 1024 < 2;
      if (!isImg) {
        this.$message.error("上传头像图片大小不能超过 2MB!");
      }

      const isType = file.type === "image/png";
      const isType2 = file.type === "image/jpeg";

      if (!isType && !isType2) {
        this.$message.error("上传头像图片格式为png或jpg");
      }
      return (isType || isType2) && isImg;
    },
  }
结果:

前端代码:
<template>
  <div>
    <el-form :model="form">
      <el-form-item label="图片" v-model="form.imageUrl">
        <el-upload
          action="#"
          list-type="picture-card"
          :http-request="httpRequest"
          :before-upload="beforeAvatarUpload"
        >
          <i class="el-icon-plus"></i>
        </el-upload>
        <el-dialog :visible.sync="dialogVisible">
          <img width="100%" :src="dialogImageUrl" alt />
        </el-dialog>
      </el-form-item>
      <el-form-item>
        <el-button type="primary" @click="onSubmit">立即创建</el-button>
        <el-button>取消</el-button>
      </el-form-item>
    </el-form>
  </div>
</template>

<script>
import {uploadByServer} from "@/api/upload";
export default {
  data() {
    return {
      form: {
        imageUrl: ""
      },
      dialogImageUrl: "",
      dialogVisible: false
    };
  },
  methods: {
    httpRequest(data) {
      console.log("自定义上传", data);
      var formData = new FormData();
      formData.append("file", data.file);
      console.log("formData",formData);
      uploadByServer(formData).then(res => {
        console.log(res);
      }).catch(err=>{})
    },
    beforeAvatarUpload(file) {
      //   console.log("上传前", file);
      const isImg = file.size / 1024 / 1024 < 2;
      if (!isImg) {
        this.$message.error("上传头像图片大小不能超过 2MB!");
      }

      const isType = file.type === "image/png";
      const isType2 = file.type === "image/jpeg";

      if (!isType && !isType2) {
        this.$message.error("上传头像图片格式为png或jpg");
      }
      return (isType || isType2) && isImg;
    },
    handleChange(file, fileList) {
      if (fileList.length > 1) {
        fileList.shift();
      }
    },
    handleRemove(file, fileList) {
      console.log(file, fileList);
    },
    onSubmit() {
      console.log("submit!");
    }
  },
  created() {},
  mounted() {}
};
</script>
  }
二、后端接口
利用OSS实现简单的图片上传功能:
引入oss依赖
  <dependency>
      <groupId>com.alibaba.cloud</groupId>
      <artifactId>spring-cloud-starter-alicloud-oss</artifactId>
      <version>2.2.0.RELEASE</version>
  </dependency>
Controller层((@RequestParam MultipartFile file))
   @PostMapping("/uploadByServer")
   public R uploadByServer(@RequestParam MultipartFile file) {
       String s = bannerServiece.uploadByServer(file);
       return R.ok().put("data",s);
   }
接口实现
    public String uploadByServer(MultipartFile file) {
        // Endpoint以华东1(杭州)为例,其它Region请按实际情况填写。
        String endpoint = "https://oss-cn-hangzhou.aliyuncs.com";
        // 阿里云账号AccessKey拥有所有API的访问权限,风险很高。强烈建议您创建并使用RAM用户进行API访问或日常运维,请登录RAM控制台创建RAM用户。
        String accessKeyId = "yourAccessKeyId";
        String accessKeySecret = "yourAccessKeySecret";
        // 填写Bucket名称,例如examplebucket。
        String bucketName = "examplebucket";
        // 填写Object完整路径,完整路径中不能包含Bucket名称,例如exampledir/exampleobject.txt。
        String objectName = "banner/uat/";

        // 创建OSSClient实例。
        OSS ossClient = new OSSClientBuilder().build(endpoint, accessKeyId, accessKeySecret);
        String url = "";
        try {
            // 获取上传文件的输入流
            InputStream inputStream = file.getInputStream();
            // 获取文件原始名称
            String filename = file.getOriginalFilename();

            // 创建PutObjectRequest对象。
            PutObjectRequest putObjectRequest = new PutObjectRequest(bucketName, objectName + filename, inputStream);
            // 设置该属性可以返回response。如果不设置,则返回的response为空。
            putObjectRequest.setProcess("true");
            // 调用oss方法实现上传
            // 1、bucketName 2、上传到oss文件路径和文件名称 3、文件的输入流
//            PutObjectResult putObjectResult = ossClient.putObject(bucketName, objectName + filename, inputStream);
            PutObjectResult putObjectResult = ossClient.putObject(putObjectRequest);

            // 获取url地址(根据阿里云oss中的图片实例拼接字符串) 拼接url字符串
            // https://edu-leader.oss-cn-beijing.aliyuncs.com/%E4%BB%96.jpg
            String uri = putObjectResult.getResponse().getUri();
//            url = "https://" + bucketName + "." + "oss-cn-hangzhou.aliyuncs.com" + "/" + objectName + filename;
            url = uri;
            // 关闭oss
            ossClient.shutdown();
        } catch (OSSException oe) {
            System.out.println("Caught an OSSException, which means your request made it to OSS, "
                    + "but was rejected with an error response for some reason.");
            System.out.println("Error Message:" + oe.getErrorMessage());
            System.out.println("Error Code:" + oe.getErrorCode());
            System.out.println("Request ID:" + oe.getRequestId());
            System.out.println("Host ID:" + oe.getHostId());
        } catch (ClientException ce) {
            System.out.println("Caught an ClientException, which means the client encountered "
                    + "a serious internal problem while trying to communicate with OSS, "
                    + "such as not being able to access the network.");
            System.out.println("Error Message:" + ce.getMessage());
        } catch (IOException e) {
            throw new RuntimeException(e);
        } finally {
            if (ossClient != null) {
                ossClient.shutdown();
            }
        }
        return url;
    }
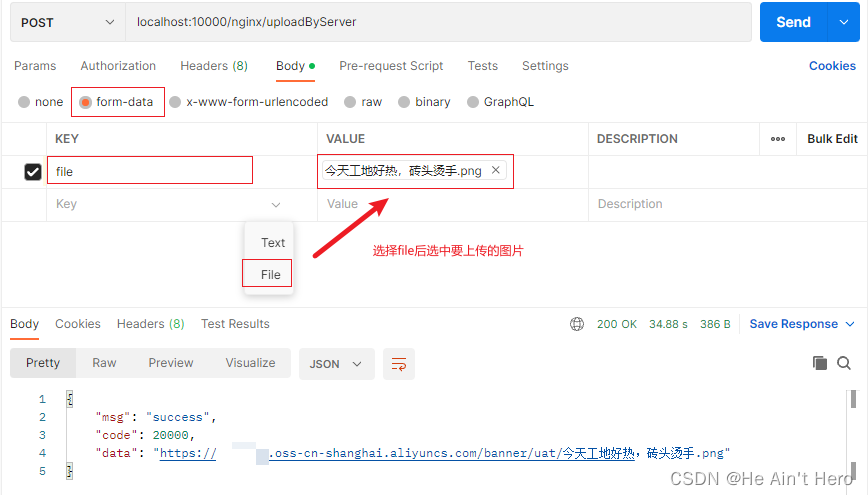
三、postman测试图片上传
总结

旨在为数千万中国开发者提供一个无缝且高效的云端环境,以支持学习、使用和贡献开源项目。
更多推荐


 4
4 0
0- 0


 已为社区贡献4条内容

所有评论(0)