
更稳定的手势识别方法-基于手部骨架与关键点检测
导读本期将介绍并演示基于MediaPipe的手势骨架与特征点提取步骤以及逐步为基础实现手势识别的方法。介绍关于MediaPipe以前有相关文章介绍,可以参见以下链接:Google开源手势识别-基于TF Lite / MediaPipe它能做些什么?它支持的语言和平台有什么?请看下面两张图:我们主要介绍手势骨骼与关键点提取,其他内容大家有兴趣自主学习了解。github地址:https://githu

导读
本期将介绍并演示基于MediaPipe的手势骨架与特征点提取步骤以及逐步为基础实现手势识别的方法。
介绍
关于MediaPipe以前有相关文章介绍,可以参见以下链接:
Google开源手势识别-基于TF Lite / MediaPipe
它能做些什么?它支持的语言和平台有什么?请看下面两张图:
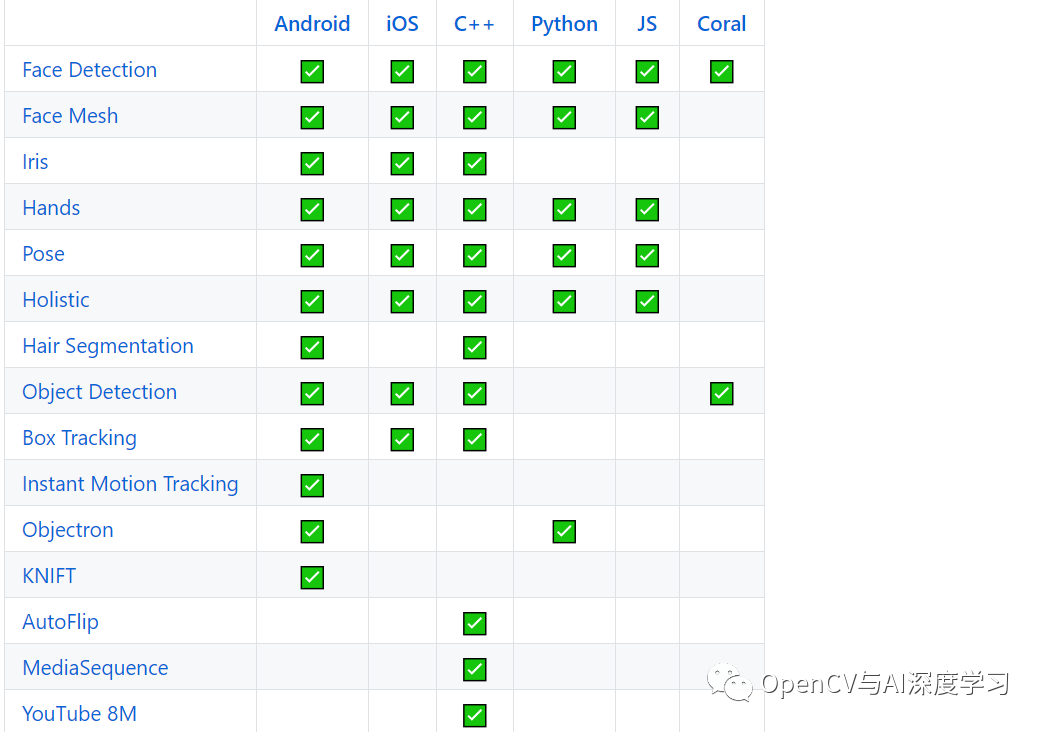
我们主要介绍手势骨骼与关键点提取,其他内容大家有兴趣自主学习了解。github地址:https://github.com/google/mediapipe
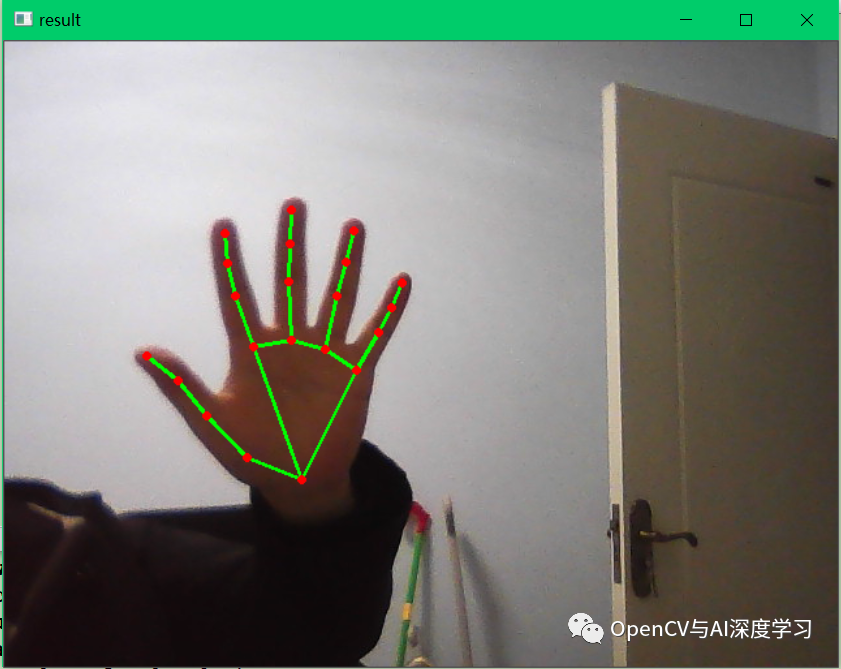
效果展示
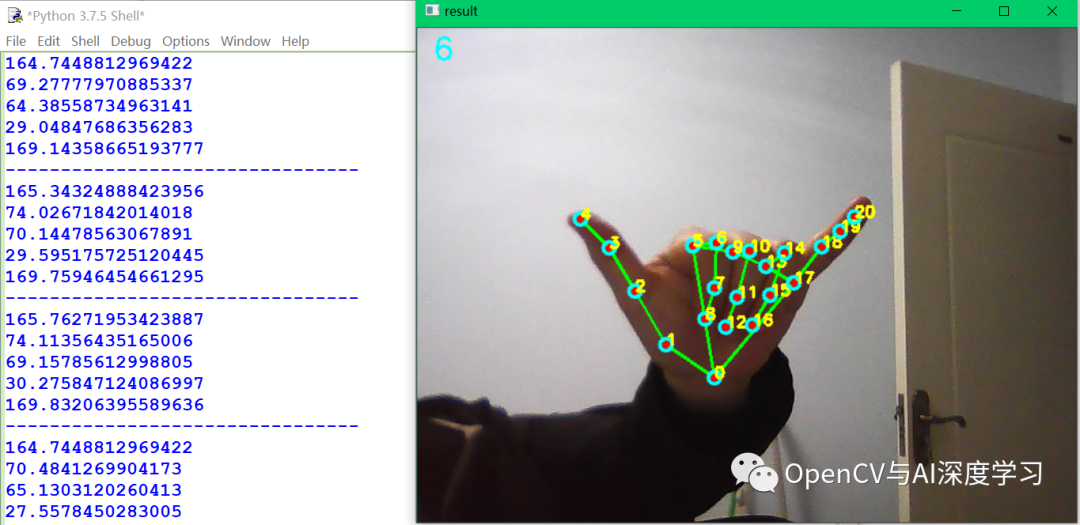
手势骨骼提取与关键点标注:
手势骨架与关键点提取-计算机视觉
手势识别0〜6 :
手势识别-提前祝大家新年快乐
实现步骤
具体可参考下面链接:
https://google.github.io/mediapipe/solutions/hands
(1)安装mediapipe,执行pip install mediapipe

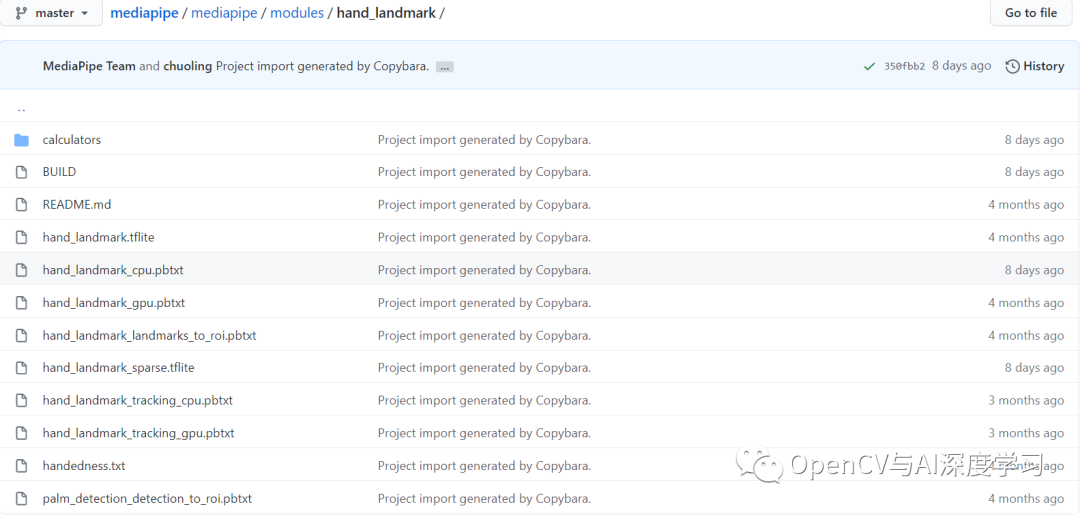
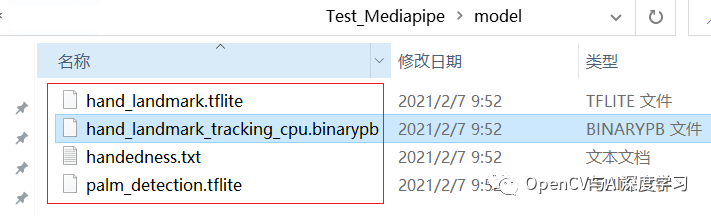
(2)下载手势检测与骨架提取模型,地址:
https://github.com/google/mediapipe/tree/master/mediapipe/modules/hand_landmark
(3 )代码测试(摄像头实时测试):
import cv2import mediapipe as mpfrom os import listdirmp_drawing = mp.solutions.drawing_utilsmp_hands = mp.solutions.handshands = mp_hands.Hands(min_detection_confidence=0.5, min_tracking_confidence=0.5)cap = cv2.VideoCapture(0)while cap.isOpened():success, image = cap.read()if not success:print("Ignoring empty camera frame.")continueimage = cv2.cvtColor(cv2.flip(image, 1), cv2.COLOR_BGR2RGB)image.flags.writeable = Falseresults = hands.process(image)image.flags.writeable = Trueimage = cv2.cvtColor(image, cv2.COLOR_RGB2BGR)if results.multi_hand_landmarks:for hand_landmarks in results.multi_hand_landmarks:mp_drawing.draw_landmarks(image, hand_landmarks, mp_hands.HAND_CONNECTIONS)cv2.imshow('result', image)if cv2.waitKey(5) & 0xFF == 27:breakcv2.destroyAllWindows()hands.close()cap.release()
输出与结果:
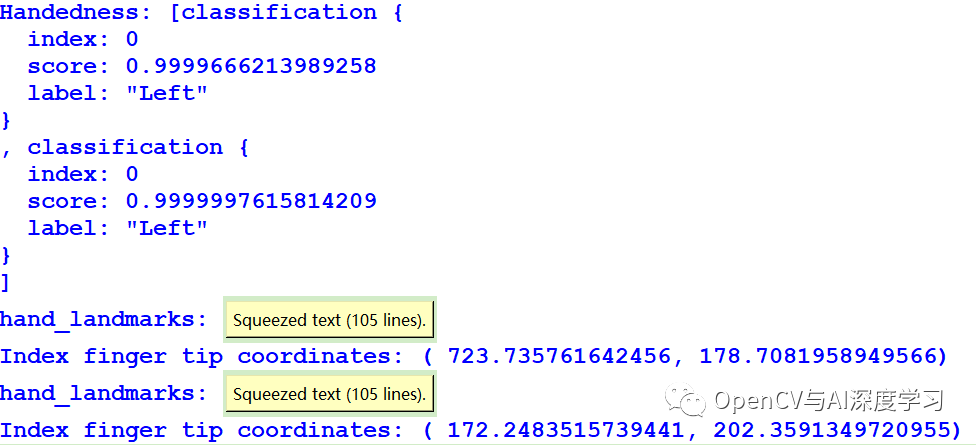
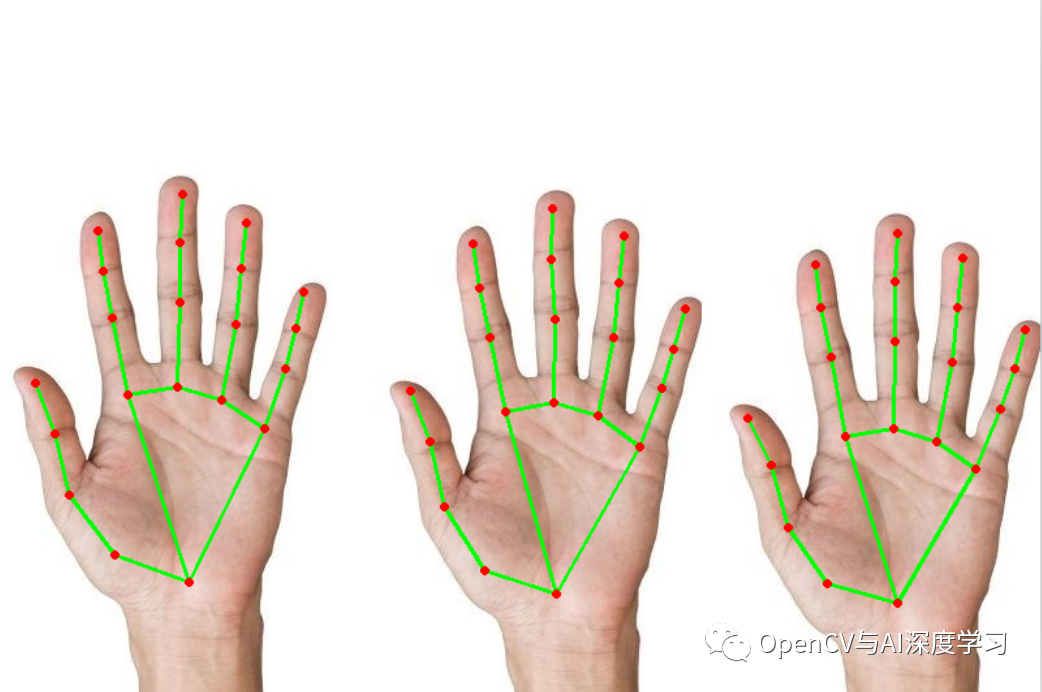
图片检测(可支持多个手掌):
import cv2import mediapipe as mpfrom os import listdirmp_drawing = mp.solutions.drawing_utilsmp_hands = mp.solutions.hands# For static images:hands = mp_hands.Hands(static_image_mode=True,max_num_hands=5,min_detection_confidence=0.2)img_path = './multi_hands/'save_path = './'index = 0file_list = listdir(img_path)for filename in file_list:index += 1file_path = img_path + filename# Read an image, flip it around y-axis for correct handedness output (see# above).image = cv2.flip(cv2.imread(file_path), 1)# Convert the BGR image to RGB before processing.results = hands.process(cv2.cvtColor(image, cv2.COLOR_BGR2RGB))# Print handedness and draw hand landmarks on the image.print('Handedness:', results.multi_handedness)if not results.multi_hand_landmarks:continueimage_hight, image_width, _ = image.shapeannotated_image = image.copy()for hand_landmarks in results.multi_hand_landmarks:print('hand_landmarks:', hand_landmarks)print(f'Index finger tip coordinates: (',f'{hand_landmarks.landmark[mp_hands.HandLandmark.INDEX_FINGER_TIP].x * image_width}, 'f'{hand_landmarks.landmark[mp_hands.HandLandmark.INDEX_FINGER_TIP].y * image_hight})')mp_drawing.draw_landmarks(annotated_image, hand_landmarks, mp_hands.HAND_CONNECTIONS)cv2.imwrite(save_path + str(index) + '.png', cv2.flip(annotated_image, 1))hands.close()# For webcam input:hands = mp_hands.Hands(min_detection_confidence=0.5, min_tracking_confidence=0.5)cap = cv2.VideoCapture(0)while cap.isOpened():success, image = cap.read()if not success:print("Ignoring empty camera frame.")# If loading a video, use 'break' instead of 'continue'.continue# Flip the image horizontally for a later selfie-view display, and convert# the BGR image to RGB.image = cv2.cvtColor(cv2.flip(image, 1), cv2.COLOR_BGR2RGB)# To improve performance, optionally mark the image as not writeable to# pass by reference.image.flags.writeable = Falseresults = hands.process(image)# Draw the hand annotations on the image.image.flags.writeable = Trueimage = cv2.cvtColor(image, cv2.COLOR_RGB2BGR)if results.multi_hand_landmarks:for hand_landmarks in results.multi_hand_landmarks:mp_drawing.draw_landmarks(image, hand_landmarks, mp_hands.HAND_CONNECTIONS)cv2.imshow('result', image)if cv2.waitKey(5) & 0xFF == 27:breakcv2.destroyAllWindows()hands.close()cap.release()

总结后续说明
总结:MediaPipe手势检测与骨架提取模型识别相较传统方法更稳定,而且提供手指关节的三维坐标点,对于手势识别与进一步手势动作相关开发有很大帮助。
其他说明:
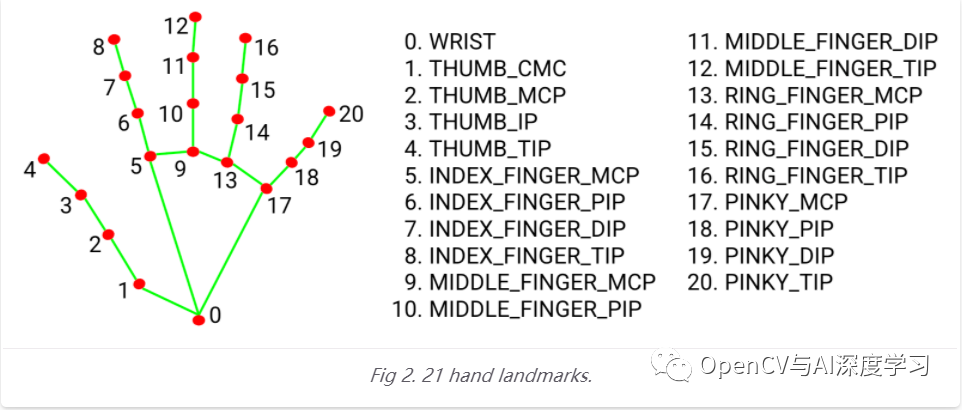
(1)手部关节点标记与排序定义如下图:
(2 )手部关节点坐标(x,y,z)输出为小于1的小数,需要归一化后显示到图像上,这部分可以查看上部分源码后转到定义查看,这里称为演示代码,另外的Z坐标靠近屏幕扩大,超出屏幕尺寸:
def Normalize_landmarks(image, hand_landmarks):new_landmarks = []for i in range(0,len(hand_landmarks.landmark)):float_x = hand_landmarks.landmark[i].xfloat_y = hand_landmarks.landmark[i].y# Z坐标靠近屏幕增大,远离屏幕减小float_z = hand_landmarks.landmark[i].zprint(float_z)width = image.shape[1]height = image.shape[0]pt = mp_drawing._normalized_to_pixel_coordinates(float_x,float_y,width,height)new_landmarks.append(pt)return new_landmarks
(3 )根据此您可以做一个简单的额度识别识别或手势靠近远离屏幕的小程序,当然还要要考虑关节点的坐标,可能还需要计算角度已经以前的状态等等,某种以下这样:
其他演示与相关代码均在知识星球主题中发布,需要的朋友可以加入获取。另外后续有时间更新C ++版本也将直接发布在知识星球中。
觉得有用,麻烦给个赞和在看

旨在为数千万中国开发者提供一个无缝且高效的云端环境,以支持学习、使用和贡献开源项目。
更多推荐


 5
5 0
0- 0


 已为社区贡献6条内容

所有评论(0)