
Android:Fragment详细介绍 & 使用方法解析
FragmentFragment一、什么是Fragment?二、为什么要有Fragment?三、Fragment的特点四、Fragment的生命周期五、将fragment添加到Activity的两种方式参考Fragment一、什么是Fragment?Fragment:是Android3.0开始新增的概念,意为碎片。Fragment是依赖于Activity的,不能独立存在的。Activity界面中的
Fragment
Fragment
一、什么是Fragment?
Fragment:是Android3.0开始新增的概念,意为碎片。Fragment是依赖于Activity的,不能独立存在的。
Activity界面中的一部分,可理解为模块化的Activity
Fragment不能独立存在,必须嵌入到Activity中
Fragment具有自己的生命周期,接收它自己的事件,并可以在Activity运行时被添加或删除
Fragment的生命周期直接受所在的Activity的影响。如:当Activity暂停时,它拥有的所有Fragment们都暂停
二、为什么要有Fragment?
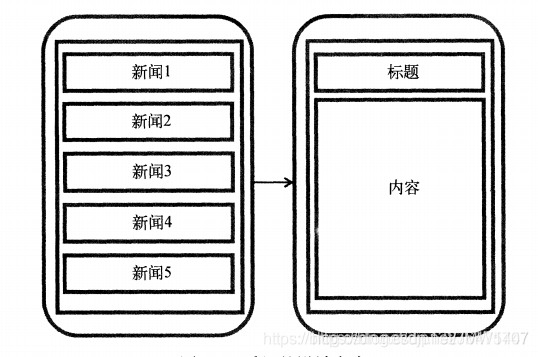
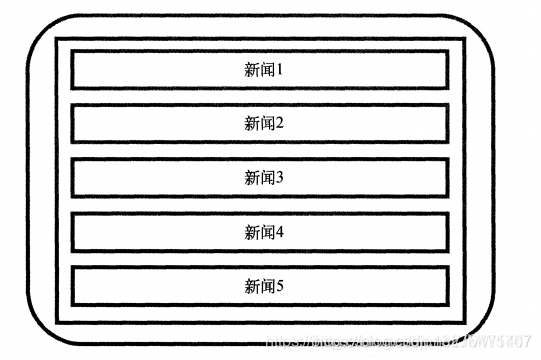
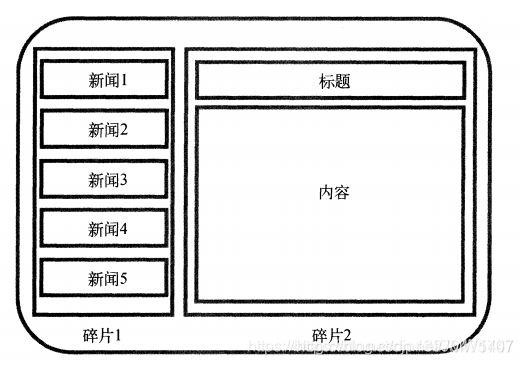
Android运行在各种各样的设备中,有小屏幕的手机,还有大屏幕的平板,电视等。同样的界面在手机上显示可能很好看,在大屏幕的平板上就未必了,手机的界面放在平板上可能会有过分被拉长、控件间距过大等情况。针对屏幕尺寸的差距,Fragment的出现能做到一个App可以同时适应手机和平板。这就是为什么要有Fragment的原因。
在手机效果:
没用碎片在平板效果:
用碎片在平板效果:
三、Fragment的特点
Fragment是一种可以嵌入在Activity当中的UI片段
用来组建Activity界面的局部模块, 也可以说一个Actiivty界面可以由多个Fragment组成
其行为与Activity很相似, 有自己对应的布局(包含具体的View), 它有自己的生命周期,接收自己的输入事件,并且可以从运行中的activity中添加或移除
一个fragment必须总是嵌入在一个activity中,同时fragment的生命周期受activity的影响
本质上会产生一个FrameLayout,它加载的布局为其子布局
优势:
- 模块化:我们不必把所有代码全部写在Activity中,而是把代码写在各自的Fragment中。
- 可重用:多个Activity可以重用一个Fragment。
- 可适配:根据硬件的屏幕尺寸、屏幕方向,能够方便地实现不同的布局,这样用户体验更好。
四、Fragment的生命周期
Fragment的生命周期和Activity类似,但比Activity的生命周期复杂一些,基本的生命周期方法如下图:
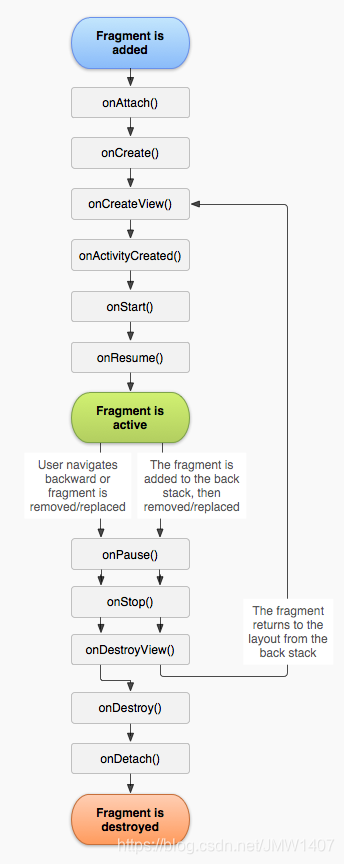
onAttach():Fragment和Activity相关联时调用。可以通过该方法获取Activity引用,还可以通过getArguments()获取参数。
onCreate():Fragment被创建时调用。
onCreateView():创建Fragment的布局。
onActivityCreated():当Activity完成onCreate()时调用。
onStart():当Fragment可见时调用。
onResume():当Fragment可见且可交互时调用。
onPause():当Fragment不可交互但可见时调用。
onStop():当Fragment不可见时调用。
onDestroyView():当Fragment的UI从视图结构中移除时调用。
onDestroy():销毁Fragment时调用。
onDetach():当Fragment和Activity解除关联时调用。
Fragment生命周期解析
- 当一个fragment被创建的时候:
onAttach()
onCreate()
onCreateView()
onActivityCreated() - 当这个fragment对用户可见的时候,它会经历以下状态。
onStart()
onResume() - 当这个fragment进入“后台模式”的时候,它会经历以下状态。
onPause()
onStop() - 当这个fragment被销毁了(或者持有它的activity被销毁了):
onPause()
onStop()
onDestroyView()
onDestroy()
onDetach() - 就像Activity一样,在以下的状态中,可以使用Bundle对象保存一个fragment的对象。
onCreate()
onCreateView()
onActivityCreated()
其他场景的调用
- 屏幕灭掉
onPause() onSaveInstanceState() onStop()
- 屏幕解锁
onStart() onResume()
- 切换到其他Fragment
onPause() onStop() onDestroyView()
- 切换回本身的Fragment
onCreateView() onActivityCreated() onStart() onResume()
- 回到桌面
onPause() onSaveInstanceState() onStop()
- 回到应用
onStart() onResume()
- 退出应用
onPause() onStop() onDestroyView() onDestroy() onDetach()
五、将fragment添加到Activity的两种方式
由于Fragment作为Activity一部分,所以Fragment的使用一般是添加到Activity中
将Fragment添加到Activity中一般有2种方法:
- 在Activity的layout.xml布局文件中
静态添加 - 在Activity的.java文件中
动态添加
5.1 在Activity的layout.xml布局文件中静态添加
Activity的布局文件:fragment_layout_test.xml
<LinearLayout xmlns:android="http://schemas.android.com/apk/res/android"
    xmlns:tools="http://schemas.android.com/tools"
    android:layout_width="match_parent"
    android:layout_height="match_parent"
    android:orientation="vertical" >

// 该fragment类定义在包名为"com.skywang.app"中的FragmentLayoutTest类的内部类ExampleFragment中
   <fragment android:name="com.skywang.app.FragmentLayoutTest$ExampleFragment"
        android:id="@+id/list"
        android:layout_weight="1"
        android:layout_width="match_parent"
        android:layout_height="match_parent"/>

</LinearLayout>
Fragment的布局文件:example_fragment.xml
<LinearLayout xmlns:android="http://schemas.android.com/apk/res/android"
    xmlns:tools="http://schemas.android.com/tools"
    android:layout_width="match_parent"
    android:layout_height="match_parent"
    android:orientation="vertical" >

    <TextView
        android:text="@string/example_fragment"
        android:layout_width="wrap_content"
        android:layout_height="wrap_content"/>

</LinearLayout>
Activity的.java文件:FragmentLayoutTest.java
// 在Activity使用Fragment时,需要考虑版本兼容问题
// 1. Android 3.0后,Activity可直接继承自Activity,并且在其中嵌入使用Fragment
// 2. Android 3.0前,Activity需FragmentActivity(其也继承自Activity),同时需要导入android-support-v4.jar兼容包,这样在Activity中才能嵌入Fragment

public class FragmentLayoutTest extends Activity {

    @Override
    protected void onCreate(Bundle savedInstanceState) {
        super.onCreate(savedInstanceState);
        setContentView(R.layout.fragment_layout_test);
        // 设置上述布局文件
    }

    // 继承自Fragment
    // 布局文件中的Fragment通过该FragmentLayoutTest的内部类ExampleFragment实现
    public static class ExampleFragment extends Fragment {
        @Override
        public View onCreateView(LayoutInflater inflater, ViewGroup container,
                                 Bundle savedInstanceState) {

            return inflater.inflate(R.layout.example_fragment, container, false);
             // 将example_fragment.xml作为该Fragment的布局文件
            // 即相当于FragmentLayoutTest直接调用example_fragment.xml来显示到Fragment中
        }
    }
}
onCreateView()中container参数代表该Fragment在Activity中的父控件;savedInstanceState提供了上一个实例的数据。
inflate()方法的三个参数:
- 第一个是resource ID,指明了当前的Fragment对应的资源文件;
- 第二个参数是父容器控件;
- 第三个布尔值参数表明是否连接该布局和其父容器控件,在这里的情况设置为false,因为系统已经插入了这个布局到父控件,设置为true将会产生多余的一个View Group。
5.2 在Activity的.java文件中动态添加
当Activity处于Running状态下的时候,可以在Activity的布局中动态地加入Fragment,只需要指定加入这个Fragment的父View Group即可。
步骤1:在Activity的布局文件定义1占位符(FrameLayout)
这样做的好处是:可动态在Activity中添加不同的 Fragment,更加灵活
fragment_transaction_test.xml
<LinearLayout xmlns:android="http://schemas.android.com/apk/res/android"
    android:layout_width="match_parent"
    android:layout_height="match_parent"
    android:orientation="vertical" >

    <FrameLayout
        android:id="@+id/about_fragment_container"
        android:layout_width="match_parent"
        android:layout_height="match_parent"/>

</LinearLayout>
步骤2:设置Fragment的布局文件
example_fragment.xml
<LinearLayout xmlns:android="http://schemas.android.com/apk/res/android"
    xmlns:tools="http://schemas.android.com/tools"
    android:layout_width="match_parent"
    android:layout_height="match_parent"
    android:orientation="vertical" >

    <TextView
        android:text="@string/example_fragment"
        android:layout_width="wrap_content"
        android:layout_height="wrap_content"/>

</LinearLayout>
步骤3:在Activity的.java文件中动态添加Fragment
FragmentTransactionTest
动态添加碎片主要分为 5 步:

```cpp
1. 创建待添加的碎片实例

2. 获取 FragmentManager,在活动中可以直接调用 getSupportFragmentManager()方法得到

3. 开启一个事务,通过调用 beginTransaction()方法开启

4. 向容器内添加或替换碎片,使用 replace() 方法实现,需要传入容器的 id 和待添加的碎片实例。

5. 提交事务,调用 commit()方法来完成


public class FragmentTransactionTest extends Activity {

    @Override
    protected void onCreate(Bundle savedInstanceState) {
        super.onCreate(savedInstanceState);
        setContentView(R.layout.fragment_transaction_test);

        // 步骤1:获取FragmentManager
        FragmentManager fragmentManager = getFragmentManager();

        // 步骤2:获取FragmentTransaction
        FragmentTransaction fragmentTransaction = fragmentManager.beginTransaction();

        // 步骤3:创建需要添加的Fragment :ExampleFragment
        ExampleFragment fragment = new ExampleFragment();

        // 步骤4:动态添加fragment
        // 即将创建的fragment添加到Activity布局文件中定义的占位符中(FrameLayout)
        fragmentTransaction.add(R.id.about_fragment_container, fragment);
        fragmentTransaction.commit();
    }

    // 继承与Fragment
    public static class ExampleFragment extends Fragment {
        @Override
        public View onCreateView(LayoutInflater inflater, ViewGroup container,
                                 Bundle savedInstanceState) {

            return inflater.inflate(R.layout.example_fragment, container, false);
            // 将example_fragment.xml作为该Fragment的布局文件
        }
    }
}
动态添加fragment常用的类:
- FragmentManager:用来管理Activity中的fragment
- FragmentTransaction:事务,用来添加,移除,替换fragment,
FragmentTransaction transaction = fm.benginTransatcion();//开启一个事务
 transaction.add() ://往Activity中添加一个Fragment

transaction.remove() ://从Activity中移除一个Fragment,如果被移除的Fragment没有添加到回退栈,
//这个Fragment实例将会被销毁。

transaction.replace()://使用另一个Fragment替换当前的,实际上就是remove()然后add()的合体~

transaction.hide()://隐藏当前的Fragment,仅仅是设为不可见,并不会销毁

transaction.show()://显示之前隐藏的Fragment

transaction.commit()://提交一个事务
- detach():会将view从UI中移除,和remove()不同,此时fragment的状态依然由FragmentManager维护。
注意:在用fragment的时候,可能会经常遇到这样Activity状态不一致:State loss这样的错误。主要是因为:commit方法一定要在Activity.onSaveInstance()之前调用。
值得注意的是:如果你喜欢使用Fragment,一定要清楚这些方法,哪个会销毁视图,哪个会销毁实例,哪个仅仅只是隐藏,这样才能更好的使用它们。
- attach():重建view视图,附加到UI上并显示。
a、比如:我在FragmentA中的EditText填了一些数据,当切换到FragmentB时,如果希望会到A还能看到数据,则适合你的就是hide和show;也就是说,希望保留用户操作的面板,你可以使用hide和show,当然了不要使劲在那new实例,进行下非null判断。
b、再比如:我不希望保留用户操作,你可以使用remove(),然后add();或者使用replace()这个和remove,add是相同的效果。
c、remove和detach有一点细微的区别,在不考虑回退栈的情况下,remove会销毁整个Fragment实例,而detach则只是销毁其视图结构,实例并不会被销毁。那么二者怎么取舍使用呢?如果你的当前Activity一直存在,那么在不希望保留用户操作的时候,你可以优先使用detach。
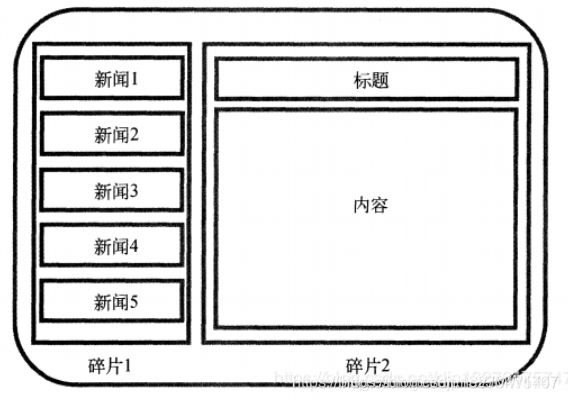
六、碎片的最佳实践-简易版的新闻应用
在写代码之前想好自己的需求是什么那是非常重要的,需求:1. 分清楚双页模式和单页模式。让项目可以一套代码运行; 2. 单页模式下,有一个新闻列表,点击里面的新闻标题跳转到新闻详情页; 3. 双页模式下,左边是新闻列表,右边是新闻详情,点击左边的新闻列表,右边的新闻详情随之更新。
步骤如下:
1、创建项目,添加后面需要用到的 RecyclerView 依赖库:
2、新建完项目后,在activity_main里面放一个碎片,作为单页模式的新闻列表 :
Manifest.xml
<?xml version="1.0" encoding="utf-8"?>
<manifest xmlns:android="http://schemas.android.com/apk/res/android"
  package="com.example.activitytest">

  <application
    android:allowBackup="true"
    android:icon="@mipmap/ic_launcher"
    android:label="@string/app_name"
    android:roundIcon="@mipmap/ic_launcher_round"
    android:supportsRtl="true"
    android:theme="@style/Theme.ActivityTest">
    <activity android:name= ".News.NewsContentActivity">

    </activity>
    <activity android:name=".MainActivity">

      <intent-filter>
        <action android:name="android.intent.action.MAIN" />
        <category android:name="android.intent.category.LAUNCHER" />
      </intent-filter>
    </activity>
  </application>

</manifest>
activity_main
<?xml version="1.0" encoding="utf-8"?>
<FrameLayout xmlns:android="http://schemas.android.com/apk/res/android"
    xmlns:app="http://schemas.android.com/apk/res-auto"
    xmlns:tools="http://schemas.android.com/tools"
    android:id="@+id/news_title_layout"
    android:layout_width="match_parent"
    android:layout_height="match_parent"
    android:orientation="horizontal"
    tools:context=".MainActivity">

    <!--在单页模式下只会加载一个新闻标题的碎片-->
    <fragment
        android:id="@+id/left_fragment"
        android:name="com.djp.administrator.fragmenttest.NewsTitleFragment"
        android:layout_width="match_parent"
        android:layout_height="match_parent" />

</FrameLayout>
接下来,准备好一个新闻的实体类,新建类 News,代码如下所示:
/**
 * 新闻实体类
 */

public class News {

    private String title;   // 新闻标题

    private String content; // 新闻内容

    public String getTitle() {
        return title;
    }

    public void setTitle(String title) {
        this.title = title;
    }

    public String getContent() {
        return content;
    }

    public void setContent(String content) {
        this.content = content;
    }
}
接着新建一个 news_content_frag.xml 布局,作为新闻内容的布局:
<?xml version="1.0" encoding="utf-8"?>
<RelativeLayout
    xmlns:android="http://schemas.android.com/apk/res/android"
    android:layout_width="match_parent"
    android:layout_height="match_parent">

    <LinearLayout
        android:id="@+id/visibility_layout"
        android:layout_width="match_parent"
        android:layout_height="match_parent"
        android:orientation="vertical"
        android:visibility="invisible">

        <!--新闻标题-->
        <TextView
            android:id="@+id/news_title"
            android:layout_width="match_parent"
            android:layout_height="wrap_content"
            android:gravity="center"
            android:padding="10dp"
            android:text="东营职业学院"
            android:textSize="20sp" />
        <!--分割线-->
        <View
            android:layout_width="match_parent"
            android:layout_height="1dp"
            android:background="#000"/>
        <!--新闻正文-->
        <TextView
            android:id="@+id/news_content"
            android:layout_width="match_parent"
            android:layout_height="0dp"
            android:layout_weight="1"
            android:textSize="18sp"
            android:padding="15dp"/>
    </LinearLayout>
    <!--分割线-->
    <View
            android:layout_width="1dp"
            android:layout_height="match_parent"
            android:layout_alignParentLeft="true"
            android:background="#000"/>


</RelativeLayout>
新闻内容的布局主要分为两个部分,头部显示新闻标题,正文显示新闻内容,中间使用一条细线分隔开;
然后再新建一个 NewsContentFragment 类,如下:
/**
 * 新闻内容Fragment
 */

public class NewsContentFragment extends Fragment {
    private  View view;

    public View onCreateView(LayoutInflater inflater, ViewGroup container, Bundle savedInstanceState) {
        //加载新闻布局
        view = inflater.inflate(R.layout.news_content_frag,container,false);
        return view;
    }

    /**
     * 将新闻标题和新闻内容显示在界面上  用来刷新新闻详情
     */
    public void refresh(String newsTitle,String newsContent){
        View visibilityLayout = view.findViewById(R.id.visibility_layout);
        visibilityLayout.setVisibility(View.VISIBLE);//把visibilityLayout设置成可见
        TextView newsTitleText = (TextView) view.findViewById (R.id.news_title);//获取新闻标题控件
        TextView newsContentText = (TextView) view.findViewById(R.id.news_content);//获取新闻正文控件
        newsTitleText.setText(newsTitle);//刷新新闻标题
        newsContentText.setText(newsContent);//刷新新闻内容
    }
}
这样就把新闻内容的碎片和布局创建好了
但它们都是在双页模式下使用的,若要在单页模式中使用
还需创建一个活动 NewsContentActivity,其布局 news_content.xml 中的代码如下:
<LinearLayout xmlns:android="http://schemas.android.com/apk/res/android"
    android:orientation="vertical"
    android:layout_width="match_parent"
    android:layout_height="match_parent">

    <!--单页模式-->
    <fragment
        android:id="@+id/news_content_fragment"
        android:name="com.djp.administrator.fragmenttest.NewsContentFragment"
        android:layout_width="match_parent"
        android:layout_height="match_parent"
        />

</LinearLayout>
这里直接在布局中引入了 NewsContentFragment,相当于把 news_content_frag 布局的内容自动加了进来,
然后编写 NewsContentActivity 的代码,如下:
/**
 * 单页模式
 */
public class NewsContentActivity extends AppCompatActivity {

    /**
     * 构建Intent,传递所需数据
     */
    public static void actionStart(Context context,String newsTitle,String newsContent){
        Intent intent  = new Intent(context,NewsContentActivity.class);
        intent.putExtra("news_title",newsTitle);
        intent.putExtra("news_content",newsContent);
        context.startActivity(intent);
    }
    @Override
    protected void onCreate(Bundle savedInstanceState) {
        super.onCreate(savedInstanceState);
        setContentView(R.layout.news_content);
        //获取传入的新闻标题、新闻内容
        String newsTitle = getIntent().getStringExtra("news_title");
        String newsContent = getIntent().getStringExtra("news_content");
        //获取NewsContentFragment 实例
        NewsContentFragment newsContentFragment = (NewsContentFragment) getSupportFragmentManager().findFragmentById(R.id.news_content_fragment);
        //刷新NewsContentFragment   显示数据
        newsContentFragment.refresh(newsTitle,newsContent);
    }
}
在 onCreate() 方法中通过 Intent 获取传入的新闻标题和内容
然后调用 FragmentManager 的 findFragmentById() 方法得到 NewsContentFragment 的实例
接着调用它的 refresh() 方法,并将新闻的标题和内容传入,显示数据
接下来还需再创建显示新闻列表的布局 news_title_frag.xml,如下:
<LinearLayout xmlns:android="http://schemas.android.com/apk/res/android"
    android:orientation="vertical"
    android:layout_width="match_parent"
    android:layout_height="match_parent">

    <!--新闻列表-->
    <android.support.v7.widget.RecyclerView
        android:id="@+id/news_title_recycler_view"
        android:layout_width="match_parent"
        android:layout_height="match_parent" />

</LinearLayout>
新建 news_item.xml 作为 上述 RecyclerView 子项的布局:
<TextView
    xmlns:android="http://schemas.android.com/apk/res/android"
    android:id="@+id/news_title"
    android:layout_width="match_parent"
    android:layout_height="wrap_content"
    android:singleLine="true"
    android:ellipsize="end"
    android:textSize="18sp"
    android:padding="10dp"/>
子项的布局就只有一个 TextView
新闻列表和子项布局都创建好了,接下来就需要一个用于展示新闻列表的地方
这里新建 NewsTitleFragment 作为展示新闻列表的碎片:
/**
 * 新闻列表fragment
 */

public class NewsTitleFragment extends Fragment{

    private boolean isTowPane;

    @Override
    public View onCreateView(LayoutInflater inflater,  ViewGroup container,  Bundle savedInstanceState) {
        View view = inflater.inflate(R.layout.news_content_frag, container, false);
        return view;
    }

    @Override
    public void onActivityCreated(@Nullable Bundle savedInstanceState) {
        super.onActivityCreated(savedInstanceState);
        if (getActivity().findViewById(R.id.news_content_layout)!= null){
            // 可以找到 news_content_layout 布局时,为双页模式
            isTowPane = true;
        }else {
            // 找不到 news_content_layout 布局时,为单页模式
            isTowPane = false;
        }
    }
}
为实现上述 onActivityCreated() 方法中判断当前时双页还是单页模式
接下来在 NewsTitleFragemt 中新建一个内部类 NewsAdapter 来作为 RecyclerView 的适配器
如下:
public class NewsTitleFragment extends Fragment{

    private boolean isTowPane;

    . . .

    /**
     * RecyclerViews适配器
     * */
    class NewsAdapter extends RecyclerView.Adapter<NewsAdapter.ViewHolder> {

        private List<News> mNewsList;

        class ViewHolder extends RecyclerView.ViewHolder {

            TextView newsTitleText;

            public ViewHolder(View view) {
                super(view);
                newsTitleText = (TextView) view.findViewById(R.id.news_title);//新闻标题
            }

        }

        public NewsAdapter(List<News> newsList) {
            mNewsList = newsList;
        }

        @Override
        public ViewHolder onCreateViewHolder(ViewGroup parent, int viewType) {
            //加载布局
            View view = LayoutInflater.from(parent.getContext()).inflate(R.layout.news_item, parent, false);
            //每个Item的点击事件
            final ViewHolder holder = new ViewHolder(view);
            view.setOnClickListener(new View.OnClickListener() {
                @Override
                public void onClick(View v) {
                    News news = mNewsList.get(holder.getAdapterPosition());
                    //如果是双页模式,则刷新NewsContentActivity中的数据
                    if (isTwoPane) {
                        NewsContentFragment newsContentFragment = (NewsContentFragment) getFragmentManager().findFragmentById(R.id.news_content_fragment);
                        newsContentFragment.refresh(news.getTitle(), news.getContent());
                    } else {
                        //如果是单页模式,则直接启动NewsContentActivity
                        NewsContentActivity.actionStart(getActivity(), news.getTitle(), news.getContent());
                    }
                }
            });
            return holder;
        }
        @Override
        public void onBindViewHolder(ViewHolder holder, int position) {
            News news = mNewsList.get(position);
            holder.newsTitleText.setText(news.getTitle());
        }
        @Override
        public int getItemCount() {
            return mNewsList.size();
        }

    }
需要注意的是,这里把适配器写成内部类是为了直接访问 NewsTitleFragment 的变量
比如:isTowPane
现在还剩最后一步收尾工作,就是向 RecyclerView 中填充数据了
修改 NewsTitleFragment 中的代码,如下所示:
public class NewsTitleFragment extends Fragment{

    . . .

    @Override
    public View onCreateView(LayoutInflater inflater, ViewGroup container, Bundle savedInstanceState) {
        View view = inflater.inflate(R.layout.news_title_frag, container, false);

        //RecyclerView实例
        RecyclerView newsTitleRecyclerView = (RecyclerView) view.findViewById(R.id.news_title_recycler_view);
        LinearLayoutManager layoutManager = new LinearLayoutManager(getActivity());
        newsTitleRecyclerView.setLayoutManager(layoutManager);//指定布局为线性布局
        NewsAdapter adapter = new NewsAdapter(getNews());//把模拟新闻数据传入到NewsAdapter构造函数中
        newsTitleRecyclerView.setAdapter(adapter);//完成适配器设置
        return view;
    }

    @Override
    public void onActivityCreated(Bundle savedInstanceState) {
        super.onActivityCreated(savedInstanceState);
        if (getActivity().findViewById(R.id.news_content_layout) != null) {
            // 可以找到news_content_layout布局时,为双页模式
            isTwoPane = true;
        } else {
            // 找不到news_content_layout布局时,为单页模式
            isTwoPane = false;
        }
    }

    /**
     * 初始化50条模拟新闻数据
     * @return
     */
     private List<News> getNews() {
        //创建集合
        List<News> newsList = new ArrayList<>();
        //实例化数据
        for (int i = 1; i <= 50; i++) {
            News news = new News();
            news.setTitle("标题" + i);
            news.setContent(getRandomLengthContent("东营职业学院电子信息与传媒学院" + i + ". "));
            newsList.add(news);
        }
        return newsList;
    }


    /**
     * 随机生成不同长度的新闻内容
     * @param content
     * @return
     */
    private String getRandomLengthContent(String content) {
        Random random = new Random();
        int length = random.nextInt(20) + 1;
        StringBuilder builder = new StringBuilder();
        for (int i = 0; i < length; i++) {
            builder.append(content);
        }
        return builder.toString();
    }

    . . .
}
NewsTitleFragment最终版本
package com.example.activitytest.News;

import java.util.ArrayList;
import java.util.List;
import java.util.Random;

import android.os.Bundle;
import android.view.LayoutInflater;
import android.view.View;
import android.view.ViewGroup;
import android.widget.TextView;
import androidx.annotation.NonNull;
import androidx.annotation.Nullable;
import androidx.fragment.app.Fragment;
import androidx.recyclerview.widget.LinearLayoutManager;
import androidx.recyclerview.widget.RecyclerView;

import com.example.activitytest.R;

/**
 * 新闻列表fragment
 */
public class NewsTitleFragment extends Fragment {
  private boolean isTwoPane;

  public View onCreateView(@NonNull LayoutInflater inflater, @Nullable ViewGroup container, @Nullable Bundle savedInstanceState) {
    View view=inflater.inflate(R.layout.news_title_frag,container,false);

    RecyclerView newTitleRecyclerView=(RecyclerView)view.findViewById(R.id.news_title_recycler_view);
    LinearLayoutManager layoutManager=new LinearLayoutManager(getActivity());

    newTitleRecyclerView.setLayoutManager(layoutManager);
    NewsAdapter adapter=new NewsAdapter(getNews());
    newTitleRecyclerView.setAdapter(adapter);
    return view;
  }
  private List<News> getNews(){
    List<News> newsList=new ArrayList<>();
    for(int i=1;i<=50;i++){

      News news=new News();
      news.setTitle("This is news title "+i);
      news.setContent(getRandomLengthContent("This is news content "+i+"."));
      newsList.add(news);
    }
    return newsList;
  }
  private  String getRandomLengthContent(String content){
    Random random=new Random();
    int length=random.nextInt(20)+1;
    StringBuilder builder=new StringBuilder();
    for(int i=0;i<length;i++){
      builder.append(content);
    }
    return builder.toString();
  }

  @Override
  public void onActivityCreated(@Nullable Bundle savedInstanceState) {
    super.onActivityCreated(savedInstanceState);
    if (getActivity().findViewById(R.id.news_content_layout) != null) {
      isTwoPane = true;
    } else {
      isTwoPane = false;
    }
  }
  class NewsAdapter extends RecyclerView.Adapter<NewsAdapter.ViewHolder>{

    private List<News>mNewsList;
    class ViewHolder extends  RecyclerView.ViewHolder{

      TextView newsTitleText;
      public  ViewHolder(View view){
        super(view);
        newsTitleText=(TextView)view.findViewById(R.id.news_title);

      }
    }
    public  NewsAdapter(List<News> newsList){
      mNewsList=newsList;
    }

    @Override
    public ViewHolder onCreateViewHolder(@NonNull ViewGroup parent, int viewType) {
      View view = LayoutInflater.from(parent.getContext()).inflate(R.layout.news_item, parent, false);
      final ViewHolder holder = new ViewHolder(view);
      view.setOnClickListener(new View.OnClickListener() {
        @Override
        public void onClick(View v) {
          News news = mNewsList.get(holder.getAdapterPosition());
          if (isTwoPane) {
//如果是双页模式,则刷新NewsContentFragment中的内容
            NewsContentFragment newsContentFragment = (NewsContentFragment) getFragmentManager().findFragmentById(R.id.news_content_fragment);
            newsContentFragment.refresh(news.getTitle(), news.getContent());
          } else {
//如果是单页模式,则直接启动NewsContentActivity
            NewsContentActivity.actionStart(getActivity(), news.getTitle(), news.getContent());
          }
        }
      });
      return holder;
    }

    @Override
    public void onBindViewHolder(@NonNull ViewHolder holder, int position) {
      News news=mNewsList.get(position);
      holder.newsTitleText.setText(news.getTitle());
    }

    @Override
    public int getItemCount() {
      return mNewsList.size();
    }
  }
}
下面是双页模式
首先看过前几页第一行代码的敲友应该可以知道,在res下面新建layout-sw600dp文件夹系统就在屏幕分辨率大于600的时候自动选择该文件夹下的文件,在文件夹下面新建activity_main文件。(这里面有个坑,请绕行,我们新建的是 layout-sw600dp文件夹,不是layout_sw600dp。layout后面不是下划线,是杠,是杠,是杠!)
<?xml version="1.0" encoding="utf-8"?>
<LinearLayout xmlns:android="http://schemas.android.com/apk/res/android"
    android:layout_width="match_parent"
    android:layout_height="match_parent"
    android:orientation="horizontal">

    <fragment
        android:id="@+id/news_title_fragment"
        android:name="com.yiyajing.mypremission.fragment.NewsTitleFragment"
        android:layout_width="0dp"
        android:layout_height="match_parent"
        android:layout_weight="1" />

    <FrameLayout
        android:id="@+id/news_content_layout"
        android:layout_width="0dp"
        android:layout_height="match_parent"
        android:layout_weight="3">

        <fragment
            android:id="@+id/news_content_fragment"
            android:name="com.yiyajing.mypremission.fragment.NewsContentFragment"
            android:layout_width="match_parent"
            android:layout_height="match_parent" />
    </FrameLayout>
</LinearLayout>
可以看出,在双页模式下我们同时引入了两个碎片,并将新闻内容的碎片放在了一个FrameLayout布局下而这个布局的id正是news_content_layout,因此,能找到这个id就是双页模式,否则就是单页模式,双页模式情况下,系统会自动选择该布局。
MainActivity.java
package com.example.activitytest;

import androidx.appcompat.app.AppCompatActivity;
import android.os.Bundle;
import android.util.Log;


public class MainActivity extends AppCompatActivity {
  private final  String Tag = "MainActivity:";

  @Override
  protected void onCreate(Bundle savedInstanceState) {
    super.onCreate(savedInstanceState);
    Log.d(Tag,this.toString());
    setContentView(R.layout.activity_main);
  }

}
实现效果图:
参考
参考
1、https://blog.csdn.net/zsp765098084/article/details/80901582
2、https://blog.csdn.net/qq_37982823/article/details/86539172
3、https://www.jianshu.com/p/2bf21cefb763
4、https://www.jianshu.com/p/dad51f6c9c4d
5、https://blog.csdn.net/weixin_30632883/article/details/95435703

旨在为数千万中国开发者提供一个无缝且高效的云端环境,以支持学习、使用和贡献开源项目。
更多推荐


 37
37 0
0- 0


 已为社区贡献14条内容

所有评论(0)