python + vue + electron实现本地音乐播放器
前言因为受够了一般音乐播放软件的各种没什么用的功能以及各种垃圾广告,所以想自己搞一个音乐播放器来用,花了几天时间就搞了这么个东西,跟大家分享一下。这个文档并不是针对前端新手的,所以如果你接触前端不久就简单了解一下就好。代码已经在我的Github上了,代码里也加了点注释,真的对这个很感兴趣的可以下载下来自己试试。这篇文章的叙述思路跟我实际开发的思路相同,主要分成三个步骤,下面将一步一步地说。第一步,
前言
因为受够了一般音乐播放软件的各种没什么用的功能以及各种垃圾广告,所以想自己搞一个音乐播放器来用,花了几天时间就搞了这么个东西,跟大家分享一下。
这个文档并不是针对前端新手的,所以如果你接触前端不久就简单了解一下就好。
代码已经在我的Github上了,代码里也加了点注释,真的对这个很感兴趣的可以下载下来自己试试。
这篇文章的叙述思路跟我实际开发的思路相同,主要分成三个步骤,下面将一步一步地说。
第一步,使用vue做个网页播放器
这是这个项目的重点,毕竟我本身就是个前端,先实现一个网页版来满足基本要求。
- 先写个audio标签
在网页上播放音乐,首先想到的肯定是audio标签,那么第一步就很简单了,在页面上放个audio。
<audio :src="songUrl" ref="audio"></audio>
要是偷懒可以直接用audio自己带的功能来实现对音乐播放的控制,因为我以前常用酷狗,所以打算仿照它的样子搞一版,就不能用原生的内容要自己定义,这是前端内容里比较复杂的一点。此处内容我倒是不太想赘述,因为与之相关的内容很容易就能搜索到,就简单的贴一下相关代码。
  mounted () {
    this.audio = this.$refs.audio
    // 绑定监听事件实时获取歌曲时间信息
    this.audio.addEventListener('timeupdate', () => {
      this.currentTime = this.audio.currentTime
      this.$emit('update:current', this.currentTime)
      if (this.currentTime >= this.duration && this.currentTime > 0) { // 一首歌播放完自动播放下一首
        this.handoverSong('next')
      }
    })
    // 获取歌曲时长
    this.audio.addEventListener('canplay', () => {
      this.duration = this.audio.duration
    })
    // 歌曲可以播放时才允许播放
    this.audio.addEventListener('loadeddata', () => {
      if (this.audio.readyState >= 2 && this.playStatus) {
        this.playMusic()
      }
    })
  },
  methods: {
    playMusic () { // 切换播放状态
      if (this.duration > 0) {
        this.playStatus = true
        this.audio.play()
      }
    },
    pauseMusic () { // 暂停状态
      this.playStatus = false
      this.audio.pause()
    },
    clickIcon () { // 点击播放或者暂停按钮切换状态
      this.playStatus ? this.pauseMusic() : this.playMusic()
    },
    formatSeconds (value) { // 时间标准化为xx:xx
      let s = parseInt(value) // 秒
      s = isNaN(s) ? 0 : s
      let m = 0 // 分
      if (s > 60) {
        m = parseInt(s / 60)
        s = parseInt(s % 60)
      }
      return m.toString().padStart(2, '0') + ':' + s.toString().padStart(2, '0')
    },
    adjustSong (type) { // 快进快退操作
      if (this.duration > 0) {
        if (type.indexOf('r') > -1) { // 快退
          this.audio.currentTime -= 3
          this.audio.currentTime = this.audio.currentTime < 0 ? 0 : this.audio.currentTime
        } else { // 快进
          this.audio.currentTime += 3
          this.audio.currentTime = this.audio.currentTime > this.audio.duration ? this.audio.duration : this.audio.currentTime
        }
      }
    },
    handoverSong (type) { // 切换上一首下一首,最后一首与第一首衔接在一起
      if (type.indexOf('next') > -1) {
        this.songIndex++
        this.songIndex = this.songIndex < this.songList.length ? this.songIndex : 0
      } else {
        this.songIndex--
        this.songIndex = this.songIndex > -1 ? this.songIndex : this.songList.length - 1
      }
      this.$emit('update:musicIndex', this.songIndex)
      this.playThisMusic(this.songIndex)
    },
    playThisMusic (index) { // 播放当前下标歌曲
      this.playStatus = true
      this.songIndex = index
      this.getMusic()
    },
    getMusic () { // 获取音频文件
      const _this = this
      const param = {
        file: this.song.src
      }
      this.$axios({
        method: 'post',
        url: '/music/file',
        data: param,
        responseType: 'blob'
      }).then(
        res => {
          _this.songUrl = window.URL.createObjectURL(res.data)
          console.log(res.data)
        }
      ).catch(res => {
        console.log(res)
      })
    },
    ctrlVolume (e) { // 控制音量
      console.log(e.layerY)
      this.volume = parseInt(11 - e.layerY / 16)
      this.audio.volume = this.volume / 10
    },
    dragElem (e, direction) { // 拖动音量或者进度的圆点
      const el = e.target
      const sX = e.clientX - el.offsetLeft
      const sY = e.clientY - el.offsetTop
      el.style.transition = 'none'

      document.onmousemove = (e) => { // 圆点鼠标移动
        const eX = e.clientX - sX
        const eY = e.clientY - sY
        if (direction.indexOf('horizontal') > -1) { // 只能横向移动即歌曲进度调整
          el.style.left = eX + 'px'
          this.audio.currentTime = parseInt(el.style.left) / window.innerWidth * this.audio.duration
        } else { // 只能纵向移动,歌曲音量控制
          if (eY >= 0 && eY <= 160) {
            el.style.top = eY + 8 + 'px'
            this.volume = parseInt(10 - eY / 16)
            this.audio.volume = this.volume / 10
          }
        }
      }
      document.onmouseup = (e) => { // 移动结束时的操作
        document.onmousemove = null
        el.style.transition = 'all 0.5s'
      }
    }
此处内容的介绍都在注释里,主要包含上一曲下一曲、快进快退、播放暂停以及音量控制,手动拖动进度条的功能,修改播放顺序的功能没实现,主要是因为懒。
完成的效果

这里可以先随便找一个歌来试,先实现能自由控制音频播放的功能。
- 实现歌曲列表
此处内容就比较简单,获取项目文件夹下的音频文件并把获取到的数据放在此处,可以先手动把数据放在这里,之后使用python的目的就是能够自动获取任意文件夹下的信息。
完成的效果

主要的功能就是点击对应歌名切换歌曲,实现起来并不复杂。
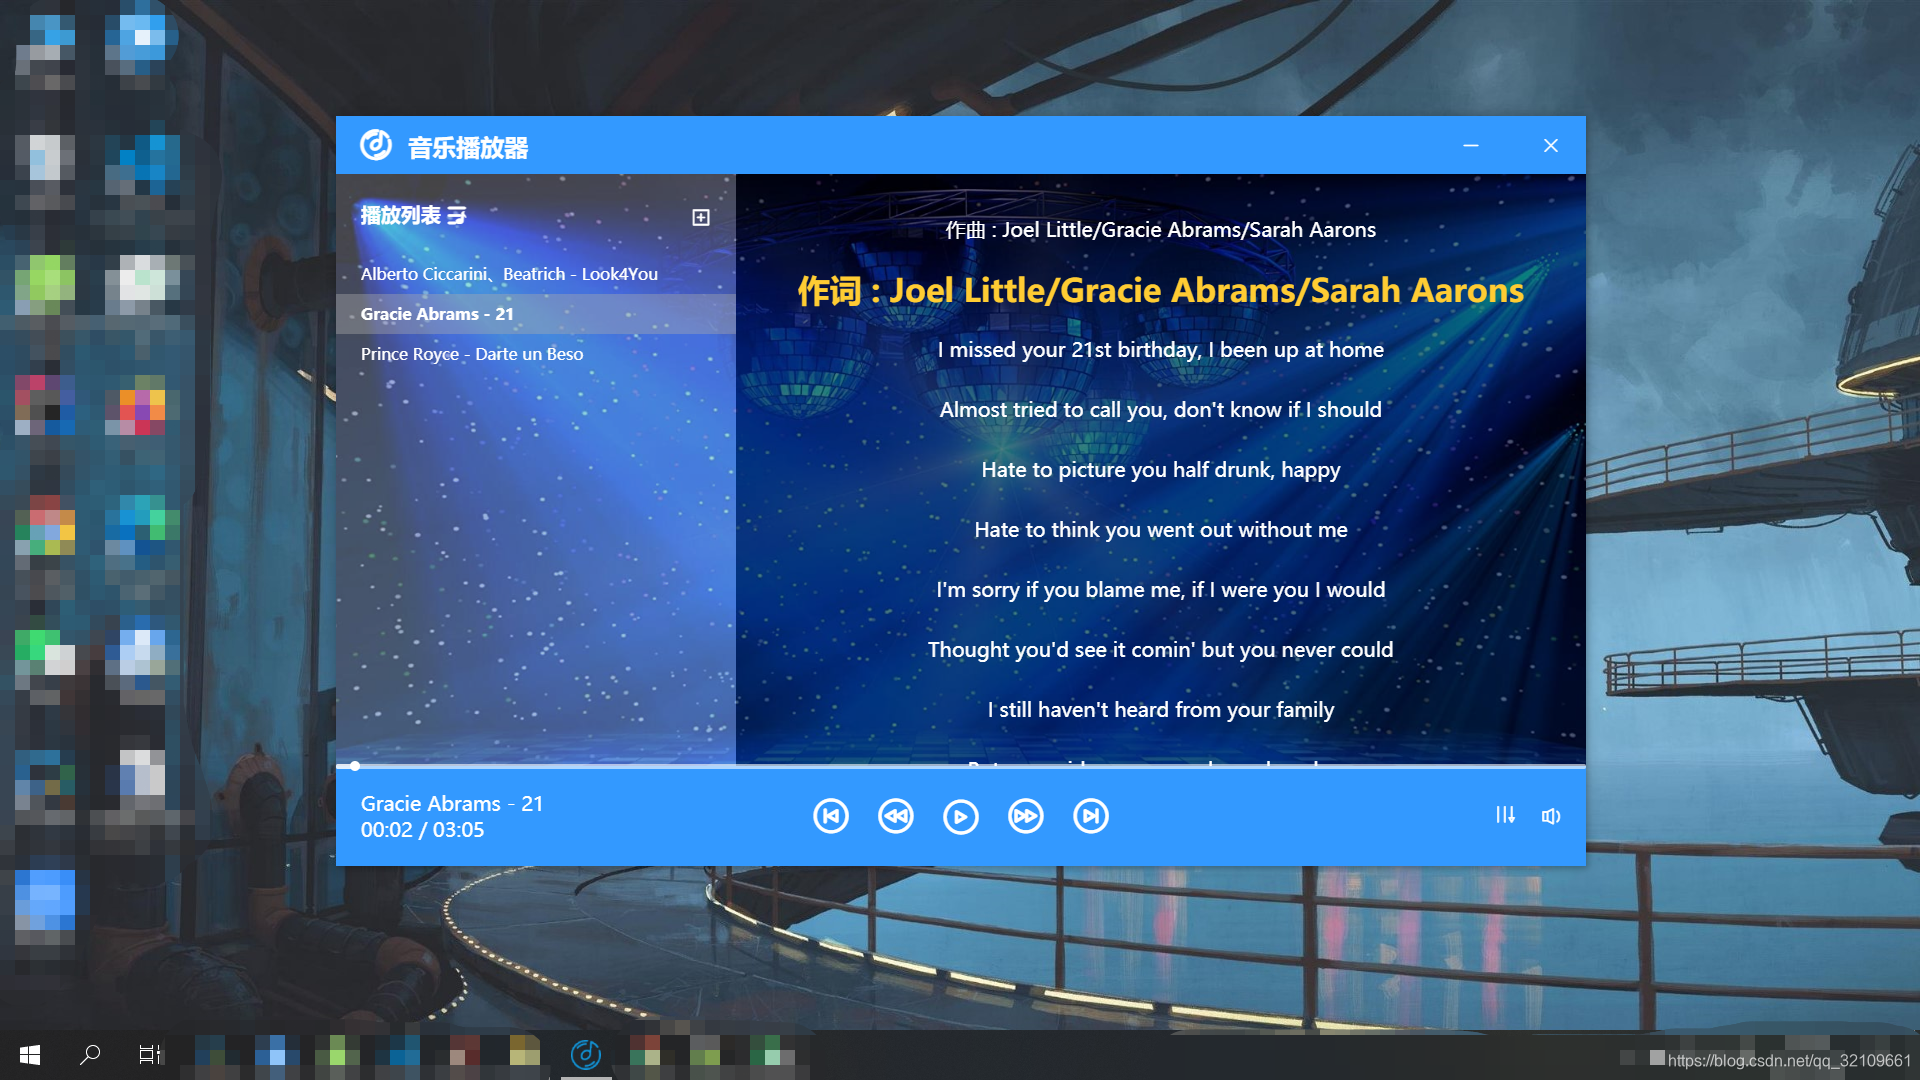
3. 歌词展示
歌词文件要求与歌名完全一致,还必须是lrc文件,至于为什么必须是lrc格式,因为懒的适配多种格式。
lrc歌词的格式大体如下所示
	[ti:Look4You]
	[ar:Alberto Ciccarini/Beatrich]
	[al:Look4You]
	[by:]
	[offset:0]
	[00:00.10]Look4You - Alberto Ciccarini/Beatrich
	[00:00.20]Written by:Alberto Ciccarini/Benas Ivanovas/Beatrice Pundziute
	[00:00.40]Loves is only made for two
	[00:01.63]
	[00:02.23]All the way back to you what do I do
	[00:05.73]
	[00:09.37]I just wanna hide with you
	[00:10.79]
	[00:11.61]This is not something new if I would knew
前面是时间后面是歌词,以此为标志拆分这个文件为数组就能很好的显示歌词了。
拆分歌词的方法是百度来的,感谢这个热爱分享的大佬
  const lrc = res.data
  if (lrc.length > 0) {
     const lrcs = lrc.split('\n')// 用回车拆分成数组
     for (let i in lrcs) { // 遍历歌词数组
        lrcs[i] = lrcs[i].replace(/(^\s*)|(\s*$)/g, '') // 去除前后空格
        let t = lrcs[i].substring(lrcs[i].indexOf('[') + 1, lrcs[i].indexOf(']'))// 取[]间的内容
        let s = t.split(':')// 分离:前后文字
        if (!isNaN(parseInt(s[0]))) { // 是数值
          let arr = lrcs[i].match(/\[(\d+:.+?)\]/g)// 提取时间字段,可能有多个
          let start = 0
          for (let k in arr) {
             start += arr[k].length // 计算歌词位置
          }
          let content = lrcs[i].substring(start)// 获取歌词内容
          if (content.length > 0) {
            for (let k in arr) {
               let t = arr[k].substring(1, arr[k].length - 1).split(':')// 取[]间的内容
               this.lyricList.push({// 对象{t:时间,c:歌词}加入ms数组
                 t: (parseFloat(t[0]) * 60 + parseFloat(t[1])).toFixed(3),
                  c: content
               })
            }
          }
        }
      }
    }
最后得到的lyricList就是歌词数组,只要和当前歌曲播放时间current比较就能知道当前播到哪句歌词了
    currentLyric (index) { // 判断当前播放的歌词并将已播放的部分歌词隐藏
      if (index < this.lyricList.length - 1) {
        const current = this.time >= this.lyricList[index].t && this.time <= this.lyricList[index + 1].t
        this.currentIndex = current ? index : this.currentIndex
        return current
      }
      return true
    }
这里会把当前歌词的前五句之前的歌词隐藏掉,这样可以达到当前歌词基本保持在中间的效果。
完成的效果

我这里因为是最终成果,所以显示区域比较小。
第二步 python实现可以读取任意盘下的歌曲文件
html的同源策略让你无法读取任意位置的文件,我们也不能要求使用者把歌曲放在我们的项目里,而且也不能手动获取每一条的歌曲信息,所以就需要后端的内容来配合,python是个很好的选择。
我的python水平也就是看了两三天廖雪峰老师的文档的程度,所以主要还是参考了别人的代码写了个app.py
	#!/usr/bin/env python3
	# -*- coding: utf-8 -*-

	from flask import Flask, request, Response, render_template
	import os
	import json

	dist = "./dist"

	app = Flask(__name__,
	            template_folder=dist,
	            static_folder=dist + "/static")

	# 启动python服务默认打开的页面


	@ app.route('/', methods=['GET', 'POST'])
	def home():
	    return render_template('index.html')

	# 获取歌曲列表的接口


	@ app.route('/music/list', methods=['POST'])
	def get_music_list():
	    file_url = request.json.get("fileUrl")
	    music = [d for d in os.listdir(file_url)]
	    music_list = []
	    for m in music:
	        if os.path.splitext(m)[1] == '.mp3':  # 目录下包含.mp3的文件
	            music_list.append(m)
	    str_json = json.dumps(music_list, indent=2,
	                          ensure_ascii=False)  # json转为string

	    return str_json

	# 获取单个音频文件的接口,仅限MP3文件


	@app.route('/music/file', methods=['POST'])
	def stream_mp3():
	    path = request.json.get("file")
	    file = open(path, 'rb')
	    return Response(file, mimetype="audio/mpeg3")

	# 获取歌词文件的接口,仅限lrc文件


	@app.route('/music/lyric', methods=['POST'])
	def stream_lyric():
	    path = request.json.get("file")
	    file = open(path, 'rb')
	    return Response(file)


	if __name__ == '__main__':
	    app.run(host='127.0.0.1', port=5000)
具体内容都在注释里了,实在看不明白就直接复制好了,主要是获取列表、获取单个歌曲与获取单个歌词的接口,至于怎么调用就不需要我多赘述了。
第三步 electron将项目转为桌面软件
使用python的问题在于你要随时启动python的服务才能使用,这样肯定是不方便的,所以就更进一步,把网页音乐播放器改成左面音乐播放器。
想要实现这个功能百度一下的结果提供了一个解决方案eel,这玩意用起来简单,但是eel.js这个文件在使用时会报错,搞来搞去不知道怎么解决,所以就采用了electron。
这个主要是参考了Likianta Me的博客内容,建议先看他写的东西。
/**
 * electron功能的主要实现文件
 */
const { app, BrowserWindow, ipcMain, dialog } = require('electron')

function createWindow () {
  const win = new BrowserWindow({
    width: 1000, // 宽度
    height: 600, // 高度
    frame: false, // 边框
    center: true, // 居中
    resizable: false, // 允许变更宽高
    webPreferences: {
      nodeIntegration: true,
      // devTools: true, // 允许控制台
      preload: __dirname + '/preload.js' // 加载额外文件,引入在vue里使用的electron属性
    }
  })

  win.loadURL('http://127.0.0.1:5000/#/') // 加载Url,该url时python服务启动的的url

  //接收最小化命令
  ipcMain.on('window-min', function () {
    win.minimize();
  })
  //接收最大化命令
  ipcMain.on('window-max', function () {
    if (win.isMaximized()) {
      win.restore();
    } else {
      win.maximize();
    }
  })
  //接收关闭命令
  ipcMain.on('window-close', function () {
    win.close();
  })
  // 打开弹窗
  ipcMain.on('open-directory-dialog', function (event, p) {
    dialog.showOpenDialog({
      properties: [p]
    }).then(result => {
      if (result) {// 如果有选中
        event.sender.send('selectedItem', result.filePaths[0])
      }
    }).catch(err => {
      console.error('ERROR: ', err)
    })
  })
}

// 从 python-shell 导入一个 PythonShell 对象 (注意大小写)
const { PythonShell } = require("python-shell")
PythonShell.run(
  __dirname + '/app.py', null, function (err, results) {
    if (err) throw err
    console.log('results', results)
  }
)

app.whenReady().then(createWindow)

app.on('window-all-closed', () => {
  if (process.platform !== 'darwin') {
    app.quit()
  }
})

app.on('activate', () => {
  if (BrowserWindow.getAllWindows().length === 0) {
    createWindow()
  }
})
这里使用了electron与python-shell,需要npm安装,但是问题在于electron在安装时会下载一个70MB左右的压缩包,下载速度很慢,我下了一个多小时,所以要有耐心。
想要用好electron就要看electron官方API,网络上给的一些内容已经过时了,所以还是要多看看官方文档。
有了这个就可以把网页项目变成桌面软件,最终实现效果为
我的文章说的比较简略,学前端的同学想要搞个自己的桌面软件程序的话最好还是下载下来我的代码自己多试试。有什么问题倒是可以问我,不过我回复很可能不及时,但是看到就会回复的。

前往低代码交流专区
更多推荐

 5
5 0
0- 0


 已为社区贡献2条内容

所有评论(0)