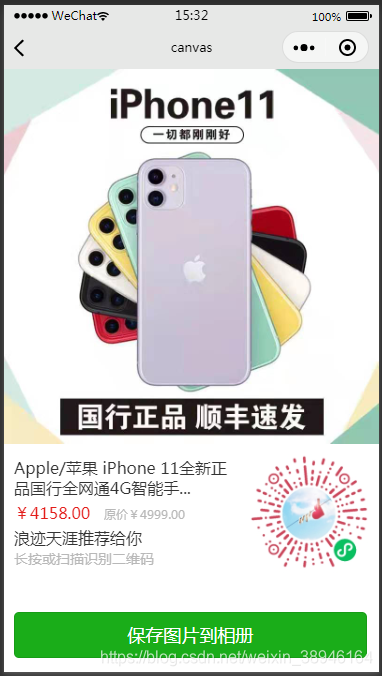
uniapp 画布canvas的用法
效果图:代码:<template><view class="demo"><canvas :style="{ width: canvasW + 'px', height: canvasH + 'px' }" canvas-id="myCanvas" id="myCanvas01"> </canvas><button class="btn" typ
·
效果图:
代码:
<template>
<view class="demo">
<canvas :style="{ width: canvasW + 'px', height: canvasH + 'px' }" canvas-id="myCanvas" id="myCanvas01"> </canvas>
<button class="btn" type="primary" v-if="isShow" @click="saveImage">保存图片到相册</button>
</view>
</template>
<script>
export default {
data() {
return {
canvasW:0, // 画布宽
canvasH:0, // 画布高
SystemInfo:{}, // 设备信息
goodsImg: {}, // 商品主图信息
ewmImg:{}, // 二维码图片信息
ewmW:120, // 二维码大小
title:'Apple/苹果 iPhone 11全新正品国行全网通4G智能手机苹果SE2', // 商品标题
price:'4158.00', // 价格
Oldprice:'4999.00', // 原价
name:'浪迹天涯', // 推荐人
isShow:false ,
}
},
async onLoad() {
// 获取设备信息,主要获取宽度,赋值给canvasW 也就是宽度:100%
this.SystemInfo = await this.getSystemInfo();
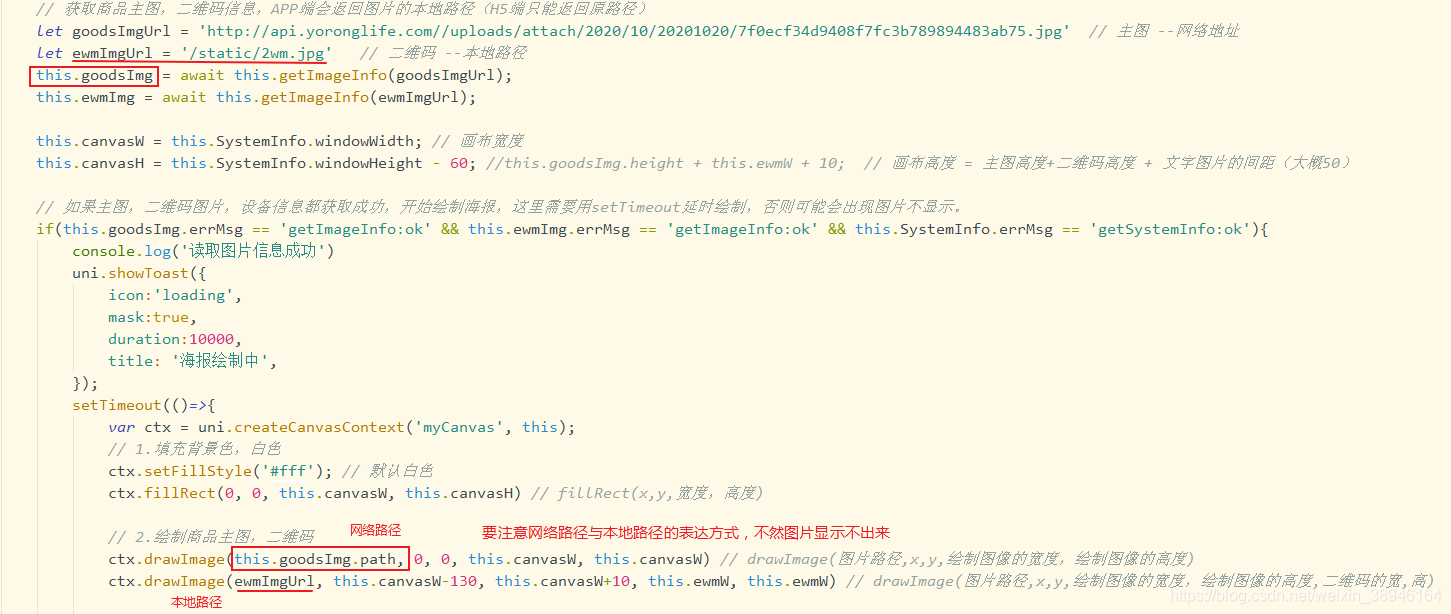
// 获取商品主图,二维码信息,APP端会返回图片的本地路径(H5端只能返回原路径)
let goodsImgUrl = '/static/bjt.jpg' // 主图本地路径,也可以用网络地址
let ewmImgUrl = '/static/2wm.jpg'
this.goodsImg = await this.getImageInfo(goodsImgUrl);
this.ewmImg = await this.getImageInfo(ewmImgUrl);
this.canvasW = this.SystemInfo.windowWidth; // 画布宽度
this.canvasH = this.SystemInfo.windowHeight - 60; //this.goodsImg.height + this.ewmW + 10; // 画布高度 = 主图高度+二维码高度 + 文字图片的间距(大概50)
// 如果主图,二维码图片,设备信息都获取成功,开始绘制海报,这里需要用setTimeout延时绘制,否则可能会出现图片不显示。
if(this.goodsImg.errMsg == 'getImageInfo:ok' && this.ewmImg.errMsg == 'getImageInfo:ok' && this.SystemInfo.errMsg == 'getSystemInfo:ok'){
console.log('读取图片信息成功')
uni.showToast({
icon:'loading',
mask:true,
duration:10000,
title: '海报绘制中',
});
setTimeout(()=>{
var ctx = uni.createCanvasContext('myCanvas', this);
// 1.填充背景色,白色
ctx.setFillStyle('#fff'); // 默认白色
ctx.fillRect(0, 0, this.canvasW, this.canvasH) // fillRect(x,y,宽度,高度)
// 2.绘制商品主图,二维码
ctx.drawImage(goodsImgUrl, 0, 0, this.canvasW, this.canvasW) // drawImage(图片路径,x,y,绘制图像的宽度,绘制图像的高度)
ctx.drawImage(ewmImgUrl, this.canvasW-130, this.canvasW+10, this.ewmW, this.ewmW) // drawImage(图片路径,x,y,绘制图像的宽度,绘制图像的高度,二维码的宽,高)
// 3.绘制商品标题,多余文字自动换行
ctx.setFontSize(16); // setFontSize() 设置字体字号
ctx.setFillStyle('#333'); // setFillStyle() 设置字体颜色
/* str 这段代码是我百度找的,参考别人的。canvas不能自动换行,需要自行计算 */
let _strlineW = 0;
let _strLastIndex = 0; //每次开始截取的字符串的索引
let _strHeight = this.canvasW +30; //绘制字体距离canvas顶部的初始高度
let _num = 1;
for (let i = 0; i < this.title.length; i++) {
_strlineW += ctx.measureText(this.title[i]).width;
if (_strlineW > this.canvasW-155) {
if(_num == 2 && 2){
//文字换行数量大于二进行省略号处理
ctx.fillText(this.title.substring(_strLastIndex, i-5)+'...', 10, _strHeight);
_strlineW = 0;
_strLastIndex = i;
_num++;
break;
}else{
ctx.fillText(this.title.substring(_strLastIndex, i), 10, _strHeight);
_strlineW = 0;
_strHeight += 20;
_strLastIndex = i;
_num++;
}
}else if (i == this.title.length - 1) {
ctx.fillText(this.title.substring(_strLastIndex, i + 1), 10, _strHeight);
_strlineW = 0;
}
}
// 4、商品价格
ctx.setFontSize(16) // 字号
ctx.setFillStyle('#e31d1a') // 颜色
ctx.fillText('¥'+this.price, 10, this.canvasW +75); // (文字,x,y)
ctx.setFontSize(12)
ctx.setFillStyle('#b8b8b8')
ctx.fillText('原价¥'+this.Oldprice, 100, this.canvasW +75);
// 5、邀请信息
ctx.setFontSize(16)
ctx.setFillStyle('#333')
ctx.fillText(this.name+'推荐给你', 10, this.canvasW +100);
ctx.setFontSize(14)
ctx.setFillStyle('#b8b8b8')
ctx.fillText('长按或扫描识别二维码', 10, this.canvasW +this.ewmW);
// draw方法 把以上内容画到 canvas 中
ctx.draw(true,(ret)=>{
this.isShow = true // 显示按钮-保存图片到相册
uni.showToast({
icon:'success',
mask:true,
title: '绘制完成',
});
uni.canvasToTempFilePath({ // 保存canvas为图片
canvasId: 'myCanvas',
quality: 1,
complete: function(res) {
// 在H5平台下,tempFilePath 为 base64, // 图片提示跨域 H5保存base64失败,APP端正常输出临时路径
console.log(res.tempFilePath)
uni.setStorageSync('filePath',res.tempFilePath) //保存临时文件路径到缓存
} ,
})
});
},1500)
} else {
console.log('读取图片信息失败')
}
},
methods: {
// 获取图片信息
getImageInfo(image) {
return new Promise((req, rej) => {
uni.getImageInfo({
src: image,
success: function(res) {
req(res)
},
});
})
},
// 获取设备信息
getSystemInfo(){
return new Promise((req, rej) => {
uni.getSystemInfo({
success: function (res) {
req(res)
}
});
})
},
// 保存图片到相册
saveImage() {
let filePath = uni.getStorageSync('filePath') //从缓存中读取临时文件路径
wx.saveImageToPhotosAlbum({
filePath: filePath,
success(res) {
uni.showToast({
icon:'success',
mask:true,
title: '保存到相册了',
});
},
fail(res) {
console.log(res.errMsg)
}
})
}
}
}
</script>
<style>
.btn{
margin-left: 10px;
margin-right: 10px;
margin-bottom: 10px;
width: 94%;
}
</style>
使用网络图片与本地图片的区别,详见红色标注。
参考了这篇文章:https://blog.csdn.net/qq_40745143/article/details/109313719

为开发者提供学习成长、分享交流、生态实践、资源工具等服务,帮助开发者快速成长。
更多推荐


 16
16 1
1- 0


 已为社区贡献26条内容

所有评论(0)