
Docker Harbor镜像管理仓库2.0搭建与使用详解
Harbor 概述Harbor是由VMWare公司开源的容器镜像仓库。事实上,Harbor是在Docker Registry上进行了相应的企业级扩展, 从而获得了更加广泛的应用,这些新的企业级特性包括:管理用户界面,基于角色的访问控制 ,AD/LDAP集成以及 审计日志等,足以满足基本企业需求。官方:https://goharbor.io/Github:https://github.com/goh

Harbor
Harbor是VMware开源的企业级镜像仓库,目前已是CNCF的毕业项目。它拥有完整的仓库管理、镜像管理、基于角色的权限控制、镜像安全扫描集成、镜像签名等。

harbor支持级联和主从模式,你想将harbor从一个地方搬到另外一个地方,这样就可以将一个镜像仓库复制到另外一边去。
Harbor提供的服务
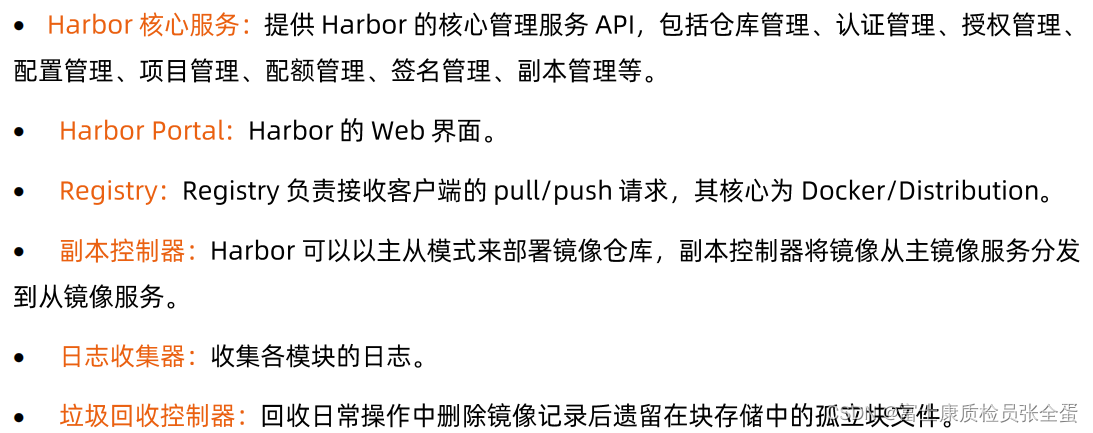
Harbor架构

要达到高可用其实就是冗余部署+负载均衡,前面负载均衡器做负载均衡,后面有不同的harbor服务,每个实例里面都会有有ui,那么就可以在访问前端的时候那么就是高可用的,一个Pod失败了,另外一个pod还在工作,最后所有这些不同的实例指向同样的存储,如果真正的去使用网络存储,那么就会有统一的storageclass,

Harbor的用户管理

垃圾回收

因为容器镜像是overylay的系统,我们希望利用它的能力是基础镜像的复用,所以当我去删除容器的时候,如果将其所有对应的块blob所有文件都删除的话,万一一个blob是被其他容器镜像共享,那么那边所依赖的这个文件就被删除了,删除容器镜像的时候删除blob是不安全的,所以做容器镜像删除的时候,删除的是原数据,这个blob文件是会存在这个机器上面的,它会定期有个扫描机制,如图也可以手动,会去扫描当前镜像仓库有哪些blob以及没有对应的原数据,说明blob已经不活跃了,这个时候才会将其回收掉。
本地镜像加速dragonfly
如果集群是5000个节点,紧急扩容,缩容之后,容器镜像又很大,然后容器镜像在拉取的时候,always表示只要容器要起来不管没有没有都会去镜像仓库里面去拉取,这样镜像仓库面临的压力是非常大的,镜像仓库可能就直接挂了。
这个不一定要用,看我们的集群规模,集群节点个数多,对主的镜像仓库压力是无法忍受的,所以在每套集群都不是一个dragonfly来做本地容器镜像的缓存。

优势
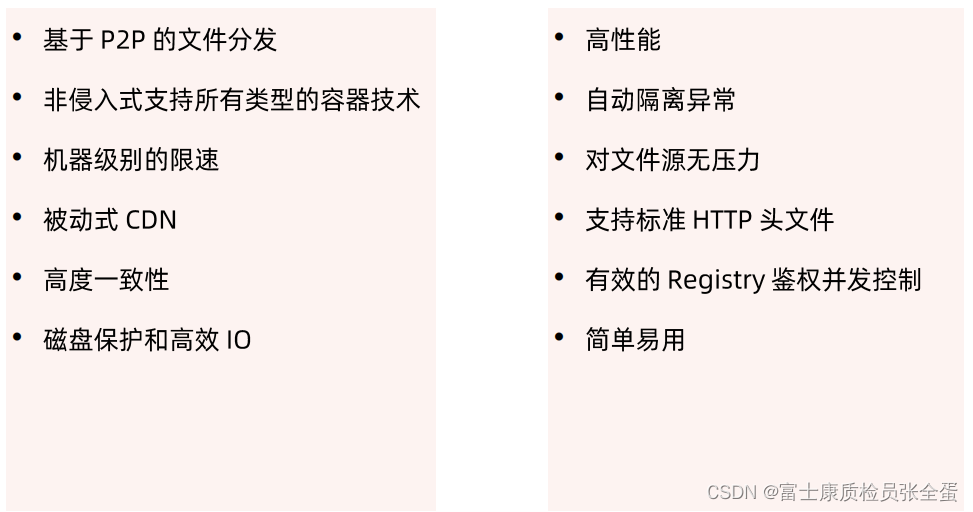
p2p是从多个源同时拉,不需要对现有的仓库做改造,而是添加一些附加的能力。然后有比较好的限速能力,然后有缓存,本身有CDN,所以可以的话每个集群可以使用这个dragonfly。
镜像下载流程

首先register是我们的主镜像仓库,当我们搭建了dragonfly之后,首先有个最主要的协调组件叫cluster manager,其次在每个主机上面有afget proxy,它的作用是当我的容器daemon要去拉取镜像的时候,原来是去主镜像仓库去拉,现在我要去proxy里面去拉取,但是proxy并不是去register里面去拉取的,它会将request转发到cluster manager,如果镜像在本地不存在的话,那么cluster就会将请求转发给register,然后将镜像拉取下来。
拉取下来就可以分发下去,那么文件块就在某个节点上就有了, 如果有第二个节点来拉取同样的镜像,它就会去cluste rmanager那里问,这个镜像有没有,那么会告诉其第一个节点有这个镜像,那么就可以直接从这里面拉取了。
这样就避免了每次都去主镜像仓库去拉取。
同时在拉取的时候可以从多个源区去拉取,所以我的效率会很高。
镜像下载流程

镜像层由多个块组成的,所以说第一块从第一个节点去拉,无论是cluster也好还是peer节点也好,这样的话块从别处拉,这样的话最终把不同的文件块拉取下来之后再到本地去做组装,这样就有效的提升了我整个容器镜像的分发的效率。
当我们要去在整个企业去构建容器镜像仓库的时候,我是不是需要去使用一个主仓库加这种镜像缓存的模式来提供整个镜像服务。这就看具体场景了。
Harbor 概述
Harbor是由VMWare公司开源的容器镜像仓库。事实上,Harbor是在Docker Registry上进行了相应的企业级扩展, 从而获得了更加广泛的应用,这些新的企业级特性包括:管理用户界面,基于角色的访问控制 ,AD/LDAP集成以及 审计日志等,足以满足基本企业需求。
官方:https://goharbor.io/
Github:https://github.com/goharbor/harbor
Harbor有两个版本,之前使用的是1版本,这里使用2.0版本

Harbor 部署先决条件
服务器硬件配置:
• 最低要求:CPU2核/内存4G/硬盘40GB
• 推荐:CPU4核/内存8G/硬盘160GB
软件:
• Docker CE 17.06版本+ (版本要求)
• Docker Compose 1.18版本+ (单机容器编排利器,python写的工具)
Harbor安装有2种方式
• 在线安装:从Docker Hub下载Harbor相关镜像,因此安装软件包非常小(只涉及脚本程序这些,所涉及的镜像都是从网上去拉取的)
• 离线安装:安装包包含部署的相关镜像,因此安装包比较大(通过启动一批镜像去部署)
Harbor 部署HTTP
1、先安装Docker和Docker Compose 一个二进制工具,直接下载之后放在系统二进制目录下就能使用了。下载注意linux版本
[root@localhost harbor]# ls
docker-compose-Linux-x86_64  harbor-offline-installer-v2.0.0.tgz

[root@localhost harbor]# mv docker-compose-Linux-x86_64 /usr/bin/docker-compose
[root@localhost harbor]# chmod o+x /usr/bin/docker-compose
2、部署Harbor HTTP
[root@localhost harbor]# tar xf harbor-offline-installer-v2.0.0.tgz

#解压之后有这些包
[root@localhost harbor]# ls
common.sh  harbor.v2.0.0.tar.gz  harbor.yml.tmpl  install.sh  LICENSE  prepare
修改habor.yml,这里存储的都是镜像仓库的配置信息
这里给了一个模板文件,可以拷贝该模板文件就行修改
[root@localhost harbor]# cp harbor.yml.tmpl harbor.yml


[root@localhost harbor]# vim harbor.yml

定义怎么访问harbor,是使用ip还是使用域名,这里使用域名
hostname: reg.mydomain.com
修改为 hostname: reg.harbor.com


这里先部署http将https的注释掉  先注释https相关配置
# https related config
#https:
  # https port for harbor, default is 443
#  port: 443
#  # The path of cert and key files for nginx
#  certificate: /your/certificate/path
#  private_key: /your/private/key/path

这个是harbor默认登入的密码,记住这个密码,后面登入需要
harbor_admin_password: Harbor12345
prepare是一个shell脚本,做一些准备性的工作,包括拉取镜像,这个镜像从网络获取
[root@localhost harbor]# ./prepare
prepare base dir is set to /harbor/harbor
Unable to find image 'goharbor/prepare:v2.0.0' locally
v2.0.0: Pulling from goharbor/prepare

这里会根据配置文件生成一些相关的yml文件
执行安装脚本,会将harbor镜像导入到本地,由之前的离线包将镜像导入到本地,然后使用导入的镜像去启动容器,那些输出的都是本地镜像只有prepare那次的镜像需要从网络获取(很多功能都解耦了,一个功能就是一个容器)
这些启动的容器还得益于docker-compos,擅长单机容器编排,管理

[root@localhost harbor]# ./install.sh
[Step 0]: checking if docker is installed ...
Note: docker version: 19.03.13
[Step 1]: checking docker-compose is installed ...
Note: docker-compose version: 1.26.0
[Step 2]: loading Harbor images ...
这些启动的容器还得益于docker-compos,擅长单机容器编排,管理
[root@localhost harbor]# docker ps
CONTAINER ID        IMAGE                                COMMAND                  CREATED             STATUS                             PORTS                       NAMES
41988ff6bbe6        goharbor/harbor-jobservice:v2.0.0    "/harbor/entrypoint.??   24 seconds ago      Up 19 seconds (health: starting)                               harbor-jobservice
a3082eadd3f8        goharbor/nginx-photon:v2.0.0         "nginx -g 'daemon of??   24 seconds ago      Up 19 seconds (health: starting)   0.0.0.0:80->8080/tcp        nginx
0145862416ec        goharbor/harbor-core:v2.0.0          "/harbor/entrypoint.??   27 seconds ago      Up 23 seconds (health: starting)                               harbor-core
ece825f63e1b        goharbor/redis-photon:v2.0.0         "redis-server /etc/r??   32 seconds ago      Up 27 seconds (health: starting)   6379/tcp                    redis
2fddb4c08cf7        goharbor/harbor-db:v2.0.0            "/docker-entrypoint.??   32 seconds ago      Up 28 seconds (health: starting)   5432/tcp                    harbor-db
ba4ef934e774        goharbor/registry-photon:v2.0.0      "/home/harbor/entryp??   32 seconds ago      Up 27 seconds (health: starting)   5000/tcp                    registry
2bc4ef63f73d        goharbor/harbor-registryctl:v2.0.0   "/home/harbor/start.??   32 seconds ago      Up 27 seconds (health: starting)                               registryctl
185b62a72bef        goharbor/harbor-portal:v2.0.0        "nginx -g 'daemon of??   33 seconds ago      Up 28 seconds (health: starting)   8080/tcp                    harbor-portal
b198329cb567        goharbor/harbor-log:v2.0.0           "/bin/sh -c /usr/loc??   34 seconds ago      Up 32 seconds (healthy)            127.0.0.1:1514->10514/tcp   harbor-log
容器全部启动完毕,在你的windows
C:\Windows\System32\drivers\etc\hosts
下面做一个域名解析 添加一行
192.168.179.102 reg.harbor.com
用户名
admin
密码
Harbor12345
Harbor 基本使用
向harbor里面推送镜像需要登入到仓库才可以
[root@localhost harbor]# docker login reg.harbor.com
Username: admin
Password: Harbor12345
Error response from daemon: Get https://reg.harbor.com/v2/: dial tcp 192.168.179.102:443: connect: connection refused
这里没有提供https服务,docker默认是以https去连接镜像仓库的。如果要使用http要配置可信任,在docker的配置文件里面配置可信任。
[root@localhost harbor]# vim /usr/lib/systemd/system/docker.service
ExecStart=/usr/bin/dockerd -H fd:// --containerd=/run/containerd/containerd.sock --insecure-registry=reg.harbor.com

[root@localhost harbor]# cat /etc/hosts | tail -n 1
192.168.179.102 reg.harbor.com

[root@localhost harbor]# systemctl daemon-reload
[root@localhost harbor]# systemctl restart docker
重启docker可能导致容器不能自启动(可以看到访问不了,因为docker重启有些容器退出了)
[root@localhost harbor]# docker login reg.harbor.com
Username: admin
Password:
Error response from daemon: Get http://reg.harbor.com/v2/: dial tcp 192.168.179.102:80: connect: connection refused

[root@localhost harbor]# docker-compose ps
      Name                     Command                       State                     Ports
------------------------------------------------------------------------------------------------------
harbor-core         /harbor/entrypoint.sh            Exit 137
harbor-db           /docker-entrypoint.sh            Up (healthy)            5432/tcp
harbor-jobservice   /harbor/entrypoint.sh            Up (health: starting)
harbor-log          /bin/sh -c /usr/local/bin/ ...   Up (healthy)            127.0.0.1:1514->10514/tcp
harbor-portal       nginx -g daemon off;             Exit 128
nginx               nginx -g daemon off;             Exit 128
redis               redis-server /etc/redis.conf     Exit 128
registry            /home/harbor/entrypoint.sh       Up (healthy)            5000/tcp
registryctl         /home/harbor/start.sh            Exit 137
使用docker-compose来重启容器
[root@localhost harbor]# docker-compose up -d   将退出的容器拉起,如果要全部关闭使用docker-compose down,容器里面数据重启不会丢失因为做持久化了
harbor-log is up-to-date
Starting registryctl ...
Starting harbor-portal ...
Starting registryctl   ... done
Starting harbor-portal ... done
Starting redis         ... done
Starting harbor-core   ... done
harbor-jobservice is up-to-date
Starting nginx         ... done

[root@localhost harbor]# docker-compose ps
      Name                     Command                  State                 Ports
---------------------------------------------------------------------------------------------
harbor-core         /harbor/entrypoint.sh            Up (healthy)
harbor-db           /docker-entrypoint.sh            Up (healthy)   5432/tcp
harbor-jobservice   /harbor/entrypoint.sh            Up (healthy)
harbor-log          /bin/sh -c /usr/local/bin/ ...   Up (healthy)   127.0.0.1:1514->10514/tcp
harbor-portal       nginx -g daemon off;             Up (healthy)   8080/tcp
nginx               nginx -g daemon off;             Up (healthy)   0.0.0.0:80->8080/tcp
redis               redis-server /etc/redis.conf     Up (healthy)   6379/tcp
registry            /home/harbor/entrypoint.sh       Up (healthy)   5000/tcp
registryctl         /home/harbor/start.sh            Up (healthy)
可以看到容器启动正常了,没有问题了
再次登入,可以看到成功登入
[root@localhost harbor]# docker login reg.harbor.com
Username: admin
Password: Harbor12345
WARNING! Your password will be stored unencrypted in /root/.docker/config.json.
Configure a credential helper to remove this warning. See
https://docs.docker.com/engine/reference/commandline/login/#credentials-store

Login Succeeded
[root@devops harbor]# cat /root/.docker/config.json
{
"auths": {
"121.40.102.116:8888": {
"auth": "YWRtaW46MTIzNDU2"
}
}
}如果你需要查看日志可以如下
[root@localhost harbor]# tail -f /var/log/harbor/core.log
Nov 12 19:59:24 172.18.0.1 core[17064]: 2020/11/12 11:59:24.337 #033[1;44m[D]#033[0m [transaction.go:62]  |      127.0.0.1|#033[97;42m 200 #033[0m|   3.274733ms|   match|#033[97;44m GET     #033[0m /api/v2.0/ping   r:/api/v2.0/ping
打标签和上传镜像
打标签,因为镜像的上传是需要一定格式的(这个标签是有固定格式的)harbor仓库为我们提供了打标签的命令和上传的命令

给镜像打标签
[root@reg harbor]# docker tag nginx:latest reg.harbor.com/library/nginx:latest
[root@reg harbor]# docker tag busybox:latest reg.harbor.com/library/busybox:latest
给镜像打好标签之后就是推送镜像了到仓库了
[root@localhost harbor]# docker push reg.harbor.com/library/busybox:latest
The push refers to repository [reg.harbor.com/library/busybox]
d2421964bad1: Pushed
latest: digest: sha256:c9249fdf56138f0d929e2080ae98ee9cb2946f71498fc1484288e6a935b5e5bc size: 527

[root@localhost harbor]#  docker push reg.harbor.com/library/nginx:latest
The push refers to repository [reg.harbor.com/library/nginx]
7b5417cae114: Pushed
aee208b6ccfb: Pushed
2f57e21e4365: Pushed
2baf69a23d7a: Pushed
d0fe97fa8b8c: Pushed 
可以看到这里面之前上传的镜像就有了,拉取也一样
[root@localhost harbor]#  docker pull reg.harbor.com/library/nginx:latest
latest: Pulling from library/nginx
Digest: sha256:34f3f875e745861ff8a37552ed7eb4b673544d2c56c7cc58f9a9bec5b4b3530e
Status: Image is up to date for reg.harbor.com/library/nginx:latest
reg.harbor.com/library/nginx:latest
瓜分20万奖金 获得内推名额 丰厚实物奖励 易参与易上手
更多推荐
 0
0 0
0- 0


 已为社区贡献6条内容

所有评论(0)