windows10+wsl2+kali子系统+ubuntu+docker
1024 节日快乐kali1. 环境要求win10专业工作站,系统版本1904,版本号2004C盘150G以上2. wsl2官方:https://docs.microsoft.com/zh-cn/windows/wsl/install-win10#update-to-wsl-2wsl2 GPU驱动:(没必要)https://docs.microsoft.com/zh-cn/windows/win3
文章目录
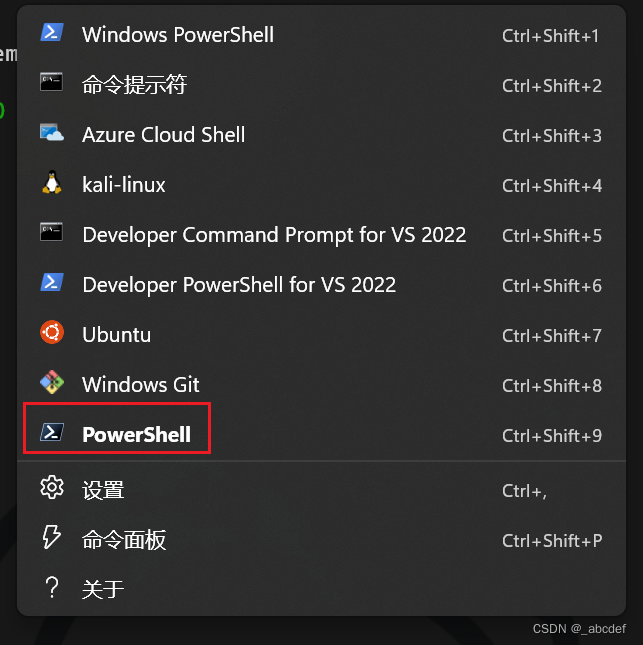
Windows Terminal
1. 安装powershell7
winget install --id Microsoft.Powershell --source winget
将Windows Terminal终端设置为powershell7

2. 安装ohmypost
Install-Module -Name PowerShellGet -Force
winget install JanDeDobbeleer.OhMyPosh -s winget
PowerShellGet\Install-Module posh-git -Scope CurrentUser -Force
Install-Module PSReadLine

code $PROFILE
相关字体与主题配置
https://ohmyposh.dev/docs/configuration/templates
https://www.nerdfonts.com/font-downloads

3. 终端设置
settings.json
            {
                "backgroundImage": "E:\\NS\\\u58c1\u7eb8\\kali_1.jpg",
                "backgroundImageOpacity": 0.050000000000000003,
                "guid": "{574e775e-4f2a-5b96-ac1e-a2962a402336}",
                "hidden": false,
                "name": "PowerShell",
                "opacity": 100,
                "source": "Windows.Terminal.PowershellCore",
                "useAcrylic": false
            }
kali
1. 环境要求
win10专业工作站,系统版本1904,版本号2004
C盘150G以上

2. wsl2
官方:
https://docs.microsoft.com/zh-cn/windows/wsl/install-win10#update-to-wsl-2
wsl2 GPU驱动:(非必要)
https://docs.microsoft.com/zh-cn/windows/win32/direct3d12/gpu-accelerated-training
开启 windows 功能
适用于Linux的windows 子系统,Hypcr-V
设置
开启开发人员模式

win商店安装kali,设置账户密码(账户小写)

安装linux内核包
https://docs.microsoft.com/zh-cn/windows/wsl/wsl2-kernel#download-the-linux-kernel-update-package

wsl2模块安装
cmd管理员
dism.exe /online /enable-feature /featurename:Microsoft-Windows-Subsystem-Linux /all /norestart
重启
dism.exe /online /enable-feature /featurename:VirtualMachinePlatform /all /norestart
设置默认版本为wsl2
wsl --set-default-version 2
或
wsl --set-version kali-linux 2

更换kali源
/etc/apt/sources.list
#中科大
deb http://mirrors.ustc.edu.cn/kali kali-rolling main non-free contrib
deb-src http://mirrors.ustc.edu.cn/kali kali-rolling main non-free contrib
#阿里云
deb http://mirrors.aliyun.com/kali kali-rolling main non-free contrib
deb-src http://mirrors.aliyun.com/kali kali-rolling main non-free contrib
#清华大学
deb http://mirrors.tuna.tsinghua.edu.cn/kali kali-rolling main contrib non-free
deb-src https://mirrors.tuna.tsinghua.edu.cn/kali kali-rolling main contrib non-free
#163
deb http://mirrors.163.com/debian wheezy main non-free contrib
deb-src http://mirrors.163.com/debian wheezy main non-free contrib
deb http://mirrors.163.com/debian wheezy-proposed-updates main non-free contrib
deb-src http://mirrors.163.com/debian wheezy-proposed-updates main non-free contrib
deb-src http://mirrors.163.com/debian-security wheezy/updates main non-free contrib
#东软大学
deb http://mirrors.neusoft.edu.cn/kali kali-rolling/main non-free contrib
deb-src http://mirrors.neusoft.edu.cn/kali kali-rolling/main non-free contrib
3. 安装工具
apt install kali-linux-large
4. kali-win-kex 桌面化
apt install kali-win-kex
kex 进入	(root目录下运行)
F8 退出

Opening password file failed
unable connect to socket:Connection refused(10061)
kex stop
kex start
Unable to contact settings server
apt-get install x11-xserver-utils dconf-editor dbus-x11 -y
5. kali-zsh
# .bashrc
if [ -t 1 ]; then
  exec zsh
fi
ubuntu18 子系统 wsl2 docker
重复操作比修改为wsl版本号2
1. 阿里镜像
# step 1: 安装必要的一些系统工具
sudo apt-get update
sudo apt-get -y install apt-transport-https ca-certificates curl software-properties-common
# step 2: 安装GPG证书
curl -fsSL https://mirrors.aliyun.com/docker-ce/linux/ubuntu/gpg | sudo apt-key add -
# Step 3: 写入软件源信息
sudo add-apt-repository "deb [arch=amd64] https://mirrors.aliyun.com/docker-ce/linux/ubuntu $(lsb_release -cs) stable"
# Step 4: 更新并安装Docker-CE
sudo apt-get -y update
sudo apt-get -y install docker-ce

# 安装指定版本的Docker-CE:
# Step 1: 查找Docker-CE的版本:
# apt-cache madison docker-ce
#   docker-ce | 17.03.1~ce-0~ubuntu-xenial | https://mirrors.aliyun.com/docker-ce/linux/ubuntu xenial/stable amd64 Packages
#   docker-ce | 17.03.0~ce-0~ubuntu-xenial | https://mirrors.aliyun.com/docker-ce/linux/ubuntu xenial/stable amd64 Packages
# Step 2: 安装指定版本的Docker-CE: (VERSION例如上面的17.03.1~ce-0~ubuntu-xenial)
# sudo apt-get -y install docker-ce=[VERSION]
2. ubuntu docker 命令补全
apt-get install bash-completion
source /etc/bash_completion

# 2. 配置文件,编辑/etc/bash.bashrc,在最后加入如下代码
   [plain]
   if [ -f /etc/bash_completion ]; then
        /etc/bash_completion
   fi
3. docker

空间问题
关闭所有wsl
diskpart
定位vhdx
C:\Users\{用户名}\AppData\Local\Packages\{子系统名}\LocalState\ext4.vhdx
选择这个文件
执行压缩命令
select vdisk file="{vhdx文件名}"
compact vdisk
可能会有的问题
https://github.com/yhl452493373/WSL2-Auto-Port-Forward
参考的对象类型不支持尝试的操作。
Press any key to continue…
net stop LxssManager
net start LxssManager
netsh winsock reset
子系统局域网访问问题
方法1
在.wslconfig中配置
[wsl2]
# 内存
memory=4GB
# swap
swap=2G
# 将wsl端口转发至宿主机
localhostForwarding=true
# CPU核心数量
processors = 4
方法2
子系统端口映射问题
因为子系统的IP是通过 Hyper-v net 出来的,所以,解决 子系统能被局域网内访问问题用netsh映射
netsh interface portproxy add v4tov4 listenport=8080(主机映射) listenaddress=0.0.0.0 connectport=8080(子系统映射) connectaddress=172.19.232.163(子系统ip)


关闭端口转发
netsh interface portproxy delete v4tov4 listenport=8080(主机端口) listenaddress=0.0.0.0
写在最后
映射网络驱动器
\\wsl$

配置wsl内存问题
运行
%UserProfile%
创建
.wslconfig
[wsl2]
memory=4GB
swap=2G
# localhostForwarding=true
processors = 4
wslconfig
https://learn.microsoft.com/zh-cn/windows/wsl/wsl-config

wsl.confg
# Automatically mount Windows drive when the distribution is launched
[automount]

# Set to true will automount fixed drives (C:/ or D:/) with DrvFs under the root directory set above. Set to false means drives won't be mounted automatically, but need to be mounted manually or with fstab.
enabled = true

# Sets the directory where fixed drives will be automatically mounted. This example changes the mount location, so your C-drive would be /c, rather than the default /mnt/c.
root = /

# DrvFs-specific options can be specified.
options = "metadata,uid=1003,gid=1003,umask=077,fmask=11,case=off"

# Sets the `/etc/fstab` file to be processed when a WSL distribution is launched.
mountFsTab = true

# Network host settings that enable the DNS server used by WSL 2. This example changes the hostname, sets generateHosts to false, preventing WSL from the default behavior of auto-generating /etc/hosts, and sets generateResolvConf to false, preventing WSL from auto-generating /etc/resolv.conf, so that you can create your own (ie. nameserver 1.1.1.1).
[network]
hostname = DemoHost
generateHosts = false
generateResolvConf = false

# Set whether WSL supports interop process like launching Windows apps and adding path variables. Setting these to false will block the launch of Windows processes and block adding $PATH environment variables.
[interop]
enabled = false
appendWindowsPath = false

# Set the user when launching a distribution with WSL.
[user]
default = DemoUser

# Set a command to run when a new WSL instance launches. This example starts the Docker container service.
[boot]
command = service docker start
迁移子系统到其它盘
https://github.com/wpsec/LxRunOffline
https://p3terx.com/archives/manage-wsl-with-lxrunoffline.html
更多推荐
 已为社区贡献3条内容


所有评论(0)