V-rep机器人仿真(Win10):UR5+RG2+Kinect+YOLOV3+DDPG+Pytorch(第三部分:在V-rep中用python控制机械臂)
声明:作为V-rep机器人仿真的初学者,看到博主Ianlande 的相关博客,故转载。欢迎大家访问原博客这是一个V-rep机器人仿真实验,较为简单,适合初学者在入门图像识别、机器学习、机器人学的内容时进行学习与训练。实验涉及的内容有:V-rep机器人仿真,YOLOV3图像识别,强化学习DDPG,UR5机械臂及RG2机械手,Kinect摄像头。使用环境:Win10,Pytorch0.4,V-rep整
声明:作为V-rep机器人仿真的初学者,看到博主Ianlande 的相关博客,故转载。欢迎大家访问原博客
这是一个V-rep机器人仿真实验,较为简单,适合初学者在入门图像识别、机器学习、机器人学的内容时进行学习与训练。
实验涉及的内容有:V-rep机器人仿真,YOLOV3图像识别,强化学习DDPG,UR5机械臂及RG2机械手,Kinect摄像头。
使用环境:Win10,Pytorch0.4,V-rep
整个实验一共由多篇文章组成,本文是第三部分。
第三部分:python控制机械臂
文章目录
这部分我们主要用python程序控制机械臂运动,并实现下面几个简单的功能:
- 控制机械臂的各个关节旋转
- 实现RG2的打开与闭合
- 将摄像头拍到的图片导出来
- 以及其它一些小功能
控制程序
我们编写robotControl.py程序,程序的完整代码在这篇文章的最后面,我们先解释每一部分是什么意思。
1.导入相关模块
import os
import cv2
import sys
import math
import time
import random
import string
import pygame
import vrep
import numpy as np
(1). 我们引入opencv2来处理图像:import cv2。
(2). 另外我们使用import pygame,pygame是python的一个库,主要用来做游戏,我们暂时用它控制机械臂,以及导出图像。
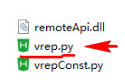
(3). import vrep:这里的vrep是我们在第二篇文章中加入的vrep.py文件,就是下面这个文件,忘了的话可以回顾上一篇文章。
2.常量、变量与句柄
我们创建一个类:UR5_RG2,它的常量变量如下:
class UR5_RG2:
    resolutionX = 640
    resolutionY = 480
    joint_angle = [0,0,0,0,0,0]
    RAD2DEG = 180 / math.pi

    # Handles information
    jointNum = 6
    baseName = 'UR5'
    rgName = 'RG2'
    jointName = 'UR5_joint'
    camera_rgb_Name = 'kinect_rgb'
    camera_depth_Name = 'kinect_depth'
下面解释每行程序的意思。
2-1.摄像头图像大小
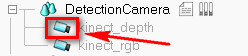
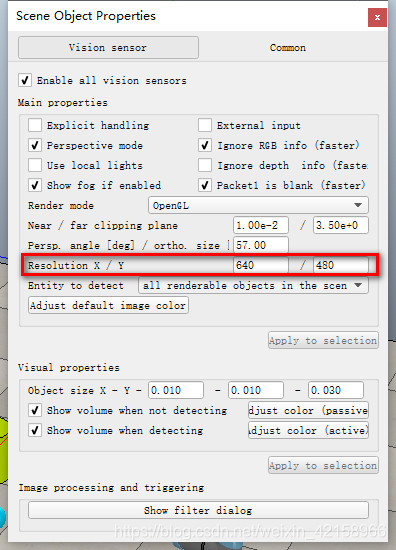
resolutionX,resolutionY是摄像头的图像大小,摄像头的图像是640*480,后面我们会把图像导出来,所以现在定义resolutionX = 640、resolutionY = 480。至于为什么图像是640*480,这个是可以设置的,查看方法如下:
在上一篇文章我们设置了一个摄像头,如下图,我们双击图中红框的按钮:
得到下图,我们可以查看摄像头的图像大小,也可以根据需要修改:
2-2.如何控制机械臂
joint_angle = [0,0,0,0,0,0]:
UR5有六个关节,在这个教程中我们使用下图所示的格式控制UR5:
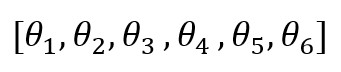
这里面的六个参数分别代表UR5六个关节的旋转角度,举个例子:
如果我们想要UR5的第二个关节正转45°,第四个关节反转30°,那我们应该这样写:[0,45,0,-30,0,0],然后将这个数据输入vrep的UR5接口,便可实现控制目标,具体细节我们后面还会讲到。
RAD2DEG = 180 / math.pi:将弧度和角度进行转换。
2-3. 句柄
(1). 什么是句柄:
我们要找到被控对象的句柄,如果不清楚句柄是什么,可以查找有关资料,简单来说句柄就是控制接口,比如我们上面讲到的[0,45,0,-30,0,0],我们需要将这条数据输入UR5,就是通过UR5的句柄来访问的,通过UR5的句柄将这条数据输入UR5中,以实现控制目标;如果我们想获取UR5当前各个关节的角度,也是通过UR5的句柄获取的。
(2). 如何获取句柄
通过Vrep自带的的APIsimxGetObjectHandle获取句柄,我们后面会提到,simxGetObjectHandle需要一个参数:被控对象的变量名。变量名查看的方法如下图:
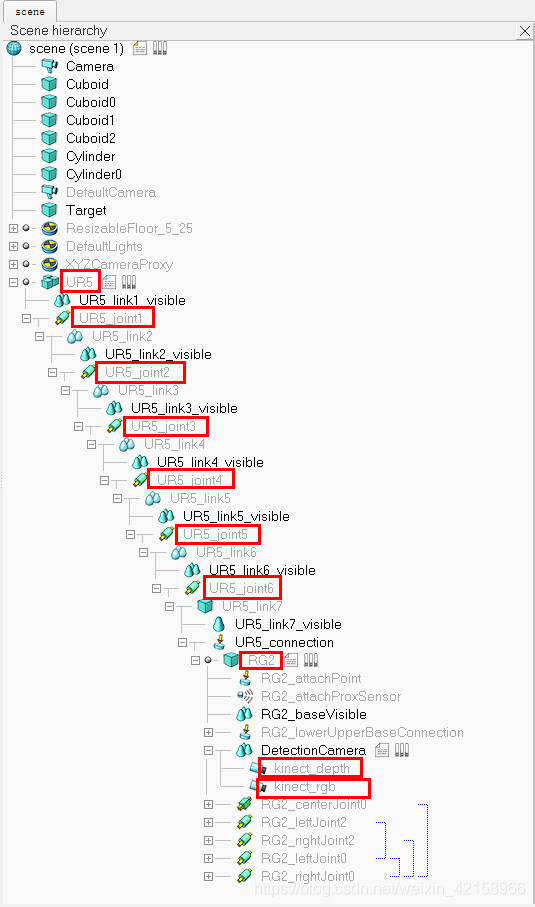
图中被红框框起来的就是它们的变量名,所以下面的代码意思就很明显了:被控对象变量名
baseName = 'UR5'
rgName = 'RG2'
jointName = 'UR5_joint'
camera_rgb_Name = 'kinect_rgb'
camera_depth_Name = 'kinect_depth'
3.函数
完整程序见文章最后,这里先解释各个函数的功能,可以和程序配合着看。
3-1.启动连接与获取句柄
函数__init__(self):启动通讯连接并获取句柄:
部分程序作用如下:
vrep.simxFinish(-1):关闭当前潜在连接。clientID = simxStart('127.0.0.1', 19999, True, True, 5000, 5):
与V-rep进行通讯,它的六个参数的意义分别是:服务端IP地址(连接当前电脑使用127.0.0.1);端口号(我们在第一篇文章里面用到的那个19999);是否等待服务端开启;连接丢失时是否尝试再次连接;超时时间(ms);数据传输间隔(越小越快)
我们用了while True死循环,程序会不断试图与Vrep进行通讯,直到通讯成功为止,通讯成功返回clientID,clientID后面会频繁用到。- 获取句柄:
直接举例,看下面这条获取UR5句柄的程序:
_, baseHandle = vrep.simxGetObjectHandle(clientID, baseName, vrep.simx_opmode_blocking)
vrep.simxGetObjectHandle作用是获取句柄,有三个参数,第一个参数是第2点得到的clientID;第二个参数是被控对象的变量名,还记得刚刚2-3句柄篇章的程序baseName = 'UR5'吧,所以函数返回UR5的句柄,即baseHandle是UR5句柄;第三个参数是通讯方式。
以此类推,我们还得到以下句柄:
(1). 机械臂句柄jointHandle:它的格式是我们在2-2篇章中提到的那种形式:[jointHandle1,jointHandle2,jointHandle3,jointHandle4,jointHandle5,jointHandle6]
(2). RG2句柄:rgHandle
(3). 摄像头RGB图像与深度图像的句柄:cameraRGBHandle,cameraDepthHandle
获取了句柄,接下来就好办了,就可以通过句柄向被控对象输入指令或者获取数据。 - 获取当前机械臂各关节角度:
jointConfig = np.zeros((jointNum, 1))
for i in range(jointNum):
     _, jpos = vrep.simxGetJointPosition(clientID, jointHandle[i], vrep.simx_opmode_blocking)
     jointConfig[i] = jpos
3-2.函数
函数以及功能如下:
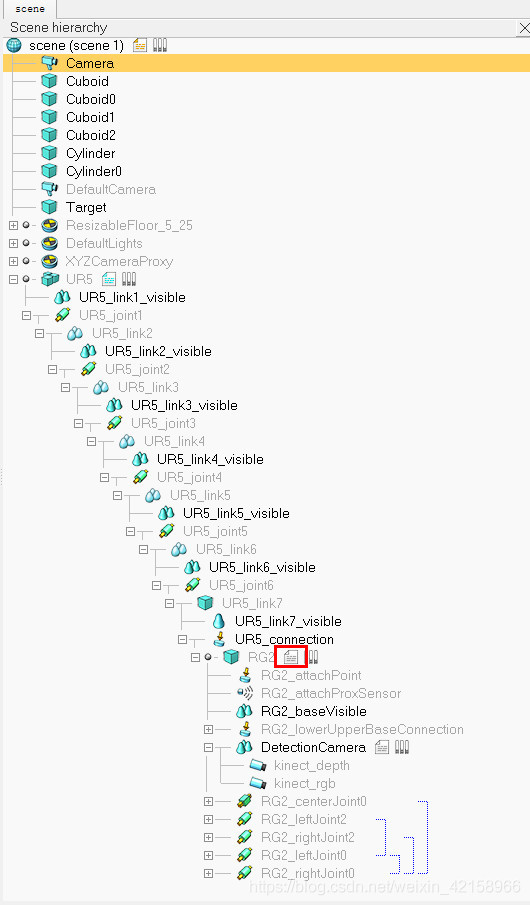
__del__(self):断开连接。showHandles(self):将句柄print出来。showJointAngles(self):获取机械臂六个关节的当前角度。我们用到V-rep自带APIvrep.simxGetJointPosition,它的功能是获取关节当前角度,它的三个参数分别是:clientID;被控对象的句柄;通讯方式。openRG2(self):控制RG2打开,我们这里用到V-rep自带APIvrep.simxCallScriptFunction,它的功能是调用嵌入式脚本,所以我们还需要写嵌入式脚本,方法如下:
双击红框:
脚本程序如下,有两个函数:rg2Close与rg2Open,分别用于控制RG2的关闭与打开,openRG2函数中的vrep.simxCallScriptFunction便调用了脚本rg2Open。
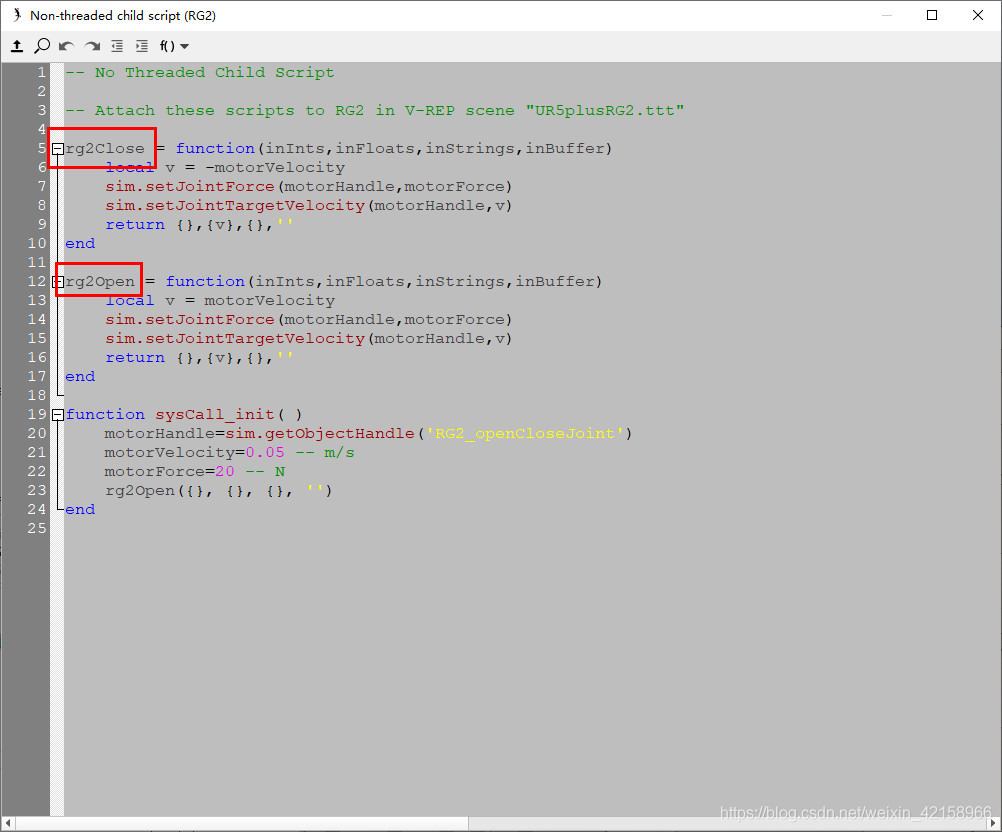
rg2Close = function(inInts,inFloats,inStrings,inBuffer)
    local v = -motorVelocity
    sim.setJointForce(motorHandle,motorForce)
    sim.setJointTargetVelocity(motorHandle,v)
    return {},{v},{},''
end

rg2Open = function(inInts,inFloats,inStrings,inBuffer)
    local v = motorVelocity
    sim.setJointForce(motorHandle,motorForce)
    sim.setJointTargetVelocity(motorHandle,v)
    return {},{v},{},''
end

function sysCall_init( )
    motorHandle=sim.getObjectHandle('RG2_openCloseJoint')
    motorVelocity=0.05 -- m/s
    motorForce=20 -- N
    rg2Open({}, {}, {}, '')
end
- 5.
closeRG2(self):控制RG2闭合,原理与上面一样,vrep.simxCallScriptFunction调用嵌入式脚本rg2Close。 - 6.
rotateAllAngle(self, joint_angle):控制机械臂各关节旋转到joint_angle设定的角度。joint_angle格式:[0,0,0,0,0,0]。举个例子,joint_angle=[0,45,0,-30,0,0],得到的结果是:UR5第二个关节正转45°,第四个关节反转30°
这里用到两个函数:
vrep.simxSetJointTargetPosition(clientID,关节句柄,旋转角度,通讯方式):控制关节旋转到参数3设定的角度。
vrep.simxPauseCommunication(clientID, True/False):暂停通信。主要用法:先暂停通讯,存储所有控制命令,再启动通讯一起发送控制命令。 - 7.
rotateCertainAnglePositive(self, num, angle):将第num个关节正转angle度,该函数与第6点的区别在于:
rotateAllAngle是关节旋转到某个角度,而rotateCertainAnglePositive是在当前角度的基础上再正转某个角度。举个例子,当前第二个关节的角度是45°,使用rotateAllAngle([0,30,0,0,0,0])得到的结果:第二个关节转到30°,即第二个关节的角度为30°;使用rotateCertainAnglePositive(2,30)的结果:第二个关节在45°的基础上正转30°,即第二个关节的角度为75° - 8.
rotateCertainAngleNegative(self, num, angle):与第7点类似,将第num个关节反转angle度。 4.图像获取及处理
获取图像这一块内容比较多,所以我们单独用一个篇章来讲。
- 函数
getImageRGB(self):
使用vrep.simxGetVisionSensorImage获取图像数据,但是获取到的数据格式却是下面这样的:
假设RGB图像大小是2*2,三通道,每个像素0-255,如下图:
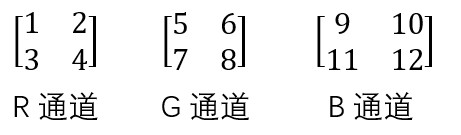
则vrep.simxGetVisionSensorImage返回的格式是:1,5,9,2,6,10,3,7,11,4,8,12
所以对数据进行如下处理:
(1). 将1,5,9,2,6,10,3,7,11,4,8,12每隔3个数提取出来,组成[1,2,3,4],[5,6,7,8],[9,10,11,12]
(2). 将[1,2,3,4],[5,6,7,8],[9,10,11,12]分别转成矩阵形式
(3). 使用opencv2将矩阵转成图像形式
(4). 到这一步,我们得到的是翻转后的图像,所以还要使用opencv2将图像再翻转回来
到这一步,我们才获取到了正确的图像数据,函数getImageDepth(self)类似。 - 函数
arrayToImage(self)和arrayToDepthImage(self):
将图像数据保存成图片,保存地址分别为文件夹imgTemp和文件夹imgTempDep
5.控制程序
5-1 控制目标
我们使用pygame模块控制机械臂,由于pygame是一个开发游戏的工具,所以使用pygame可以实现用键盘按键操控机械臂运动。
5-2 程序
编写
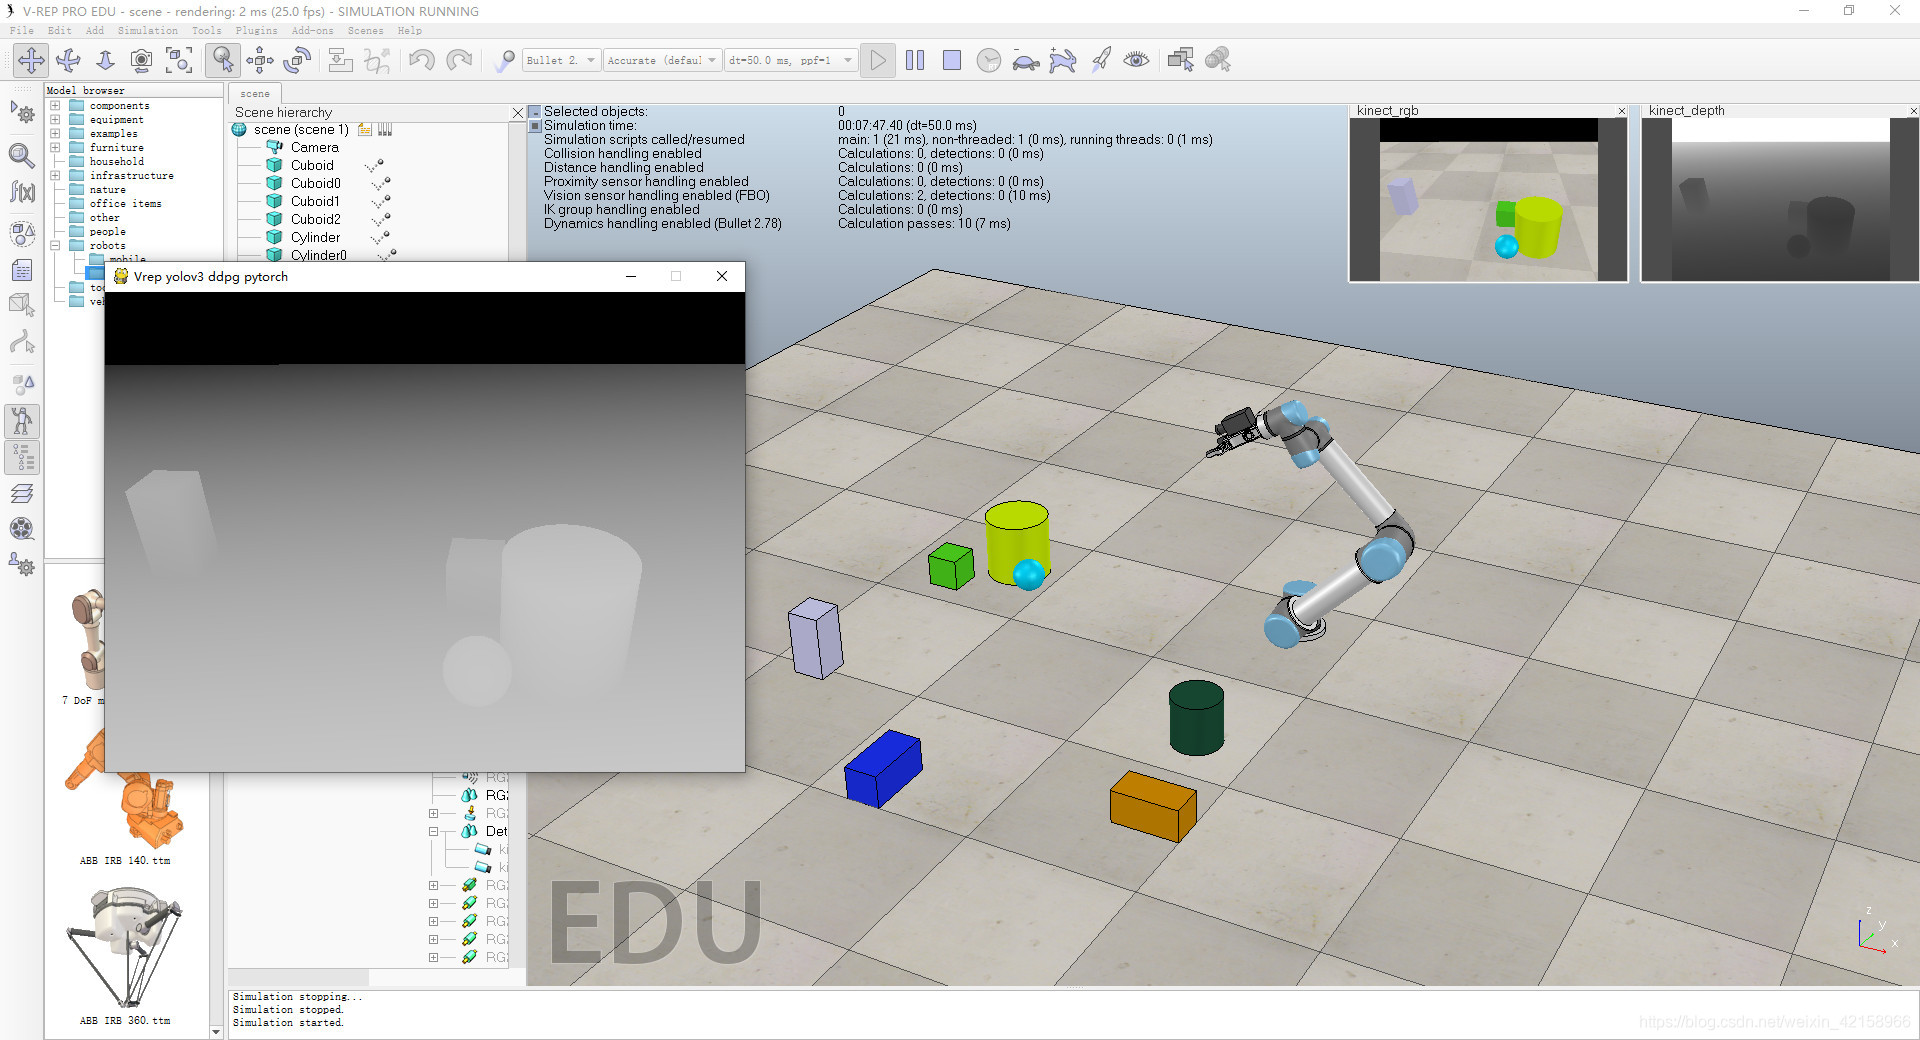
main函数,程序实现的原理如下:- 创建一个游戏窗口,游戏窗口显示的内容是摄像头的RGB图像,我们在篇章4图像获取那部分已经用
arrayToImage函数得到摄像头图像的图片了,我们只需加载这个图像并在每一帧不断更新便可。
运行效果如图:
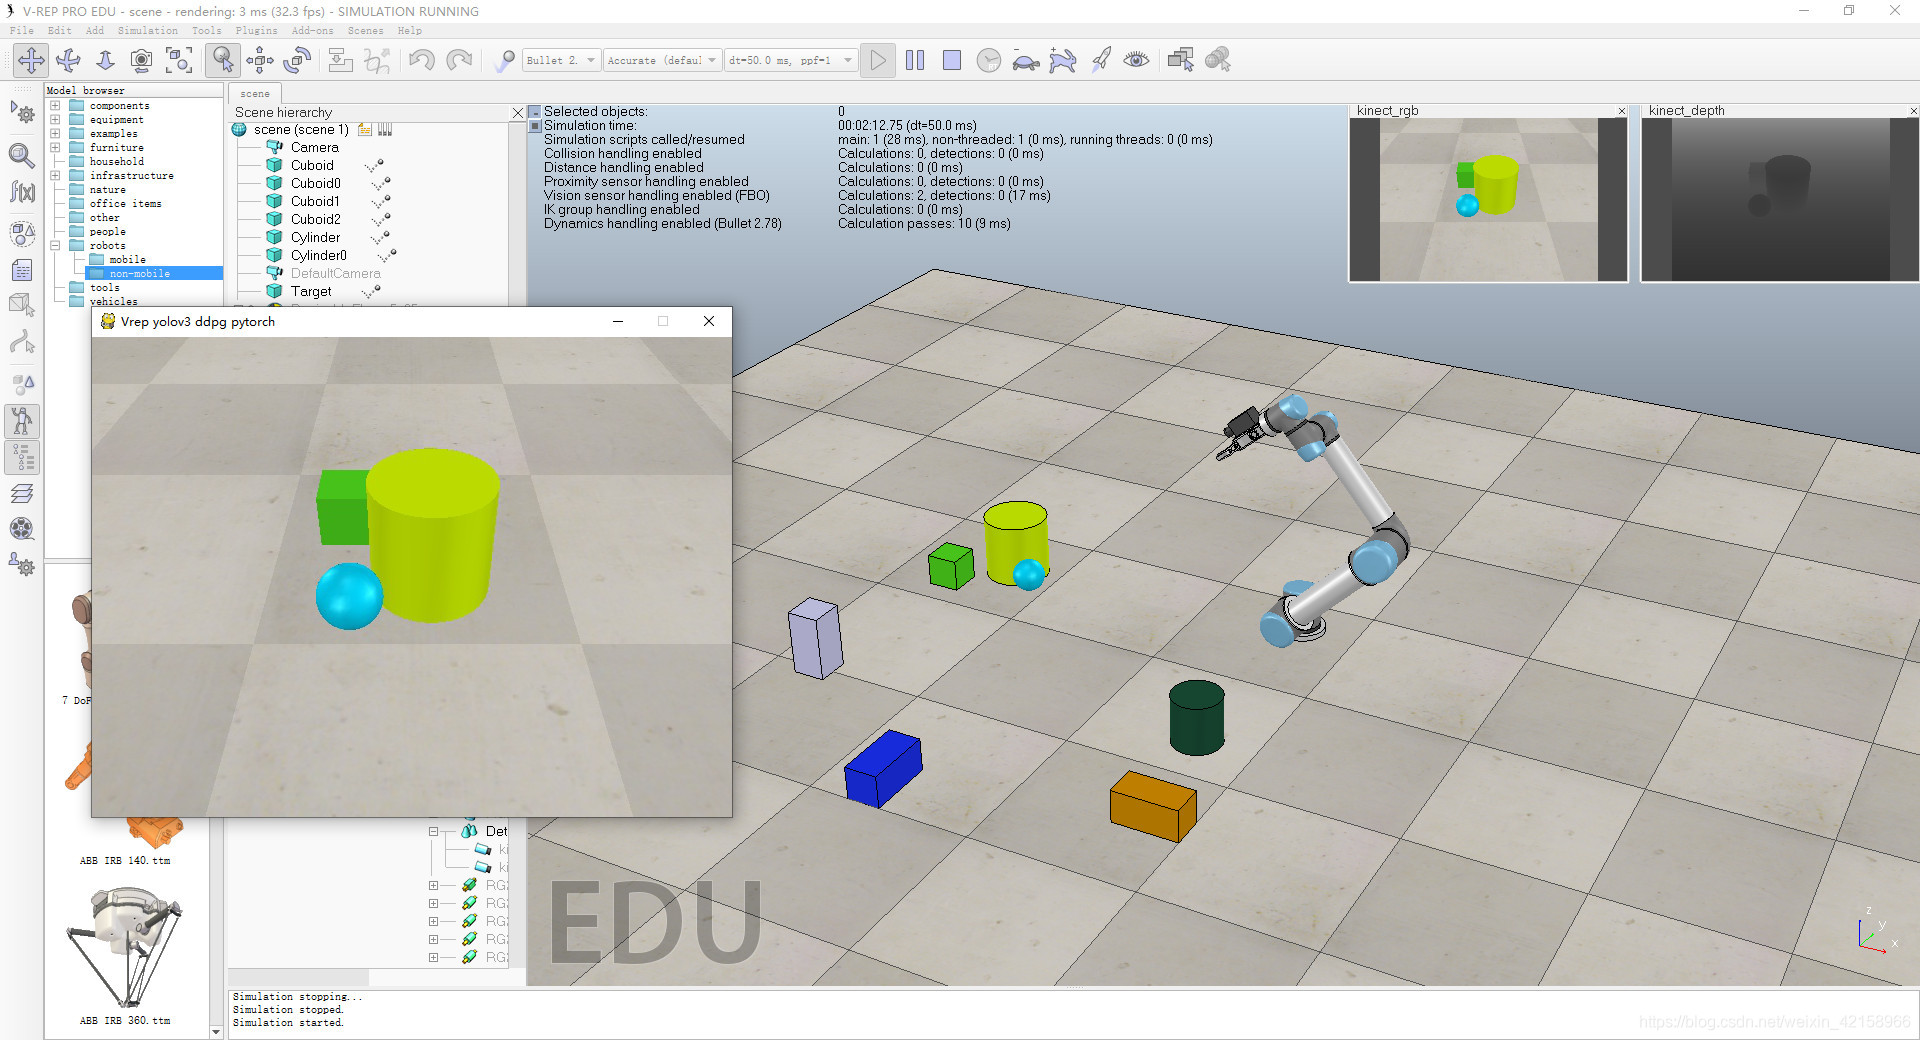
可以看到,V-rep的图像已经在我们创建的游戏窗口中显示出来了;同理,修改程序也可以获取深度图像:
- pygame模块有按键事件功能。通过按键事件我们实现以下功能:
(1). Q键/W键:机械臂关节1正/反转。实现原理:使用3-2篇章讲到的rotateCertainAnglePositive函数,按下Q键,关节1正转一定的角度,我们设置这个角度angle=1,即按Q键一次,关节1正转1°
(2). 以此类推,实现以下功能:
Q键/W键:机械臂关节1正/反转
A键/S键:机械臂关节2正/反转
Z键/X键:机械臂关节3正/反转
E键/R键:机械臂关节4正/反转
D键/F键:机械臂关节5正/反转
C键/V键:机械臂关节6正/反转
Y键/T键:打开/关闭RG2
P键:退出程序
L键:重置机械臂关节并修改angle的值
空格键:保存摄像头图像,保存地址在文件夹saveImg中
5-3 其它
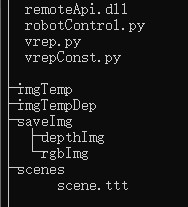
到目前为止,我们的文件夹目录层次结构如下:
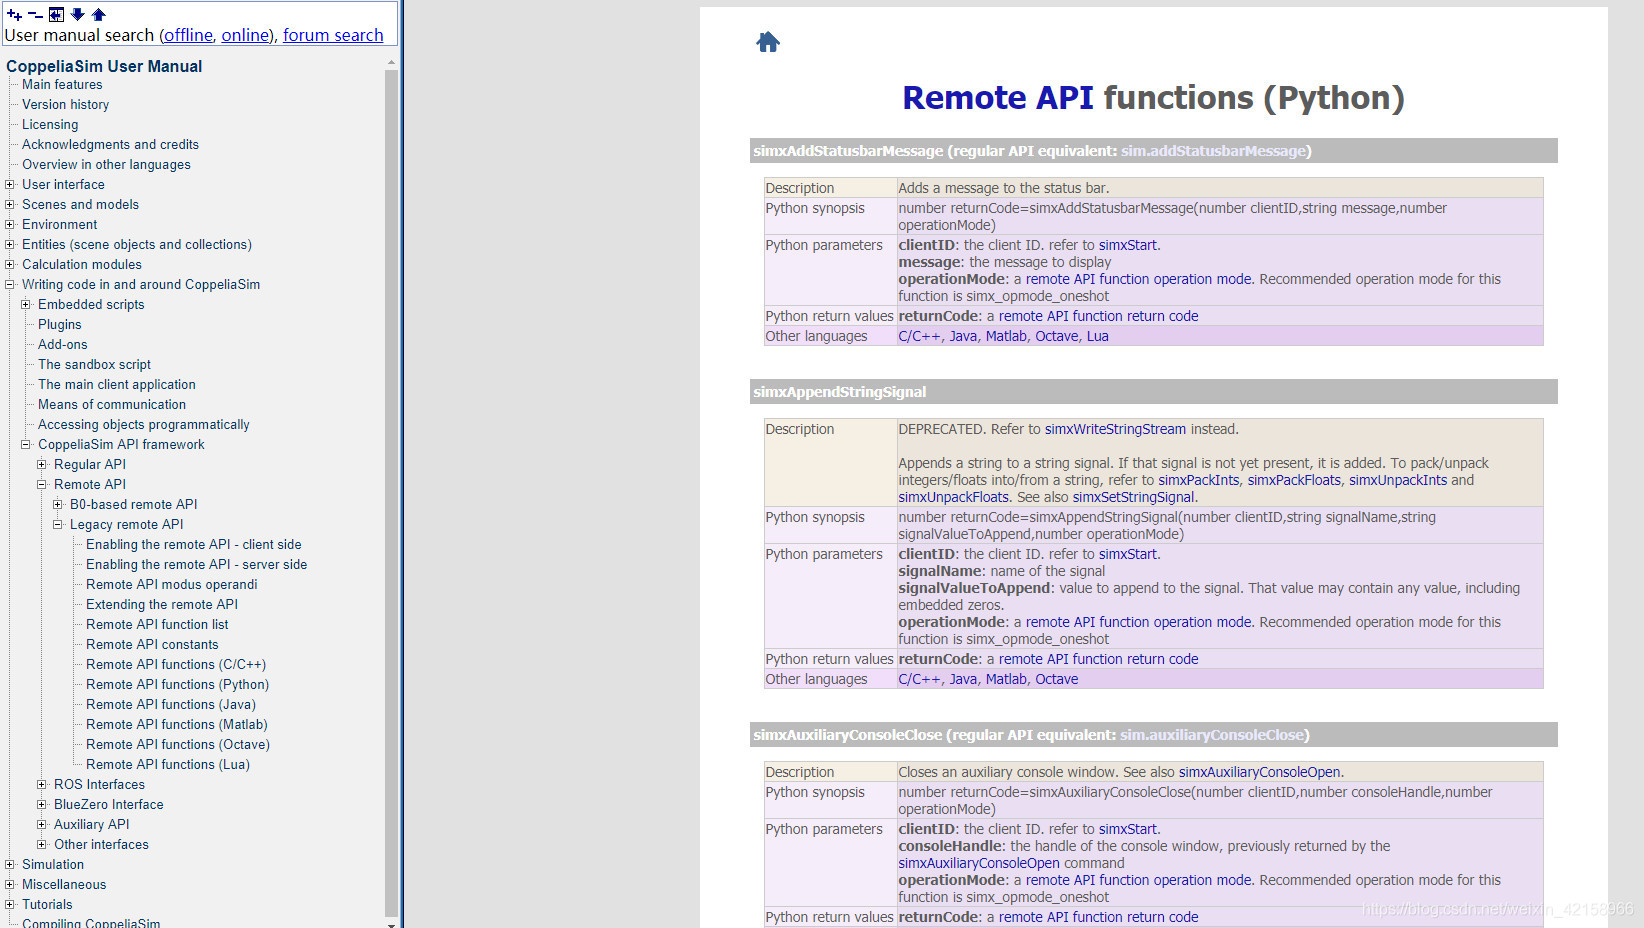
更多API可以参考 V-rep python函数库:Remote API functions (Python)
6.为后续做准备
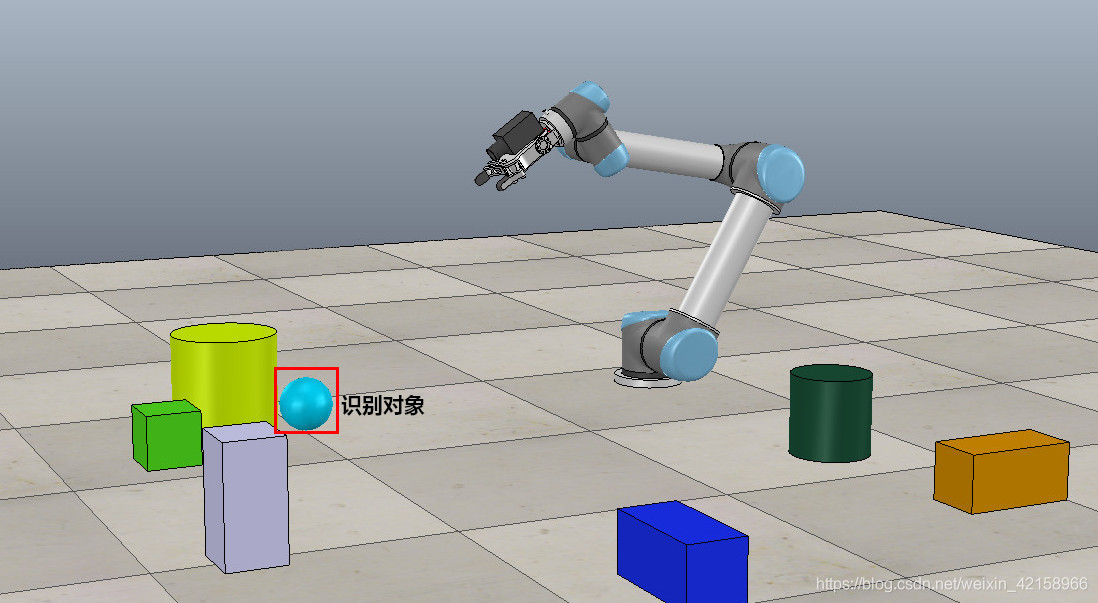
我们接下来用YOLOV3做一个目标识别实验,识别对象是一个圆球,如图:
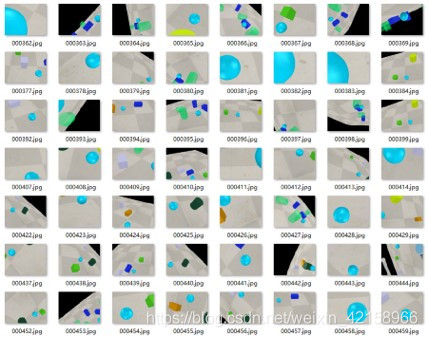
我们已经可以用键盘控制机械臂了,而且有保存摄像头图像的功能,保存地址在文件夹saveImg中,于是我们便可以控制机械臂去采集图像,制作成训练集。如图,这是部分训练集:

具体细节我们会在后面的文章中说明。7.附录-完整程序
#-*- coding:utf-8 -*- """ keyboard Instructions: robot moving velocity: <=5(advise) Q,W: joint 0 A,S: joint 1 Z,X: joint 2 E,R: joint 3 D,F: joint 4 C,V: joint 5 P: exit() T: close RG2 Y: open RG2 L: reset robot SPACE: save image """ import os import cv2 import sys import math import time import random import string import pygame import vrep import numpy as np class UR5_RG2: # variates resolutionX = 640 # Camera resolution: 640*480 resolutionY = 480 joint_angle = [0,0,0,0,0,0] # each angle of joint RAD2DEG = 180 / math.pi # transform radian to degrees # Handles information jointNum = 6 baseName = 'UR5' rgName = 'RG2' jointName = 'UR5_joint' camera_rgb_Name = 'kinect_rgb' camera_depth_Name = 'kinect_depth' # communication and read the handles def __init__(self): jointNum = self.jointNum baseName = self.baseName rgName = self.rgName jointName = self.jointName camera_rgb_Name = self.camera_rgb_Name camera_depth_Name = self.camera_depth_Name print('Simulation started') vrep.simxFinish(-1) # 关闭潜在的连接 # 每隔0.2s检测一次, 直到连接上V-rep while True: # simxStart的参数分别为:服务端IP地址(连接本机用127.0.0.1);端口号;是否等待服务端开启;连接丢失时是否尝试再次连接;超时时间(ms);数据传输间隔(越小越快) clientID = vrep.simxStart('127.0.0.1', 19999, True, True, 5000, 5) if clientID > -1: print("Connection success!") break else: time.sleep(0.2) print("Failed connecting to remote API server!") print("Maybe you forget to run the simulation on vrep...") vrep.simxStartSimulation(clientID, vrep.simx_opmode_oneshot) # 仿真初始化 # 读取Base和Joint的句柄 jointHandle = np.zeros((jointNum, 1), dtype=np.int) for i in range(jointNum): _, returnHandle = vrep.simxGetObjectHandle(clientID, jointName + str(i+1), vrep.simx_opmode_blocking) jointHandle[i] = returnHandle _, baseHandle = vrep.simxGetObjectHandle(clientID, baseName, vrep.simx_opmode_blocking) _, rgHandle = vrep.simxGetObjectHandle(clientID, rgName, vrep.simx_opmode_blocking) _, cameraRGBHandle = vrep.simxGetObjectHandle(clientID, camera_rgb_Name, vrep.simx_opmode_blocking) _, cameraDepthHandle = vrep.simxGetObjectHandle(clientID, camera_depth_Name, vrep.simx_opmode_blocking) # 读取每个关节角度 jointConfig = np.zeros((jointNum, 1)) for i in range(jointNum): _, jpos = vrep.simxGetJointPosition(clientID, jointHandle[i], vrep.simx_opmode_blocking) jointConfig[i] = jpos self.clientID = clientID self.jointHandle = jointHandle self.rgHandle = rgHandle self.cameraRGBHandle = cameraRGBHandle self.cameraDepthHandle = cameraDepthHandle self.jointConfig = jointConfig def __del__(self): clientID = self.clientID vrep.simxFinish(clientID) print('Simulation end') # show Handles information def showHandles(self): RAD2DEG = self.RAD2DEG jointNum = self.jointNum clientID = self.clientID jointHandle = self.jointHandle rgHandle = self.rgHandle cameraRGBHandle = self.cameraRGBHandle cameraDepthHandle = self.cameraDepthHandle print('Handles available!') print("==============================================") print("Handles: ") for i in range(len(jointHandle)): print("jointHandle" + str(i+1) + ": " + jointHandle[i]) print("rgHandle:" + rgHandle) print("cameraRGBHandle:" + cameraRGBHandle) print("cameraDepthHandle:" + cameraDepthHandle) print("===============================================") # show each joint's angle def showJointAngles(self): RAD2DEG = self.RAD2DEG jointNum = self.jointNum clientID = self.clientID jointHandle = self.jointHandle for i in range(jointNum): _, jpos = vrep.simxGetJointPosition(clientID, jointHandle[i], vrep.simx_opmode_blocking) print(round(float(jpos) * RAD2DEG, 2), end = ' ') print('\n') # get RGB images def getImageRGB(self): clientID = self.clientID cameraRGBHandle = self.cameraRGBHandle resolutionX = self.resolutionX resolutionY = self.resolutionY res1, resolution1, image_rgb = vrep.simxGetVisionSensorImage(clientID, cameraRGBHandle, 0, vrep.simx_opmode_blocking) image_rgb_r = [image_rgb[i] for i in range(0,len(image_rgb),3)] image_rgb_r = np.array(image_rgb_r) image_rgb_r = image_rgb_r.reshape(resolutionY,resolutionX) image_rgb_r = image_rgb_r.astype(np.uint8) image_rgb_g = [image_rgb[i] for i in range(1,len(image_rgb),3)] image_rgb_g = np.array(image_rgb_g) image_rgb_g = image_rgb_g.reshape(resolutionY,resolutionX) image_rgb_g = image_rgb_g.astype(np.uint8) image_rgb_b = [image_rgb[i] for i in range(2,len(image_rgb),3)] image_rgb_b = np.array(image_rgb_b) image_rgb_b = image_rgb_b.reshape(resolutionY,resolutionX) image_rgb_b = image_rgb_b.astype(np.uint8) result_rgb = cv2.merge([image_rgb_b,image_rgb_g,image_rgb_r]) # 镜像翻转, opencv在这里返回的是一张翻转的图 result_rgb = cv2.flip(result_rgb, 0) return result_rgb # get depth images def getImageDepth(self): clientID = self.clientID cameraDepthHandle = self.cameraDepthHandle resolutionX = self.resolutionX resolutionY = self.resolutionY res2, resolution2, image_depth = vrep.simxGetVisionSensorImage(clientID, cameraDepthHandle, 0, vrep.simx_opmode_blocking) image_depth_r = [image_depth[i] for i in range(0,len(image_depth),3)] image_depth_r = np.array(image_depth_r) image_depth_r = image_depth_r.reshape(resolutionY,resolutionX) image_depth_r = image_depth_r.astype(np.uint8) image_depth_g = [image_depth[i] for i in range(1,len(image_depth),3)] image_depth_g = np.array(image_depth_g) image_depth_g = image_depth_g.reshape(resolutionY,resolutionX) image_depth_g = image_depth_g.astype(np.uint8) image_depth_b = [image_depth[i] for i in range(2,len(image_depth),3)] image_depth_b = np.array(image_depth_b) image_depth_b = image_depth_b.reshape(resolutionY,resolutionX) image_depth_b = image_depth_b.astype(np.uint8) result_depth = cv2.merge([image_depth_b,image_depth_g,image_depth_r]) # 镜像翻转, opencv在这里返回的是一张翻转的图 result_depth = cv2.flip(result_depth, 0) # 黑白取反 height, width, channels = result_depth.shape for row in range(height): for list in range(width): for c in range(channels): pv = result_depth[row, list, c] result_depth[row, list, c] = 255 - pv return result_depth # open rg2 def openRG2(self): rgName = self.rgName clientID = self.clientID res, retInts, retFloats, retStrings, retBuffer = vrep.simxCallScriptFunction(clientID, rgName,\ vrep.sim_scripttype_childscript,'rg2Open',[],[],[],b'',vrep.simx_opmode_blocking) # close rg2 def closeRG2(self): rgName = self.rgName clientID = self.clientID res, retInts, retFloats, retStrings, retBuffer = vrep.simxCallScriptFunction(clientID, rgName,\ vrep.sim_scripttype_childscript,'rg2Close',[],[],[],b'',vrep.simx_opmode_blocking) # joint_angle是这种形式: [0,0,0,0,0,0], 所有的关节都旋转到对应的角度 def rotateAllAngle(self, joint_angle): clientID = self.clientID jointNum = self.jointNum RAD2DEG = self.RAD2DEG jointHandle = self.jointHandle # 暂停通信,用于存储所有控制命令一起发送 vrep.simxPauseCommunication(clientID, True) for i in range(jointNum): vrep.simxSetJointTargetPosition(clientID, jointHandle[i], joint_angle[i]/RAD2DEG, vrep.simx_opmode_oneshot) vrep.simxPauseCommunication(clientID, False) self.jointConfig = joint_angle # 将第num个关节正转angle度 def rotateCertainAnglePositive(self, num, angle): clientID = self.clientID RAD2DEG = self.RAD2DEG jointHandle = self.jointHandle jointConfig = self.jointConfig vrep.simxSetJointTargetPosition(clientID, jointHandle[num], (jointConfig[num]+angle)/RAD2DEG, vrep.simx_opmode_oneshot) jointConfig[num] = jointConfig[num] + angle self.jointConfig = jointConfig # 将第num个关节反转angle度 def rotateCertainAngleNegative(self, num, angle): clientID = self.clientID RAD2DEG = self.RAD2DEG jointHandle = self.jointHandle jointConfig = self.jointConfig vrep.simxSetJointTargetPosition(clientID, jointHandle[num], (jointConfig[num]-angle)/RAD2DEG, vrep.simx_opmode_oneshot) jointConfig[num] = jointConfig[num] - angle self.jointConfig = jointConfig # convert array from vrep to image def arrayToImage(self): path = "imgTemp\\frame.jpg" if os.path.exists(path): os.remove(path) ig = self.getImageRGB() cv2.imwrite(path, ig) # convert array from vrep to depth image def arrayToDepthImage(self): path = "imgTempDep\\frame.jpg" if os.path.exists(path): os.remove(path) ig = self.getImageDepth() cv2.imwrite(path, ig) # control robot by keyboard def main(): robot = UR5_RG2() resolutionX = robot.resolutionX resolutionY = robot.resolutionY #angle = float(eval(input("please input velocity: "))) angle = 1 pygame.init() screen = pygame.display.set_mode((resolutionX, resolutionY)) screen.fill((255,255,255)) pygame.display.set_caption("Vrep yolov3 ddpg pytorch") # 循环事件,按住一个键可以持续移动 pygame.key.set_repeat(200,50) while True: robot.arrayToImage() ig = pygame.image.load("imgTemp\\frame.jpg") #robot.arrayToDepthImage() #ig = pygame.image.load("imgTempDep\\frame.jpg") screen.blit(ig, (0, 0)) pygame.display.update() key_pressed = pygame.key.get_pressed() for event in pygame.event.get(): # 关闭程序 if event.type == pygame.QUIT: sys.exit() if event.type == pygame.KEYDOWN: if event.key == pygame.K_p: sys.exit() # joinit 0 elif event.key == pygame.K_q: robot.rotateCertainAnglePositive(0, angle) elif event.key == pygame.K_w: robot.rotateCertainAngleNegative(0, angle) # joinit 1 elif event.key == pygame.K_a: robot.rotateCertainAnglePositive(1, angle) elif event.key == pygame.K_s: robot.rotateCertainAngleNegative(1, angle) # joinit 2 elif event.key == pygame.K_z: robot.rotateCertainAnglePositive(2, angle) elif event.key == pygame.K_x: robot.rotateCertainAngleNegative(2, angle) # joinit 3 elif event.key == pygame.K_e: robot.rotateCertainAnglePositive(3, angle) elif event.key == pygame.K_r: robot.rotateCertainAngleNegative(3, angle) # joinit 4 elif event.key == pygame.K_d: robot.rotateCertainAnglePositive(4, angle) elif event.key == pygame.K_f: robot.rotateCertainAngleNegative(4, angle) # joinit 5 elif event.key == pygame.K_c: robot.rotateCertainAnglePositive(5, angle) elif event.key == pygame.K_v: robot.rotateCertainAngleNegative(5, angle) # close RG2 elif event.key == pygame.K_t: robot.closeRG2() # # open RG2 elif event.key == pygame.K_y: robot.openRG2() # save Images elif event.key == pygame.K_SPACE: rgbImg = robot.getImageRGB() depthImg = robot.getImageDepth() # 随机生成8位ascii码和数字作为文件名 ran_str = ''.join(random.sample(string.ascii_letters + string.digits, 8)) cv2.imwrite("saveImg\\rgbImg\\"+ran_str+"_rgb.jpg", rgbImg) cv2.imwrite("saveImg\\depthImg\\"+ran_str+"_depth.jpg", depthImg) print("save image") # reset angle elif event.key == pygame.K_l: robot.rotateAllAngle([0,0,0,0,0,0]) angle = float(eval(input("please input velocity: "))) else: print("Invalid input, no corresponding function for this key!") if __name__ == '__main__': main()- 函数

CSDN联合极客时间,共同打造面向开发者的精品内容学习社区,助力成长!
更多推荐


 7
7 1
1- 0


 已为社区贡献8条内容

所有评论(0)