[深度学习] ImageAI库使用笔记
ImageAI是一个Python库,旨在使开发人员,研究人员和学生能够使用简单的几行代码来构建具有独立的深度学习和计算机视觉功能的应用程序和系统。ImageAI的官方GitHub存储库为https://github.com/OlafenwaMoses/ImageAI文章目录0 安装1 图像预测1.1 参数说明1.2 样例代码2 目标检测2.1 参数说明2.2 样例代码3 视频实时检测与分析3.1
ImageAI是一个Python库,旨在使开发人员,研究人员和学生能够使用简单的几行代码来构建具有独立的深度学习和计算机视觉功能的应用程序和系统。
ImageAI的官方GitHub存储库为https://github.com/OlafenwaMoses/ImageAI
# 去掉警告
import warnings
warnings.filterwarnings("ignore")
# 多行输出
from IPython.core.interactiveshell import InteractiveShell
InteractiveShell.ast_node_interactivity = "all"
0 安装
ImageAI要求您安装Python 3.5.1或更高版本以及其他一些Python库和框架。在安装ImageAI之前,必须安装以下依赖项。
- Python 3.5.1或更高版本, 下载Python
- pip3, 下载PyPi
- Tensorflow 1.4.0或更高版本
pip3 install --upgrade tensorflow
- OpenCV
pip3 install opencv-python
- Keras
pip3 install keras
- ImageAI
pip3 install imageai --upgrade
一旦安装好ImageAI,通过几行代码就能够实现深度学习诸多任务功能。主要有:
- 图像识别:识别图像中的1000个不同对象
- 图像物体检测:检测图像中的80个最常见的日常物体
- 视频对象检测:检测视频中80个最常见的日常物品
- 视频检测分析:对视频中检测到的对象进行基于时间的分析
- 自定义图像识别训练和推理:在识别自定义对象上训练新的图像新的深度学习模型
- 自定义目标检测训练和推理:训练新的YOLOv3模型以检测自定义对象
本文主要内容有:
- 图像预测
- 目标检测
- 视频实时检测与分析
- 其他功能介绍
注意有官方中文文档,但是内容实时性不强。具体文档见:
1 图像预测
ImageAI提供ImagePrediction类来识别1000个不同的对象。您可以使用范围仅在5行到12行之间的python代码来执行所有这些最新的计算机视觉任务。ImageAI提供用于图像预测的4种算法包括 SqueezeNet,ResNet,InceptionV3 和 DenseNet。这些算法中的每一个都有单独的模型文件,您必须根据所选算法使用相对应的模型文件。
- SqueezeNet(文件大小:4.82 MB,预测时间最短,精准度适中)
- ResNet50(文件大小:98 MB,预测时间较快,精准度高)
- InceptionV3(文件大小:91.6 MB,预测时间慢,精度更高)
- DenseNet (文件大小:31.6 MB,预测时间较慢,精度最高)
要在您的代码中初始化ImageAI提供ImagePrediction类来识别1000个不同的对象,您将在代码中创建该类的新实例,如下所示
1.1 参数说明
from imageai.Prediction import ImagePrediction
prediction = ImagePrediction()
创建ImagePrediction类的新实例后,可以使用下面的函数设置实例属性并开始识别图像中的对象。
- .setModelTypeAsSqueezeNet(),此函数将您创建的图像识别实例的模型类型设置为SqueezeNet模型,这意味着您将使用从上面的链接下载的经过预先训练的“ SqueezeNet”模型执行图像预测任务。示例代码如下:
prediction.setModelTypeAsSqueezeNet()
- .setModelTypeAsResNet(),此函数将您创建的图像识别实例的模型类型设置为ResNet模型,这意味着您将使用从上面的链接下载的经过预先训练的“ ResNet”模型执行图像预测任务。示例代码如下:
prediction.setModelTypeAsResNet()
- .setModelTypeAsInceptionV3(),此函数将您创建的图像识别实例的模型类型设置为InecptionV3模型,这意味着您将使用从上面的链接下载的经过预先训练的“ InceptionV3”模型执行图像预测任务。示例代码如下:
prediction.setModelTypeAsInceptionV3()
- .setModelTypeAsDenseNet(),此函数将您创建的图像识别实例的模型类型设置为DenseNet模型,这意味着您将使用从上面的链接下载的经过预先训练的“ DenseNet”模型执行图像预测任务。示例代码如下:
prediction.setModelTypeAsDenseNet()
- .setModelPath(),此函数接受一个字符串,该字符串必须是您下载的模型文件的路径,并且必须与您为图像预测实例设置的模型类型相对应。示例代码如下:
prediction.setModelPath(“resnet50_weights_tf_dim_ordering_tf_kernels.h5”)
- .loadModel(),此函数将模型从您在上面的函数调用中指定的路径加载到图像预测实例中。示例代码如下:
prediction.loadModel()
可选参数:
prediction_speed:使用此参数可以将图像预测所需的时间减少多达80%,从而导致精度略有下降。此参数接受字符串值。可用值为“normal”, “fast”, “faster” and “fastest”。默认值为“normal”
- .predictImage(),这是执行图像实际预测的功能。一旦将模型加载到预测实例中,就可以在许多图像上多次调用它。示例代码如下:
predictions, probabilities = prediction.predictImage(“image1.jpg”, result_count=10)
参数:
 1. image_input(必填):这是指图像文件的路径,图像的Numpy数组或图像的图像文件流,具体取决于您指定的输入类型。
 2. result_count(可选):这是指应返回的可能预测的数量。该参数默认设置为5。
 3. input_type(可选):这是指您要解析为image_input参数的输入的类型。默认情况下是“文件”,并且也接受“数组”和“流”。
 4. prediction_results(python列表):predictImage函数返回的第一个值是一个包含所有可能的预测结果的列表。结果按概率百分比的降序排列。
 5. prediction_probabilities(python列表):predictImage函数返回的第二个值是一个列表,其中包含预测结果中所有可能预测的相应百分比概率。
1.2 样例代码
预测图片如图所示:

以下为用于预测一张图像的示例代码:
from imageai.Prediction import ImagePrediction
import os

# 获得当前路径
execution_path = os.getcwd()

prediction = ImagePrediction()
# 加载SqueezeNet模型
prediction.setModelTypeAsSqueezeNet()
prediction.setModelPath(os.path.join(execution_path, "squeezenet_weights_tf_dim_ordering_tf_kernels.h5"))
# 加载模型
prediction.loadModel()

# 返回预测结果
predictions, probabilities = prediction.predictImage(os.path.join(execution_path, "image1.jpg"), result_count=10)
for eachPrediction, eachProbability in zip(predictions, probabilities):
    print(eachPrediction , " : " , eachProbability)
WARNING:tensorflow:From C:\ProgramData\Anaconda3\lib\site-packages\tensorflow\python\ops\resource_variable_ops.py:435: colocate_with (from tensorflow.python.framework.ops) is deprecated and will be removed in a future version.
Instructions for updating:
Colocations handled automatically by placer.
WARNING:tensorflow:From C:\ProgramData\Anaconda3\lib\site-packages\tensorflow\python\keras\layers\core.py:143: calling dropout (from tensorflow.python.ops.nn_ops) with keep_prob is deprecated and will be removed in a future version.
Instructions for updating:
Please use `rate` instead of `keep_prob`. Rate should be set to `rate = 1 - keep_prob`.
sports_car  :  46.19710445404053
convertible  :  37.57524788379669
grille  :  8.19731280207634
minivan  :  2.456847205758095
pickup  :  2.162572182714939
racer  :  1.6961924731731415
beach_wagon  :  1.1535477824509144
car_wheel  :  0.24655587039887905
cab  :  0.08109718910418451
Model_T  :  0.07264625746756792
此外还可以设置检测模式,通过以下代码设定:
prediction.loadModel(prediction_speed=“fast”)
实际上改变模式,就是改变输入图片的大小,但是结果也会随之改变。同等配置下,速度越快,精度越低。
(实验环境 OS:Windows 8, CPU:Intel Celeron N2820 2.13GHz)具体效果如下:
- 速度模式=”normal”,图片大小设置为224,224,花费时间= 5.9秒
- 速度模式=”fast”,图片大小设置为160,160,花费时间= 3.4秒
- 速度模式=”faster”,图片大小设置为120,120,花费时间= 2.7秒
- 速度模式=”fastest”,图片大小设置为100,100,花费时间= 2.2秒
另外也可以使用多线程预测,代码如下:
import os
import threading
execution_path = os.getcwd()

prediction = ImagePrediction()
prediction.setModelTypeAsResNet()
prediction.setModelPath( os.path.join(execution_path, "resnet50_weights_tf_dim_ordering_tf_kernels.h5"))

picturesfolder = os.environ["USERPROFILE"] + "\Pictures\"
allfiles = os.listdir(picturesfolder)

class PredictionThread(threading.Thread):
    def init(self):
        threading.Thread.init(self)
    def run(self):
        prediction.loadModel()
    for eachPicture in allfiles:
        if eachPicture.endswith(".png") or eachPicture.endswith(".jpg"):
            predictions, probabilities = prediction.predictImage(picturesfolder + eachPicture, result_count=1)
            for prediction, percentage_probability in zip(predictions, probabilities):
                print(prediction + " : " + percentage_probability)

predictionThread = PredictionThread()
predictionThread.start()
2 目标检测
2.1 参数说明
ImageAI提供了非常强大但易于使用的类和函数来执行图像对象检测和提取。ImageAI允许您使用最新的深度学习算法(例如RetinaNet,YOLOv3和TinyYOLOv3)执行所有这些操作。使用ImageAI,您可以运行检测任务并分析图像。
ImageAI的ObjectDetection类为您提供使用在COCO数据集上训练的预训练模型对任何图像或一组图像执行对象检测的功能。支持的模型是RetinaNet,YOLOv3和TinyYOLOv3。这意味着您可以检测和识别80种常见的日常物品。首先,请通过下面的链接下载要使用的任何预训练模型。
- RetinaNet (大小= 145 mb,高性能和准确性,更长的检测时间)
- YOLOv3 (大小= 237 mb,性能和准确性适中,检测时间适中)
- TinyYOLOv3 (大小= 34 mb,针对速度和中等性能进行了优化,具有快速检测时间)
- RetinaNet (大小= 145 mb,高性能和准确性,更长的检测时间)
一旦下载了所选择的模型,就应该创建ObjectDetection类的新实例,如以下示例所示:
from imageai.Detection import ObjectDetection
detector = ObjectDetection()
Using TensorFlow backend.
一旦创建了类的实例,就可以使用下面的函数来设置实例属性并开始检测图像中的对象。
- .setModelTypeAsRetinaNet(),此函数将您创建的对象检测实例的模型类型设置为RetinaNet模型,这意味着您将使用从上面的链接下载的经过预先训练的“ RetinaNet”模型执行对象检测任务。示例代码如下:
detector.setModelTypeAsRetinaNet()
- .setModelTypeAsYOLOv3(),此函数将您创建的对象检测实例的模型类型设置为YOLOv3模型,这意味着您将使用从上面的链接下载的经过预先训练的“ YOLOv3”模型执行对象检测任务。示例代码如下:
detector.setModelTypeAsYOLOv3()
- .setModelTypeAsTinyYOLOv3(),此函数将您创建的对象检测实例的模型类型设置为TinyYOLOv3模型,这意味着您将使用从上面的链接下载的经过预先训练的“ TinyYOLOv3”模型执行对象检测任务。示例代码如下:
detector.setModelTypeAsTinyYOLOv3()
- setModelTypeAsRetinaNet(),此函数将您创建的对象检测实例的模型类型设置为RetinaNet模型,这意味着您将使用从上面的链接下载的经过预先训练的“ RetinaNet3”模型执行对象检测任务。示例代码如下:
detector.setModelTypeAsRetinaNet()
- .setModelPath()和.loadModel() 与图像预测中所述一样。
- .detectObjectsFromImage(),此函数在加载模型后执行对象检测任务。可以多次调用它以检测任意数量的图像中的对象。示例代码如下:
detections = detector.detectObjectsFromImage(input_image=“image.jpg”, output_image_path=“imagenew.jpg”, minimum_percentage_probability=30)
参数:
1. input_image(必填):这是指您要检测的图像文件的路径。如果将参数input_type设置为“ array”或“ stream”,则可以将此参数设置为任何图像的File流的Numpy数组。
2. output_image_path(仅在input_type =“ file” 时才需要):表示将检测到的图像保存到的文件路径。仅当input_type =“ file” 时才需要。
3. minimum_percentage_probability(可选):此参数用于确定检测结果的完整性。降低该值将显示更多的对象,而增加该值可确保检测到精度最高的对象。默认值为50。
4. output_type(可选):此参数用于设置将产生检测到的图像的格式。可用值为“file”和“array”。默认值为“file”。如果此参数设置为“ array”,则该函数将返回检测到的图像的Numpy数组。请参见以下示例:
> returned_image, detections = detector.detectObjectsFromImage(input_image=”image.jpg”, output_type=”array”, minimum_percentage_probability=30)
5. display_percentage_probability(可选):如果设置为False,则此参数可用于隐藏在检测到的图像中检测到的每个对象的百分比概率。默认值为True。
6. display_object_name(可选):如果设置为False,则此参数可用于隐藏检测到的图像中检测到的每个对象的名称。默认值为True。
7. extract_detected_objects(可选):此参数可用于提取和保存/返回图像中检测到的每个对象作为单独的图像。默认值为False。
8. thread_safe(可选):如果设置为true,则确保加载的检测模型可在所有线程上工作。
- .CustomObjects(),当您只想检测选定数量的对象时,可以使用此函数。它返回对象及其正确或错误值的字典。要检测图像中的选定对象,必须将this函数返回的字典与detectCustomObjectsFromImage()函数一起使用。在下面的注释和代码示例中找到详细信息:
There are 80 possible objects that you can detect with the
ObjectDetection class, and they are as seen below.

    person,   bicycle,   car,   motorcycle,   airplane,
    bus,   train,   truck,   boat,   traffic light,   fire hydrant,   stop_sign,
    parking meter,   bench,   bird,   cat,   dog,   horse,   sheep,   cow,   elephant,   bear,   zebra,
    giraffe,   backpack,   umbrella,   handbag,   tie,   suitcase,   frisbee,   skis,   snowboard,
    sports ball,   kite,   baseball bat,   baseball glove,   skateboard,   surfboard,   tennis racket,
    bottle,   wine glass,   cup,   fork,   knife,   spoon,   bowl,   banana,   apple,   sandwich,   orange,
    broccoli,   carrot,   hot dog,   pizza,   donot,   cake,   chair,   couch,   potted plant,   bed,
    dining table,   toilet,   tv,   laptop,   mouse,   remote,   keyboard,   cell phone,   microwave,
    oven,   toaster,   sink,   refrigerator,   book,   clock,   vase,   scissors,   teddy bear,   hair dryer,
    toothbrush.

To detect only some of the objects above, you will need to call the CustomObjects function and set the name of the
object(s) yiu want to detect to through. The rest are False by default. In below example, we detected only chose detect only person and dog.

custom = detector.CustomObjects(person=True, dog=True)
- .detectCustomObjectsFromImage(),此函数具有所有参数,并返回detectObjectsFromImage()函数所做的所有值,但略有不同。使用此功能可以仅检测图像中的选定对象。与常规的detectObjectsFromImage()函数不同,它需要一个额外的参数“ custom_object”,该参数接受CustomObject()函数返回的字典。在下面的示例中,我们将检测功能设置为仅报告对人和狗的检测:
custom = detector.CustomObjects(person=True, dog=True)
detections = detector.detectCustomObjectsFromImage( custom_objects=custom, input_image=os.path.join(execution_path , “image3.jpg”), output_image_path=os.path.join(execution_path , “image3new-custom.jpg”), minimum_percentage_probability=30)
对于类检测的返回参数说明如下:
-
如果设置了所有必需的参数,并且将“ output_image_path”设置为要保存检测到的图像的文件路径,该函数将返回:
- 检测图像的numpy数组
- name (string)
- percentage_probability (float)
- box_points (tuple of x1,y1,x2 and y2 coordinates)
detections = detector.detectObjectsFromImage(input_image=”image.jpg”, output_image_path=”imagenew.jpg”, minimum_percentage_probability=30)
- 检测图像的numpy数组
-
如果设置了所有必需的参数并且output_type =‘array’,该函数将返回:
- 检测图像的numpy数组
- 字典数组,每个字典对应于对象
returned_image, detections = detector.detectObjectsFromImage(input_image=”image.jpg”, output_type=”array”, minimum_percentage_probability=30)
-
如果extract_detected_objects = True,并且“ output_image_path”设置为所需的文件路径,该函数将返回:
- 字典数组,每个字典对应于对象
- 从图像中提取的每个对象的图像的字符串路径数组
detections, extracted_objects = detector.detectObjectsFromImage(input_image=”image.jpg”, output_image_path=”imagenew.jpg”, extract_detected_objects=True, minimum_percentage_probability=30)
-
如果extract_detected_objects = True且output_type =‘array’,则该函数将返回:
- 检测图像的numpy数组
- 字典数组,每个字典对应于对象
- 图像中检测到的每个对象的numpy数组的数组
returned_image, detections, extracted_objects = detector.detectObjectsFromImage(input_image=”image.jpg”, output_type=”array”, extract_detected_objects=True, minimum_percentage_probability=30)
2.2 样例代码
样例图片如下:

基本使用代码如下:
from imageai.Detection import ObjectDetection
import os

execution_path = os.getcwd()

detector = ObjectDetection()
detector.setModelTypeAsTinyYOLOv3()
detector.setModelPath( os.path.join(execution_path , "yolo-tiny.h5"))
detector.loadModel()
detections = detector.detectObjectsFromImage(input_image=os.path.join(execution_path , "image2.jpg"), output_image_path=os.path.join(execution_path , "image2new.jpg"), minimum_percentage_probability=30)

for eachObject in detections:
    print(eachObject["name"] , " : ", eachObject["percentage_probability"], " : ", eachObject["box_points"] )
    print("--------------------------------")
donut  :  56.126707792282104  :  (15, 379, 129, 438)
--------------------------------
person  :  56.23413324356079  :  (169, 104, 285, 297)
--------------------------------
person  :  62.340474128723145  :  (412, 120, 567, 282)
--------------------------------
person  :  83.61815810203552  :  (307, 169, 384, 256)
--------------------------------
检测效果很一般,结果如图所示:

当extract_detected_objects为True时,可以保存各个检测到物体的图像
from imageai.Detection import ObjectDetection
import os

execution_path = os.getcwd()

detector = ObjectDetection()
detector.setModelTypeAsTinyYOLOv3()
detector.setModelPath( os.path.join(execution_path , "yolo-tiny.h5"))
detector.loadModel()

detections, objects_path = detector.detectObjectsFromImage(input_image=os.path.join(execution_path , "image3.jpg"), output_image_path=os.path.join(execution_path , "image3new.jpg"), minimum_percentage_probability=30,  extract_detected_objects=True)

for eachObject, eachObjectPath in zip(detections, objects_path):
    print(eachObject["name"] , " : " , eachObject["percentage_probability"], " : ", eachObject["box_points"] )
    print("--------------------------------")
dog  :  56.62620663642883  :  (395, 324, 449, 434)
--------------------------------
motorcycle  :  42.00802147388458  :  (264, 190, 354, 306)
--------------------------------
person  :  34.74058508872986  :  (143, 119, 170, 159)
--------------------------------
person  :  40.15779793262482  :  (461, 131, 509, 222)
--------------------------------
person  :  64.91314768791199  :  (157, 159, 246, 362)
--------------------------------
person  :  78.07608842849731  :  (601, 130, 640, 222)
--------------------------------
person  :  89.72326517105103  :  (10, 100, 65, 252)
--------------------------------
person  :  97.73167967796326  :  (536, 99, 580, 228)
--------------------------------
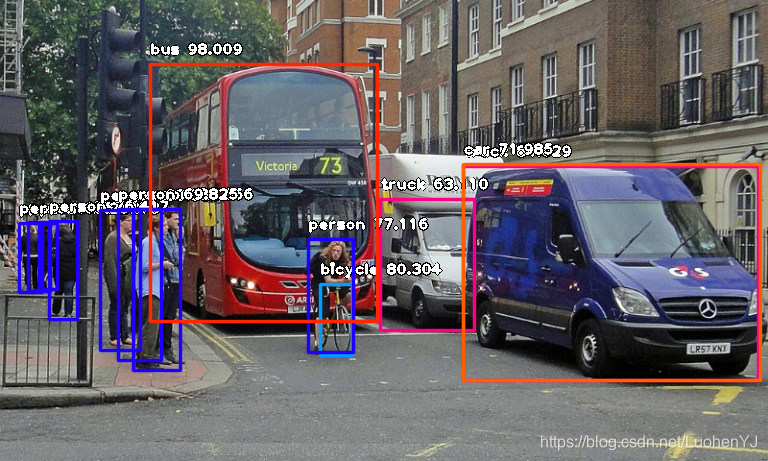
检测前后结果如图所示:


此外还可以自定义对象检测,也就是选择检测某几个物体。ImageAI允许您对上述一项或多项进行检测。这意味着您可以自定义要在图像中检测到的对象的类型。具体的物体类别前面已经说过。下面代码显示只检测狗。但是速度明显慢很多。
from imageai.Detection import ObjectDetection
import os

execution_path = os.getcwd()

detector = ObjectDetection()
detector.setModelTypeAsTinyYOLOv3()
detector.setModelPath( os.path.join(execution_path , "yolo-tiny.h5"))
detector.loadModel()

custom_objects = detector.CustomObjects(dog=True)
detections = detector.detectCustomObjectsFromImage(custom_objects=custom_objects, input_image=os.path.join(execution_path , "image3.jpg"), output_image_path=os.path.join(execution_path , "image3custom.jpg"), minimum_percentage_probability=30)

for eachObject in detections:
    print(eachObject["name"] , " : ", eachObject["percentage_probability"], " : ", eachObject["box_points"] )
    print("--------------------------------")
dog  :  56.62620663642883  :  (395, 324, 449, 434)
--------------------------------
其他用法,比如加快速度,类似对象检测的用法。
3 视频实时检测与分析
3.1 参数说明
ImageAI提供了非常强大但易于使用的类和函数来执行 视频对象检测和跟踪 以及视频分析。ImageAI允许您使用最新的深度学习算法(例如RetinaNet,YOLOv3和TinyYOLOv3)执行所有这些操作。使用ImageAI您可以运行检测任务并分析来自设备摄像机和IP摄像机的视频和实况视频源。
VideoObjectDetection类提供了使用在COCO数据集上进行训练的预训练模型来检测视频中的对象以及来自设备摄像机和IP摄像机的实时馈送的功能。支持的模型是RetinaNet,YOLOv3和TinyYOLOv3。这意味着您可以在任何视频中检测和识别80种常见的日常物体。首先,请通过下面的链接下载要使用的任何预训练模型。
- RetinaNet (大小= 145 mb,高性能和准确性,更长的检测时间)
- YOLOv3 (大小= 237 mb,性能和准确性适中,检测时间适中)
- TinyYOLOv3 (大小= 34 mb,针对速度和中等性能进行了优化,具有快速检测时间)
由于视频对象检测是一项计算密集型任务,因此建议您使用装有NVIDIA GPU和GPU版本的Tensorflow的计算机执行此实验。执行视频对象检测CPU的速度将比使用NVIDIA GPU驱动的计算机慢。
下载选择使用的模型后,创建VideoObjectDetection的实例,如下所示:
from imageai.Detection import VideoObjectDetection

detector = VideoObjectDetection()
创建该类的实例后,您可以调用以下函数来设置其属性并检测视频中的对象。
- .setModelTypeAsRetinaNet(),此函数将您创建的对象检测实例的模型类型设置为RetinaNet模型,这意味着您将使用从上面的链接下载的经过预先训练的“ RetinaNet”模型执行对象检测任务。示例代码如下:
detector.setModelTypeAsRetinaNet()
- .setModelTypeAsYOLOv3(),此函数将您创建的对象检测实例的模型类型设置为YOLOv3模型,这意味着您将使用从上面的链接下载的经过预先训练的“ YOLOv3”模型执行对象检测任务。示例代码如下
detector.setModelTypeAsYOLOv3()
- .setModelTypeAsTinyYOLOv3(),此函数将您创建的对象检测实例的模型类型设置为TinyYOLOv3模型,这意味着您将使用从上面的链接下载的经过预先训练的“ TinyYOLOv3”模型执行对象检测任务。示例代码如下
detector.setModelTypeAsTinyYOLOv3()
- .setModelPath()、.loadModel()与其他检测类型一样。
- .detectObjectsFromVideo()。这个函数在将模型加载到您创建的实例中之后,对视频文件或视频实时提要执行对象检测。找到一个完整的样本代码如下:
from imageai.Detection import VideoObjectDetection
import os

execution_path = os.getcwd()

detector = VideoObjectDetection()
detector.setModelTypeAsYOLOv3()
detector.setModelPath( os.path.join(execution_path , "yolo.h5"))
detector.loadModel()

video_path = detector.detectObjectsFromVideo(input_file_path=os.path.join(execution_path, "traffic.mp4"),
                            output_file_path=os.path.join(execution_path, "traffic_detected")
                            , frames_per_second=20, log_progress=True)
print(video_path)
- 参数 input_file_path(如果未设置camera_input,则为必需):这是指您要检测的视频文件的路径。
- 参数 output_file_path(如果未设置save_detected_video = False,则为必需):这是指将检测到的视频保存到的路径。默认情况下,此功能保存视频 .avi格式。
- 参数 frames_per_second(可选,但建议使用):使用此参数可以为要保存的检测到的视频设置每秒所需的帧数。默认值为20,但我们建议您设置适合视频或摄像机实时供稿的值。
- 参数 log_progress(可选):将此参数设置为True将显示检测到的视频或实时视频的进度。它将报告每一帧检测到的进展。默认值为False。
- 参数 return_detected_frame(可选)该参数允许您在检测到的视频的每一帧、每一秒和每一分钟中以Numpy数组的形式返回检测到的帧。返回的Numpy数组将被解析为各自的per_frame_function、per_second_function和per_minute_function。
- 参数 camera_input(可选):如果您想在摄像机的实时提要中检测对象,可以设置这个参数来替代input_file_path。您所需要做的就是用OpenCV的VideoCapture()函数加载摄像机,并将对象解析为这个参数。
- 参数 minimum_percentage_probability(可选):此参数用于确定检测结果的完整性。降低该值将显示更多的对象,而增加该值可确保检测到精度最高的对象。默认值为50。
- 参数 display_percentage_probability(可选):如果设置为False,则此参数可用于隐藏在检测到的视频中检测到的每个对象的百分比概率。默认值为True。
- 参数 display_object_name(可选):如果设置为False,则此参数可用于隐藏检测到的视频中检测到的每个对象的名称。默认值为True。
- 参数 save_detected_video(可选):此参数可用于是否保存检测到的视频或不保存。默认情况下将其设置为True。
- 参数 per_frame_function(可选):使用此参数可以解析您定义的函数的名称。然后,对于检测到的视频的每一帧,将功能解析为参数,然后执行该参数,并将视频的解析数据解析为功能。返回的数据可以可视化或保存在NoSQL数据库中,以备将来处理和可视化。
- 参数 per_second_function(可选):使用此参数可以解析定义的函数的名称。然后,对于检测到的视频的每一秒,将功能解析为参数,将执行参数,并将视频的解析数据解析为功能。返回的数据可以可视化或保存在NoSQL数据库中,以备将来处理和可视化。
- 参数 per_minute_function(可选):使用此参数可以解析您定义的函数的名称。然后,对于检测到的视频的每一分,将执行已解析为参数的功能,并将视频的解析数据解析为该功能。返回的数据与per_second_function具有相同的性质;区别在于它覆盖了视频过去1分钟的所有帧。
- 参数 video_complete_function(可选):使用此参数可以解析您定义的函数的名称。一旦视频中的所有帧都被完全检测到,该函数将被解析为参数,并且参数将被解析为视频。返回的数据与per_second_function和per_minute_function具有相同的性质;区别在于不会返回索引,并且索引会覆盖整个视频中的所有帧。
- 参数 detection_timeout(可选):此功能允许您声明应该检测的视频的秒数,在此秒之后,检测功能将停止处理视频。
3.2 样例代码
视频下载地址:
https://github.com/OlafenwaMoses/ImageAI/blob/master/data-videos/traffic.mp4
from imageai.Detection import VideoObjectDetection
import os

execution_path = os.getcwd()

detector = VideoObjectDetection()
detector.setModelTypeAsTinyYOLOv3()
detector.setModelPath( os.path.join(execution_path , "yolo-tiny.h5"))
detector.loadModel()

# frames_per_second保存的视频每秒帧数,视频检测秒数
video_path = detector.detectObjectsFromVideo(input_file_path=os.path.join(execution_path, "traffic.mp4"),
                                output_file_path=os.path.join(execution_path, "traffic_detected")
                                , frames_per_second=20, log_progress=True,detection_timeout=1)
0
1
Processing Frame :  1
0
2
Processing Frame :  2
0
3
Processing Frame :  3
0
4
Processing Frame :  4
0
5
Processing Frame :  5
0
6
Processing Frame :  6
0
7
Processing Frame :  7
0
8
Processing Frame :  8
0
9
Processing Frame :  9
0
10
Processing Frame :  10
0
11
Processing Frame :  11
0
12
Processing Frame :  12
0
13
Processing Frame :  13
0
14
Processing Frame :  14
0
15
Processing Frame :  15
0
16
Processing Frame :  16
0
17
Processing Frame :  17
0
18
Processing Frame :  18
0
19
Processing Frame :  19
1
20
输出视频如图所示:

有趣的是,ImageAI允许您对上述一项或多项进行检测。这意味着您可以自定义要在视频中检测到的对象的类型。让我们看一下下面的代码:
from imageai.Detection import VideoObjectDetection
import os

execution_path = os.getcwd()

detector = VideoObjectDetection()
detector.setModelTypeAsTinyYOLOv3()
detector.setModelPath( os.path.join(execution_path , "yolo-tiny.h5"))
detector.loadModel()

custom_objects = detector.CustomObjects(person=True, bicycle=True, motorcycle=True)

video_path = detector.detectCustomObjectsFromVideo(
                custom_objects=custom_objects,
                input_file_path=os.path.join(execution_path, "traffic.mp4"),
                output_file_path=os.path.join(execution_path, "traffic_custom_detected"),
                frames_per_second=20, log_progress=True,detection_timeout=1)
0
1
Processing Frame :  1
0
2
Processing Frame :  2
0
3
Processing Frame :  3
0
4
Processing Frame :  4
0
5
Processing Frame :  5
0
6
Processing Frame :  6
0
7
Processing Frame :  7
0
8
Processing Frame :  8
0
9
Processing Frame :  9
0
10
Processing Frame :  10
0
11
Processing Frame :  11
0
12
Processing Frame :  12
0
13
Processing Frame :  13
0
14
Processing Frame :  14
0
15
Processing Frame :  15
0
16
Processing Frame :  16
0
17
Processing Frame :  17
0
18
Processing Frame :  18
0
19
Processing Frame :  19
1
20
此外还有视频分功能。ImageAI现在在“视频对象检测”类中为视频文件输入和摄像机输入提供商业级视频分析。此功能使开发人员可以深入了解使用ImageAI处理的任何视频。这些见解可以实时可视化,存储在NoSQL数据库中,以备将来查看或分析。
对于视频分析,detectObjectsFromVideo()和detectCustomObjectsFromVideo()现在可以让您声明自己定义的功能,该功能将针对检测到的视频的每一帧,秒和/或分钟执行,并提供一种状态,该功能将在视频检测结束时执行。声明此功能后,它们将接收有关帧/秒/分钟的索引,检测到的对象(名称,percent_probability和box_points),检测到的每个唯一对象的实例数以及每个对象的平均出现次数的原始但全面的分析数据在每秒/分钟和整个视频中检测到的唯一对象。
若要获取视频分析,只需指定一个函数,该函数描述它将接收的相应参数,并将函数名称解析为检测函数中的 per_frame_function、per_second_function、per_minute_function 和 video_complete_function 参数。
4 其他功能介绍
ImageAI还有自定义检测模型训练,自定义对象检测,自定义视频对象检测与分析等功能。
具体见链接
5 参考

CSDN联合极客时间,共同打造面向开发者的精品内容学习社区,助力成长!
更多推荐


 8
8 0
0- 0


 已为社区贡献12条内容

所有评论(0)