【Dlib人脸特征提取】2. 检测、绘制人脸特征点
【 1. 人脸特征点含义 】在我们检测到人脸区域之后,接下来要研究的问题是获取到不同的脸部的特征,以区分不同人脸,即人脸特征检测(facial feature detection)。它也被称为人脸特征点检测(facial landmark detection)。人脸特征点通常会标识出脸部的下列数个区域:右眼眉毛(Right eyebrow)左眼眉毛(Left eyebrow)右眼(Right ey
【 1. 人脸特征点含义 】
在我们检测到人脸区域之后,接下来要研究的问题是获取到不同的脸部的特征,以区分不同人脸,即人脸特征检测(facial feature detection)。它也被称为人脸特征点检测(facial landmark detection)。
人脸特征点通常会标识出脸部的下列数个区域:
- 右眼眉毛(Right eyebrow)
- 左眼眉毛(Left eyebrow)
- 右眼(Right eye)
- 左眼(Left eye)
- 嘴巴(Mouth)
- 鼻子(Nose)
- 下巴(Jaw)
【 2. 人脸特征点检测原理 】
检测人脸特征点,分为如下两步:
-
第一步:定位图像中人脸区域;
这一步我们可以使用之前学到过的 OpenCV中Harr检测器 或者 Dlib中HOG加SVM的检测器。 -
第二步:在人脸区域内检测出人脸关键特征;
对于第二步,我们使用Dlib中的特征点检测。
- Dlib中使用的人脸特征检测的原理来自2014年,由Vahid Kazemi和 Josephine Sullivan在论文 《One Millisecond Face Alignment with an Ensemble of Regression Trees》中提出的人脸特征点评估的方法。
- 论文中方法的主要思想是:使用级联回归树(ensemble of regression trees, ERT),即使用级联回归因子,基于梯度提高学习的回归树方法。该方法首先需要使用一系列标定好的人脸图片作为训练集,然后会生成一个模型。使机器学习模型能够找出任何脸上的这些特征点。
简要的分为以下三步:
- (1) 定义一张脸上的68个具体的特征点(landmarks);
- (2) 标记面部特征点,获得带标记的训练数据。需要手动标记图像上的面部特征点,标签指定围绕每个面部结构的区域;
- (3) 给定训练数据,训练回归树的集合,直接从像素强度本身估计面部界标位置,得到模型。
【 3. Dlib人脸特征点模型 】
Dlib提供两种人脸检测模型:
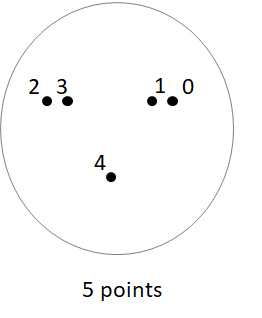
- shape_predictor_5_face_landmarks.dat:
检测5个人脸特征点,即双眼的眼头及眼尾以及鼻头这五个位置。
因为只检测五个点,所以执行速度很快。
如图:

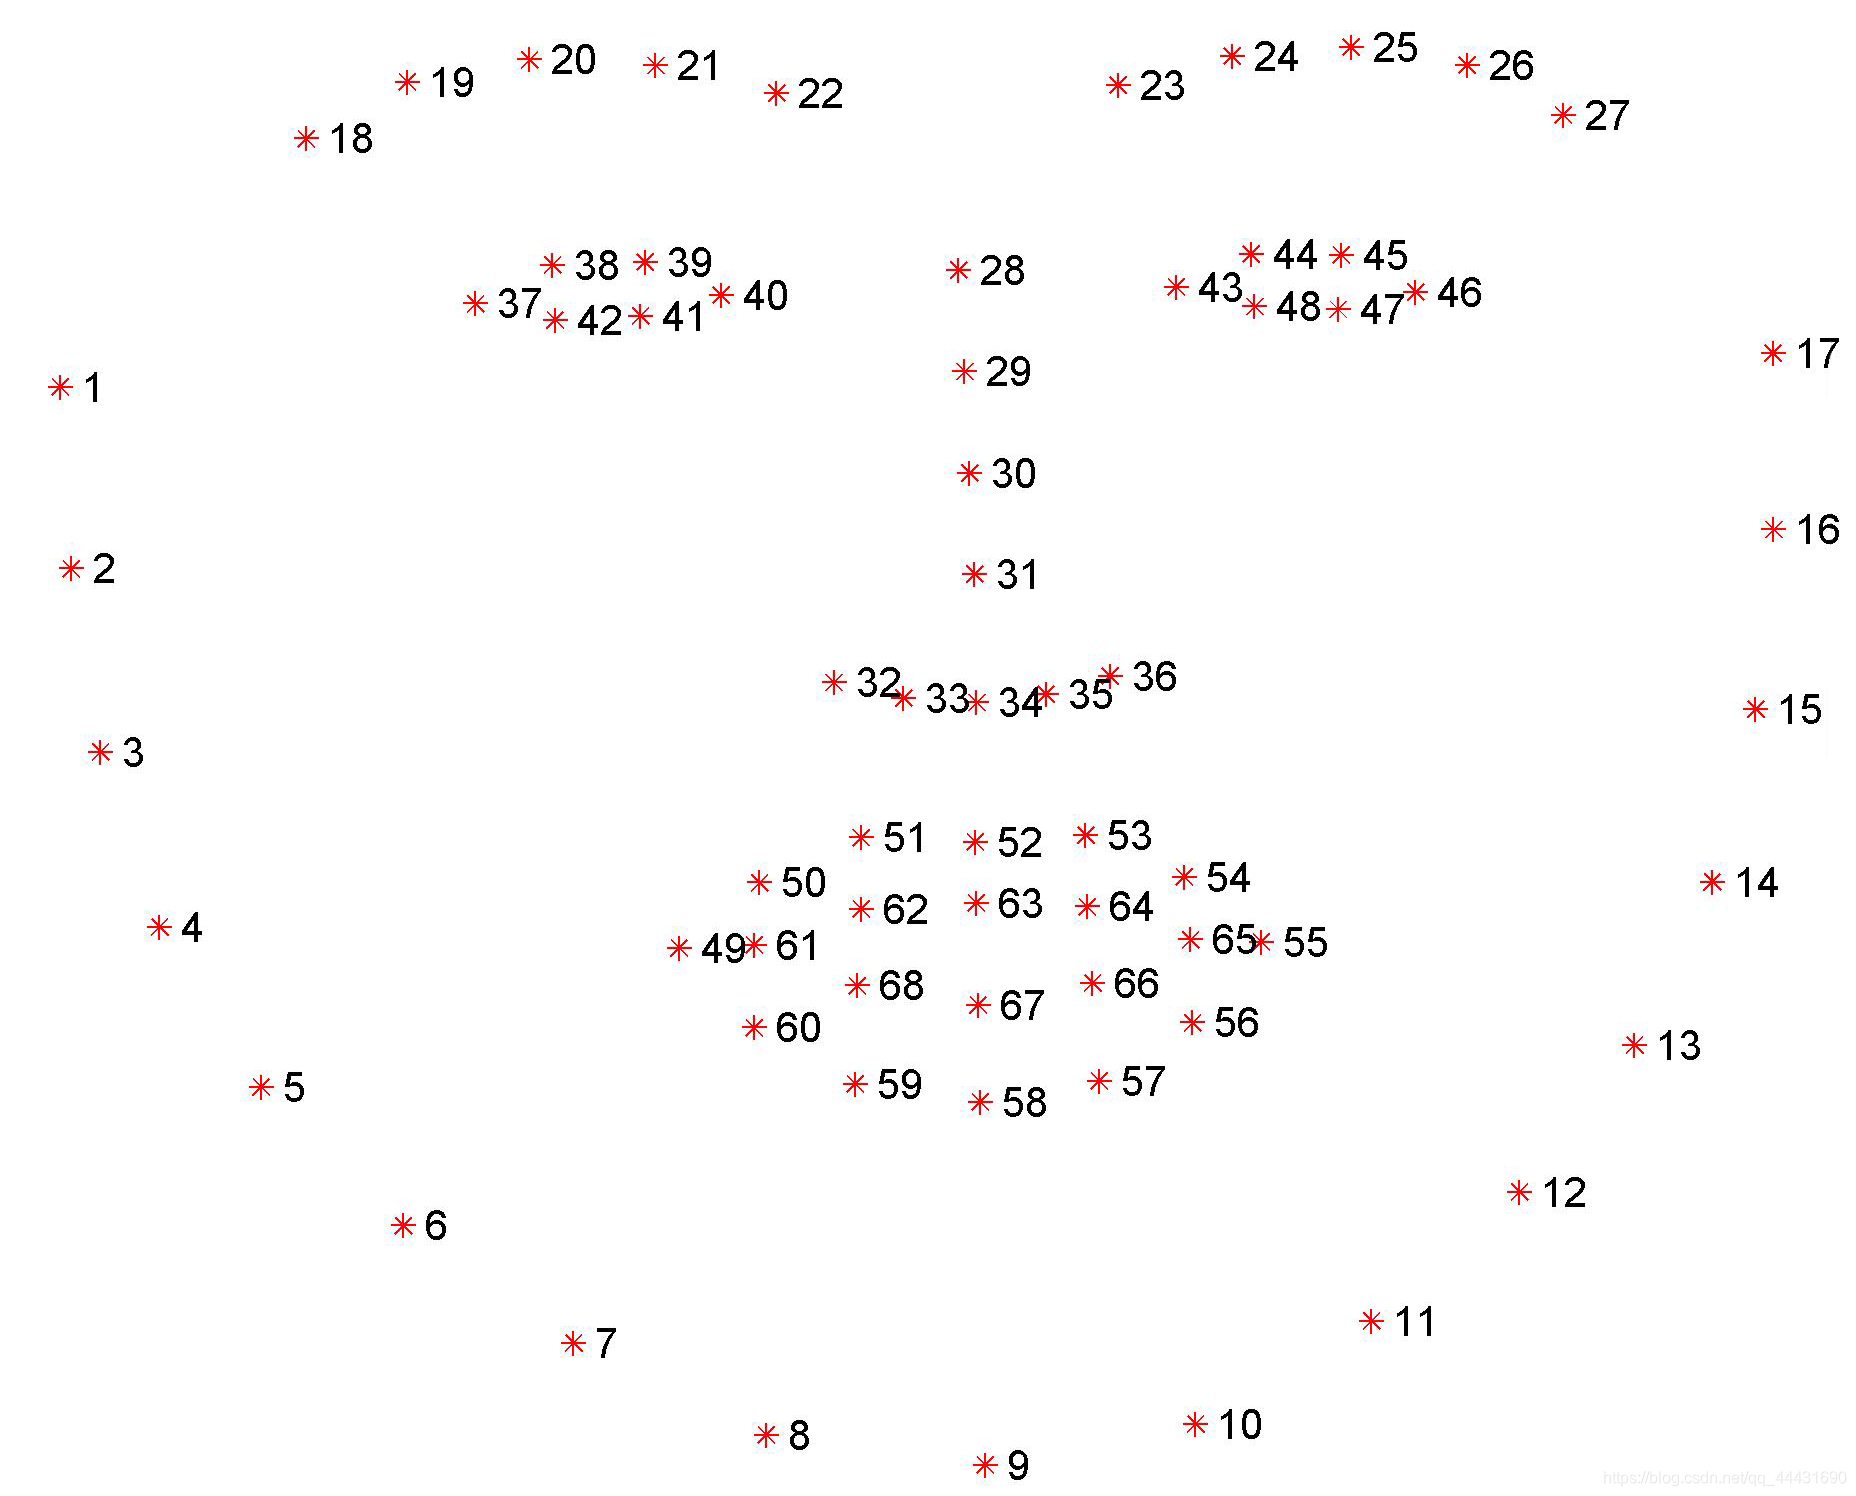
- shape_predictor_68_face_landmarks.dat:
检测68个人脸特征点。
如图:

【 4. Dlib 检测人脸特征点 】
(1)利用Dlib的正向人脸检测器 get_frontal_face_detector(),进行人脸检测,提取人脸外部矩形框 :
detector = dlib.get_frontal_face_detector()
faces = detector(image, 1)
返回的faces为识别出的脸部数组。
(2)利用训练好的人脸68点特征检测器,进行人脸面部轮廓特征提取:
链接:shape_predictor_68_face_landmarks.dat
提取码:kuv2
predictor = dlib.shape_predictor("shape_predictor_68_face_landmarks.dat")
shape = predictor(image, face)
(3)示例:
import cv2
import dlib
# 读取图片
img_path = "picture.jpg"
img = cv2.imread(img_path)
# 转换为灰阶图片
gray = cv2.cvtColor(img, cv2.COLOR_BGR2GRAY)
# 正向人脸检测器将图像
detector = dlib.get_frontal_face_detector()
# 使用训练好的5个特征点模型
predictor_path = "shape_predictor_68_face_landmarks.dat"
predictor = dlib.shape_predictor(predictor_path)
# 使用检测器来检测图像中的人脸
faces = detector(gray, 1)
# 打印结果
print("人脸数: ", len(faces))
for i, face in enumerate(faces):
    print("第", i+1, "个人脸的矩形框坐标:\n","left:", face.left(), "right:", face.right(), "top:", face.top(), "bottom:", face.bottom())
    # 获取人脸特征点
    shape = predictor(img, face)
    print("第", i+1, '个人脸特征点:')
    print(shape.parts())
运行结果:
人脸数:  1
第 1 个人脸的矩形框坐标:
 left: 82 right: 349 top: 142 bottom: 409
第 1 个人脸特征点:
points[(94, 238), (98, 271), (105, 303), (113, 334), (125, 362), (144, 385), (168, 405), (195, 420), (225, 426), (256, 421), (284, 406), (308, 386), (328, 362), (340, 333), (348, 302), (354, 271), (360, 238), (115, 206), (130, 184), (154, 172), (182, 170), (208, 174), (251, 174), (277, 169), (304, 171), (327, 182), (341, 203), (229, 207), (229, 220), (229, 234), (228, 248), (204, 275), (216, 277), (228, 279), (240, 278), (251, 276), (147, 221), (162, 212), (179, 210), (194, 218), (179, 222), (162, 224), (263, 218), (278, 209), (295, 211), (308, 220), (295, 223), (278, 222), (187, 332), (202, 315), (219, 306), (228, 309), (238, 307), (255, 319), (271, 335), (255, 350), (239, 356), (227, 357), (217, 355), (202, 348), (197, 332), (218, 321), (228, 321), (238, 321), (262, 334), (238, 338), (228, 339), (218, 337)]
【 5. Dlib 绘制人脸特征点 】
在识别出人脸特征点之后,绘制对应的特征点能可视化特征效果。
Dlib本身提供了绘制特征点的方法,主要分为以下几步:
- 使用image_window()新建图像窗口:
win = dlib.image_window()
- 指定窗口图片:
 win.clear_overlay()
 win.set_image(img)
- 绘制面部轮廓:
 # 使用predictor来计算面部轮廓
 shape = predictor(img, faces[i])
 # 绘制面部轮廓
 win.add_overlay(shape)
- 绘制人脸区域矩阵。
 # 绘制矩阵轮廓
 win.add_overlay(faces)
完整的代码示例如下:
import dlib
import cv2
# 使用 Dlib 的正面人脸检测器 frontal_face_detector
detector = dlib.get_frontal_face_detector()
# Dlib 的 68点模型
predictor = dlib.shape_predictor("shape_predictor_68_face_landmarks.dat")
# 读取图片
img = cv2.imread("picture.jpg")
# 生成 Dlib 的图像窗口
win = dlib.image_window()
win.set_image(img)
# 使用 detector 检测器来检测图像中的人脸
faces = detector(img, 1)
print("人脸数:", len(faces))
for i, d in enumerate(faces):
    print("第", i+1, "个人脸的矩形框坐标:",
          "left:", d.left(), "right:", d.right(), "top:", d.top(), "bottom:", d.bottom())
    # 使用predictor来计算面部轮廓
    shape = predictor(img, faces[i])
    # 绘制面部轮廓
    win.add_overlay(shape)
# 绘制矩阵轮廓
win.add_overlay(faces)
dlib.hit_enter_to_continue()
运行结果:


【 6. OpenCV 绘制人脸特征点 】
同样的,我们也可以调用OpenCV的绘点函数,绘制出每一个点。
cv2.circle(img, center, radius, color, thickness)
#	image: 图片对象;
#	center: 圆心坐标;
#	radius: 圆半径;
#	color: 以BGR方式指定的颜色,例如(255,0,0)是蓝色;
#	thickness:线的粗细。
完整示例:
import cv2
import dlib
# 读取图片
img_path = "picture.jpg"
img = cv2.imread(img_path)
# 转换为灰阶图片
gray = cv2.cvtColor(img, cv2.COLOR_BGR2GRAY)
# 正向人脸检测器
detector = dlib.get_frontal_face_detector()
# 使用训练完成的68个特征点模型
predictor_path = "shape_predictor_68_face_landmarks.dat"
predictor = dlib.shape_predictor(predictor_path)
# 使用检测器来检测图像中的人脸
faces = detector(gray, 1)
for i, face in enumerate(faces):
    # 获取人脸特征点
    shape = predictor(img, face)
    # 遍历所有点
    for pt in shape.parts():
        # 绘制特征点
        pt_pos = (pt.x, pt.y)
        cv2.circle(img, pt_pos, 1, (255,0, 0), 2)
cv2.imshow('opencv_face_laowang',img)  # 显示图片
cv2.waitKey(0) # 等待用户关闭图片窗口
cv2.destroyAllWindows()# 关闭窗口
运行结果:

更多推荐
 已为社区贡献10条内容


所有评论(0)